You’ve read about all the different methods we are testing for establishing native wildflowers and grasses as habitat for pollinators and natural enemies of pests. You know we learned a lot in our first season. You know we’ve been using several different techniques to collect insects in these plots. And you saw a pictorial summary of our sampling and some of the insects we’ve caught in Summer 2019.
Wouldn’t you like to come see these plots in person, hear about our preliminary results, and learn more about attracting pollinators and other beneficial insects to your farm or yard?
If you live reasonably close to Geneva, NY, you can! We are having two field events this fall:
On Wednesday, September 25, 2019, stop by our field between 3:30 and 6:30 PM for an Open House. There will be no program, just stop by and talk with Betsy Lamb, Brian Eshenaur, and I. All the details can be found here, including the address and a map to help you find our field.
On Thursday, September 26, 2019, we have a Twilight Field Day from 5 to 7 PM. This meeting has been planned with growers in mind (especially Christmas tree and nursery growers). DEC credits (1.5) will be available for categories 1a, 3a, 24, 25, and 10, and dinner is included. The cost for this meeting is $15, and we need you to register so we know how much food to provide. All the details (including the registration link) can be found here.
If you’re coming to either of these events, we’ll have lots of signs up to help you find our field. Look for the following image:
This work is supported by:
Crop Protection and Pest Management -Extension Implementation Program Area grant no. 2017-70006-27142/project accession no. 1014000, from the USDA National Institute of Food and Agriculture.
New York State Department of Agriculture and Markets
This isn’t biocontrol, but it’s very important! Have you heard about the invasive spotted lanternfly? Do you want to learn where we are in our efforts to keep it out of New York, and to manage it if (and when) it does show up?
New York State Integrated Pest Management is hosting a meeting in Binghamton, NY on Thursday August 15 where you can get answers to these questions.
This conference has been approved for 7.5 Certified Nursery Landscape Professional credits, and 6 NYS Pesticide Recertification credits in the categories of 1a, 2, 3a, 6a, 9, 10, 22 and 25.
Caption: Lady beetles will eat any aphid species, but other aphid natural enemies are much more selective. (Photo credit: Amara Dunn)
Practicing good integrated pest management in the greenhouse requires correct identification of the pest. Accurate pest ID is also critical to successful use of biocontrol. Aphids are a good example. Biocontrol of aphids works best when you match the biocontrol agent to the aphid species you have. When I first learned this, I was a bit intimidated, because aphids are pretty small, and I’m not an entomologist. But the four aphid species you are most likely to encounter in your greenhouse are actually pretty easy to differentiate.
Anatomy of an aphid
In order to successfully ID aphids, you need to know (just a little) about aphid anatomy. All aphids are pretty small (between approximately 1/16 and 1/8 inches long). In addition to six legs and a body, aphids have antennae. Antennae attach near their eyes and are angled back over their bodies. They also have two little “spikes” that protrude from their rear end. These are called cornicles. Not so bad, right?
Two features that will help you identify an aphid are the antennae attached to their head, and the two short cornicles attached to the rear end of their abdomen. (Diagram credit: Amara Dunn)
Green peach aphid
Green peach aphids vary in color from green to pink. Between their antennae you’ll see an indentation, and their cornicles are the same color as their body, with dark tips. (Photo credit: John Sanderson)
Green peach aphids come in different colors (from green to, well, peachy pink) and they are one of the smaller species. Their cornicles are the same color as their body (whatever that color is), and have dark tips on the ends. Green peach aphids also have an indentation in their head between the bases of their antennae.
Melon (or cotton) aphid
Melon (also called cotton) aphids can be distinguished from green peach aphids by their dark cornicles. They also lack an indentation between their antennae. (Photo credit: John Sanderson)
Melon aphids (also called cotton aphids) also come in a range of colors that include light yellow, green, dark green, or almost black. Regardless of the body color, the cornicles will always be dark. Also, there’s no indentation in their head between the bases of the antennae. This is another small aphid species.
Foxglove aphid
Foxglove aphids are shiny green with long antennae that look like they have dark spots on them. You’ll also see darker green spots at the base of each cornicle and dark leg joints. (Photo credit: Dan Gilrein)
Foxglove aphids are large (for an aphid). Their bodies are light green, but often shiny. There is an indentation in their head between their antennae. Their antennae are extra-long, extending well beyond the end of their body, and appear to have dark spots on them because the joints of the antennae are dark. The joints of their legs are also dark. Check where the cornicles attach to the body of the aphid. Foxglove aphids have darker green spots on their bodies at the base of the cornicles. These aphids usually like to hang out on the lower leaves of a plant, though they will infest flower petals sometimes.
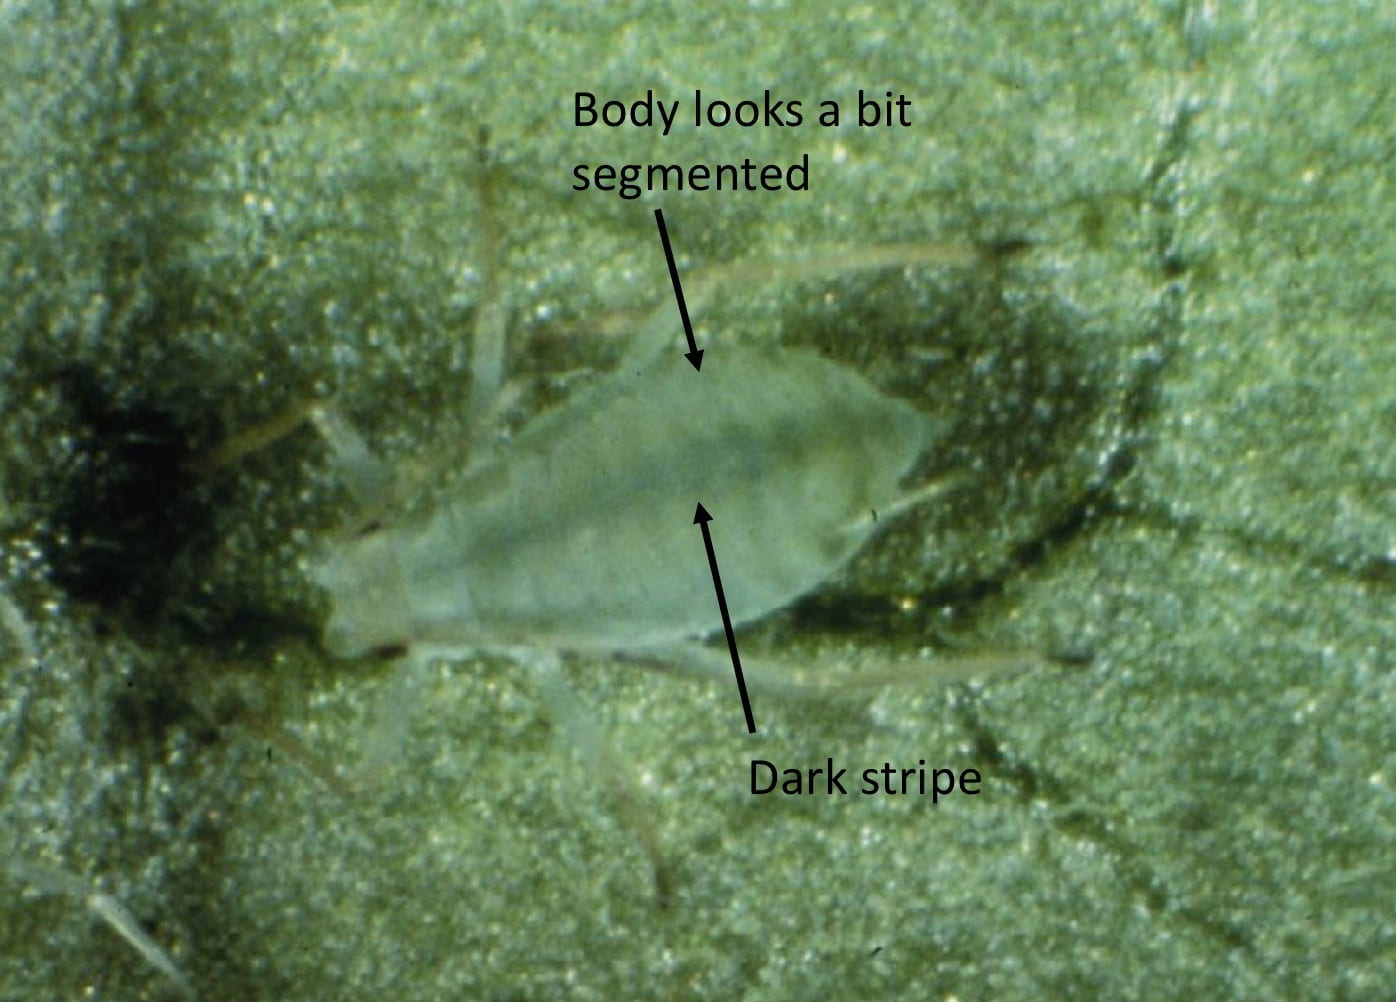
Potato aphid
Potato aphids have a dark stripe running down the length of their body, and they look faintly segmented. (Photo credit: John Sanderson)
Another large aphid, potato aphids come in pink and green. They look like they have a dark stripe running down the middle of their backs, and their body appears faintly segmented. They also have an indentation in their head between the antennae. Of the four species we’re discussing here, only the melon aphids lack this indentation.
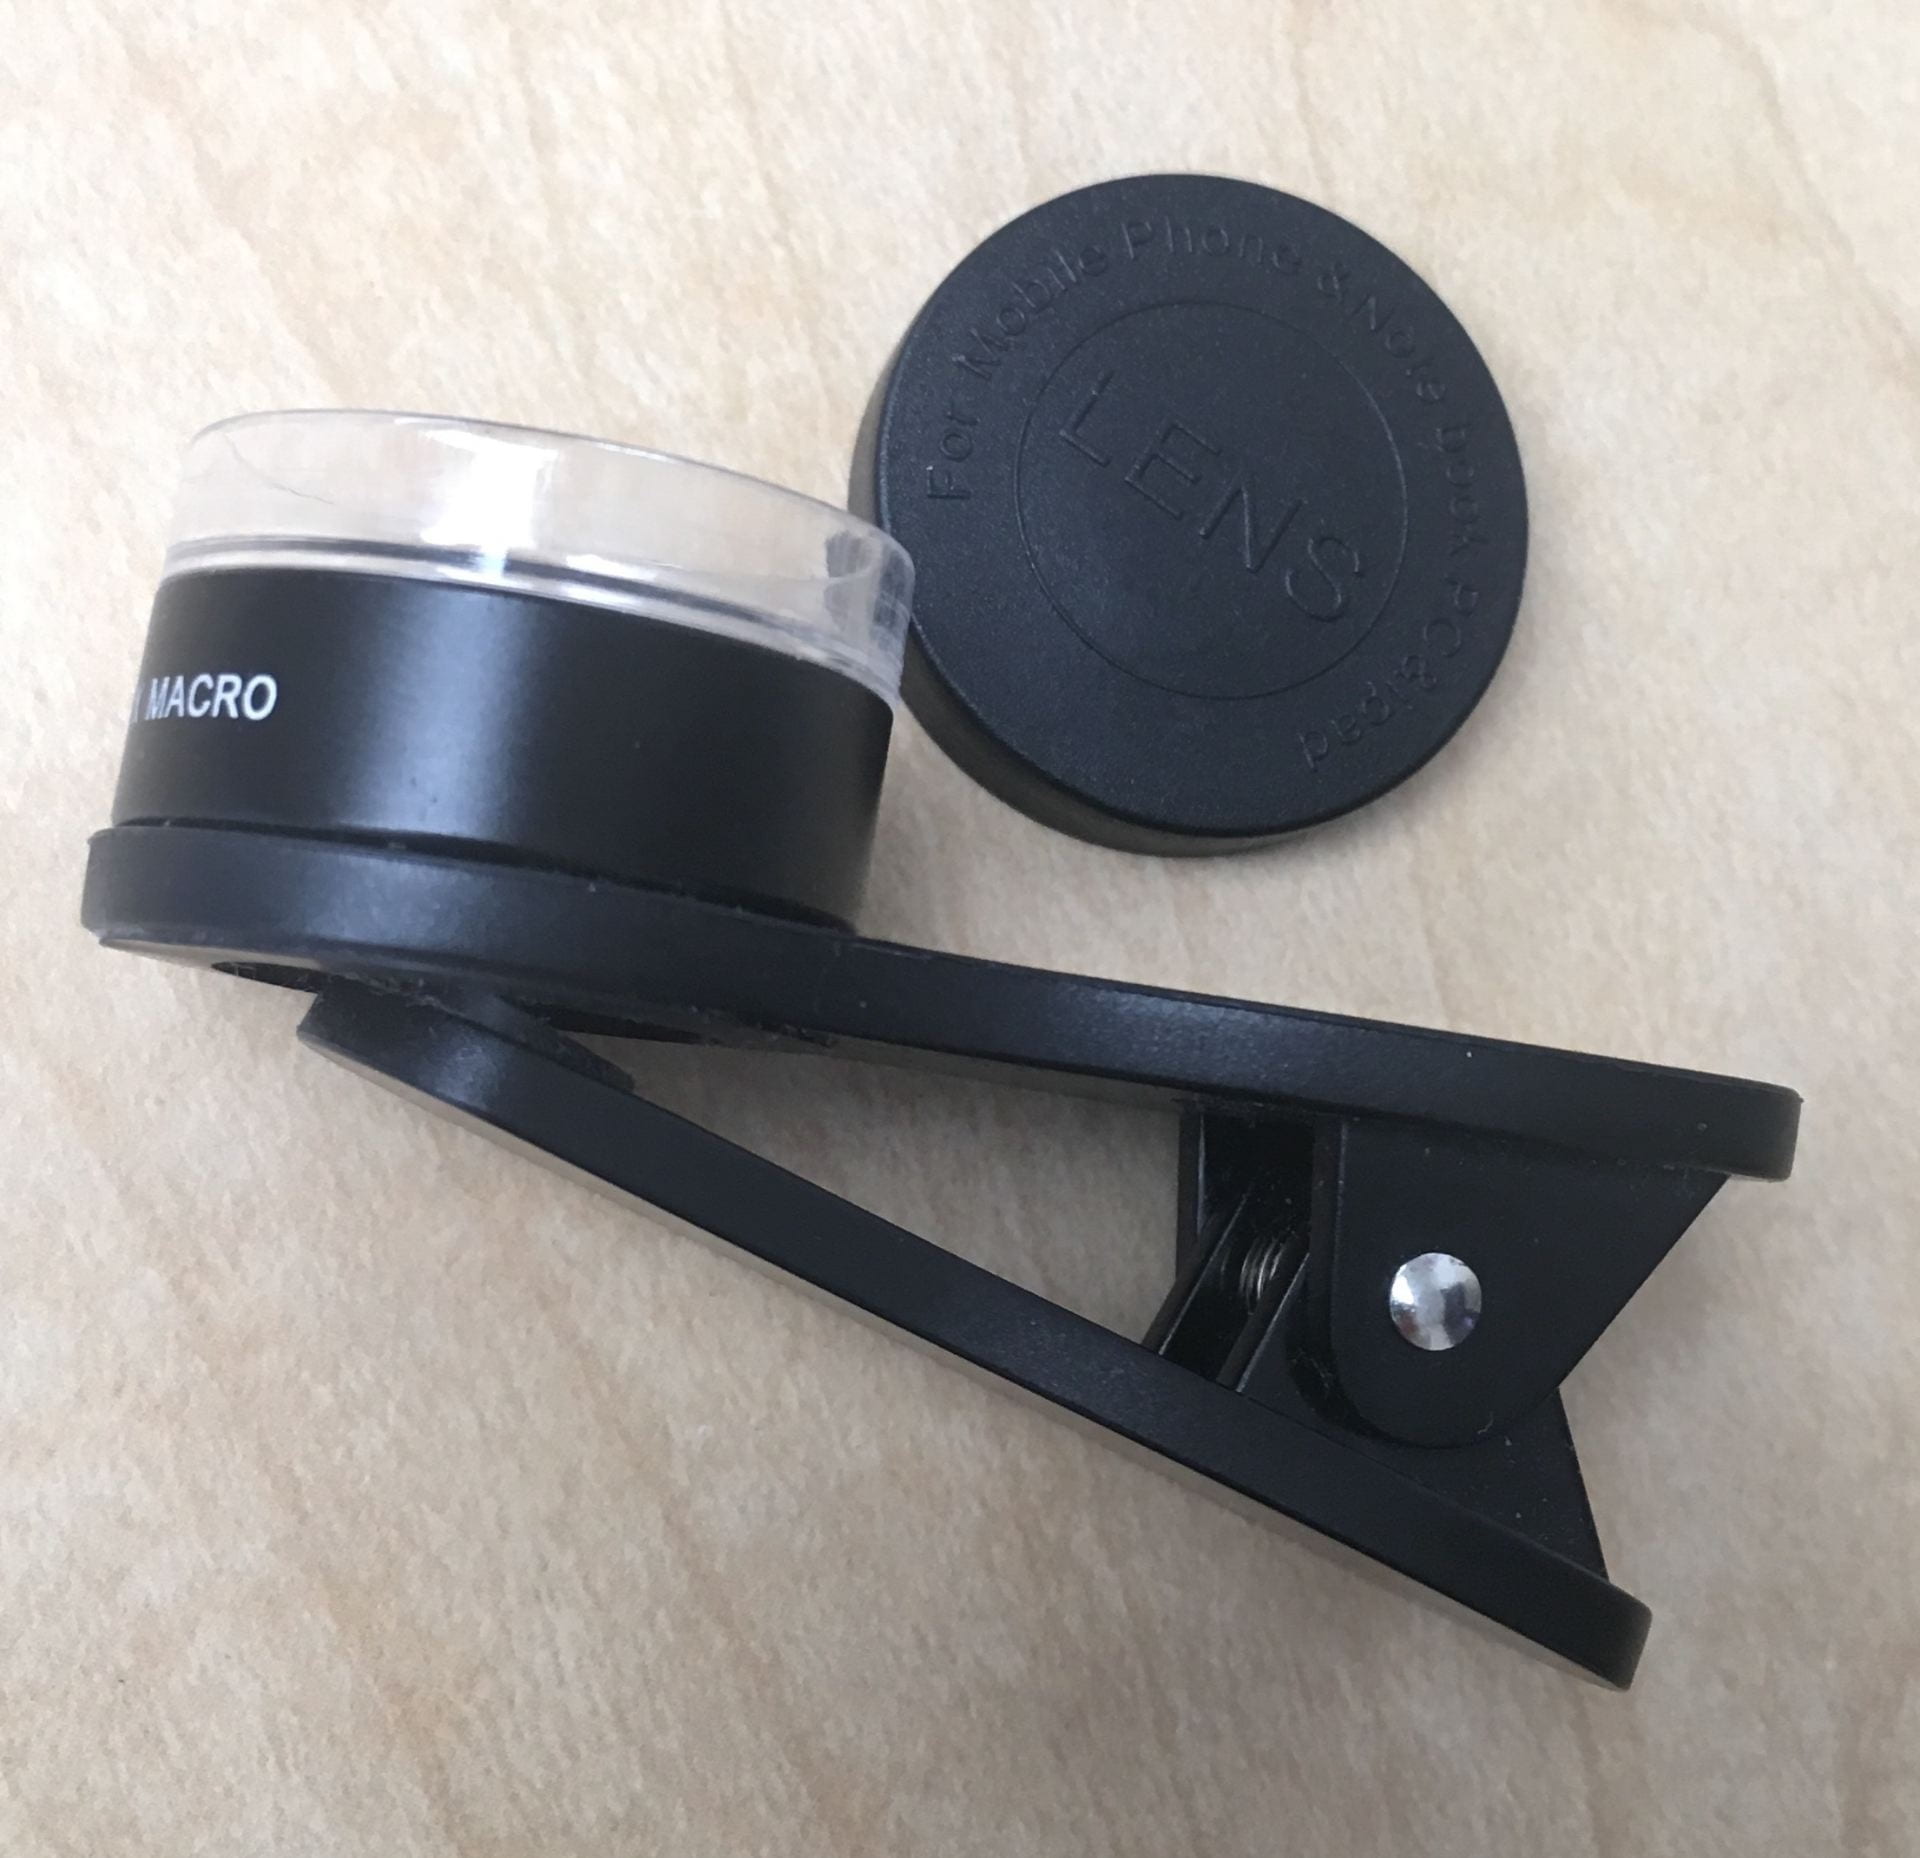
To see these features, you will need a little magnification, but you don’t need a fancy microscope. Find a hand lens or a magnifier with 10X magnification. I like to keep one in my backpack so I’m always prepared.
A 10X hand lens will enable you to magnify the features of an aphid that are important for identification.
There are even some relatively inexpensive 10X lenses you can snap on to your smartphone or tablet. Not only does this turn your device into a little microscope, but you can take a picture to document what you see (and show to an expert, later).
Magnifying macro lenses can be clipped onto your smart phone or tablet, helping you both magnify and document the aphids you find.
You can also find (at least some of) these four aphid species outside. Last summer I spotted the aphid below on an acorn squash plant in August. Now that you know what to look for, what species do you think it might be?
Use what you’ve learned to identify this aphid! (Photo credit: Amara Dunn)
One minor complication: Each of these four aphid species can either have wings, or be without wings. Usually aphids you find in a greenhouse have no wings, so you can stick with the above descriptions. But winged aphids can appear in the greenhouse, particularly when populations get very high. If you find aphids with wings in your greenhouse, the above descriptions won’t apply; ask for some help from your local extension office.
Both of the aphids in this picture are green peach aphids, but the one on the right has wings, and would be tricky to identify using the criteria described in this post. Get some help from an expert. (Photo credit: Whitney Cranshaw, Colorado State University, Bugwood.org)
Choosing the right natural enemy
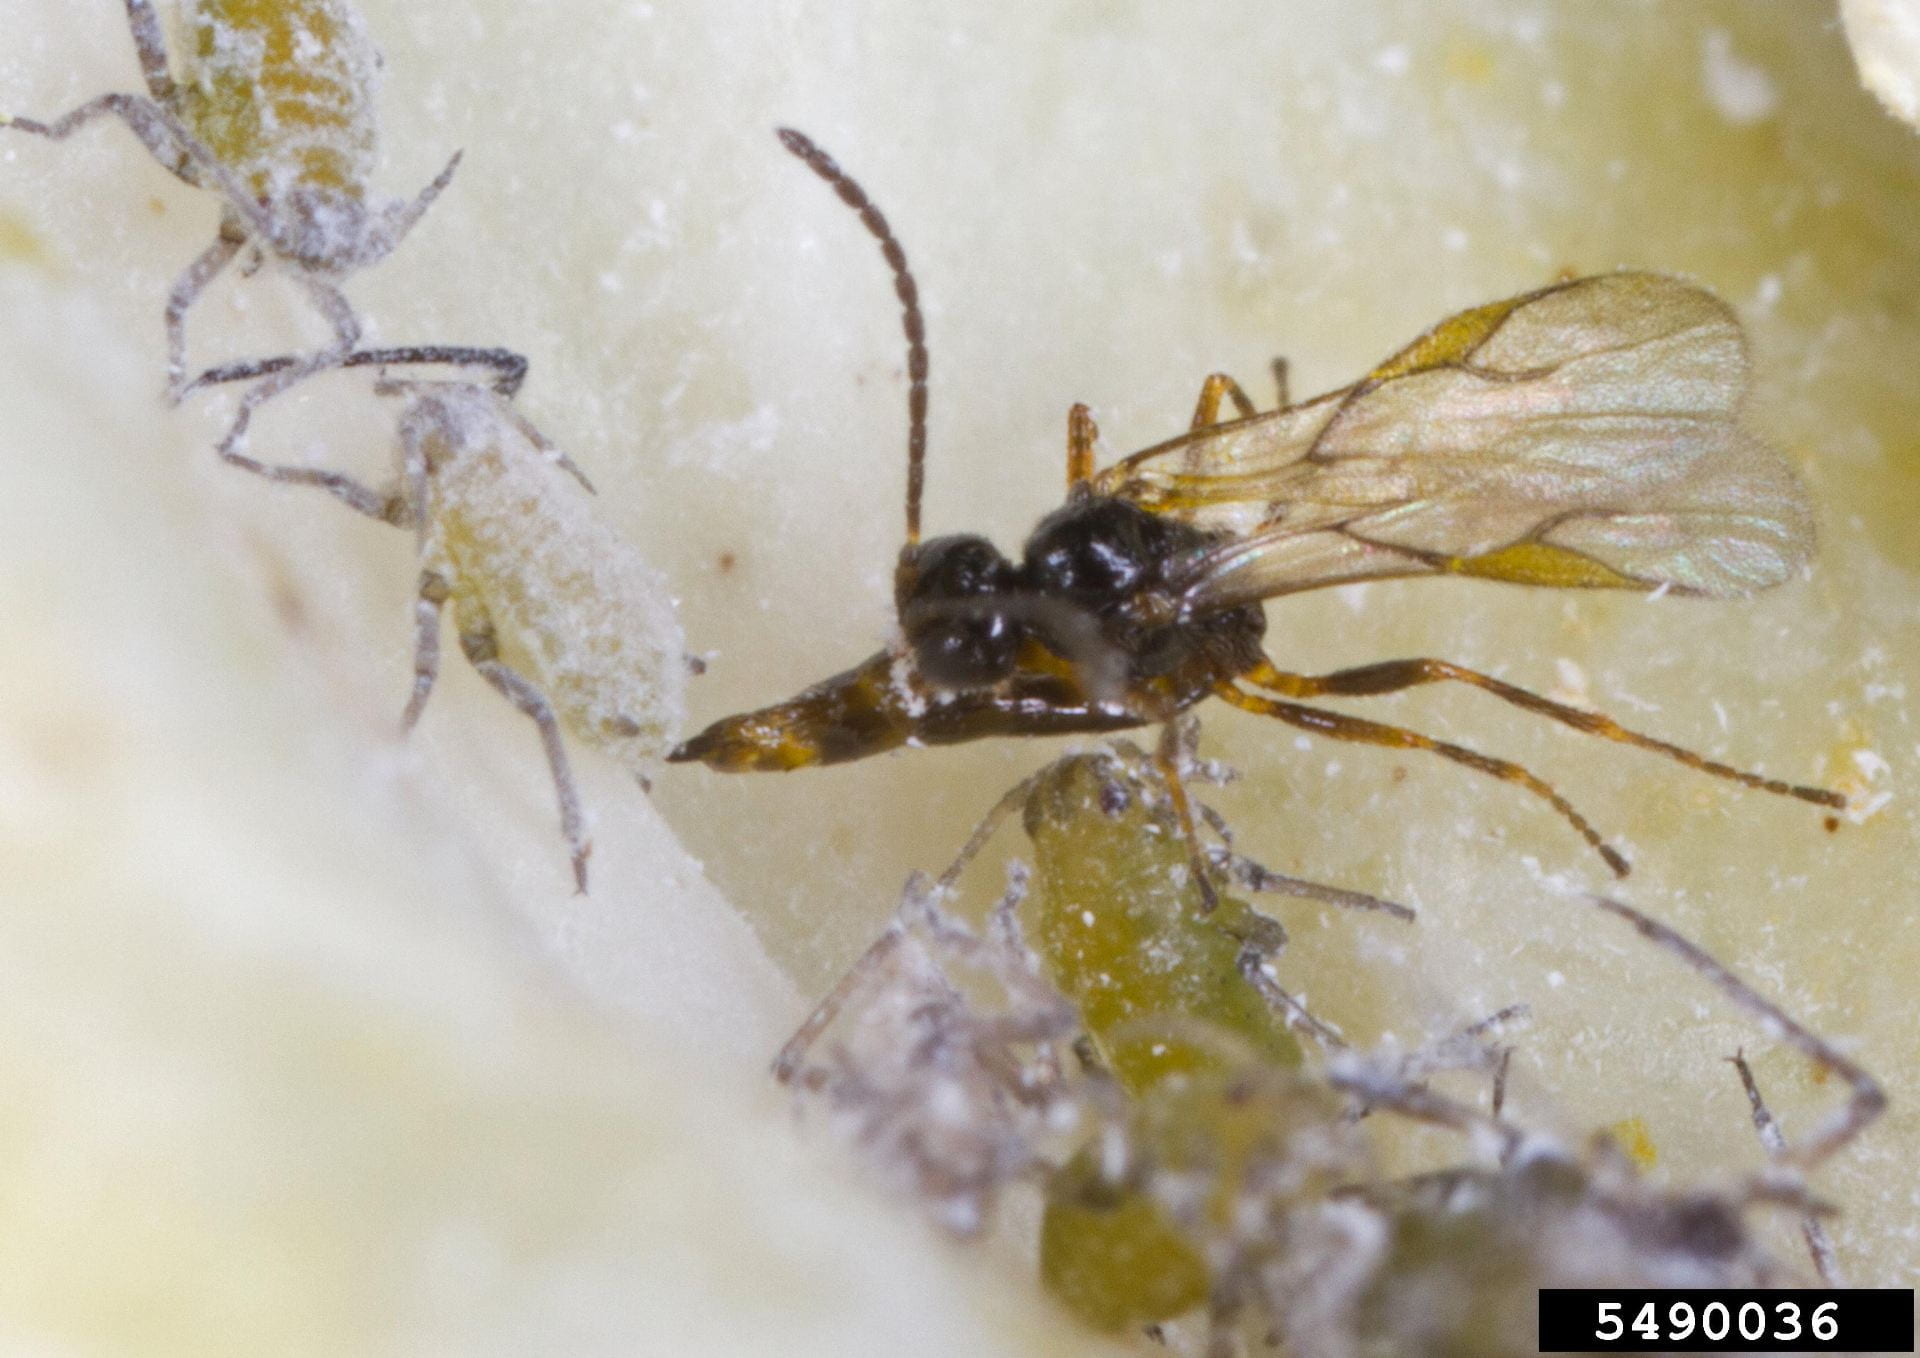
An Aphidius parasitoid wasp lays an egg inside its aphid prey. The developing wasp will kill the aphid. These happen to be cabbage aphids. (Photo credit: David Cappaert, Bugwood.org)
A good biocontrol option for aphids is a parasitoid wasp from the genus Aphidius. These tiny wasps are called parasitoids because they lay their eggs inside of aphids. As the young wasp grows, it kills the aphid and turns it into a mummy.
Aphids that are eaten from the inside out turn into dry, brown “mummies”. On this aphid mummy you can see the hole from which the adult wasp emerged. (Photo credit: Ken Wise, NYS IPM)
But if you want to purchase Aphidius wasps to release in your greenhouse (or the banker plants and prey that support them; read more here), you’ll need to know which Aphidius species to use. Aphidius colemani works well against green peach and melon aphids, while Aphidius ervi works well against foxglove and potato aphids. Another natural enemy you can use is Aphidoletes aphidimyza. This is a tiny fly whose larvae are voracious aphid predators. Although it seems to be less effective against foxglove aphid, it may work well in combination with another natural enemy.
The larvae of the tiny fly Aphidoletes aphidomyza crawls around on leaves searching for aphids to eat. (Photo credit: Sarah Jandricic)
Like all biocontrols, Aphidius wasps and Aphidoletes larvae need to be released while your aphid population is very small, before it gets out of hand. Aphid infestations can explode very quickly! Scout your crop regularly, and keep records so you know which aphid species you are likely to have. (Consider the Pocket IPM Greenhouse Scout app to help you with your scouting and pest management.) Then plan your biocontrol releases accordingly. Parasitoids and predators for aphids should be released preventatively on crops that are prone to aphids.
If you’ve inspected your aphids at 10X magnification, and still aren’t sure which species you have, contact your local extension office for help with ID. If you are planning to send a picture, make sure that it is clear and shows the features of the aphid that you now know are important (antennae, body, cornicles).
You can learn more about aphid biocontrol in this factsheet from John Sanderson (Department of Entomology, Cornell University) on managing aphids in a greenhouse. Identification of these four common aphid species and which biocontrols you can use against them are also summarized here. The natural enemies listed in the chart are meant to be a starting place. Maximizing the efficacy of your aphid biocontrol program takes some trial and error and willingness to fine-tune your program to the crop and environmental conditions you’re dealing with. Suppliers of aphid natural enemies also have great information about how to use these biocontrol agents most effectively.
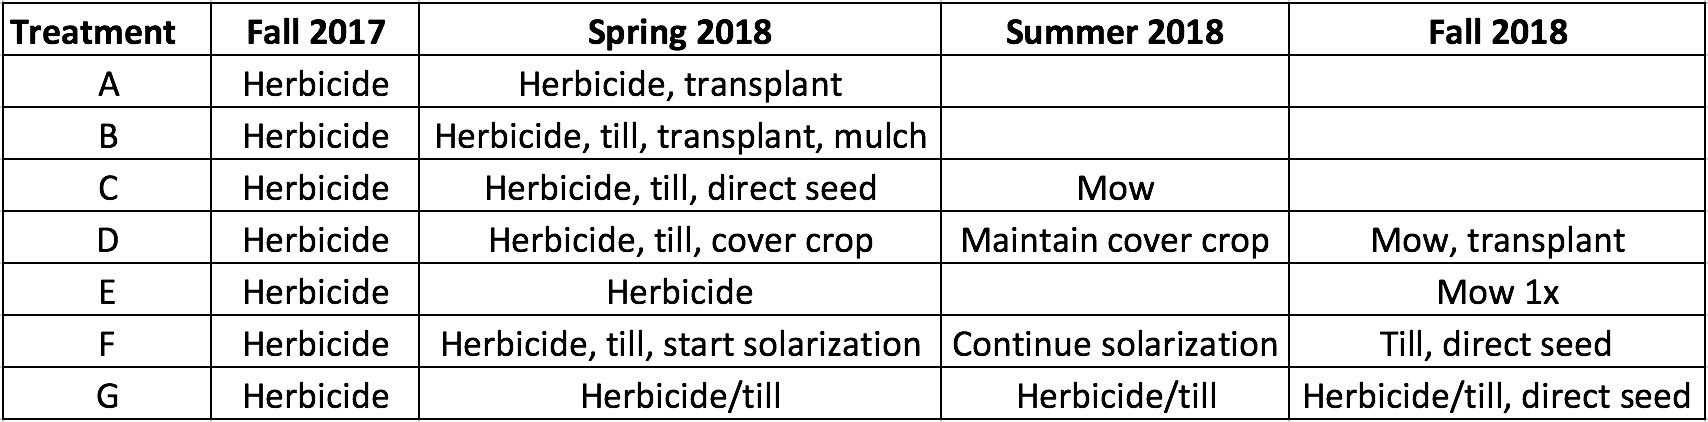
Mulching transplants planted in Spring 2018 was the most expensive establishment method, but these plots were looking pretty good a year later, even before we weeded.
By the end of our first field season, we had started using six different methods to establish wildflowers as habitat for beneficial insects (plus a weedy mowed control treatment). We also collected data on how much time and money we spent on establishment and how successful our weed management was. You can read about results from Year 1 in my post from last November.
But beneficial insect habitat establishment is not a one-year project. The establishment methods we started to implement in 2018 are ongoing, including periodic mowing of direct seeded plots, and hand-weeding of transplanted plots. We’ll keep track of how much time and money we invest in these plots in 2019, too.
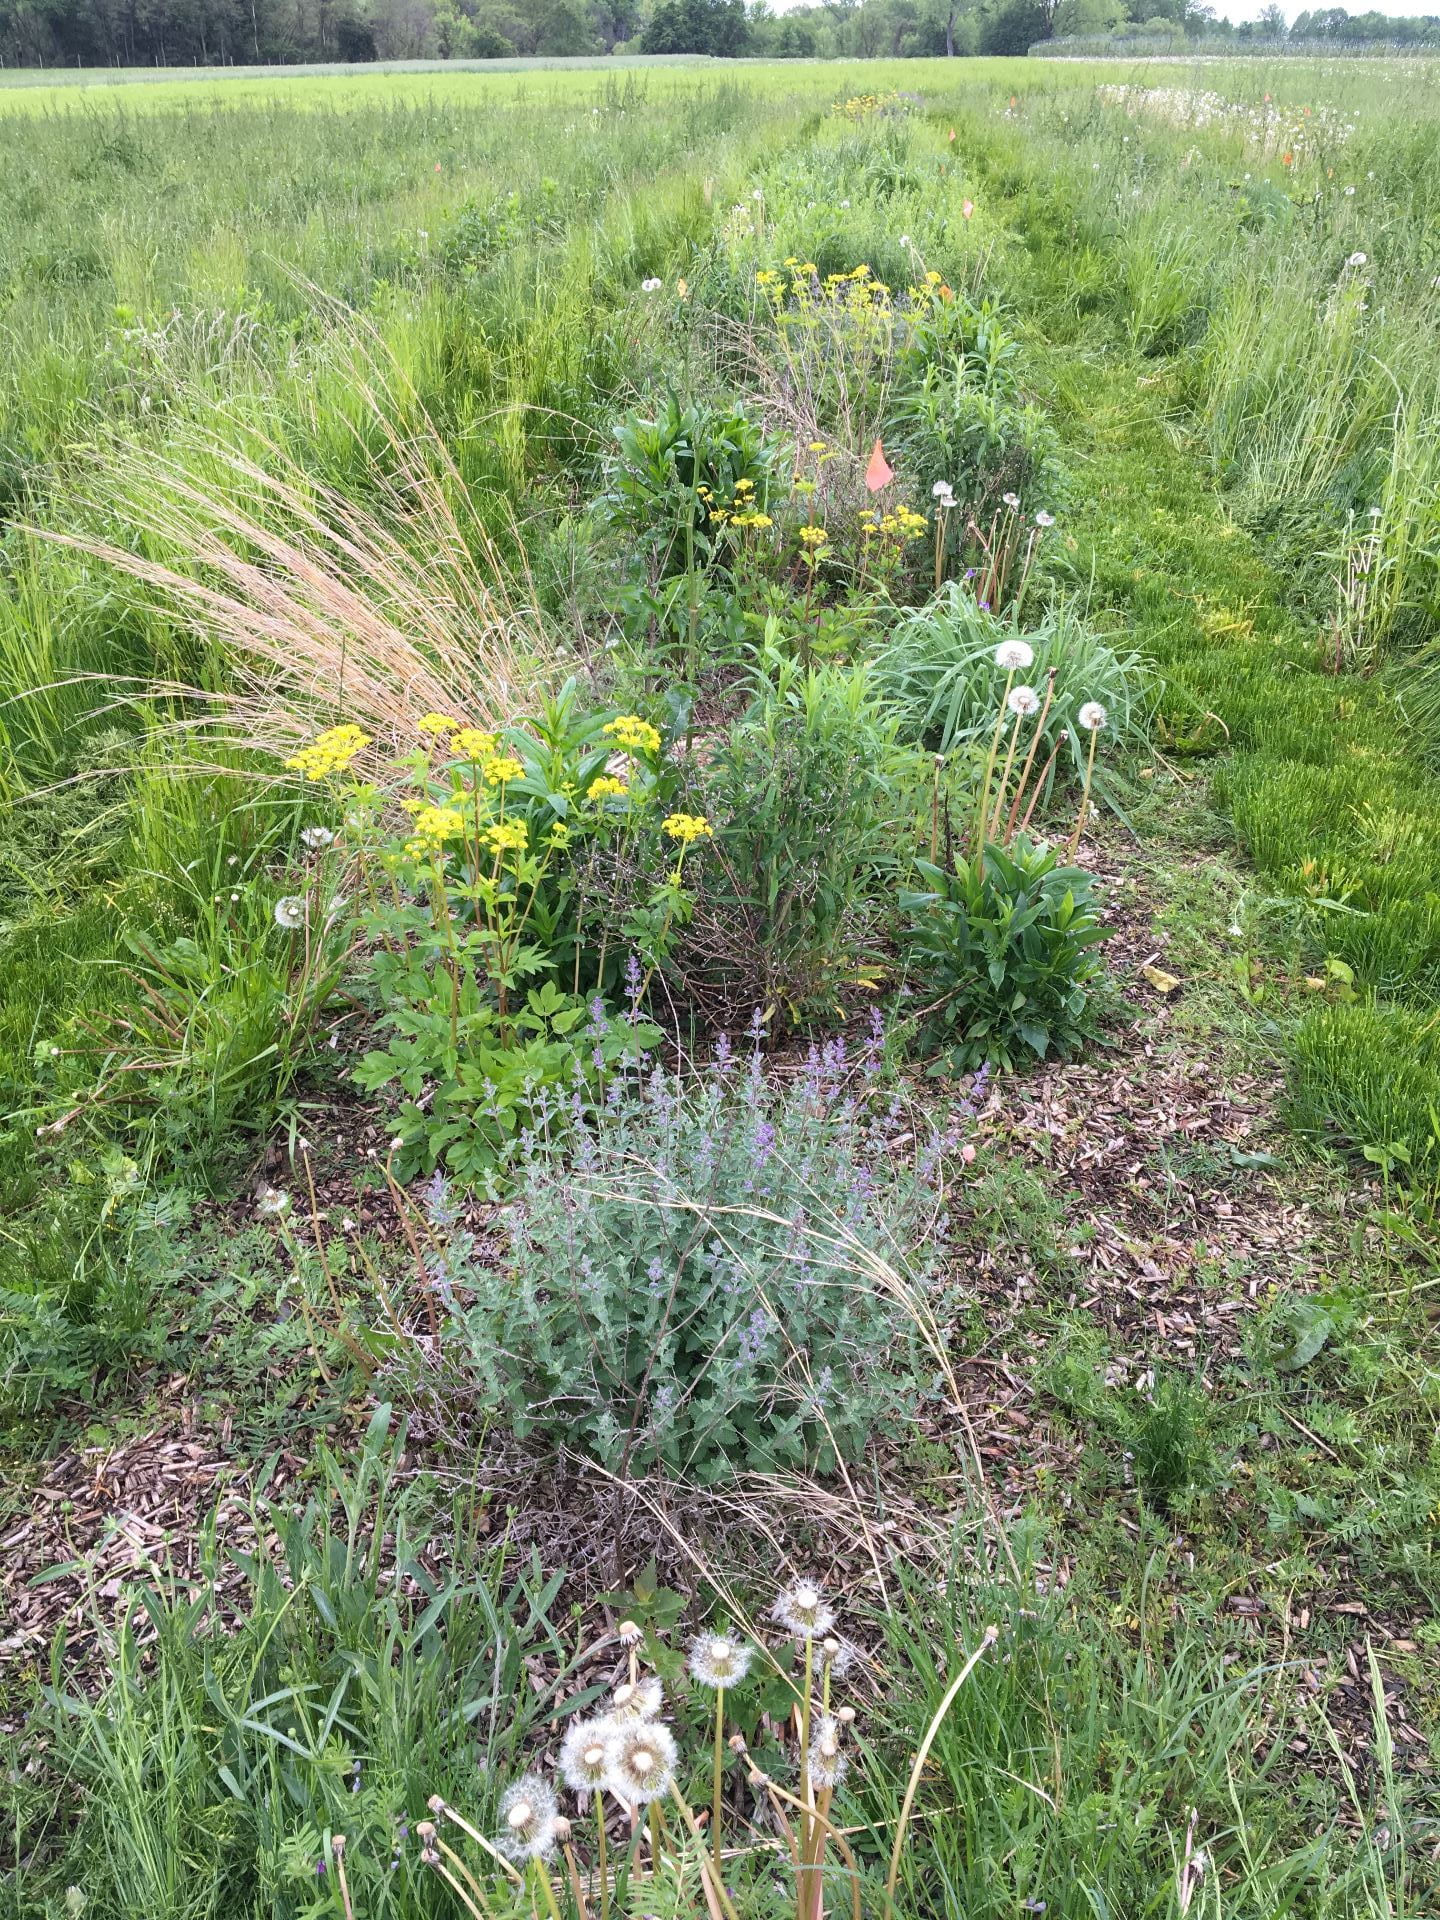
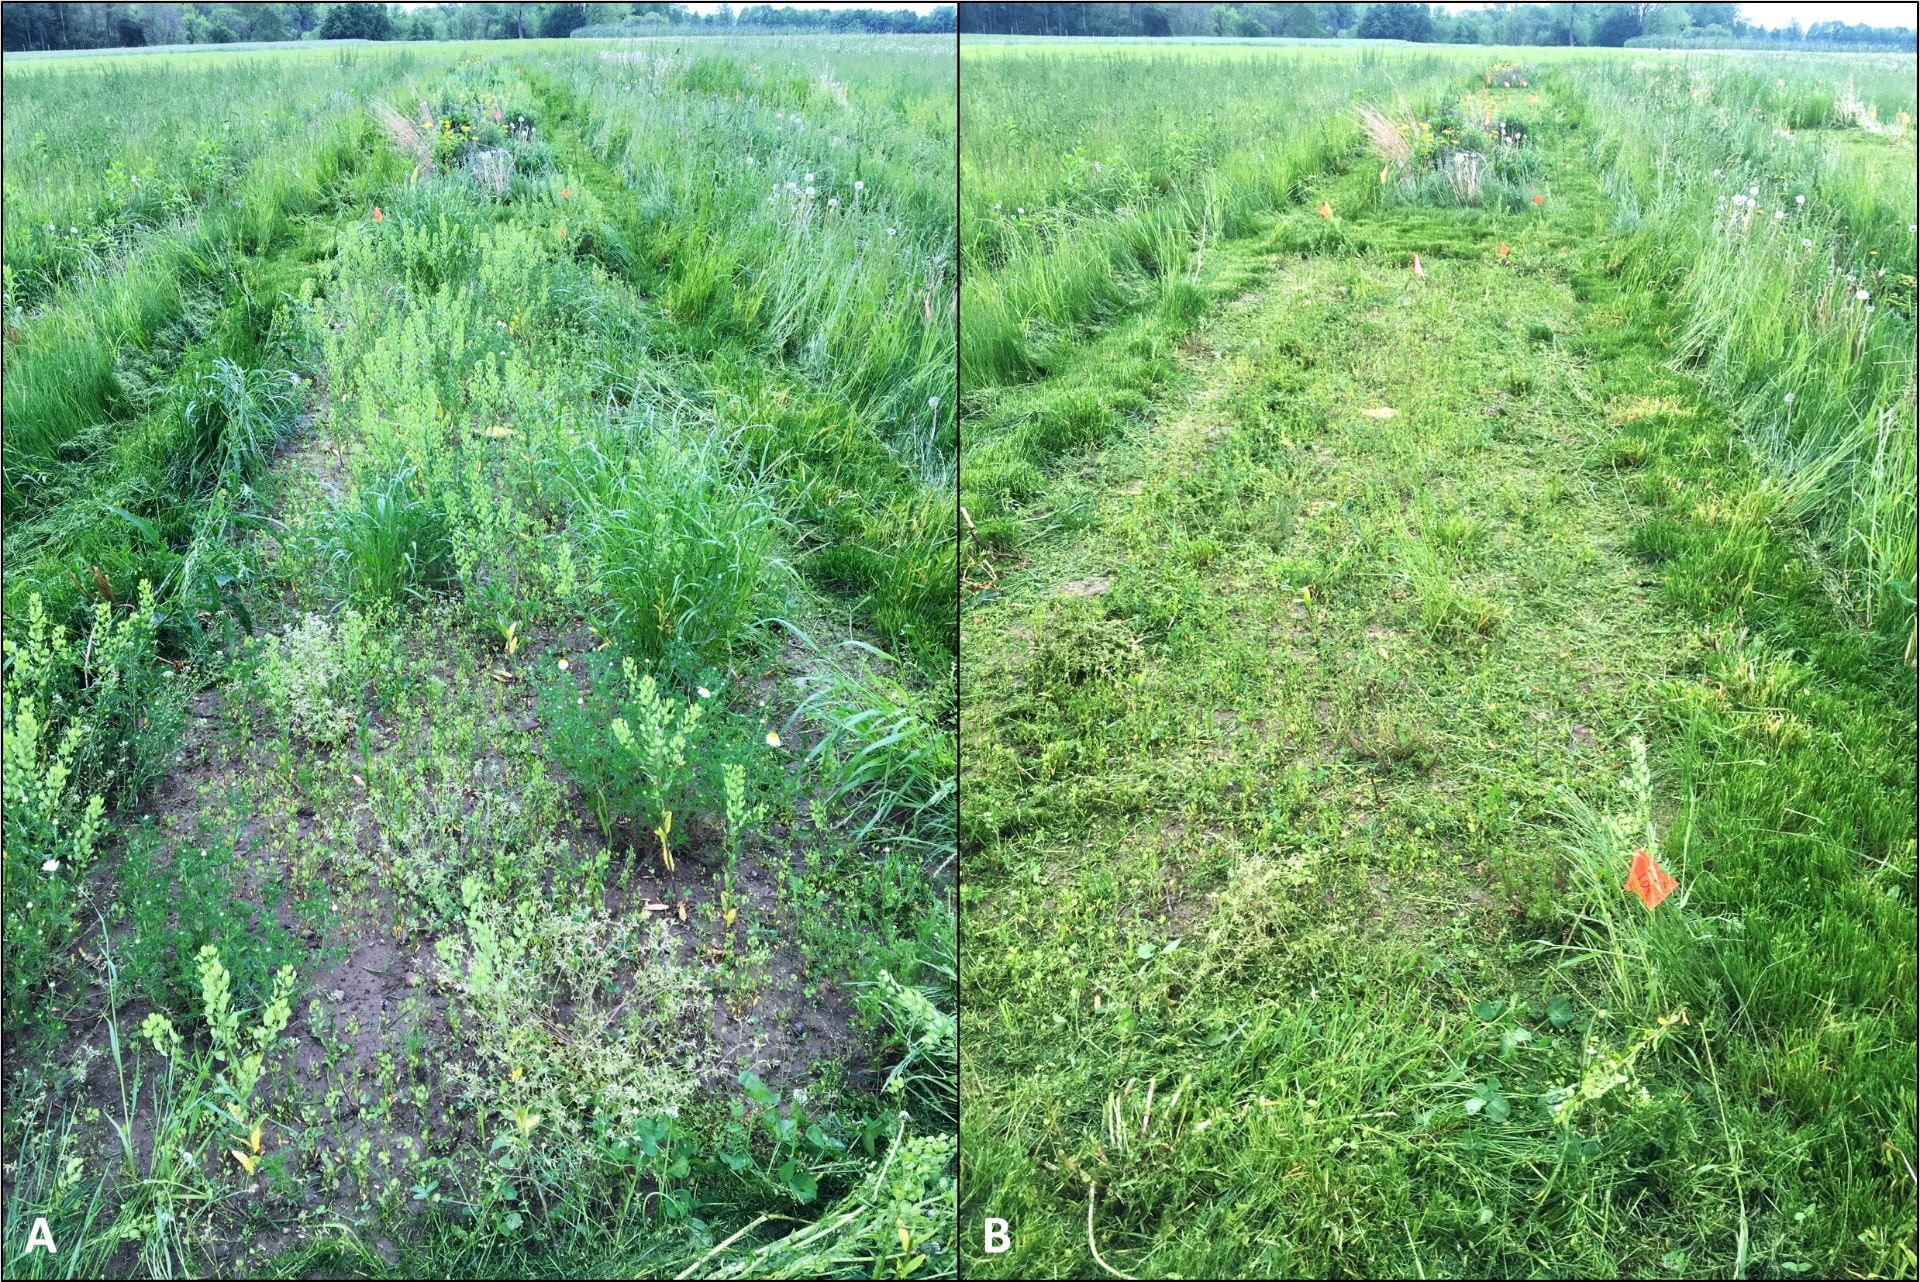
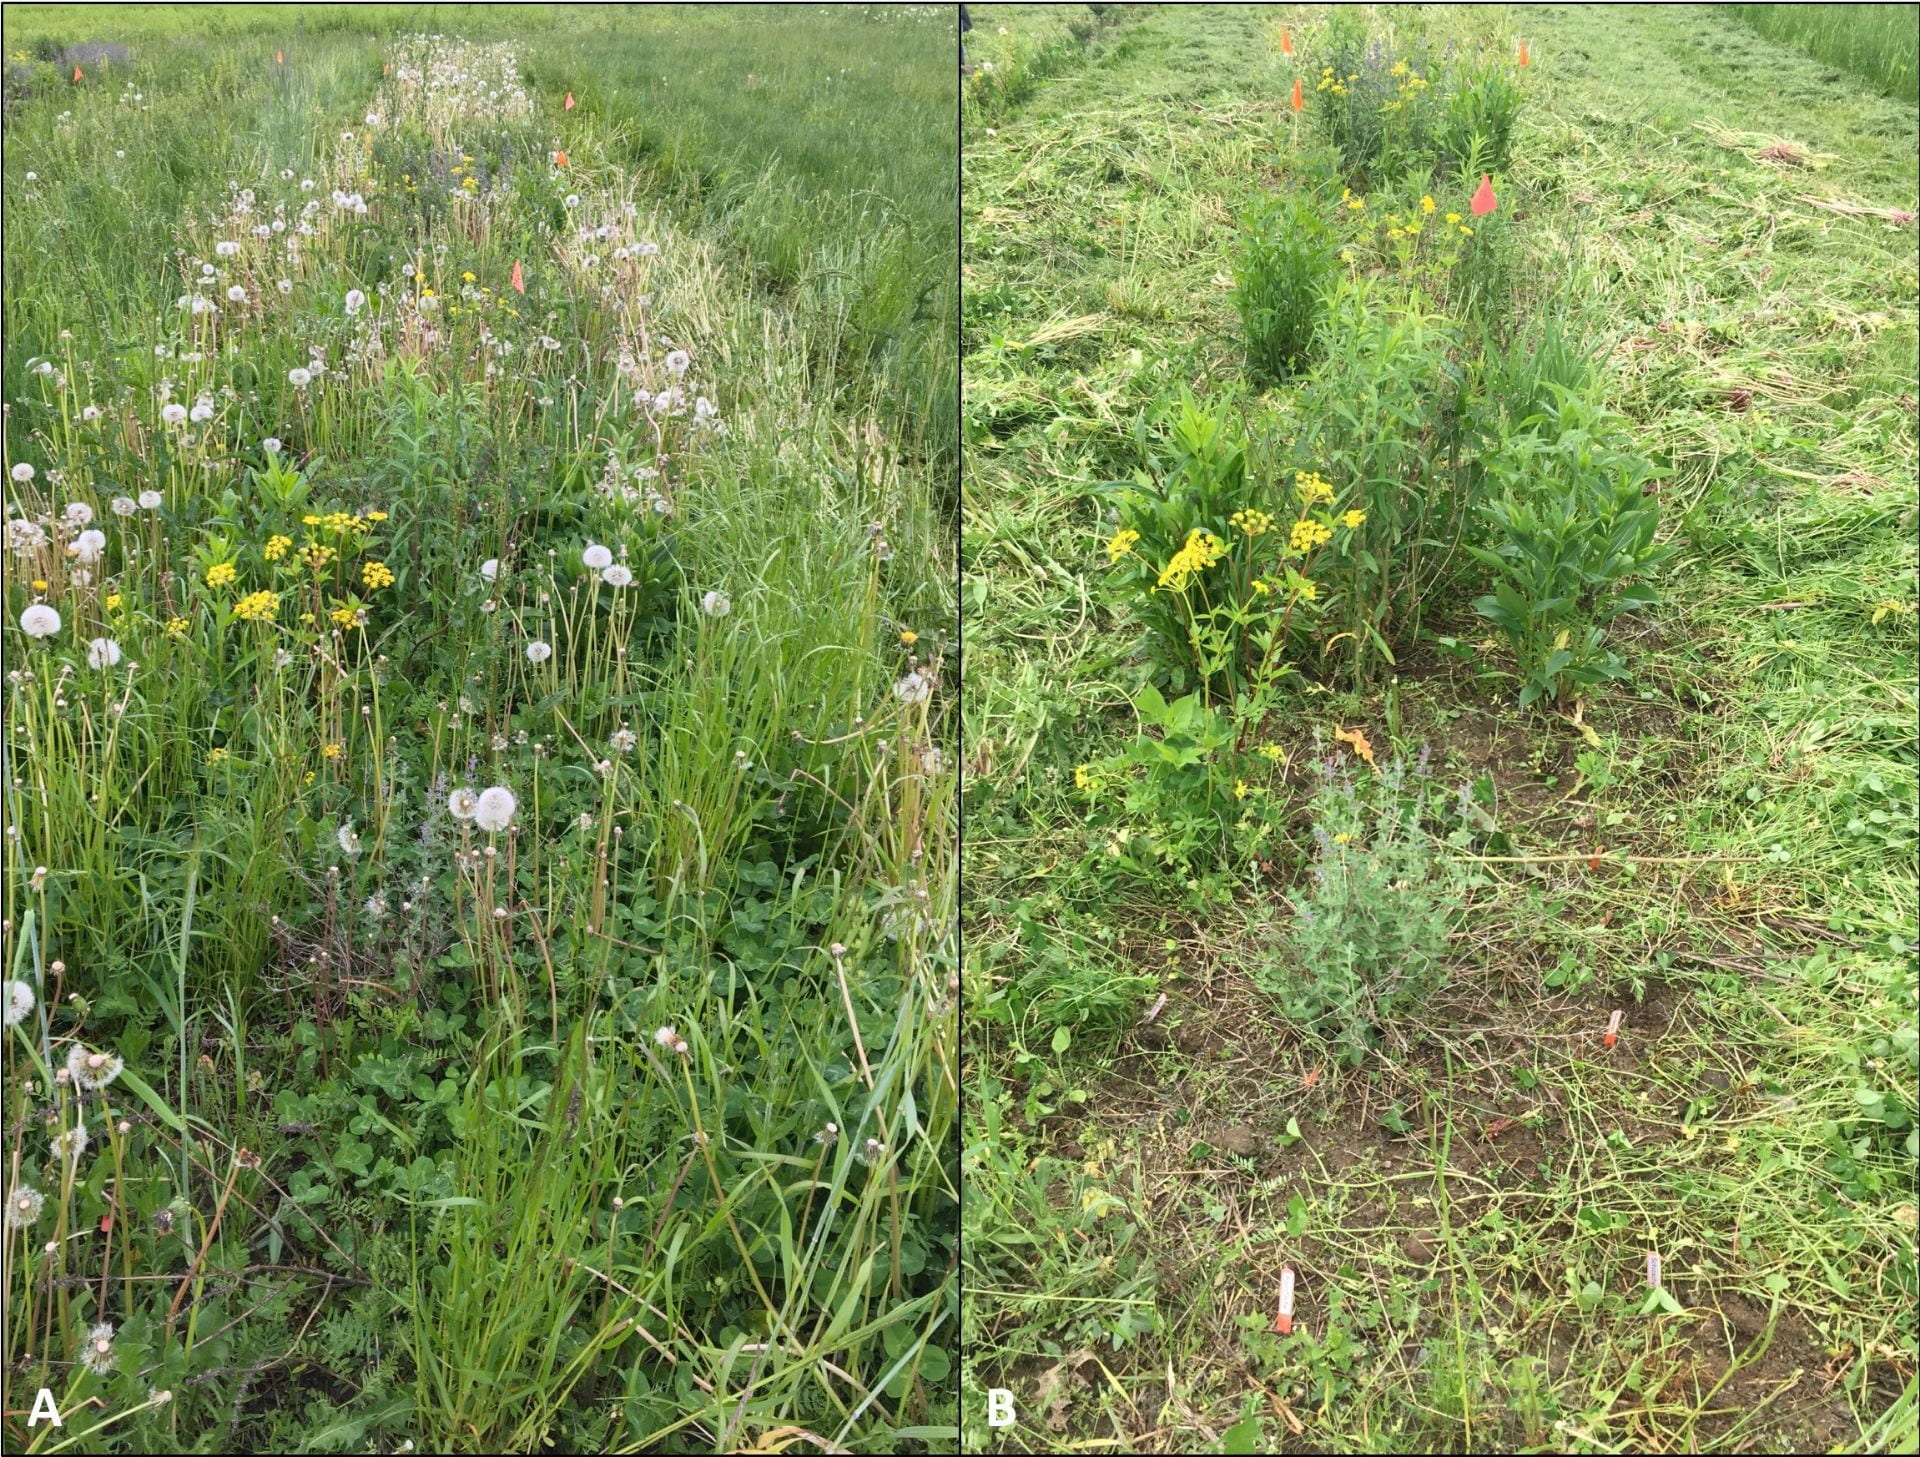
Plots that were direct seeded in 2018 will be mowed this year to favor the perennial beneficial insect habitat plants over annual weeds. This plot was treated with alternating herbicide and tillage during Summer 2018, and wildflower seed was planted in Fall 2018; (A, left) plot before mowing, (B, right) same plot after mowing.Plots that were transplanted in 2018 will be hand weeded this year to help the perennial wildflowers and grasses out-compete weeds. This plot was transplanted in Spring 2018 into bare (not tilled) ground and no mulch was used; (A, left) plot before weeding, (B, right) same plot after weeding.
And we want to know whether these plots are actually attracting beneficial or pest insects. So, in 2019 we are starting “Phase II” of our beneficial insect habitat work. We want to know which and how many insects (and other arthropods, like spiders) are being attracted to each type of plot. We will also count insects in no habitat plots (weedy, mowed occasionally) and mowed grass plots in the middle of the Christmas tree field for comparison.
Insect collection began in early May, and we are using four different techniques:
Sweep net – This is what it sounds like. We “sweep” a net through the air above the ground to capture mostly flying insects, or those who may be resting on the plants.
Butterfly and moth count – We walk through the field, counting how many of each butterfly or moth species we see in each plot.
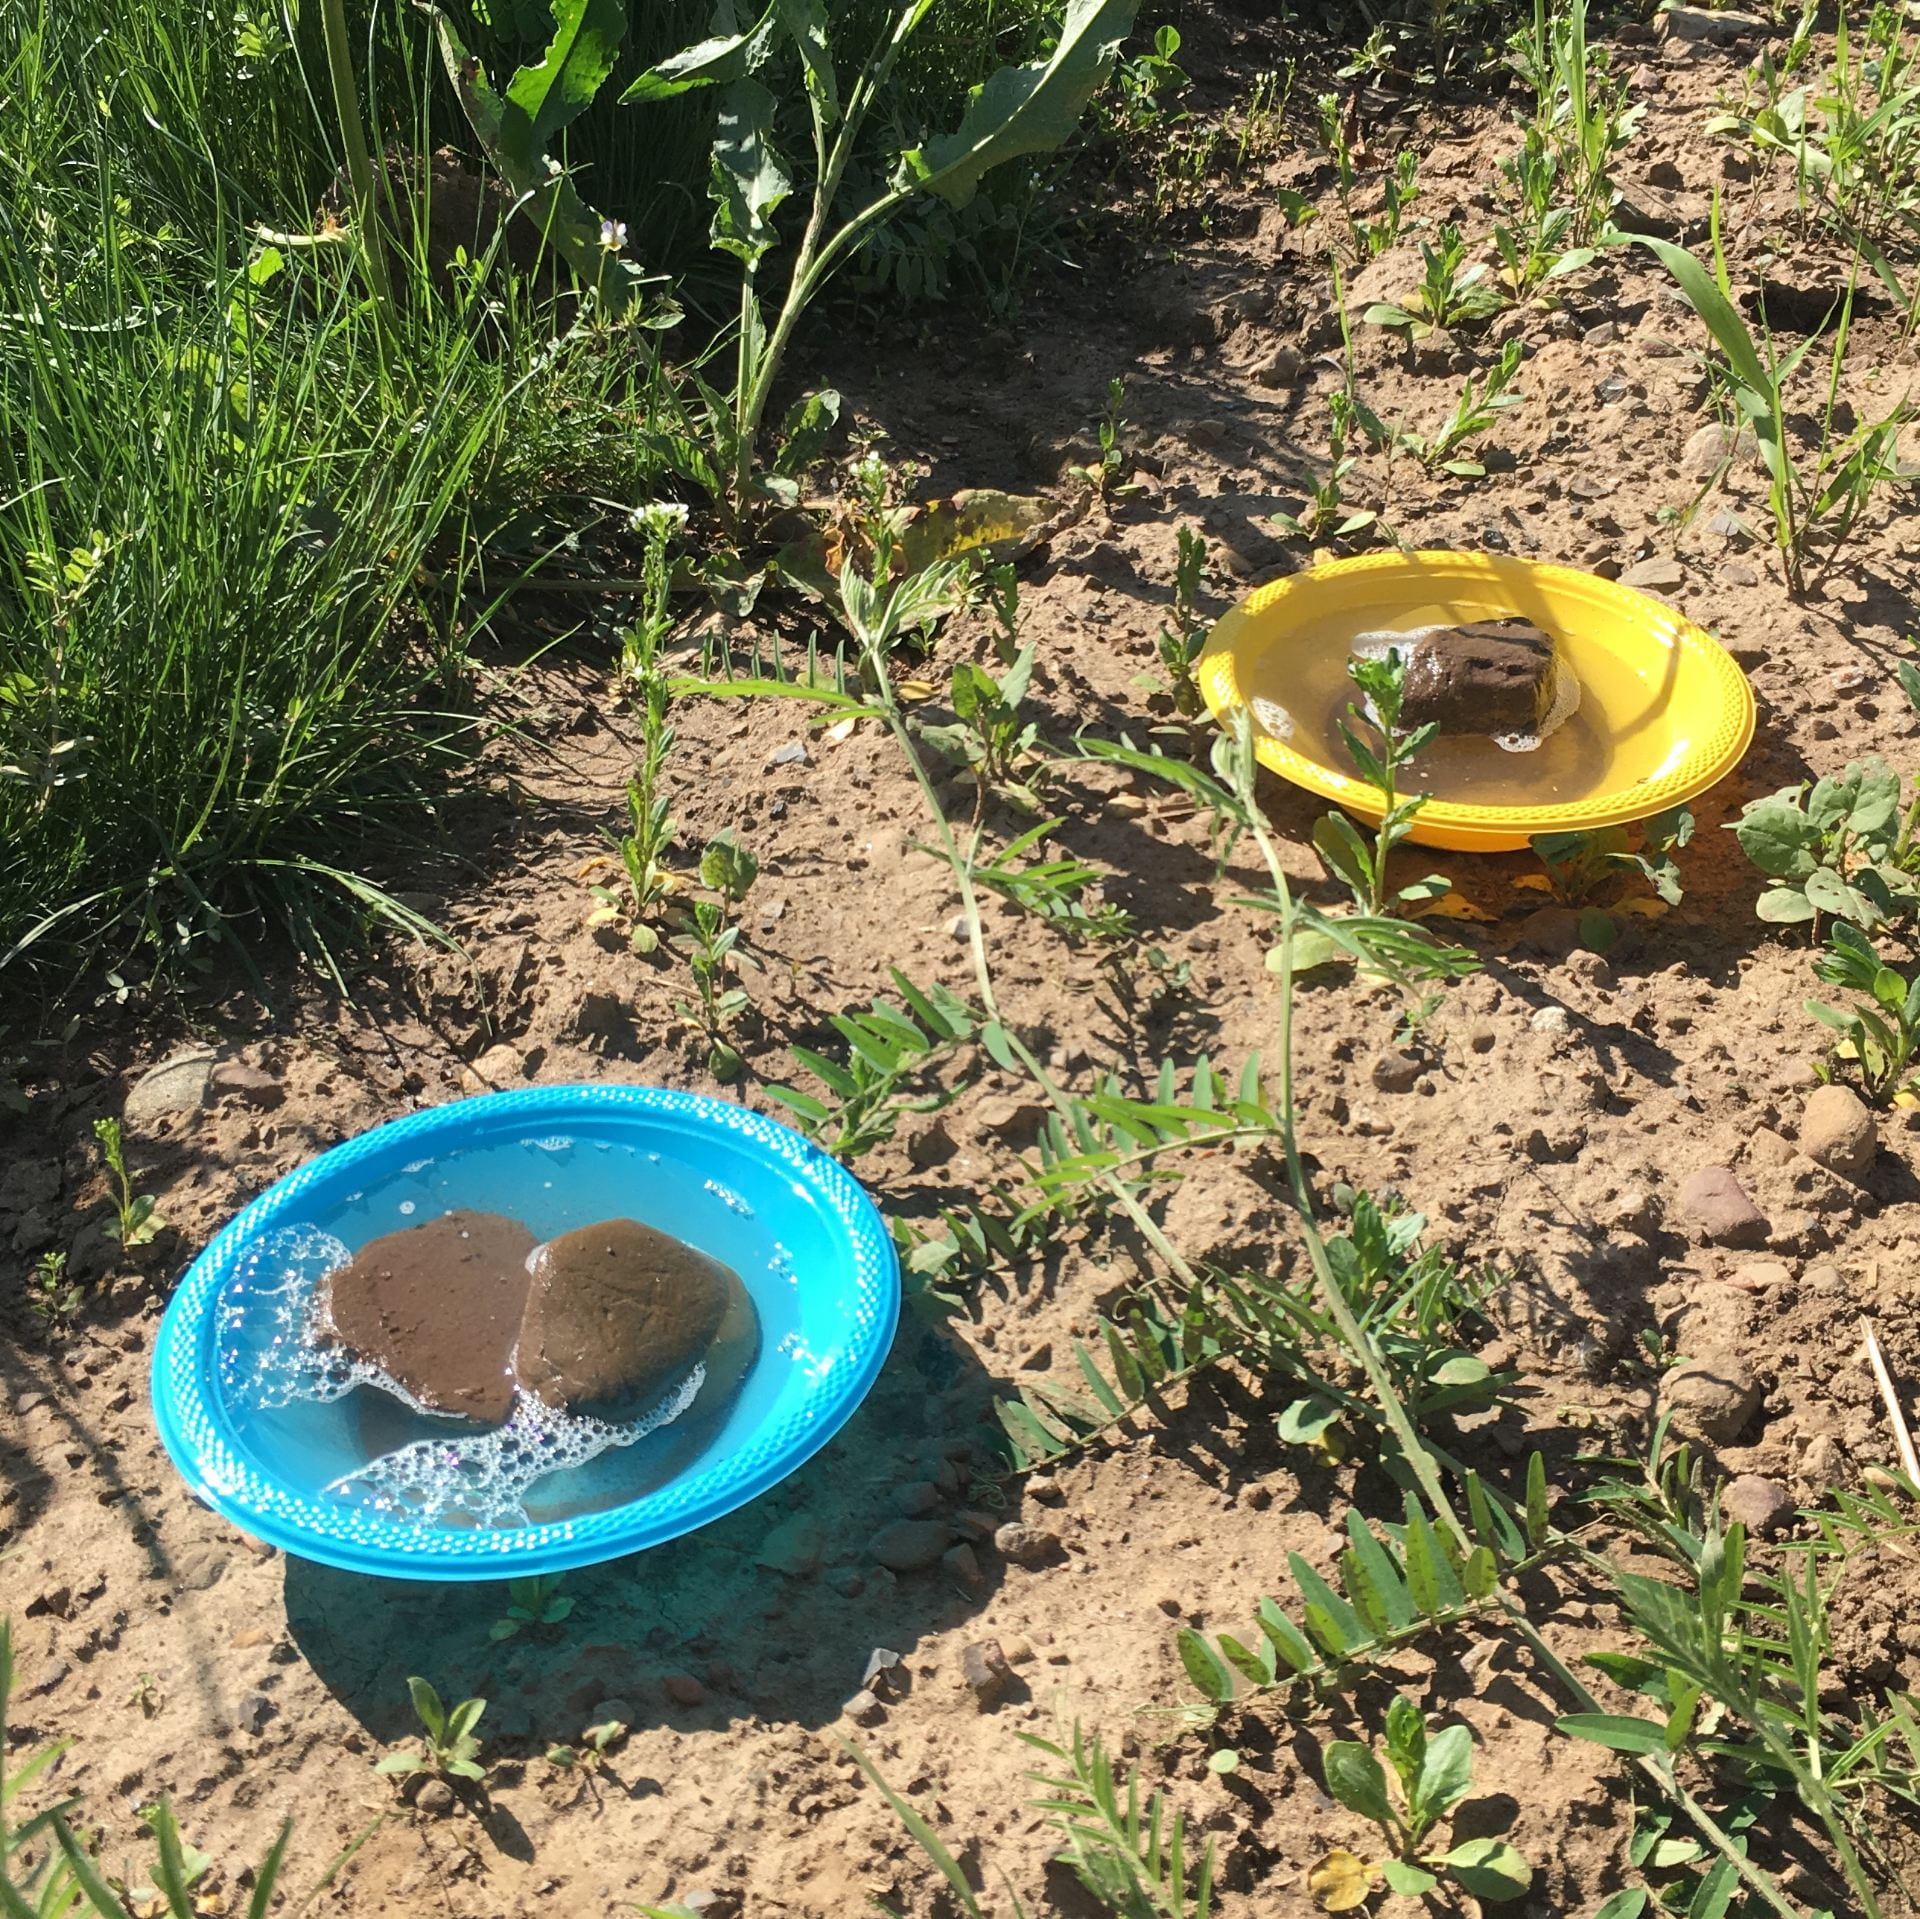
Pan traps – These are bright yellow and blue bowls filled with soapy water. One bowl of each color is placed in each plot for 2 days, then we collect the insects that have been attracted to the colorful bowls and were trapped in the soapy water. This method will help us count flying insects, especially bees and wasps.
Bright blue and yellow bowls filled with soapy water and weighed down with rocks will attract certain flying insects. By counting insects collected in these pan traps, we can learn which insects are spending time in each plot.
Pitfall traps – These are clear plastic 16-oz deli cups (like you might use for take-out food) that are sunk into the ground in each plot. Insects that crawl along the ground fall in. We will use this method to count mostly ground-dwelling insects.
A pitfall trap collects ground-dwelling insects. This one is protected by a rain cover. We didn’t want all the rain we’ve been getting this spring to overflow the traps and wash away the insects we caught!
I will write another blog post or two about this project during or at the end of this season. If you want to see more frequent updates, follow me on Twitter (@AmaraDunn). I’ll post weekly pictures of this project, including which beneficial insect habitat plants are blooming each week. You can also see lots of pictures from this project on Instagram (biocontrol.nysipm).
This work is supported by:
Crop Protection and Pest Management -Extension Implementation Program Area grant no. 2017-70006-27142/project accession no. 1014000, from the USDA National Institute of Food and Agriculture.
New York State Department of Agriculture and Markets
Bioinsecticides include microorganisms and other naturally-derived compounds that control insect pests.
My post from last February described modes of action for biopesticides that target plant diseases…as well as the difference between a biopesticide and a biostimulant. January’s post described the modes of action of five biofungicides in an ongoing vegetable trial. But there are plenty of insect and mite pests out there, too. You can attract or release predatory or parasitic insects and mites or beneficial nematodes to deal with these arthropod (insect and mite) pests. But you can also use bioinsecticides that control insects and mites. The active ingredients include microorganisms (bacteria, fungi, viruses), plant extracts, or other naturally-occurring substances. Want to know how they work? Keep reading.
Bioinsecticides can have one (or more) of the following modes of action:
Kill on contact
Kill after ingestion
Repel
Inhibit feeding
Inhibit growth
Inhibit reproduction
The examples included in the following descriptions are reported either on the bioinsecticide labels or in promotional materials produced by the manufacturers. And these are just examples, not meant to be an exhaustive list of bioinsecticides with each mode of action.
Killing on contact
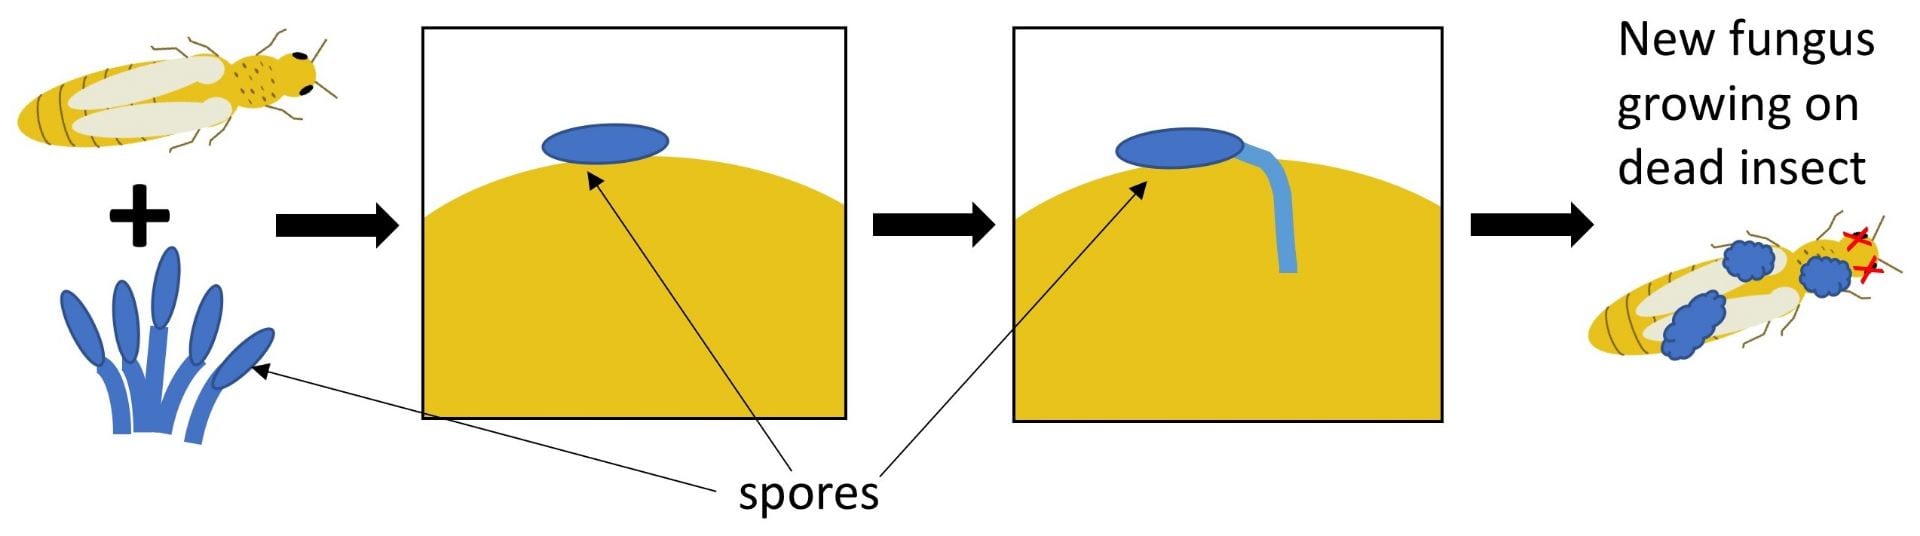
Some bioinsecticides contain living spores of a fungus. These spores need to land on the insect. Then they germinate (like a seed), invade and grow throughout the body of the insect, and eventually kill it. If the humidity is high enough, the fungus may even produce more spores on the body of the dead insect.
Some bioinsecticides need to directly contact the body of the insect or mite in order to kill it. Bioinsecticides that contain living fungi work this way. The tiny fungal spores land on the insect or mite pest, germinate (like a seed), and infect the body of the pest. The fungus grows throughout the pest’s body, eventually killing it. If the relative humidity is high enough, you might even see insects that look like they are covered with powder or fuzz (but this is not necessary for the pest to die). This powdery or fuzzy stuff growing on the pest is the fungus producing more spores. Bioinsecticides that contain the fungal species Beauveria bassiana (e.g., BotaniGard, Mycotrol), Metarhizium anisopliae or brunneum (e.g., Met52), or Isaria fumosorosea (NoFly) are examples of fungal bioinsecticides with contact activity.
If the relative humidity is high enough, insects infected with a fungus may start growing new fungus on the outside of their bodies, appearing fuzzy or like they are covered in powder. Photo credit: Louis Tedders, USDA ARS, Bugwood.org
Bioinsecticides that contain spinosad (including Entrust, SpinTor, and others) work because the active ingredient affects the nervous and muscular systems of the insect or mite, paralyzing and eventually killing it. It can kill the pest either through contact, or through ingestion (more on that in a moment). The bioinsecticide Venerate contains dead Burkholderia bacteria (strain A396) and compounds produced while growing the bacteria. One mode of action of Venerate is that it contains enzymes that degrade the exoskeleton (outer shell) of insects and mites on contact.
Killing by ingestion
Some bioinsecticides need to be eaten (ingested) in order to kill. Pesticides that contain the bacteria Bacillus thuringiensis (often called Bt for short) as the active ingredient are a good example. Proteins that were made by Bt while the bioinsecticide was being manufactured are eaten by insects and destroy their digestive systems. Several different subspecies of Bt are available as bioinsecticides, and the subspecies determines which insect pest it will be effective against. There are many bioinsecticides registered in NY that contain Bt as an active ingredient. Check NYSPAD for labels, and make sure you choose the right pesticide for the pest and setting where you need control. Bt products do not work on mites, aphids, or whiteflies.
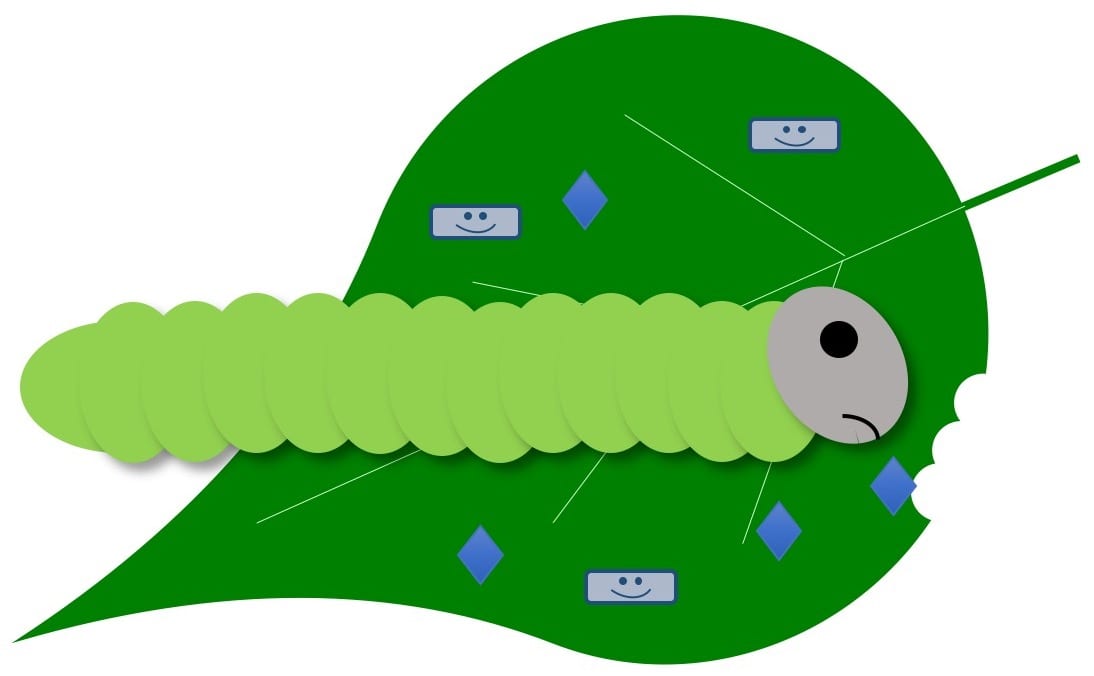
Some bioinsecticides (blue diamonds in this diagram) will only kill pests if they are eaten first. Pesticides that contain Bacillus thuringiensis (Bt) bacteria or insect viruses are examples of this mode of action.
Insect viruses are another example of a bioinsecticide active ingredient that kills through ingestion. For example, Gemstar contains parts of a virus that infects corn earworms and tobacco budworms. Once these caterpillars eat the Gemstar, the virus replicates inside the pest, eventually killing it.
Repel
Some bioinsecticides repel insects from the plants you want to protect. However, this mode of action may only work on certain pest species, or certain life stages of the pest. Read and follow the label. Bioinsecticides containing azadirachtin or neem oil, and Grandevo are reported to have repellent activity for some pests. Grandevo contains dead bacteria (Chromobacterium substugae strain PrAA4-1) and compounds produced by the bacteria while they were alive and growing.
Some bioinsecticides (blue diamonds and happy microbes in this diagram) protect plants because they repel insect and mite pests. This protects treated plants from pest damage.
Inhibit feeding
If you want insect and mite pests dead as soon as possible, I understand the sentiment. But in many cases stopping the pests from eating your plants would be just as good, right? Some bioinsecticides cause pests to lose their appetite days before they actually die. Like bioinsecticides that kill pests outright, some bioinsecticides that inhibit feeding require ingestion, while others work on contact. And these bioinsecticides may work this way for only certain pest species of certain ages. Read and follow those labels! Bioinsecticides containing Bt require ingestion and some can stop pest feeding before actually killing the pest. The same goes for Gemstar (corn earworm virus). This is another mode of action of azadirachtin products against some pests.
Some bioinsecticides (blue diamonds and happy microbes in this diagram) cause insect and mite pests to lose their appetites. Depending on the bioinsecticide, it either needs to contact the pest or be eaten by it.
Inhibit growth
Many insects and mites need to molt (shed their skin as they go from one life stage to another). Bioinsecticides that interfere with molting prevent pests from completing their life cycle. Like feeding inhibitors, these bioinsecticides won’t directly kill the pests you have, but they can prevent them from multiplying. This is another mode of action (again, for certain pests at certain stages of development) listed for azadirachtin products and Venerate (Burkholderia spp. strain A396).
Some bioinsecticides (blue diamonds in this diagram) don’t kill insects and mites outright, but they can prevent them from molting and growing into the next life stage. Pests that can’t move on to the next life stage will eventually die without completing their life cycle.
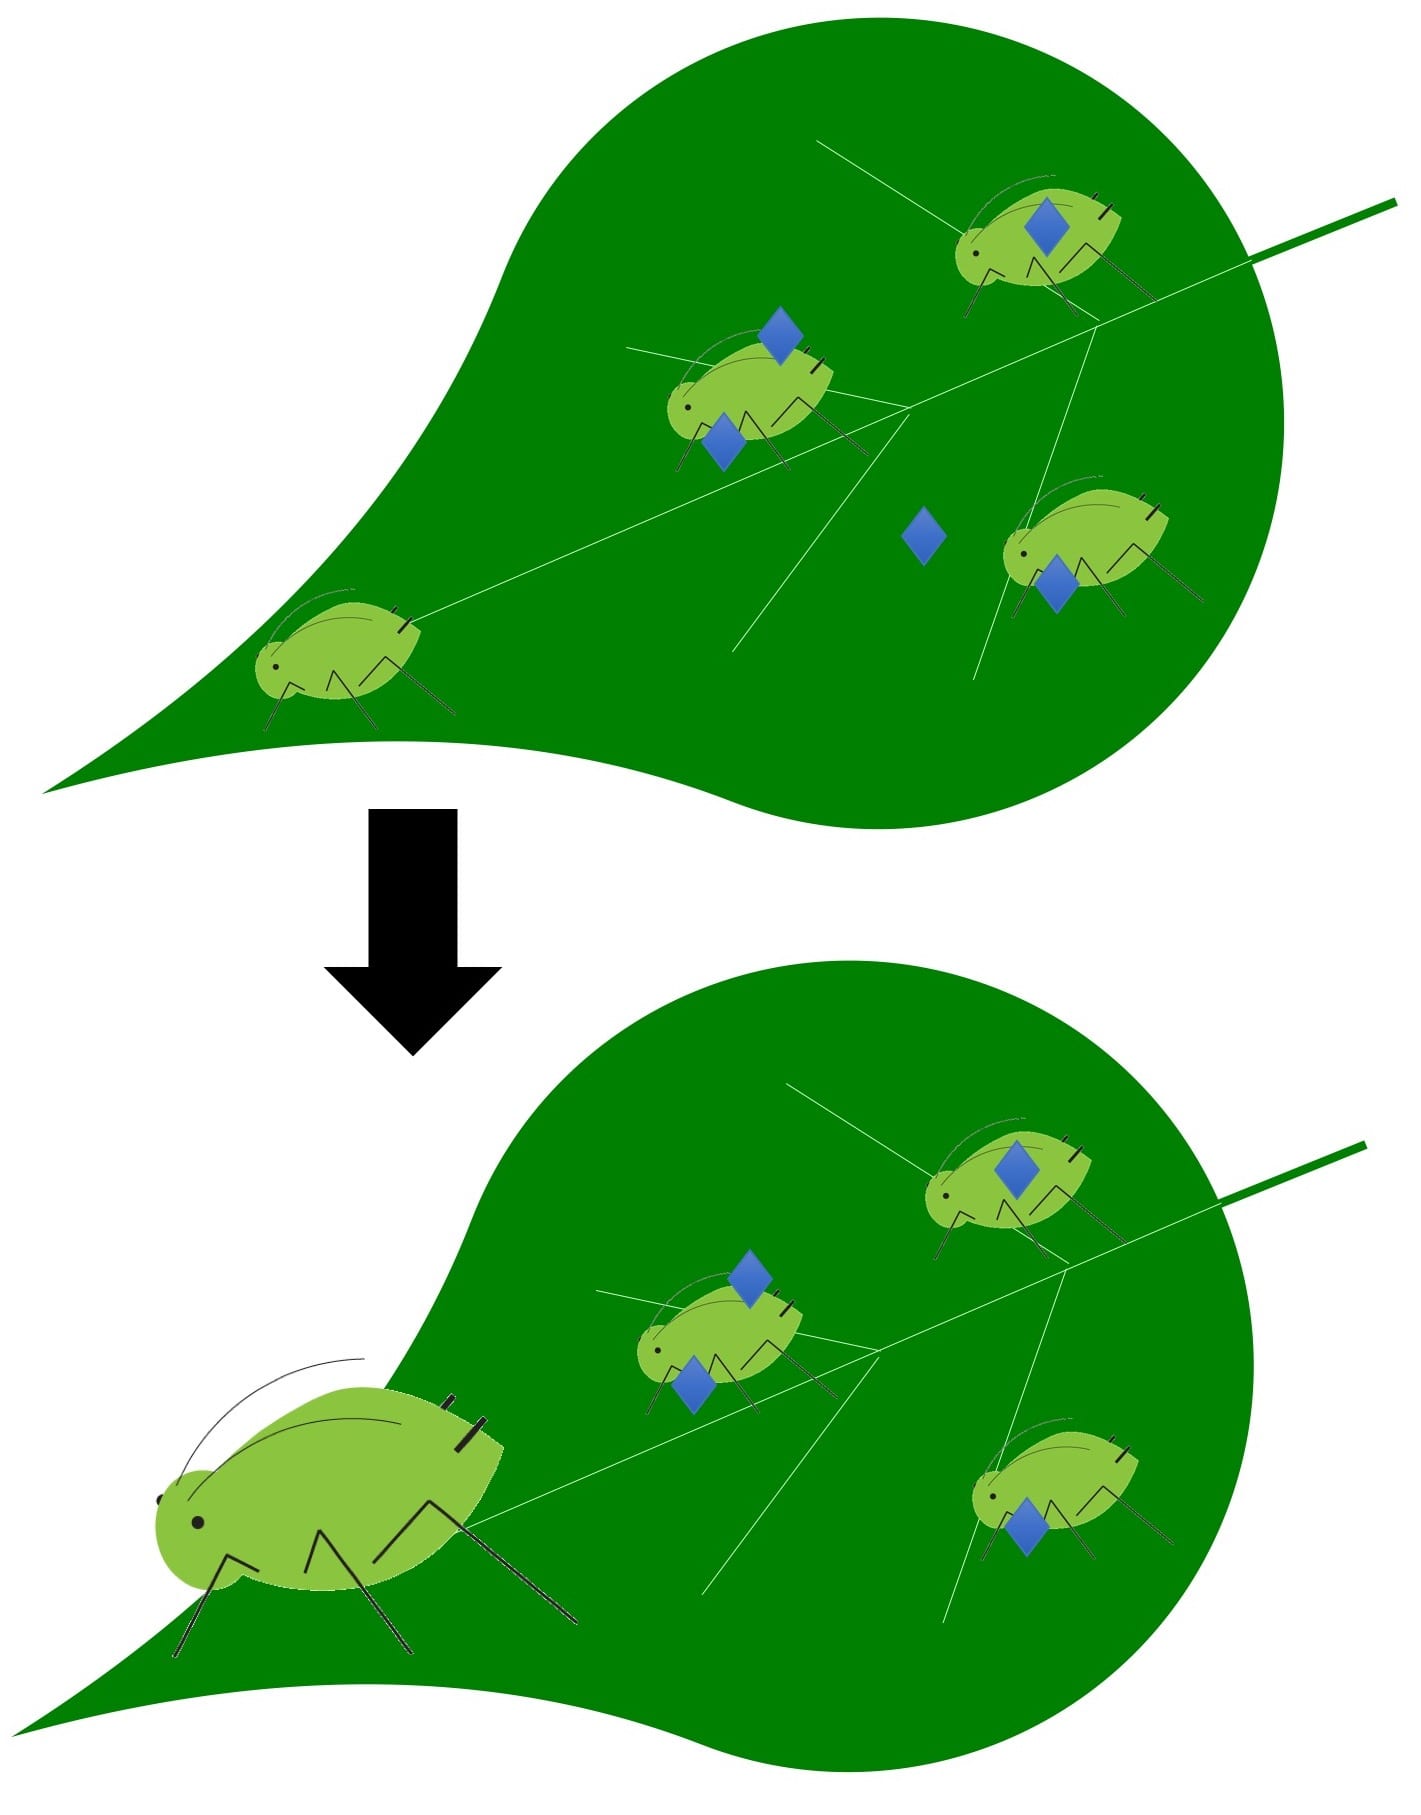
Inhibit reproduction
There are two main types of bioinsecticides that prevent or slow insect reproduction. Pheromones are compounds that confuse insects that are looking for mates. If males and females can’t find each other, there won’t be a next generation of the pest. Pheromones can be especially useful when the adults that are looking for mates don’t feed (e.g., moths). Isomate and Checkmate are two examples of pheromones available for certain fruit pests. Other bioinsecticides actually reduce the number of offspring produced by a pest. This is one of the modes of action of Grandevo (Chromobacterium substugae strain PRAA4-1) against certain pests.
Pheromones (represented here by blue diamonds) are a type of bioinsecticide that confuses insects looking for a mate. As a result, males and females can’t find each other, don’t mate, and don’t lay eggs.
Why do I care?
Do you mean besides the fact that you are a curious person and you want to know how biopesticides work? Knowing the mode of action for the pesticide you use (among other things) allows you to maximize its efficacy. Does the bioinsecticide need to contact the pest, or be eaten by it? This determines where, when, and how you apply it. Do you want to use a bioinsecticide that inhibits growth of the pest? Make sure you use it when pests are young. (Sidenote: Like all biopesticides, bioinsecticides generally work best on smaller populations of younger pests.) Is the first generation of the pest the one that causes the most damage? Don’t rely on a bioinsecticide that inhibits reproduction. Although if the pest overwinters in your field and doesn’t migrate in, maybe you could reduce the population for the next season.
Now is a great time of year to consider the insect and mite pests you are likely to encounter this season, then learn which bioinsecticides include these pests (and your crop and setting) on the label. Always read and follow the label of any pesticide (bio or not). How do you know whether these bioinsecticides are likely to work in NY on the pests listed on the label? That’s a topic for another post. In the meantime, the Organic Production Guides for fruit and vegetables from NYS IPM are a great place to start. When available, they report efficacy of OMRI-listed insecticides (including some bioinsecticides). Your local extension staff are another great resource.
Many crops (and plenty of non-crop plants) rely on pollinators. Let’s protect them!
As I’ve discussed before, the natural enemies that provide biological control of pests include both larger creatures (like insects, mites, and nematodes) and microorganisms (fungi, bacteria, and viruses) that combat pests in a variety of ways. Microorganism natural enemies are regulated as pesticides (one type of biopesticide), while the larger natural enemies are not. Growers who are successfully using biocontrol insects, mites, and nematodes usually recognize that they need to apply pesticides in such a way that they are compatible with the biocontrol organisms they use. Take a look at my April post for a summary of online resources that can help you check compatibility of pesticides (including biopesticides) with natural enemies.
Some of these compatibility resources include information on the effects of pesticides (and biopesticides) on bees. Pollinators (including honey bees, lots of other bees, and some non-bees) are very important beneficial insects. You may have noticed that they have found their way into several of my blog posts. So, I wanted to let you know about a brand new resource (hot off the digital presses) to help you protect pollinators.
“A Pesticide Decision-Making Guide to Protect Pollinators in Tree Fruit Orchards” is a terrific resource to help you choose pesticides (and pesticide combinations) that are least-toxic to bees.
“A Pesticide Decision-Making Guide to Protect Pollinators in Tree Fruit Orchards” was written by Maria van Dyke, Emma Mullen, Dan Wixted, and Scott McArt. Although it’s focus is tree fruit orchards (and therefore the pesticides used in them), it should be useful for growers of other crops who want to choose pesticides that are least toxic to bees. A few highlights:
It includes information not only on pesticides used alone, but (when available) on synergistic effects when multiple pesticide active ingredients are used together. When you combine some chemicals (either in the tank or in the environment) the mixture is more toxic than both chemicals alone.
Where available, it summarizes pesticide toxicity to other bees besides just honey bees (e.g., bumble bees and solitary bees). You can read more about why this is important in this recent article.
It describes what we know about sub-lethal (in other words, negative effects on the bees that are less serious than death) effects of pesticides on bees.
It includes about half a dozen biopesticide active ingredients.
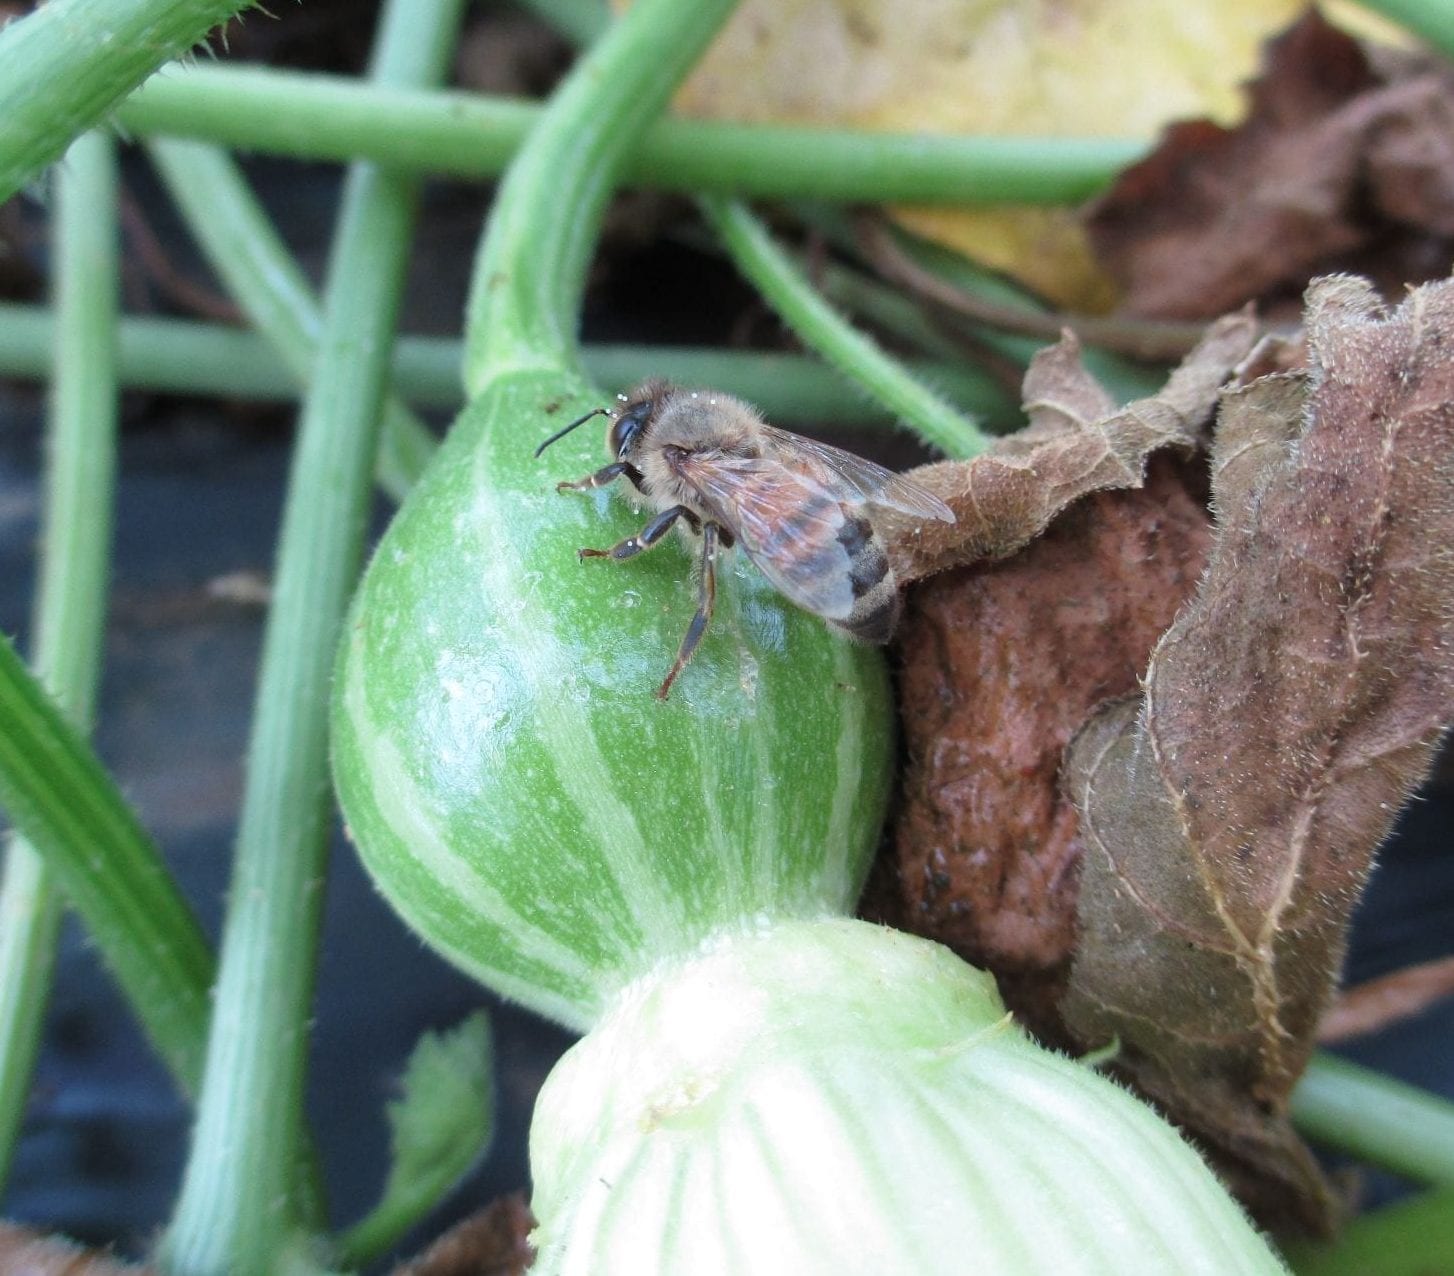
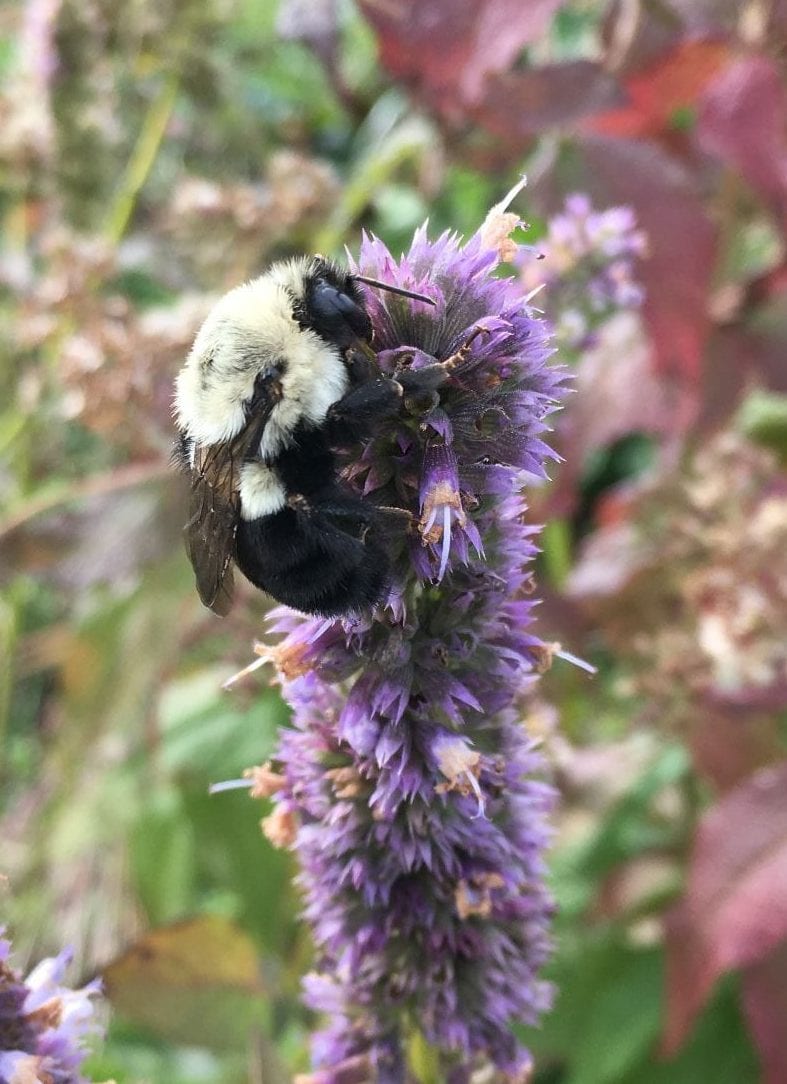
Pollination is being done by more than just honey bees! This bumble bee (plus many more bee species) are important pollinators in NY.
Guides for other crops and other resources for growers wanting to protect pollinators can be found here.
You might be asking: If a chemical on this table is toxic to bees, will it also be toxic to the insect and mite natural enemies I am releasing or conserving on my farm or in my garden? I wish I had a definitive answer to that. As you can see from the nearly three pages of Literature Cited at the end of this document, collecting these data is a time-consuming process. For now, stick with the compatibility resources that are already available, and ask the companies you buy from (pesticides or natural enemies) about compatibility.
In closing, a huge amount of work went into this resource to summarize so much useful and current (as of October 2018) information in an easy-to-read table. Bravo to the authors! The Pollinator Network @ Cornell has other helpful resources for growers on protecting pollinators. Winter is a great time to make plans for using IPM and protecting the pollinators and natural enemies that are so good for the crops we grow!


