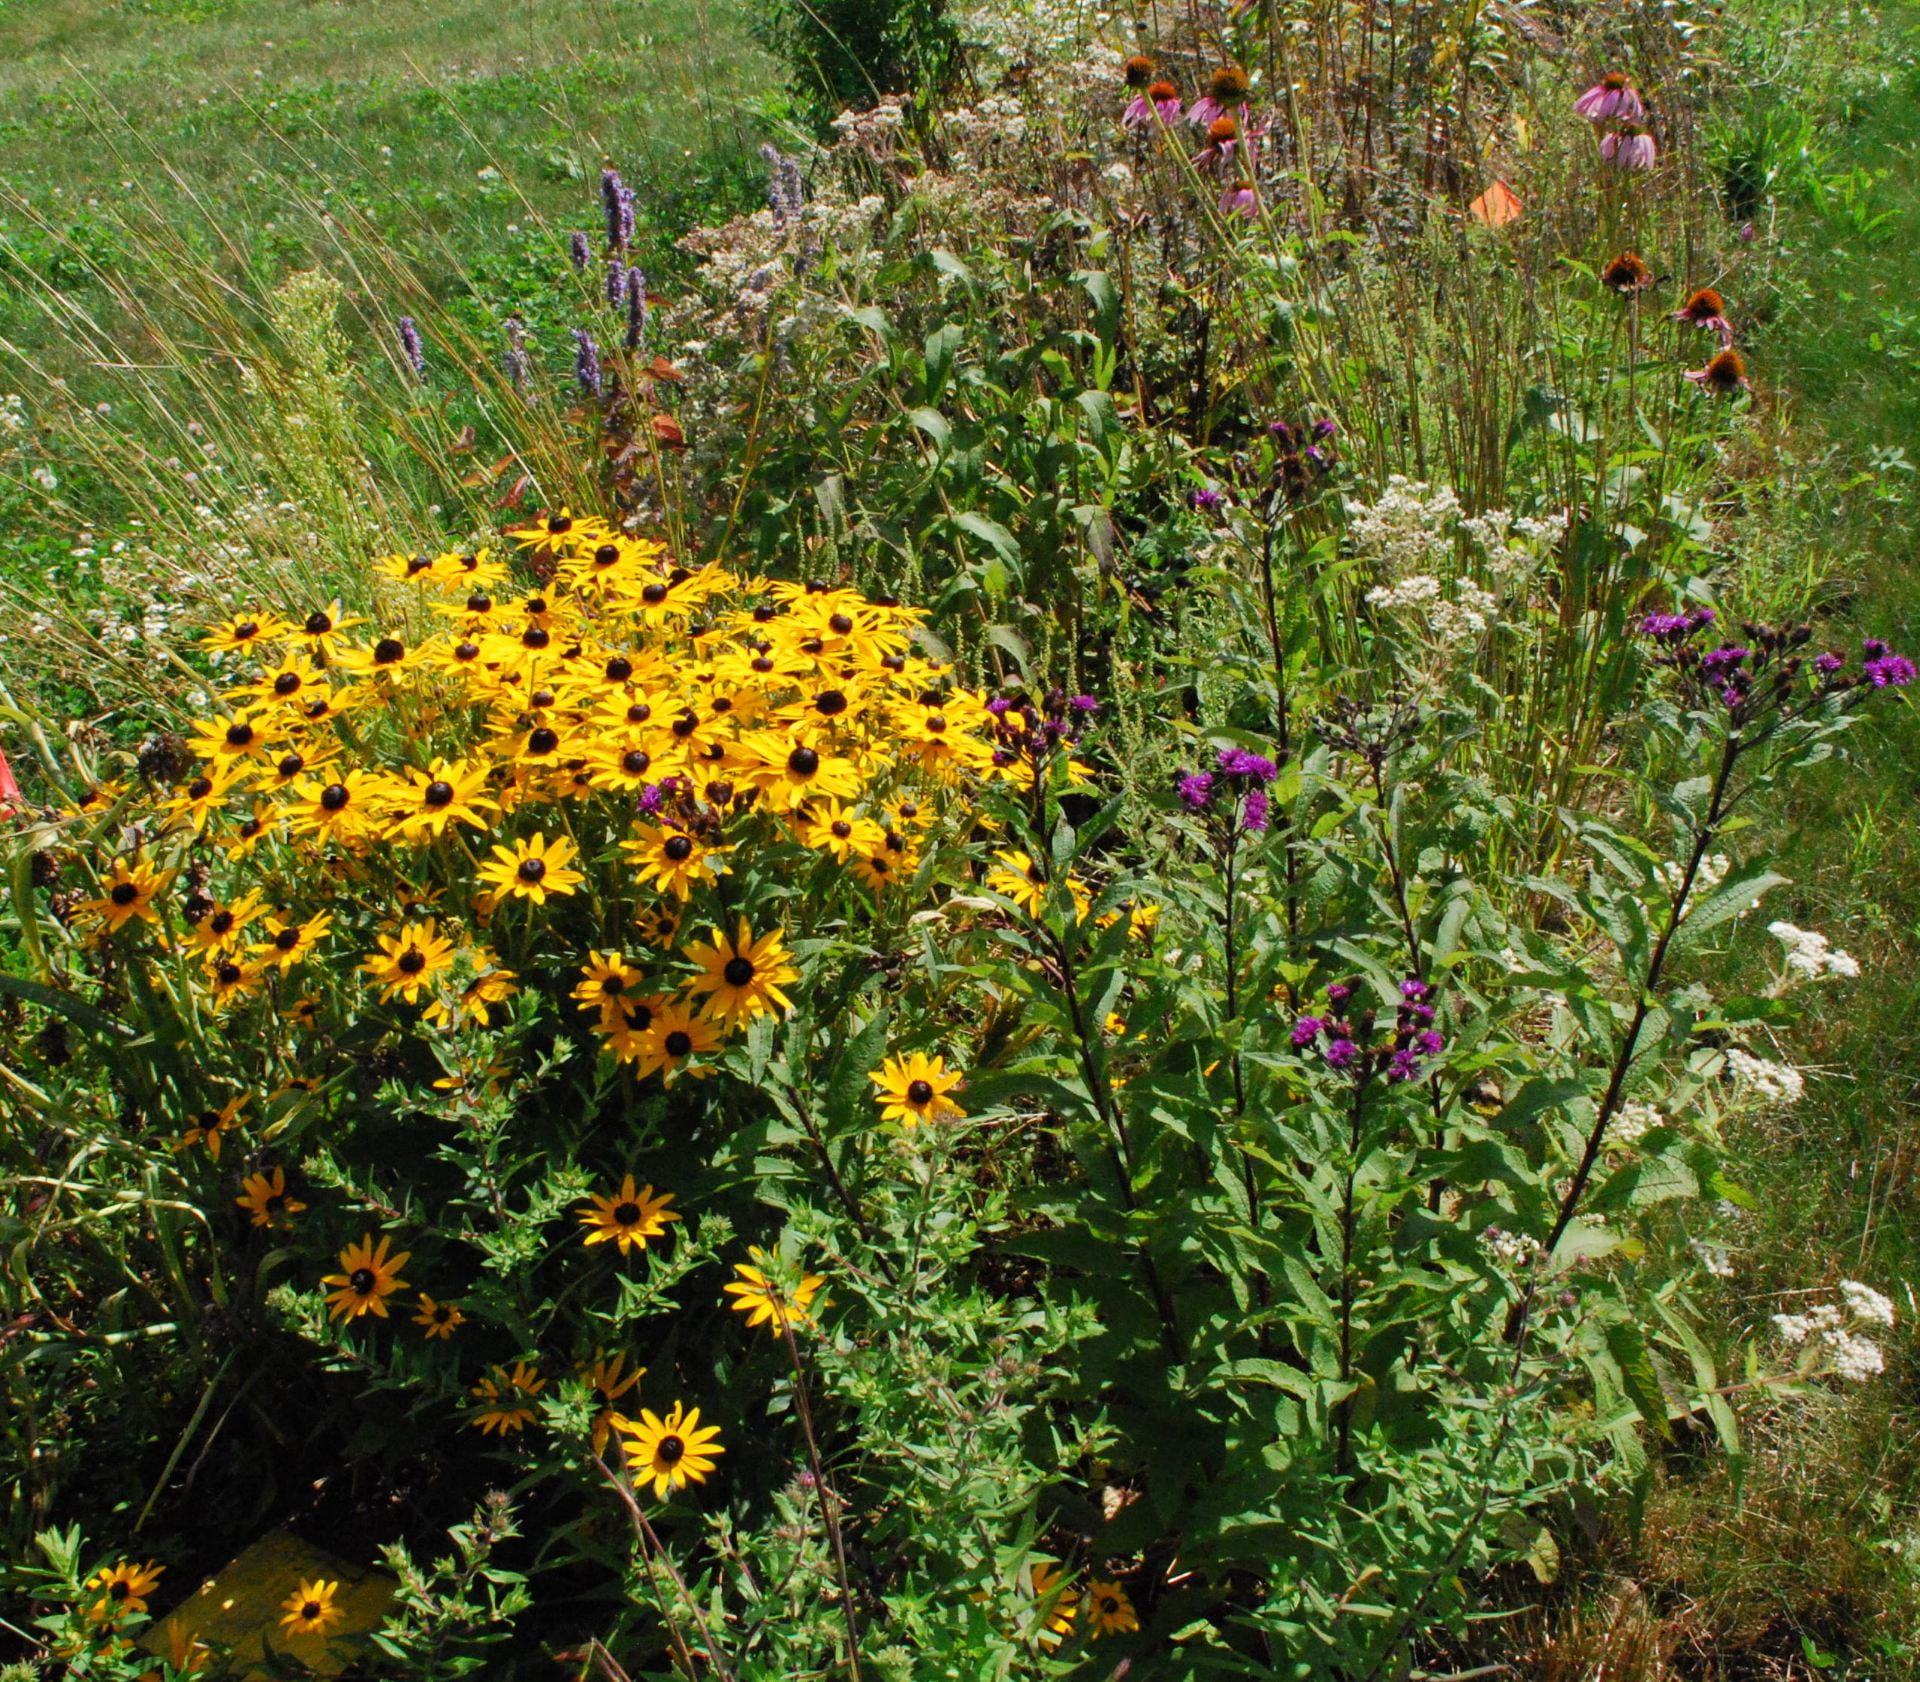
Lots of flowers bloomed in 2019 in our habitat plots. Some we had planted, and some we hadn’t.
Obviously, nothing is growing right now, but I thought this would be a good time to update you on the success of our beneficial insect habitat plots during the 2019 growing season.
When things bloomed
Recall that the goal is to have at least one plant blooming all season long. We choose wildflower species accordingly, and it worked! The following table shows which months each species bloomed in 2019 (at least in the transplanted plots). An ‘X’ means the species was blooming during that month.
Wildflower
May
June
July
Aug
Sep
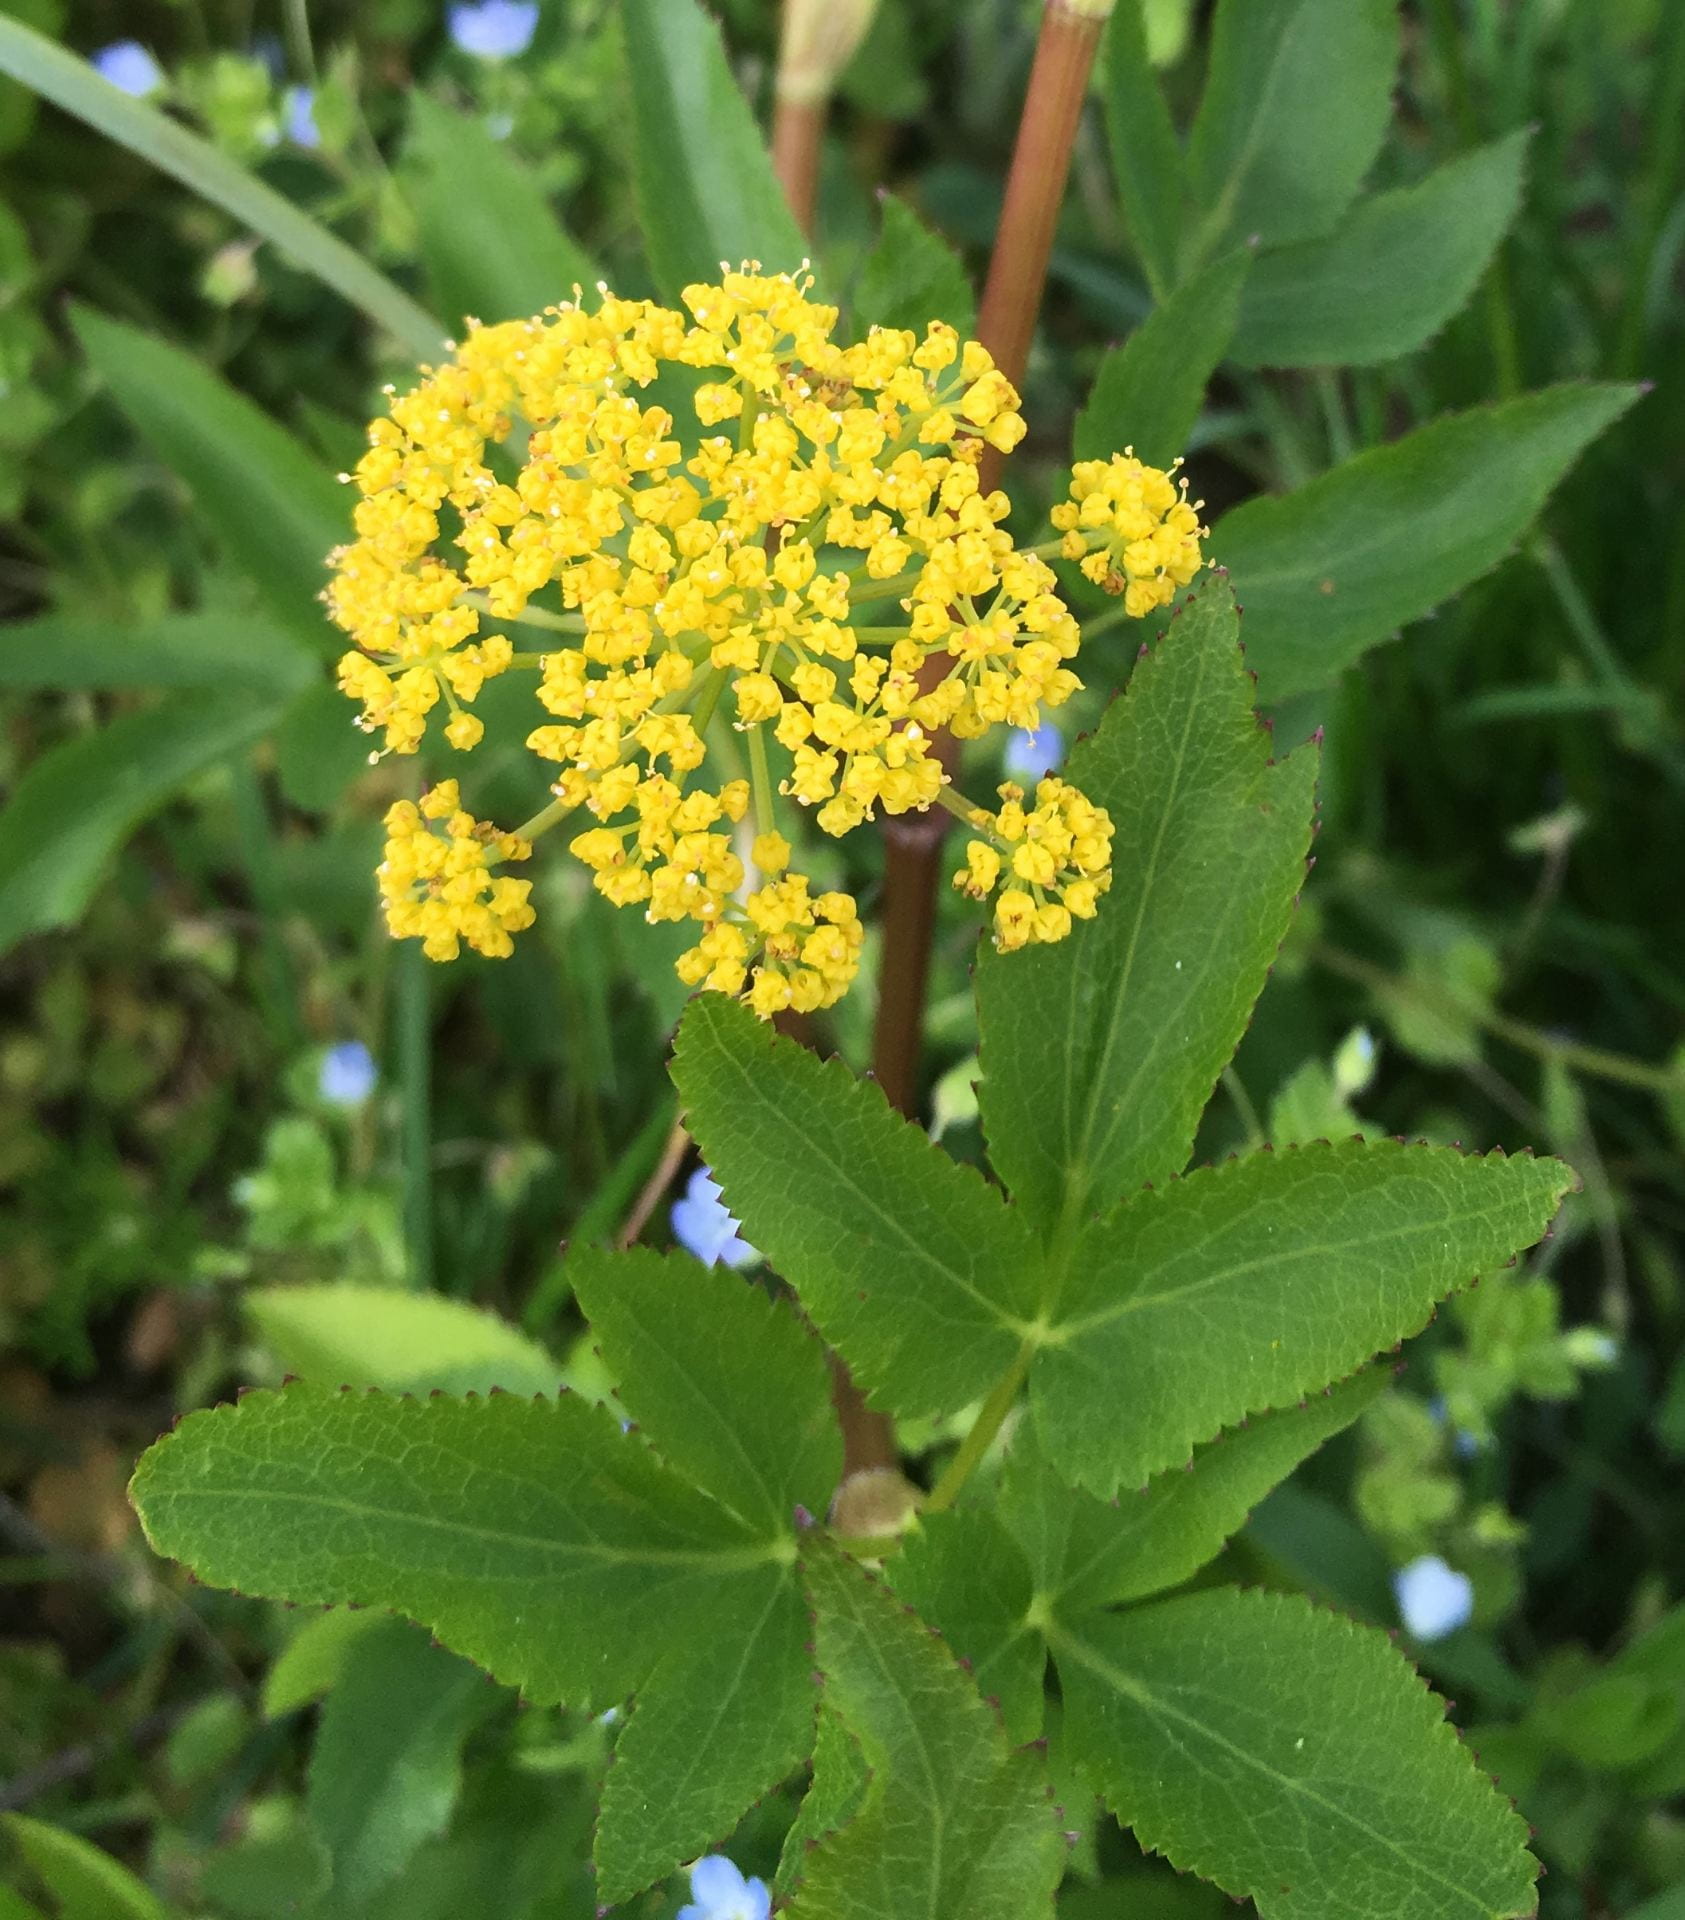
Golden alexanders
X
X
Catmint
X
X
X
X
Lanced-leaved coreopsis
X
X
Tall white beard tongue
X
X
Ohio spiderwort
X
X
Anise hyssop
X
X
X
Echinacea
X
X
X
Orange coneflower
X
X
X
Boneset
X
X
X
Wild bergamot
X
X
Common milkweed
X
NY ironweed
X
X
Showy goldenrod
X
New England aster
X
Blue false indigo
You may notice that the blue false indigo never bloomed in 2019, which was disappointing. Most of these plants are still alive (as you’ll see later in this post). They just didn’t bloom. Maybe next year?
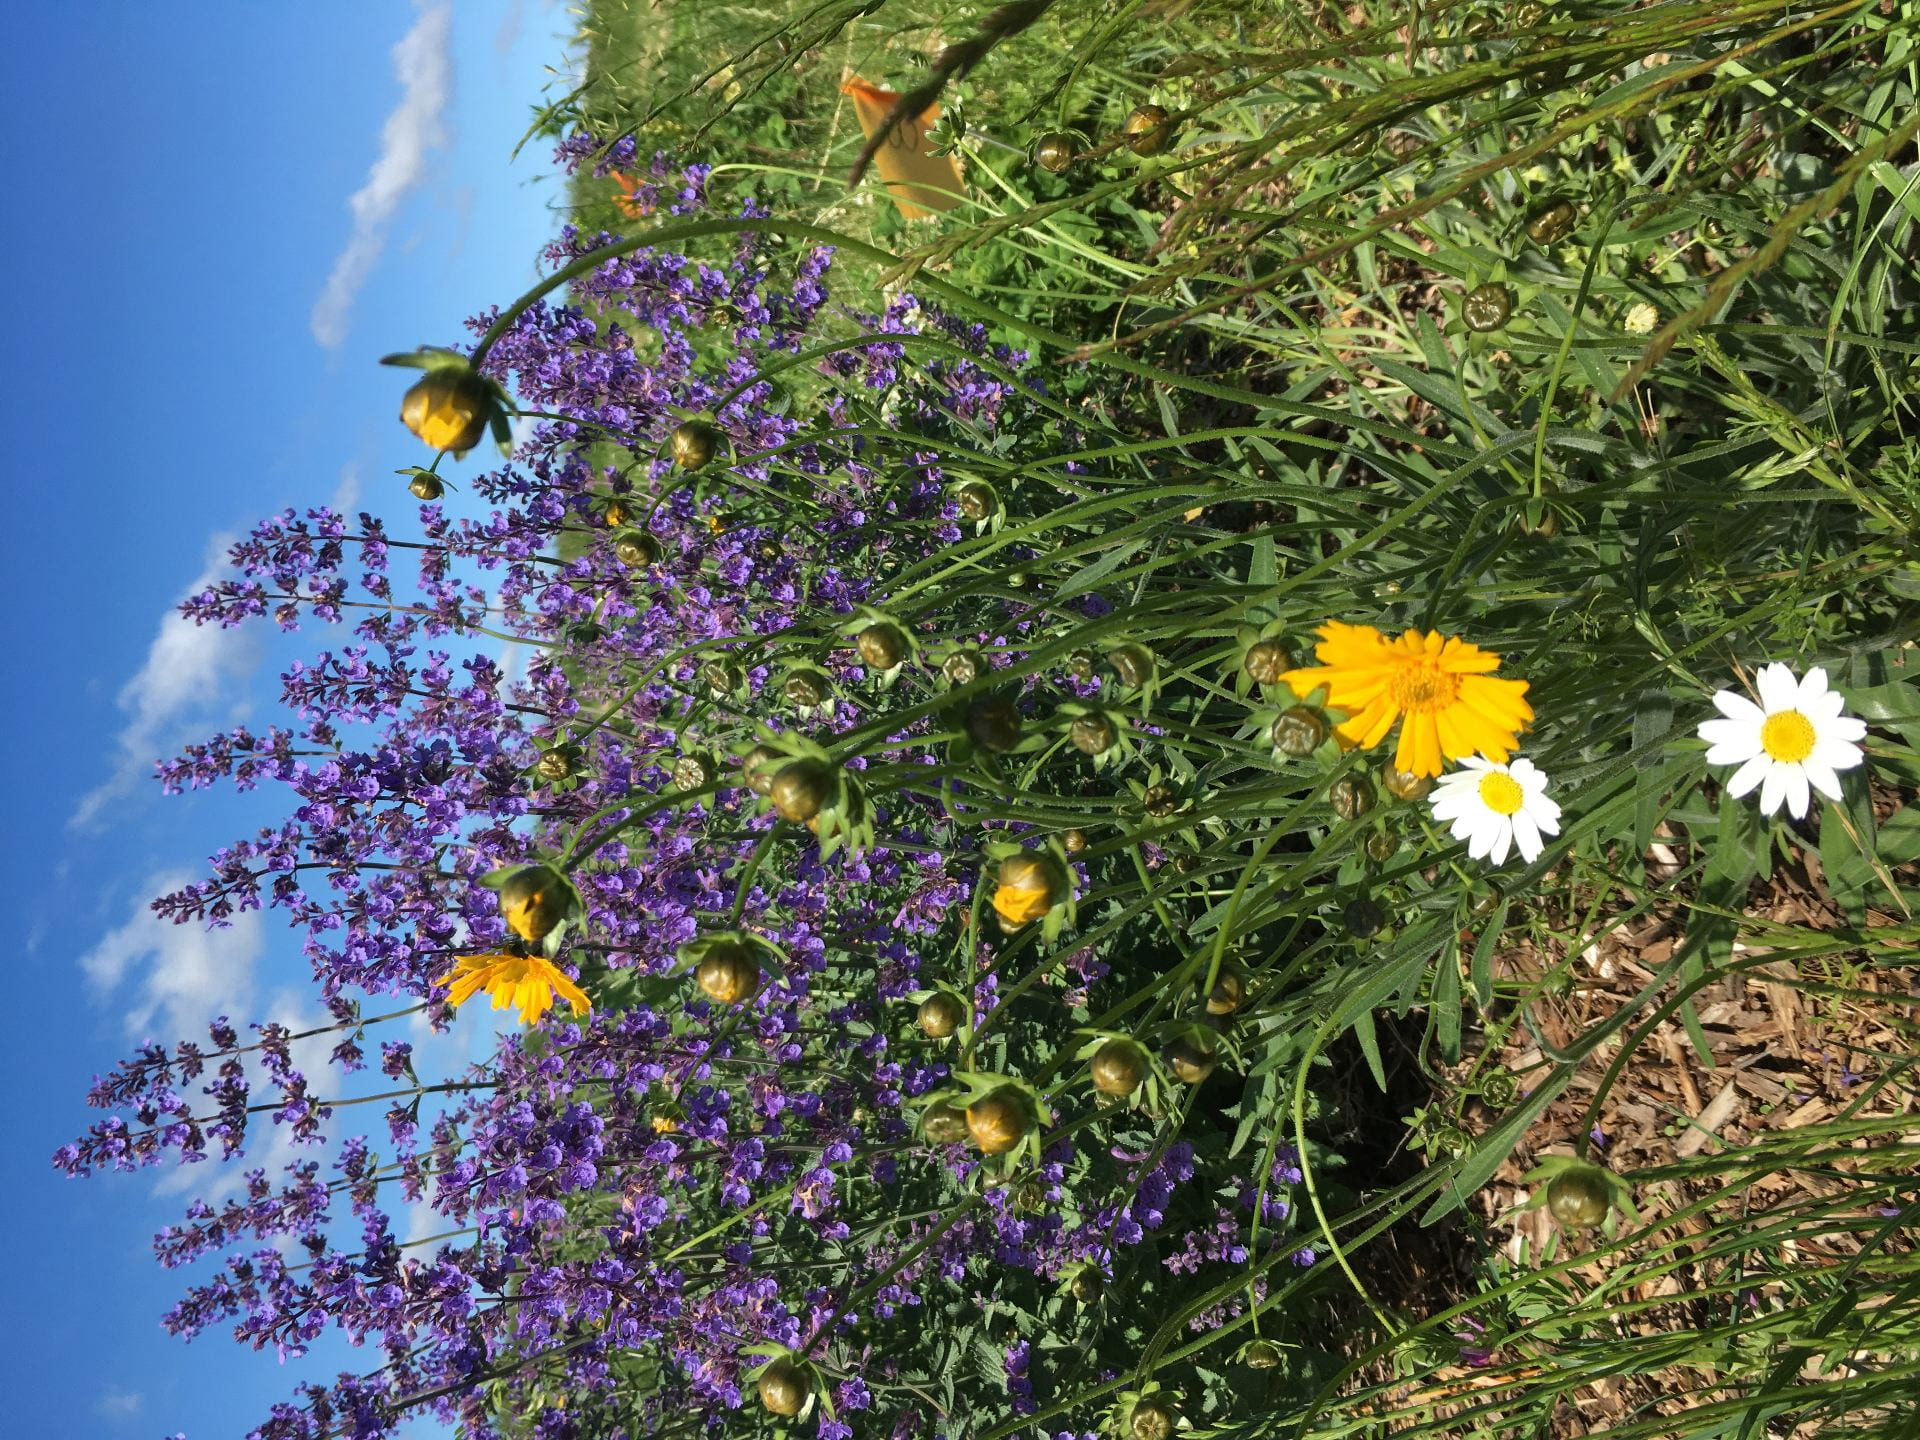
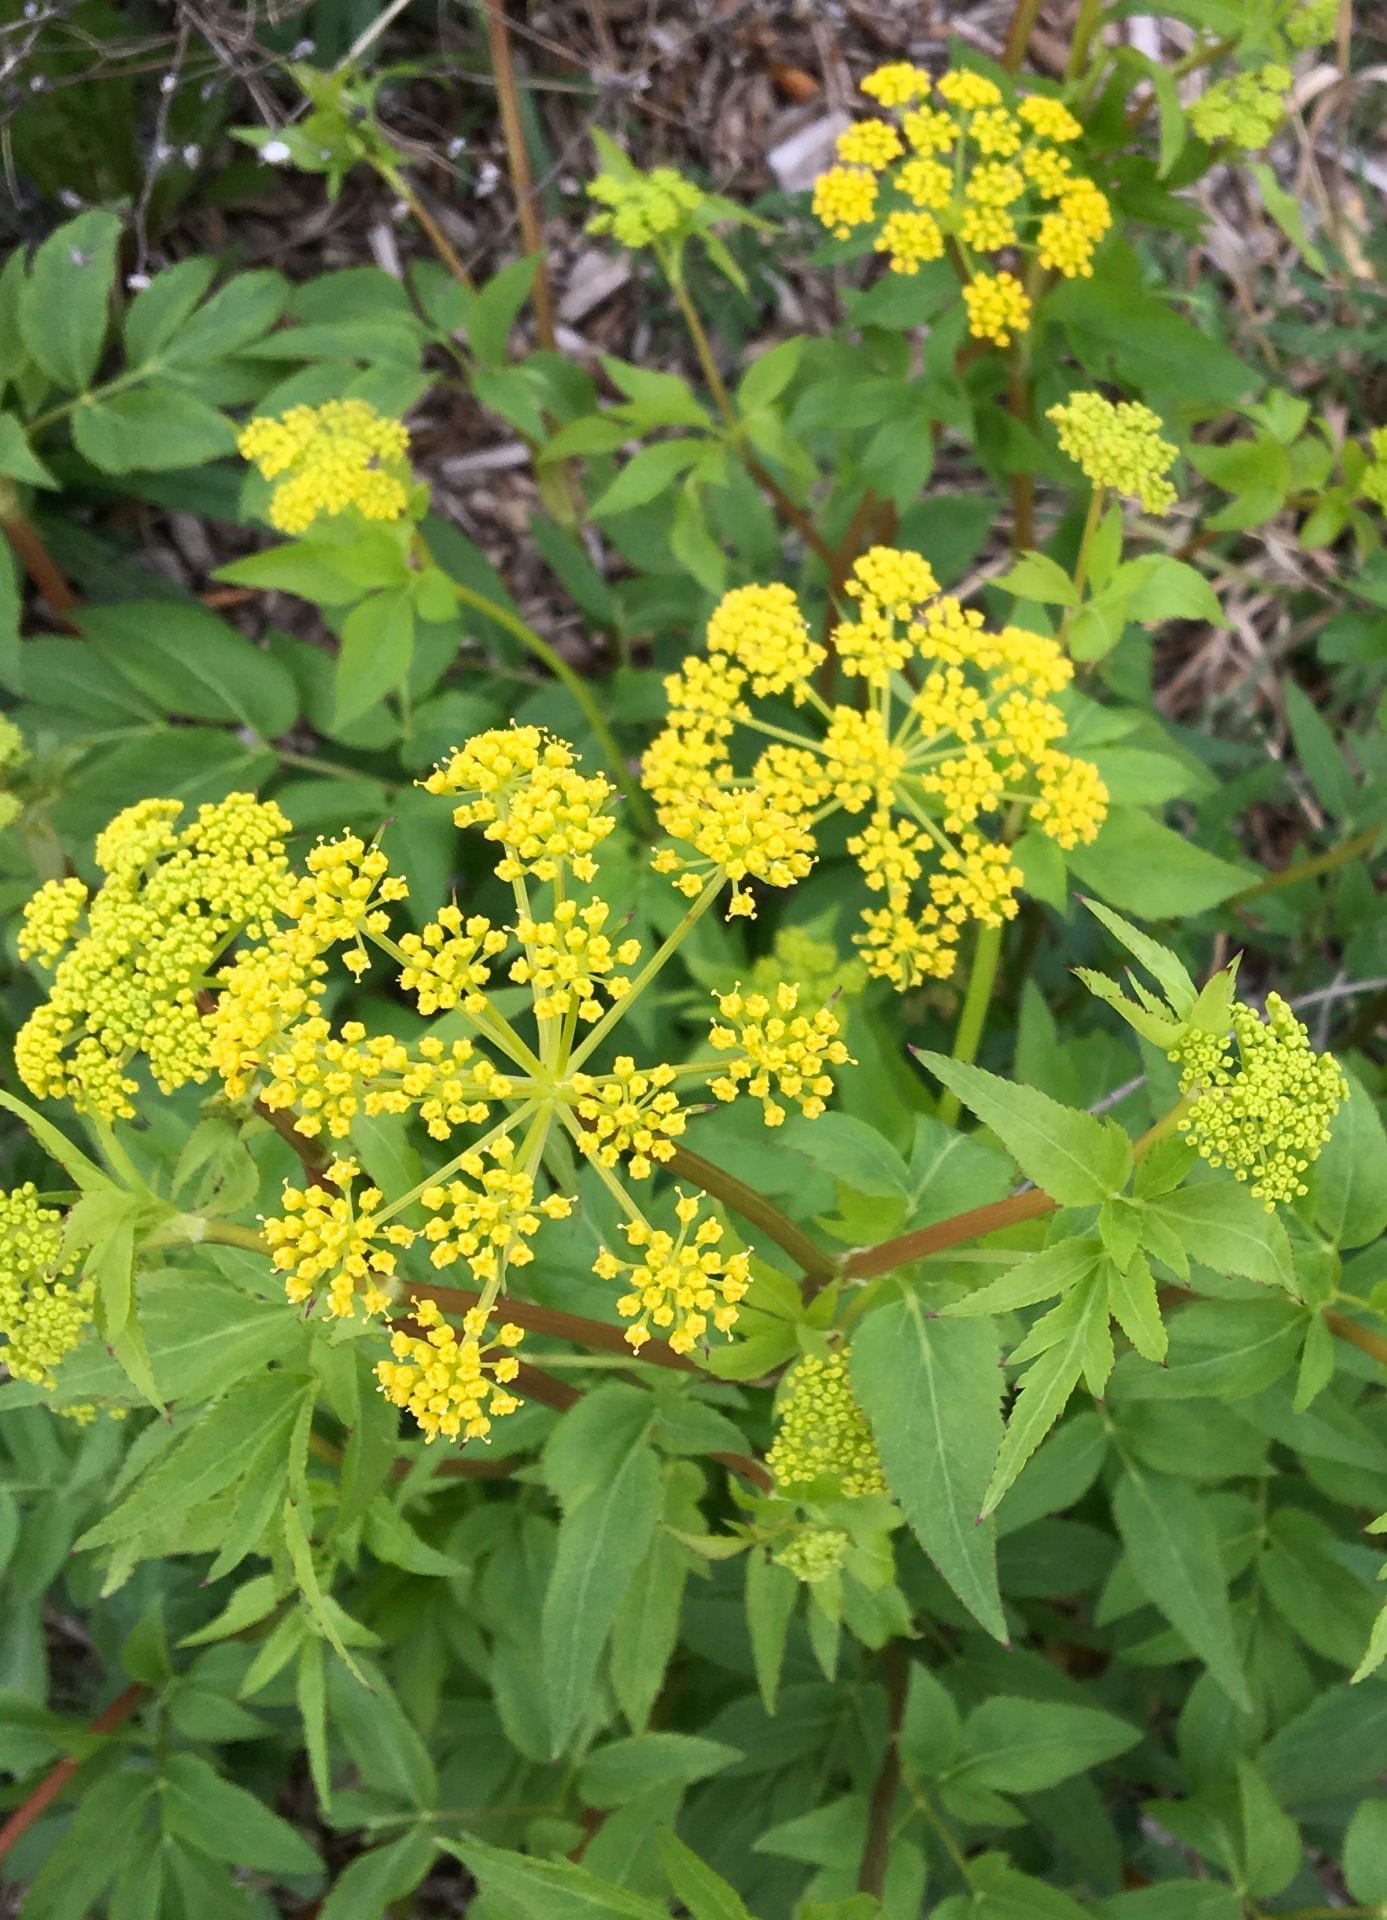
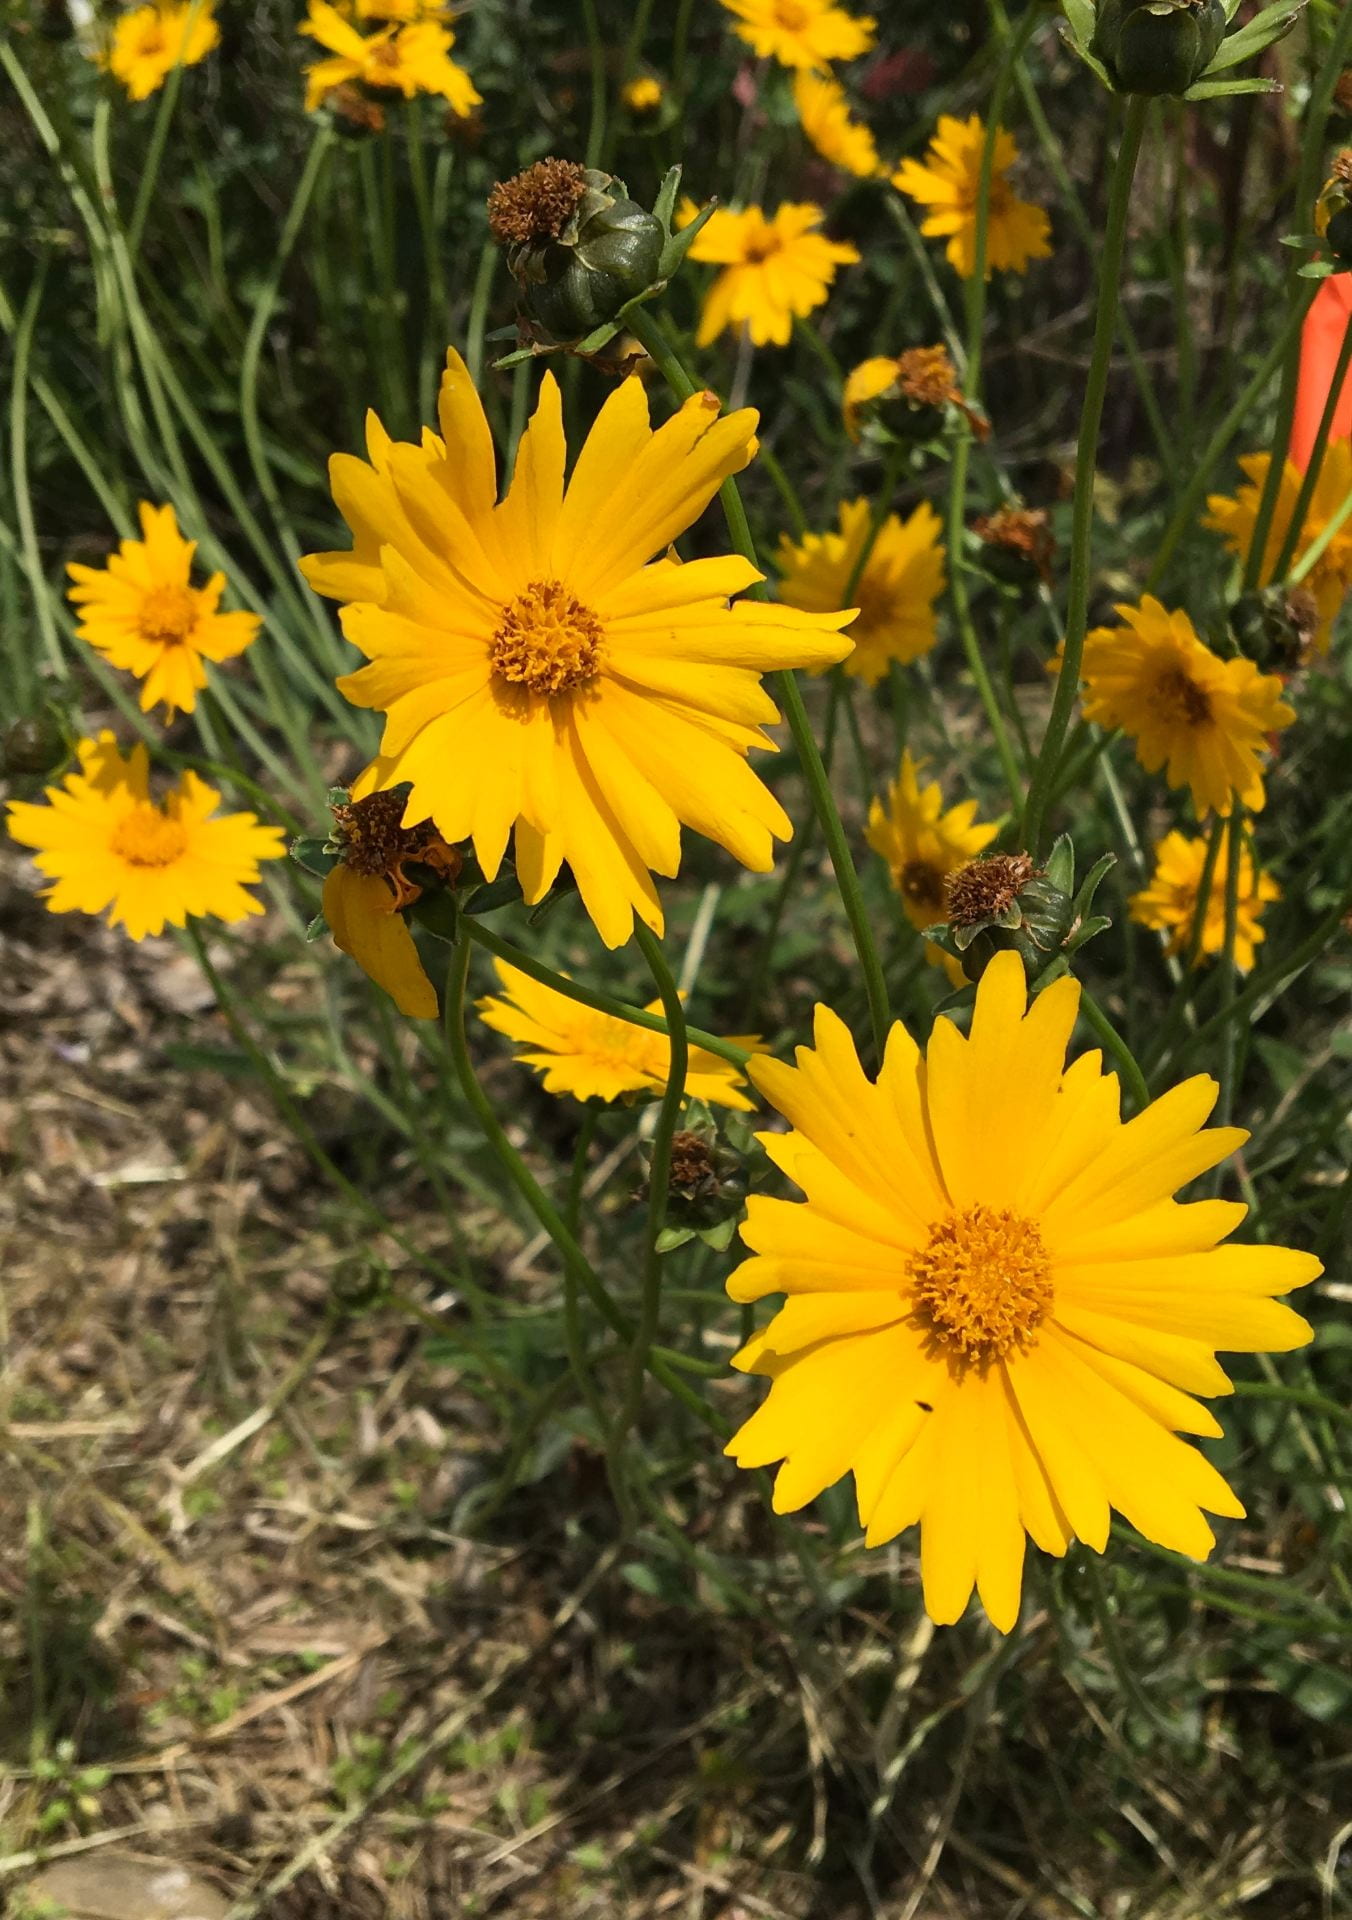
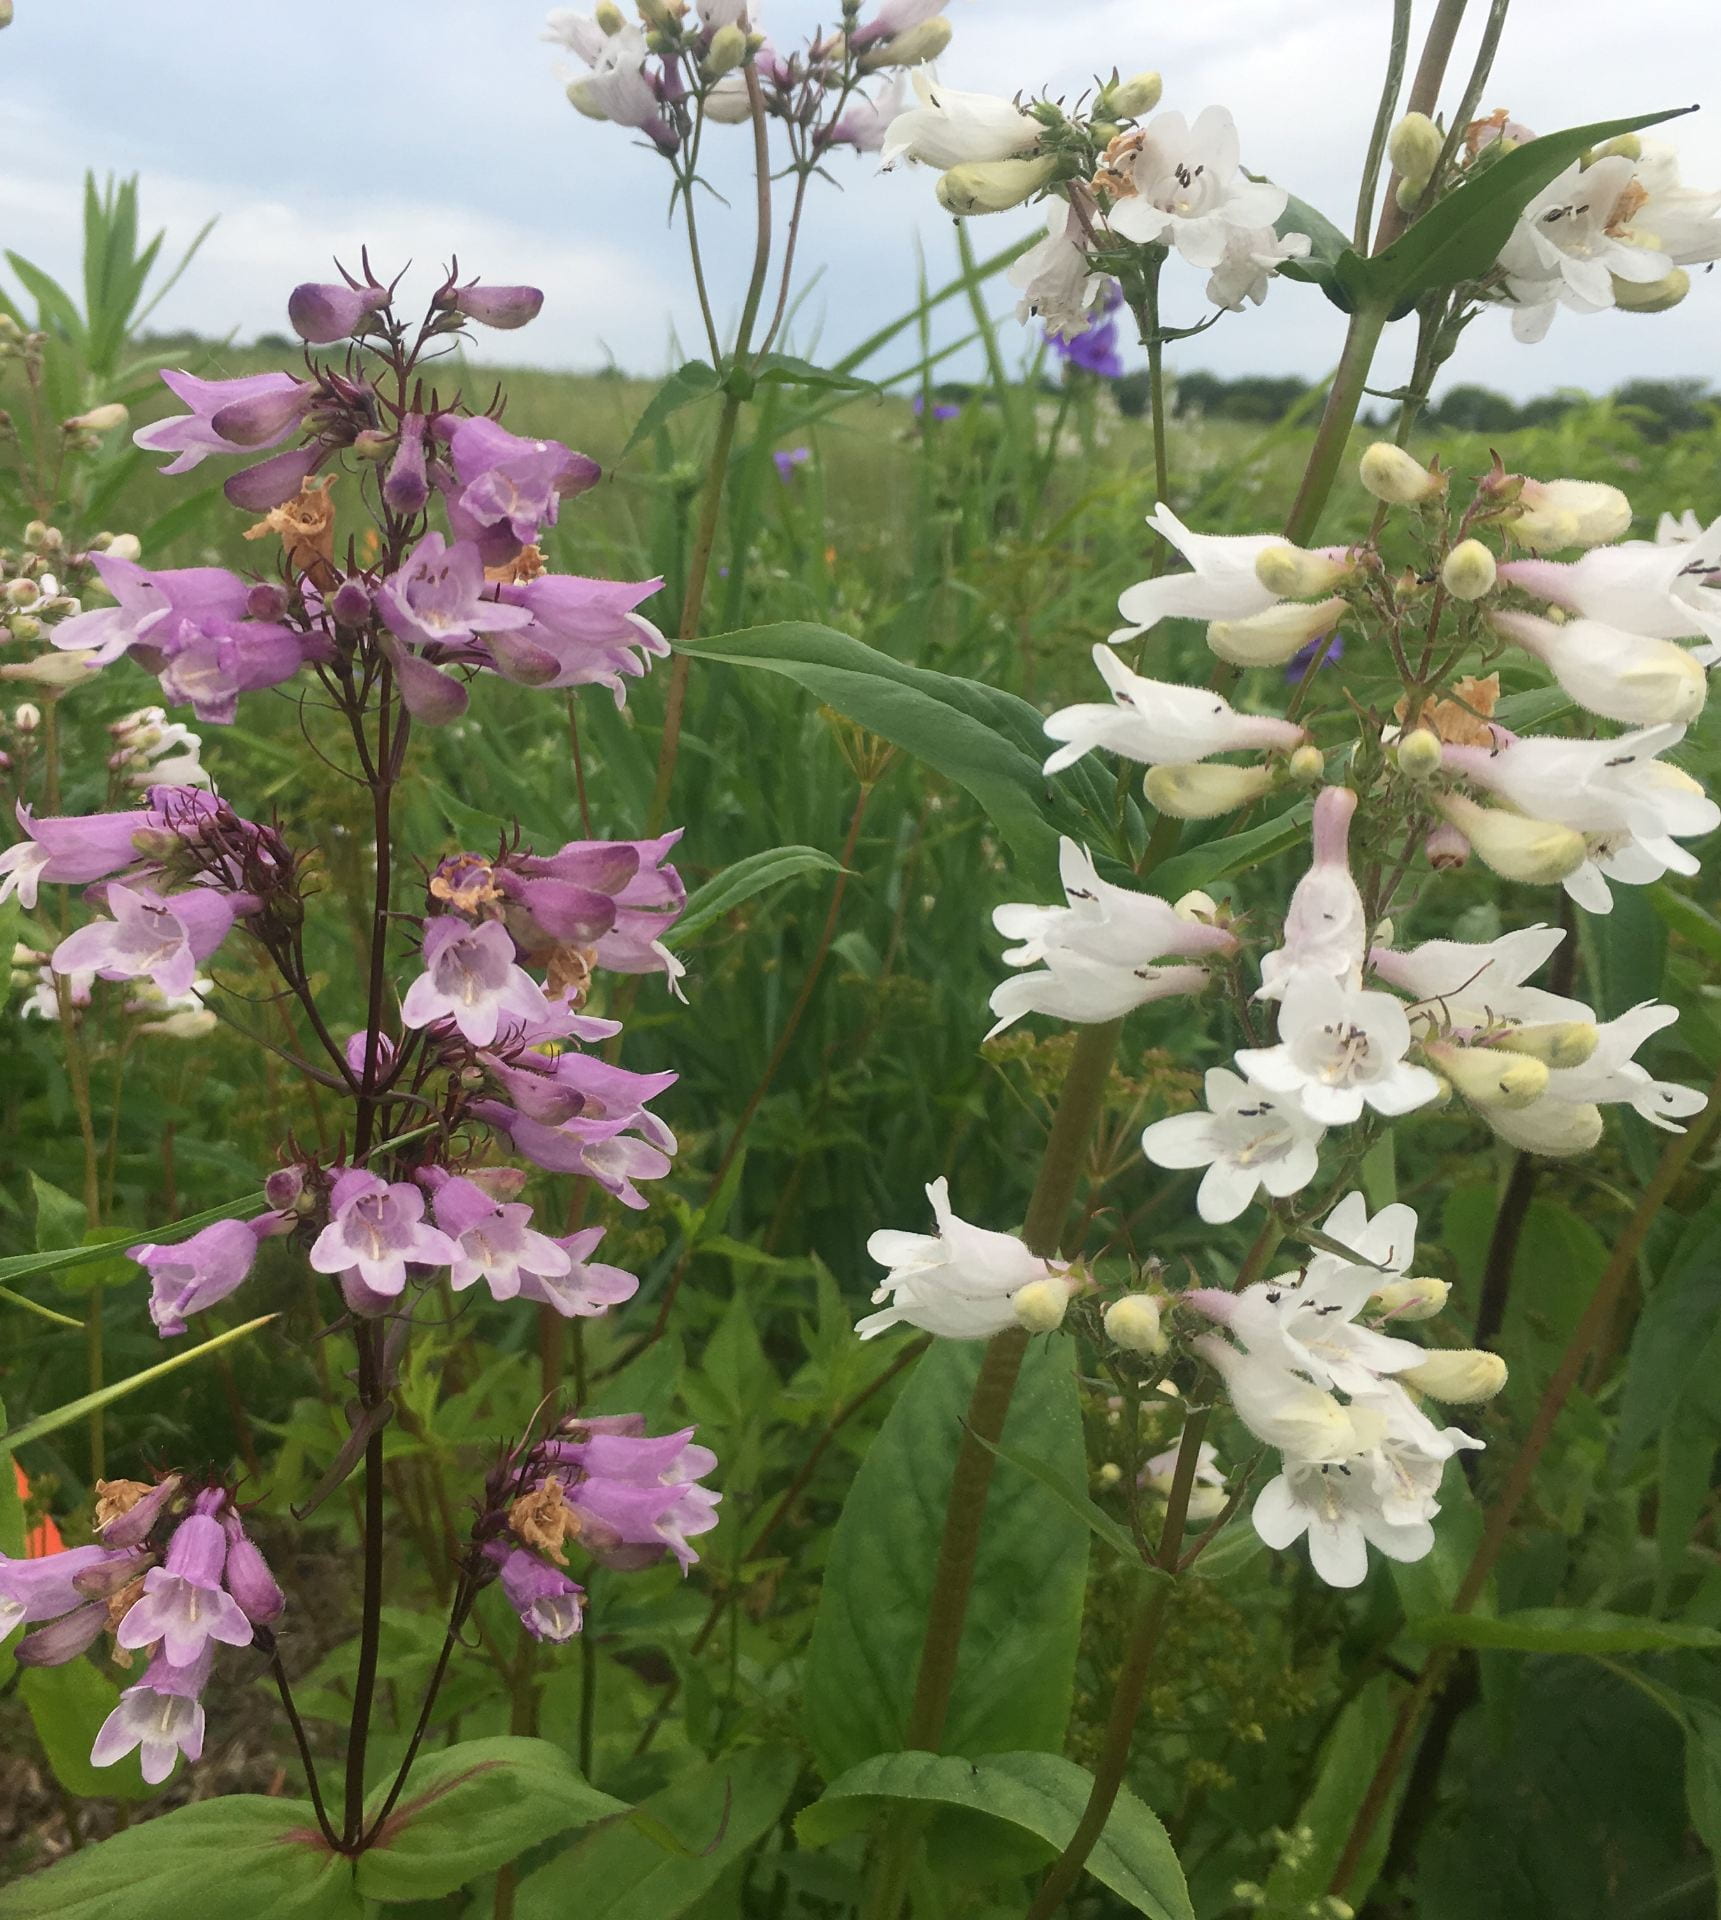
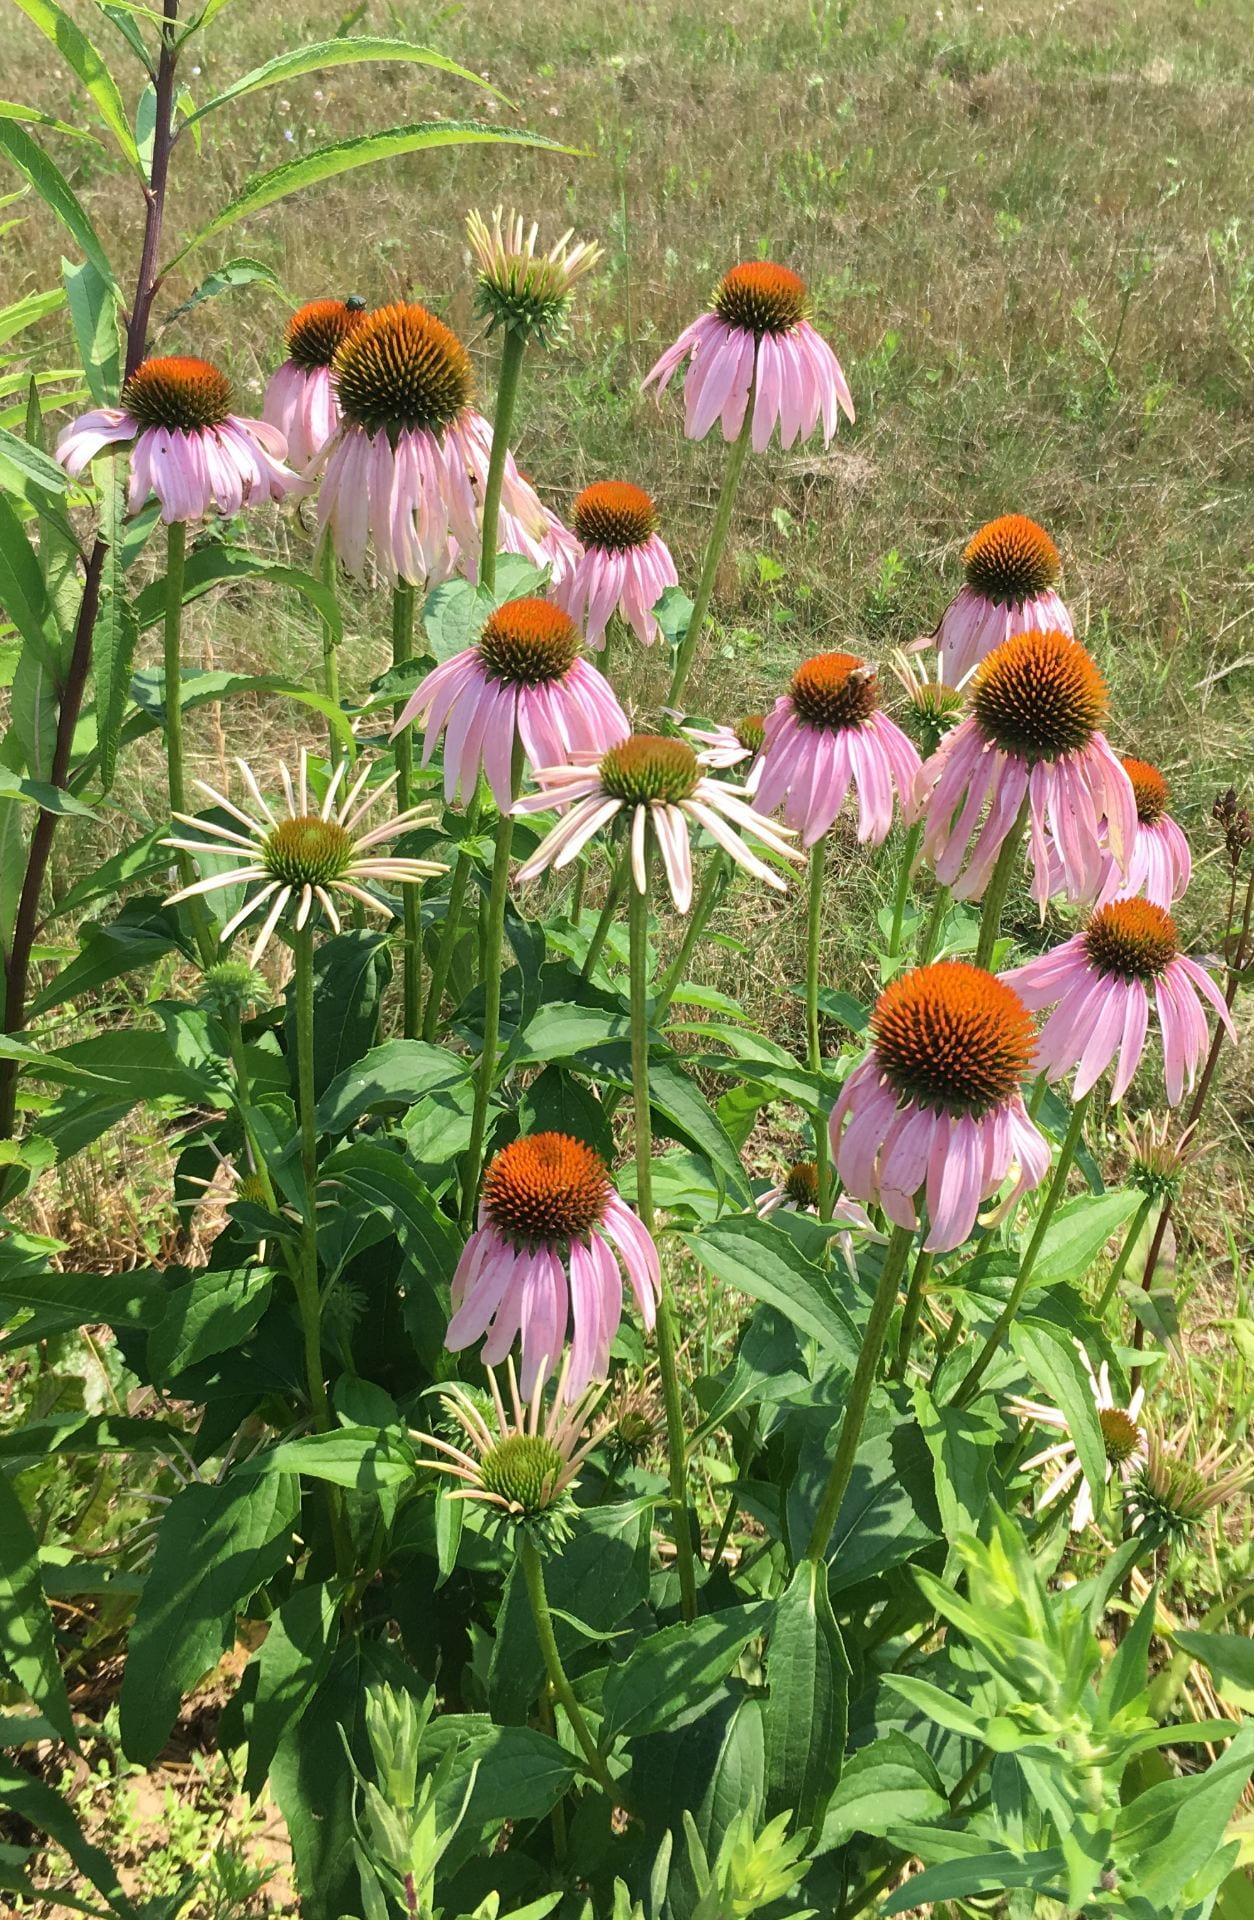
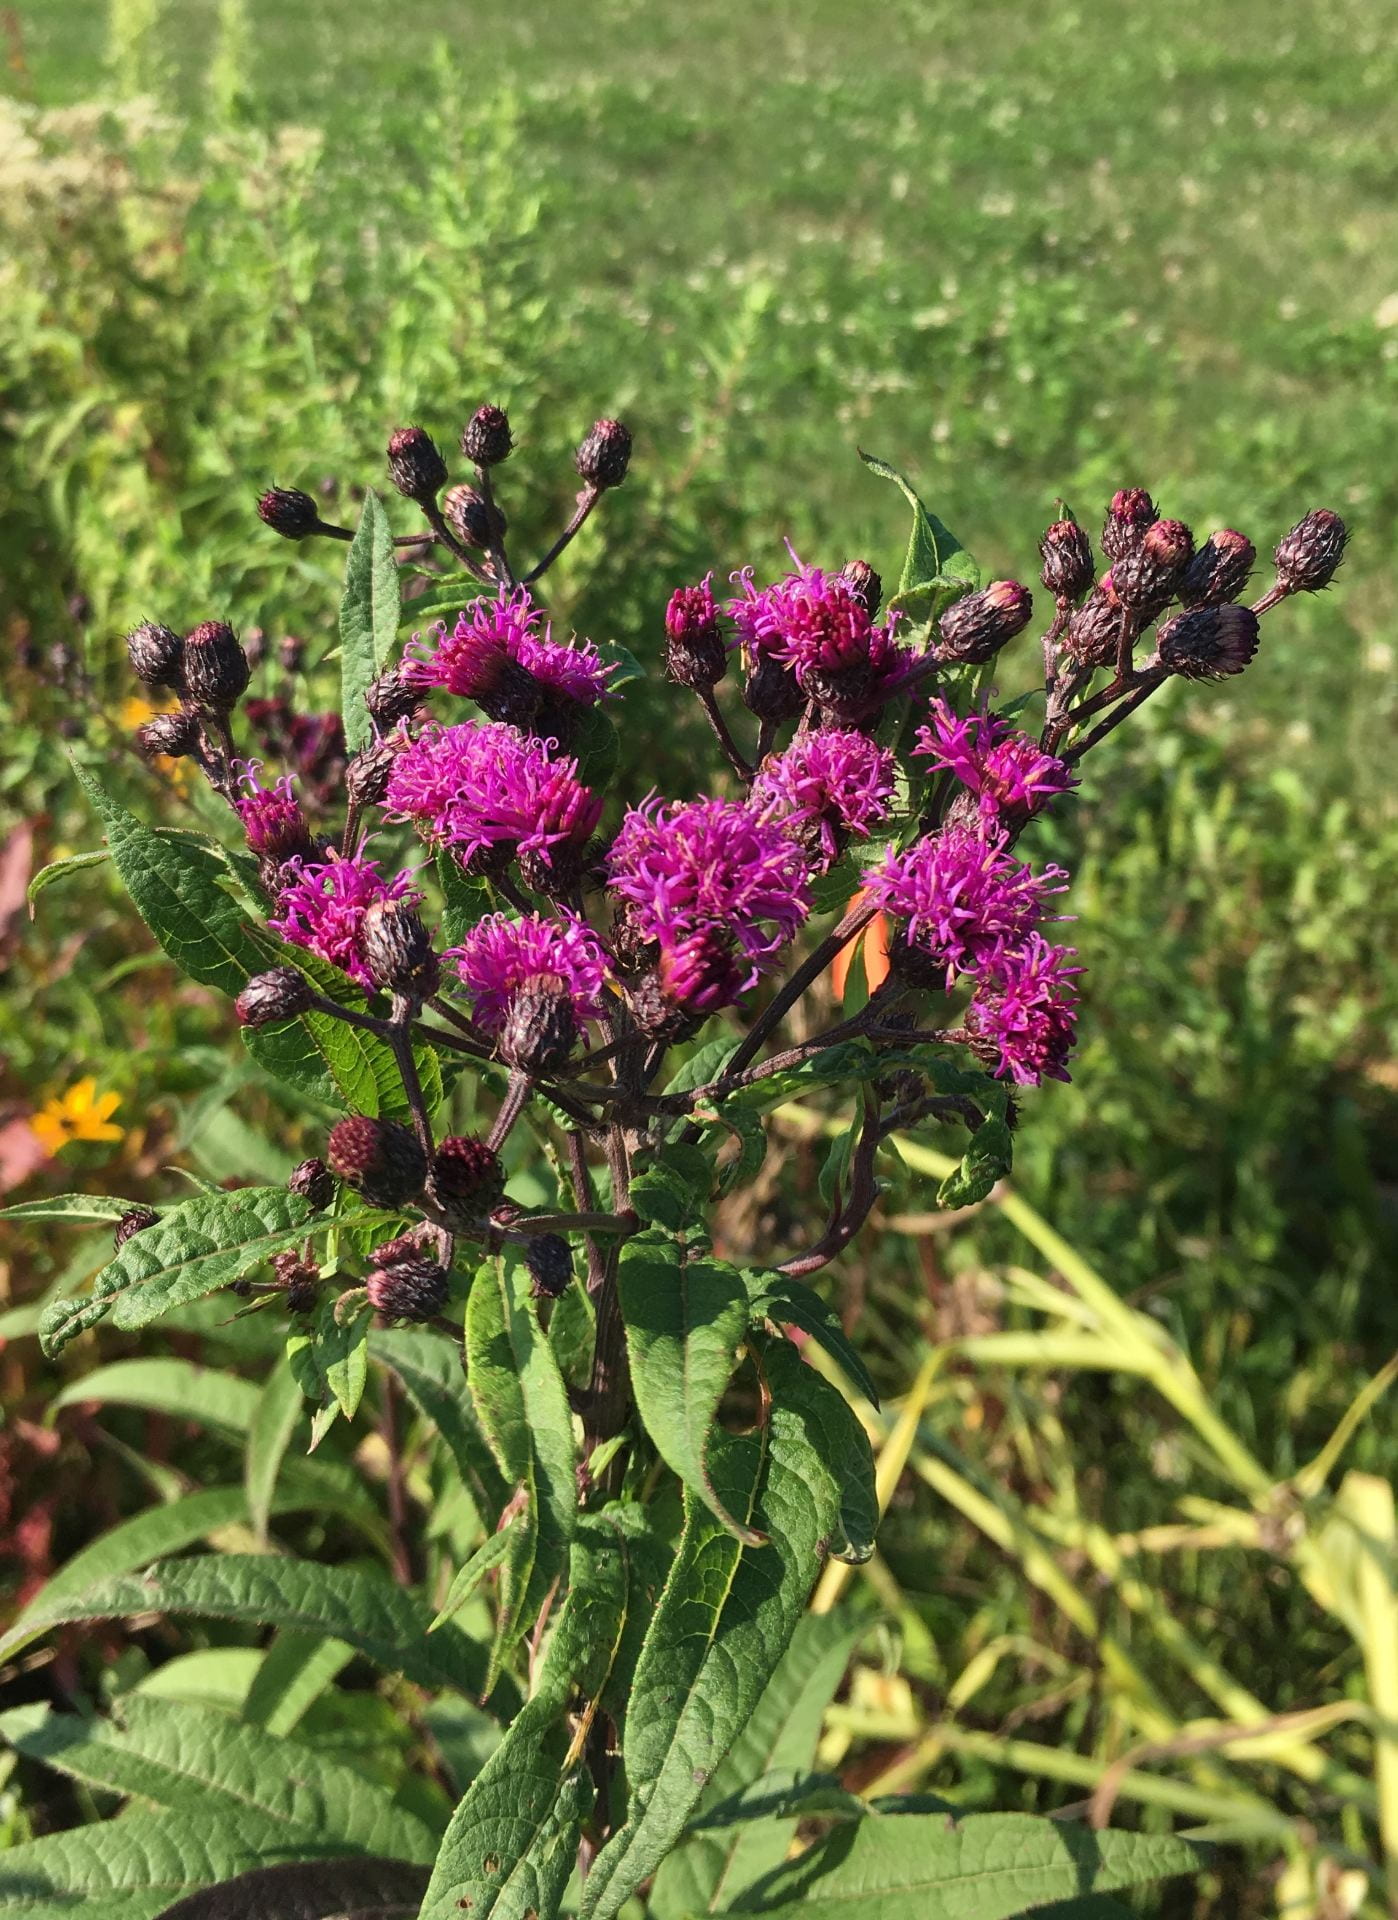
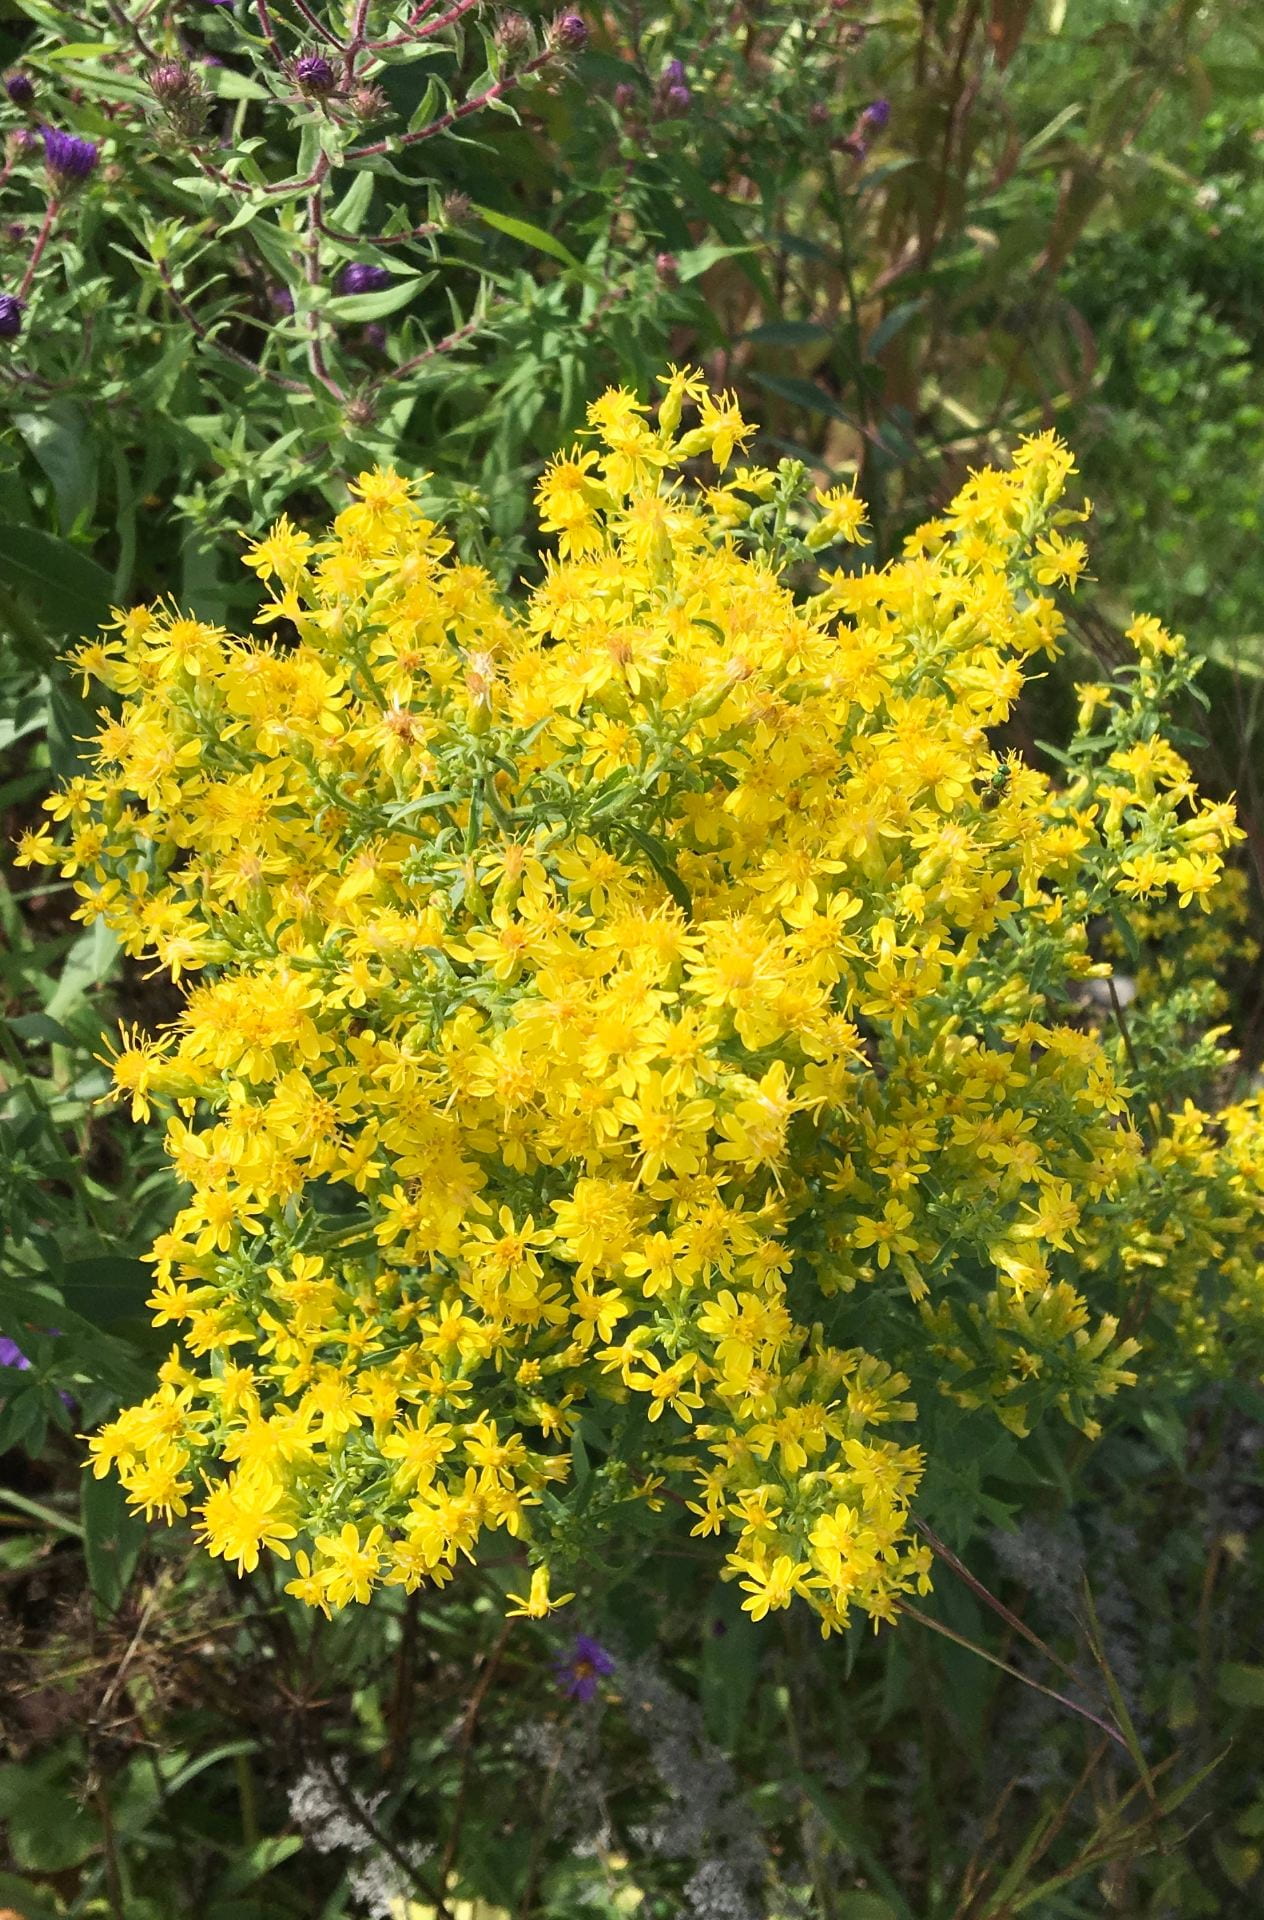
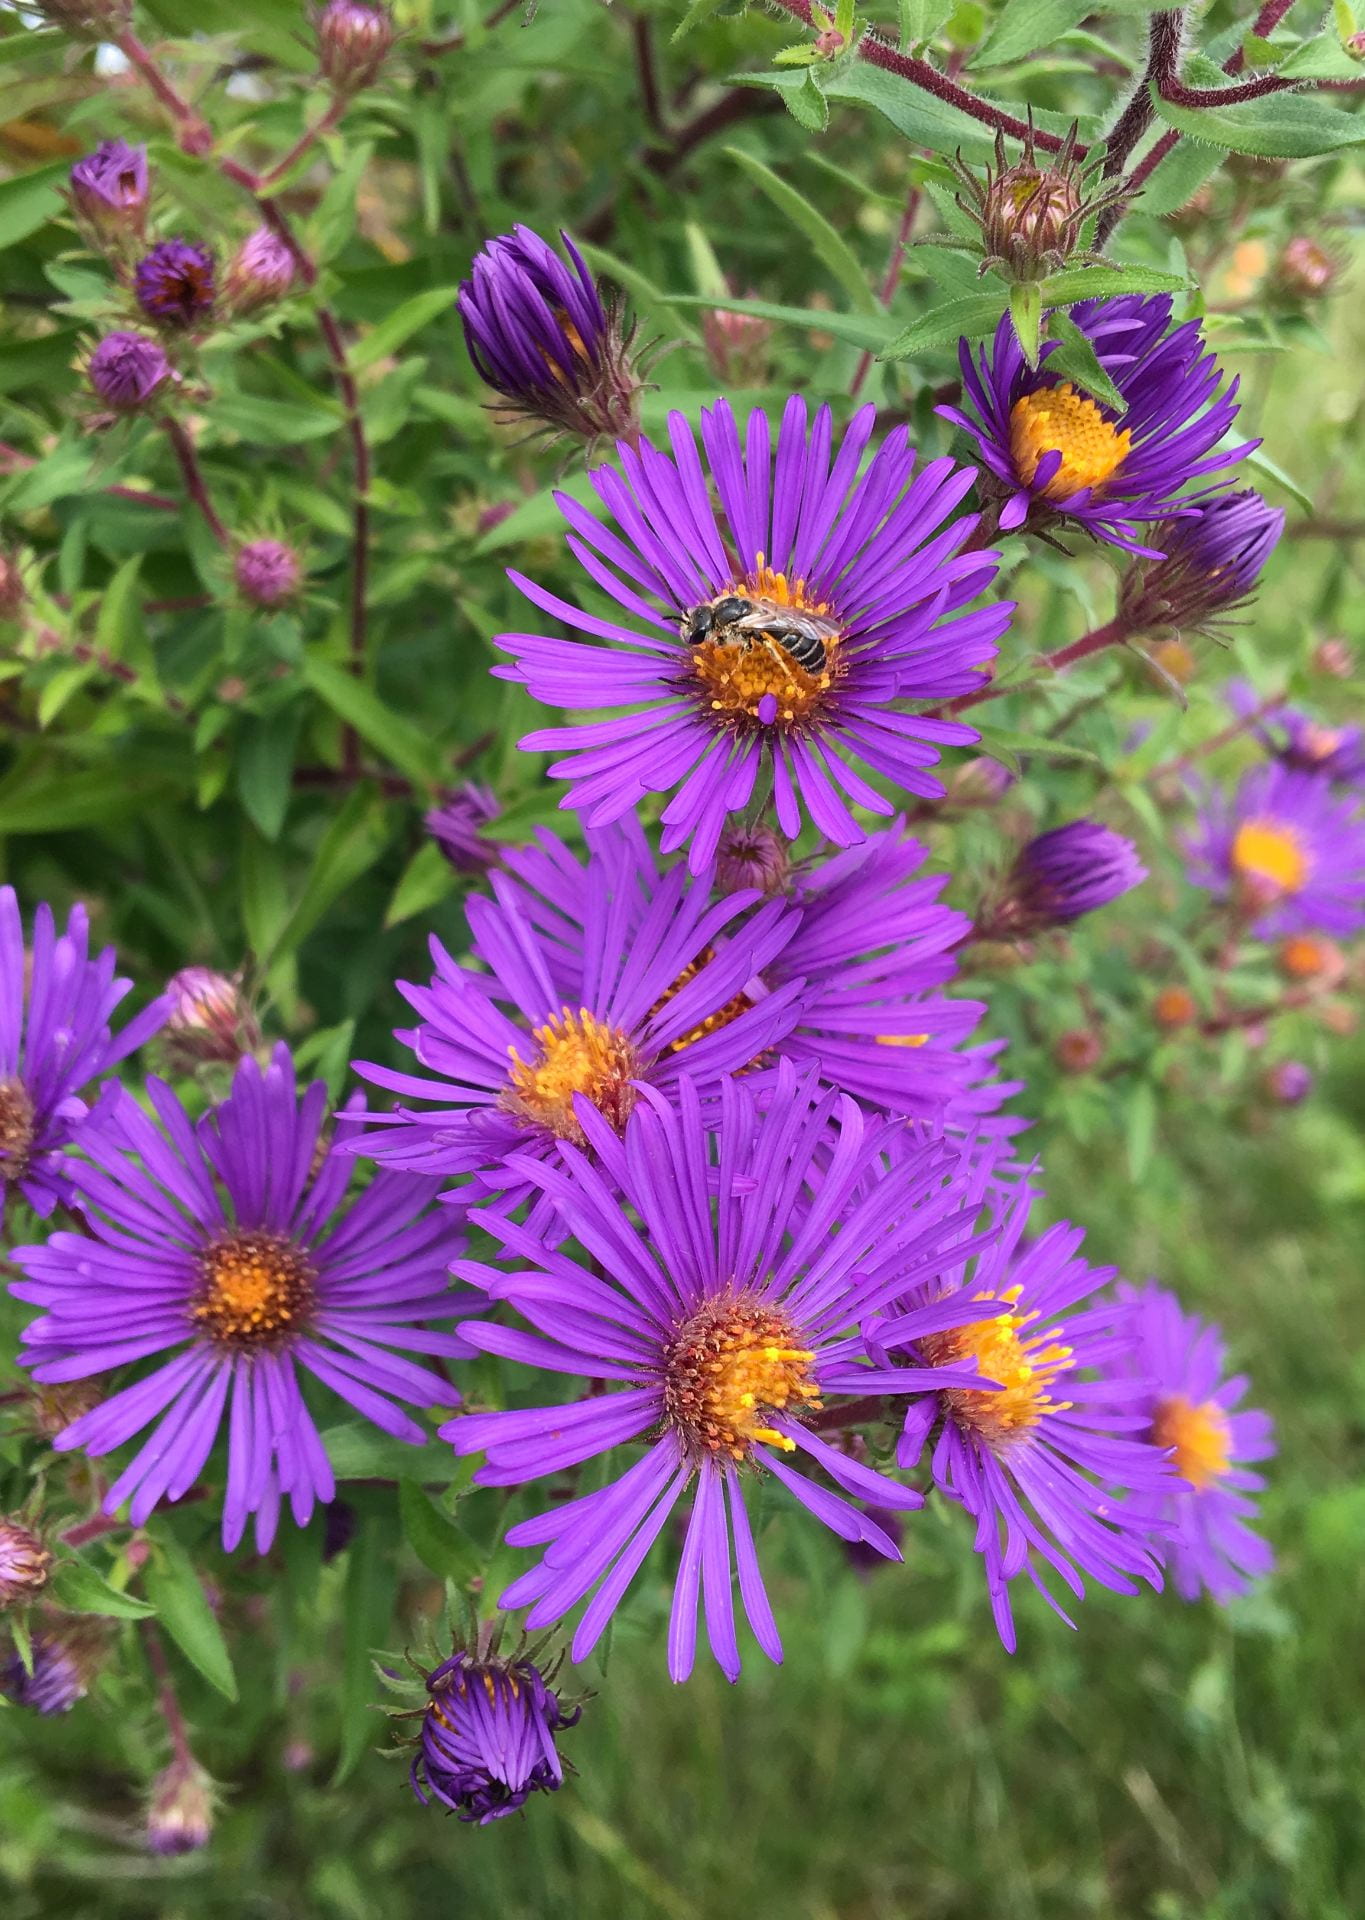
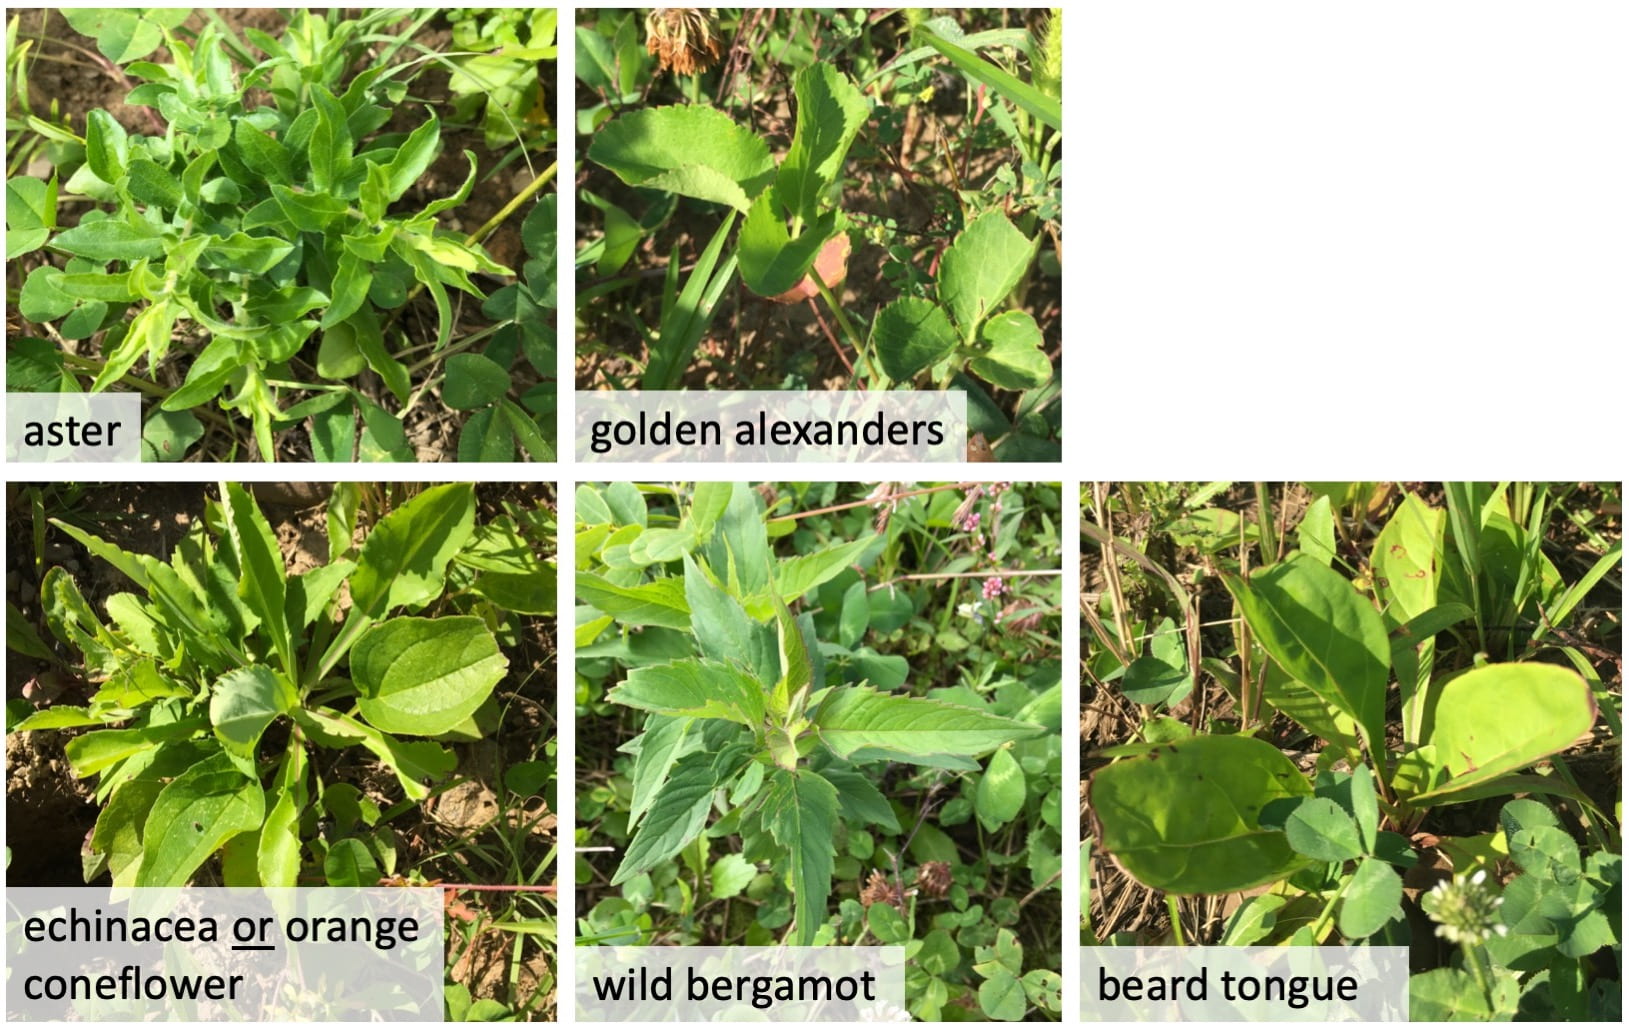
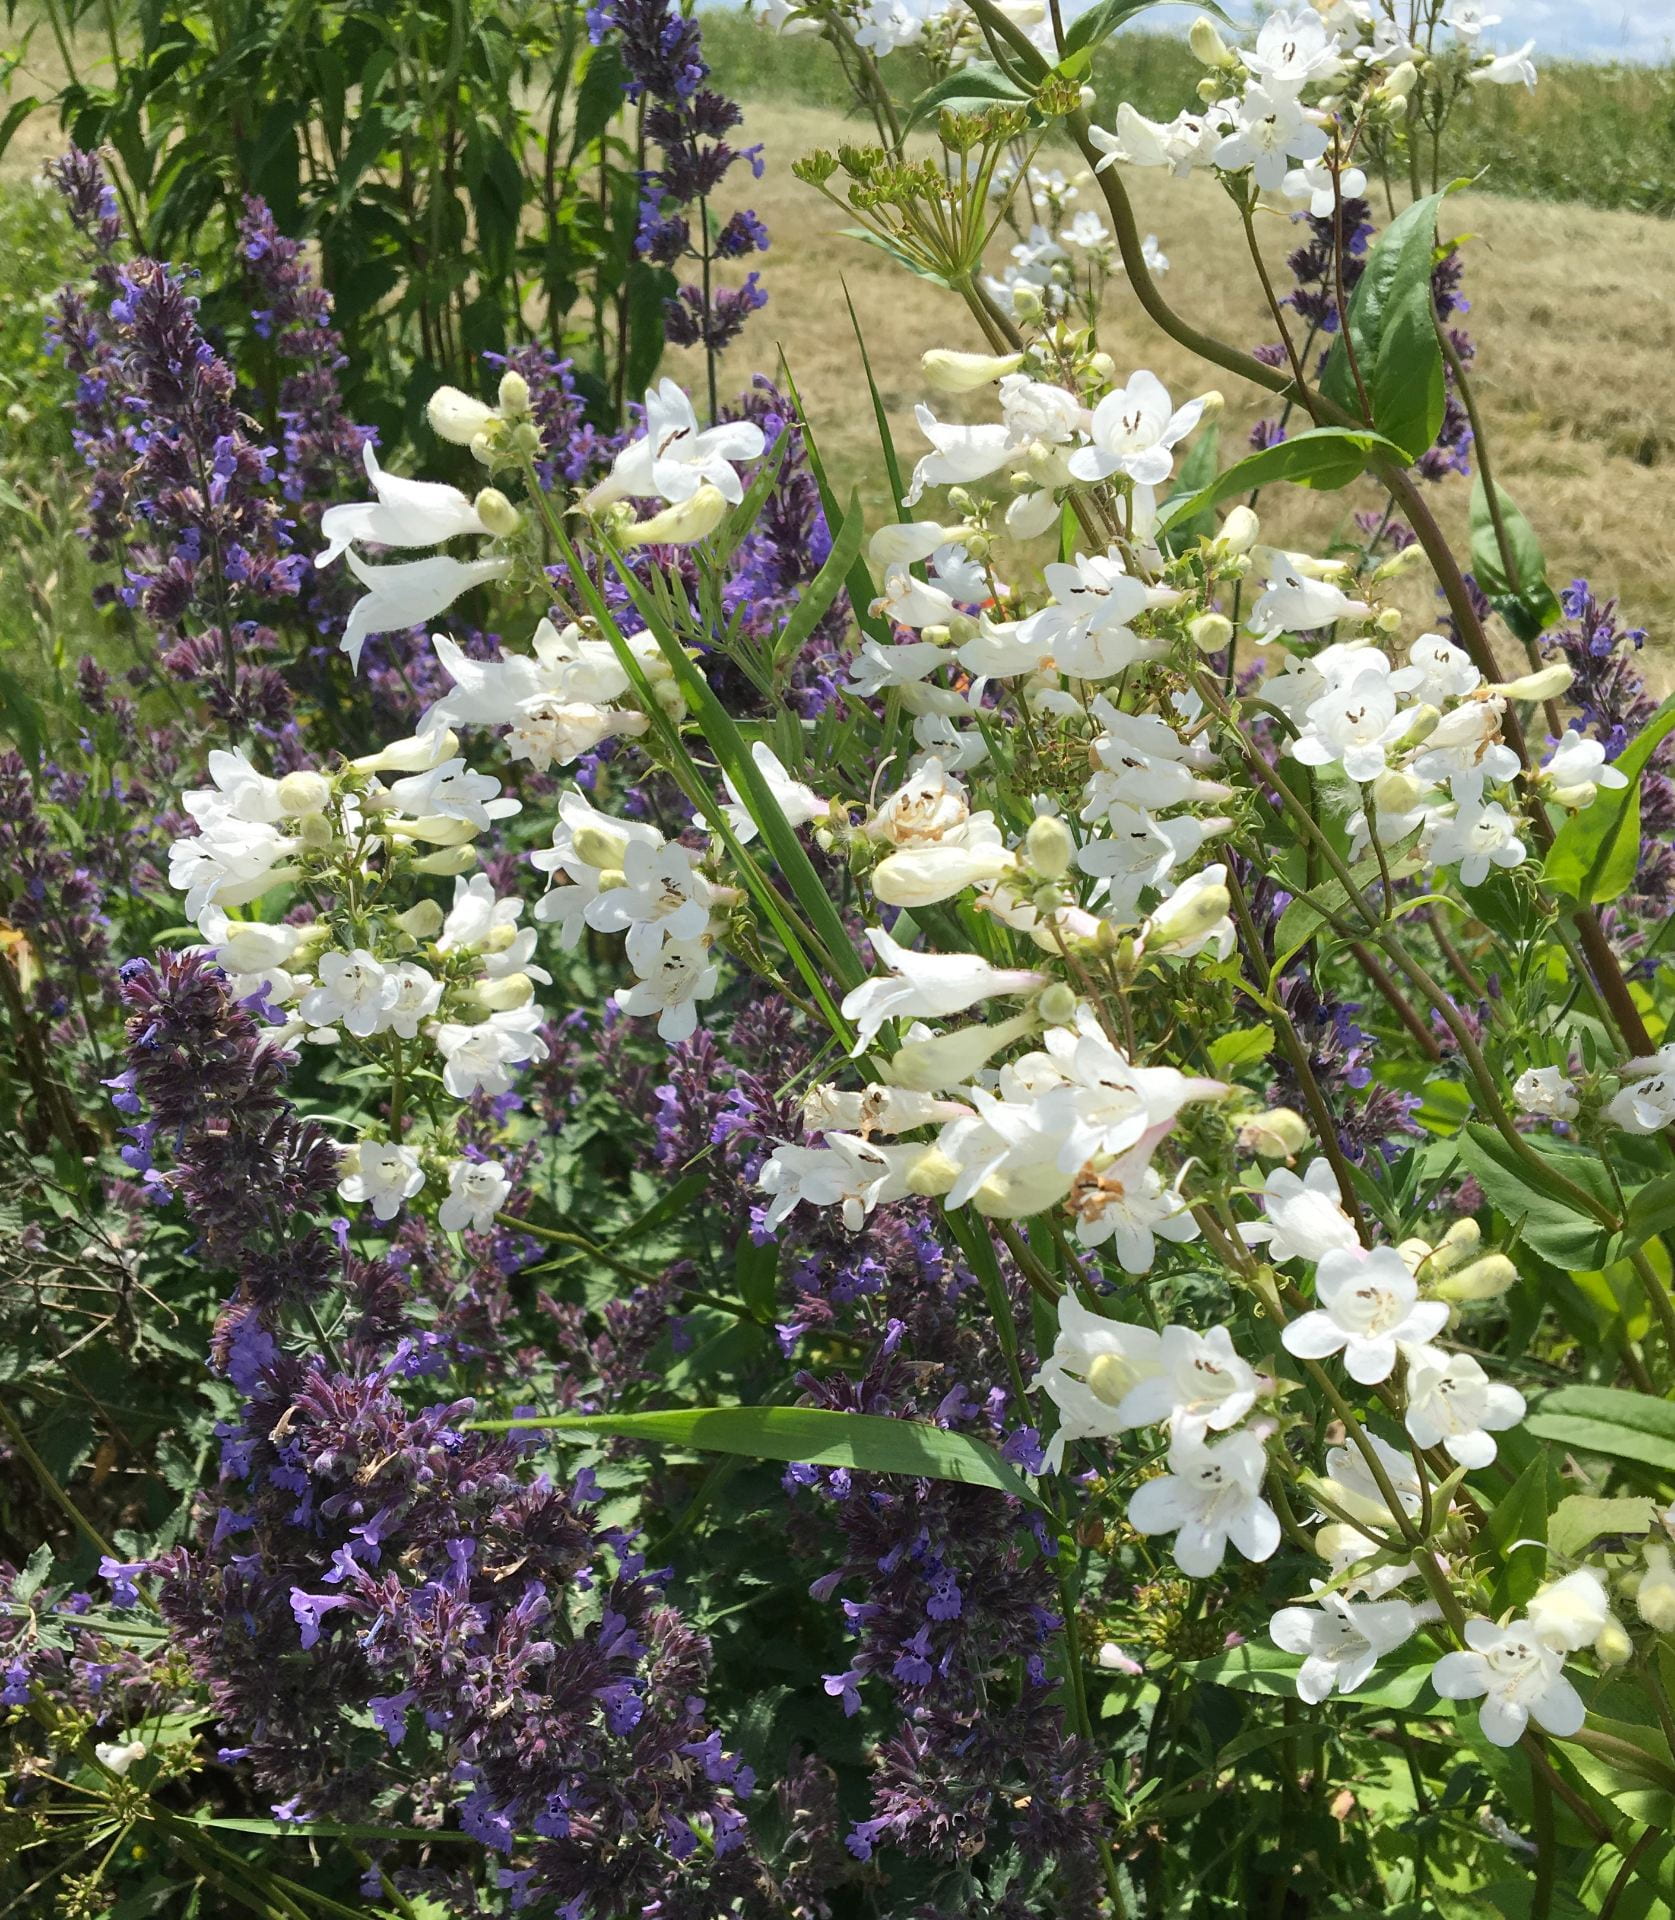
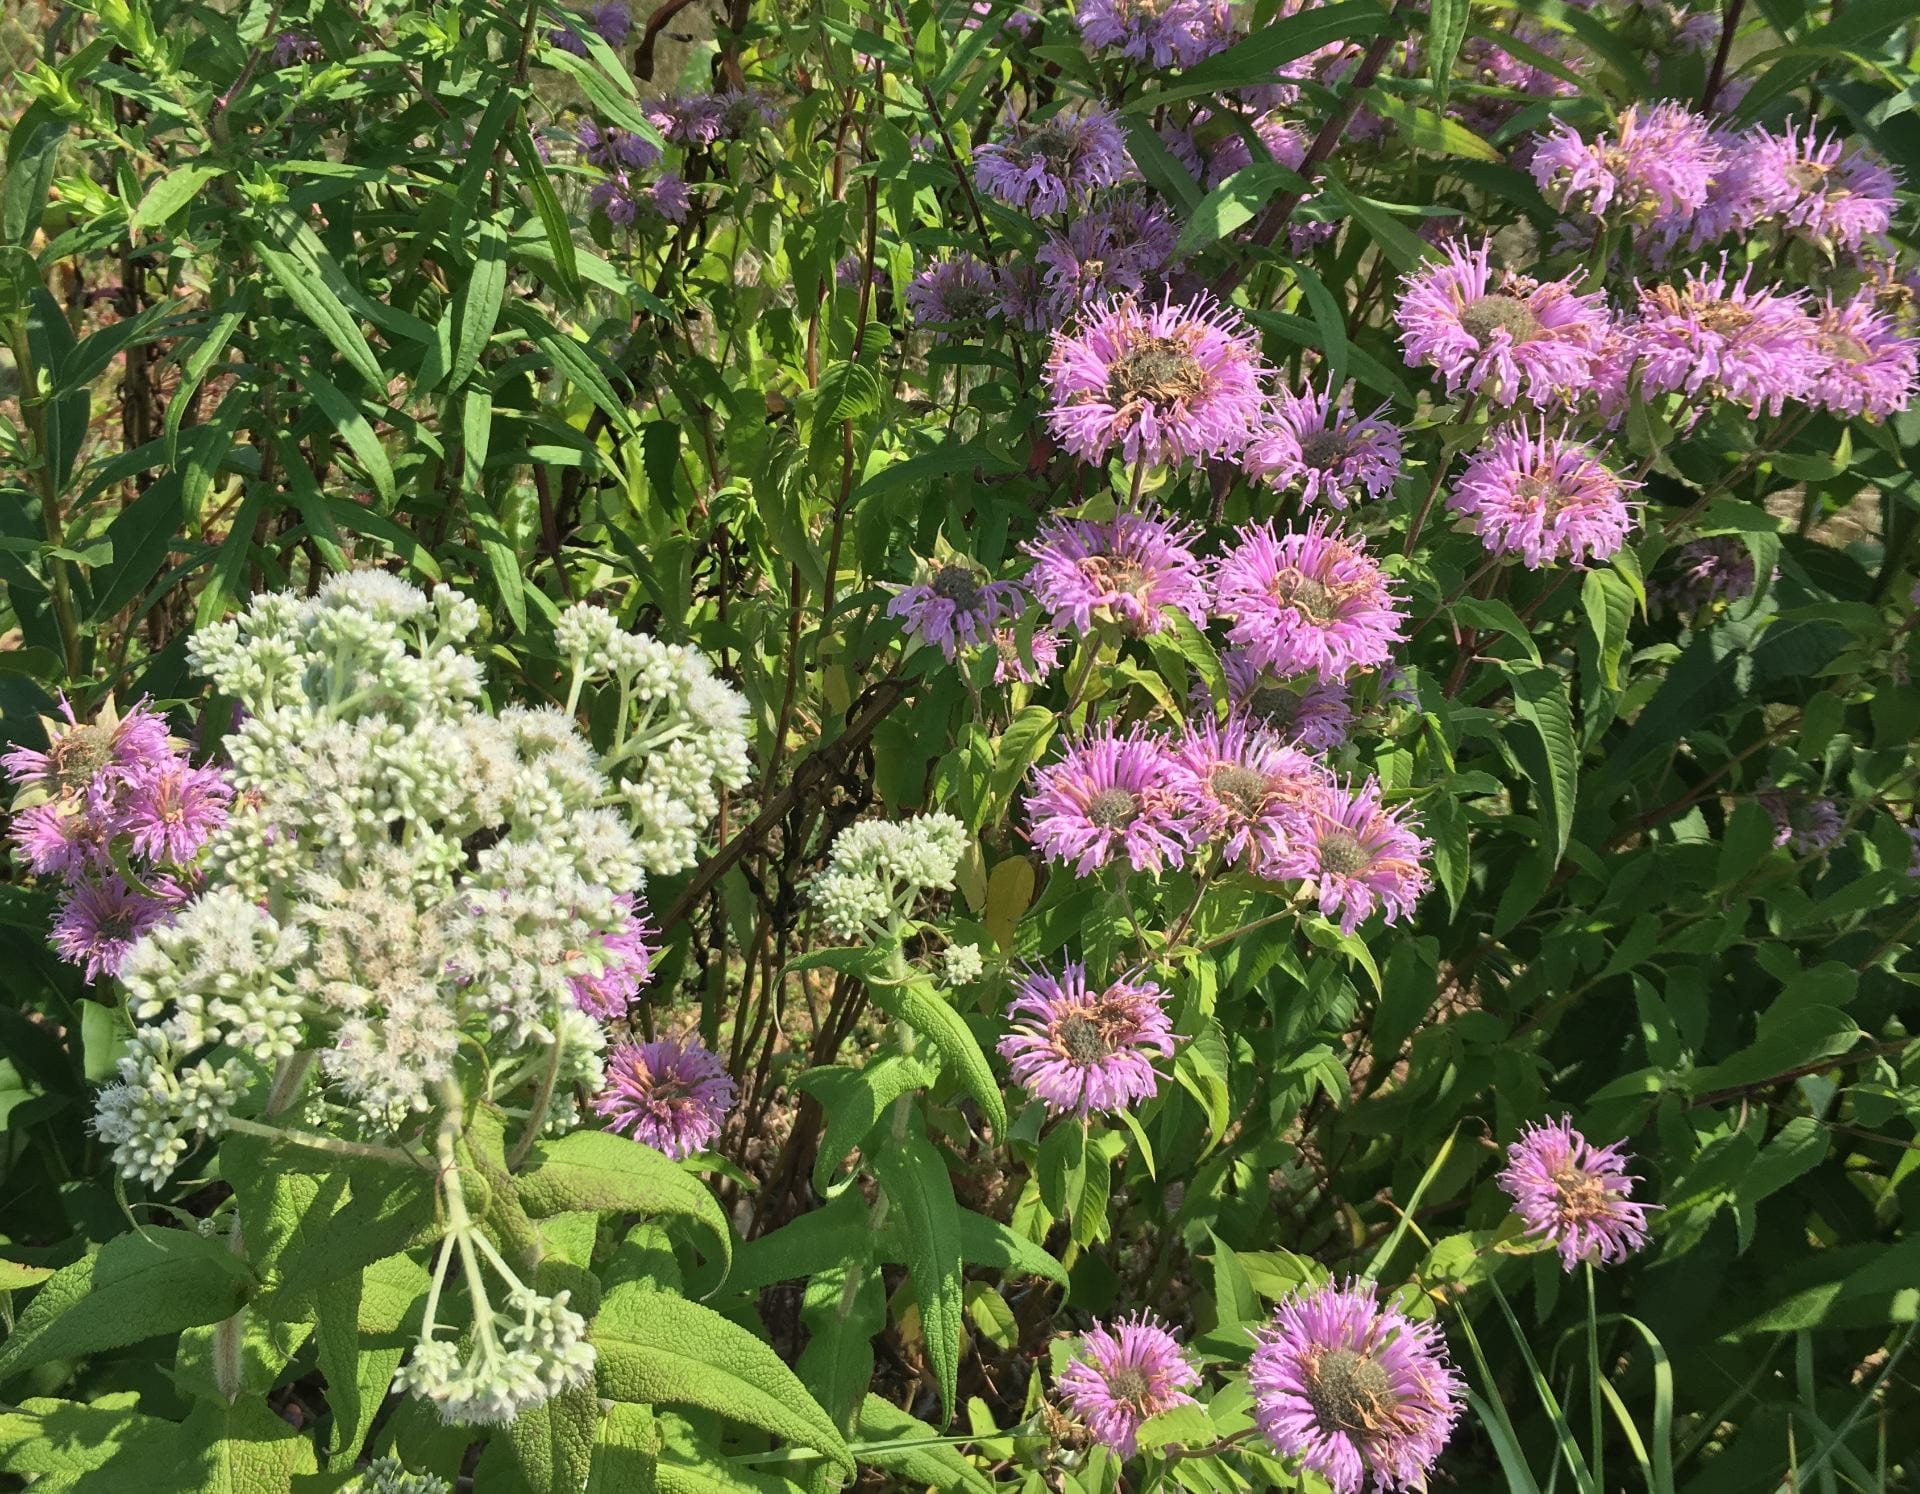
Here’s what each species looks like:
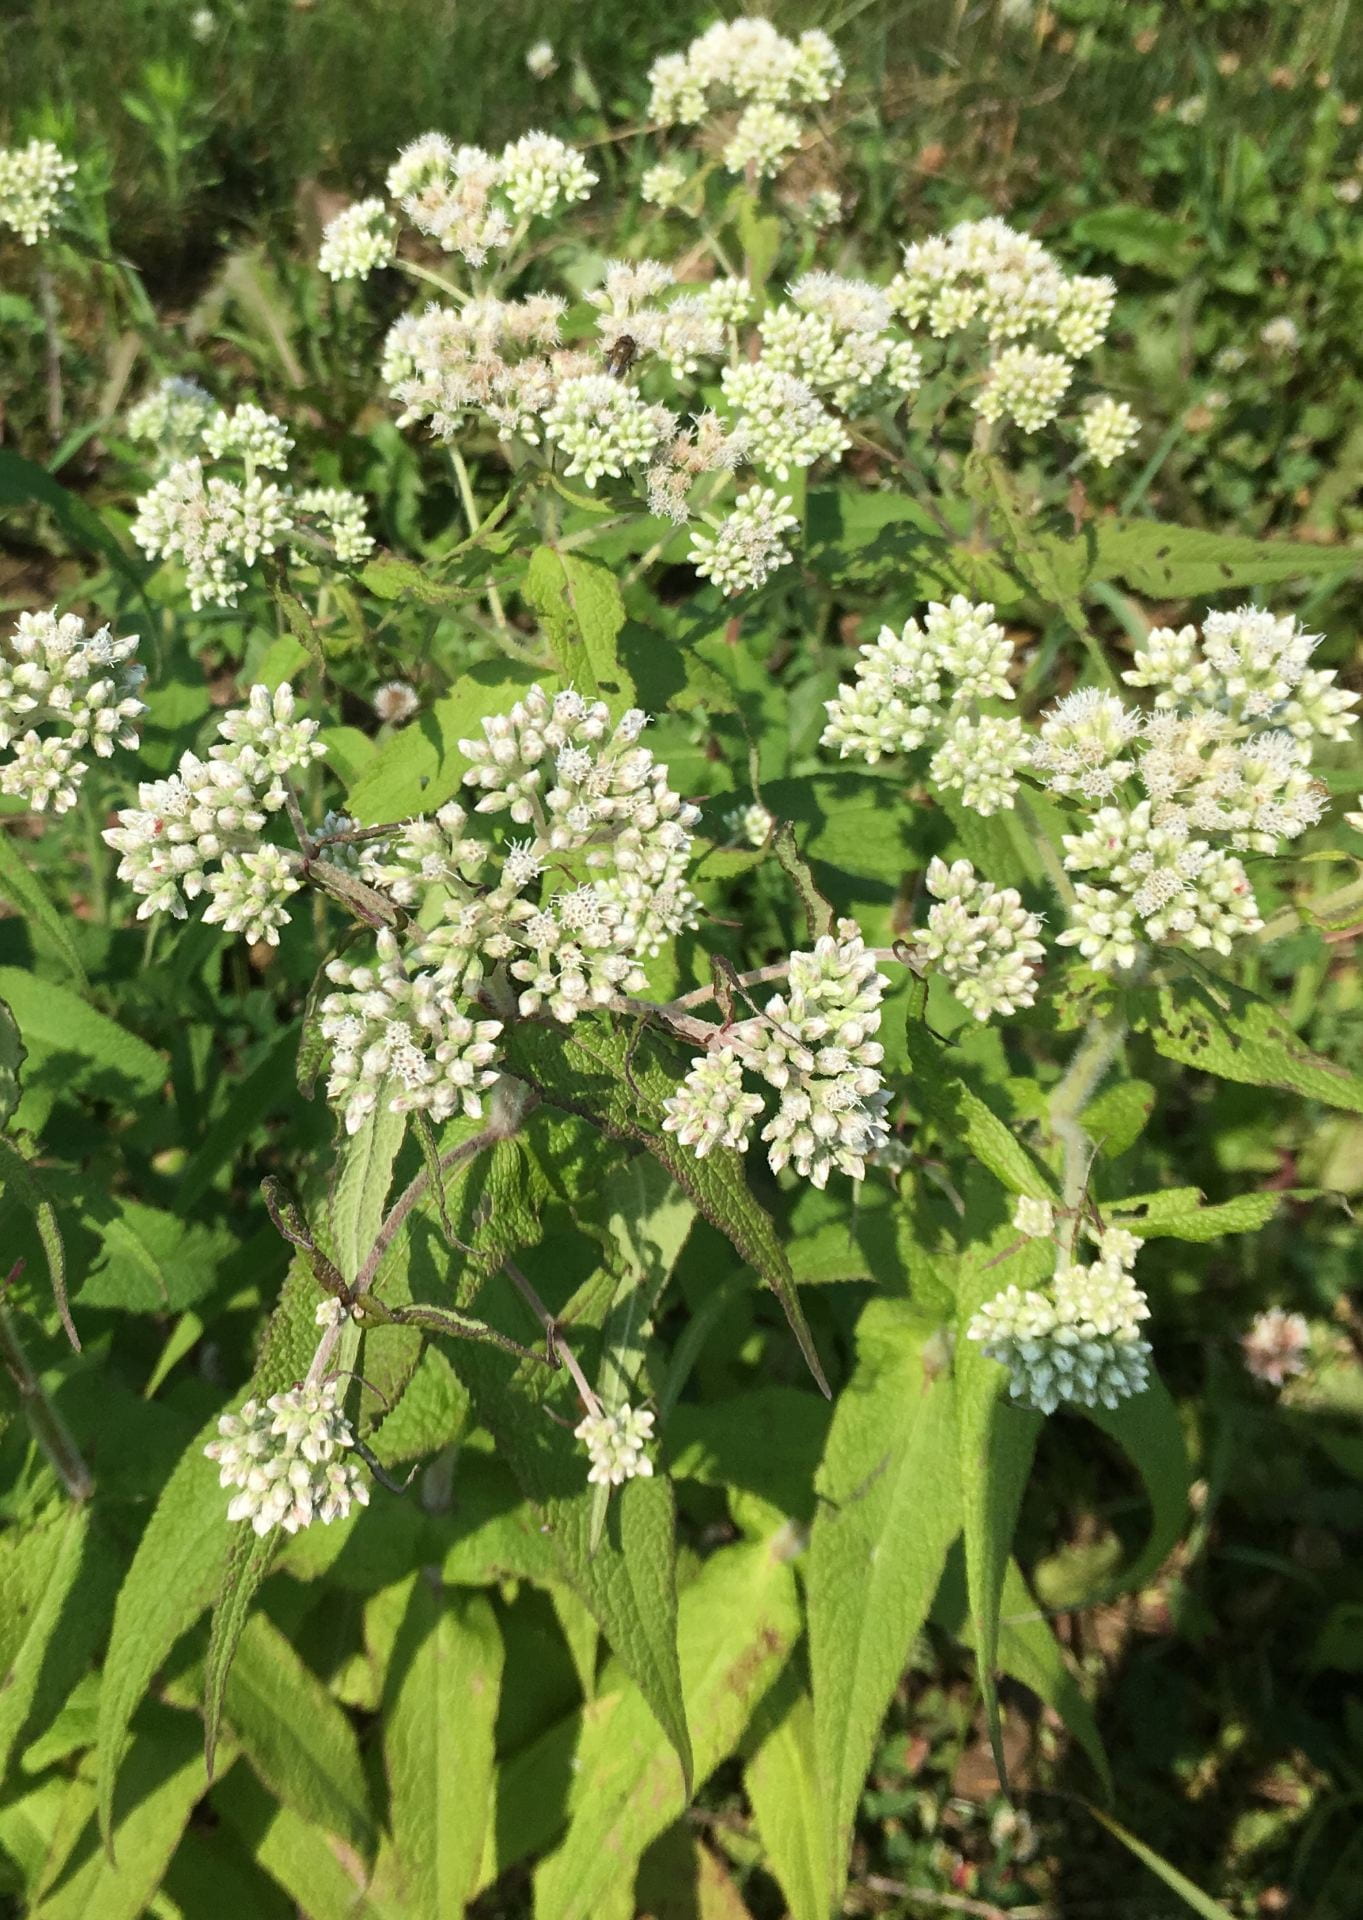
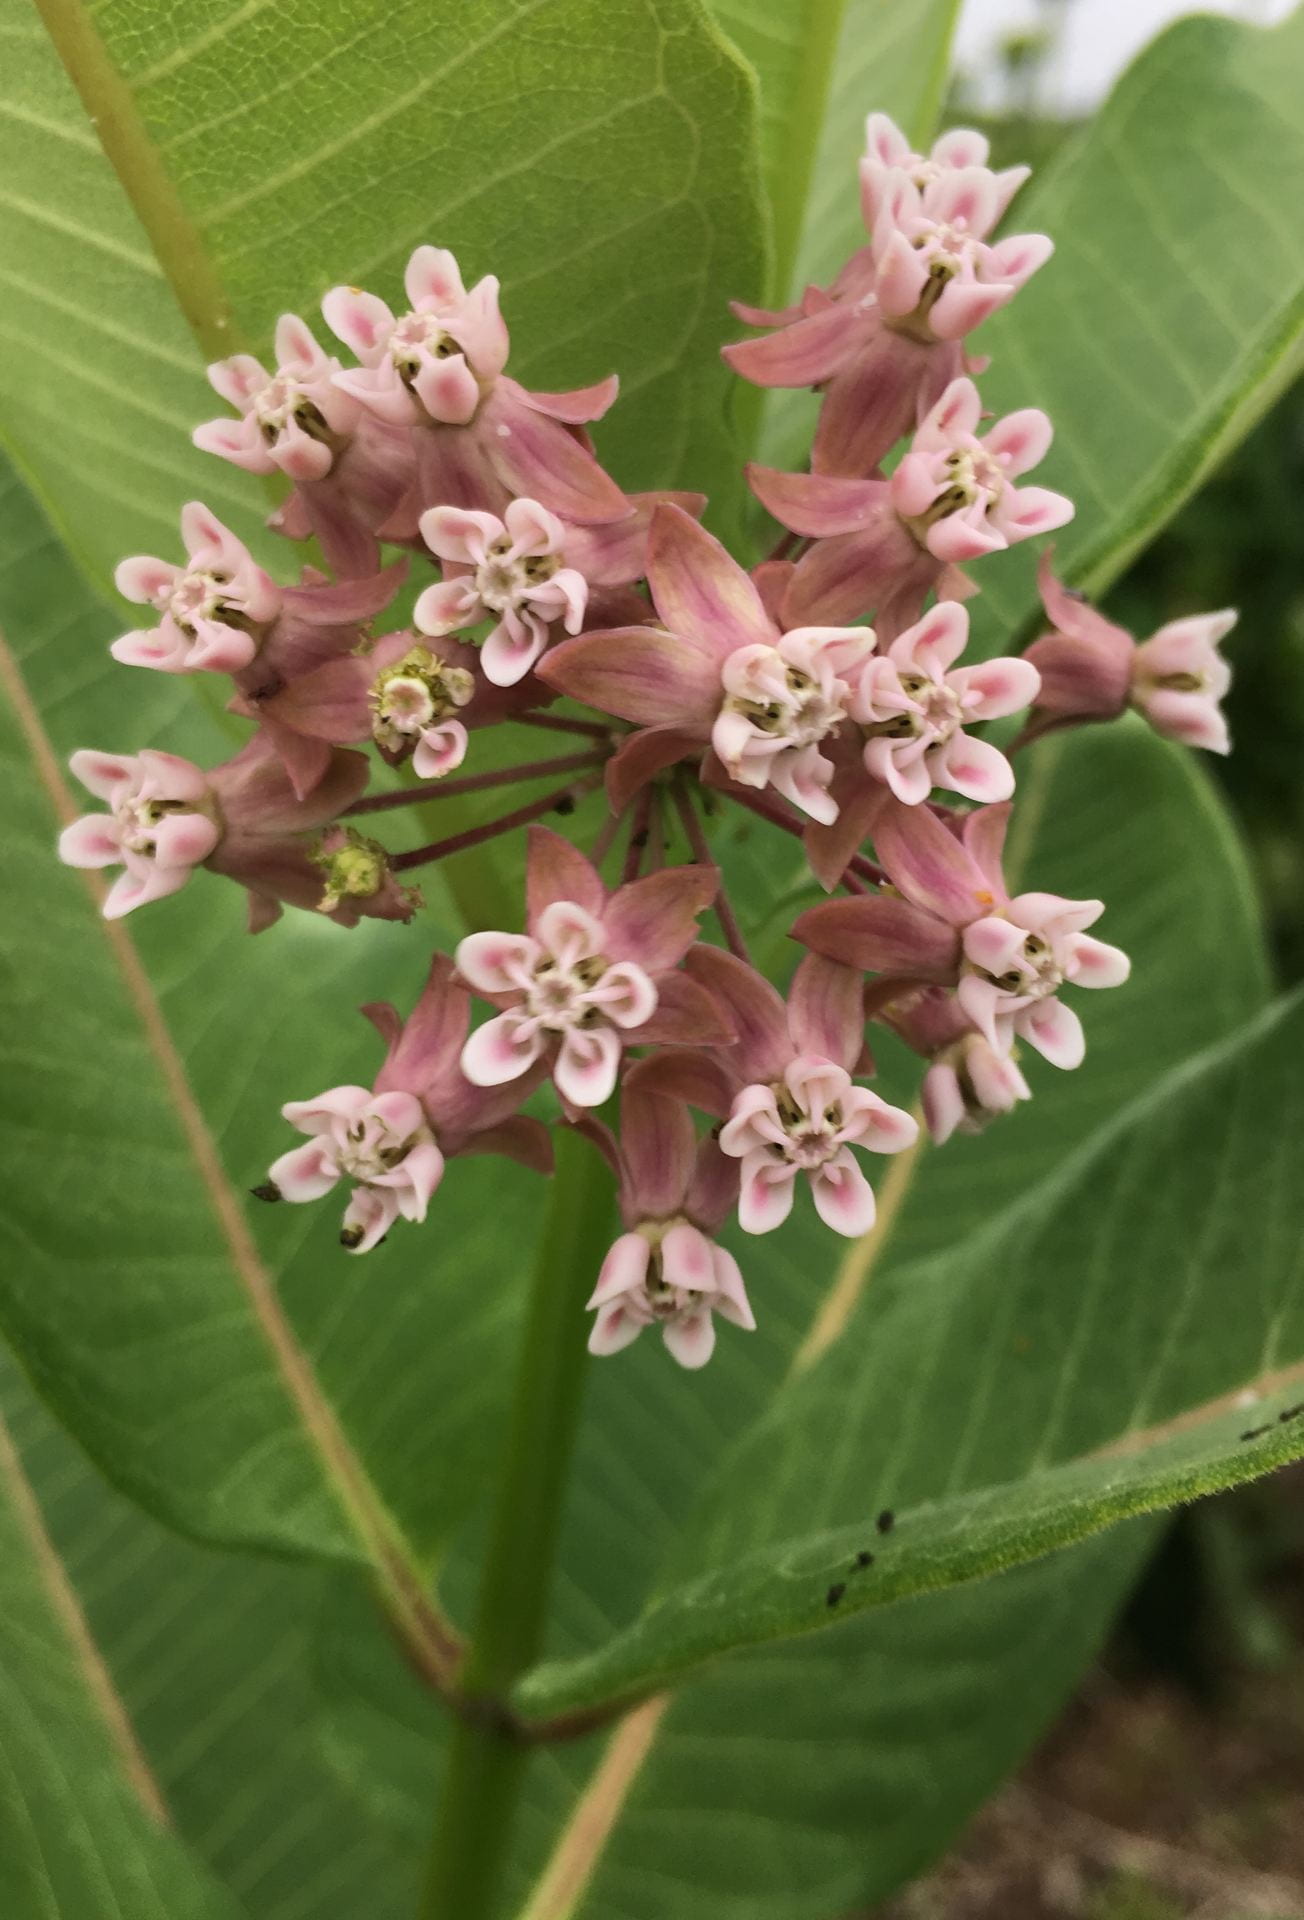
Golden alexanders (Zizia aurea)Catmint (Nepeta faassinii)Coreopsis (Coreopsis lanceolata)Tall white beard tongue (Penstemon digitalis). Obviously not all of these flowers are white!Ohio spiderwort (Tradescantia ohiensis)Anise hyssop (Agastache foeniculum)Echinacea (Echinacea purpurea)Orange coneflower (Rudbeckia fulgida var. fulgida)Boneset (Eupatorium perfoliatum)Wild bergamot (Monarda fistulosa)Common milkweed (Asclepias syriaca)NY Ironweed (Vernonia noveboracensis)Showy goldenrod (Solidago speciosa)New England aster (Symphyotrichum novae-angliae)Blue false indigo (Baptisia australis); hasn’t bloomed yet in our field. Photo credit: Ansel Oommen, Bugwood.org
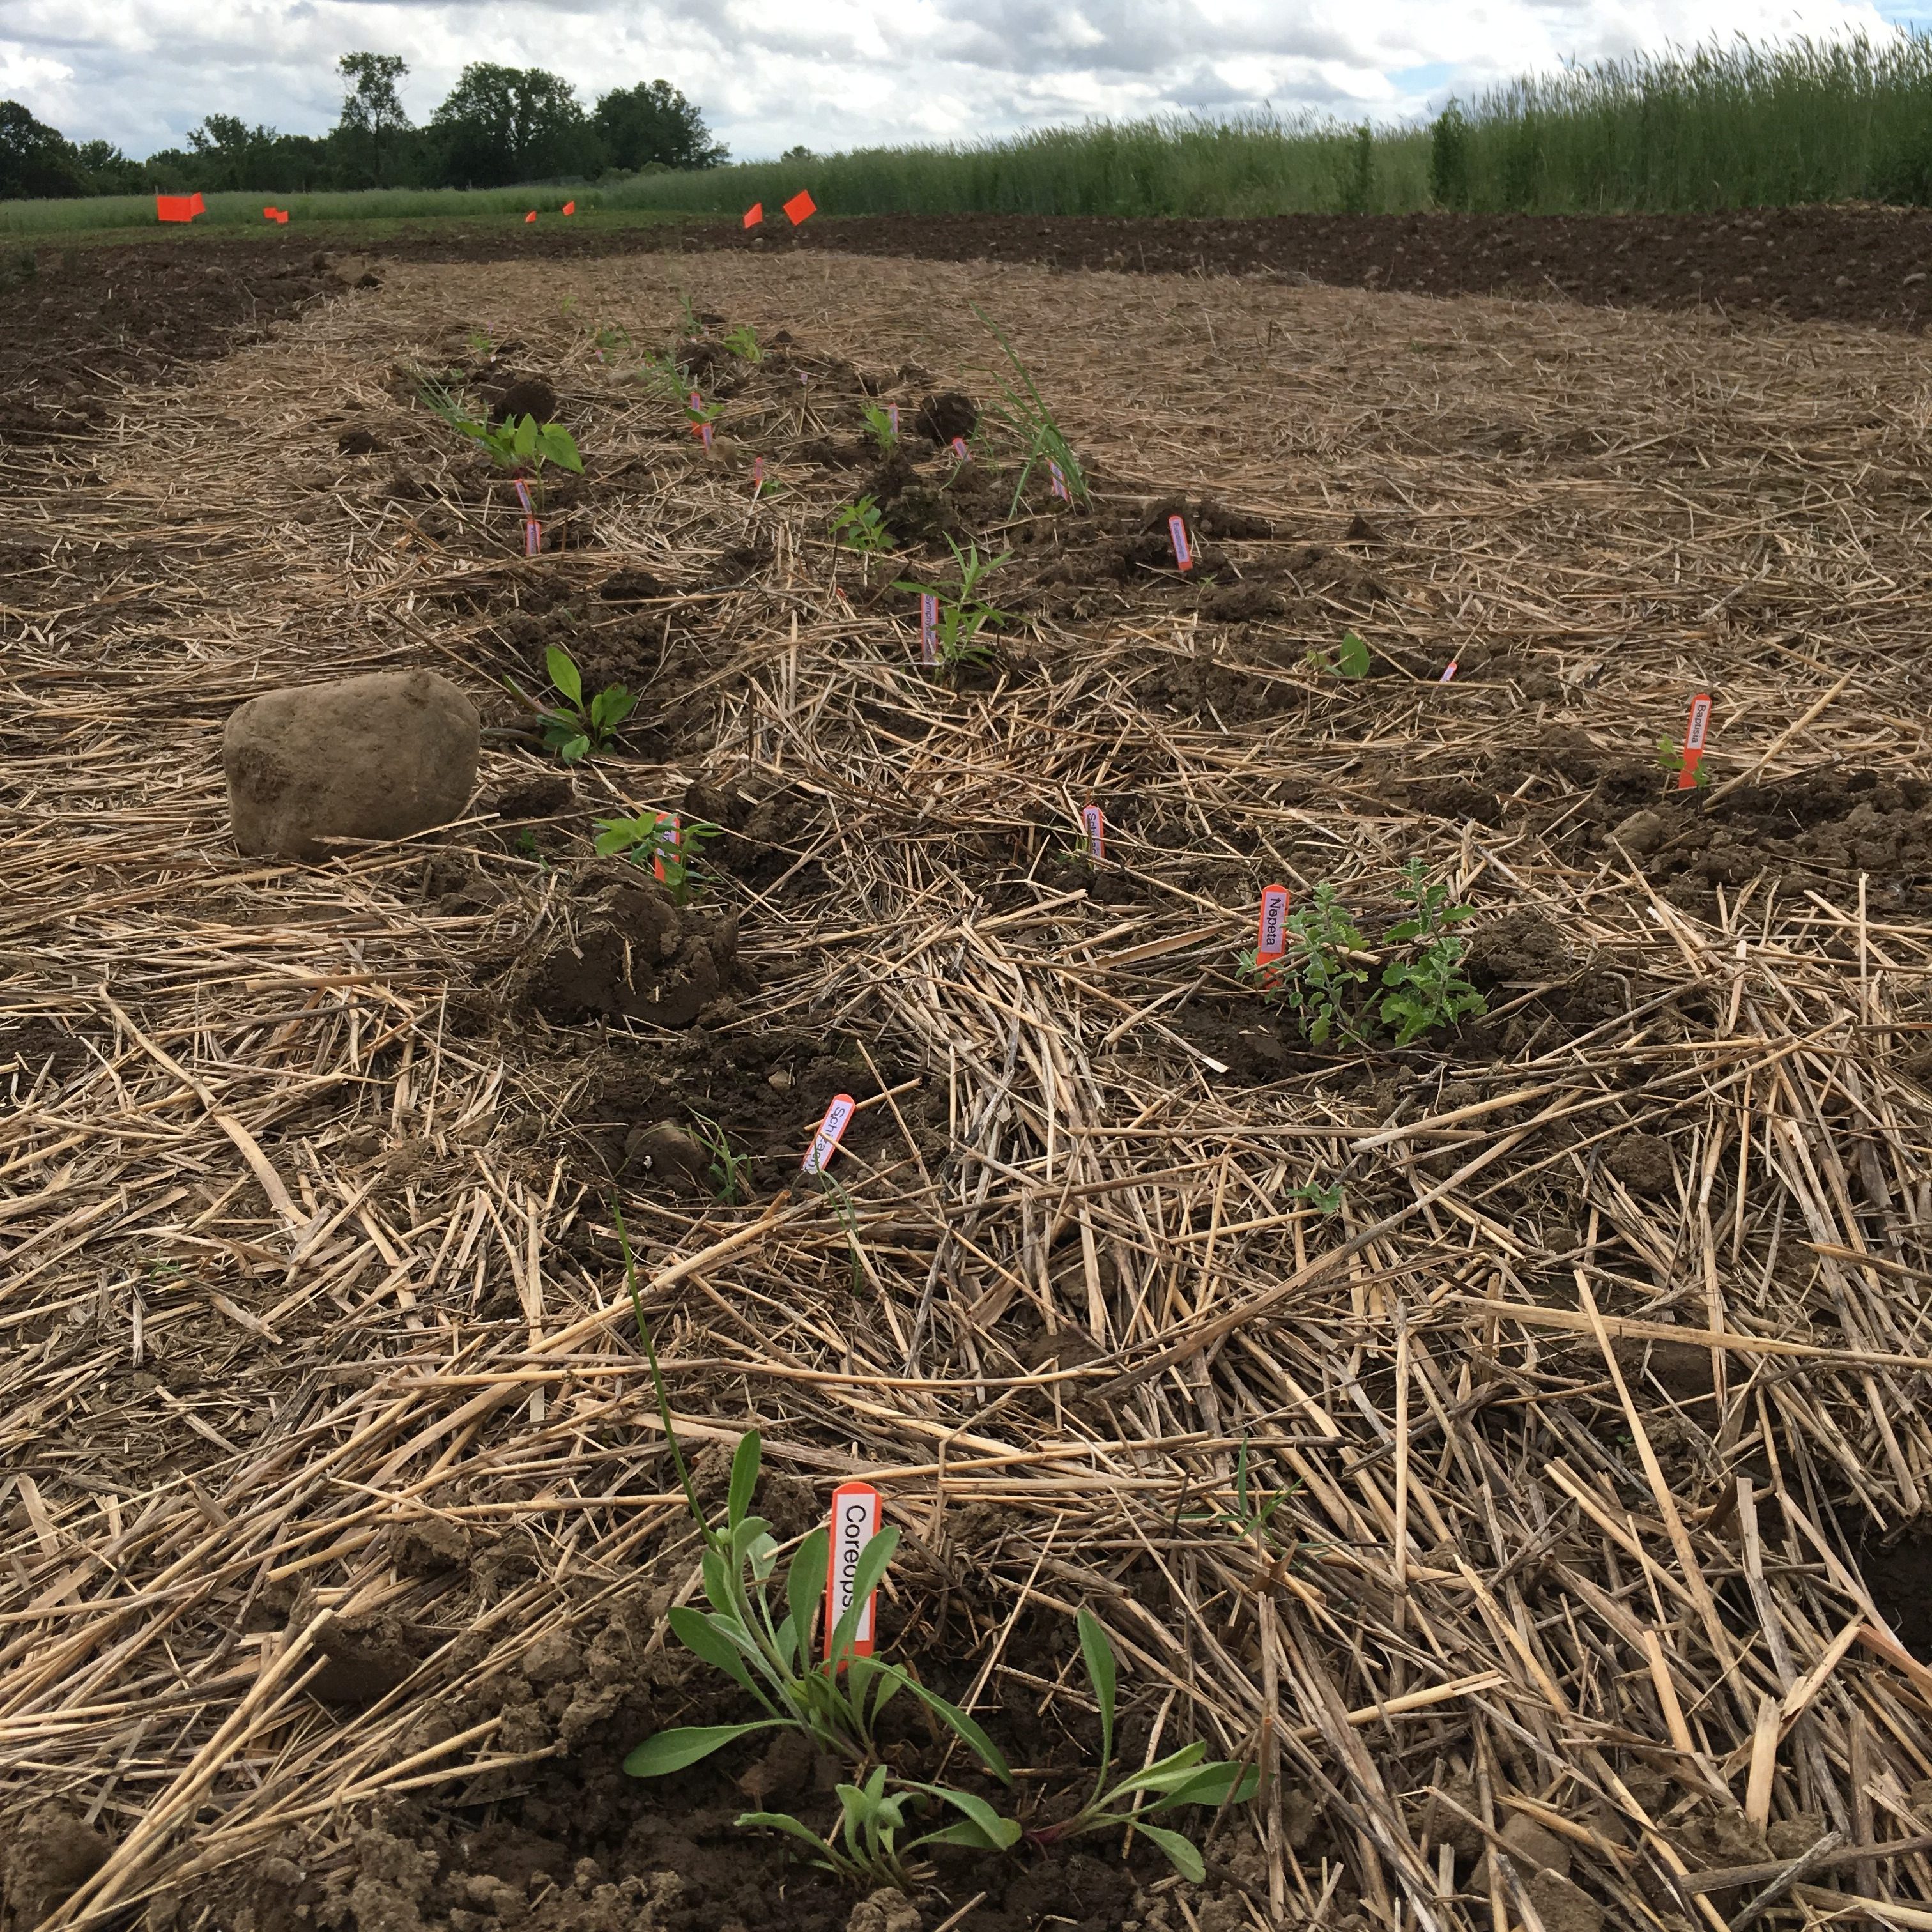
Transplanted wildflowers
The wildflowers in our transplanted plots are surviving pretty well (>80%). In the plots that were transplanted in the fall after the buckwheat cover crop, the survival is a bit lower. I think this has to do with some weed control issues (more on this in a future post).
How well have the transplanted wildflowers survived so far? Treatment A was transplanted in Spring 2018 and not mulched. Treatment B was transplanted in Spring 2018 and mulched. Treatment D was transplanted in Fall 2018 following a buckwheat cover crop. All have been hand weeded periodically. In both Spring and Fall of 2019 I counted plants to see how well they survived. The black lines on each bar in the graph show one standard error above and below the mean percent survival.
Some species have survived better than others, as the following chart shows. Again, we counted plants both in Spring and Fall 2019.
Do some species of wildflowers survive better when transplanted? There’s a little bit of variability, but overall most are surviving pretty well.
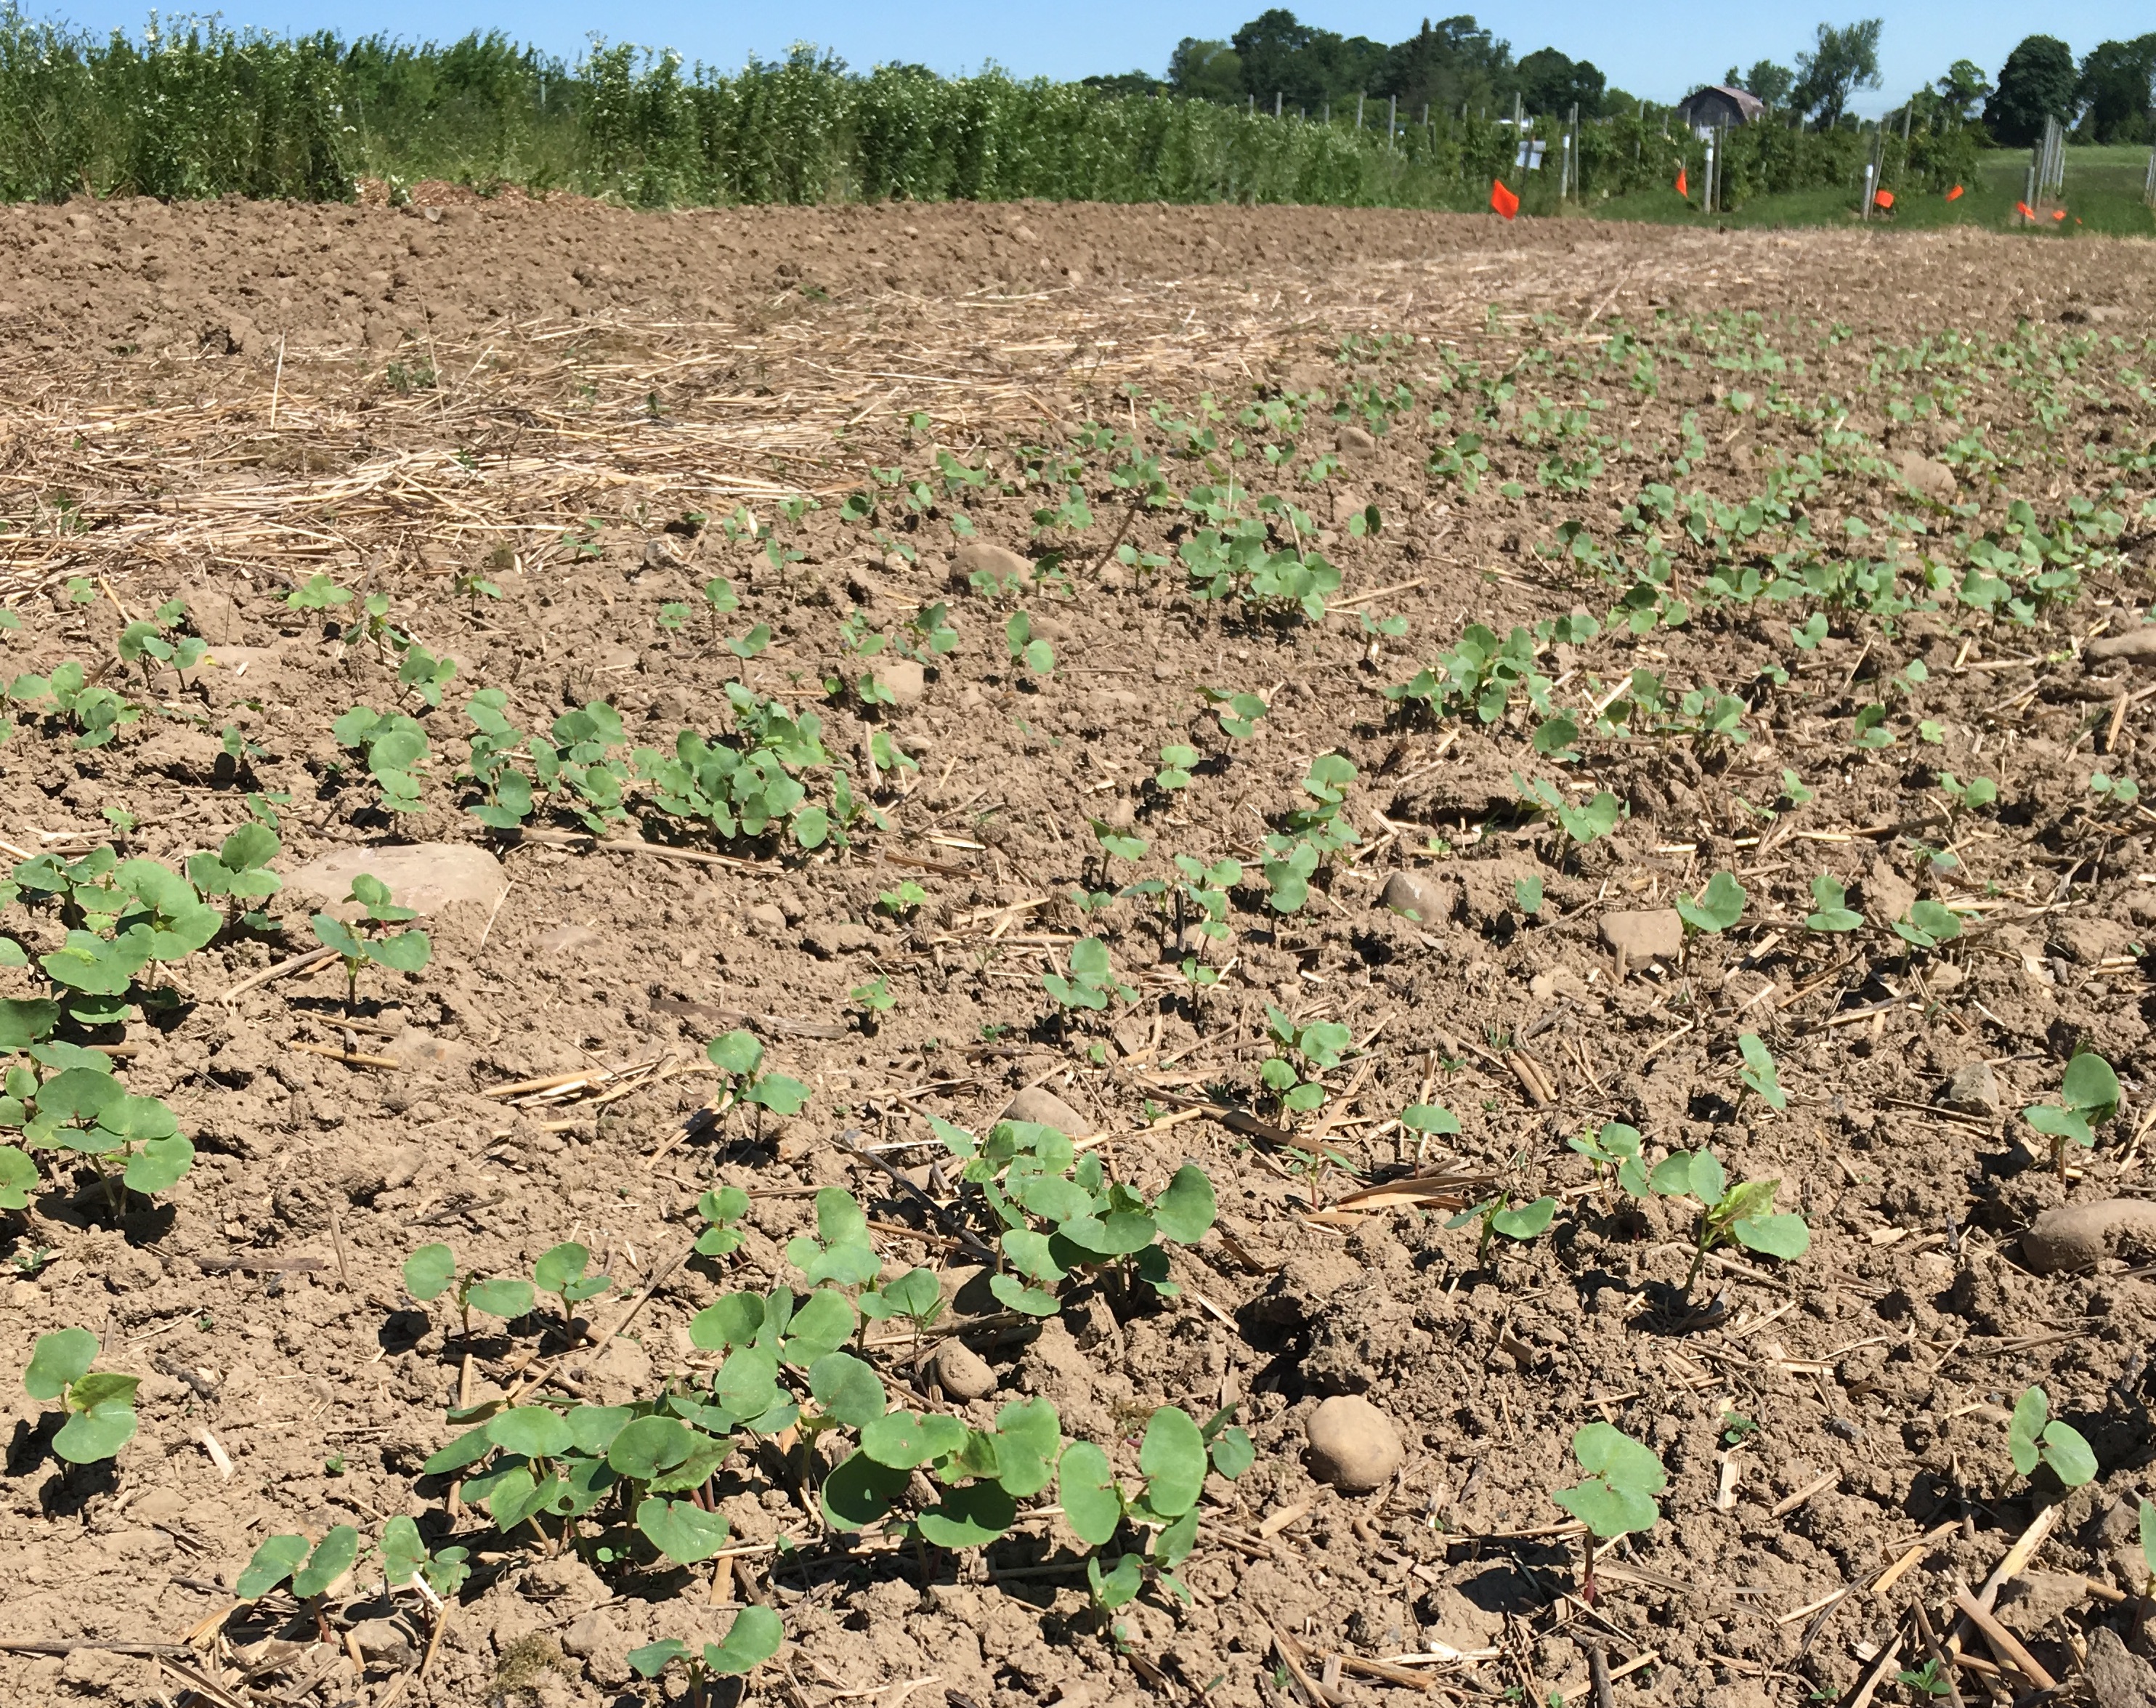
What about the direct-seeded plots?
Only three species of wildflowers planted by seed in Spring or Fall 2018 bloomed during the 2019 season. The table below shows which months these blooms were seen (marked with an ‘X’).
Common name
May
June
July
Aug
Sep
Coreopsis
X
X
X
Blackeyed susan
X
X
X
Partridge pea
X
X
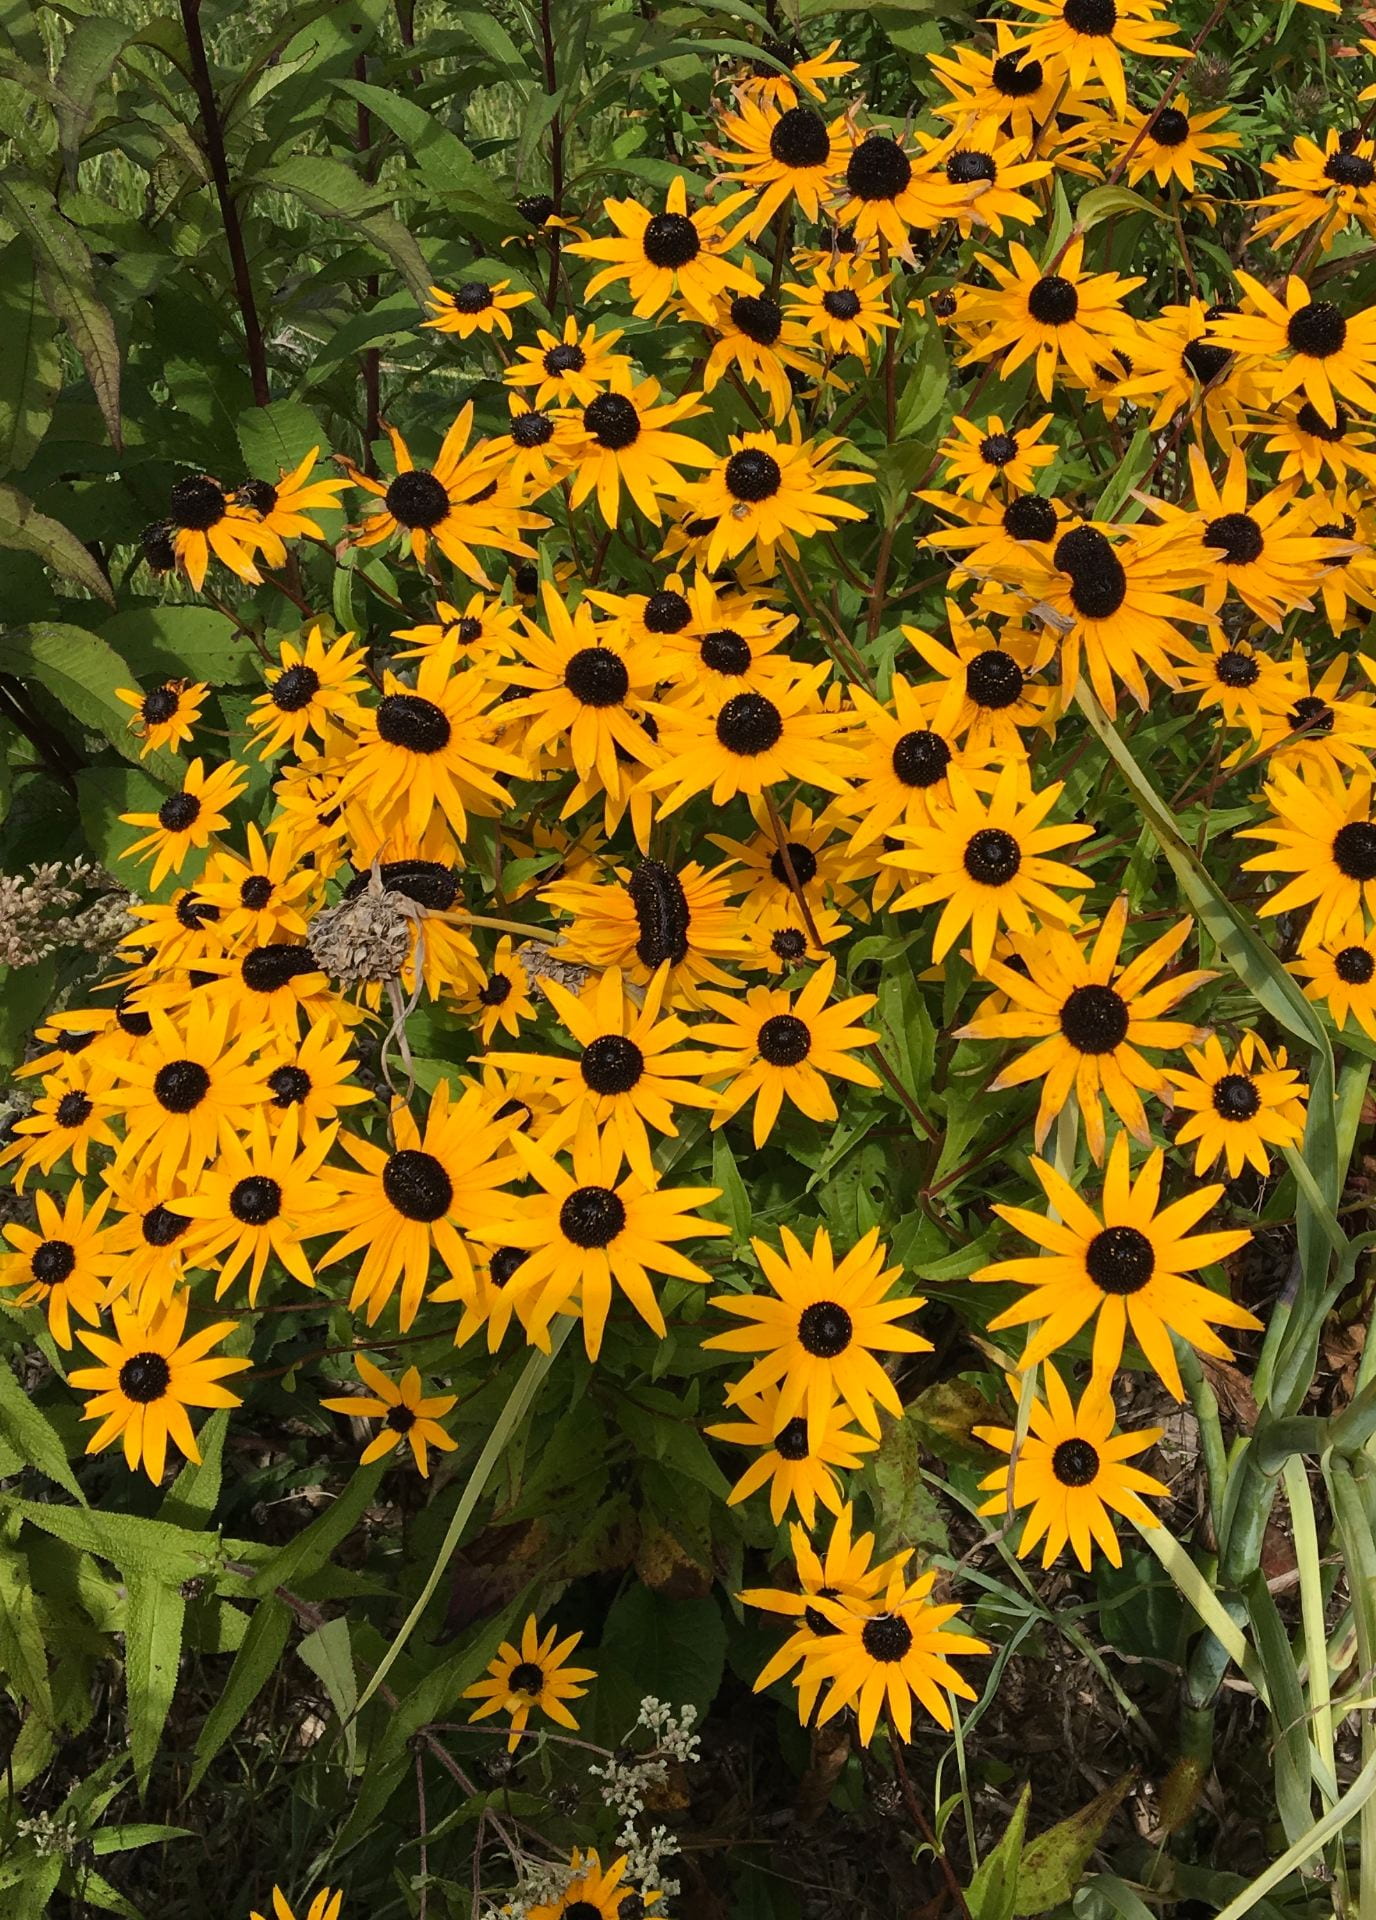
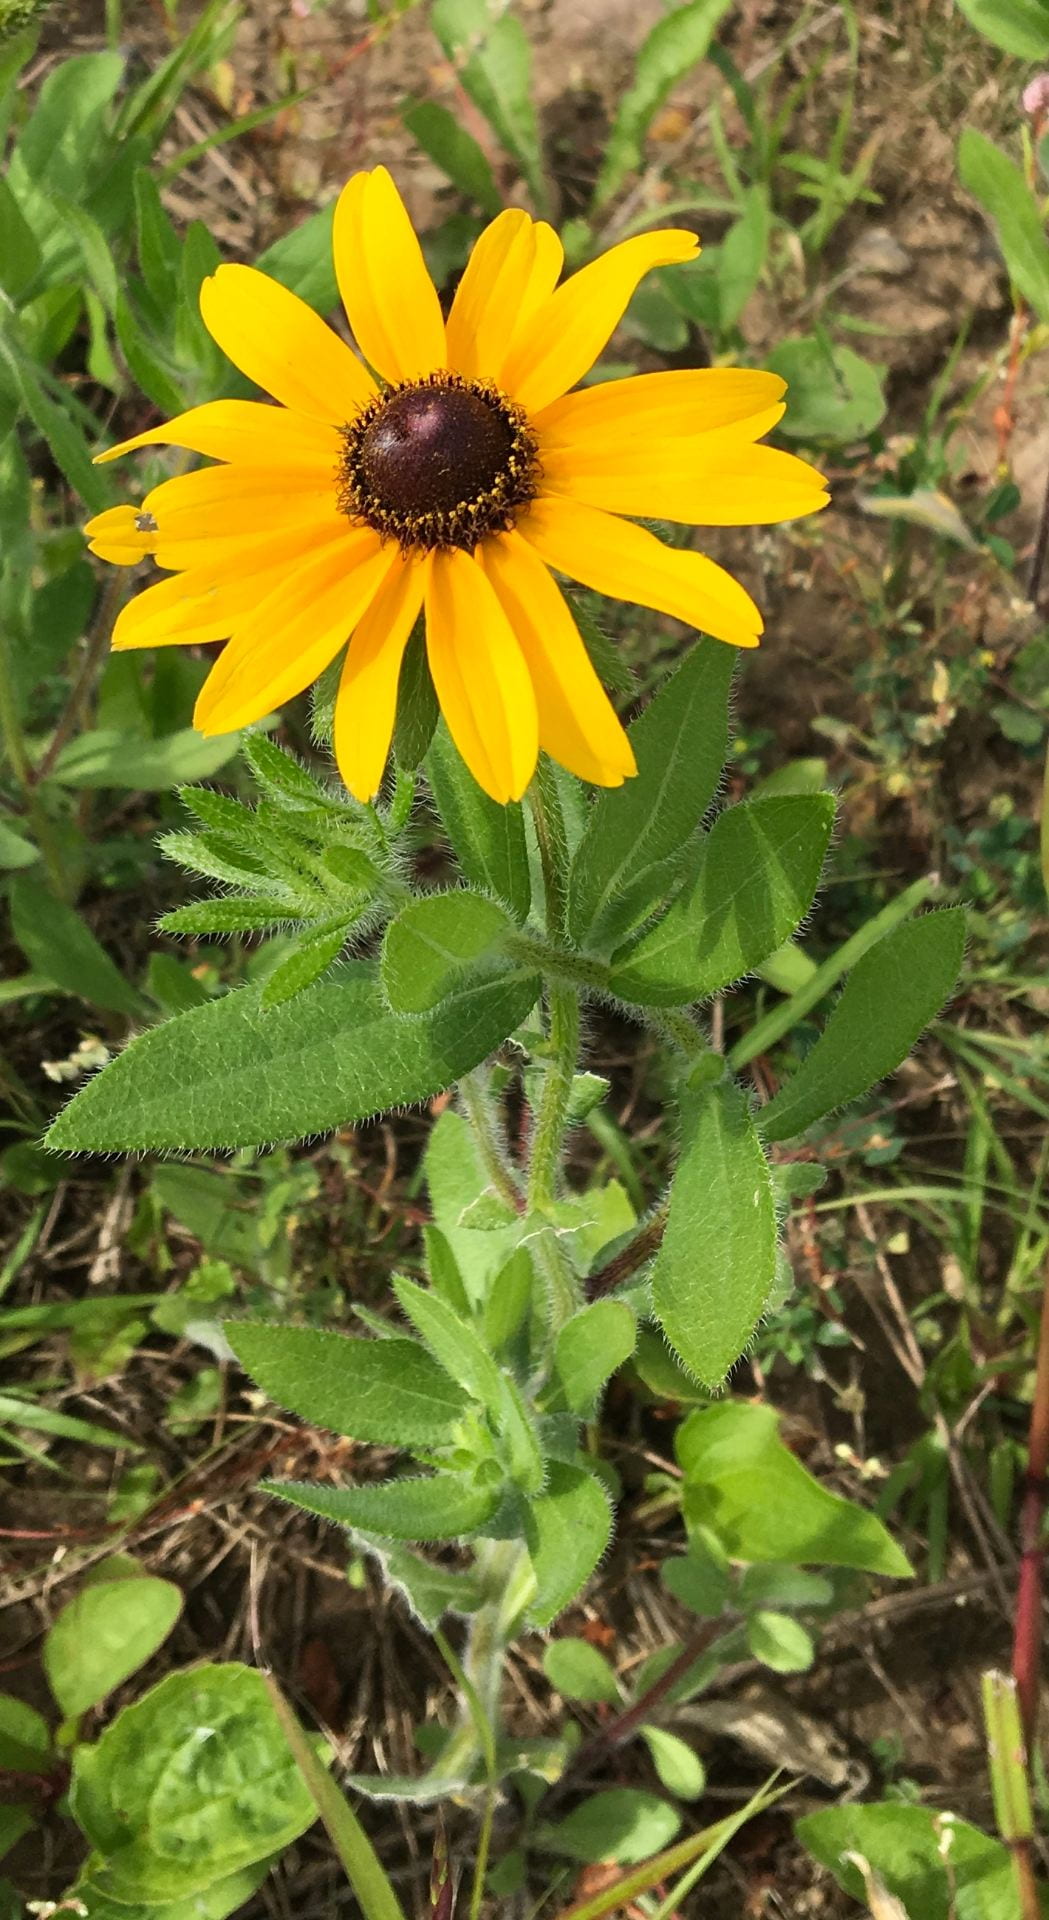
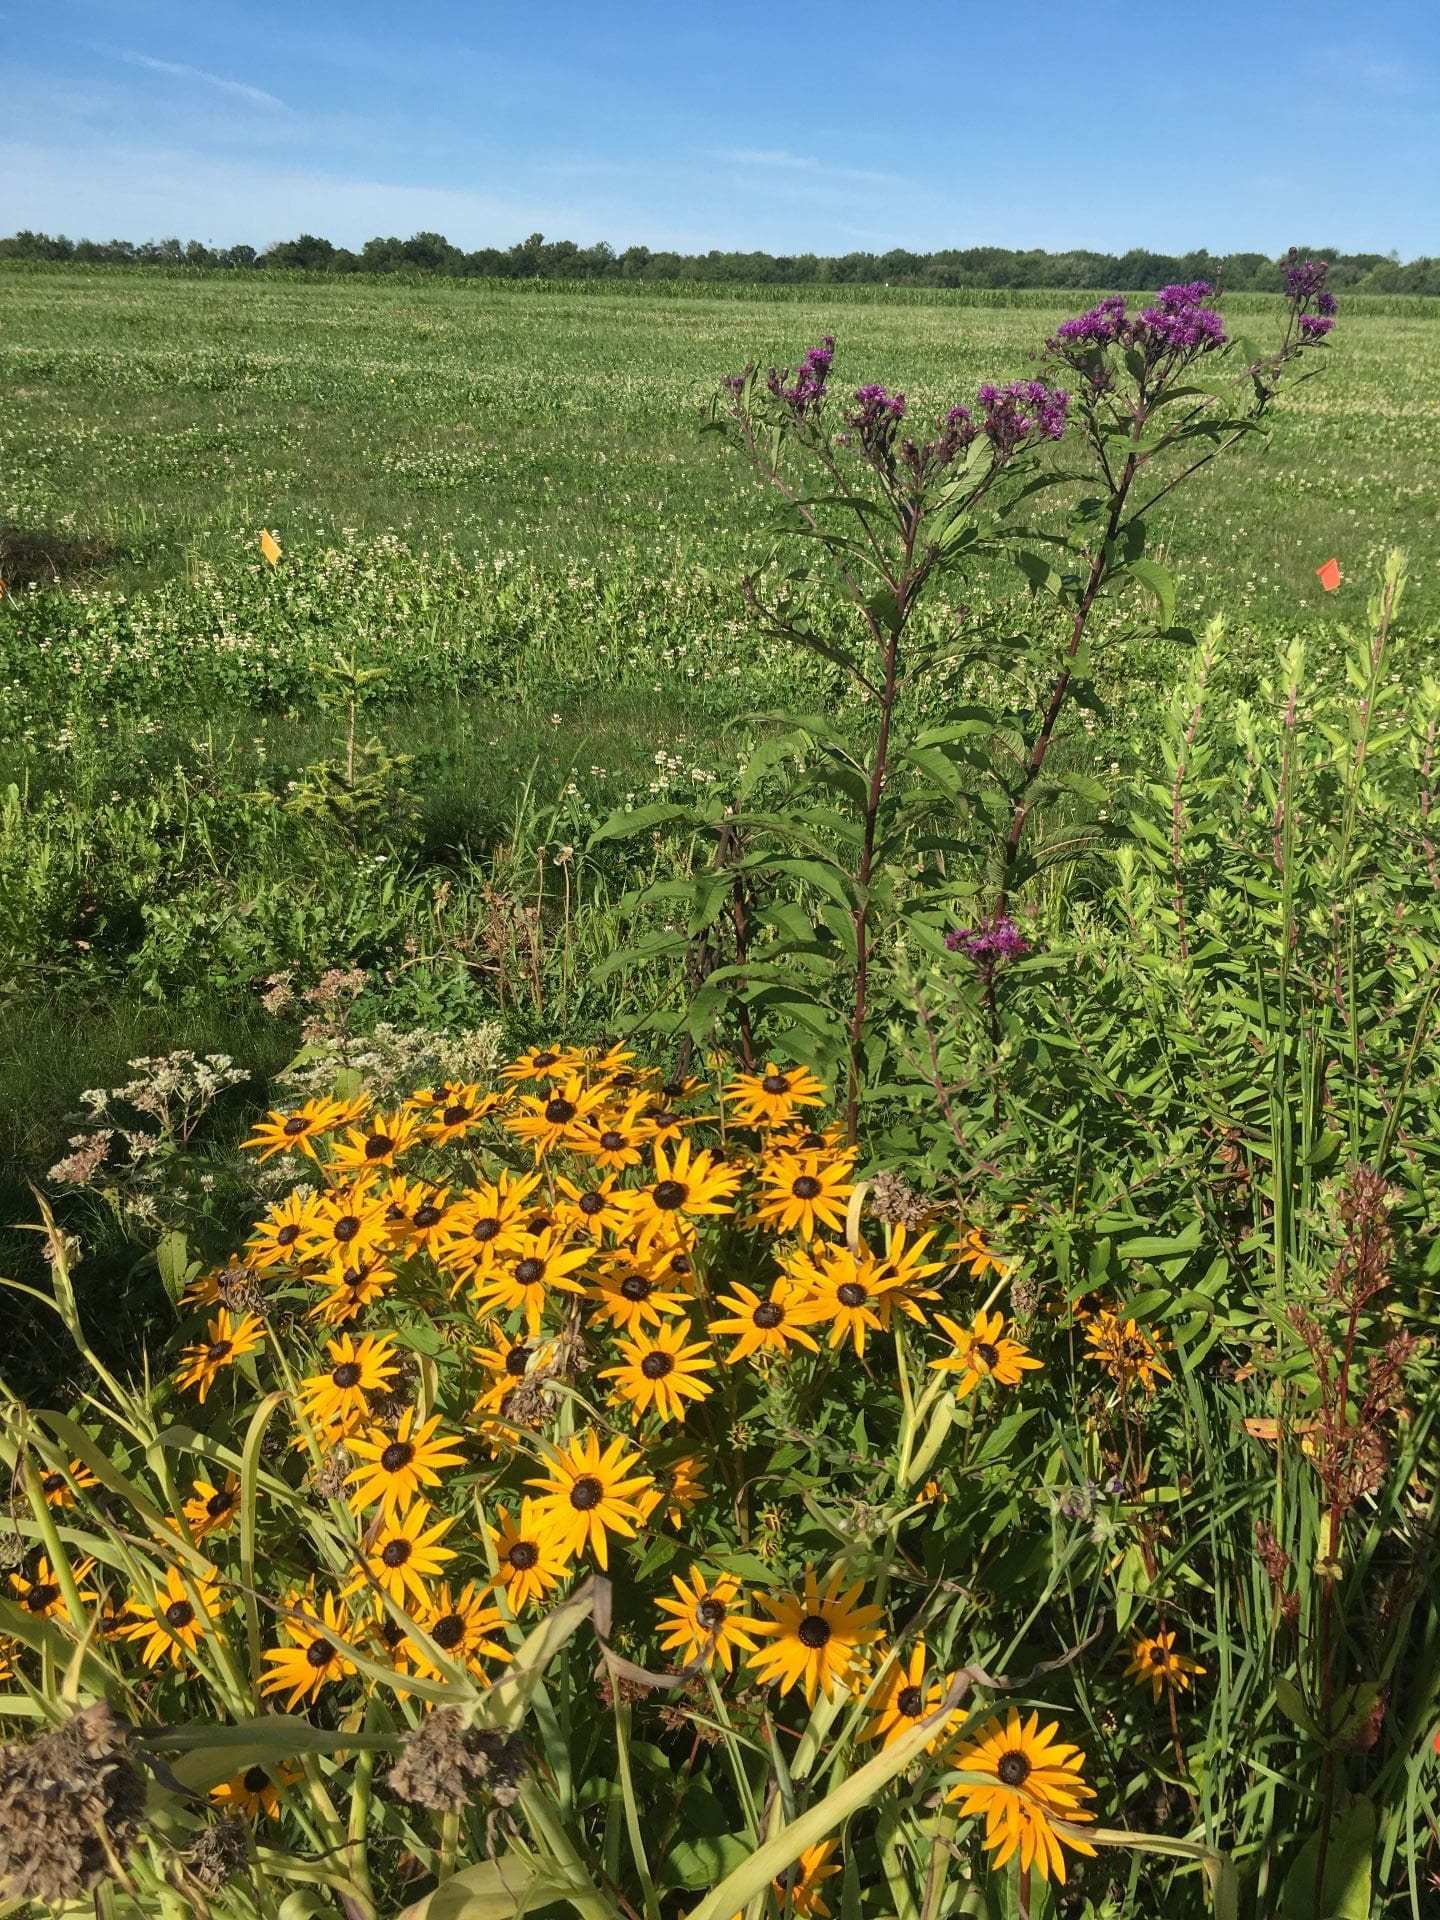
Here’s what the flowers of blackeyed susan look like. The plant has much hairier leaves than the orange coneflower.
Blackeyed susan (Rudbeckia hirta)
And here’s the partridge pea:
Partridge pea (Chamaecrista fasciculata)
But, I also spotted some wild bergamot, tall white beard tongue, asters, golden alexanders, and either echinacea or orange coneflower seedlings. (I haven’t honed my horticultural skills enough yet to distinguish the foliage of these last two wildflowers.)
Seedlings of some wildflowers could be identified in the direct-seeded plots by September 2019.
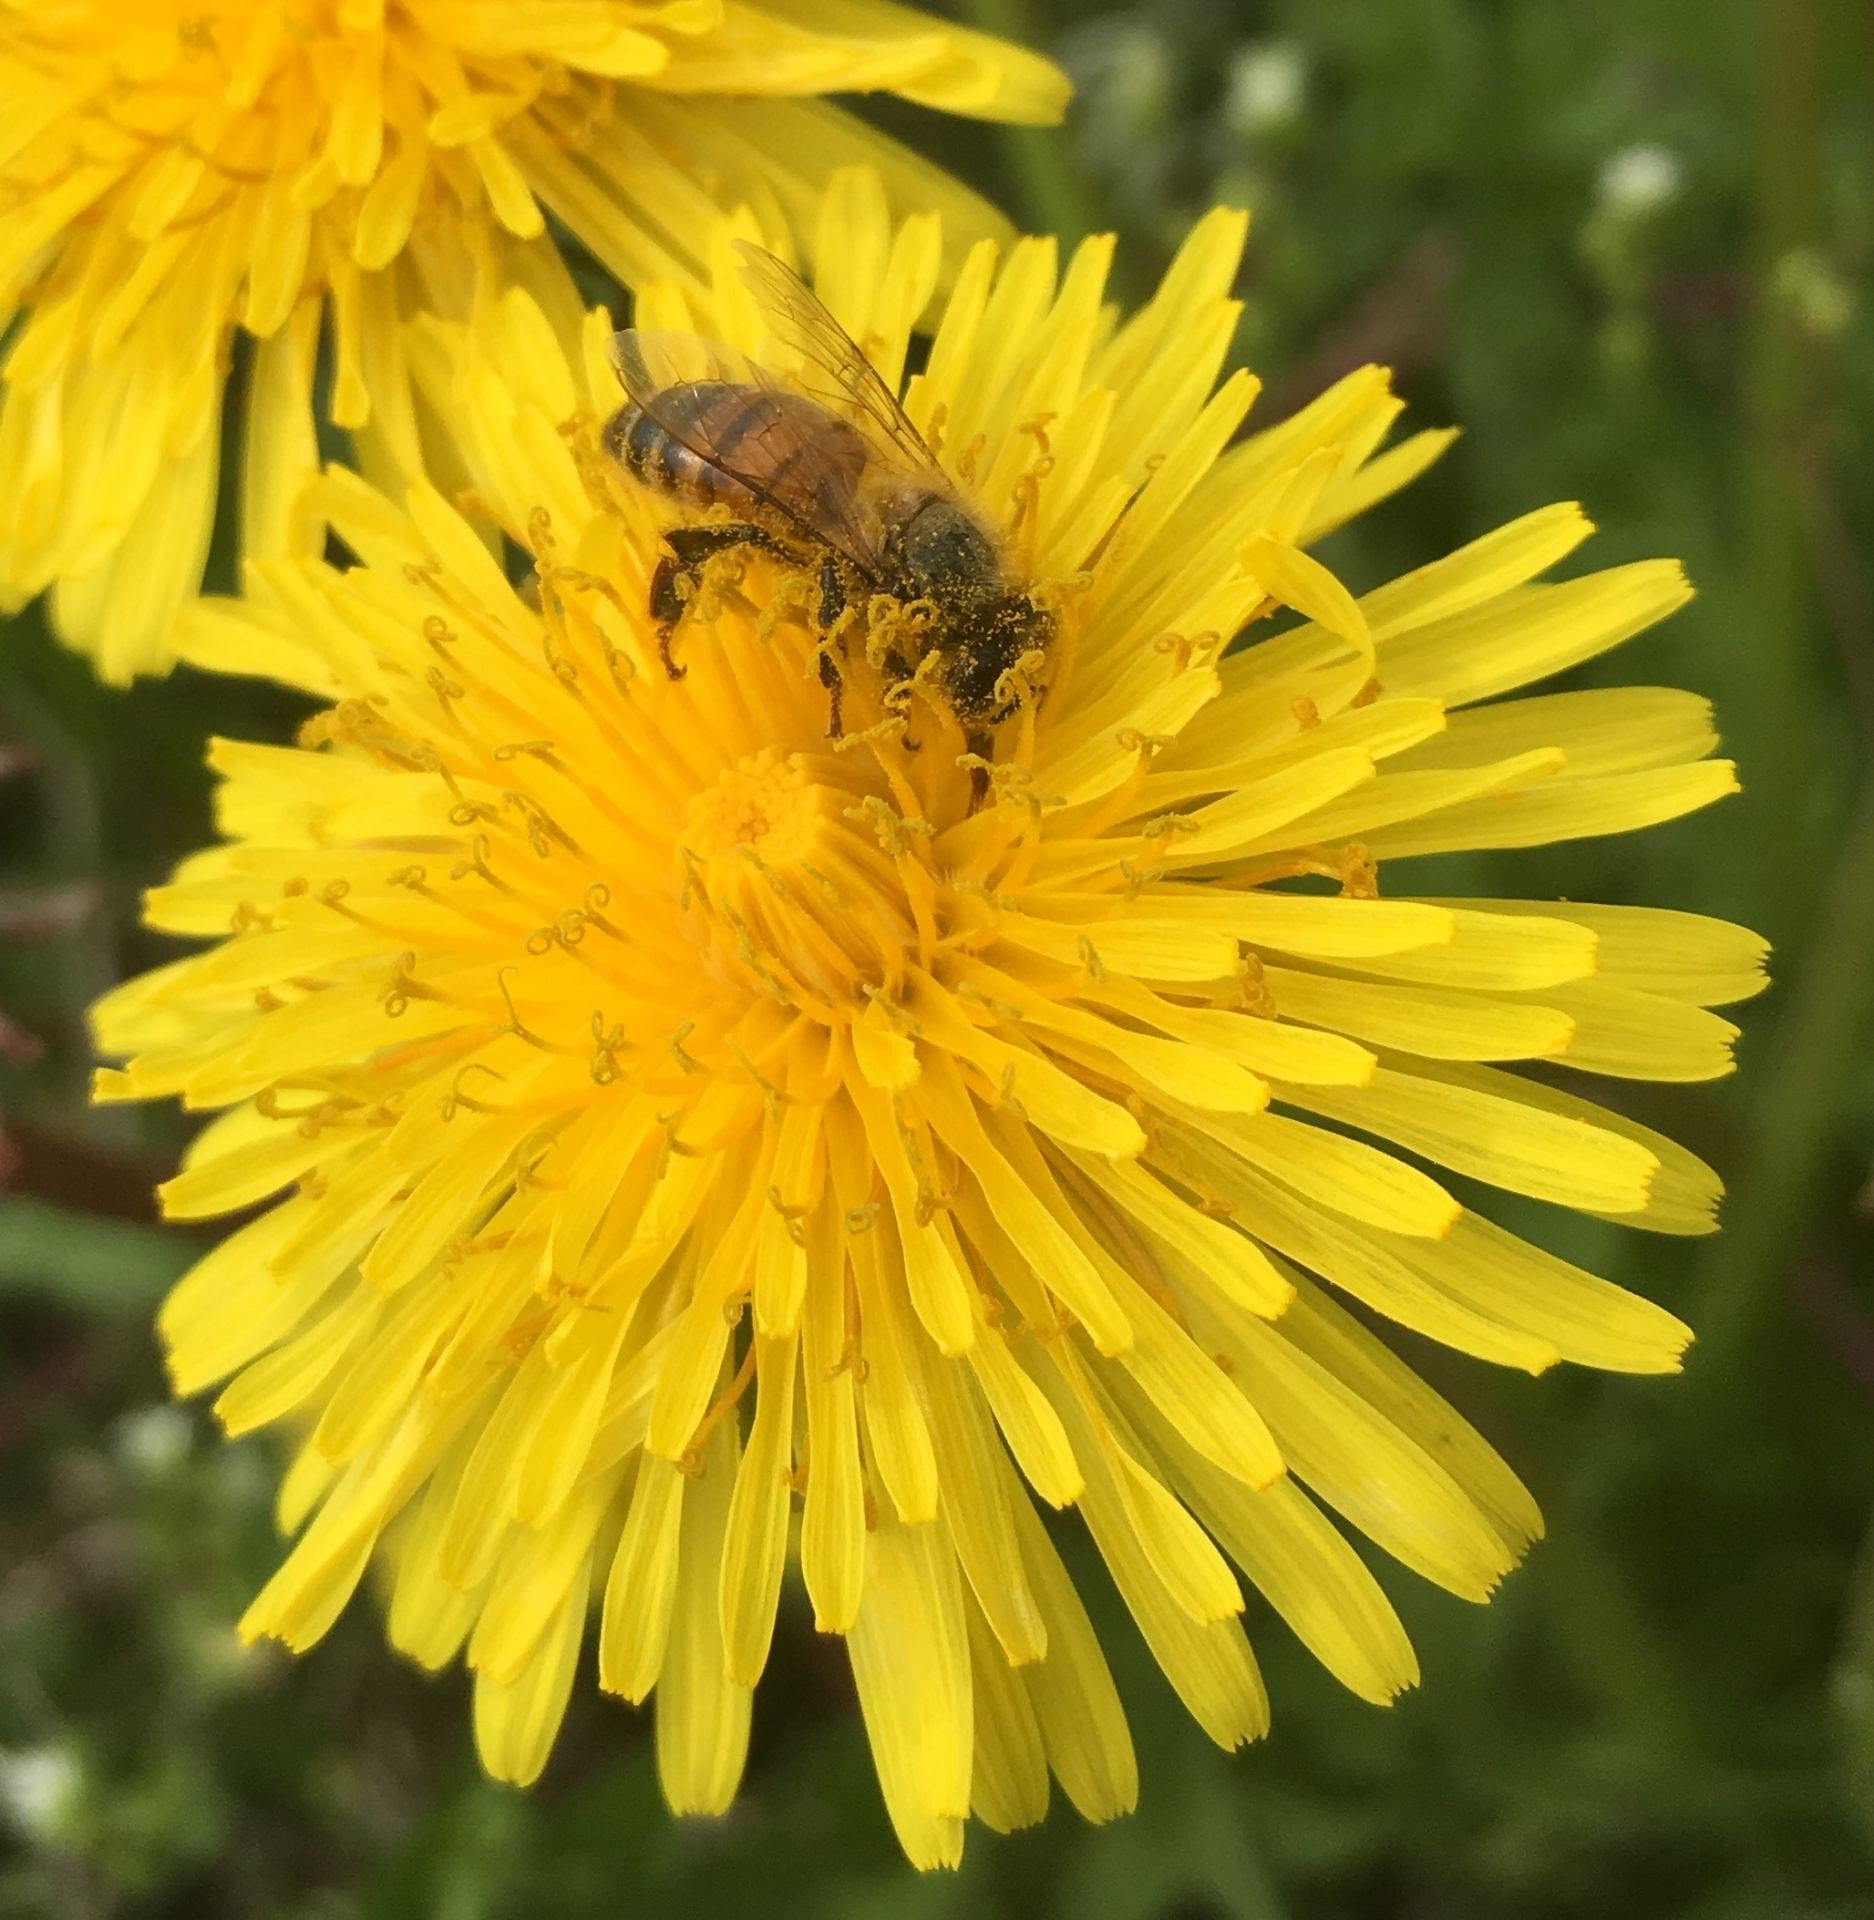
There were also plenty of weeds blooming throughout the summer, and many of them were providing pollen and nectar for pollinators and natural enemies. Here are just a few examples:
From left to right: A bee feeding on a weed in the aster family, blooming chamomile, a lady beetle on a dandelion, and a bumble bee visiting clover (that wasn’t planted).
This table summarizes when during the season different weeds were in bloom. Again, an ‘X’ indicates the weed was blooming that month.
Weed
May
June
July
Aug
Sep
Campion
X
X
X
X
X
Chamomile
X
X
X
X
X
Clover
X
X
X
X
X
Dandelion
X
X
X
X
X
Vetch
X
X
X
X
X
Viola
X
X
X
X
X
Mustard
X
X
X
X
Deadnettle
X
X
Baby blue eyes
X
Henbit
X
Asters
X
X
X
X
Buckwheat
X
X
X
X
Oxalis
X
X
X
X
Plantain
X
X
X
X
Wild lettuce
X
X
X
X
Cinquefoil
X
X
X
Indian hemp
X
X
X
Redshank
X
X
X
Chickweed
X
X
Galinsoga
X
X
Geraniums
X
Sandwort
X
Grass
X
X
Horse weed
X
X
Lambsquarters
X
X
Ragweed
X
X
Black bindweed
X
Chicory
X
There’s more!
In addition to keeping track of what bloomed from May through September, we were also still tracking costs and time spent on each plot in 2019. And of course we collected a LOT of insects. But those stories will have to wait for another post.
This post was written by Amara Dunn. All pictures were taken by her, unless otherwise credited.
This work is supported by:
Crop Protection and Pest Management -Extension Implementation Program Area grant no. 2017-70006-27142/project accession no. 1014000, from the USDA National Institute of Food and Agriculture.
New York State Department of Agriculture and Markets
You’ve read about all the different methods we are testing for establishing native wildflowers and grasses as habitat for pollinators and natural enemies of pests. You know we learned a lot in our first season. You know we’ve been using several different techniques to collect insects in these plots. And you saw a pictorial summary of our sampling and some of the insects we’ve caught in Summer 2019.
Wouldn’t you like to come see these plots in person, hear about our preliminary results, and learn more about attracting pollinators and other beneficial insects to your farm or yard?
If you live reasonably close to Geneva, NY, you can! We are having two field events this fall:
On Wednesday, September 25, 2019, stop by our field between 3:30 and 6:30 PM for an Open House. There will be no program, just stop by and talk with Betsy Lamb, Brian Eshenaur, and I. All the details can be found here, including the address and a map to help you find our field.
On Thursday, September 26, 2019, we have a Twilight Field Day from 5 to 7 PM. This meeting has been planned with growers in mind (especially Christmas tree and nursery growers). DEC credits (1.5) will be available for categories 1a, 3a, 24, 25, and 10, and dinner is included. The cost for this meeting is $15, and we need you to register so we know how much food to provide. All the details (including the registration link) can be found here.
If you’re coming to either of these events, we’ll have lots of signs up to help you find our field. Look for the following image:
This work is supported by:
Crop Protection and Pest Management -Extension Implementation Program Area grant no. 2017-70006-27142/project accession no. 1014000, from the USDA National Institute of Food and Agriculture.
New York State Department of Agriculture and Markets
Summer isn’t over yet for farmers and extension staff doing field experiments!
Labor Day weekend may be viewed by some as the end of summer, but farmers know that the summer growing (and harvesting!) season is far from over. Similarly, the field projects I’m involved with this summer (read more here and here) are still running. Over the fall and winter I’ll be analyzing data and sharing results (on this blog, and at winter meetings). In the meantime, here’s a pictorial summary of my summer projects (so far).
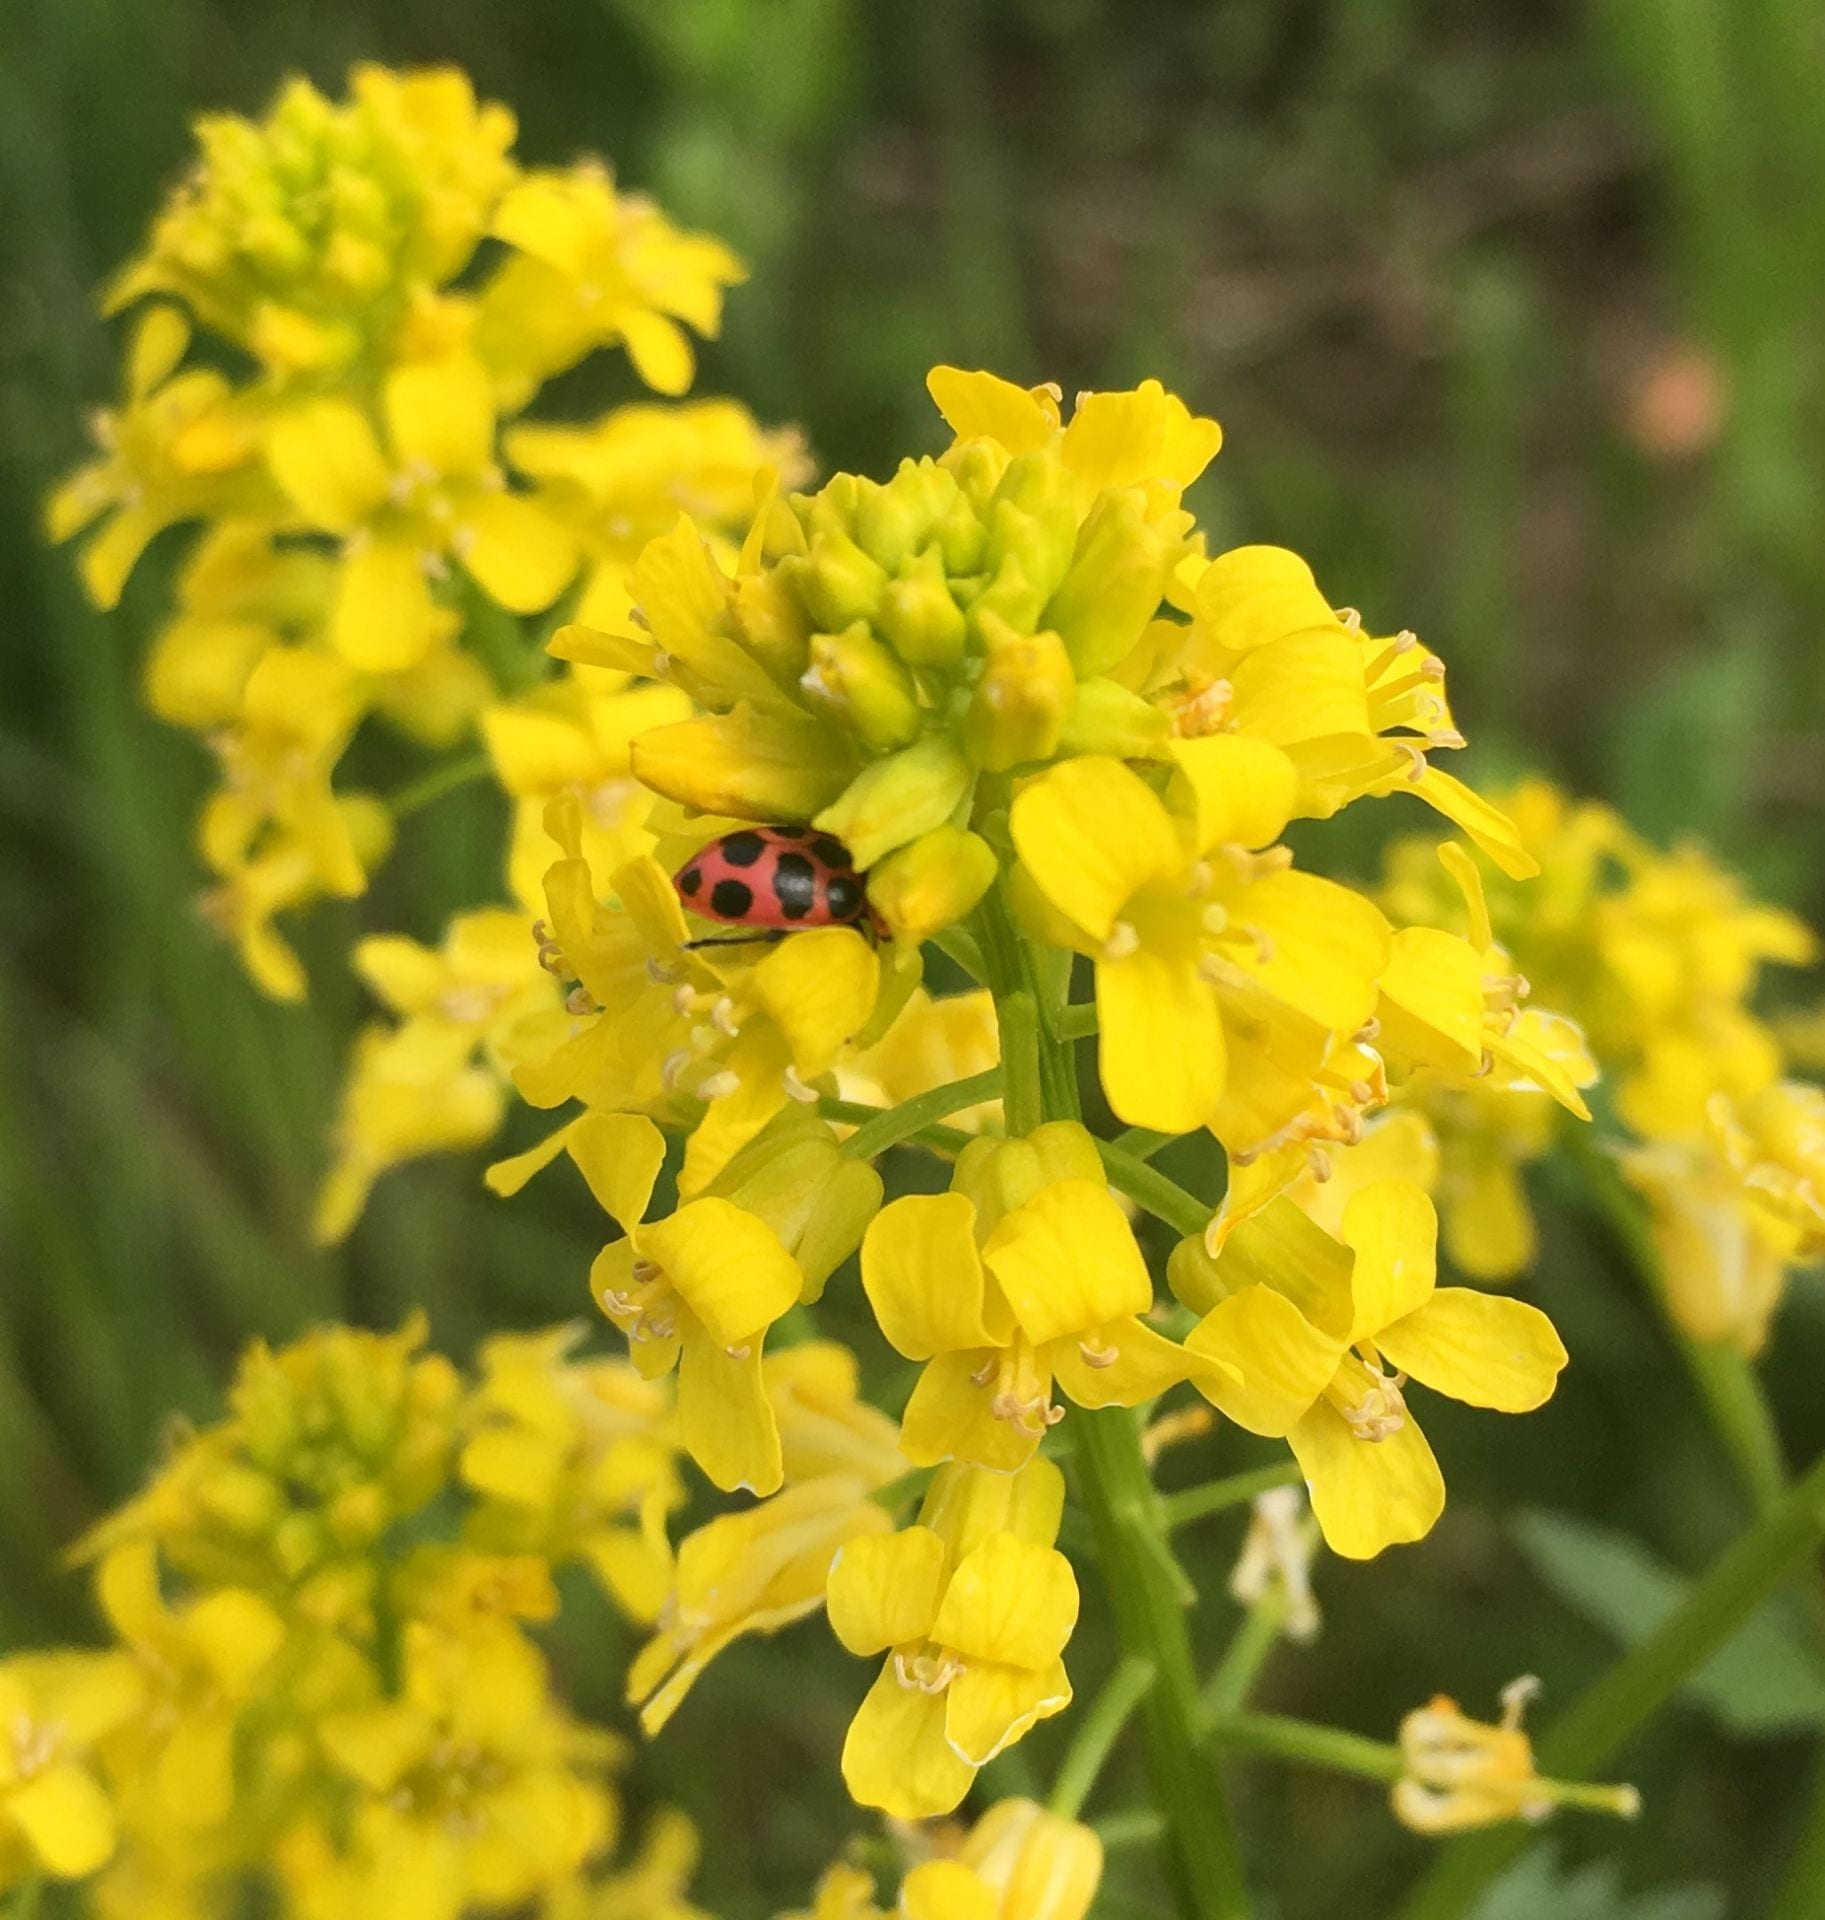
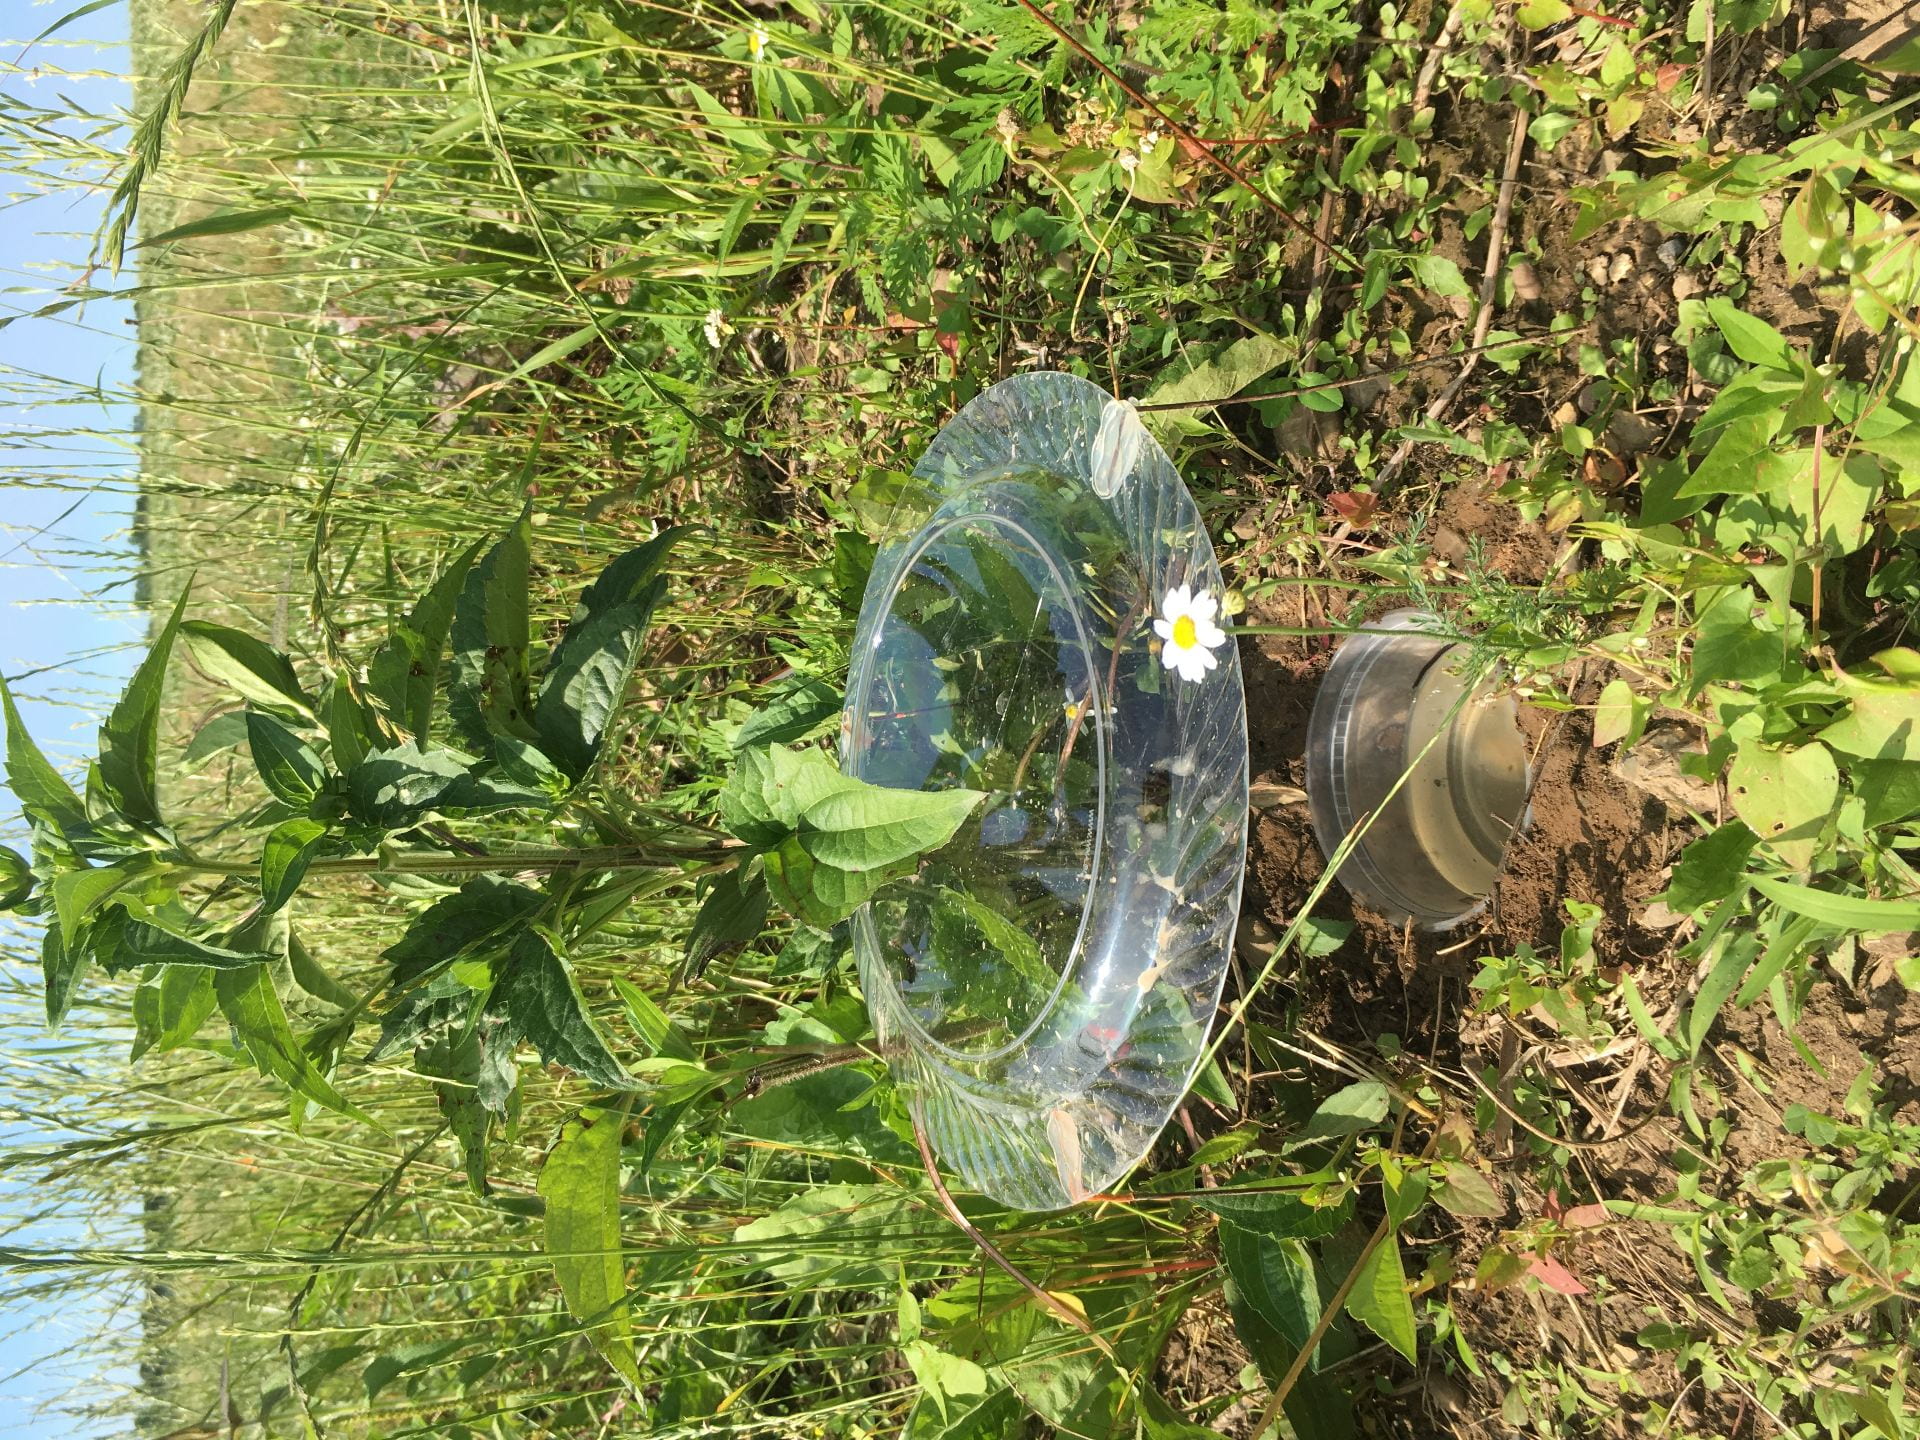
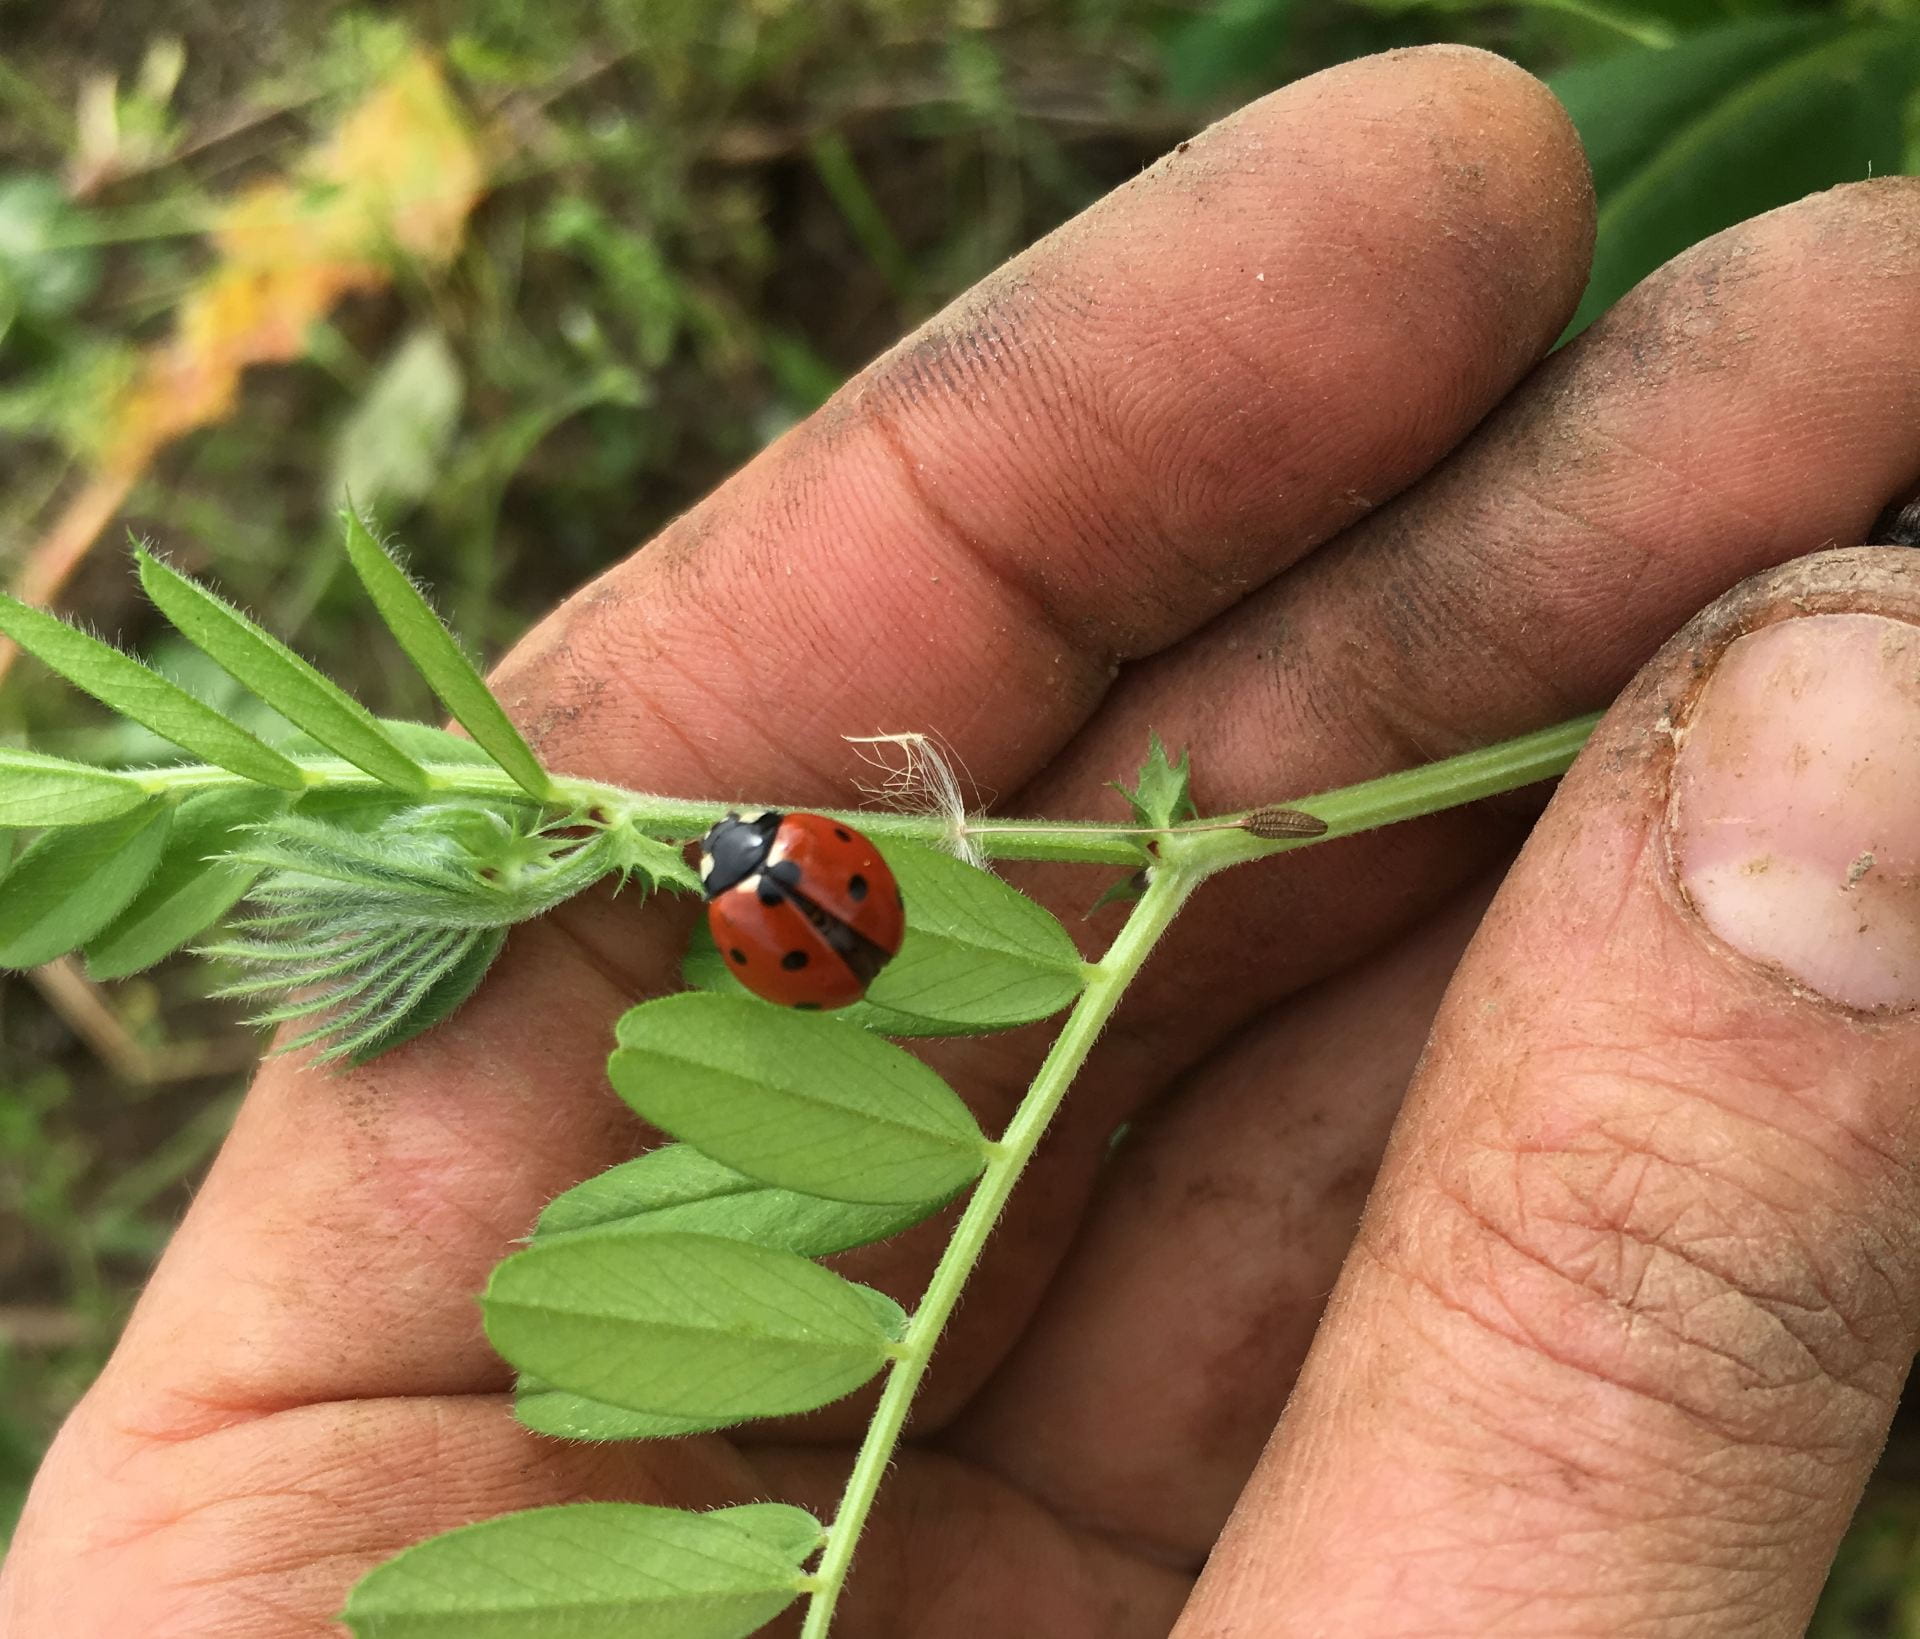
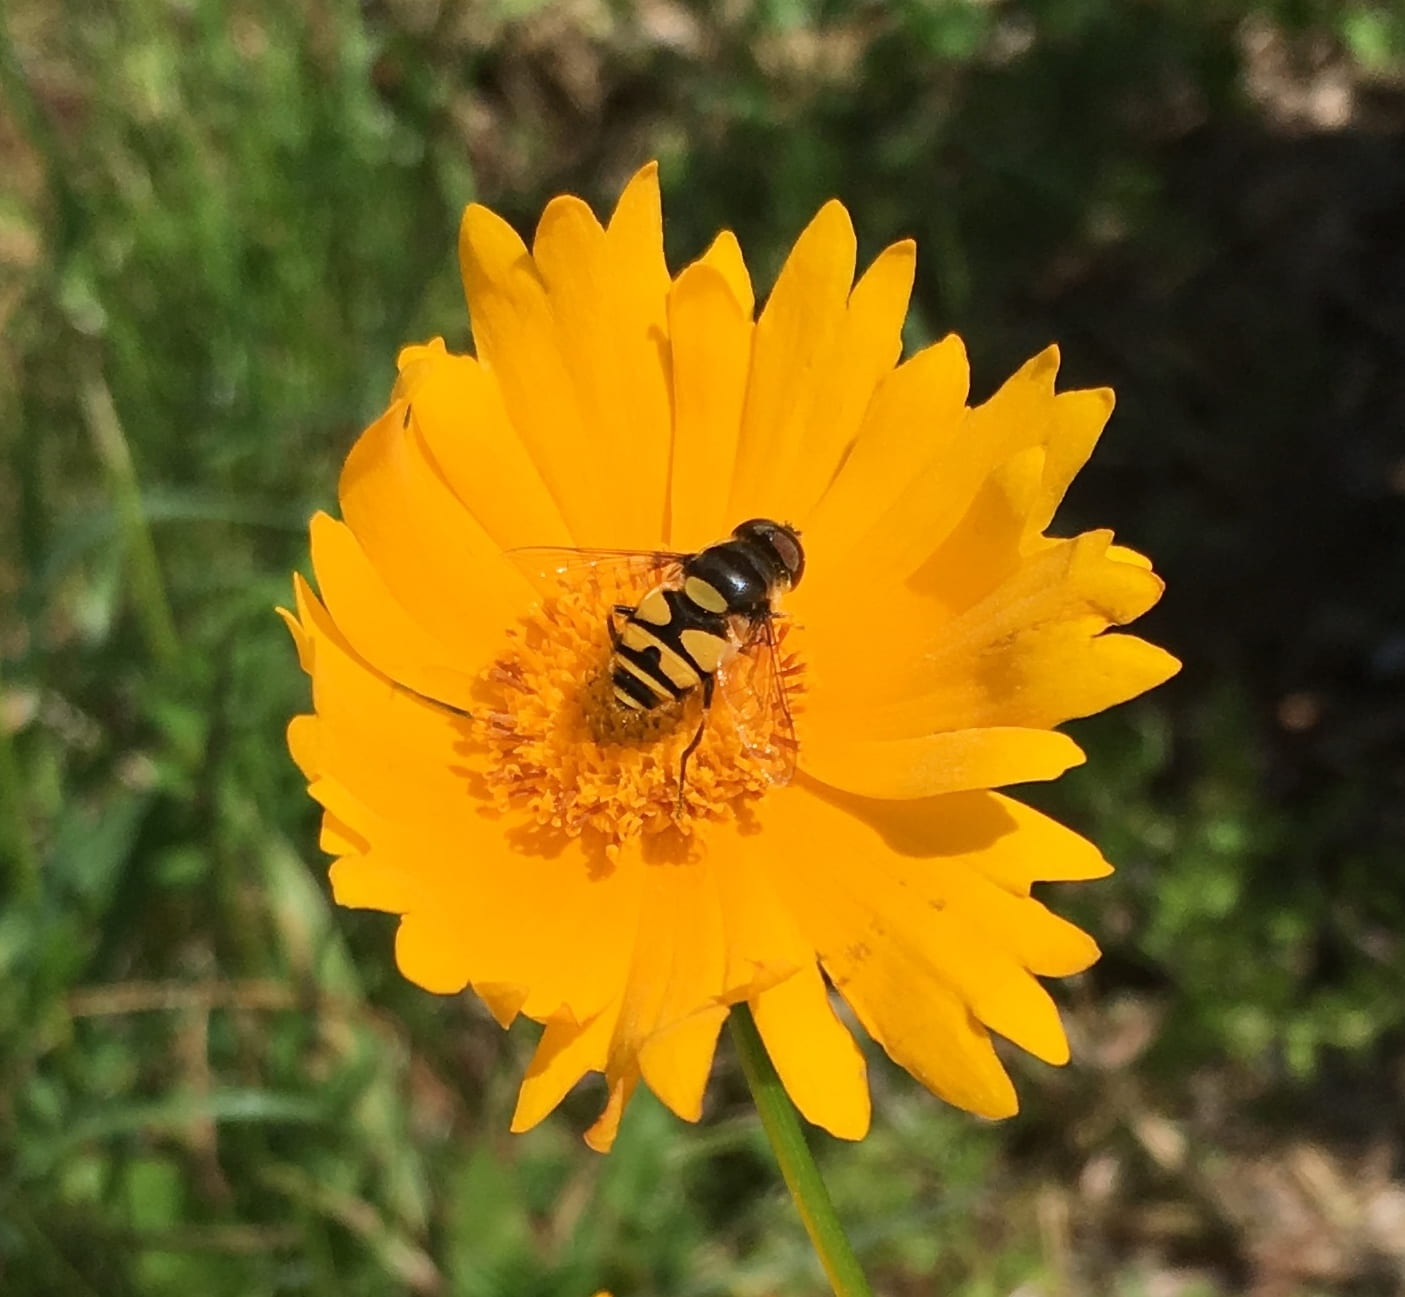
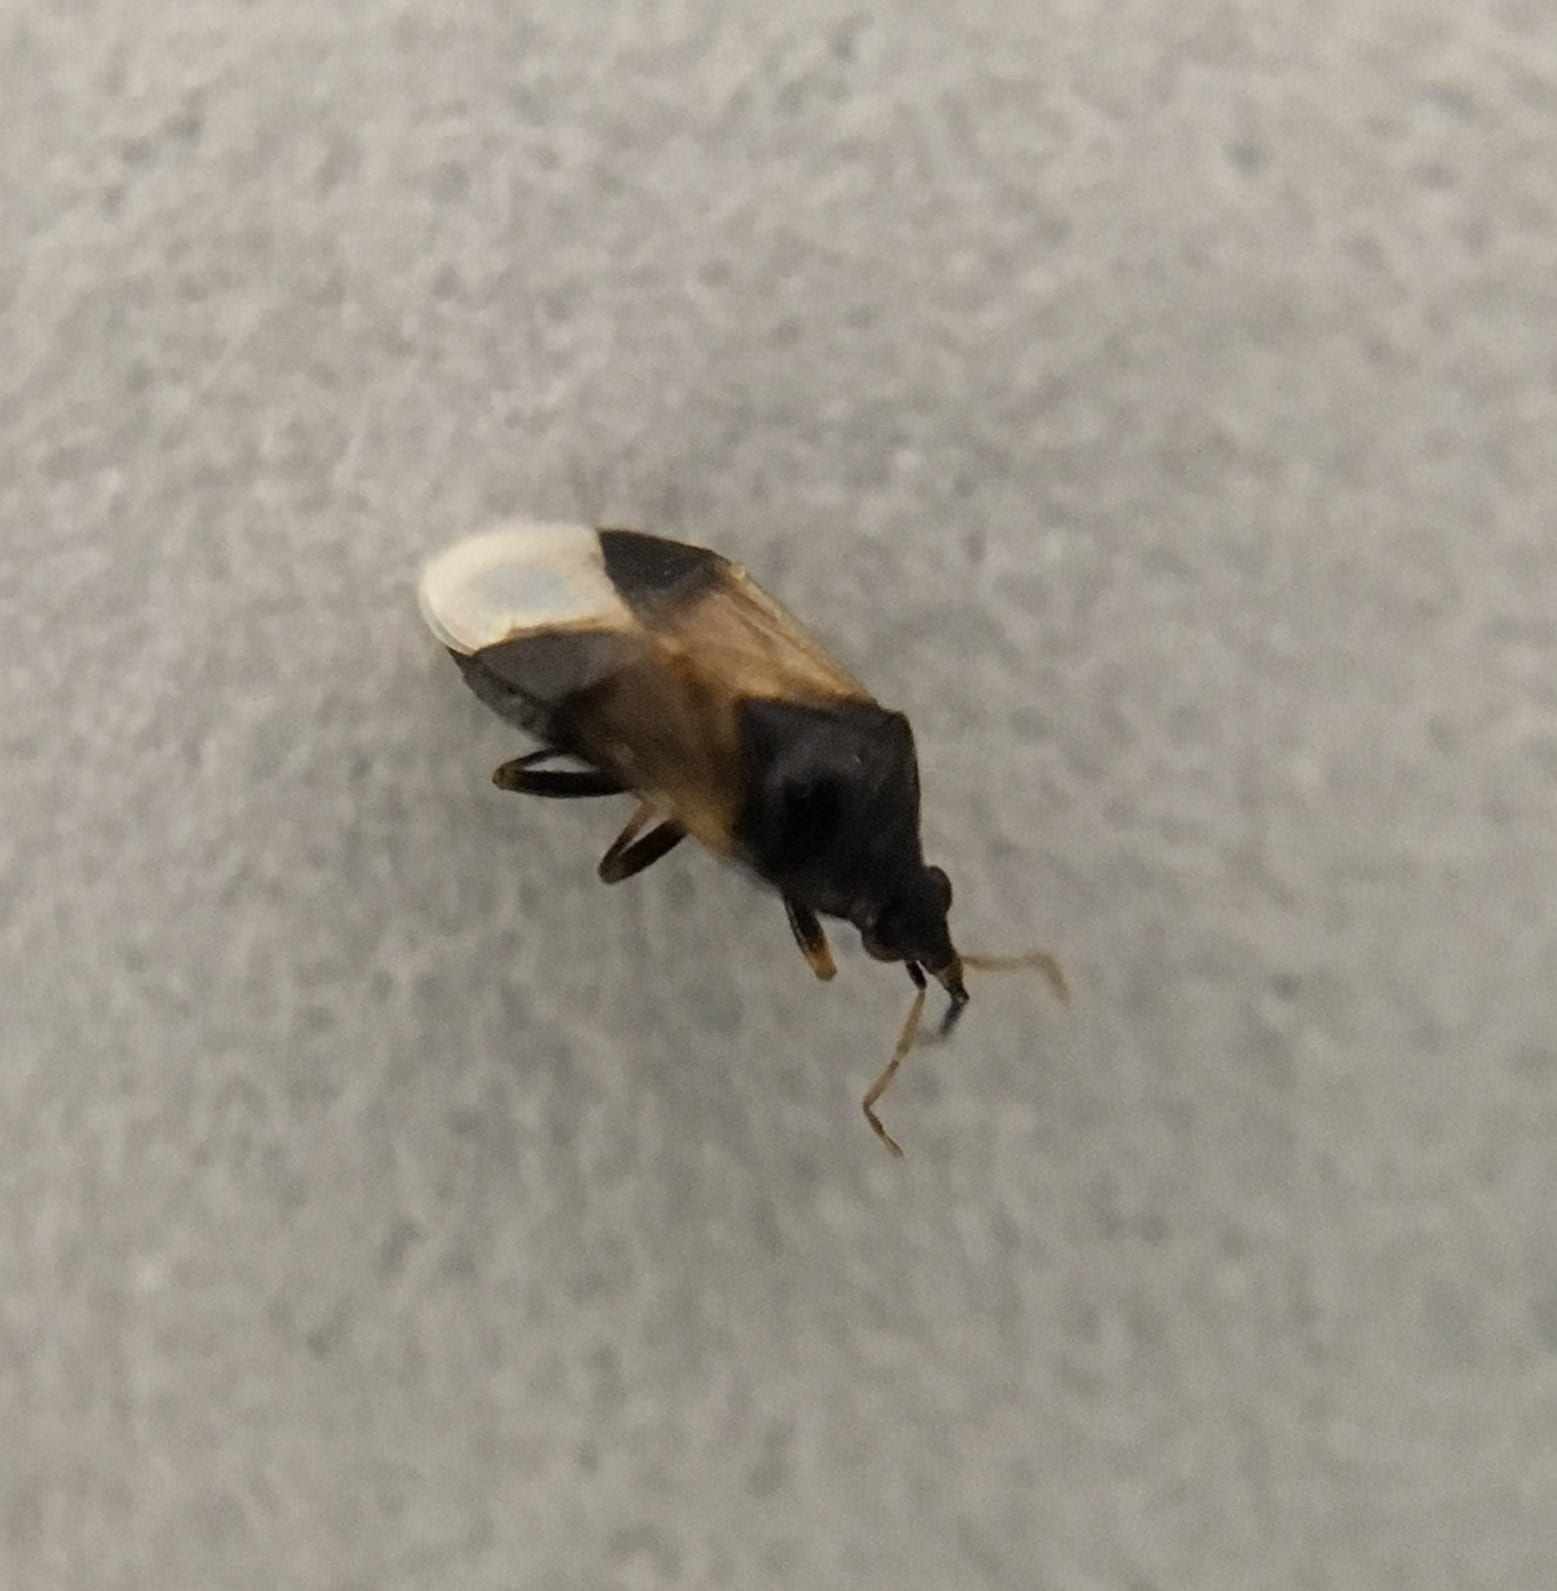
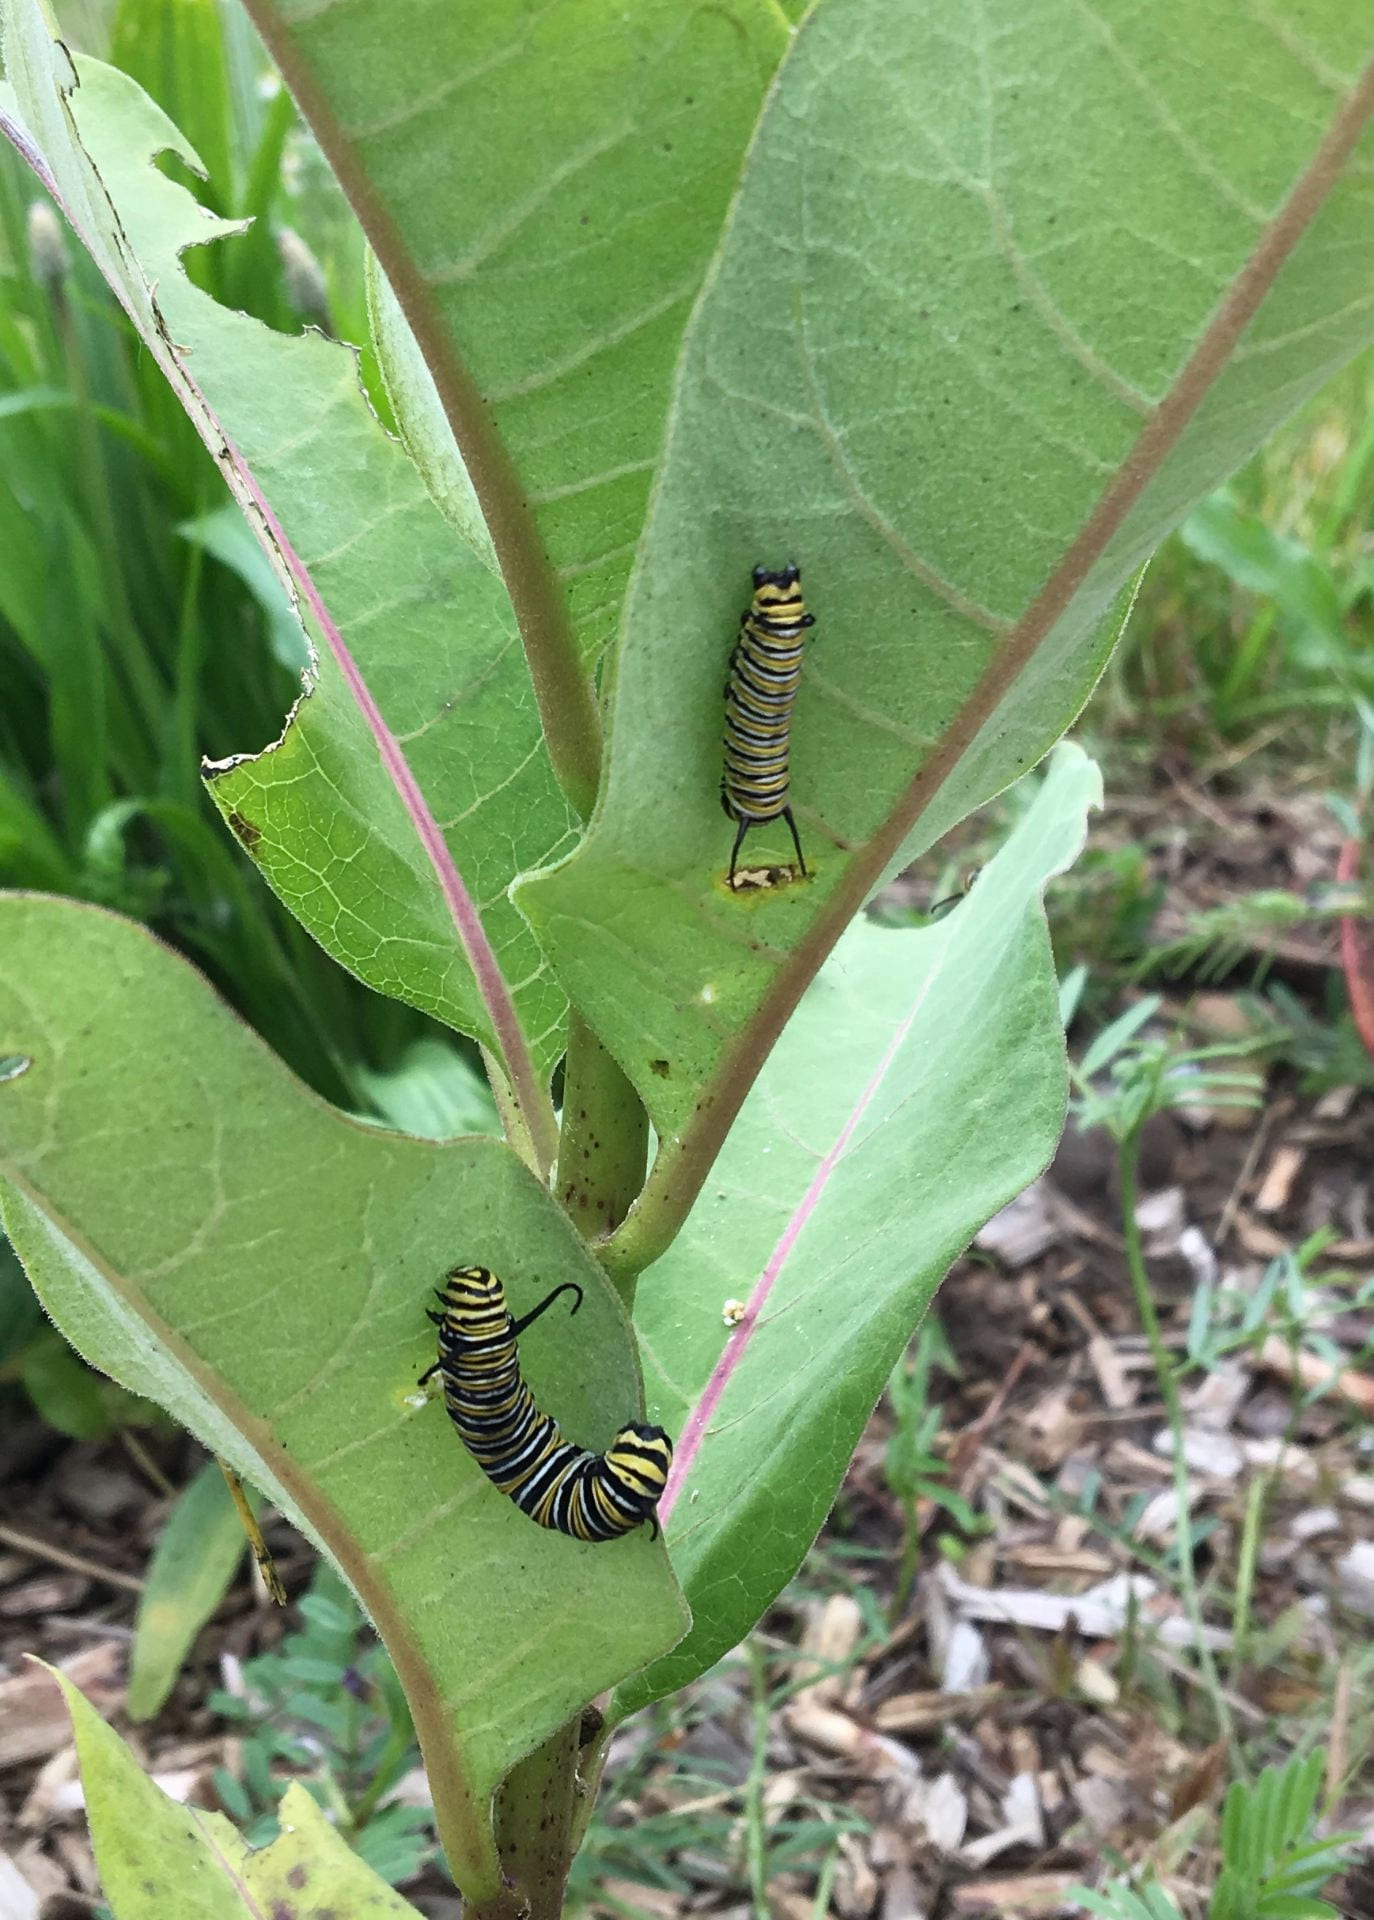
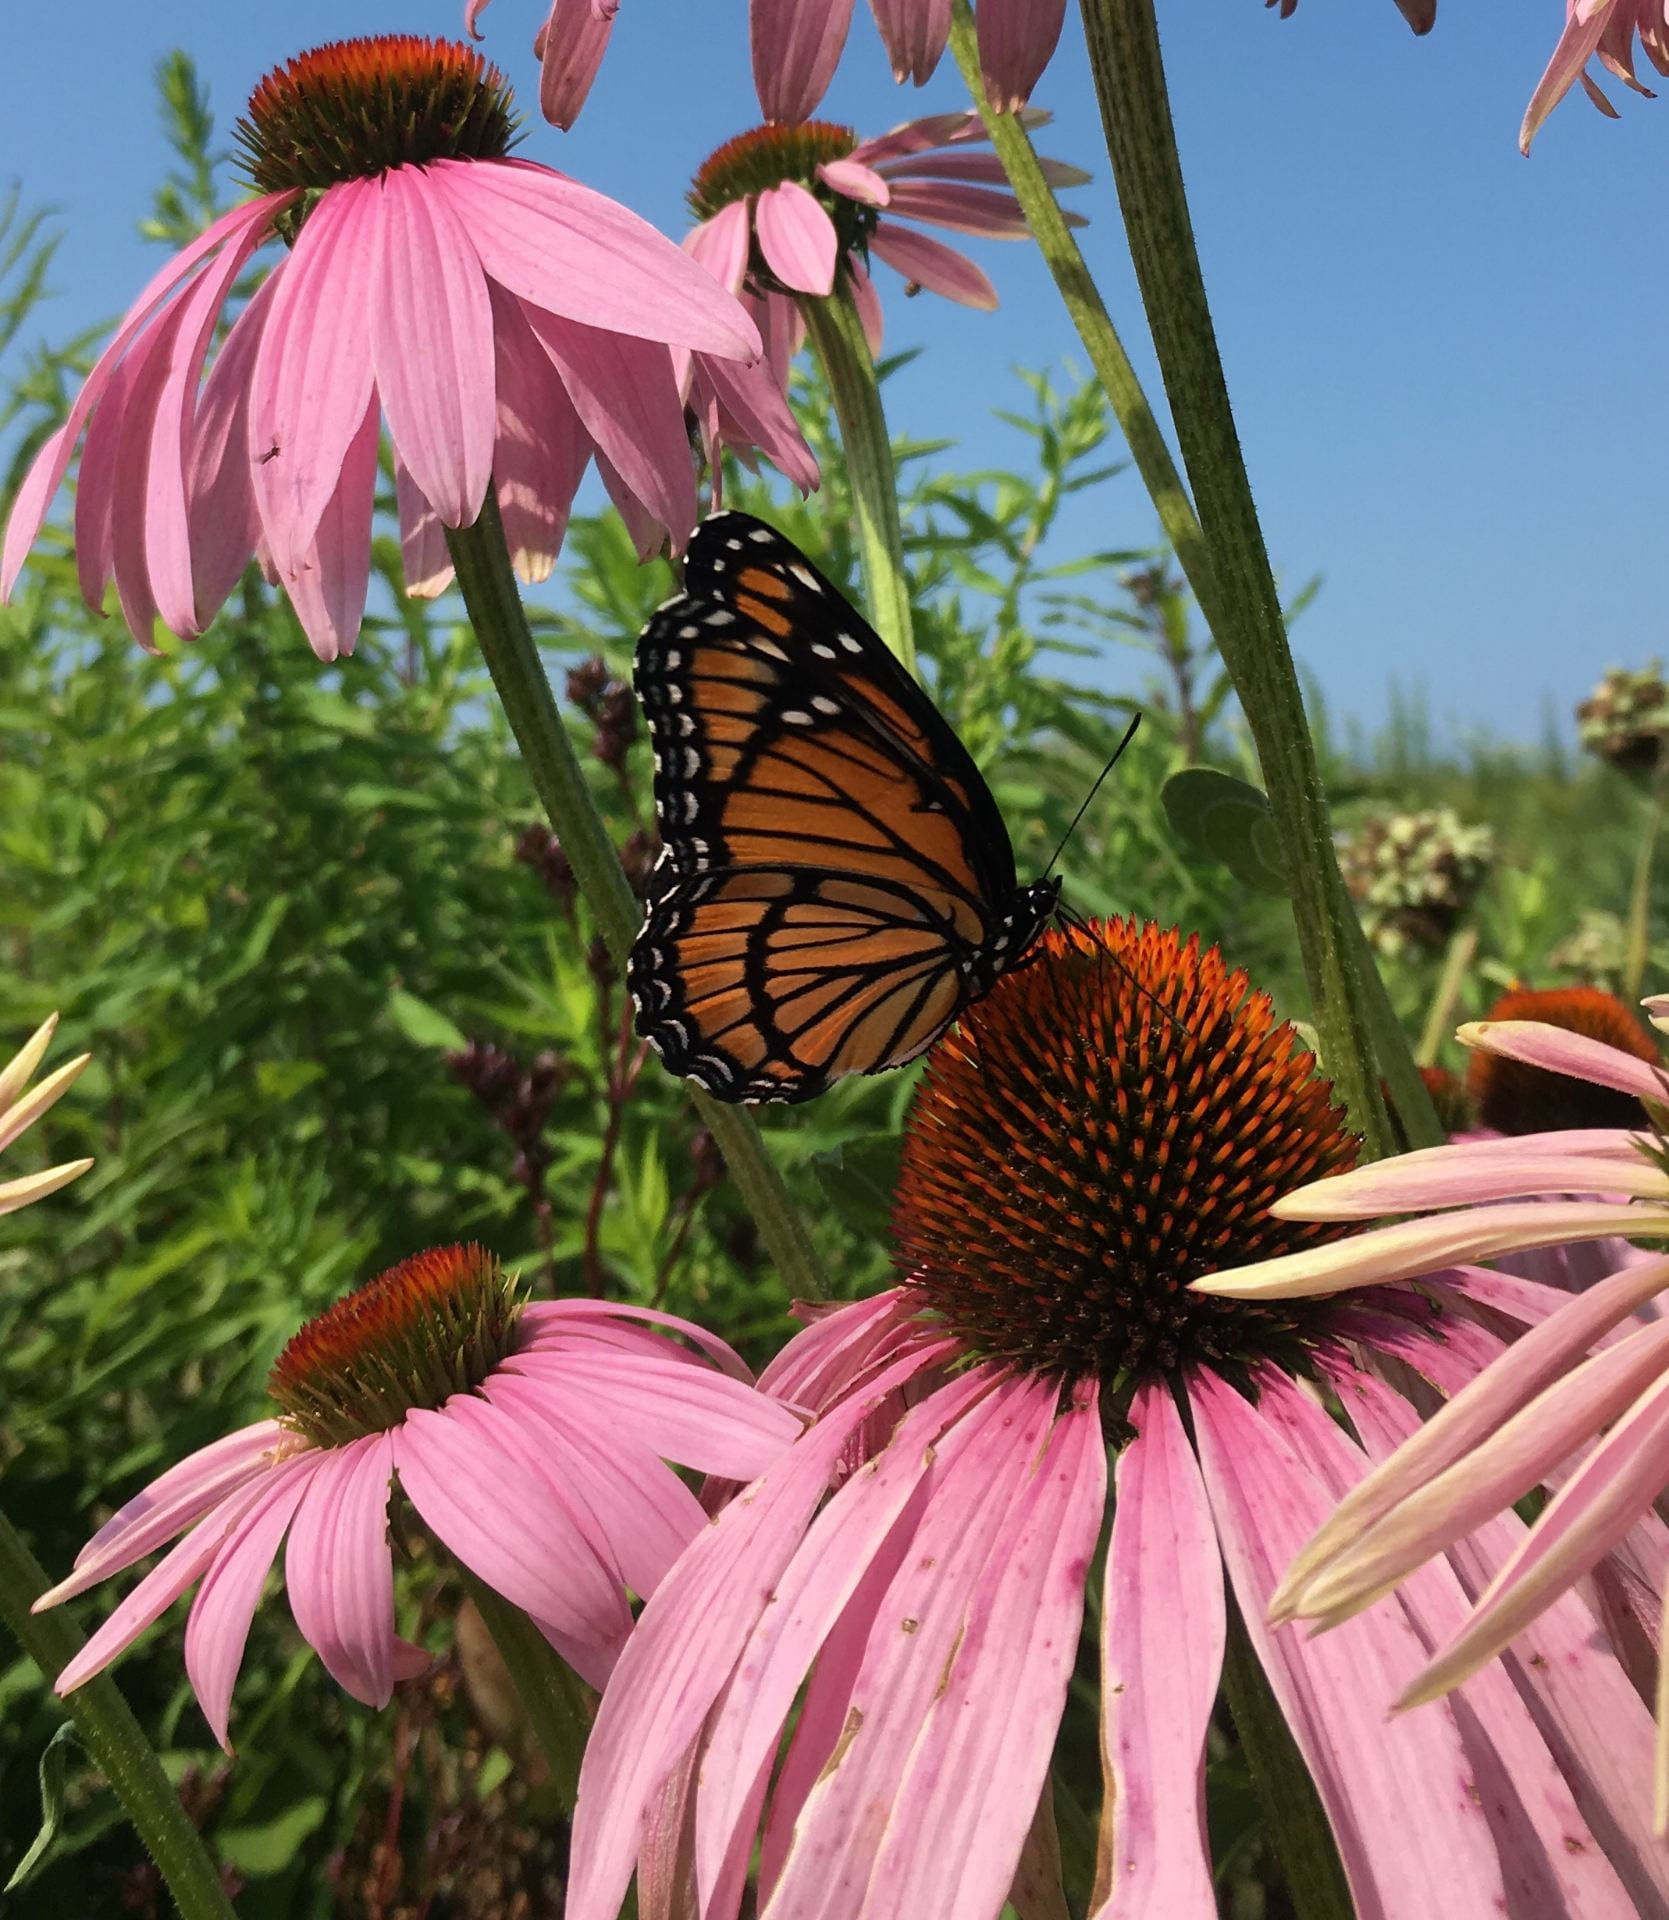
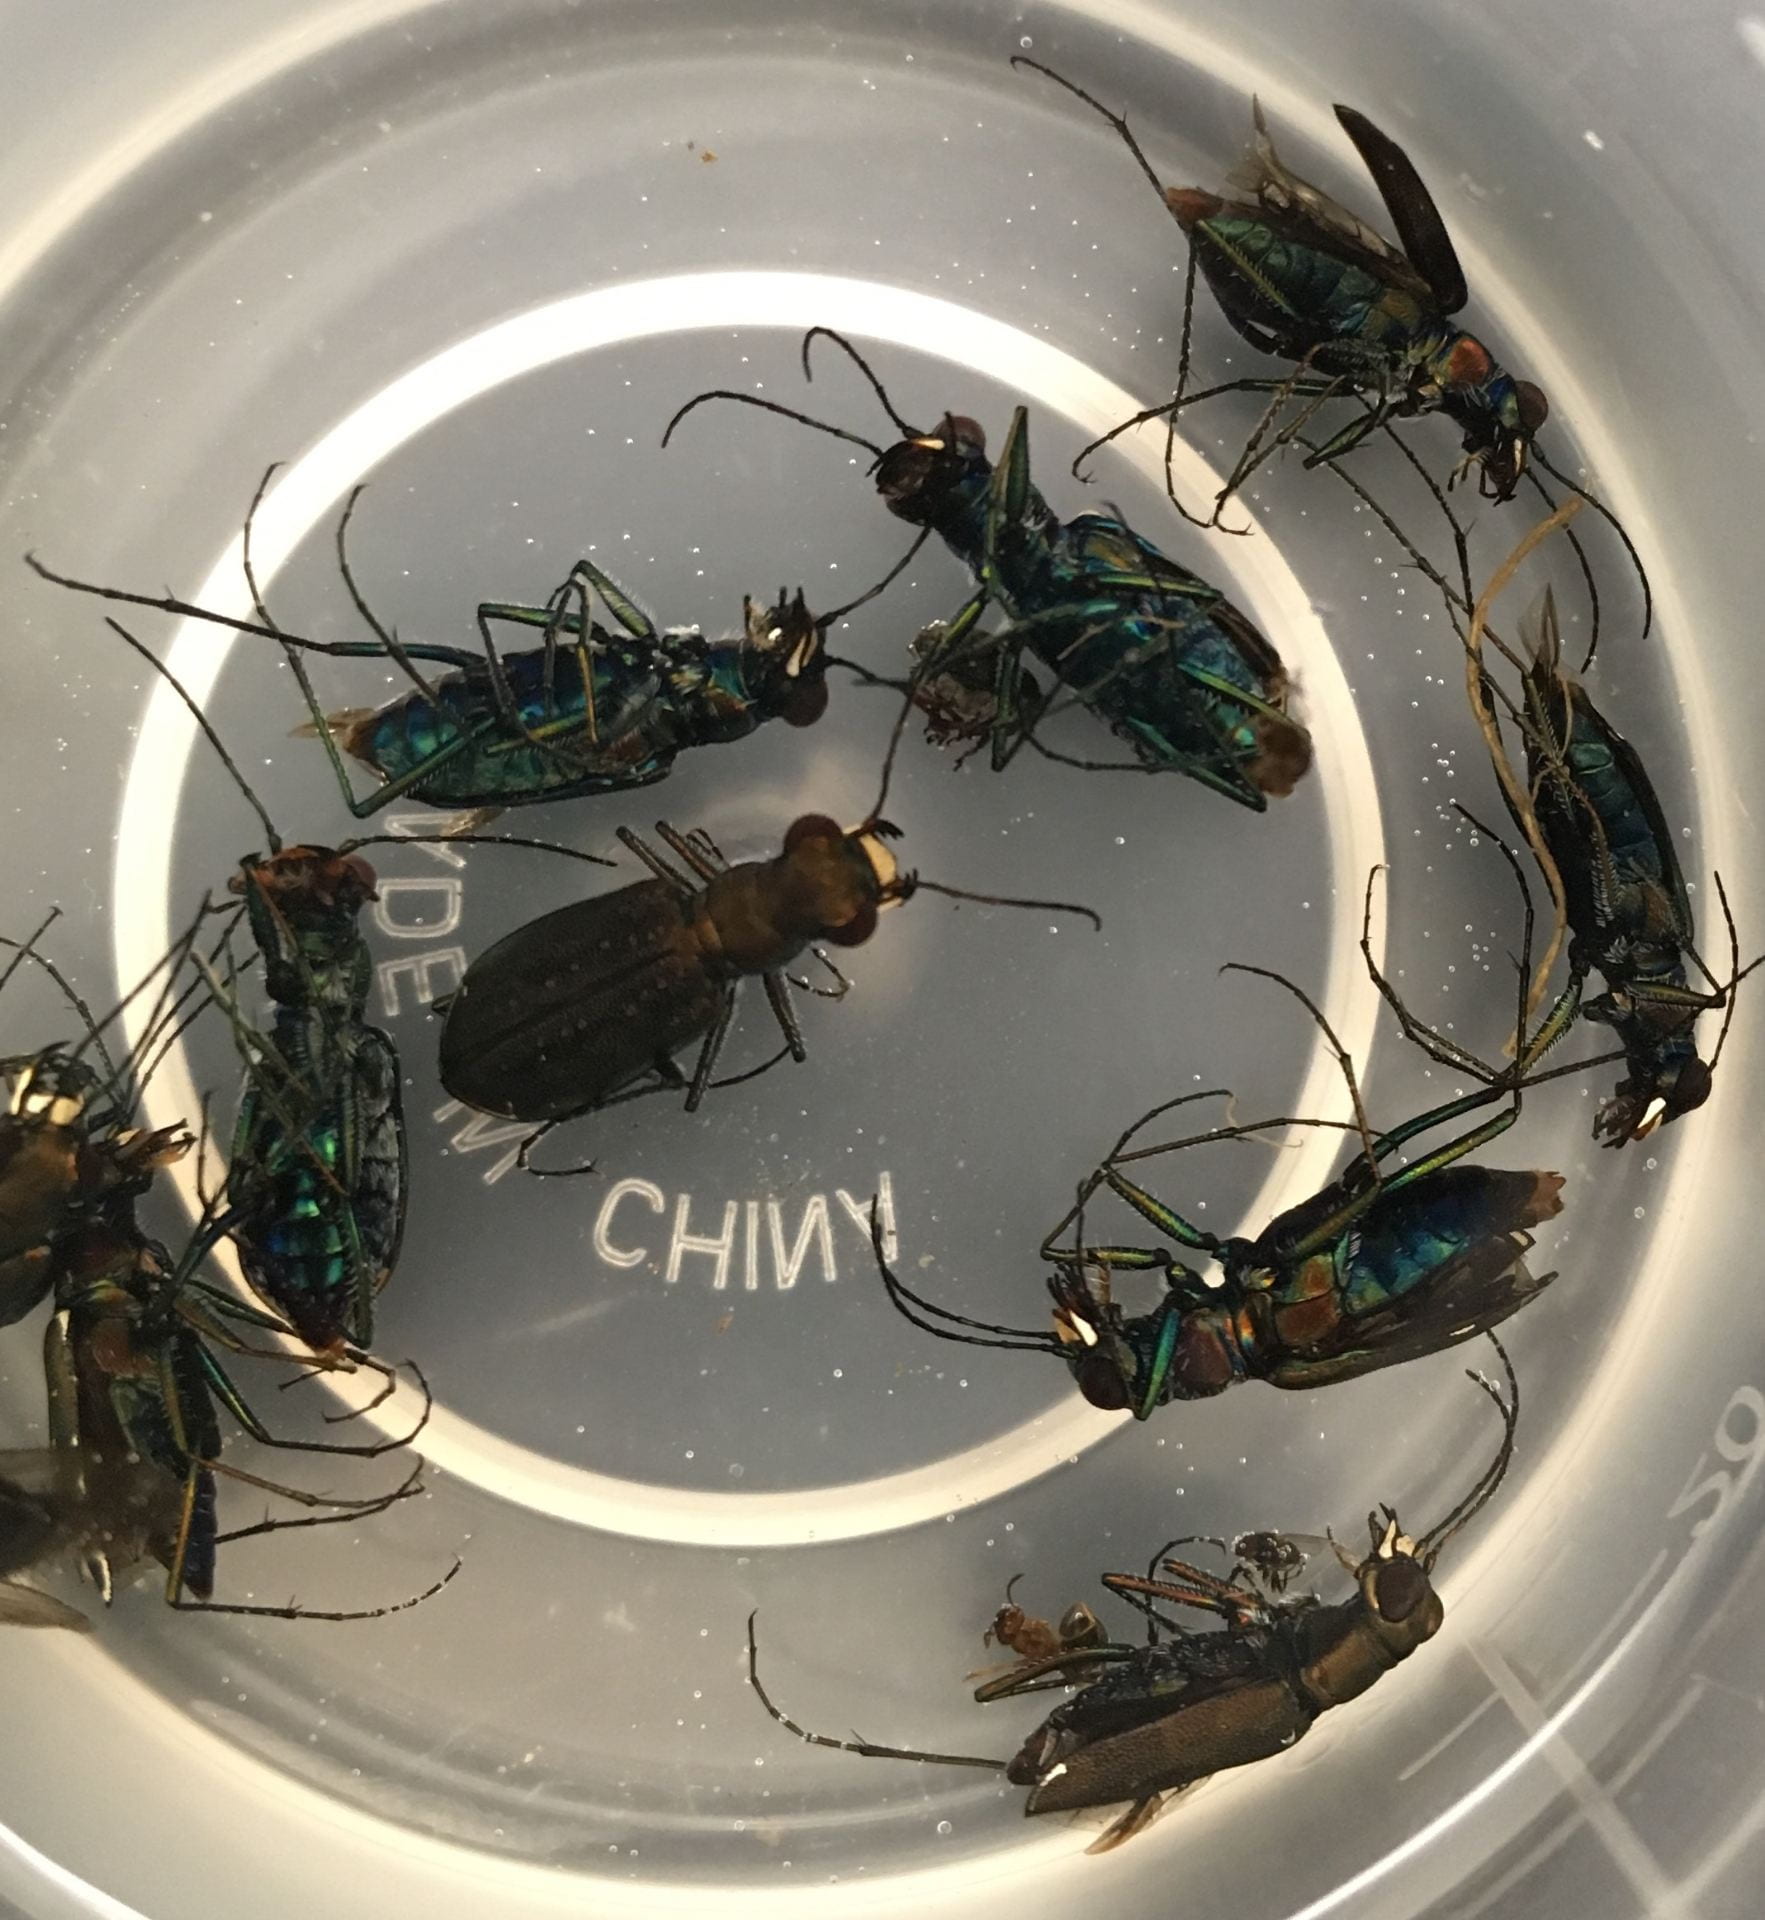
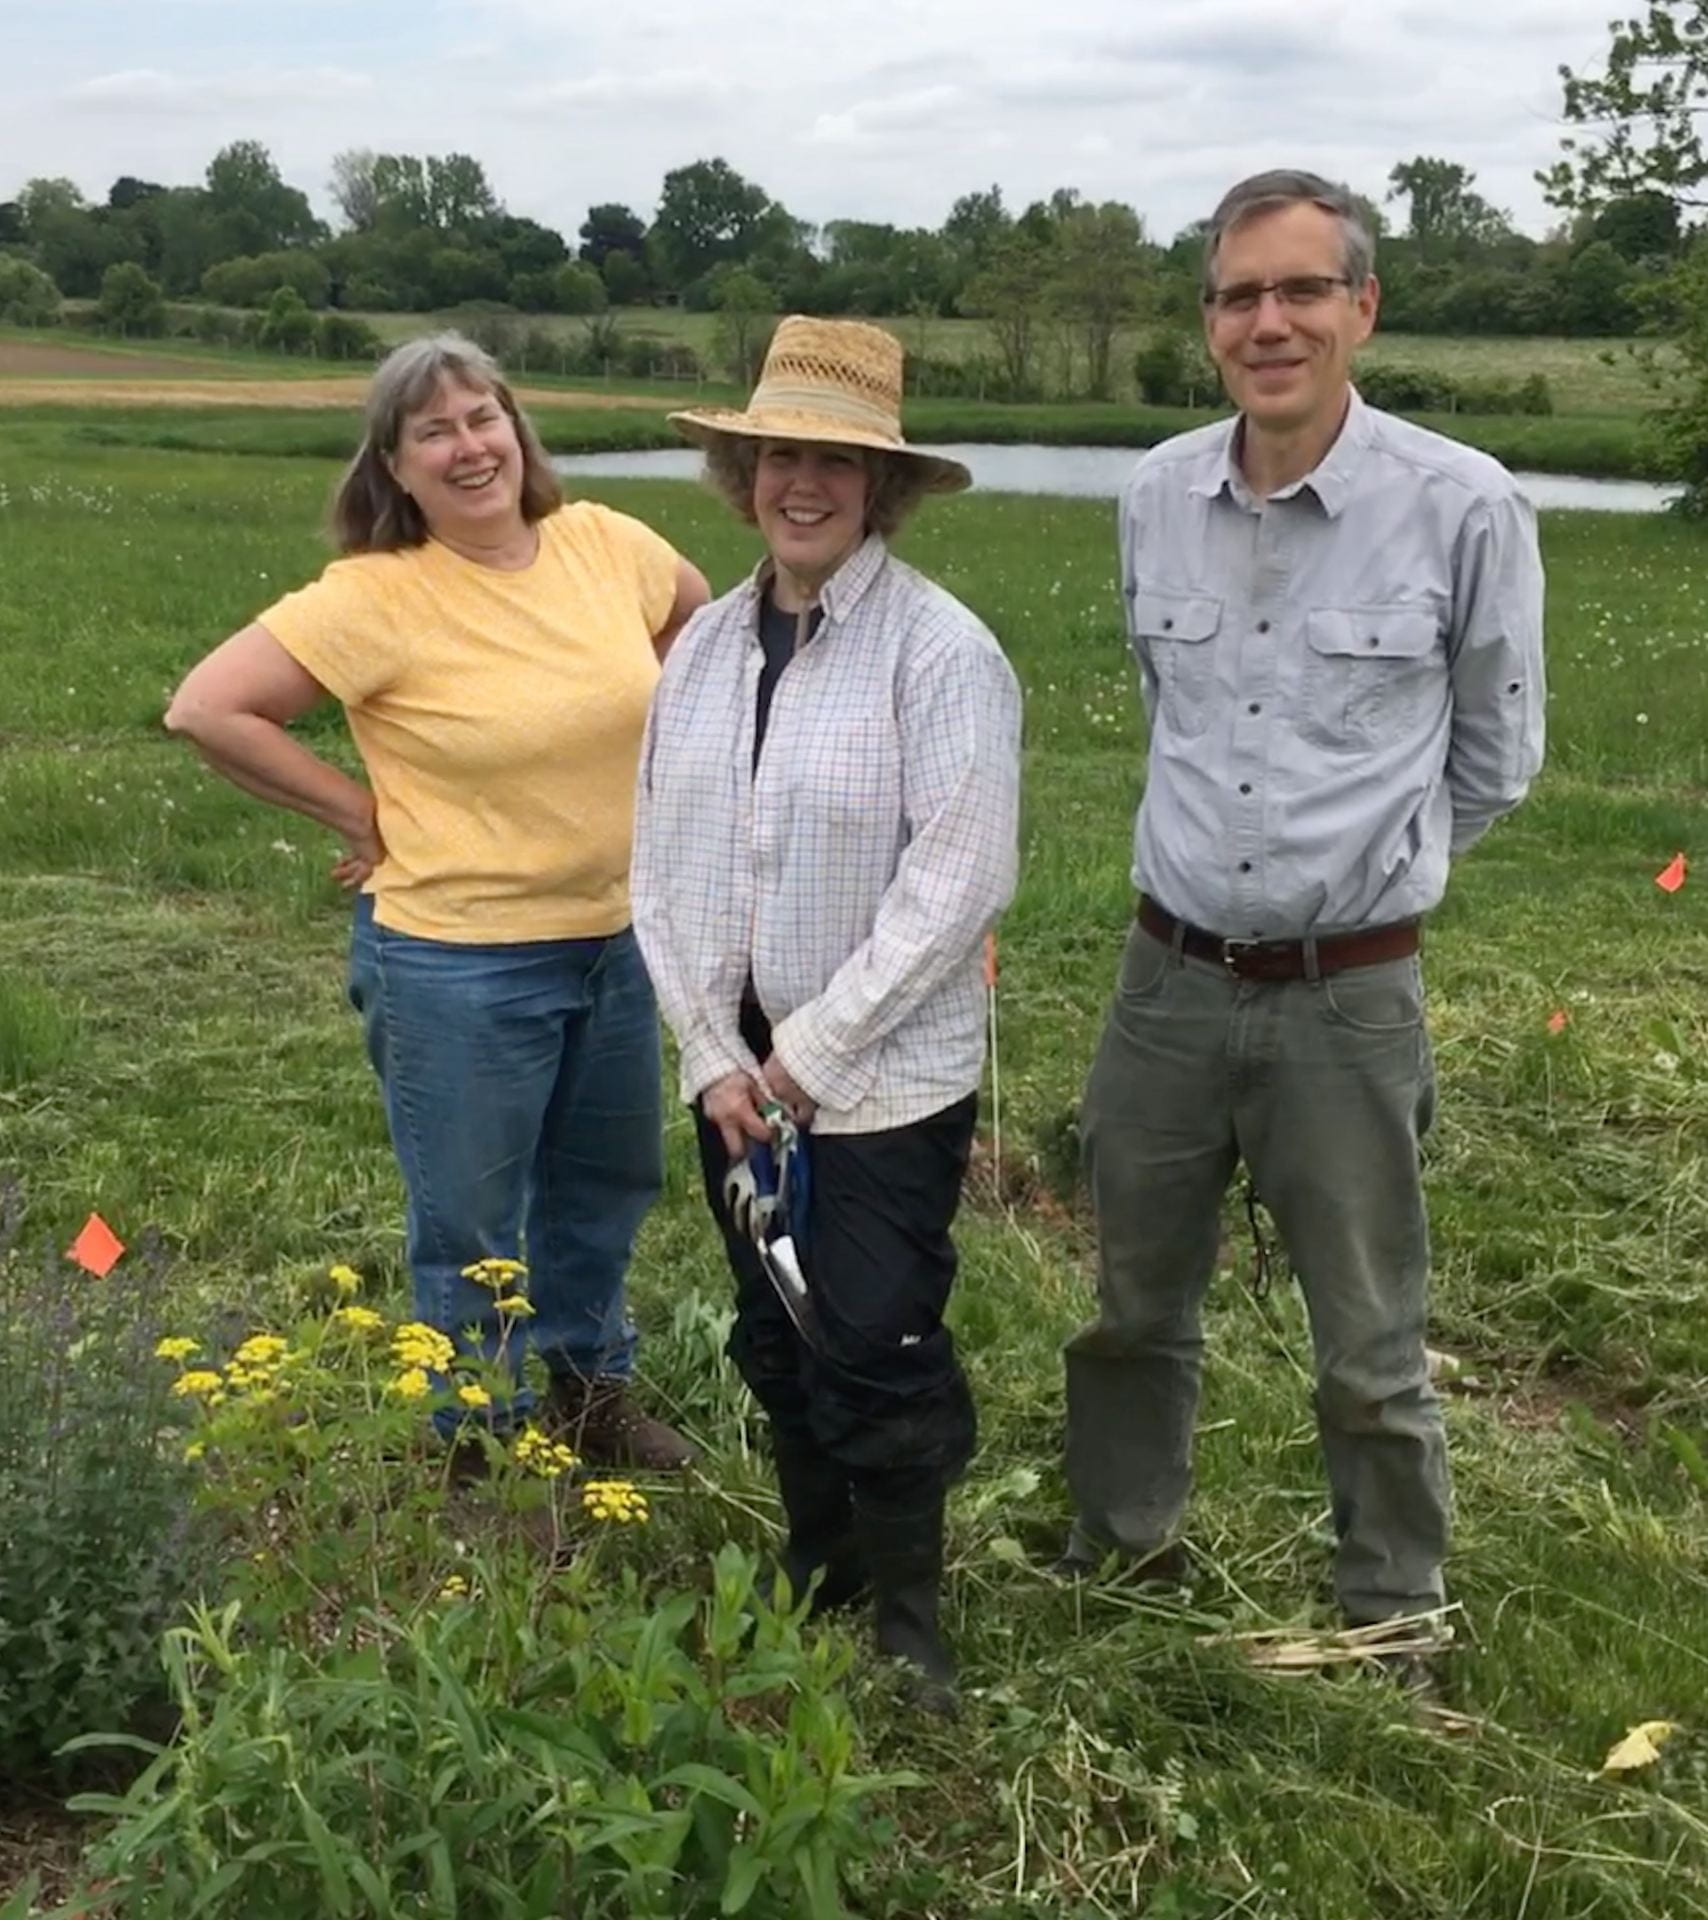
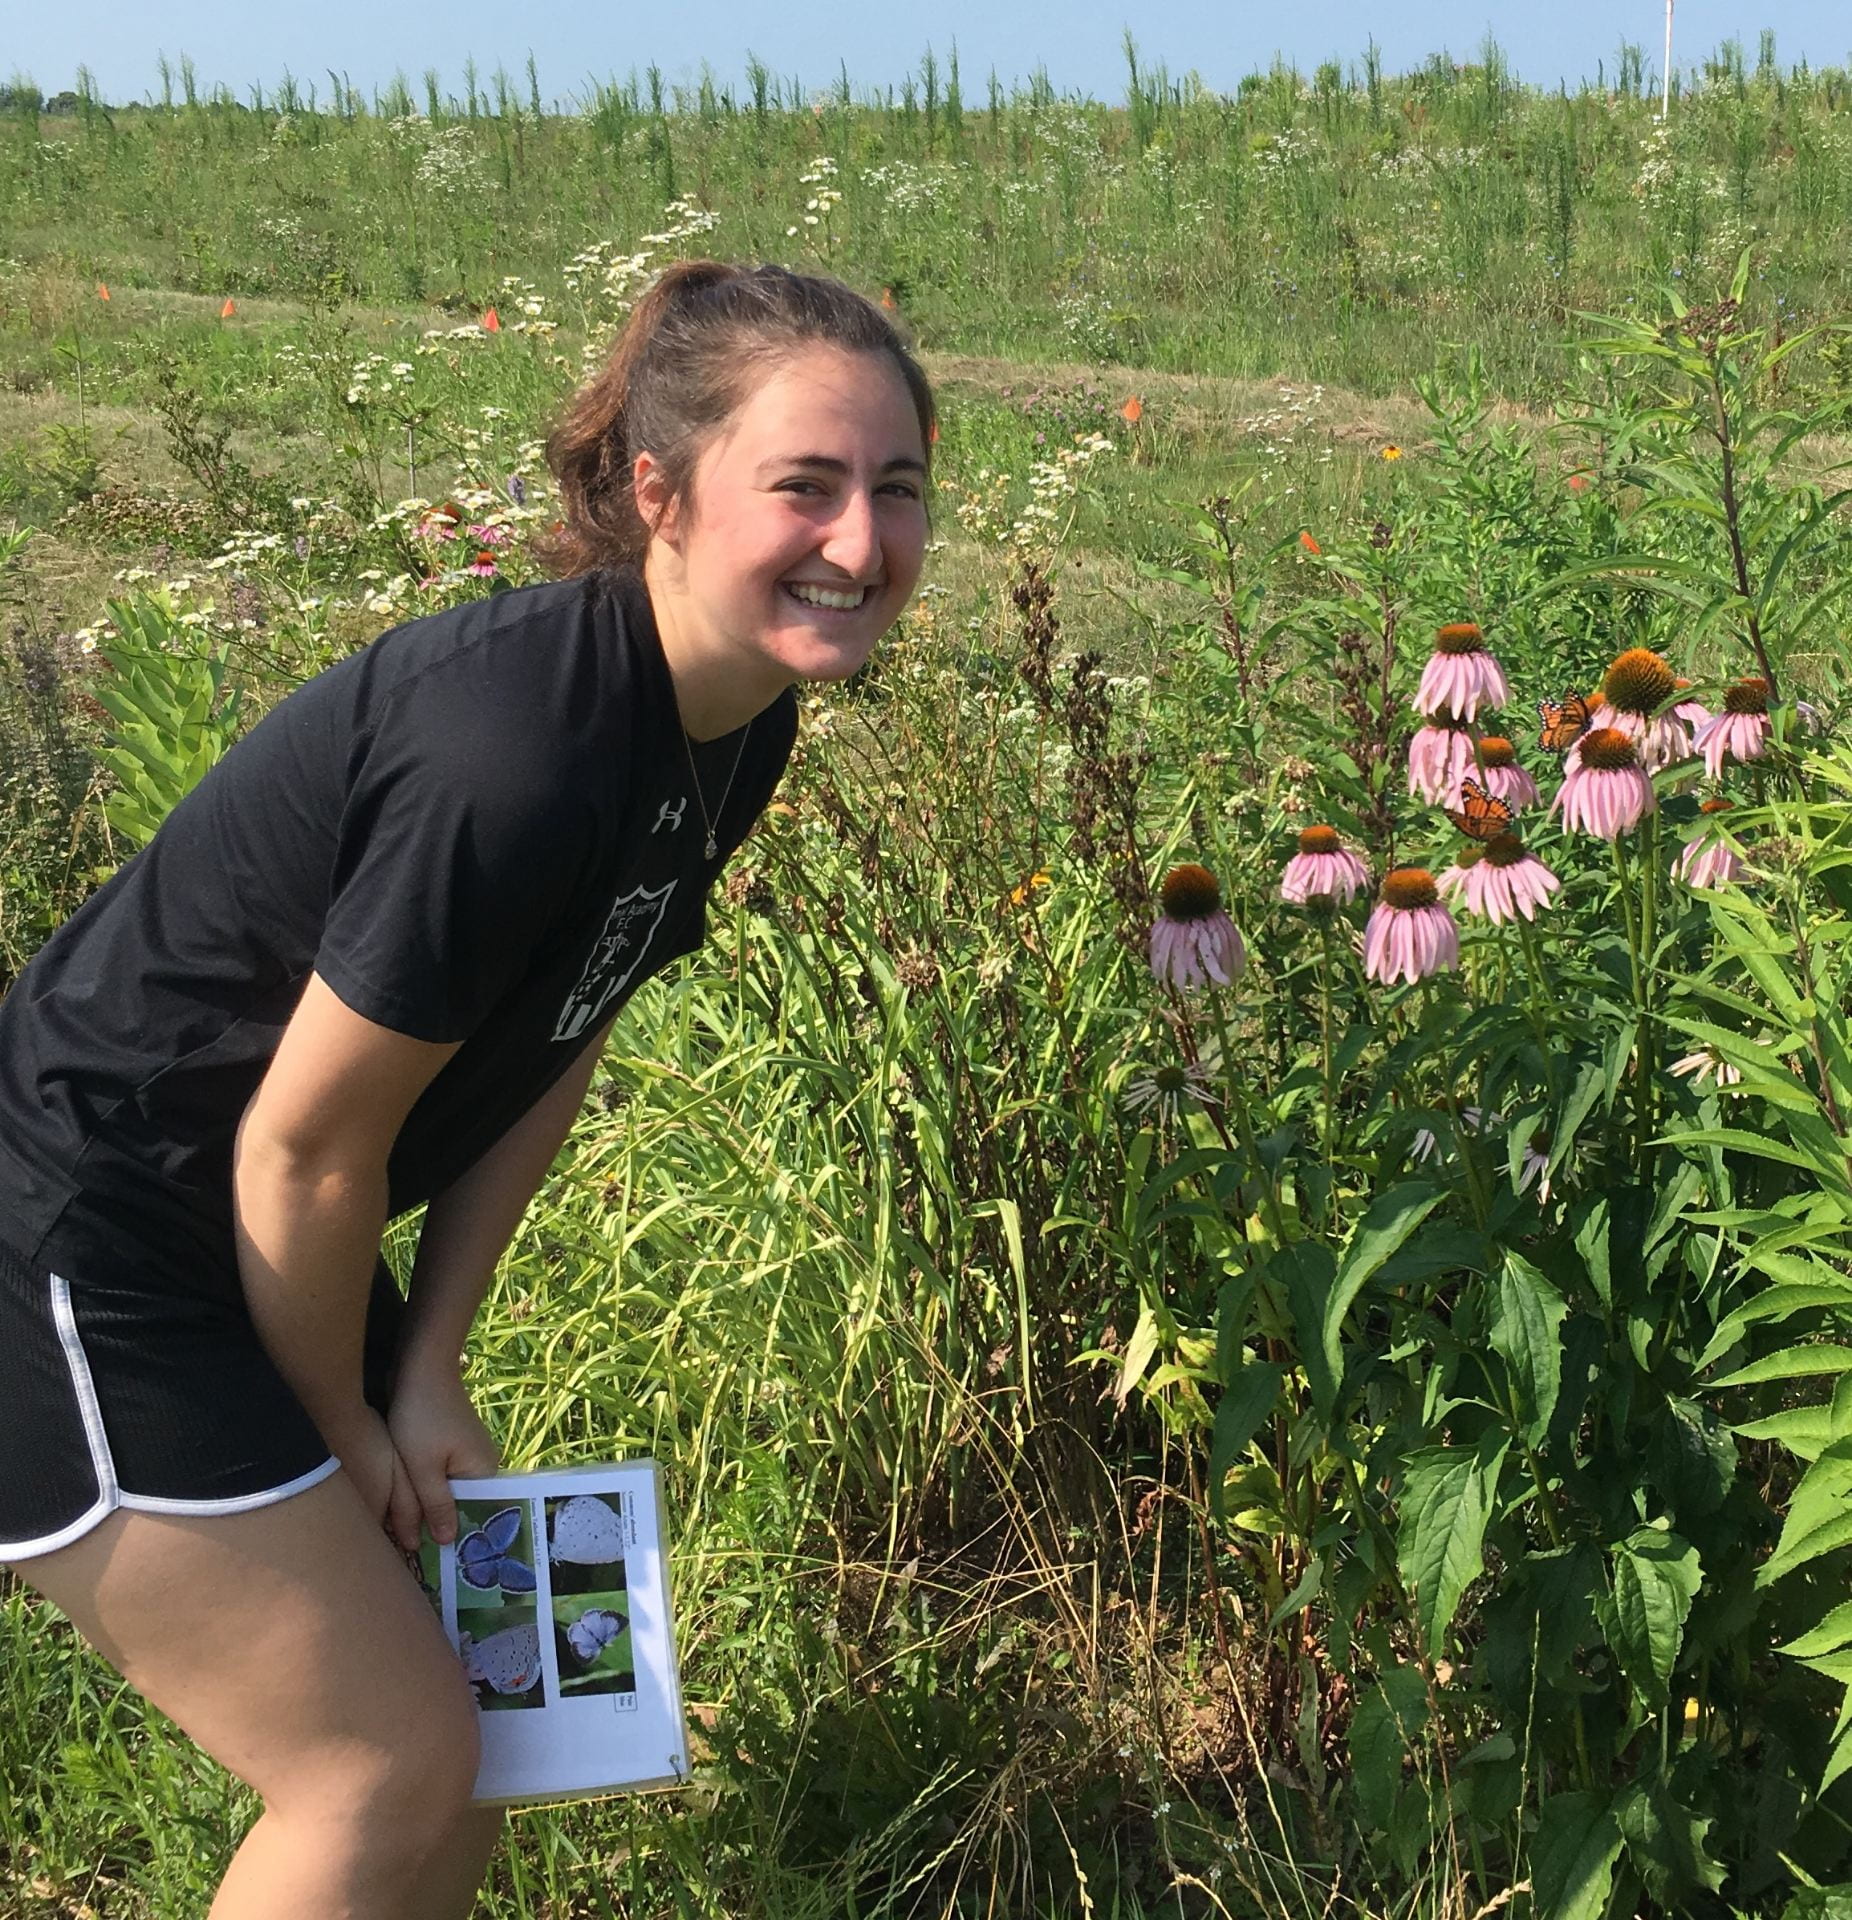
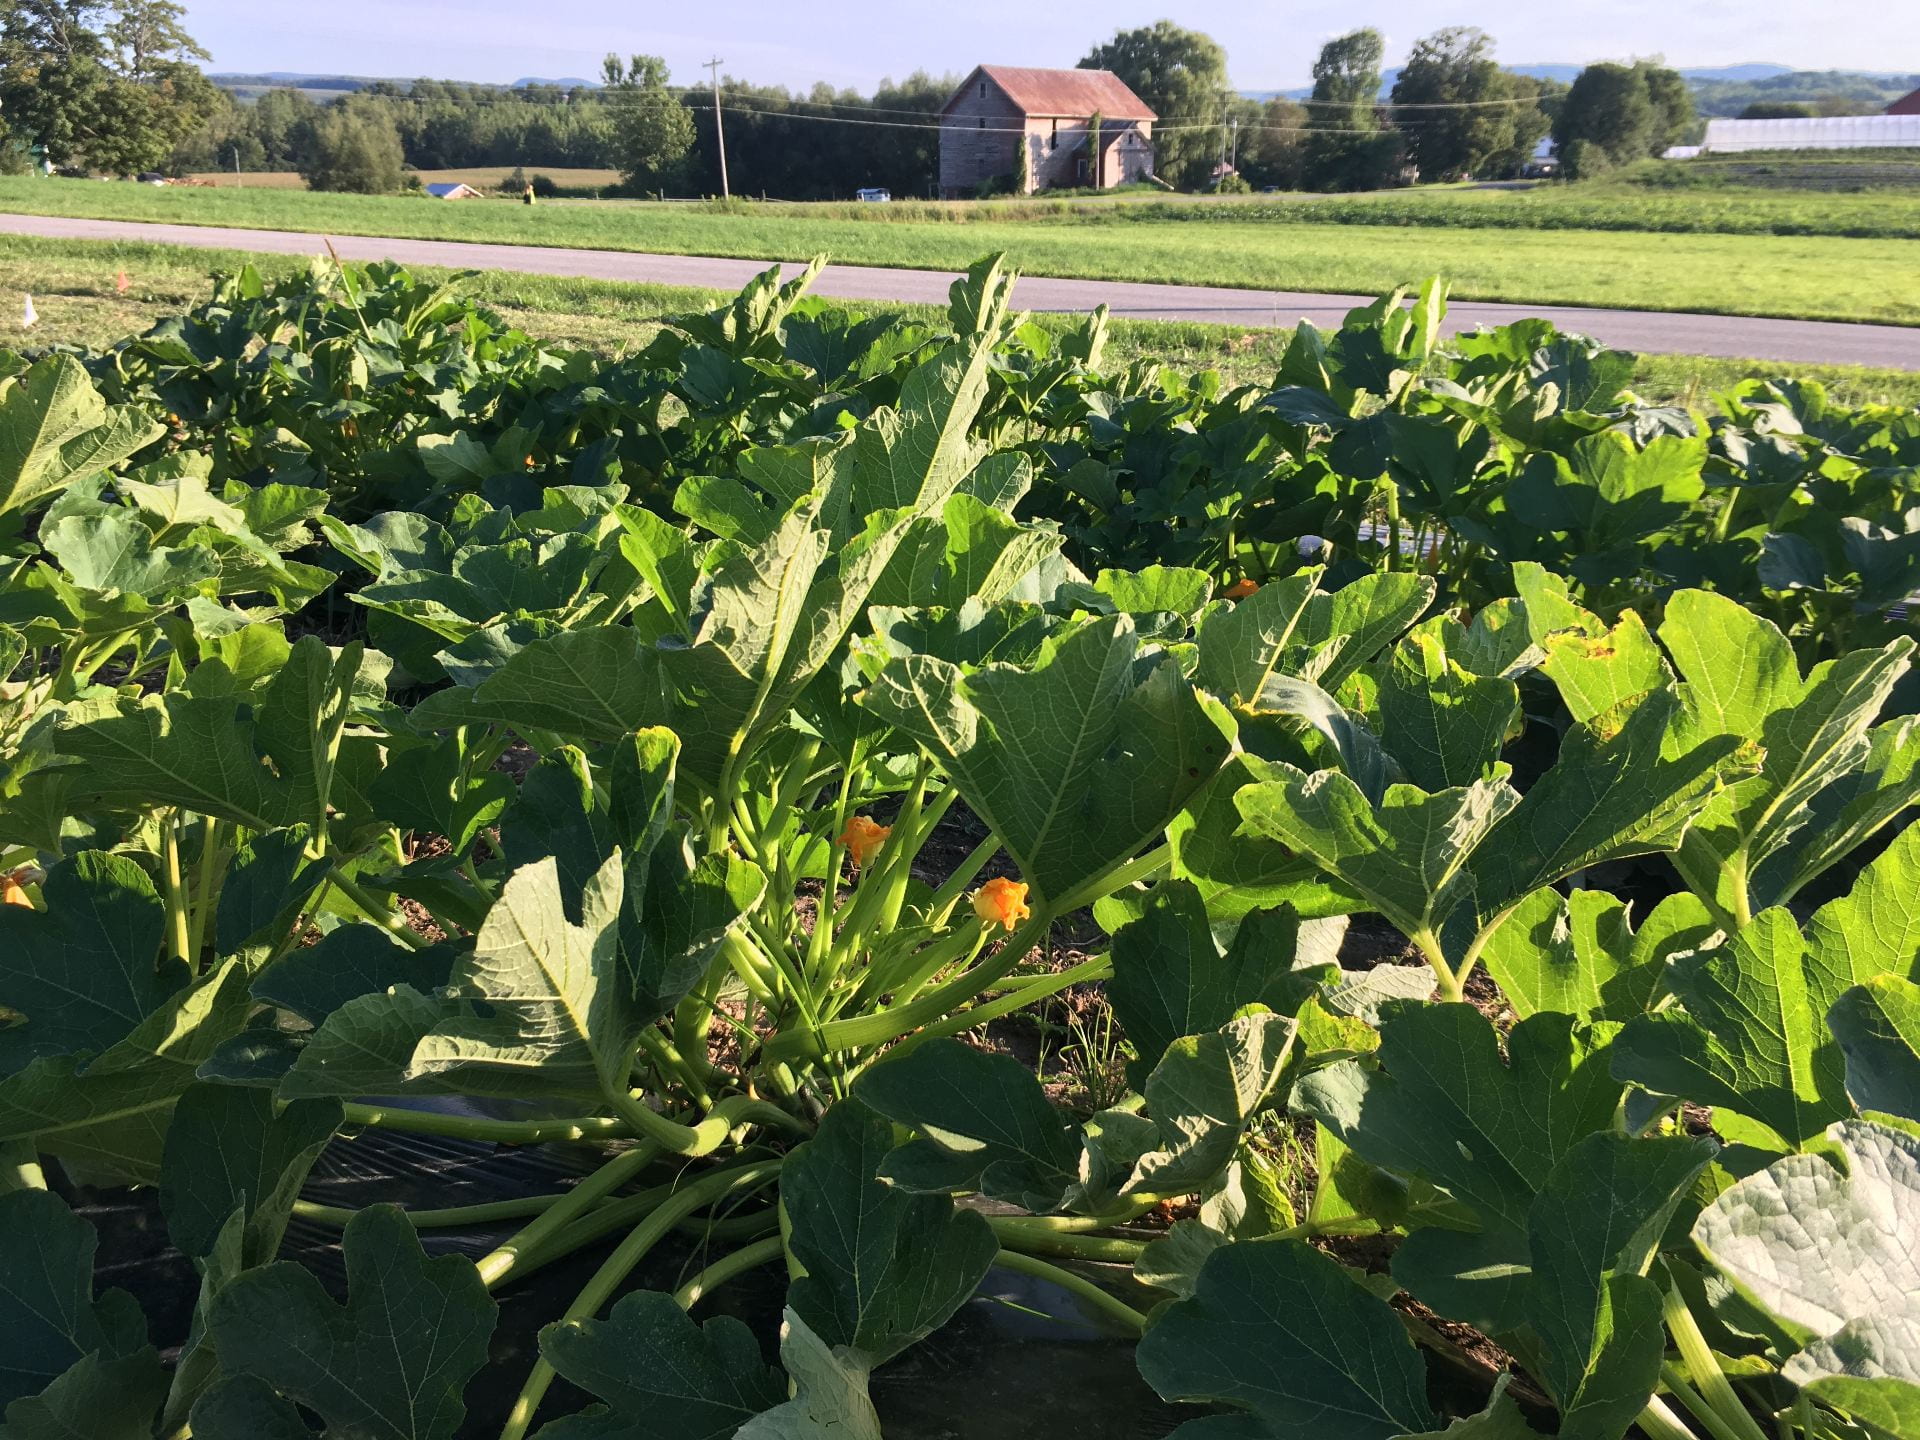
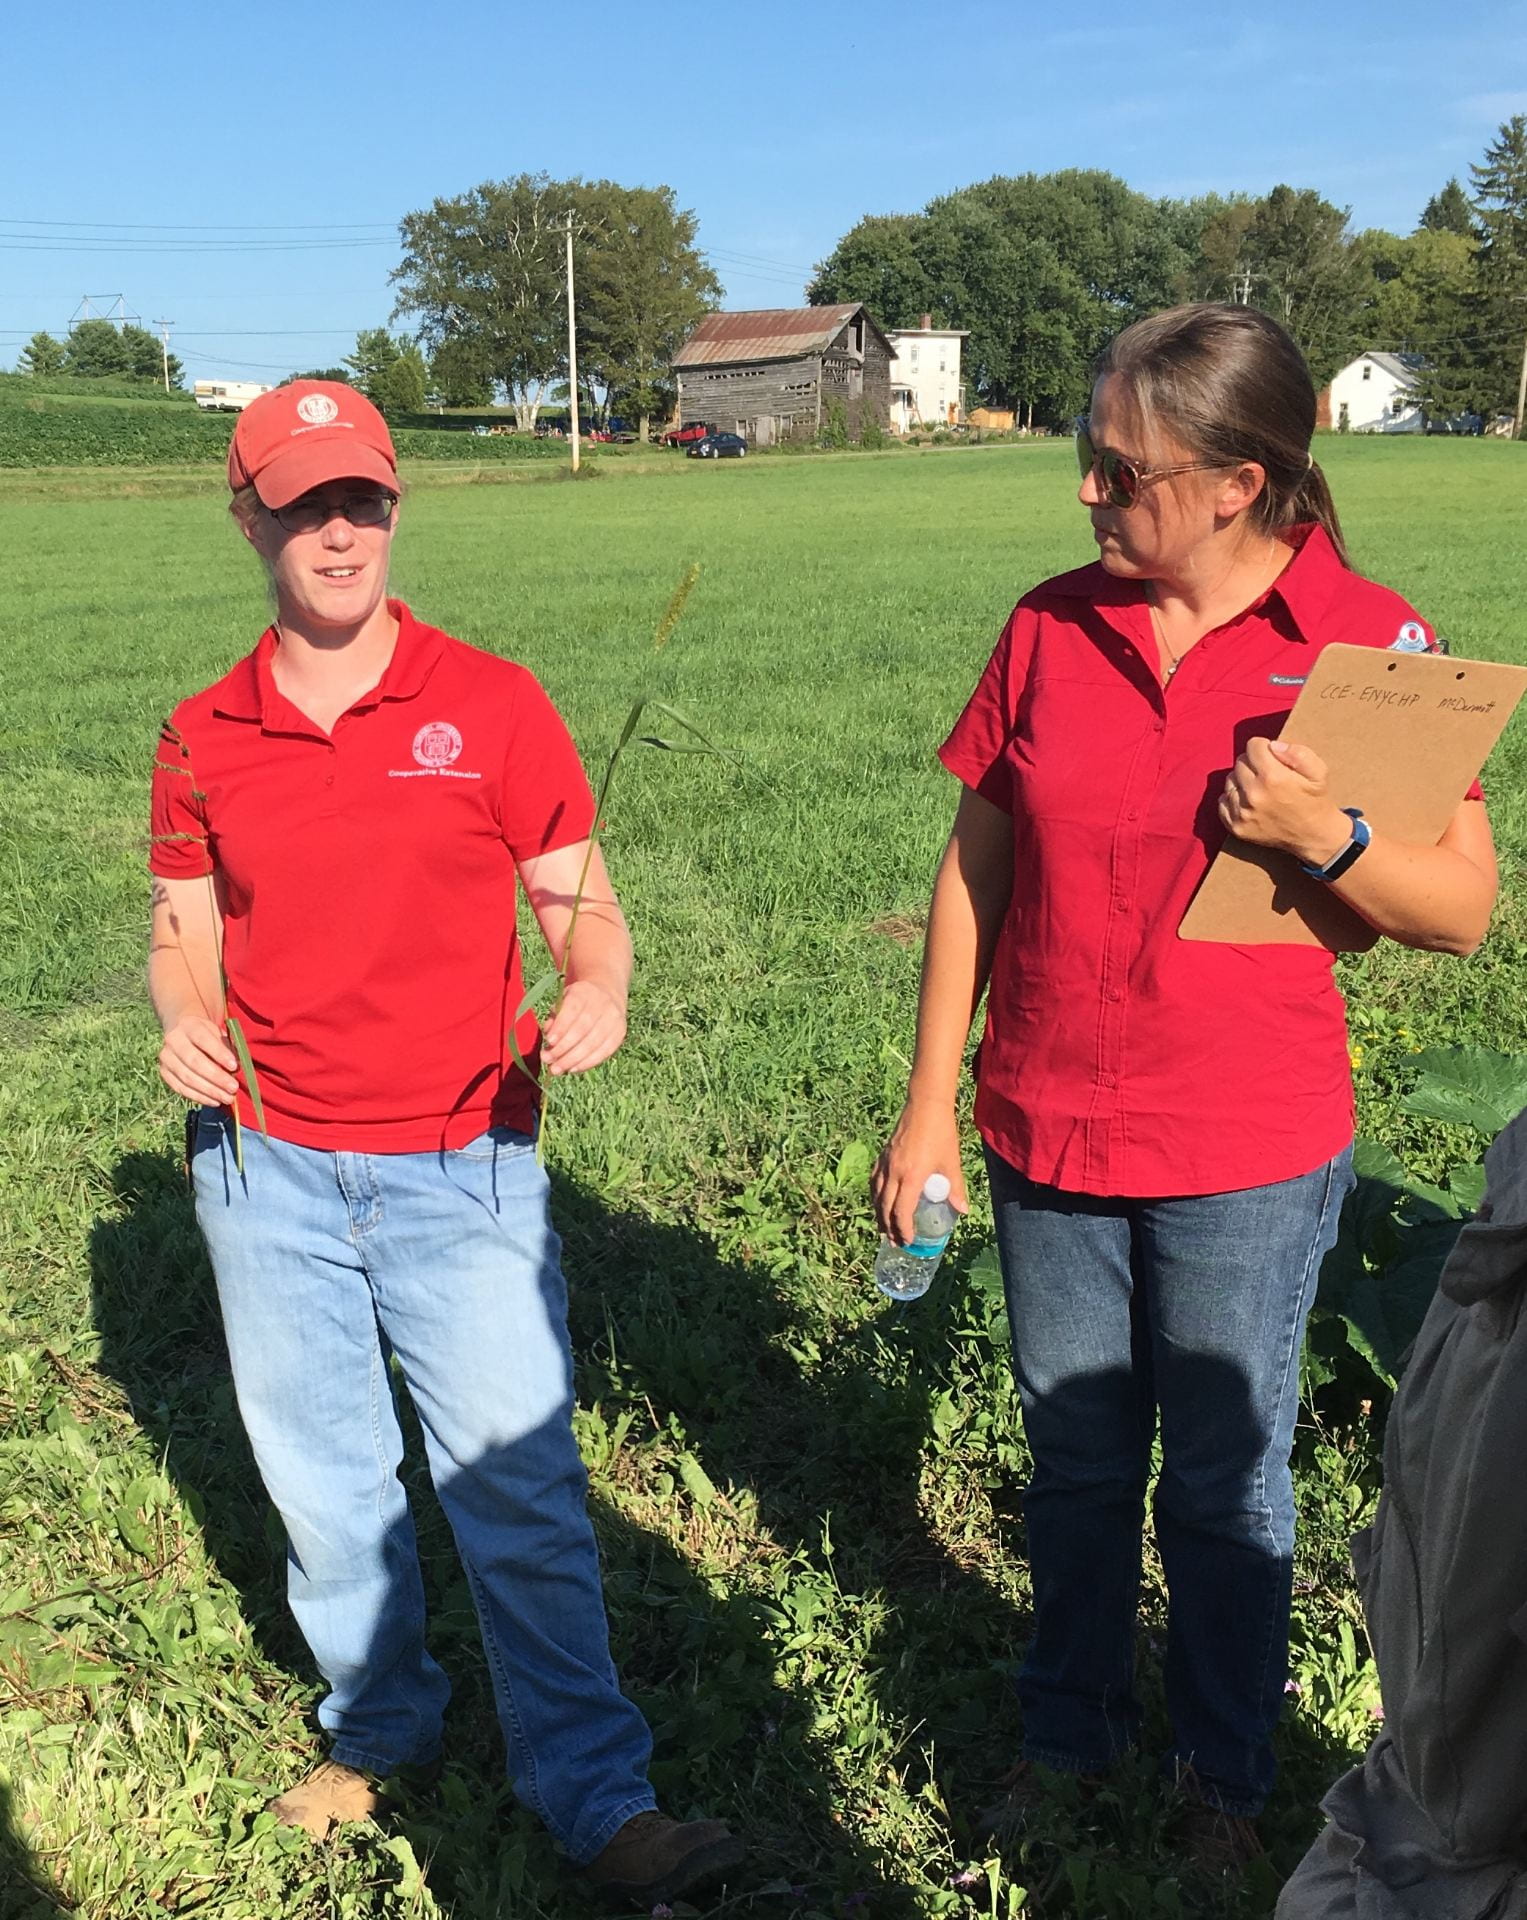
Golden alexanders (Zizia aurea) was our earliest-blooming wildflower in our beneficial insect habitat plots around the Christmas trees. It was blooming on May 16 in Geneva, NY.Some of us may not like them in our lawns, but starting in the first week of May (Geneva, NY) dandelions were providing food for beneficial insects like this bee.This shy lady beetle was finding food in the flowers of this weedy mustard plant in mid-May (Geneva, NY).After expert training from Cornell entomologist Jason Dombroskie (pictured here during our training session in late April), we’ve been using a sweep net to catch insects that fly or perch on the wildflowers in the habitat plots we started last summer. We sampled this way once every month.Starting the week of May 20th, we set out pan traps (blue and yellow plastic bowls filled with soapy water and weighed down with rocks) approximately every other week. These traps catch insects flying through our plots, especially those that are attracted to the colors blue and yellow. This includes many bee species.Also during the week of May 20th, we started setting pitfall traps once each month. Insects walking along the ground fall into these deli cups filled with a drowning solution. We put rain covers over them (made out of clear plastic dinner plates and wire from old flags) to prevent a heavy rain from flooding the deli cups during the 3 days the traps are set.We caught and saw so many insects (and non-insects, like spiders) this summer! This seven-spotted lady beetle was a frequent visitor to our plots.Many flies are important pollinators, like this one that resembles a bee at first glance. Many flies are also important natural enemies of pests (either as adults, or as worm-like larvae).This minute pirate bug may be tiny (it’s magnified 20X), but it is an important natural enemy of pests.We caught so many different kinds of bees and wasps!Plenty of caterpillars (like these monarchs) enjoyed munching on the foliage of our wildflowers.And in late July, we started seeing adult butterflies visiting the flowers like the viceroy butterfly on these purple coneflowers (Echinacea purpurea).I learned that these are tiger beetles. They are fast-moving ground predators, and we caught a lot in our pitfall traps.Different wildflowers bloomed at different times, like these purple catmint (Nepeta faassinii) and tall white beard tongue (Penstemon digitalis) in June.White boneset (Eupatorium perfoliatum) and pale purple wild bergamot (Monarda fistulosa) were blooming in late July.And now the rudbeckia (two different species, but Rudbeckia fulgida var. fulgida is pictured here) and deep magenta NY ironweed (Vernonia noveboracensis) are in full bloom. But the asters and goldenrod haven’t started, yet.And the Christmas trees planted around these beneficial insect habitat plots keep growing!I couldn’t have done this without the help of my great co-workers, Betsy Lamb, Deb Marvin, and Brian Eshenaur! They were still smiling after a morning of weeding the wildflowers by hand!A student from a local college helped me a lot with insect collection!Meanwhile, field trials with biofungicides are ongoing, targeting cucurbit powdery mildew on winter squash and white mold on snap beans and tomatoes (not pictured). This project is funded by the New York Farm Viability Institute.Elizabeth Buck (left) and Crystal Stewart (right) are running the trials in western NY and eastern NY, respectively. This project is funded by the New York Farm Viability Institute.Meg McGrath (left) is running the trial on Long Island, but we all got together at a twilight meeting in eastern NY last week. This project is funded by the New York Farm Viability Institute.So far, it’s been a good summer! I’ve really enjoyed working with great colleagues and learning new things!
The field projects I’ve just described will be wrapping up in September. Check back to learn about the results. Better yet, click the green “Subscribe” button towards the top and right of this page, and you’ll receive an email when a new post is available!
In the meantime, there will still be at least a few more weeks of pictures posted regularly on Twitter (@AmaraDunn) and Instagram (@biocontrol.nysipm).
Creating habitat for beneficial arthropods was supported by:
Crop Protection and Pest Management -Extension Implementation Program Area grant no. 2017-70006-27142/project accession no. 1014000, from the USDA National Institute of Food and Agriculture.
New York State Department of Agriculture and Markets
Mulching transplants planted in Spring 2018 was the most expensive establishment method, but these plots were looking pretty good a year later, even before we weeded.
By the end of our first field season, we had started using six different methods to establish wildflowers as habitat for beneficial insects (plus a weedy mowed control treatment). We also collected data on how much time and money we spent on establishment and how successful our weed management was. You can read about results from Year 1 in my post from last November.
But beneficial insect habitat establishment is not a one-year project. The establishment methods we started to implement in 2018 are ongoing, including periodic mowing of direct seeded plots, and hand-weeding of transplanted plots. We’ll keep track of how much time and money we invest in these plots in 2019, too.
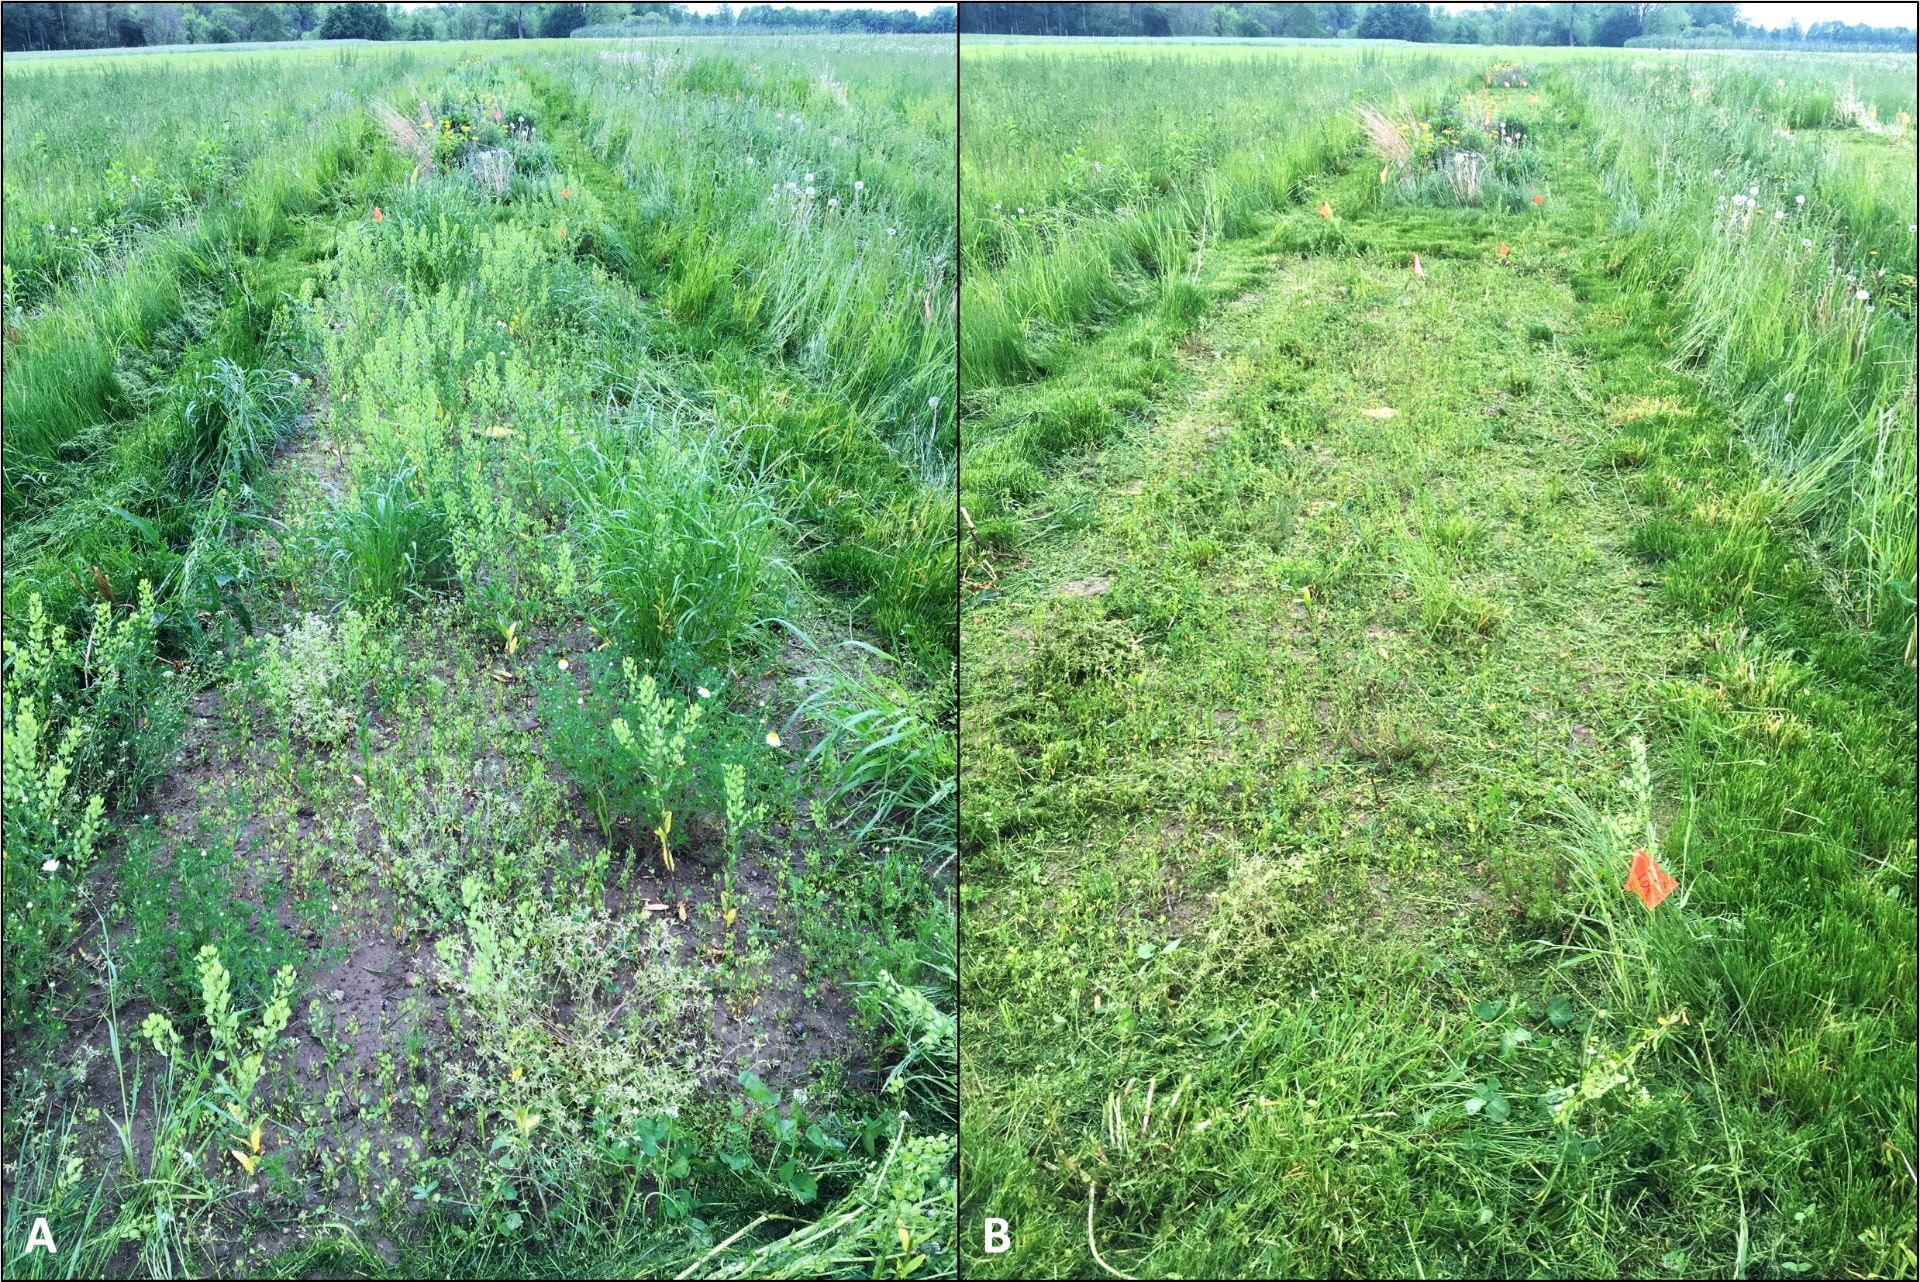
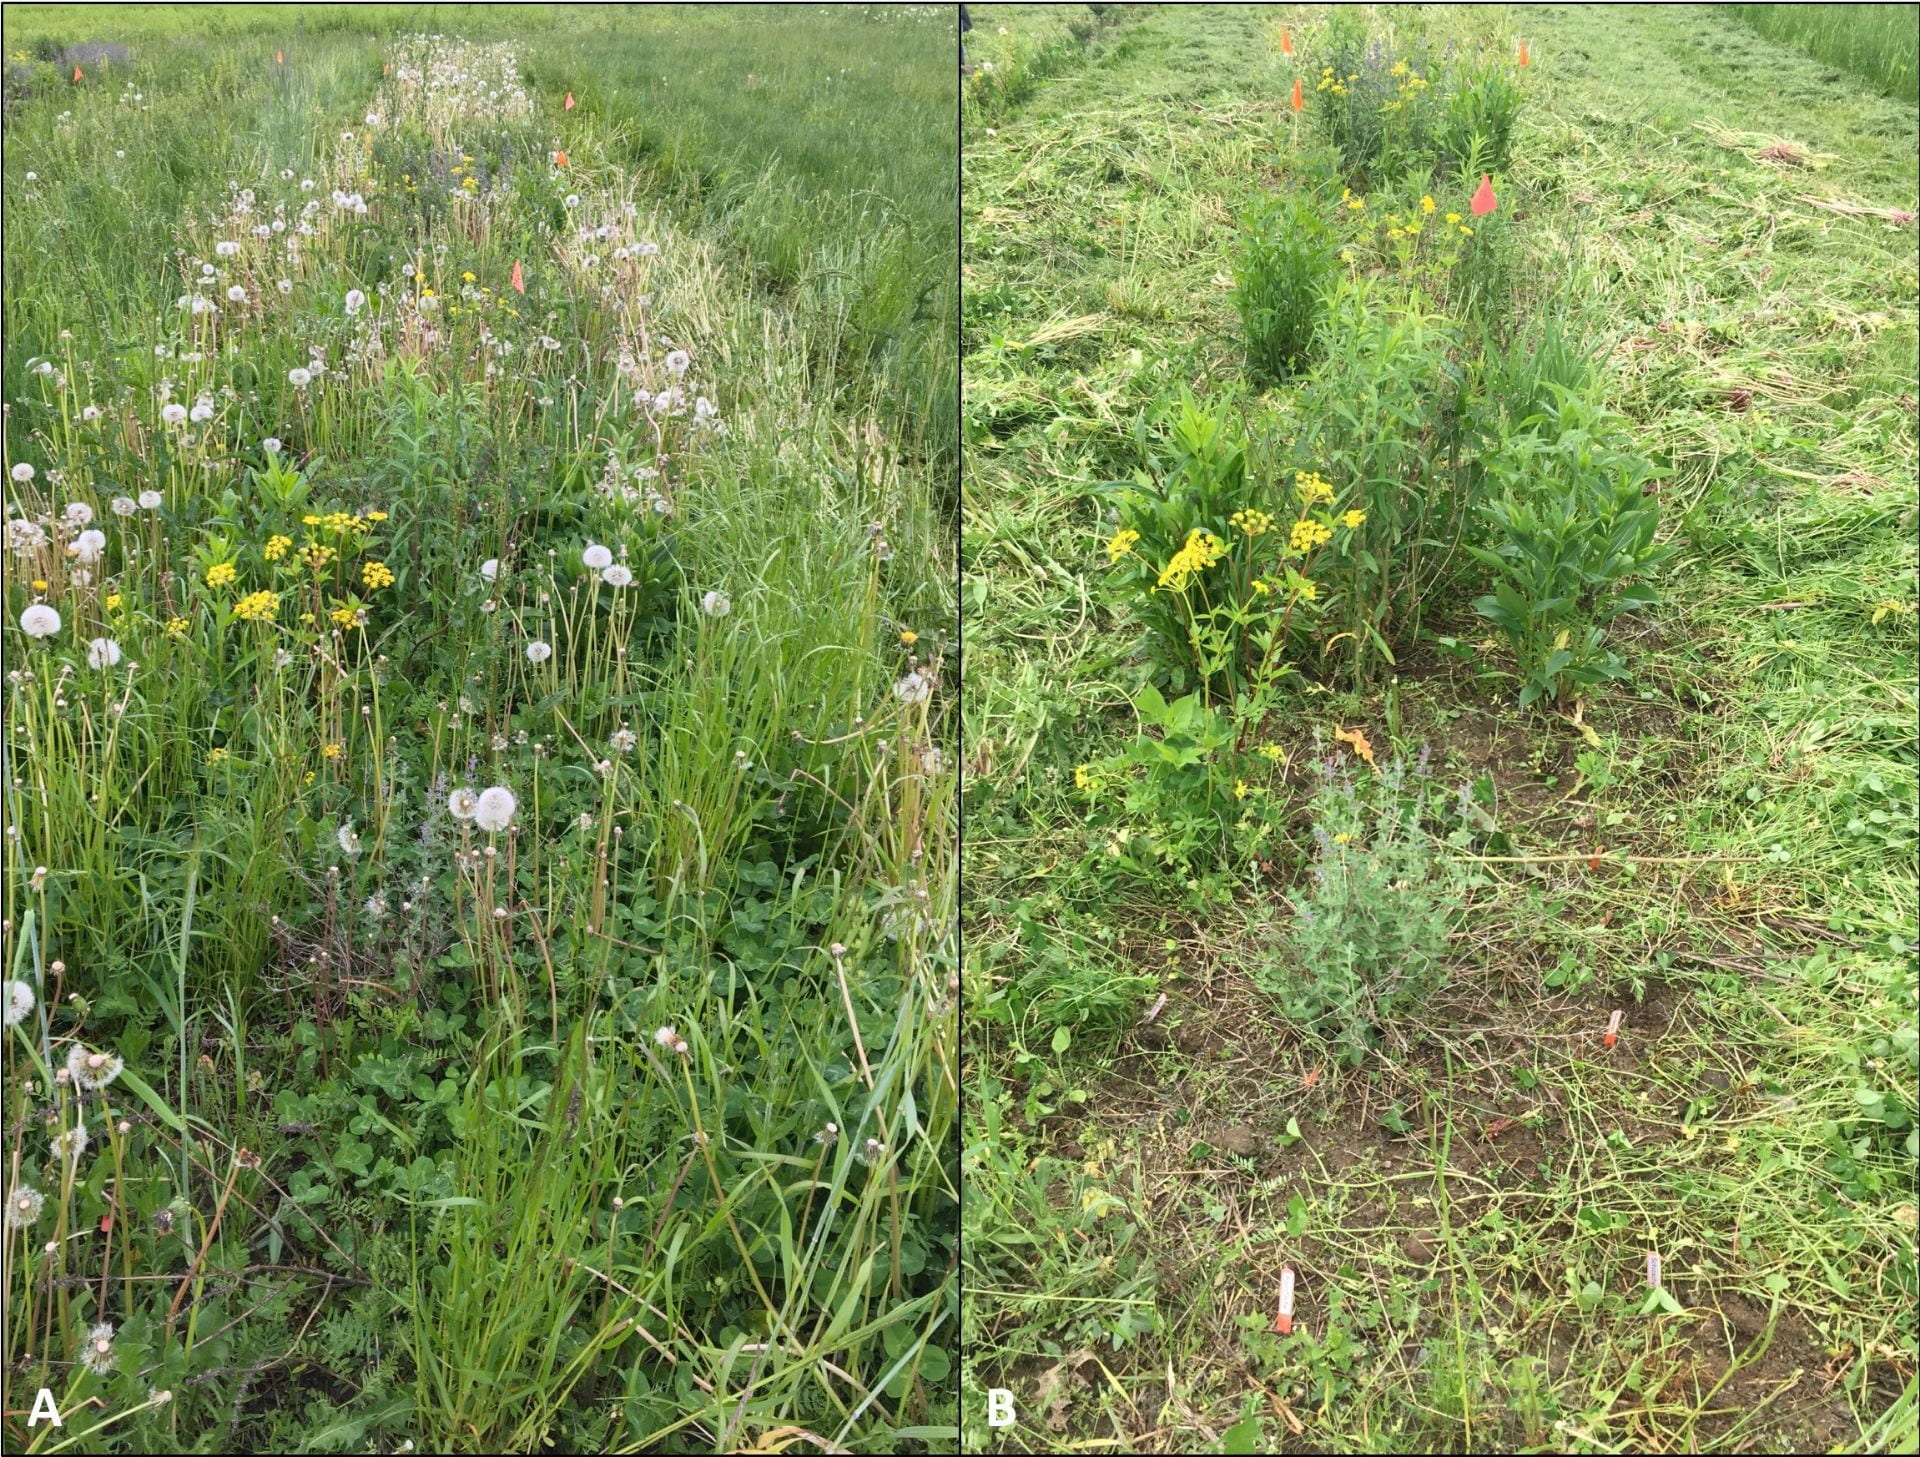
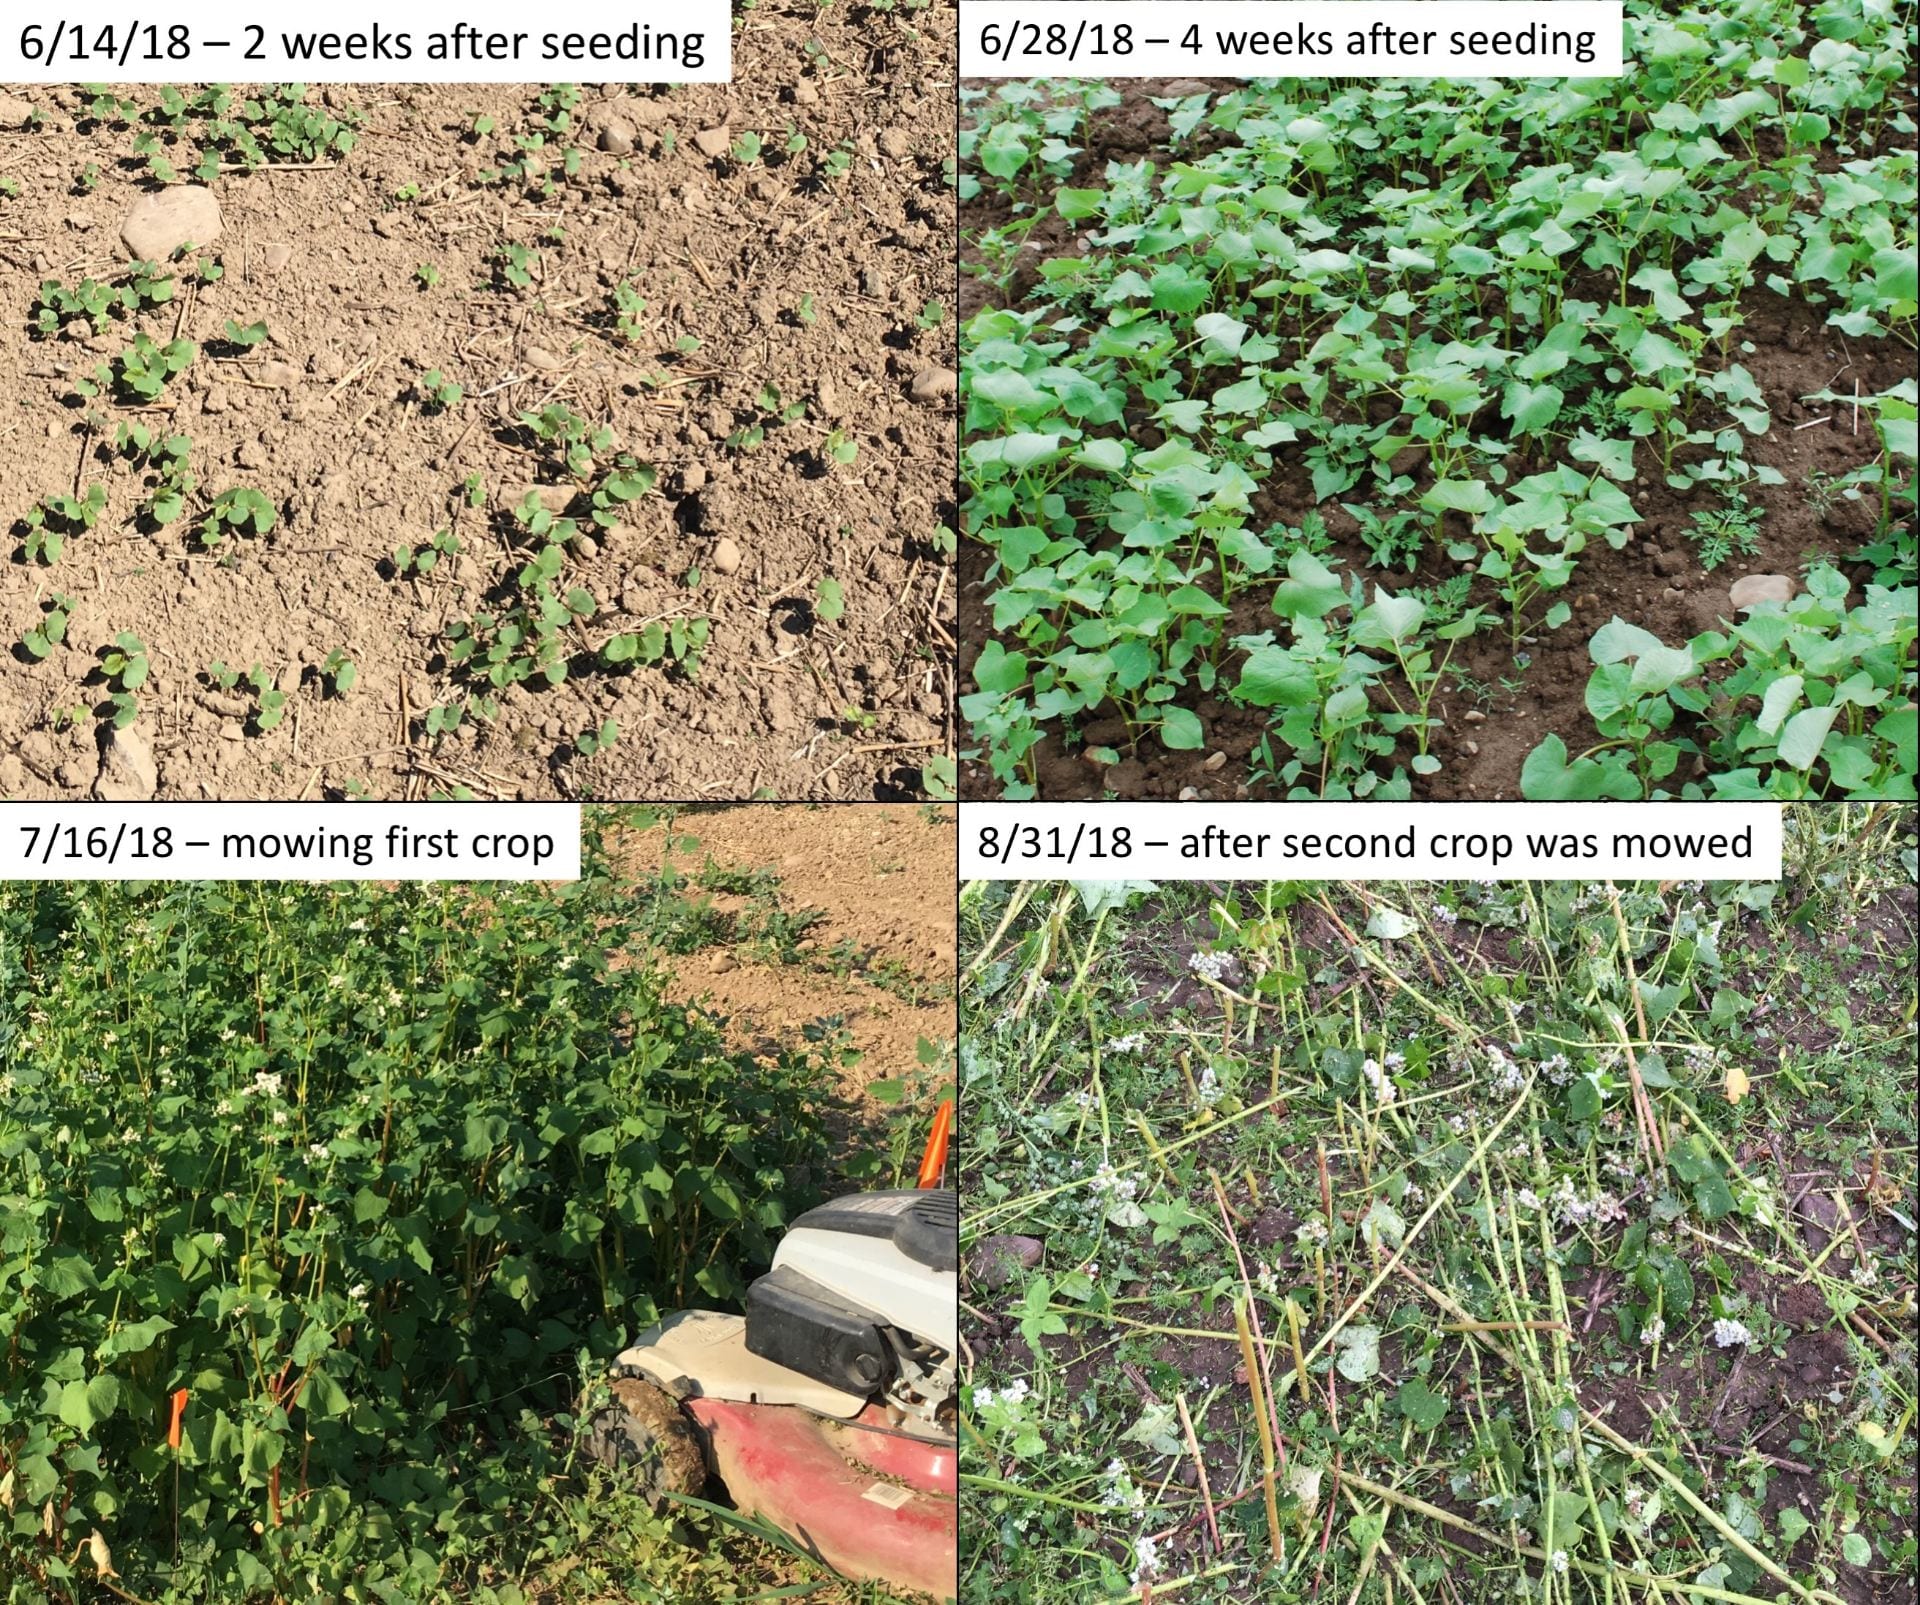
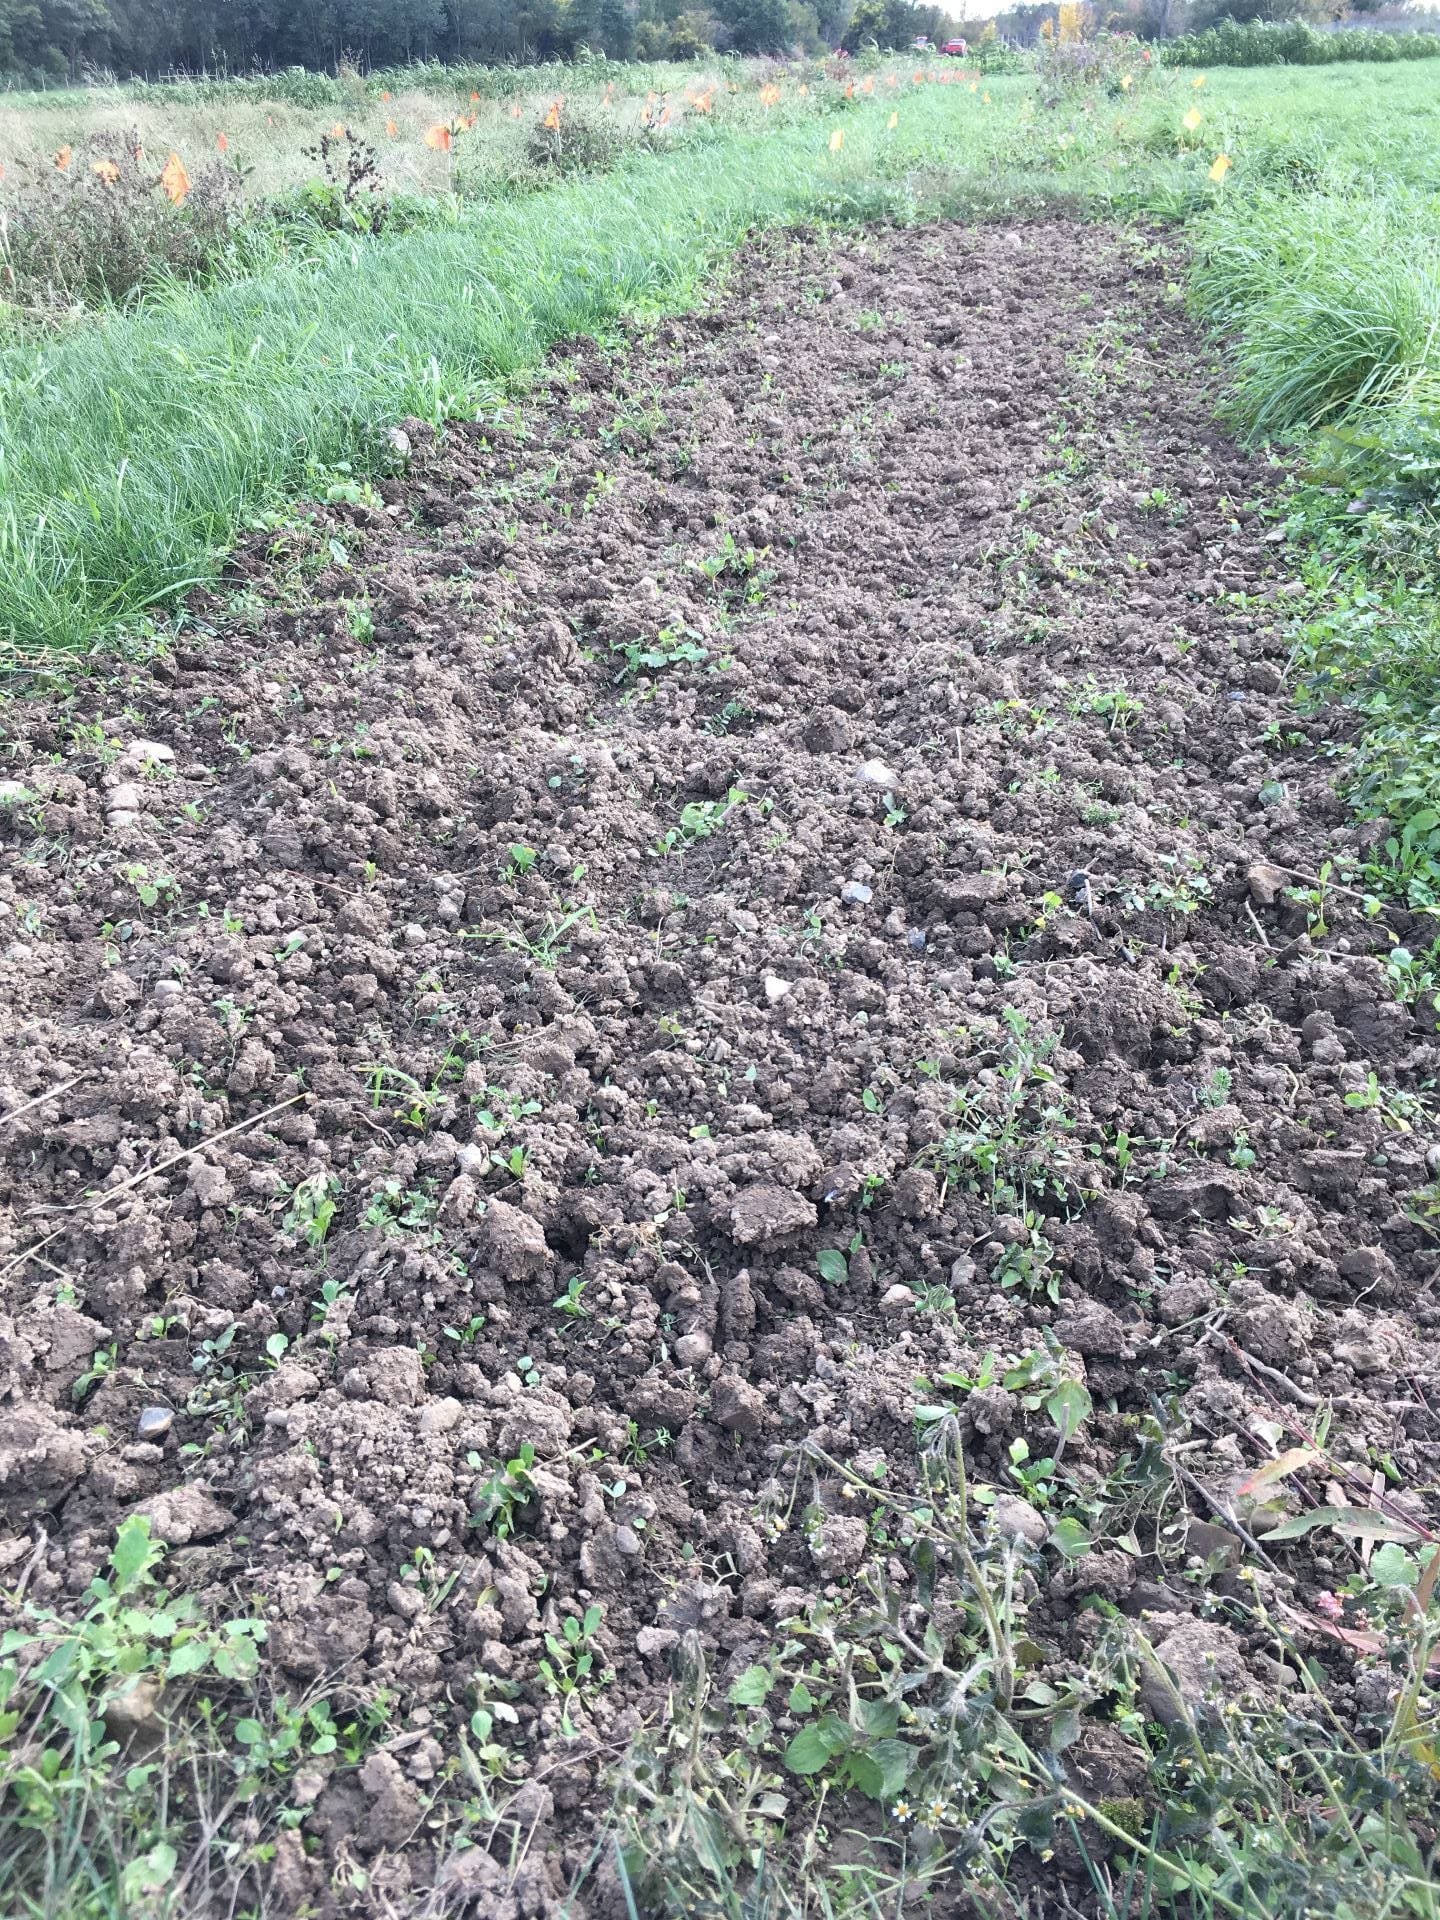
Plots that were direct seeded in 2018 will be mowed this year to favor the perennial beneficial insect habitat plants over annual weeds. This plot was treated with alternating herbicide and tillage during Summer 2018, and wildflower seed was planted in Fall 2018; (A, left) plot before mowing, (B, right) same plot after mowing.Plots that were transplanted in 2018 will be hand weeded this year to help the perennial wildflowers and grasses out-compete weeds. This plot was transplanted in Spring 2018 into bare (not tilled) ground and no mulch was used; (A, left) plot before weeding, (B, right) same plot after weeding.
And we want to know whether these plots are actually attracting beneficial or pest insects. So, in 2019 we are starting “Phase II” of our beneficial insect habitat work. We want to know which and how many insects (and other arthropods, like spiders) are being attracted to each type of plot. We will also count insects in no habitat plots (weedy, mowed occasionally) and mowed grass plots in the middle of the Christmas tree field for comparison.
Insect collection began in early May, and we are using four different techniques:
Sweep net – This is what it sounds like. We “sweep” a net through the air above the ground to capture mostly flying insects, or those who may be resting on the plants.
Butterfly and moth count – We walk through the field, counting how many of each butterfly or moth species we see in each plot.
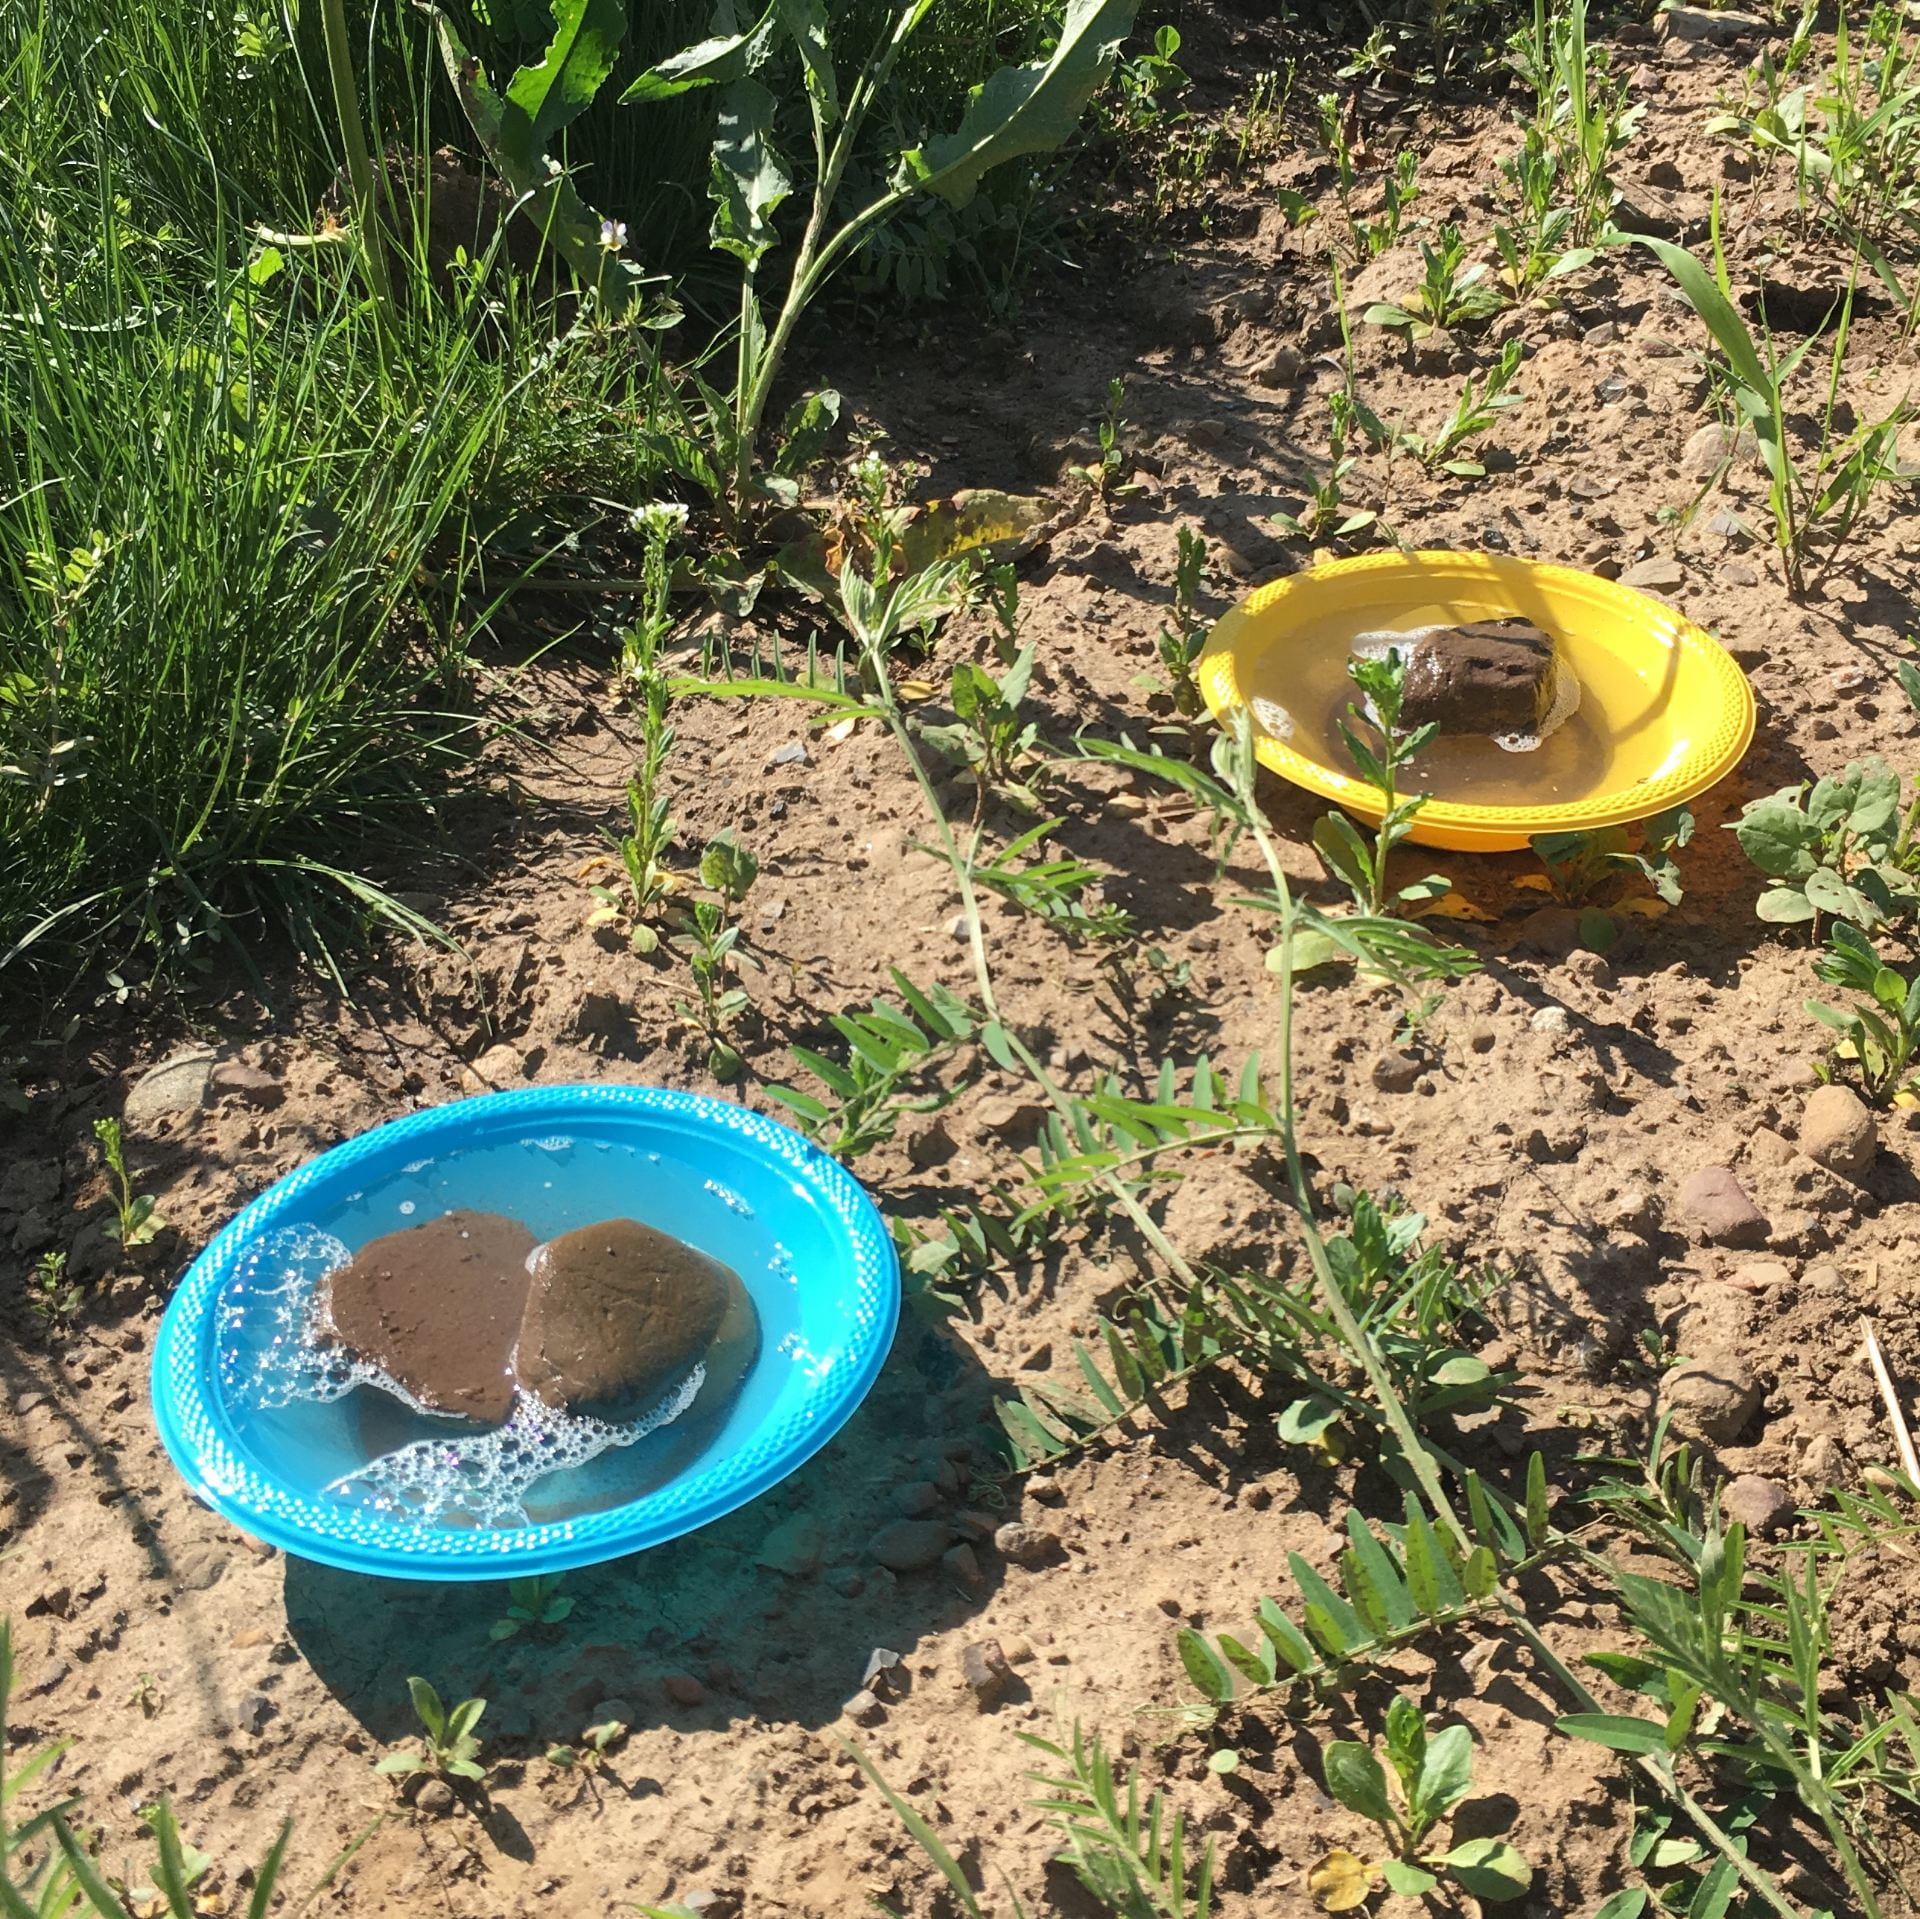
Pan traps – These are bright yellow and blue bowls filled with soapy water. One bowl of each color is placed in each plot for 2 days, then we collect the insects that have been attracted to the colorful bowls and were trapped in the soapy water. This method will help us count flying insects, especially bees and wasps.
Bright blue and yellow bowls filled with soapy water and weighed down with rocks will attract certain flying insects. By counting insects collected in these pan traps, we can learn which insects are spending time in each plot.
Pitfall traps – These are clear plastic 16-oz deli cups (like you might use for take-out food) that are sunk into the ground in each plot. Insects that crawl along the ground fall in. We will use this method to count mostly ground-dwelling insects.
A pitfall trap collects ground-dwelling insects. This one is protected by a rain cover. We didn’t want all the rain we’ve been getting this spring to overflow the traps and wash away the insects we caught!
I will write another blog post or two about this project during or at the end of this season. If you want to see more frequent updates, follow me on Twitter (@AmaraDunn). I’ll post weekly pictures of this project, including which beneficial insect habitat plants are blooming each week. You can also see lots of pictures from this project on Instagram (biocontrol.nysipm).
This work is supported by:
Crop Protection and Pest Management -Extension Implementation Program Area grant no. 2017-70006-27142/project accession no. 1014000, from the USDA National Institute of Food and Agriculture.
New York State Department of Agriculture and Markets
Many crops (and plenty of non-crop plants) rely on pollinators. Let’s protect them!
As I’ve discussed before, the natural enemies that provide biological control of pests include both larger creatures (like insects, mites, and nematodes) and microorganisms (fungi, bacteria, and viruses) that combat pests in a variety of ways. Microorganism natural enemies are regulated as pesticides (one type of biopesticide), while the larger natural enemies are not. Growers who are successfully using biocontrol insects, mites, and nematodes usually recognize that they need to apply pesticides in such a way that they are compatible with the biocontrol organisms they use. Take a look at my April post for a summary of online resources that can help you check compatibility of pesticides (including biopesticides) with natural enemies.
Some of these compatibility resources include information on the effects of pesticides (and biopesticides) on bees. Pollinators (including honey bees, lots of other bees, and some non-bees) are very important beneficial insects. You may have noticed that they have found their way into several of my blog posts. So, I wanted to let you know about a brand new resource (hot off the digital presses) to help you protect pollinators.
“A Pesticide Decision-Making Guide to Protect Pollinators in Tree Fruit Orchards” is a terrific resource to help you choose pesticides (and pesticide combinations) that are least-toxic to bees.
“A Pesticide Decision-Making Guide to Protect Pollinators in Tree Fruit Orchards” was written by Maria van Dyke, Emma Mullen, Dan Wixted, and Scott McArt. Although it’s focus is tree fruit orchards (and therefore the pesticides used in them), it should be useful for growers of other crops who want to choose pesticides that are least toxic to bees. A few highlights:
It includes information not only on pesticides used alone, but (when available) on synergistic effects when multiple pesticide active ingredients are used together. When you combine some chemicals (either in the tank or in the environment) the mixture is more toxic than both chemicals alone.
Where available, it summarizes pesticide toxicity to other bees besides just honey bees (e.g., bumble bees and solitary bees). You can read more about why this is important in this recent article.
It describes what we know about sub-lethal (in other words, negative effects on the bees that are less serious than death) effects of pesticides on bees.
It includes about half a dozen biopesticide active ingredients.
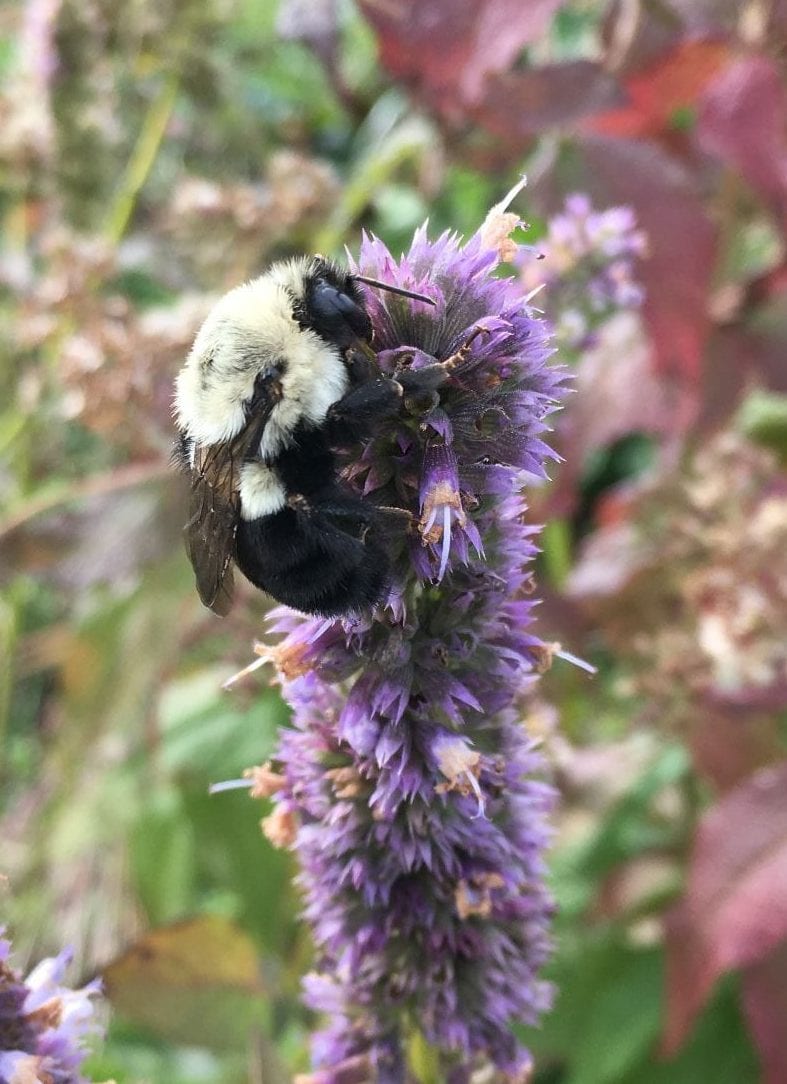
Pollination is being done by more than just honey bees! This bumble bee (plus many more bee species) are important pollinators in NY.
Guides for other crops and other resources for growers wanting to protect pollinators can be found here.
You might be asking: If a chemical on this table is toxic to bees, will it also be toxic to the insect and mite natural enemies I am releasing or conserving on my farm or in my garden? I wish I had a definitive answer to that. As you can see from the nearly three pages of Literature Cited at the end of this document, collecting these data is a time-consuming process. For now, stick with the compatibility resources that are already available, and ask the companies you buy from (pesticides or natural enemies) about compatibility.
In closing, a huge amount of work went into this resource to summarize so much useful and current (as of October 2018) information in an easy-to-read table. Bravo to the authors! The Pollinator Network @ Cornell has other helpful resources for growers on protecting pollinators. Winter is a great time to make plans for using IPM and protecting the pollinators and natural enemies that are so good for the crops we grow!
Fair warning, this is going to be a longer post. But partly that’s because there are so many pictures. I will start with the overview, then go a bit deeper into the weeds (literally and figuratively). To help you navigate more quickly, here’s a sort of table of contents that will quickly take you to the information you may be most interested to read:
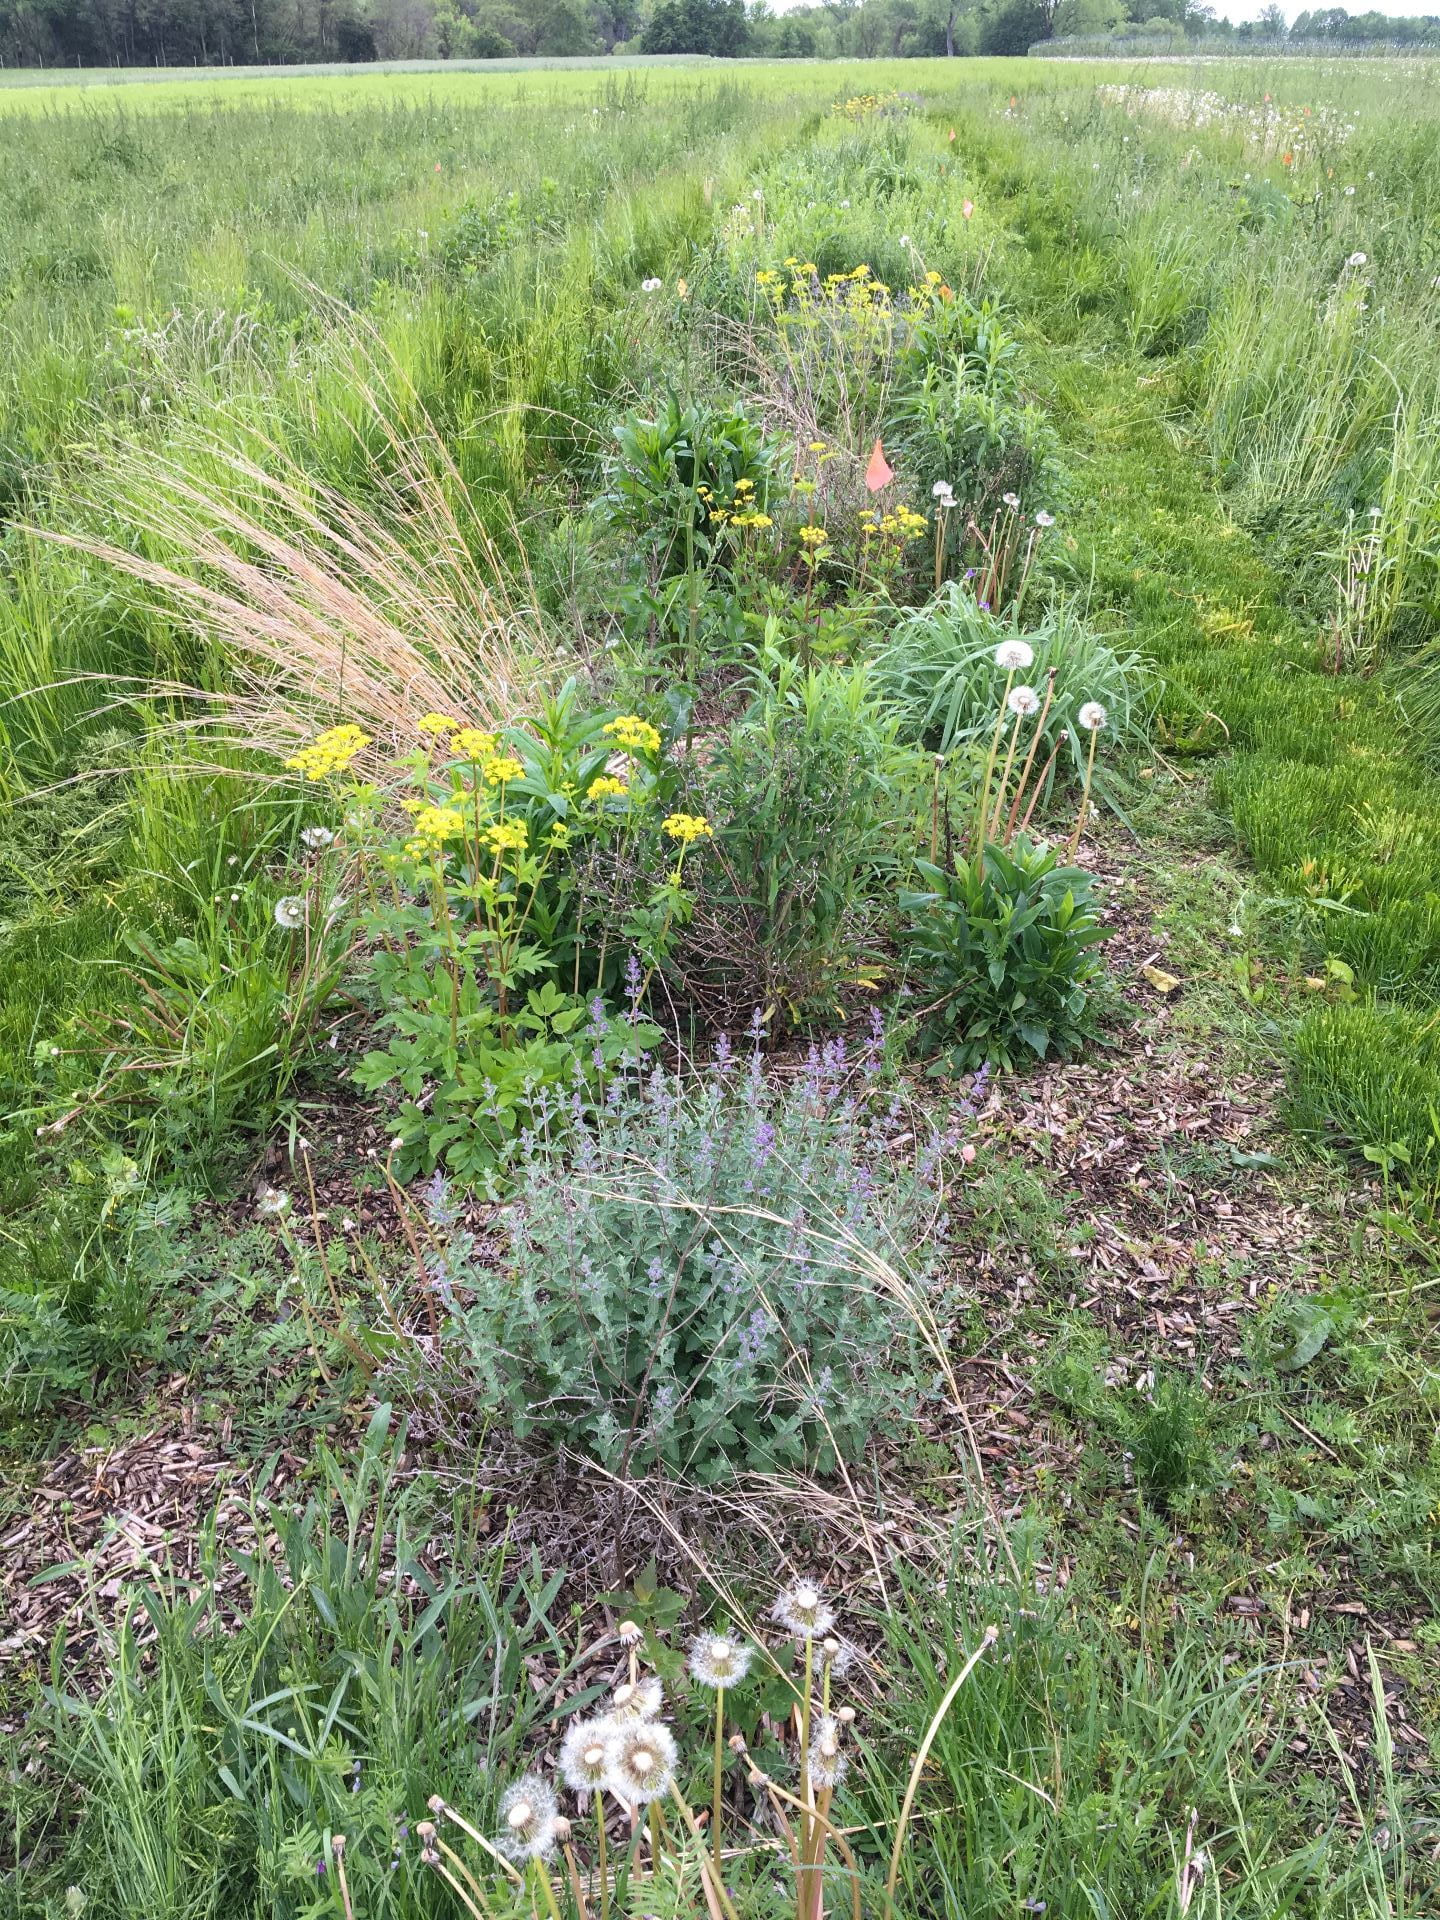
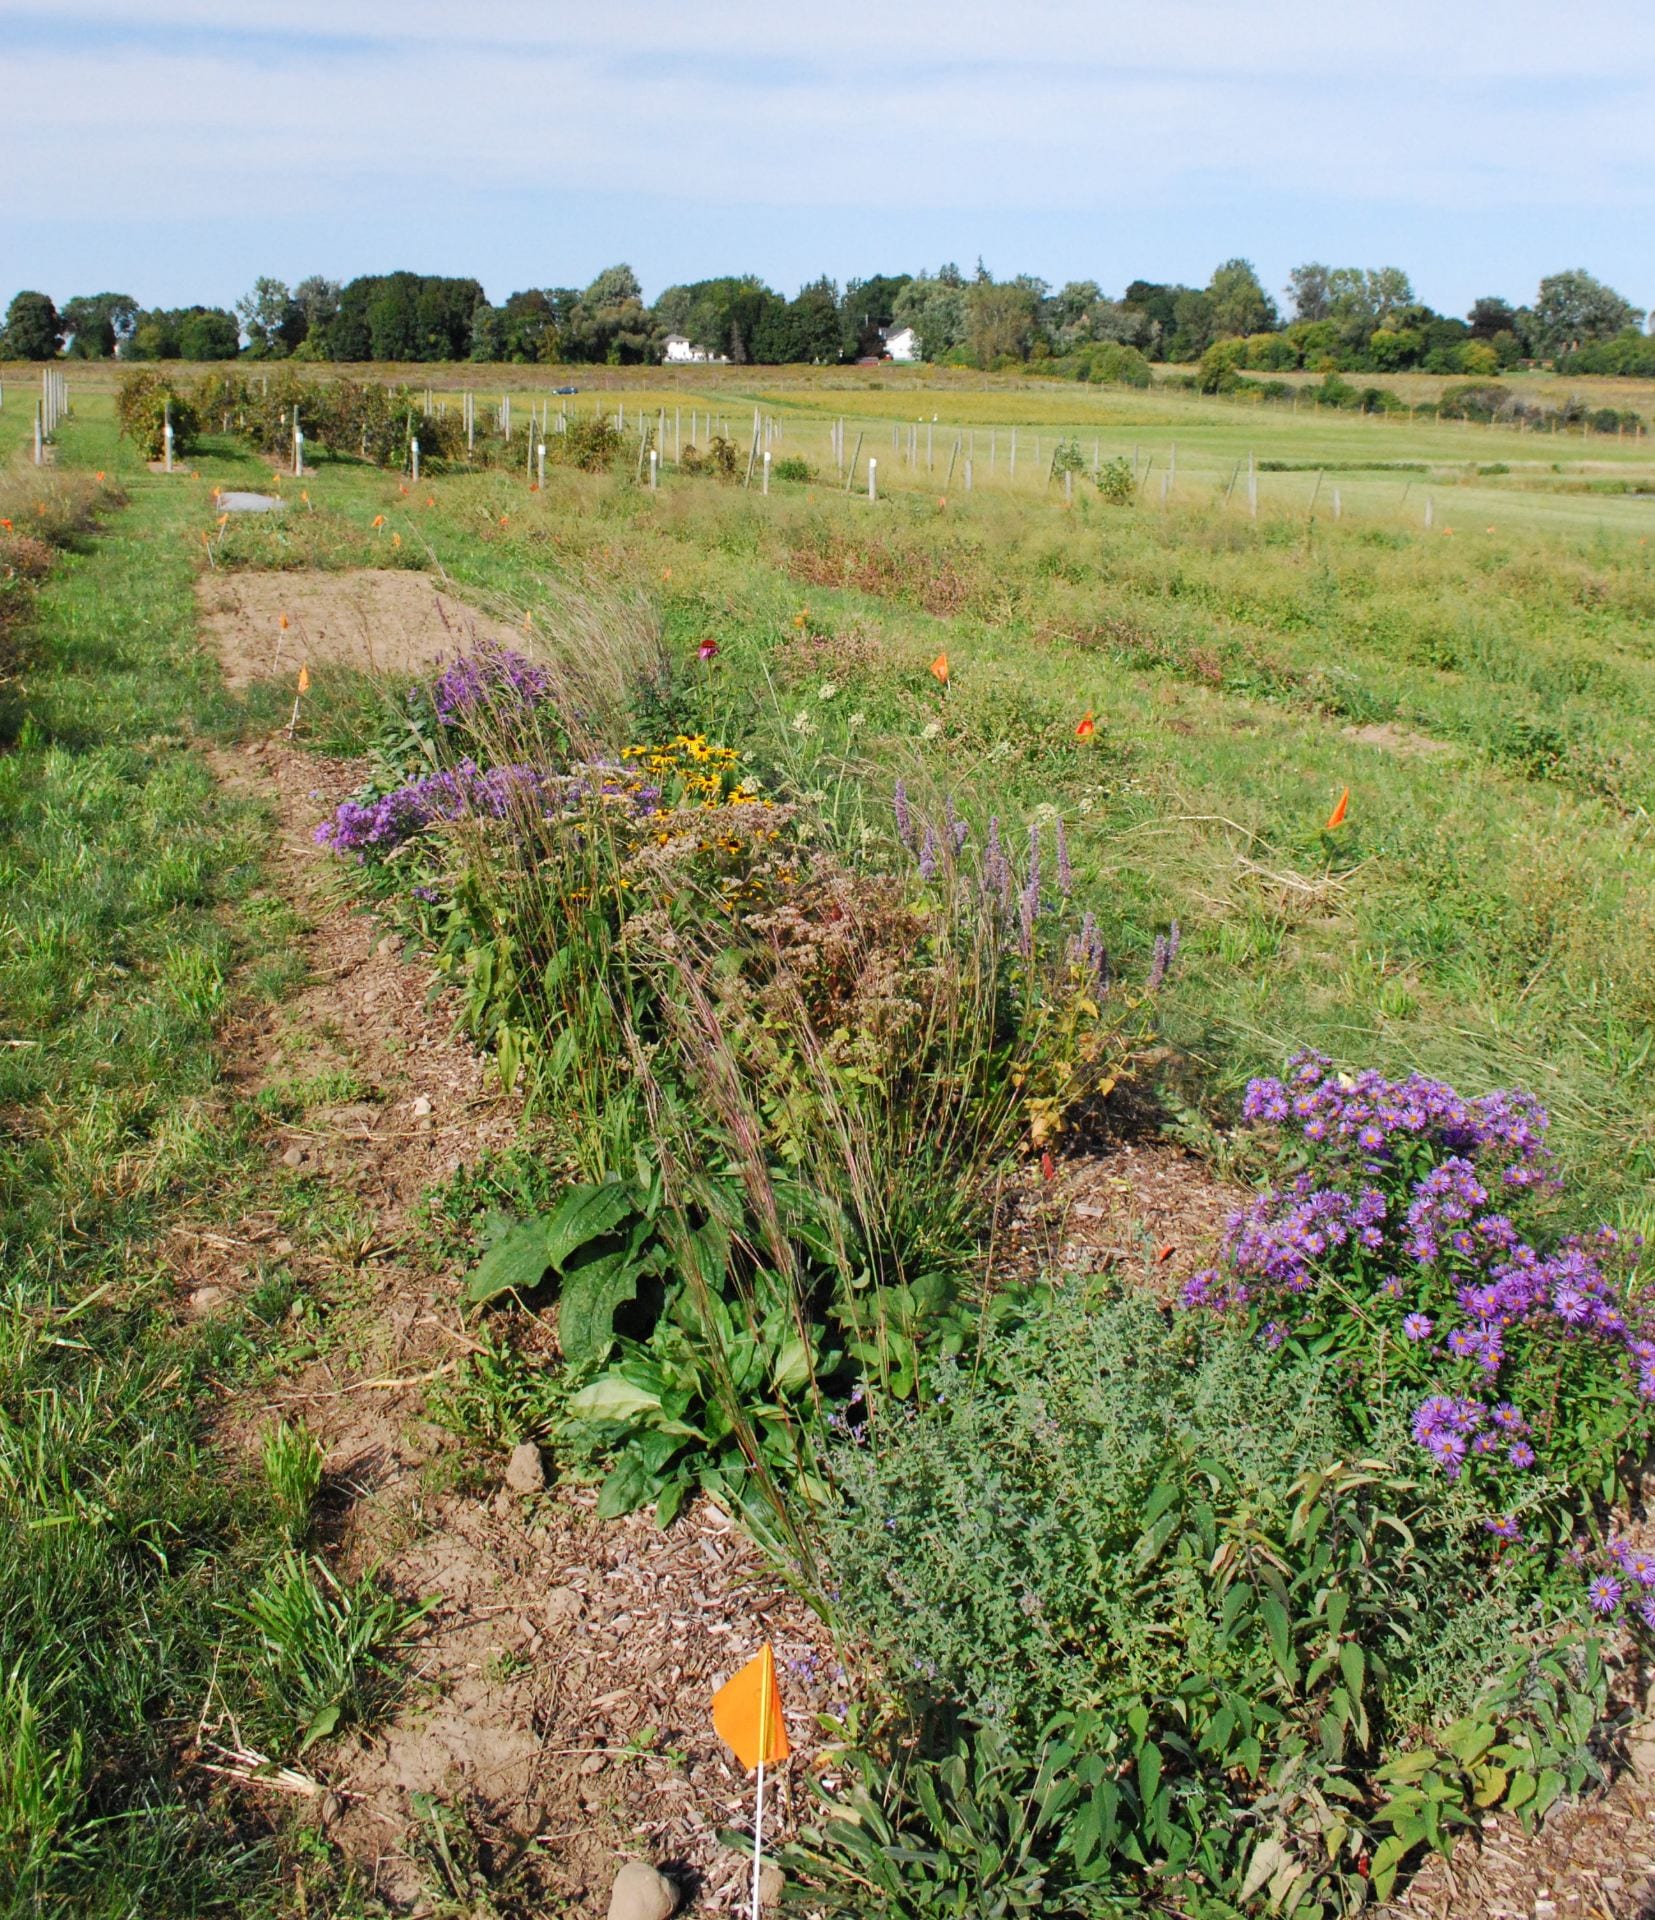
Some of our beneficial insect habitat plots looked really beautiful this fall! Others are still works in progress.
Overview
Remember back in June when I told you about the different techniques we were comparing for establishing habitat for beneficial insects? Time for an update! Here’s a brief, two-page summary of the first year of this project. For all the juicy details (and lots of pictures), keep reading!
First, remember that when I say “beneficial insects”, I mean both pollinators and natural enemies of pests. (Technically, arthropod would be a better term than insect, because spiders and predatory mites are some of the beneficial creatures we’d like to attract.) Fortunately, the same type of plants provide food and shelter for both pollinators and natural enemies on your farm or in your garden.
We used six different techniques to establish this habitat during Spring, Summer, and Fall of 2018. Treatment E was our control, where we did nothing but mow (after initial herbicide applications).
Treatment
Fall 2017
Spring 2018
Summer 2018
Fall 2018
A
Herbicide
Herbicide, transplant
Weed 2x
Replace dead plants
B
Herbicide
Till, transplant, mulch
Weed 2x
Replace dead plants
C
Herbicide
Till, direct seed
Mow 3x
Mow 1x
D
Herbicide
Till, plant buckwheat
Mow 1x, till, plant buckwheat
Mow 1x, transplant
E – control
Herbicide
Herbicide
Mow 3x
Mow 1x
F
Herbicide
Till, lay plastic
Continue solarization
Remove plastic, direct seed
G
Herbicide
Herbicide/till
Herbicide 2x, till 1x
Till 1x, direct seed
We transplanted the following species in treatments A, B, and D:
Common name
Scientific name
Number of plants in each 5 x 23 ft plot
Anise hyssop
Agastache foeniculum
2
Common milkweed
Asclepias syriaca
3
Blue false indigo
Baptisia australis
2
Lanced-leaved coreopsis
Coreopsis lanceolata
3
Purple coneflower
Echinacea purpurea
2
Boneset
Eupatorium perfoliatum
3
Wild bergamot
Monarda fistulosa
2
Catmint
Nepeta faassinii
2
Tall white beard tongue
Penstemon digitalis
3
Black-eyed Susan
Rudbeckia fulgida va. Fulgida
1
Little bluestem (grass)
Schizachyrium scoparium
11
Showy goldenrod
Solidago speciosa
1
New England aster
Symphyotrichum novae- angliae
3
Ohio spiderwort
Tradescantia ohiensis
2
NY ironweed
Vernonia noveboracensis
2
Golden alexanders
Zizia aurea
3
We planted seeds in treatments C, F, and G. The seed mixture we used was the Showy Northeast Native Wildflower & Grass Mix from Ernst Seeds, which included a more diverse species mix. This mix changes a bit from year to year. If you’re interested, you can learn about the details of the specific mix we used here.
Labor and costs
Not surprisingly, there were big differences in how much time and money we spent on different treatments this first year. The costs and hours below are for a total area of 460 ft2 (0.01 A) per treatment. Most of the cost differences are due to the huge difference in seed versus transplant expenses. We paid about $2 per plant and needed 180 plants for each treatment. In contrast, we spent about $12.50 on seed for each treatment. You can find itemized lists of cost and time inputs for each treatment here.
Treatment
Supply costs
Time (person hrs)
A – spring transplant
$417.12
13.2
B – spring transplant & mulch
$539.29
20.4
C – spring seed
$17.75
4.4
D – buckwheat & fall seed
$390.55
10.3
E – control
$2.32
2.6
F – solarize & fall seed
$148.02
10.2
G – herbicide/tillage & fall seed
$22.04
6.3
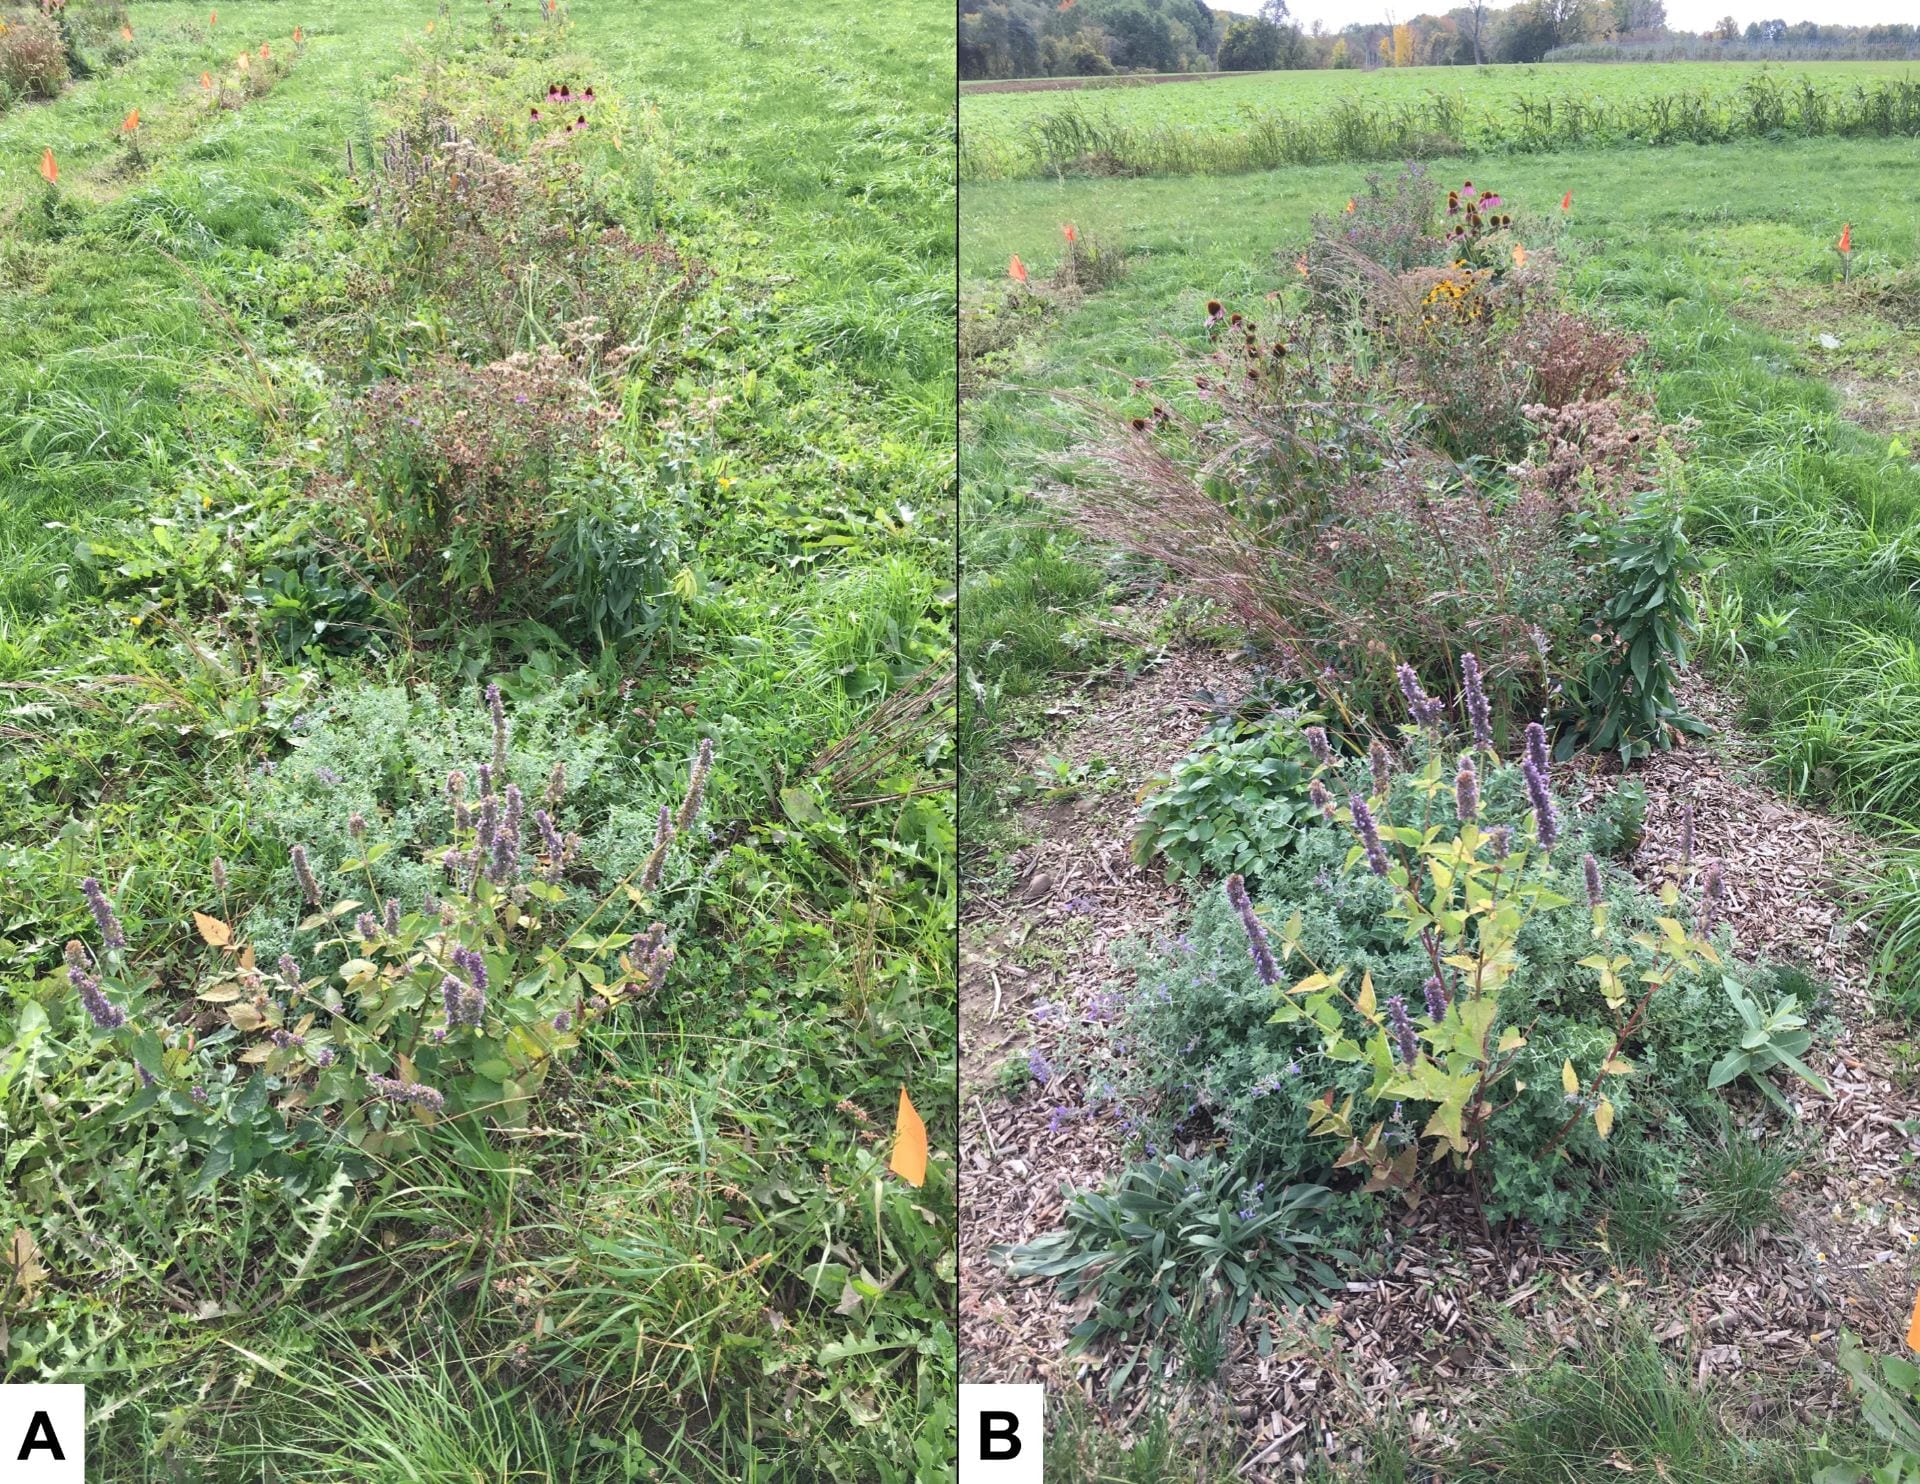
But, there were also big differences in how quickly the plants established. By September, both treatments (A and B) that had been transplanted in the spring looked like well-established gardens, with large, blooming wildflowers.
Four and a half months after transplanting, the beneficial habitat plants in treatments A (left) and B (right) were mostly growing well. But there was a big difference in weed control, in spite of similar amounts of time spent weeding each treatment.
We were generally pleased by how well most of the spring transplants survived. Although all the transplants came in 50-cell flats, some were larger than others, and the larger transplants survived better. We were fortunate to be able to plant into nice moist ground, so except for a little water on the day of transplanting, we didn’t irrigate. Survival might not have been as good if we’d had different planting conditions.
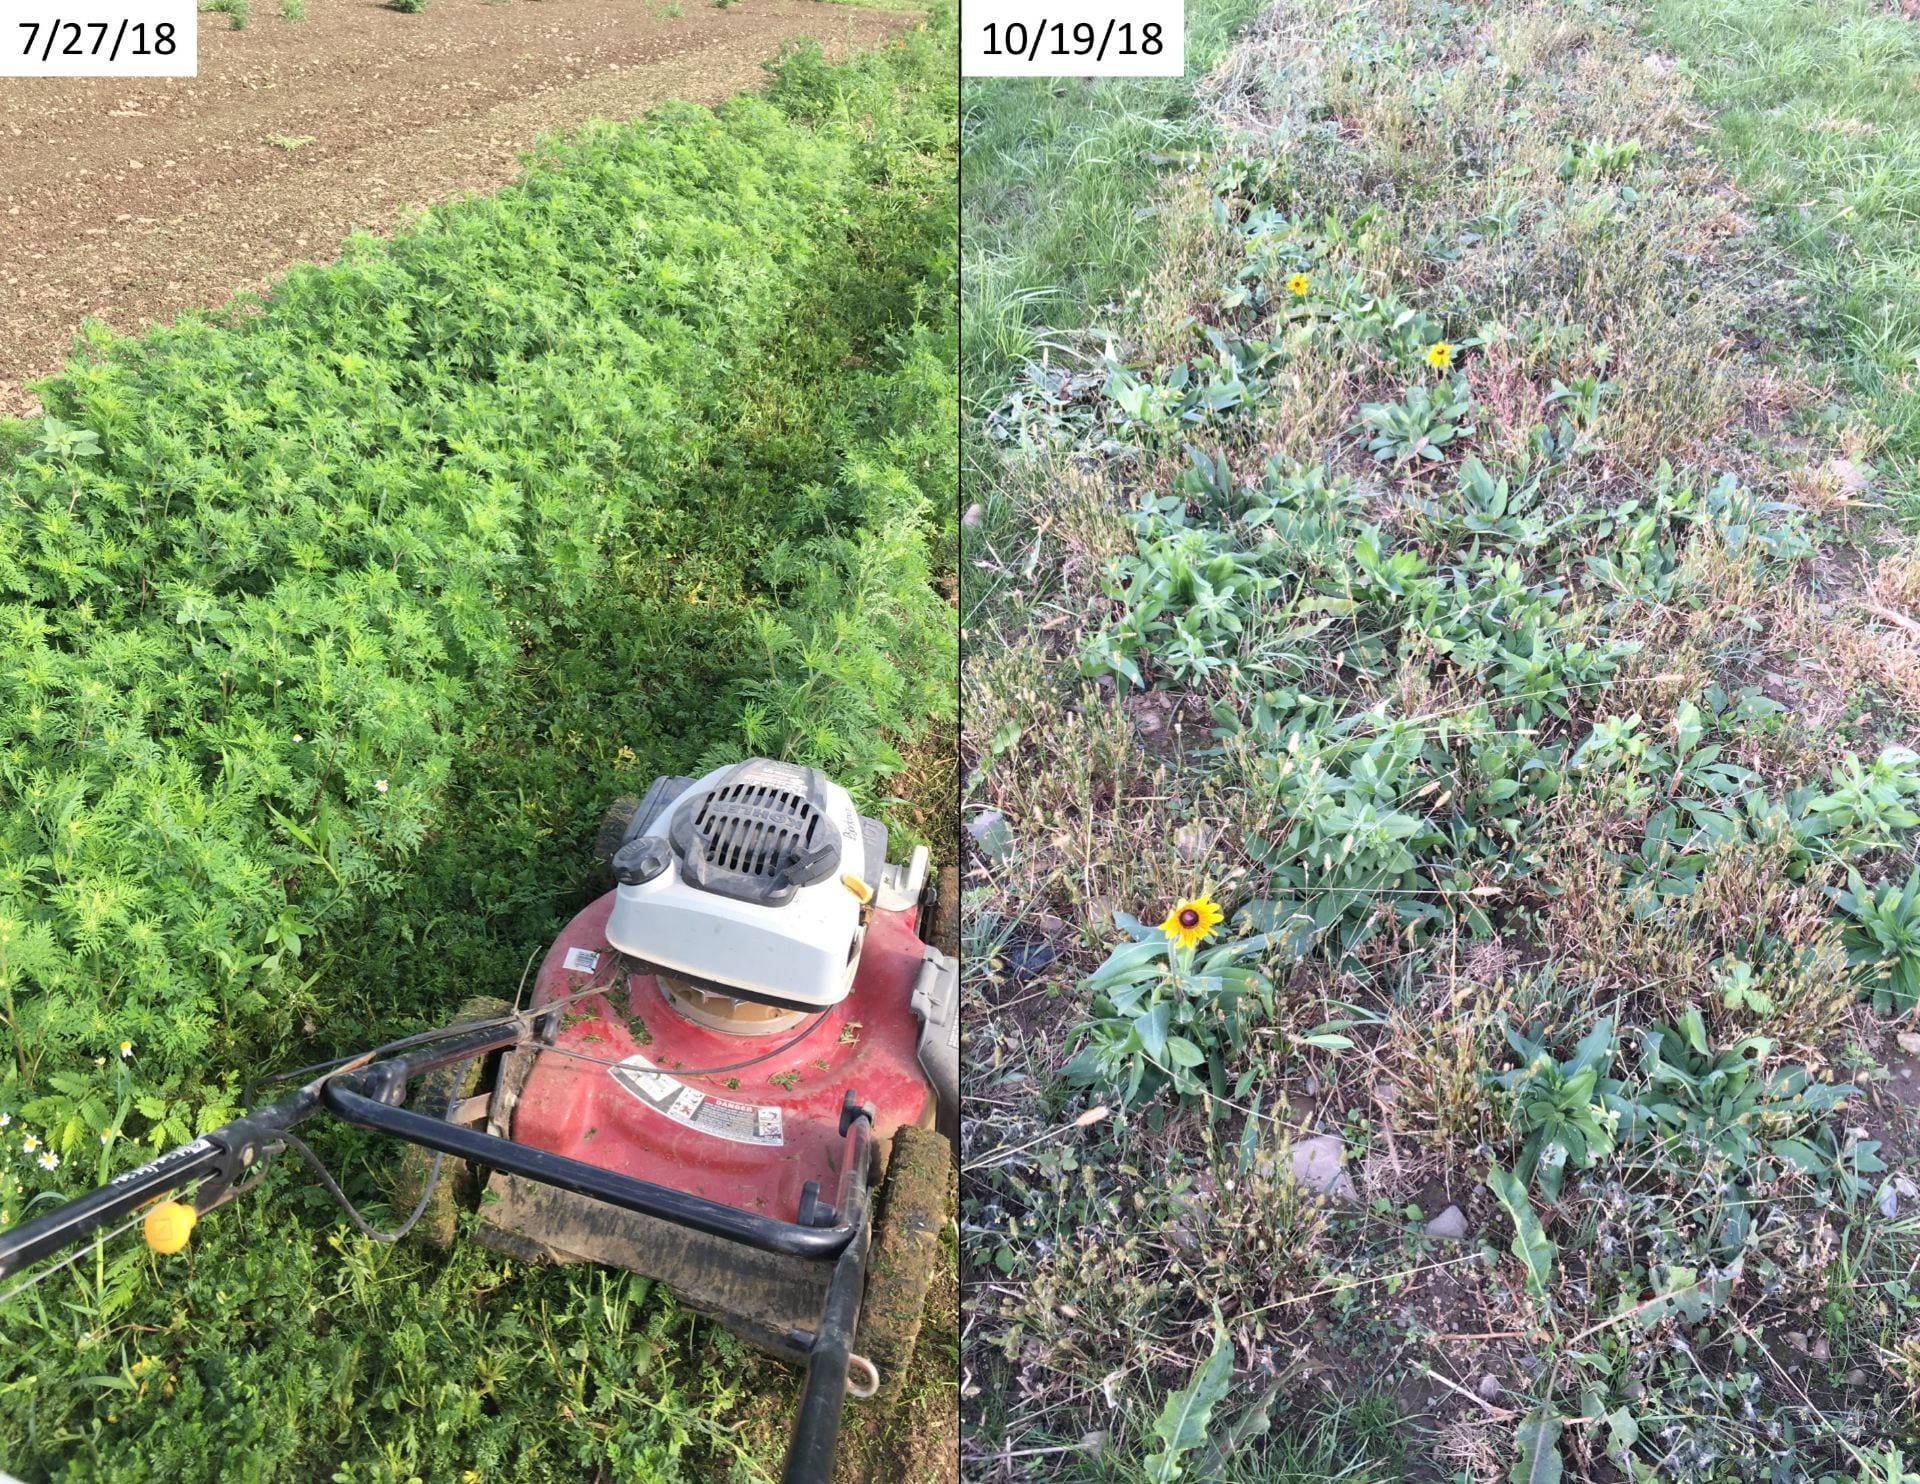
In contrast, the much less expensive treatment C was not looking too impressive even by October. A few partridge peas and blackeyed Susans bloomed this year, but otherwise it didn’t look much different from the control plots. In mid-summer, it looked like we were growing more ragweed than wildflowers.
In late July, it looked like we were growing mostly ragweed in treatment C (left). But after mowing four times during the summer and fall, you could definitely see the blackeyed Susans establishing (right).
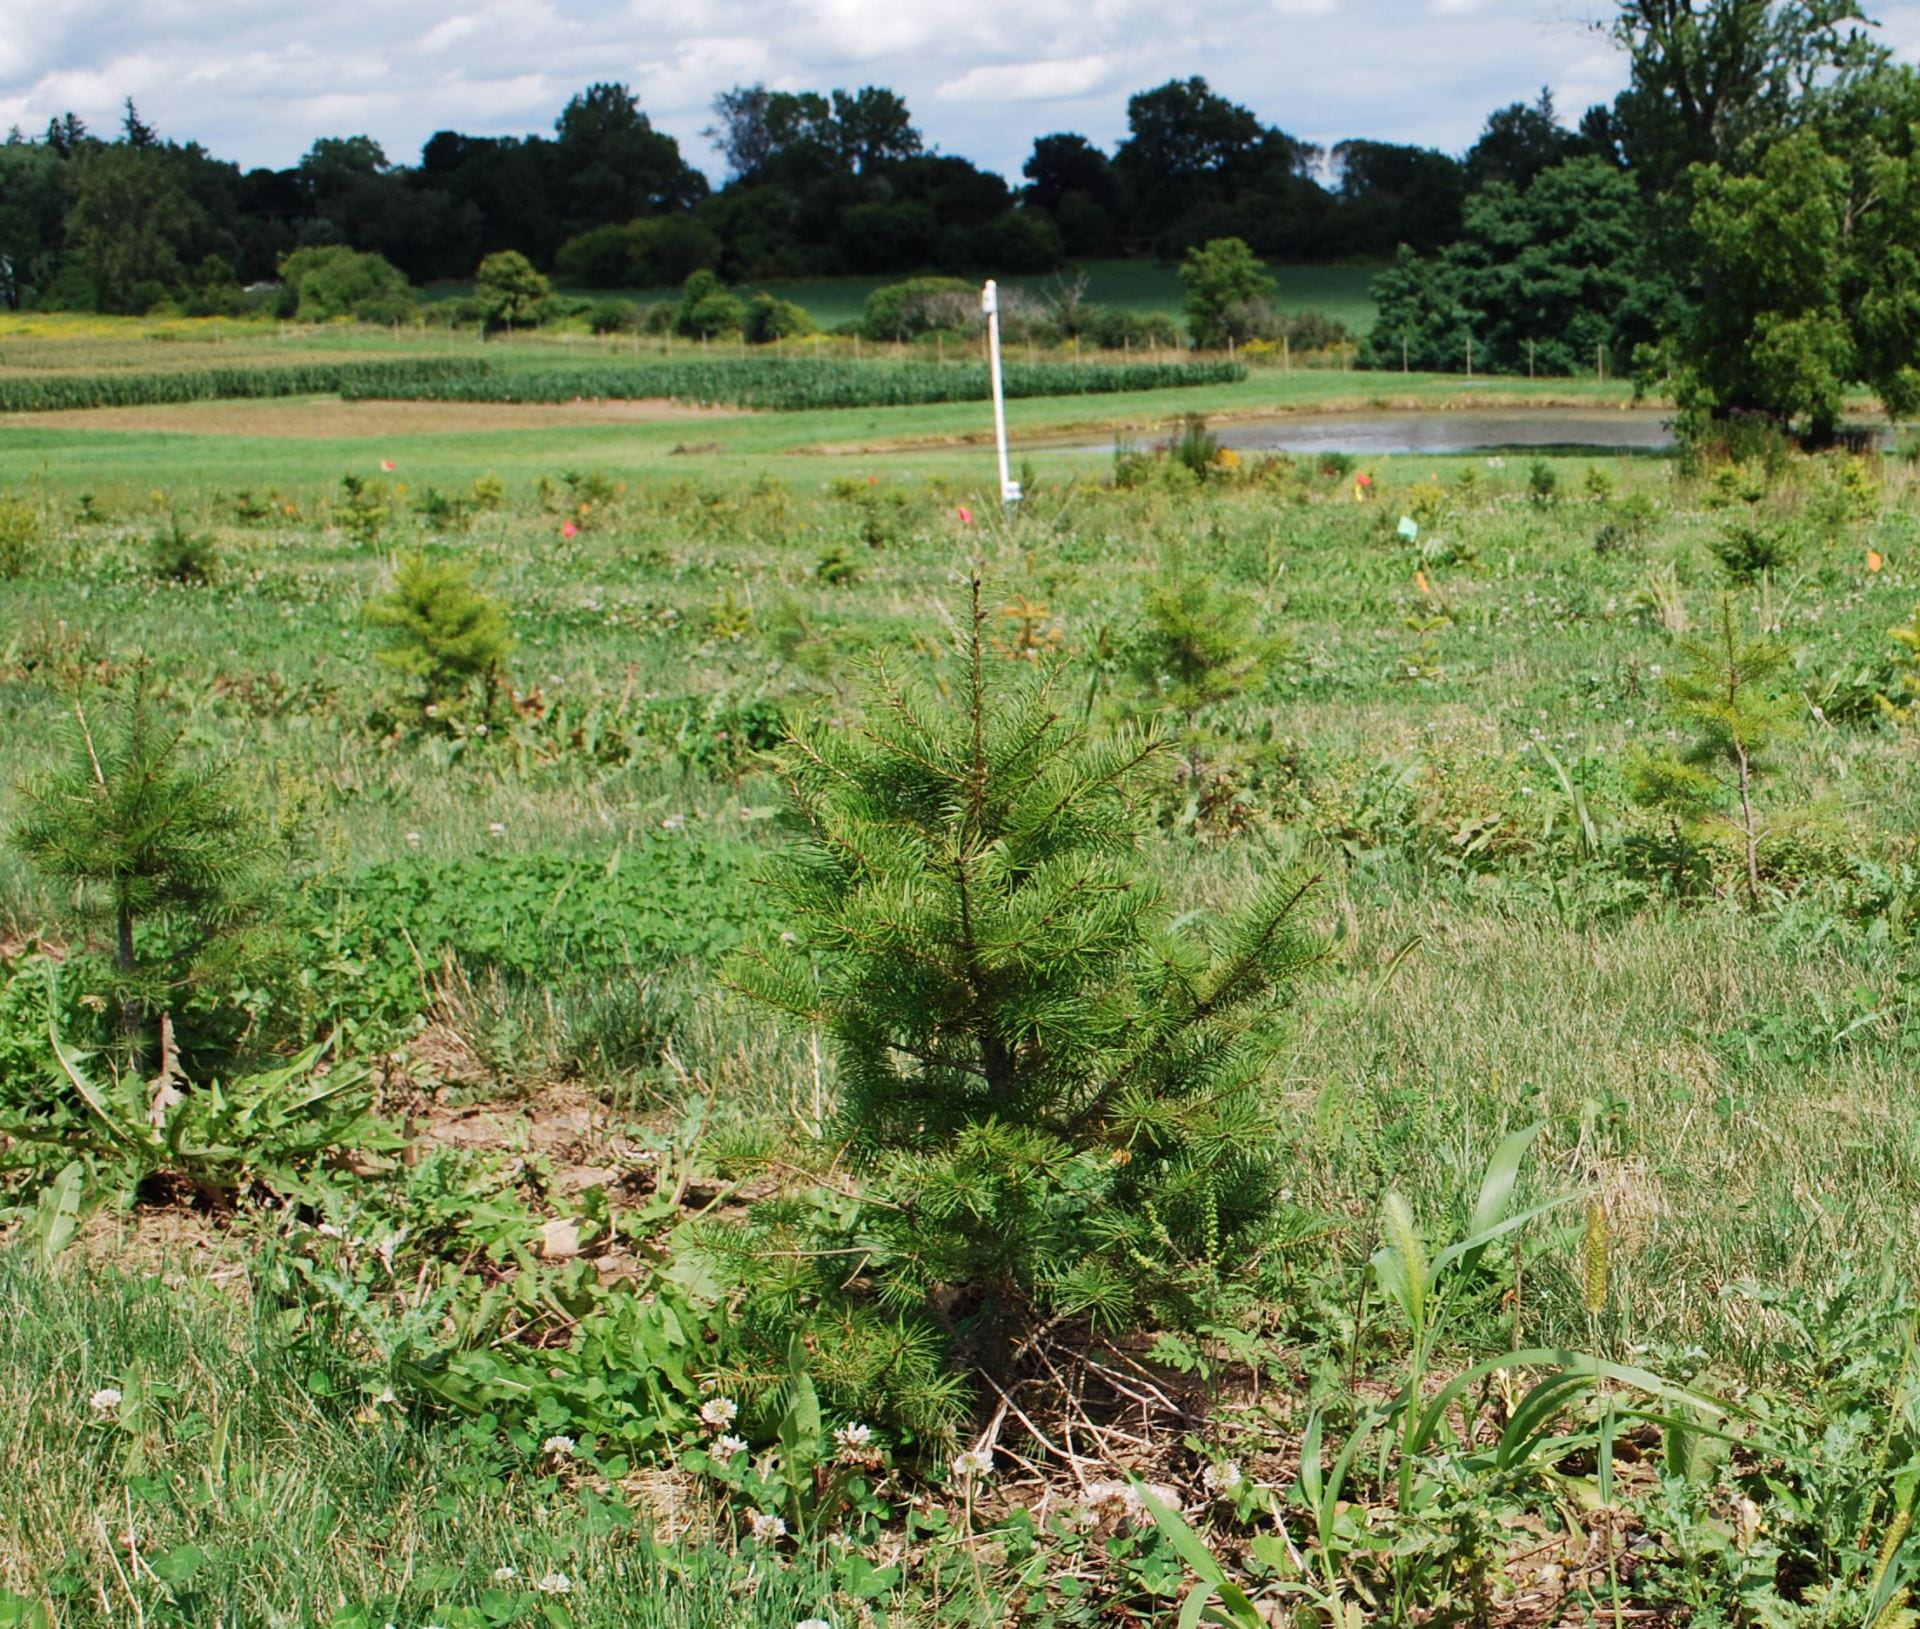
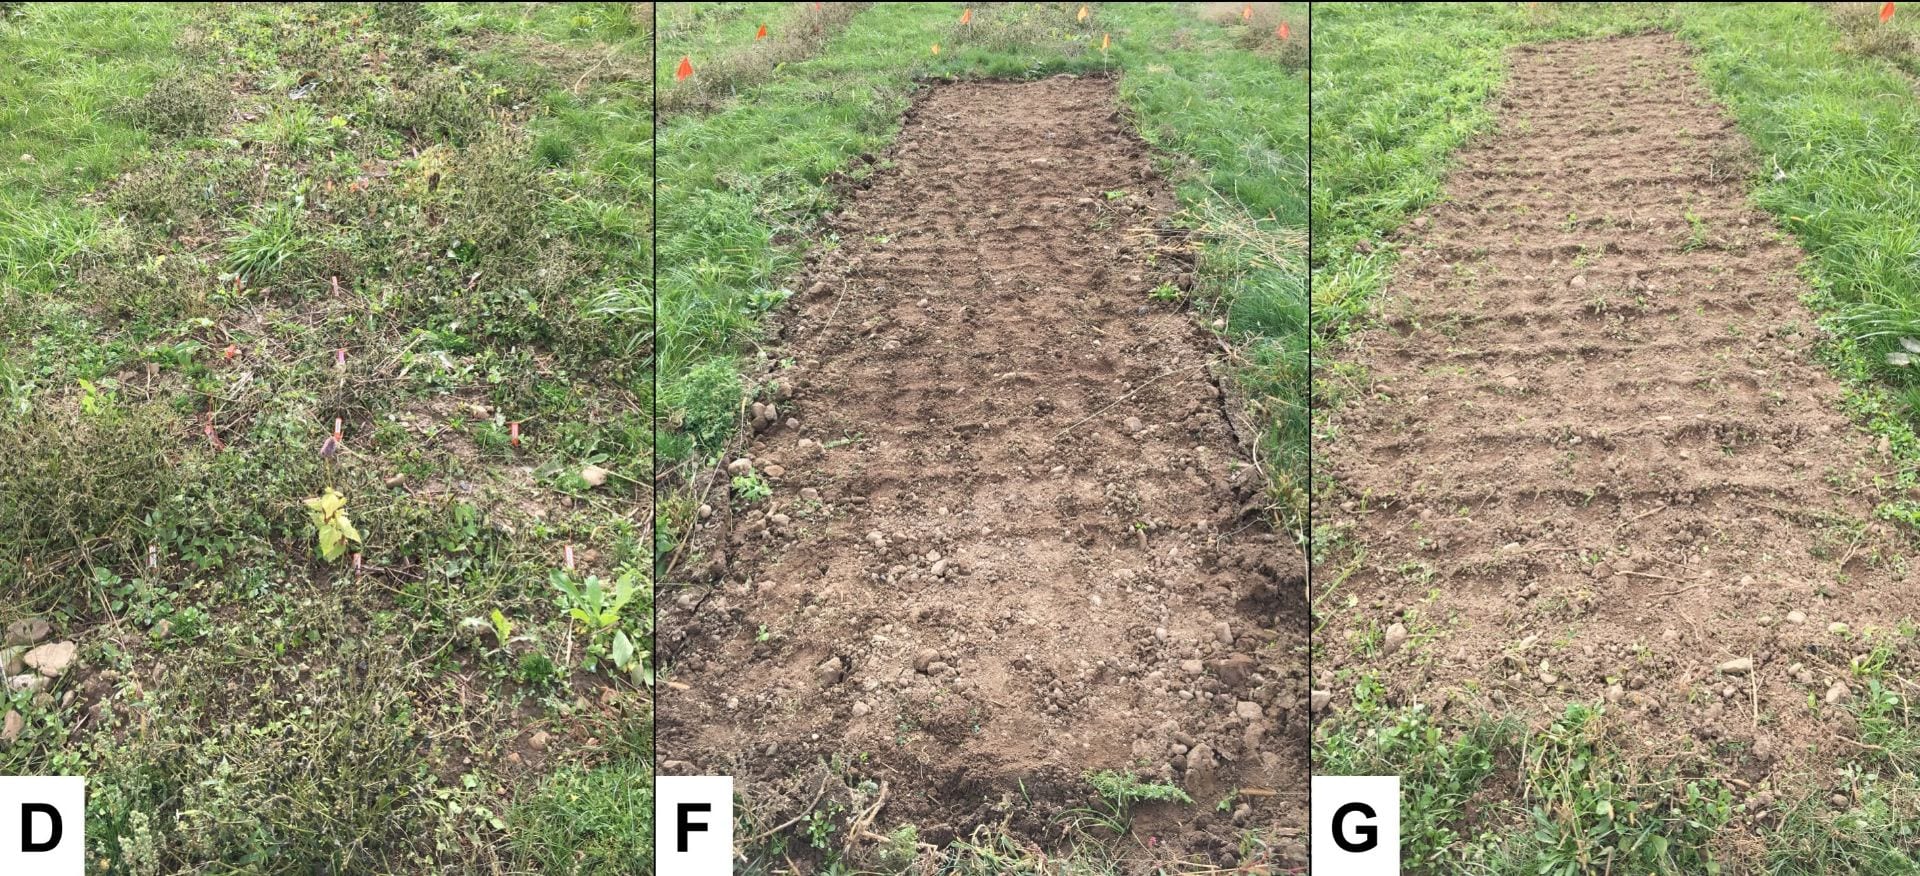
Two of the treatments (F and G) were planted with seeds this fall, and one treatment (D) was transplanted this fall. So it’s really too early to tell how successful those treatments were. Stay tuned for more updates!
Fall transplanted (D) or direct seeded treatments (F and G) did not look very impressive by October 19, 2018. I’m curious to see what they look like next spring, summer, and fall!
Details on weed control
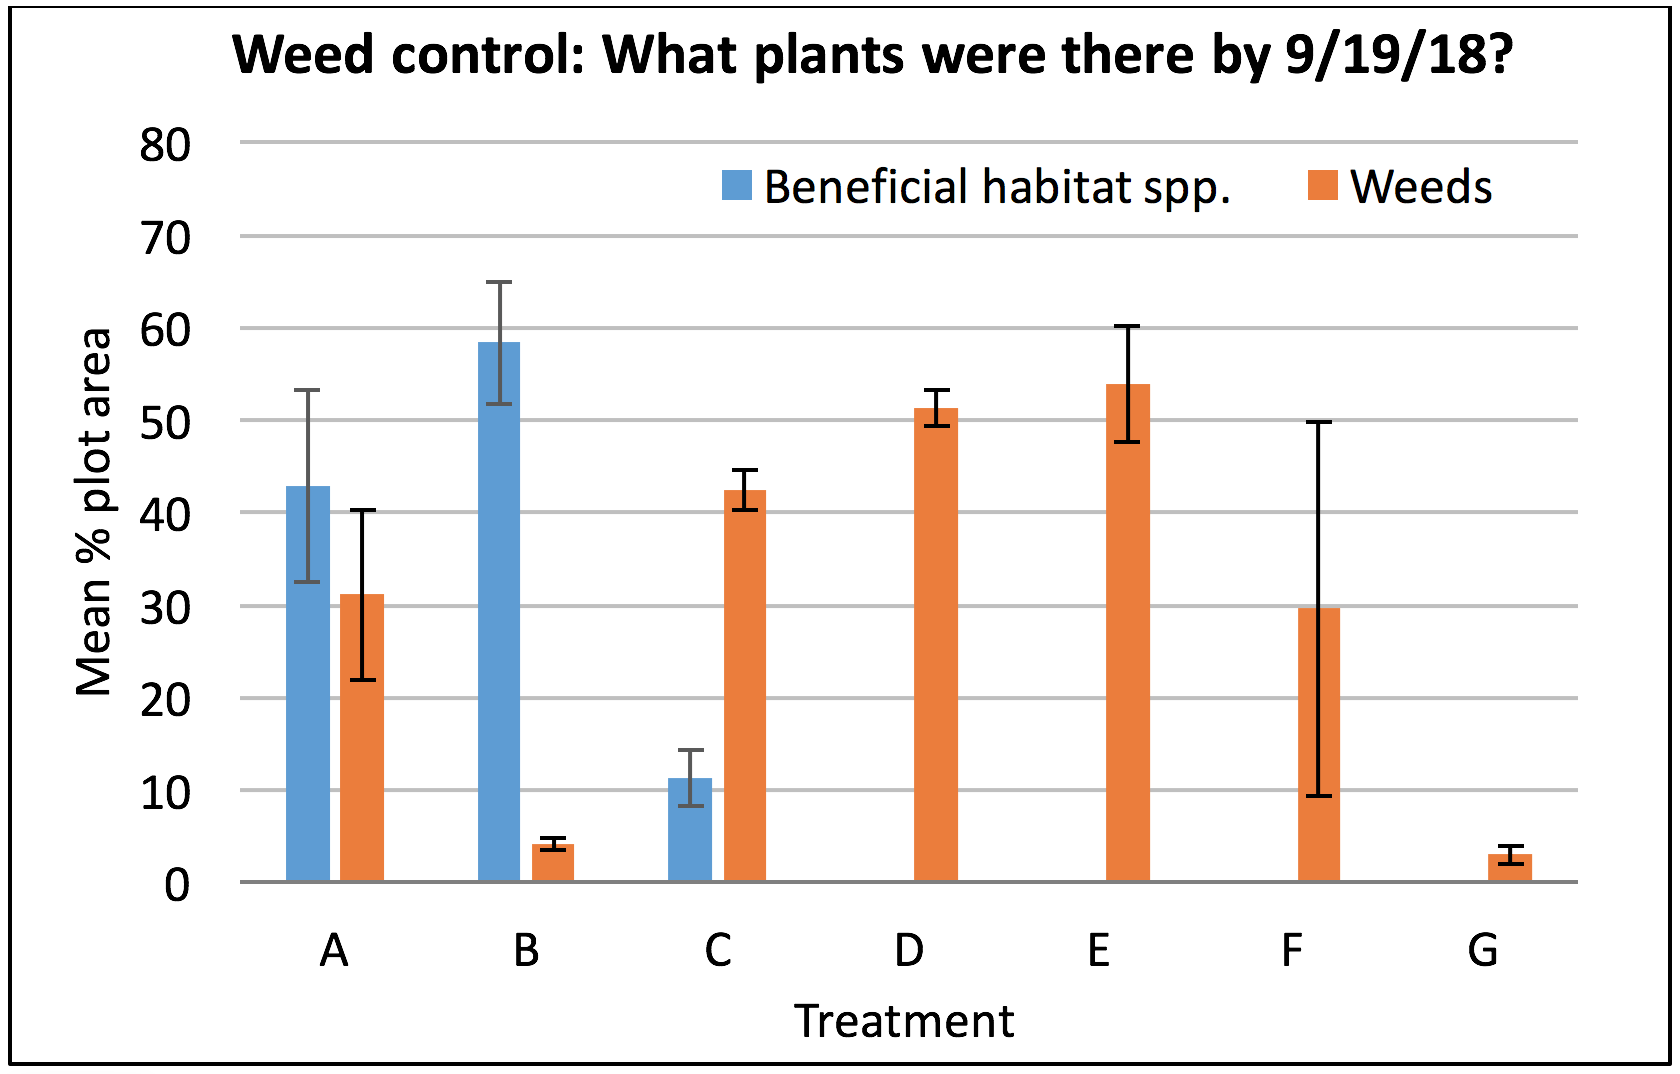
What about weeds? The graph below shows the average percent of the surface area of each plot that was covered with weeds versus planted beneficial habitat species on September 19, 2018. (Thank you, Bryan Brown, NYS IPM Integrated Weed Management Specialist for doing a weed assessment for us!) While we spent about the same amount of time weeding treatments A and B (the time difference is due to the time spent mulching treatment B), we achieved much better weed control with the mulch than without it!
Bryan Brown assessed the percent of each plot that was covered with either the beneficial habitat species we had planted (blue) or weeds (orange). Each bar represents the average of four plots for each treatment, and the error bars show the standard error.
In treatment B, we spread chipped shrub willow mulch about 3 inches deep around the transplants. If I were to do this again, I would spread it thicker. I was disappointed with how many weeds were growing through the mulch just a month after transplanting.
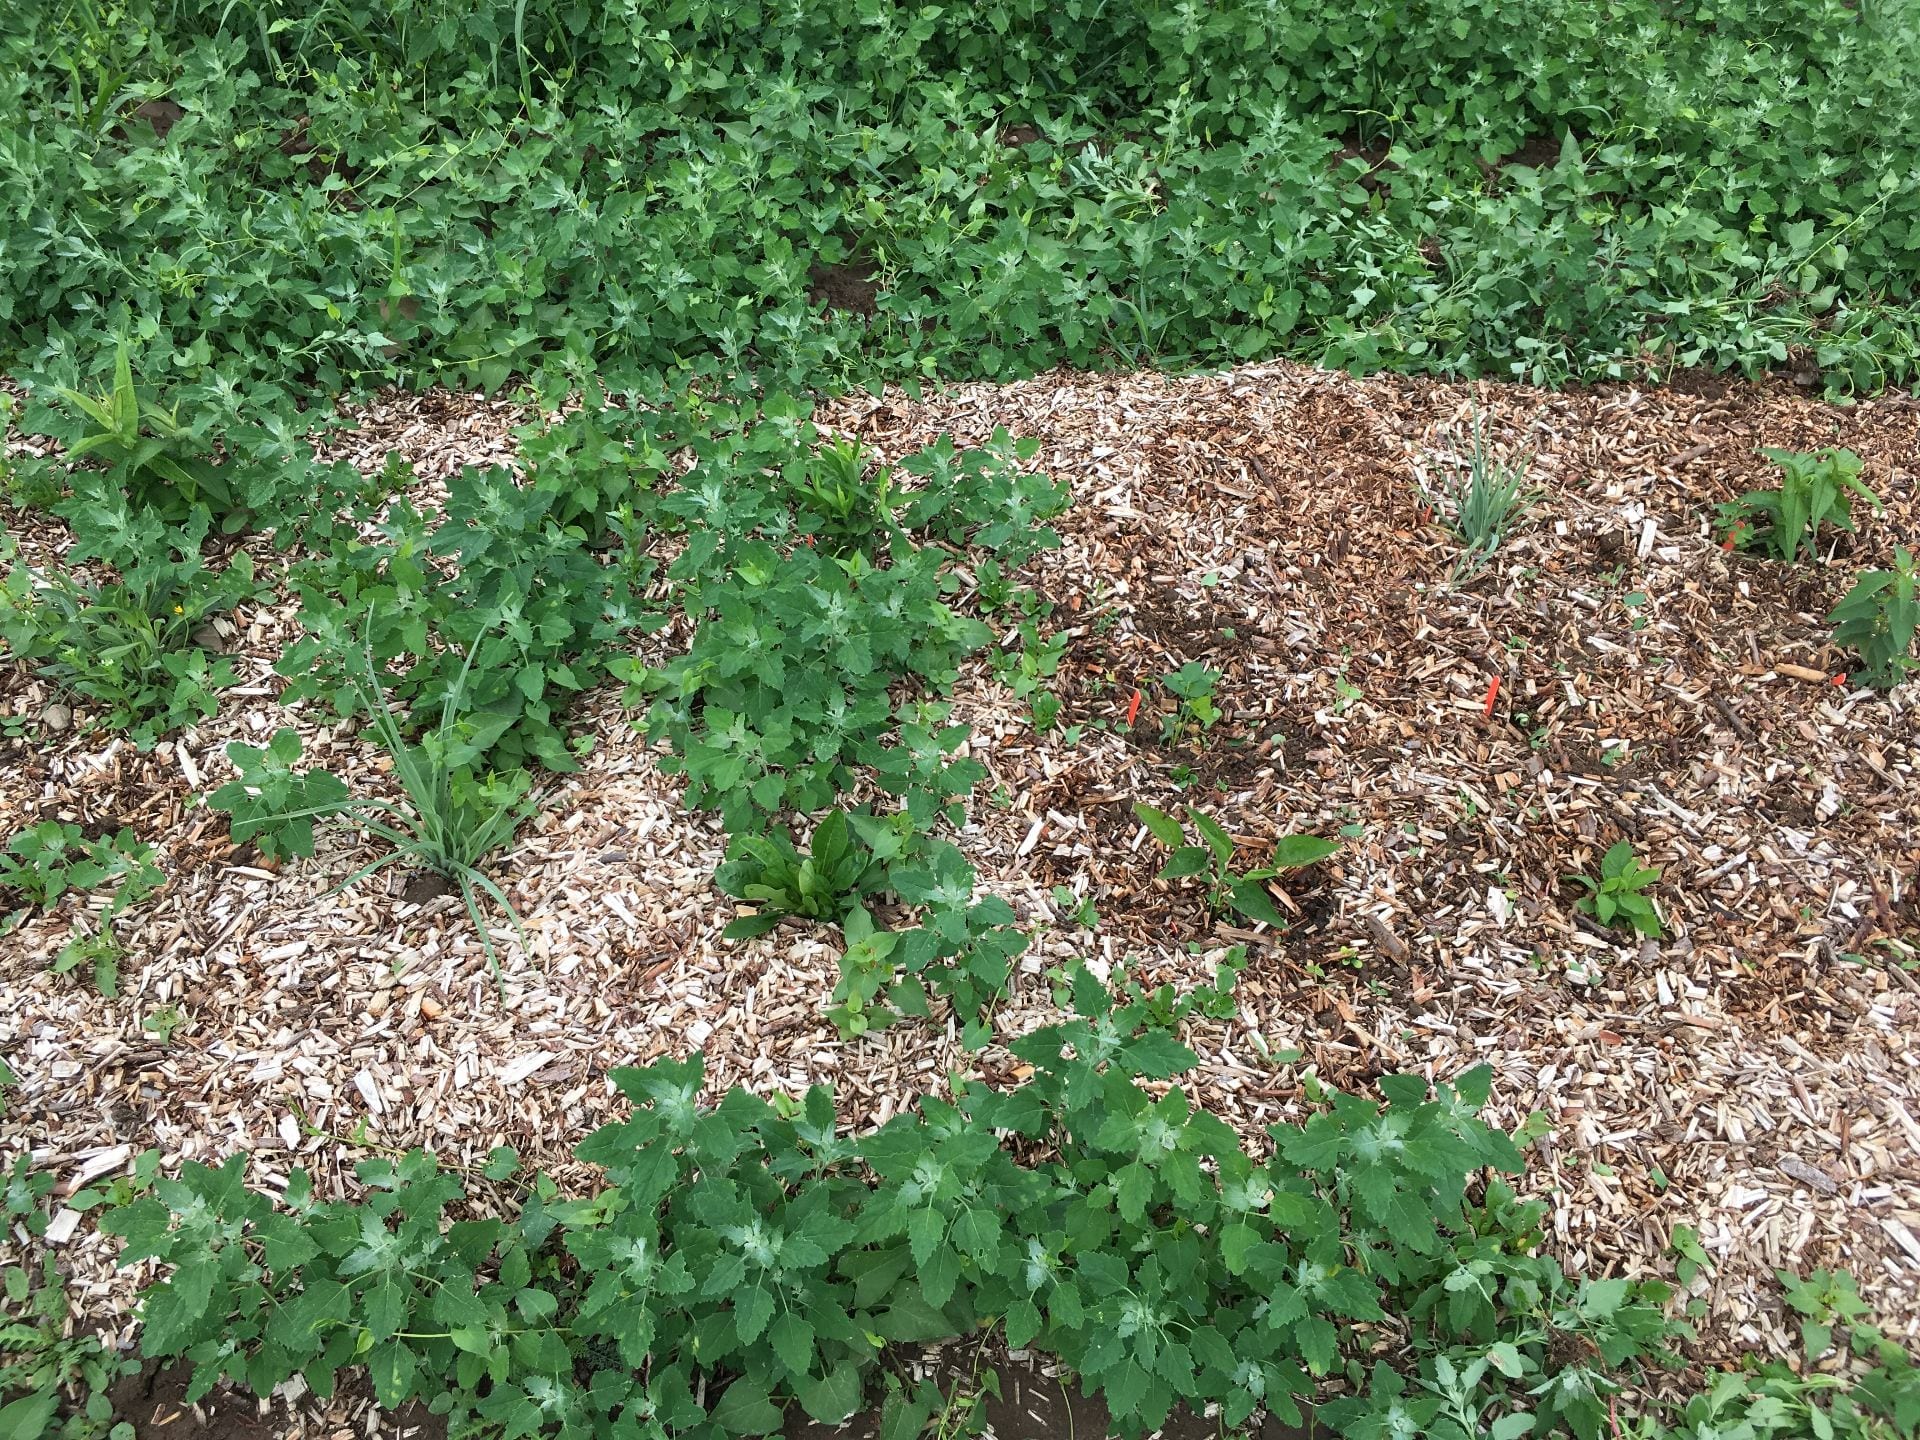
The chipped shrub willow mulch we used was not as effective at suppressing weeds as I had hoped. On the left is part of the plot that had not been weeded yet. On the right is the part that was weeded on July 6. You can also see from this picture that there was a lot of lambsquarters in this field, and that we hadn’t been able to seed grass between the plots, yet.
But weeding twice during the season pretty much took care of the weeds in treatment B. Treatment A was also weeded twice, but as you saw in the graph earlier, weed control by the end of the season was not as effective.
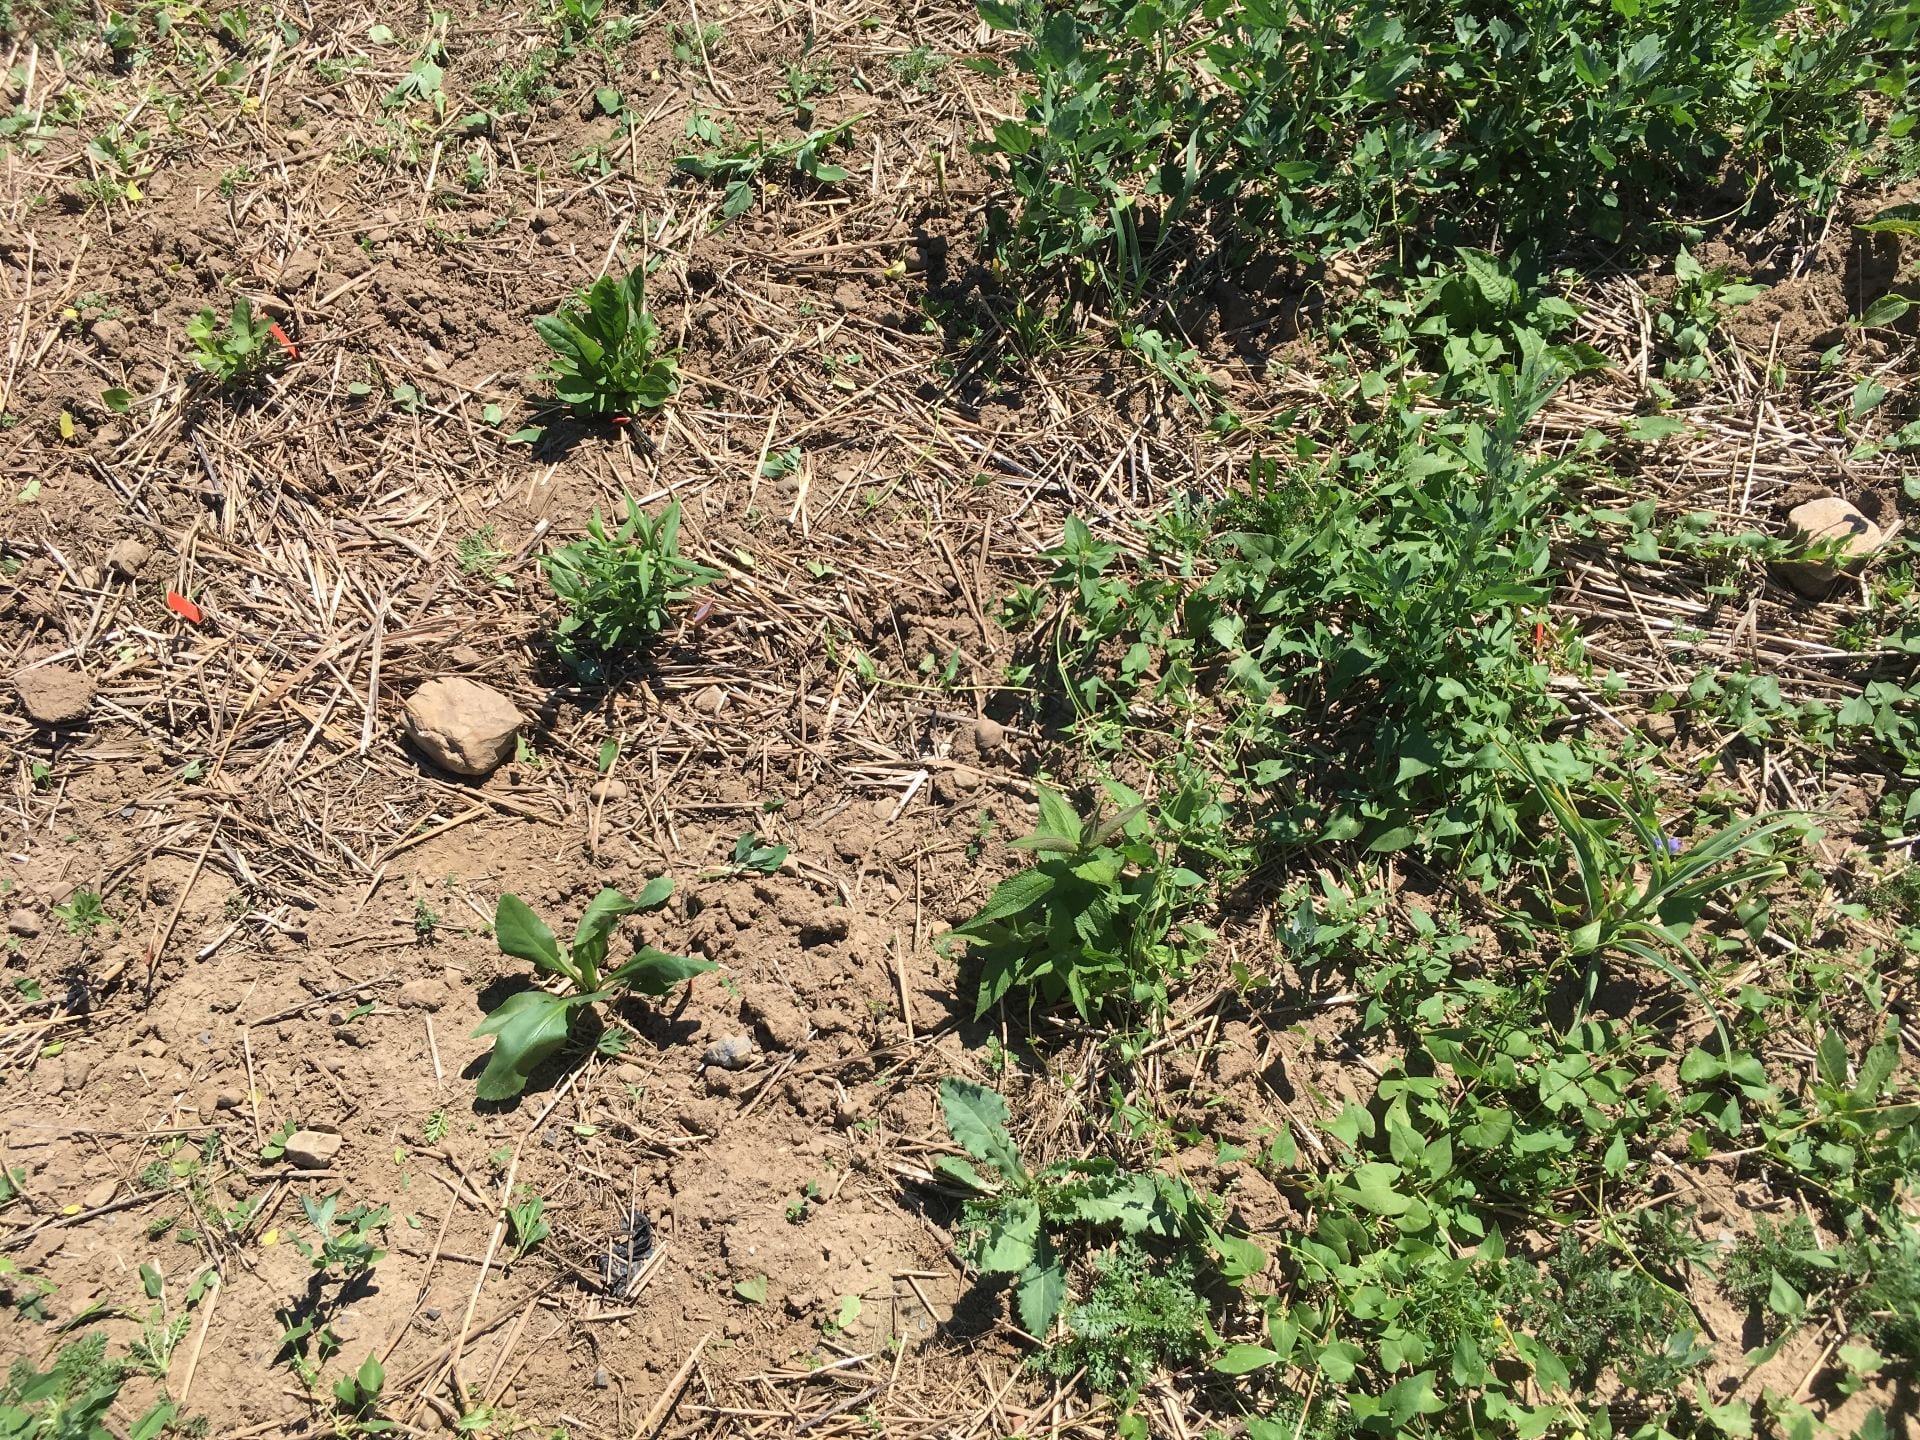
Treatment A (transplanted in the spring, with no additional weed control) before (right) and after (left) hand weeding on July 6.
I think we’ll have to wait until next year to really understand how weed control is working in treatment C. Remember, the strategy was to slowly deplete the annual weed seedbank by allowing weeds to germinate, but preventing them from producing more seed. This is not supposed to be a quick establishment method, and it wasn’t.
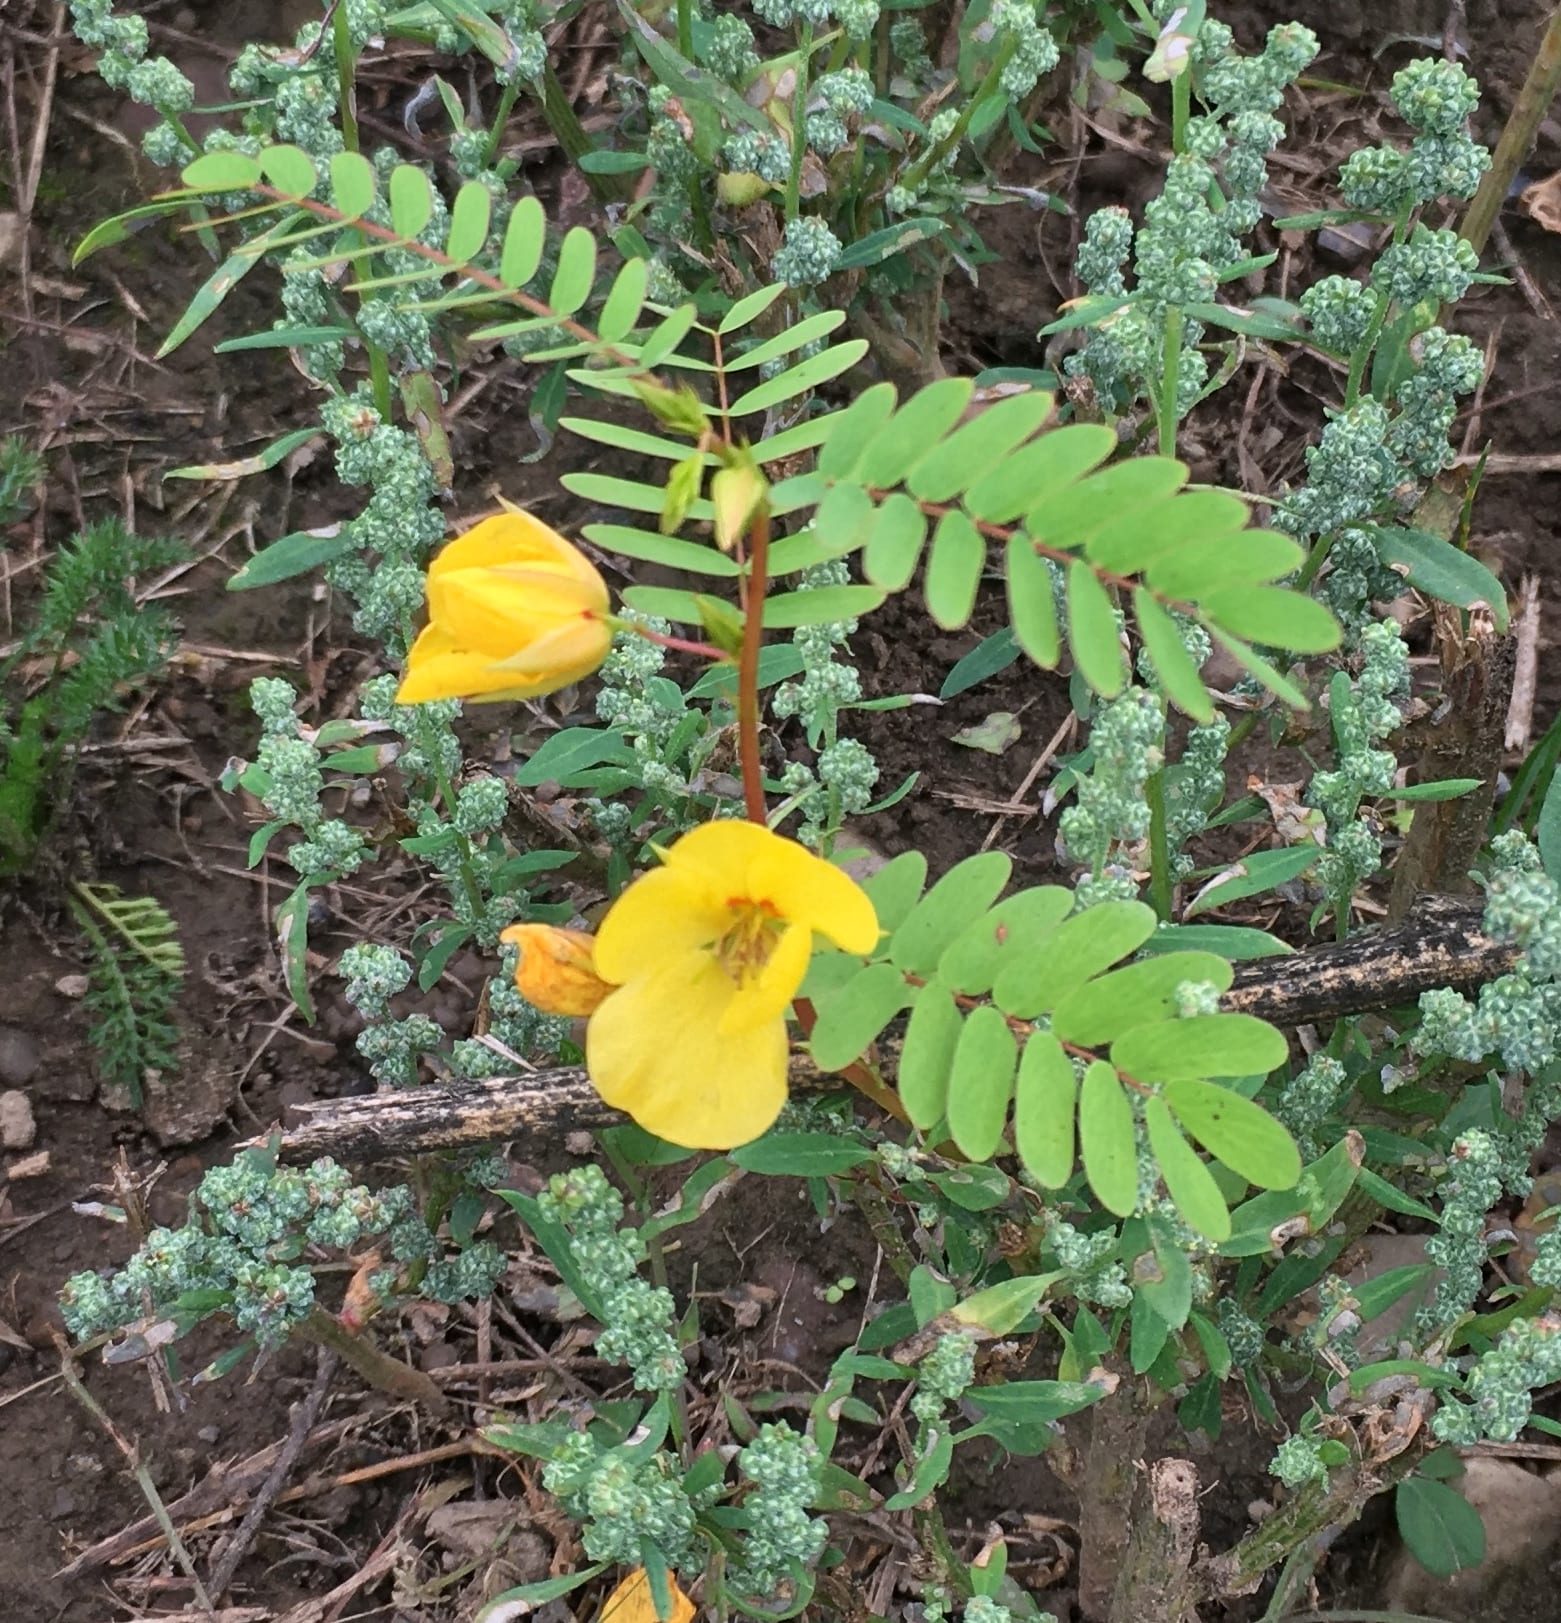
This is what partridge pea looks like. It was one of the few species from the native wildflower and grass mix seeded in the spring (treatment C) that bloomed during this first growing season.
Buckwheat as a weed-smothering cover crop
By the time Bryan did our weed assessment, it had been 3 weeks since we mowed the second planting of buckwheat. Ideally, we would have transplanted shortly after mowing the buckwheat. But, the second crop of buckwheat was starting to set seed by the end of August, and our transplants weren’t scheduled to arrive until the end of September. So we mowed the buckwheat early to prevent it from contributing its own seed to the weed seedbank. But this meant that a lot of weeds had time to germinate before we transplanted the habitat plants. The buckwheat certainly suppressed a lot of weeds during the growing season, and I hope that this will help reduce weeds next year.
The buckwheat established quickly and crowded out many weeds. We mowed the first crop in July and re-planted. We had to mow the second crop about 3 weeks before we transplanted habitat plants (not ideal).
Solarization
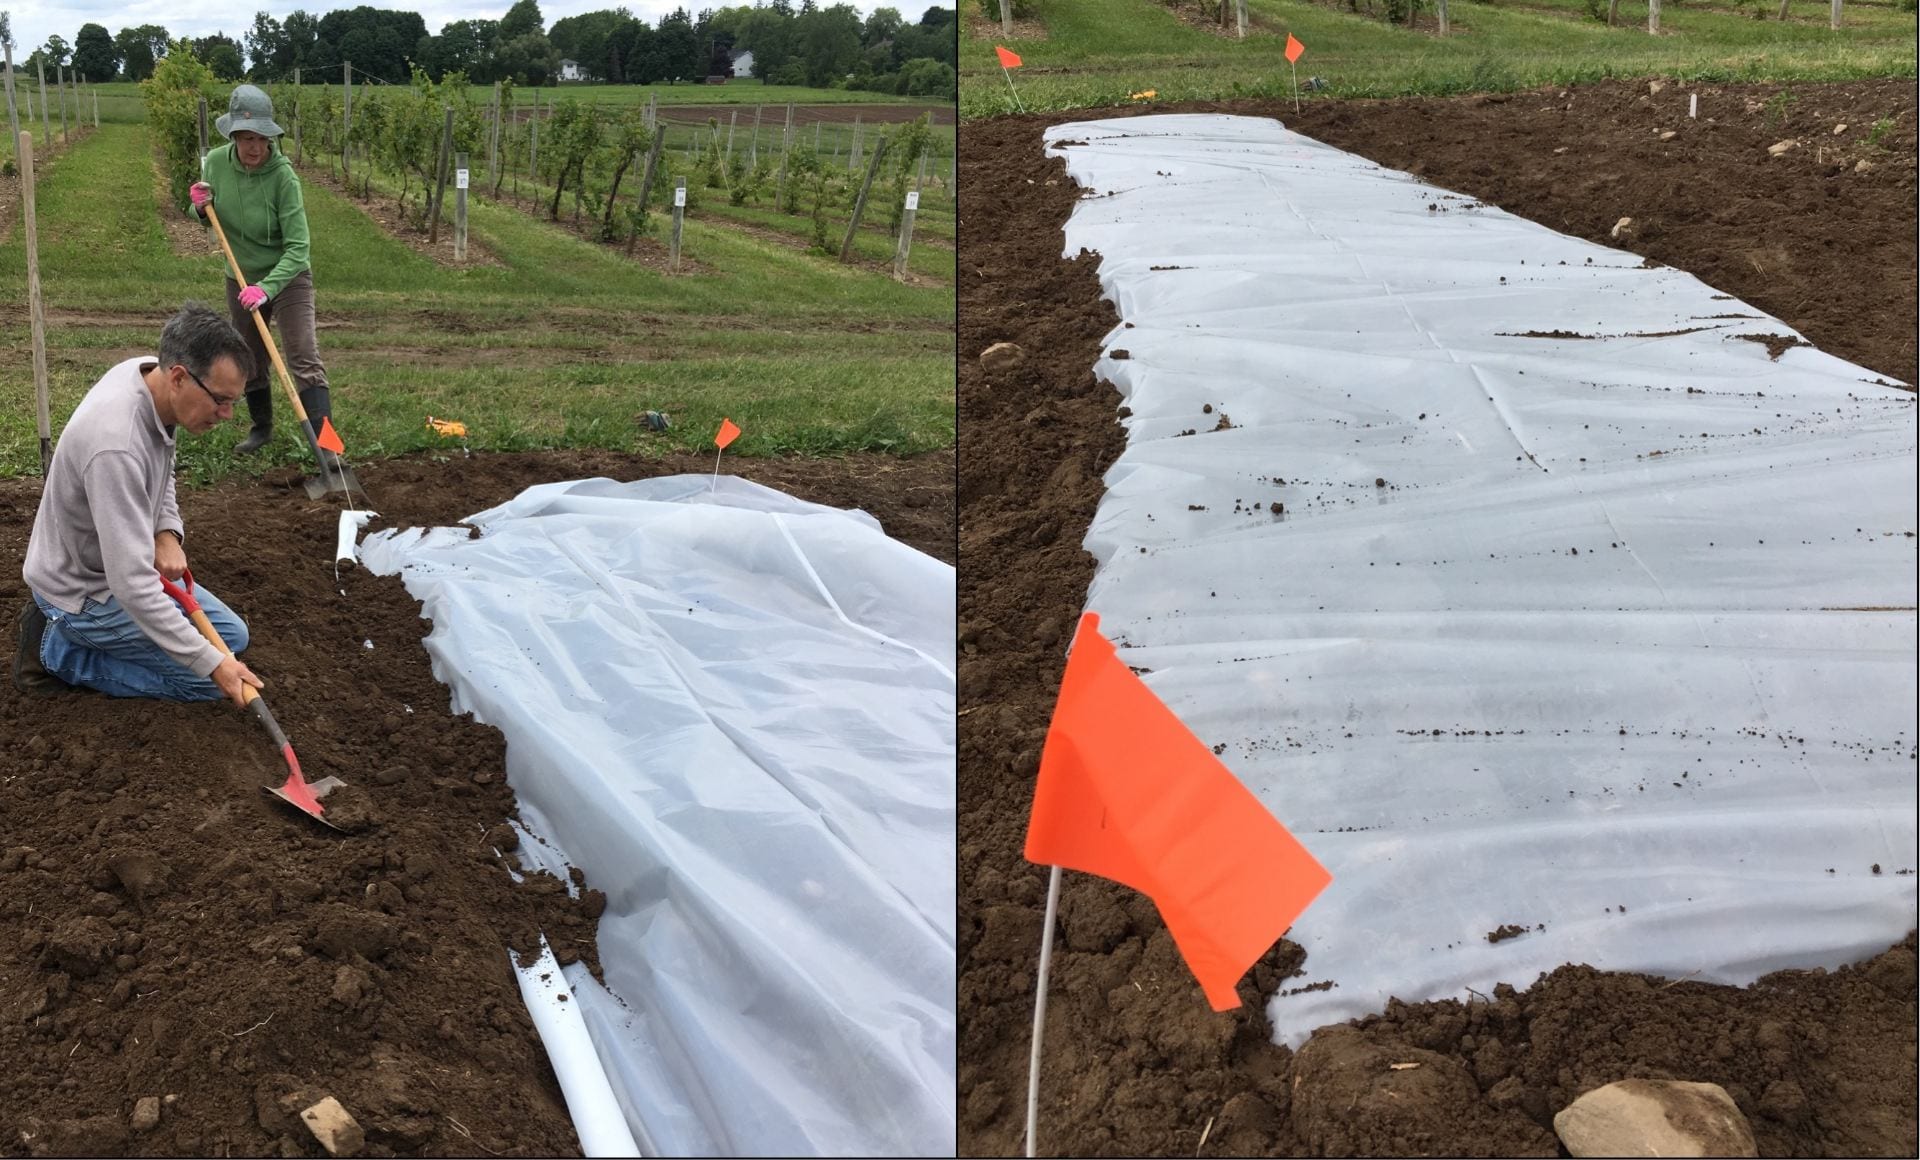
Overall, we were pleased with how the solarization worked. We laid down 6 mil clear plastic (leftover from a nearby high tunnel) in early June, and did a little weed control around the edges of the plastic just once during the summer to prevent more weed seed production and to prevent shading of the plots.
We laid 6 mil clear plastic over some plots on June 5, 2018 to solarize the soil underneath (and kill weeds).
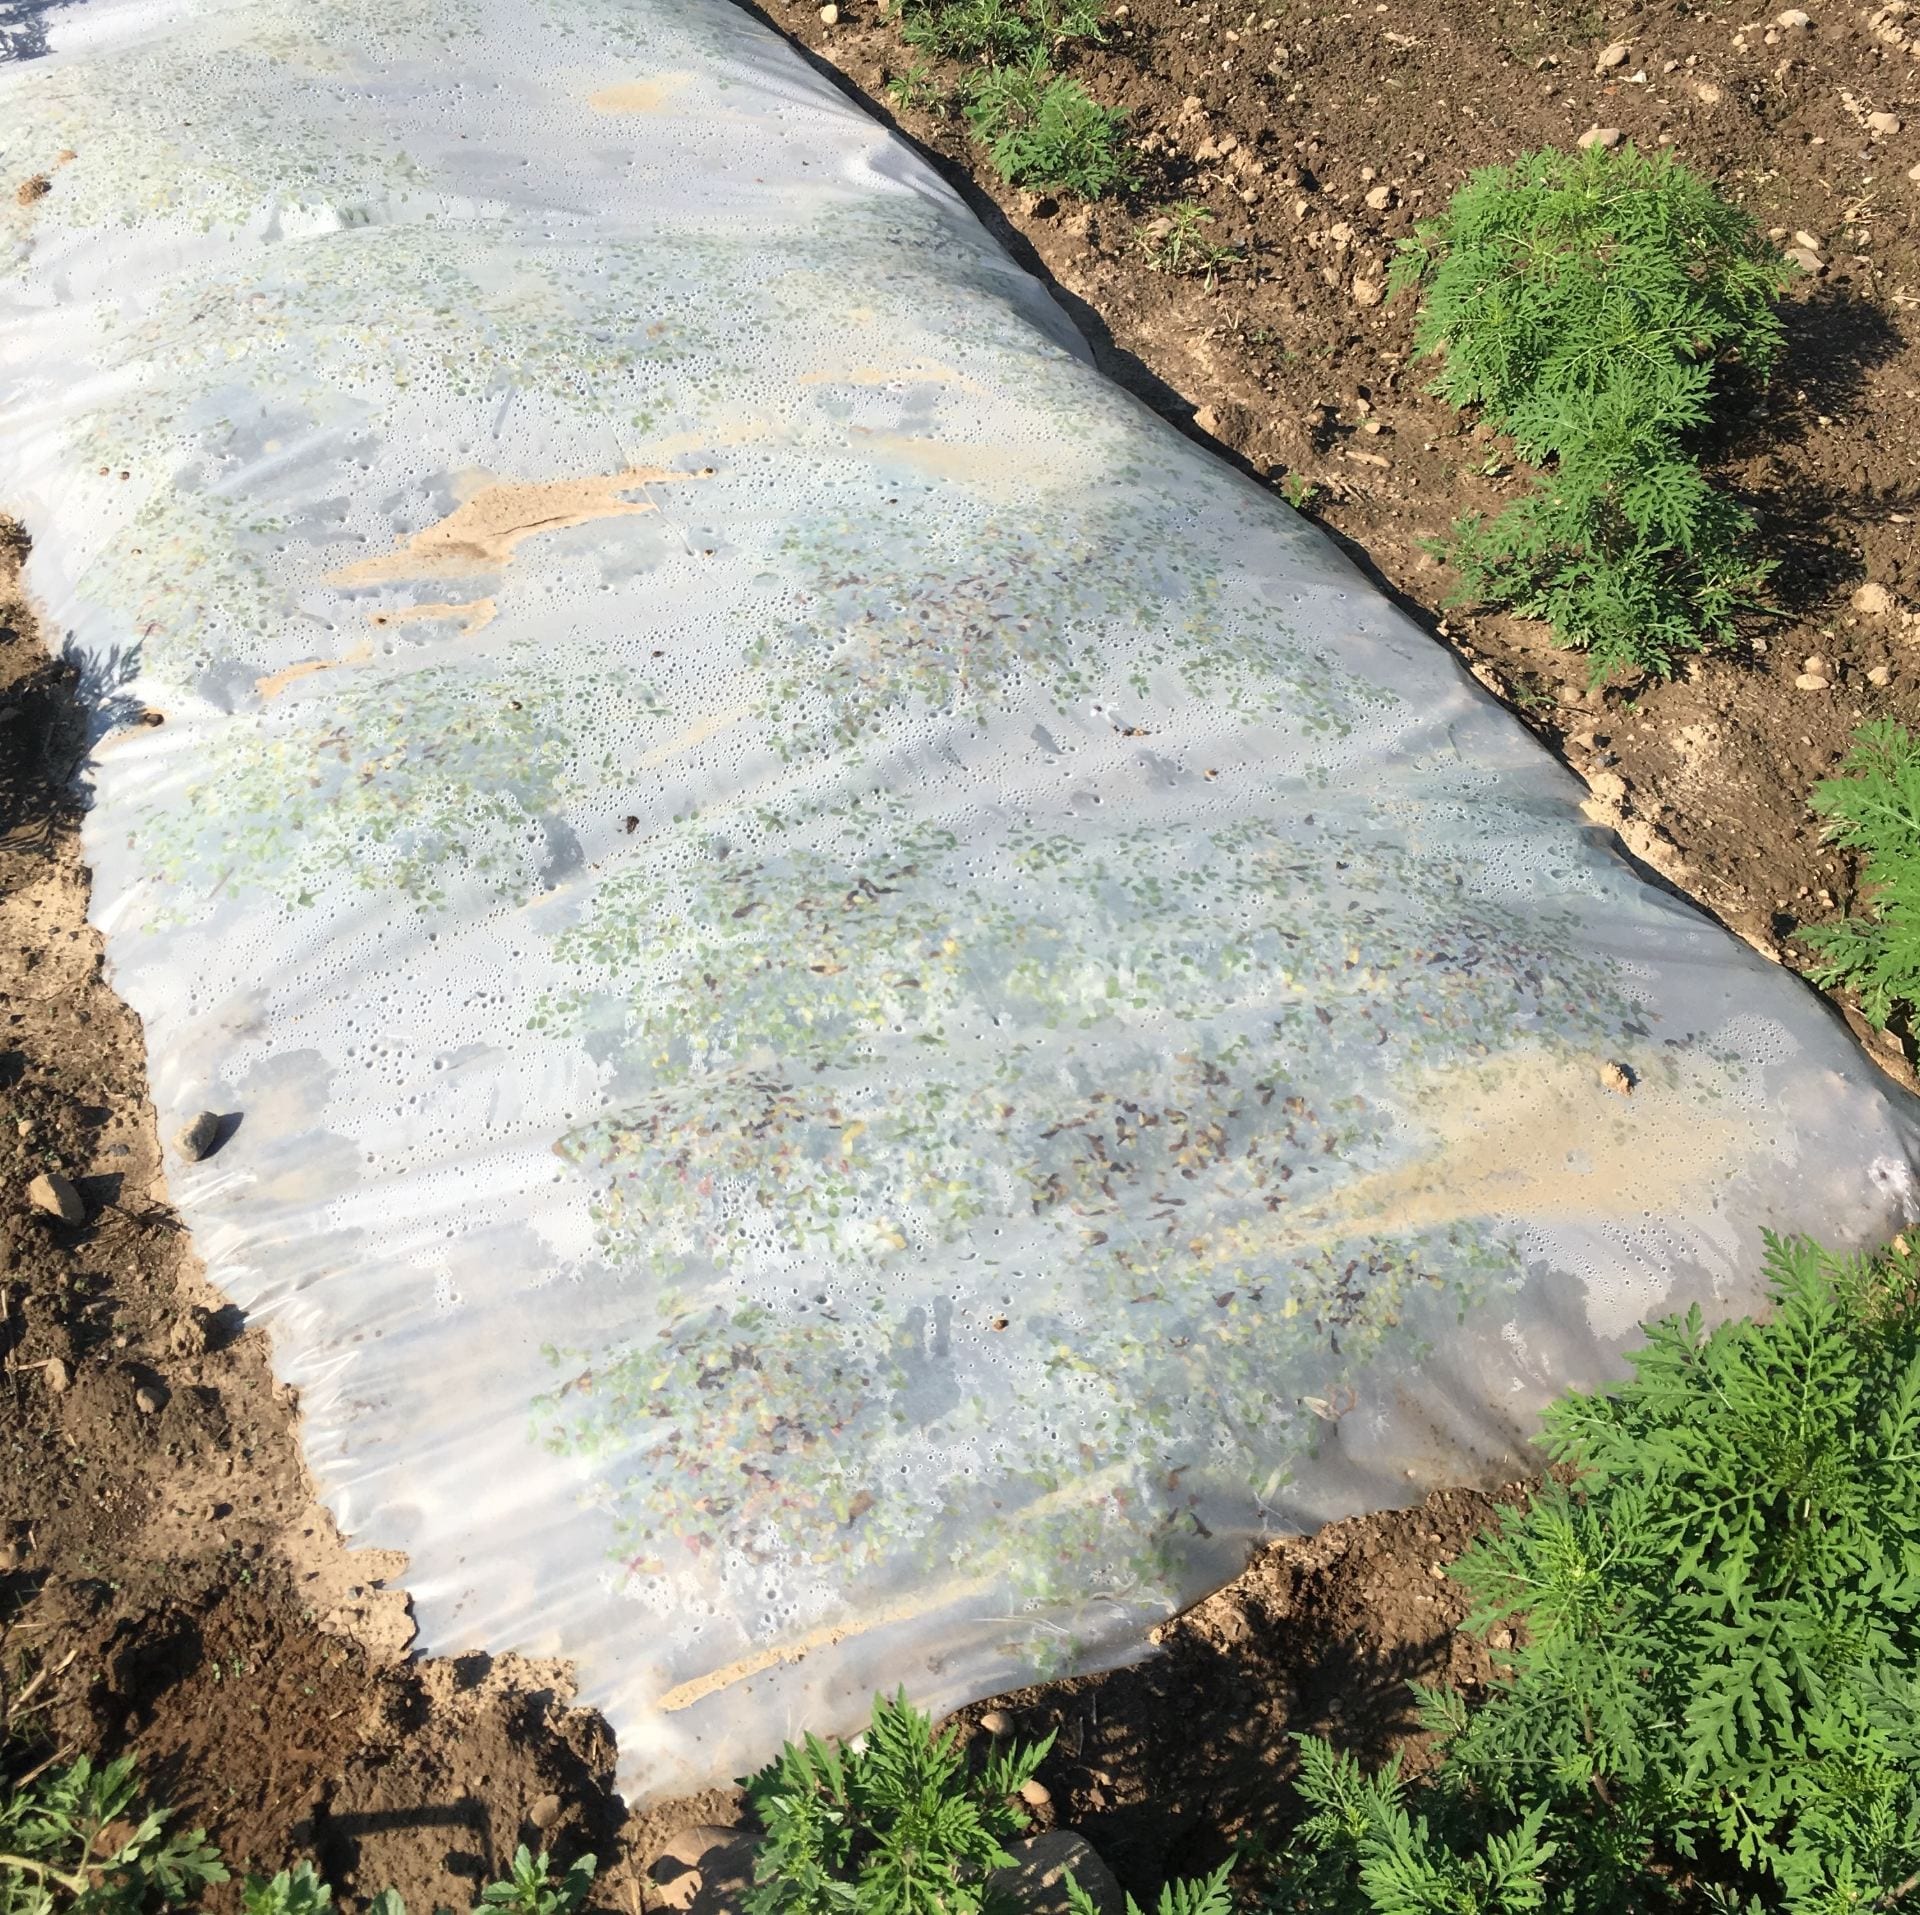
We also learned that solarization will not control purselane. In contrast, the purselane thrived only under our clear plastic, and nowhere else in the field. The plot that had the most purselane also had the most other (mostly grass) weeds. I think the purselane pushed the plastic away from the soil and reduced the temperature a bit, allowing other weeds to grow.
In some solarized plots, purselane grew happily under the plastic. Purselane was not a common weed anywhere else in the field during the season.
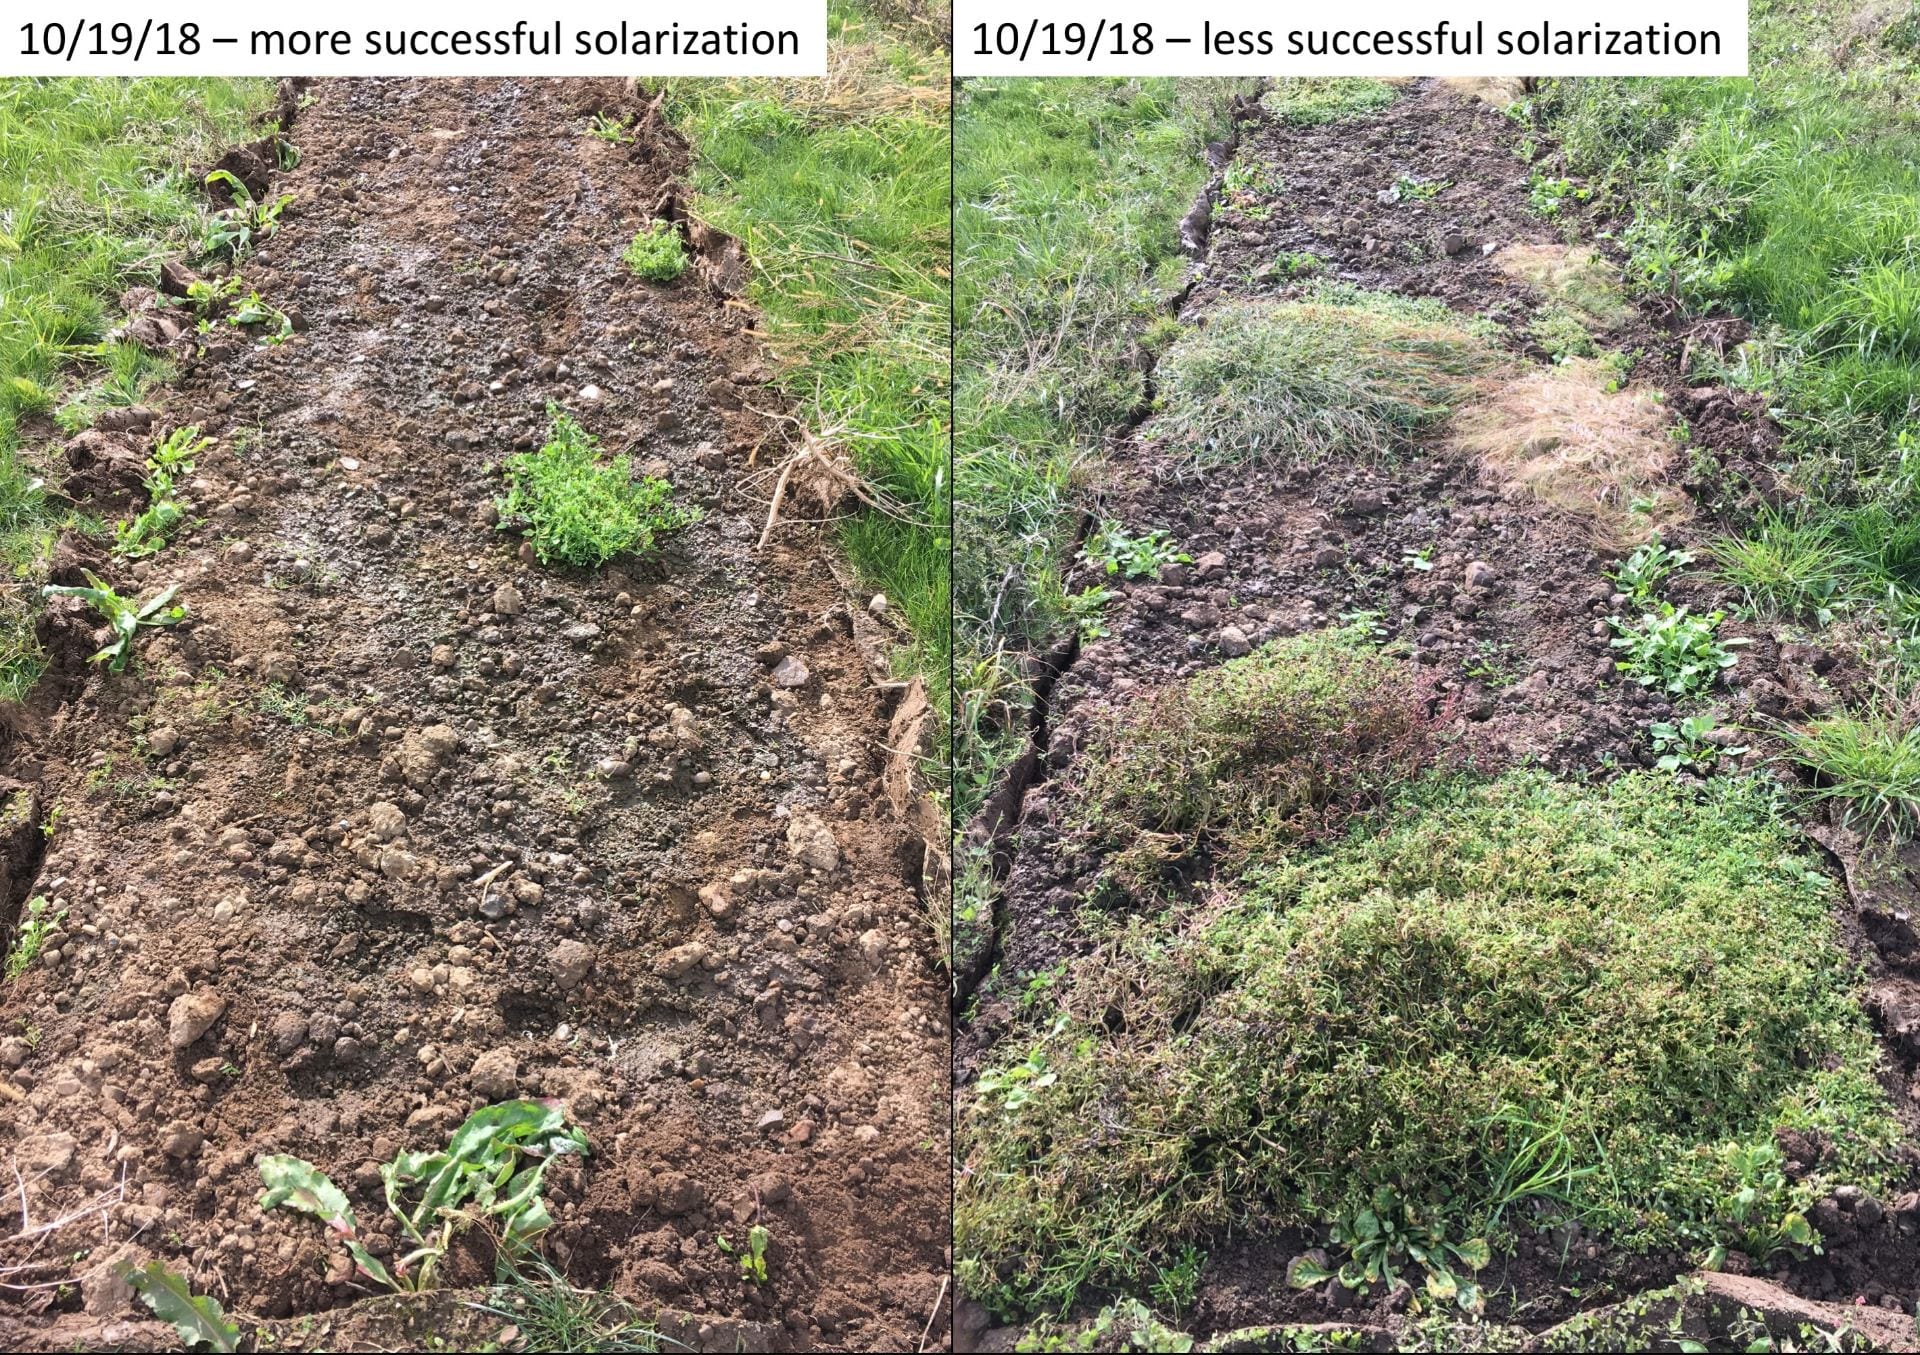
Some other plots were virtually weed-free when we pulled the plastic up in October. (Did you see how large the error bar was for weeds in treatment F in the weed graph above? This means there was a lot of variability between plots in this treatment.) Our soil temperature probe happened to be in the plot with the most purselane, and we still achieved maximum soil temperatures of 120 °F (at a depth of about 3 inches), compared to 90 °F in a nearby control (treatment E) plot.
Solarization results were pretty variable from plot to plot. In some plots, it worked great (left). In other plots more purselane germinated and it didn’t work as well (right). We cut all the weedy vegetation off at the ground before direct seeding the beneficial habitat plants.
Repeated herbicide and tillage
At the weed assessment in September, the plot that had been alternately treated with herbicide and tilled looked best in terms of weed control. Like treatment C and all the treatments planted (by seed or by transplant) in the fall, I think we’ll get a better idea next year of how effective this method was at suppressing weeds.
A few weeds were present a week after the last time the herbicide/tillage treatment (G) was rototilled. We broadcast, raked, and pressed beneficial habitat seed into these plots.
Timing of fall planting
One thing we struggled with this fall was deciding when to plant the wildflower and grass seed mixture. One source recommended the seeds be planted sometime between October and December. We were cautioned that if we planted the seed too early, some species (especially blackeyed Susans) might germinate this fall, and the young seedlings would be killed by an early frost before they established. But we were also afraid of waiting too long and not being able to till the soil (treatment G, only) if it got too wet. And we wanted a nice smooth seedbed. In treatment F, we suspected that leaving the clear plastic on into November would protect the weeds from the cooler weather. But we worried that taking it off too early would only allow more weed seeds to blow onto the bare ground.
We direct seeded October 18, 2018, after the weather cooled down a bit, and before the ground got too wet.
Finally, we compromised and planted the seeds on October 18 and 19, after our first hard frost, and once it looked like the nighttime temperatures would be in the 40’s (or below) for the next 10 days. It was only a week after the last tillage in treatment G, and the soil was still relatively dry. Those who live in the Finger Lakes know that late October and early November were pretty wet this year, so I’m glad we planted when we did. If you are trying to time fall seeding, I would recommend that you keep an eye on the 10 day forecast to see when temperatures are starting to cool. But if you get a dry sunny day to plant and it’s reasonably cool, I wouldn’t delay.
So if I want to plant habitat for pollinators and natural enemies next year, what should I do?
First, think about the time, money, and equipment you have available, as well as the area you’d like to plant. There probably isn’t a single right way to establish this habitat, but there may be a best way for you.
You can find more details on the techniques we used (and some links to other resources) here.
This post was written by Amara Dunn, Brian Eshenaur, and Betsy Lamb.
This work is supported by:
Crop Protection and Pest Management -Extension Implementation Program Area grant no. 2017-70006-27142/project accession no. 1014000, from the USDA National Institute of Food and Agriculture.
New York State Department of Agriculture and Markets
The information will be most relevant to farmers and agriculture professionals, and priority for registration will be given to these audiences. Others who are interested in attending may join a waiting list and will be notified if additional space is available.
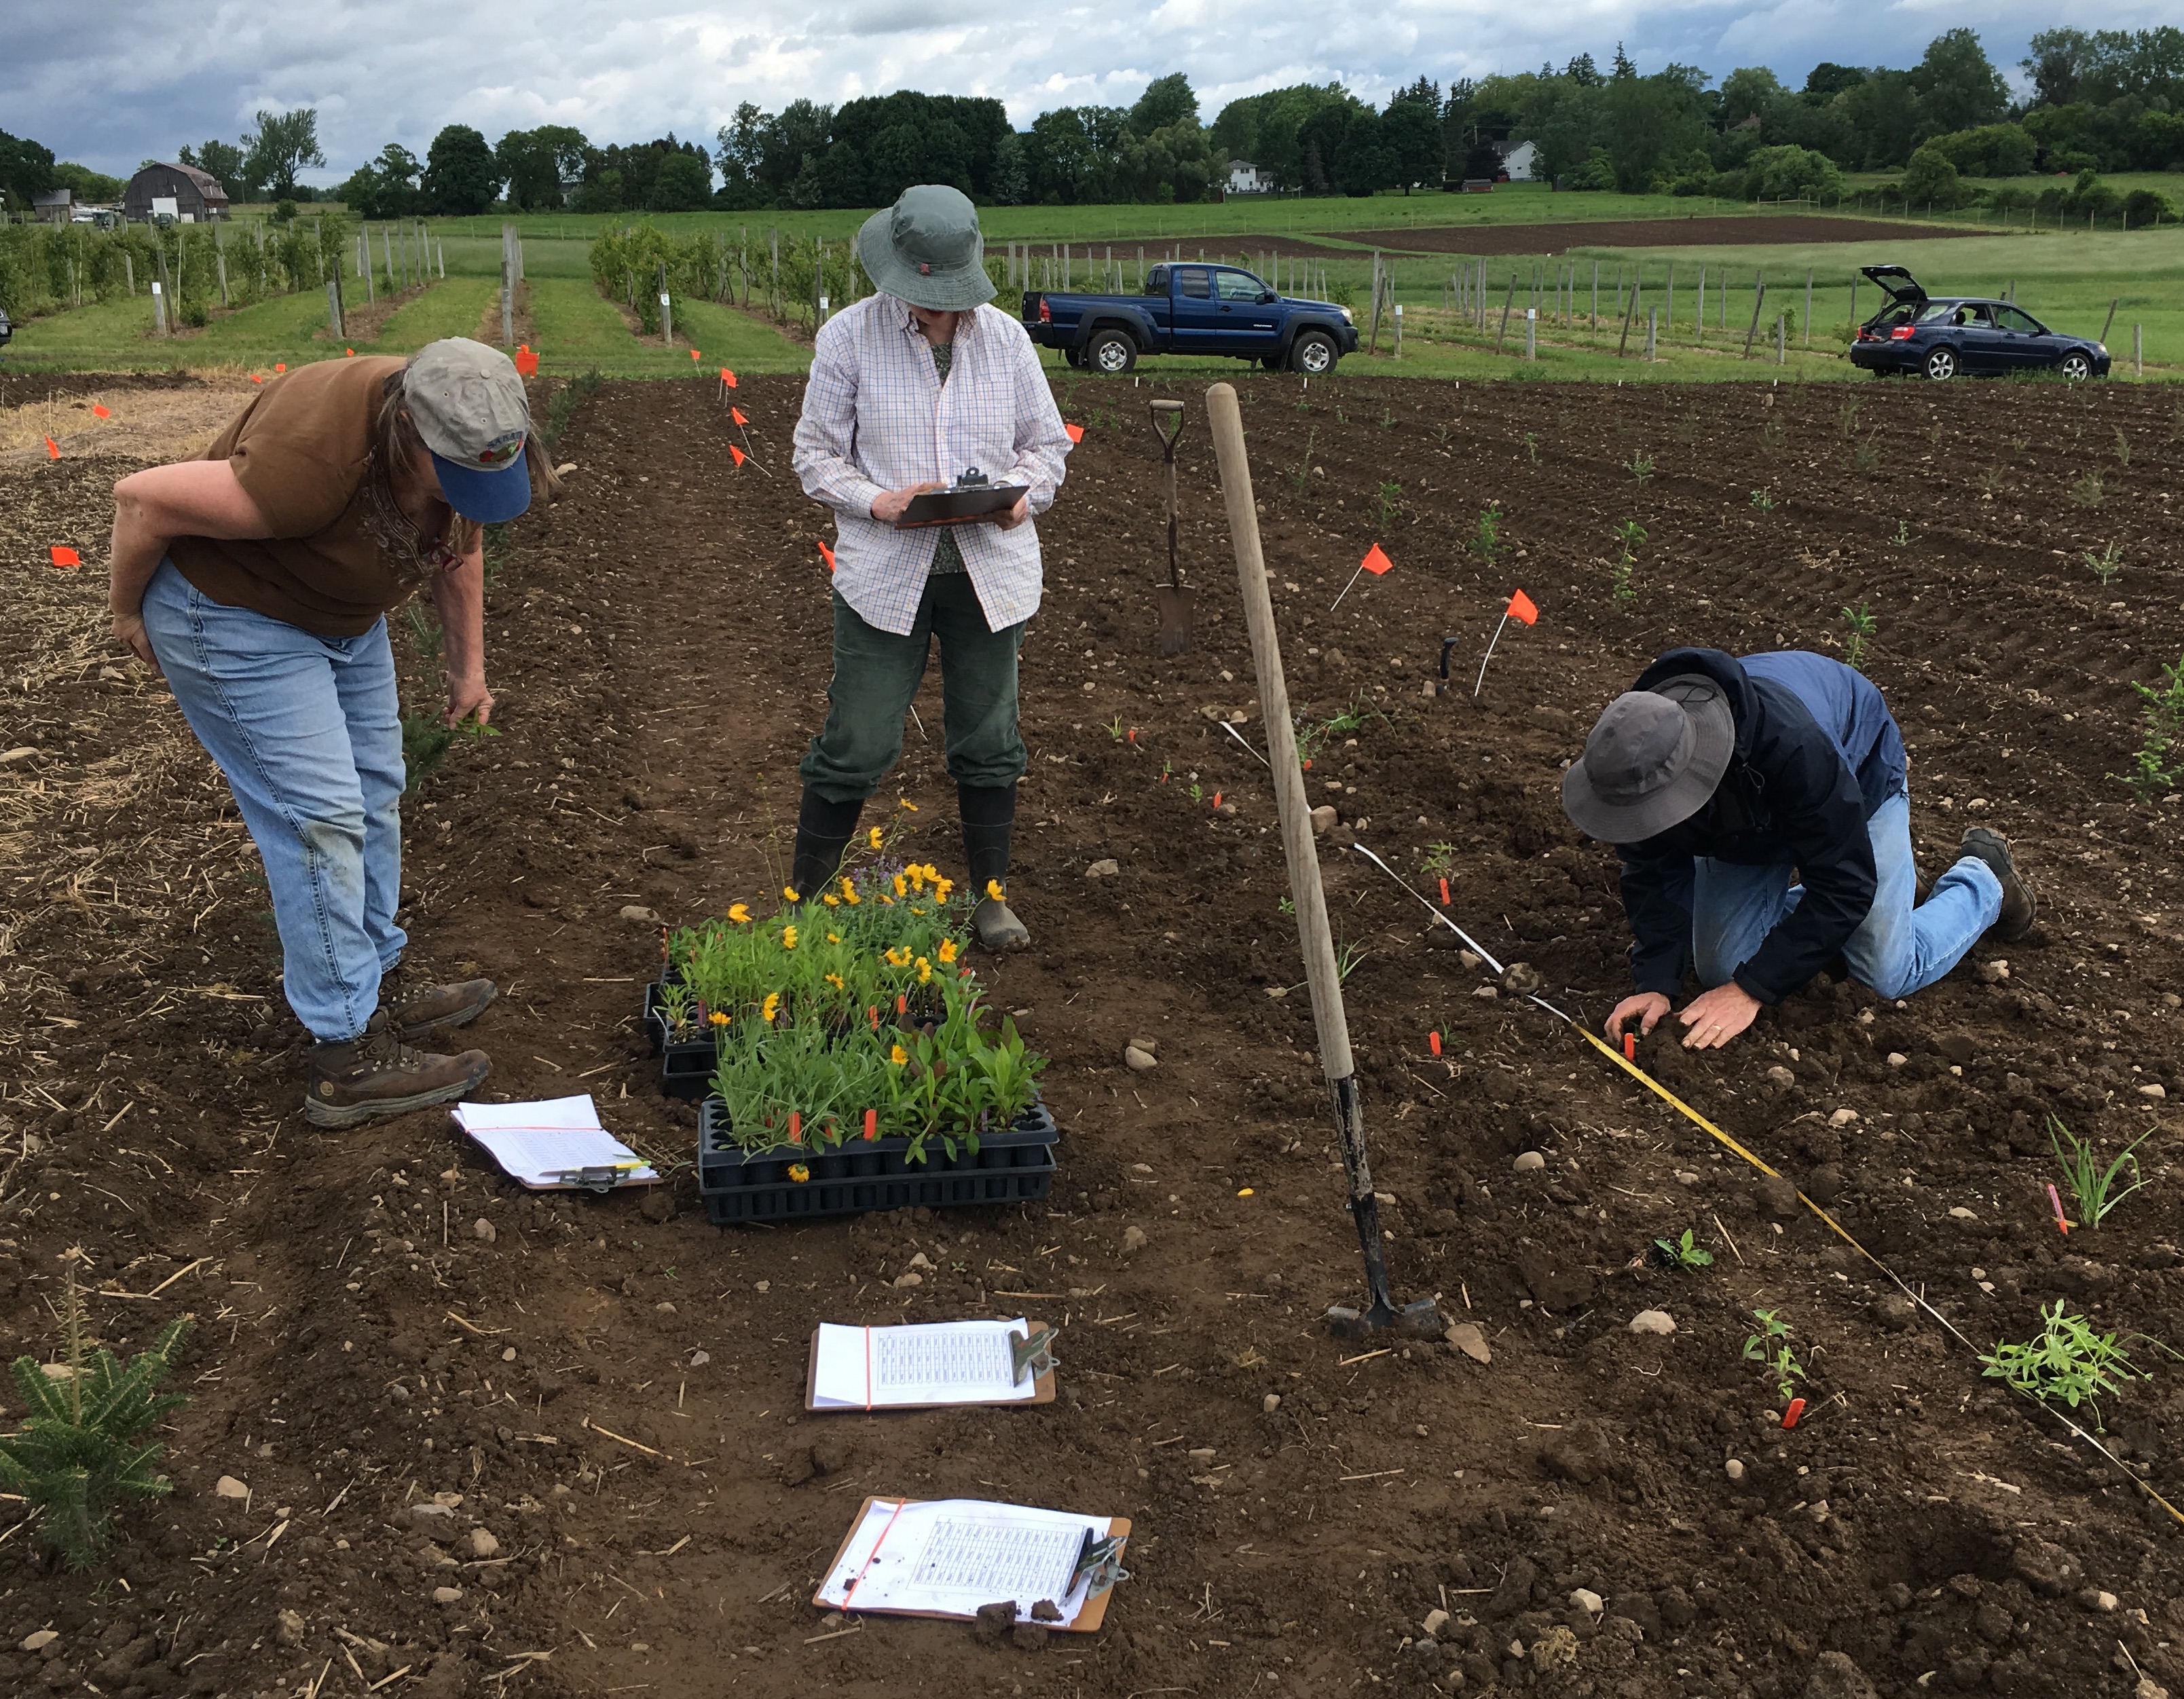
Dr. Betsy Lamb, Deb Marvin, and Brian Eshenaur (left to right) transplanting native wildflowers and grasses on the edge of a research Christmas tree planting at Cornell AgriTech in Geneva, NY. These plants will provide food and shelter for pollinators and natural enemies of pests.
As I mentioned in my January post, I am excited to be working with two NYS IPM colleagues (Dr. Betsy Lamb and Brian Eshenaur) to demonstrate the costs, labor, and effectiveness of different methods for establishing habitat plants for pollinators and other beneficial insects. Remember, habitat for pollinators is also habitat for insects and mites that are natural enemies of pests on your farm or in your garden. Thus, planting for pollinators enables you to practice conservation biocontrol. These demonstration plots are located around a new research planting of Christmas trees at Cornell AgriTech at the New York State Agricultural Experiment Station in Geneva, NY. What we learn from this project can help you choose the best way to establish your own beneficial habitat (on your farm, around your home, near your school, etc.)
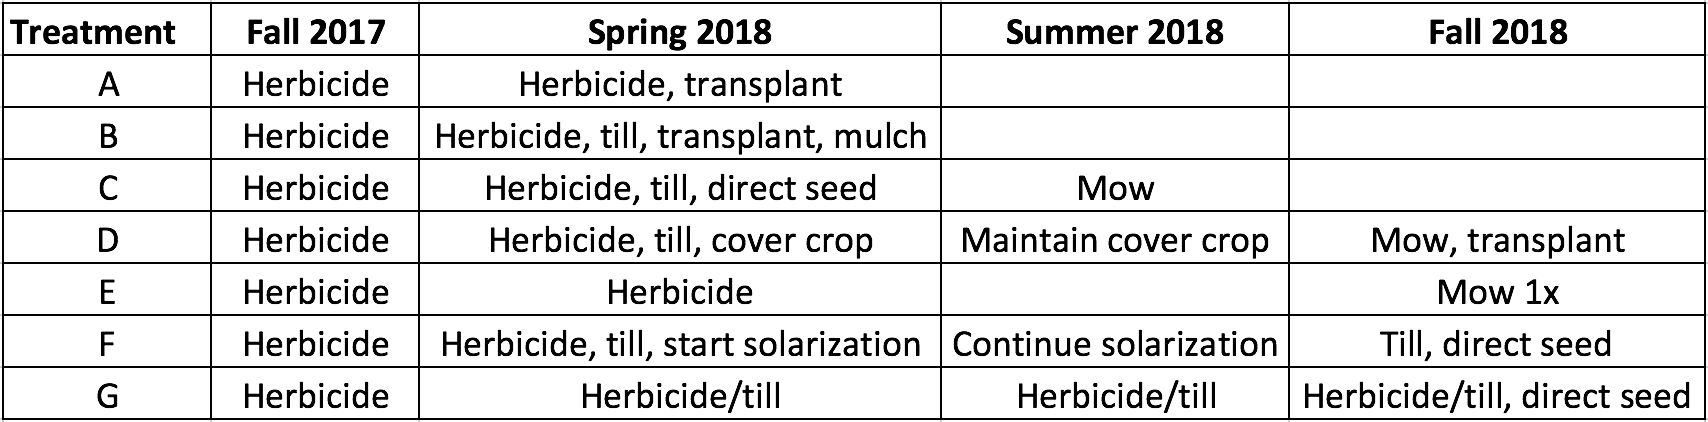
We are comparing 6 different methods of establishing habitat for beneficial insects, plus a control (Treatment E). Treatment E plots were sprayed with herbicide last fall and this spring, and will be mowed once this year. A summary of the plan for the other treatments is below.
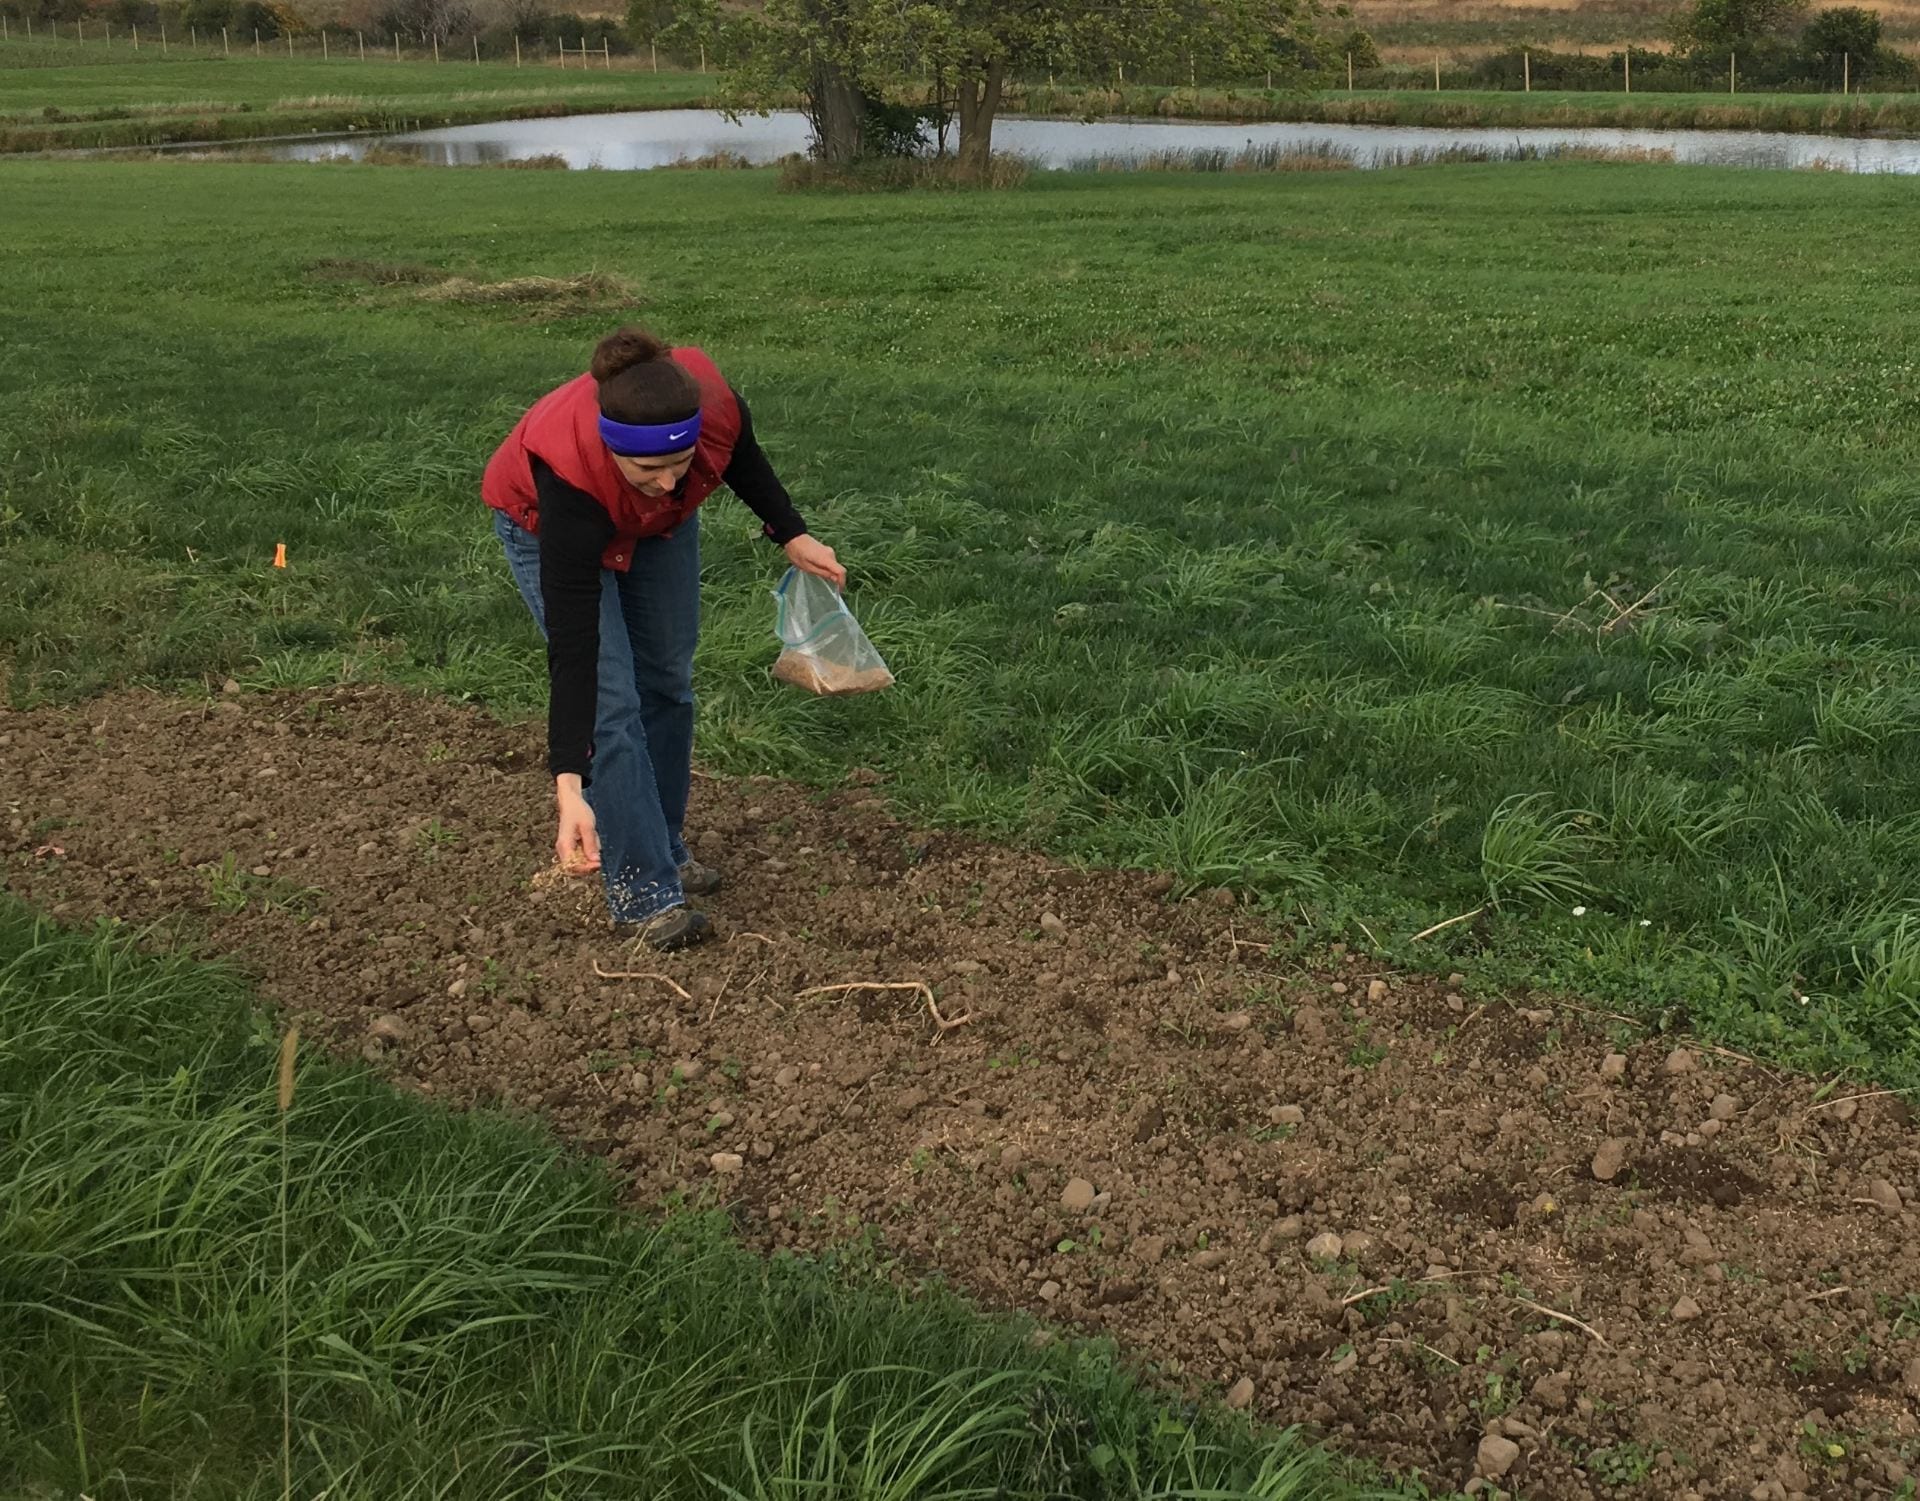
Comparing different methods for establishing plants that provide habitat and food for beneficial insects (pollinators and natural enemies of pests). Treatment E is the control.Native wildflower and grass seeds (A) were mixed with boiled rice hulls (B) to make them easier to broadcast (C). Much of what you see on the soil surface is just the rice hulls, but there are a few seeds that will hopefully grow into habitat for beneficial insects.
Because of when spring tillage occurred, plots that were scheduled to be tilled in the spring did not need a second herbicide application. About a week after spring tillage, Treatment C plots were direct seeded. I hand-broadcast a mixture of native wildflower and grass seeds at a rate of half a pound per 1,000 square feet. This worked out to be 26 g of seed for each 5-foot by 23-foot plot. To make it easier to broadcast such a small amount of seed, I first mixed the seed for each plot with about 3 cups of boiled rice hulls. After raking the seed in gently with a garden rake, I stomped the seed into the ground to ensure good contact with the soil. In a larger plot, you might use equipment like a cultipacker or lawn roller to achieve the same result.
Two weeks (and three-quarters of an inch of rain) after seeding, buckwheat is establishing. It will hopefully crowd out weeds that would otherwise grow in these plots over the summer.
I broadcast (again, by hand) buckwheat seeds in the Treatment D plots at a rate of 70 pounds per acre (84 g for each of these small plots), and raked them in on May 31st. If the buckwheat establishes well, it will smother weeds during the summer, and we can mow and transplant into these plots in the fall. We plan to mow this crop of buckwheat when it starts flowering and then reseed it, for a total of two buckwheat plantings this summer.
We transplanted by hand 15 species of wildflowers and 1 grass species into plots assigned to Treatments A and B on June 4th. Because we were able to transplant right after it rained, it wasn’t too difficult to plant into the untilled plots (Treatment A). Some of them still had some stubble from the cover crops and weeds that had been growing in this field last year, and were killed by fall and spring herbicide applications.
Native wildflowers and grasses transplanted into untilled soil. Some dead weeds and cover crop still remain on the soil surface.
The day after we transplanted into Treatment B plots, we mulched the plants to a depth of about 3 inches to (hopefully) control weeds for the rest of the summer while the habitat plants get established. We used chips from shrub willow because they were available, but other types of mulch would work, too.
These wildflowers and grasses will have help out-competing weeds from 3 inches of willow chip mulch.
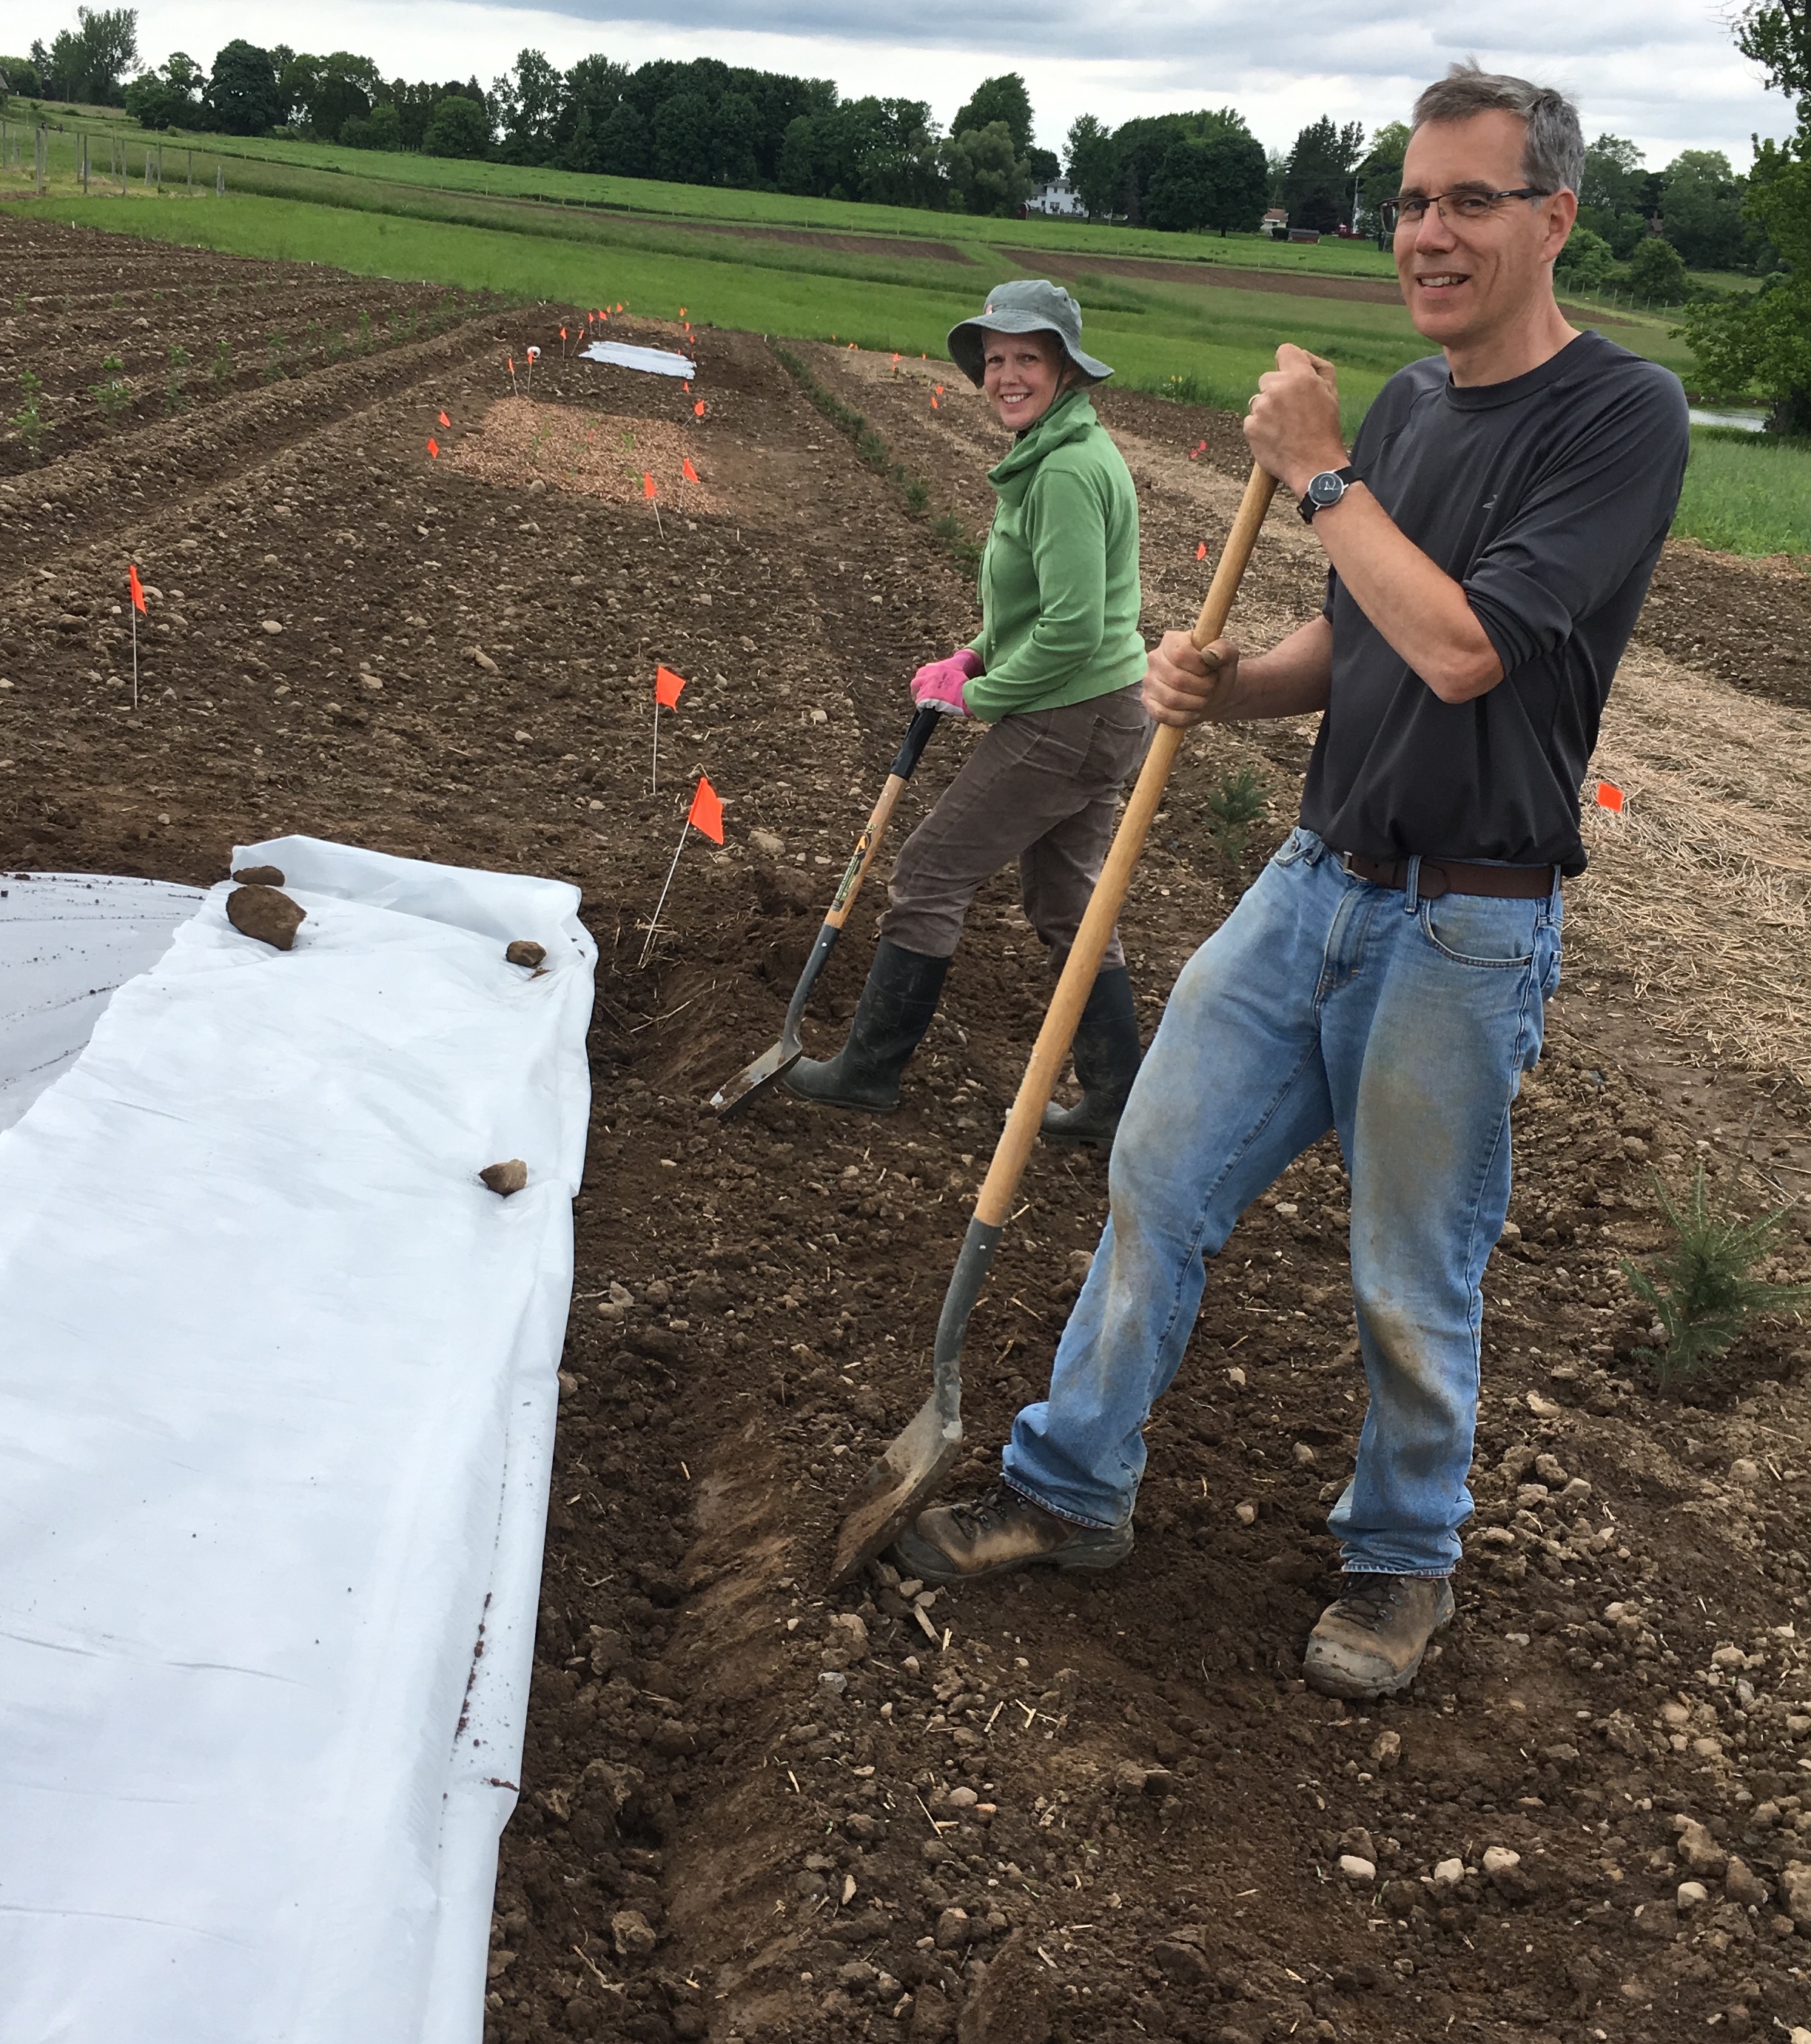
Finally, we laid clear high tunnel plastic over the plots receiving Treatment F. Ongoing research from the University of Maine suggests that soil solarization can be an effective form of weed control, even in the northeast. So we’re giving it a try! To maximize the efficacy of this technique, we laid the plastic when the soil had been tilled relatively recently, and was still very moist. To keep the plastic firmly in place for the whole summer, we rolled the edges and buried them 4-5 inches deep, then stomped the soil down around all the edges. In the fall, we will hand broadcast a mixture of native wildflower and grass seeds over these plots (same mix as Treatment C).
Deb Marvin and Brian Eshenaur (left to right) dig a trench to bury the edge of this sheet of clear plastic. The goal is weed control by soil solarization.
We’ll give weed seeds in the Treatment G plots a few more weeks to germinate and grow (depending on the rain). Then we’ll kill them with an herbicide, and till these plots again to induce more weed seeds to germinate. Then we will repeat the herbicide application, till again, and so on. This should reduce the weed seed bank in the soil over the course of the summer. After a final tillage in the fall, we will broadcast seed from the same wildflower and grass mix we used for Treatment C. Fall is the recommended time for direct seeding beneficial insect habitat in the northeast. This treatment will also have the advantage of a full season of weed control prior to planting (also recommended). The downside is that it will take longer to establish the beneficial insect habitat.
As we get these plots established, we’re keeping track of the time spent on each treatment and the costs of materials. In the late summer or fall, Dr. Bryan Brown will assess weeds in each treatment, and I will photo document how well our beneficial insect habitat plants have established in each plot. All of these data will help you choose the method that fits your timeline, budget, and equipment/labor availability. Stay tuned for more updates…including an invitation to a field day (not this year), so that you can come see the results of this project for yourself!
This work is supported by:
Crop Protection and Pest Management -Extension Implementation Program Area grant no. 2017-70006-27142/project accession no. 1014000, from the USDA National Institute of Food and Agriculture.
New York State Department of Agriculture and Markets
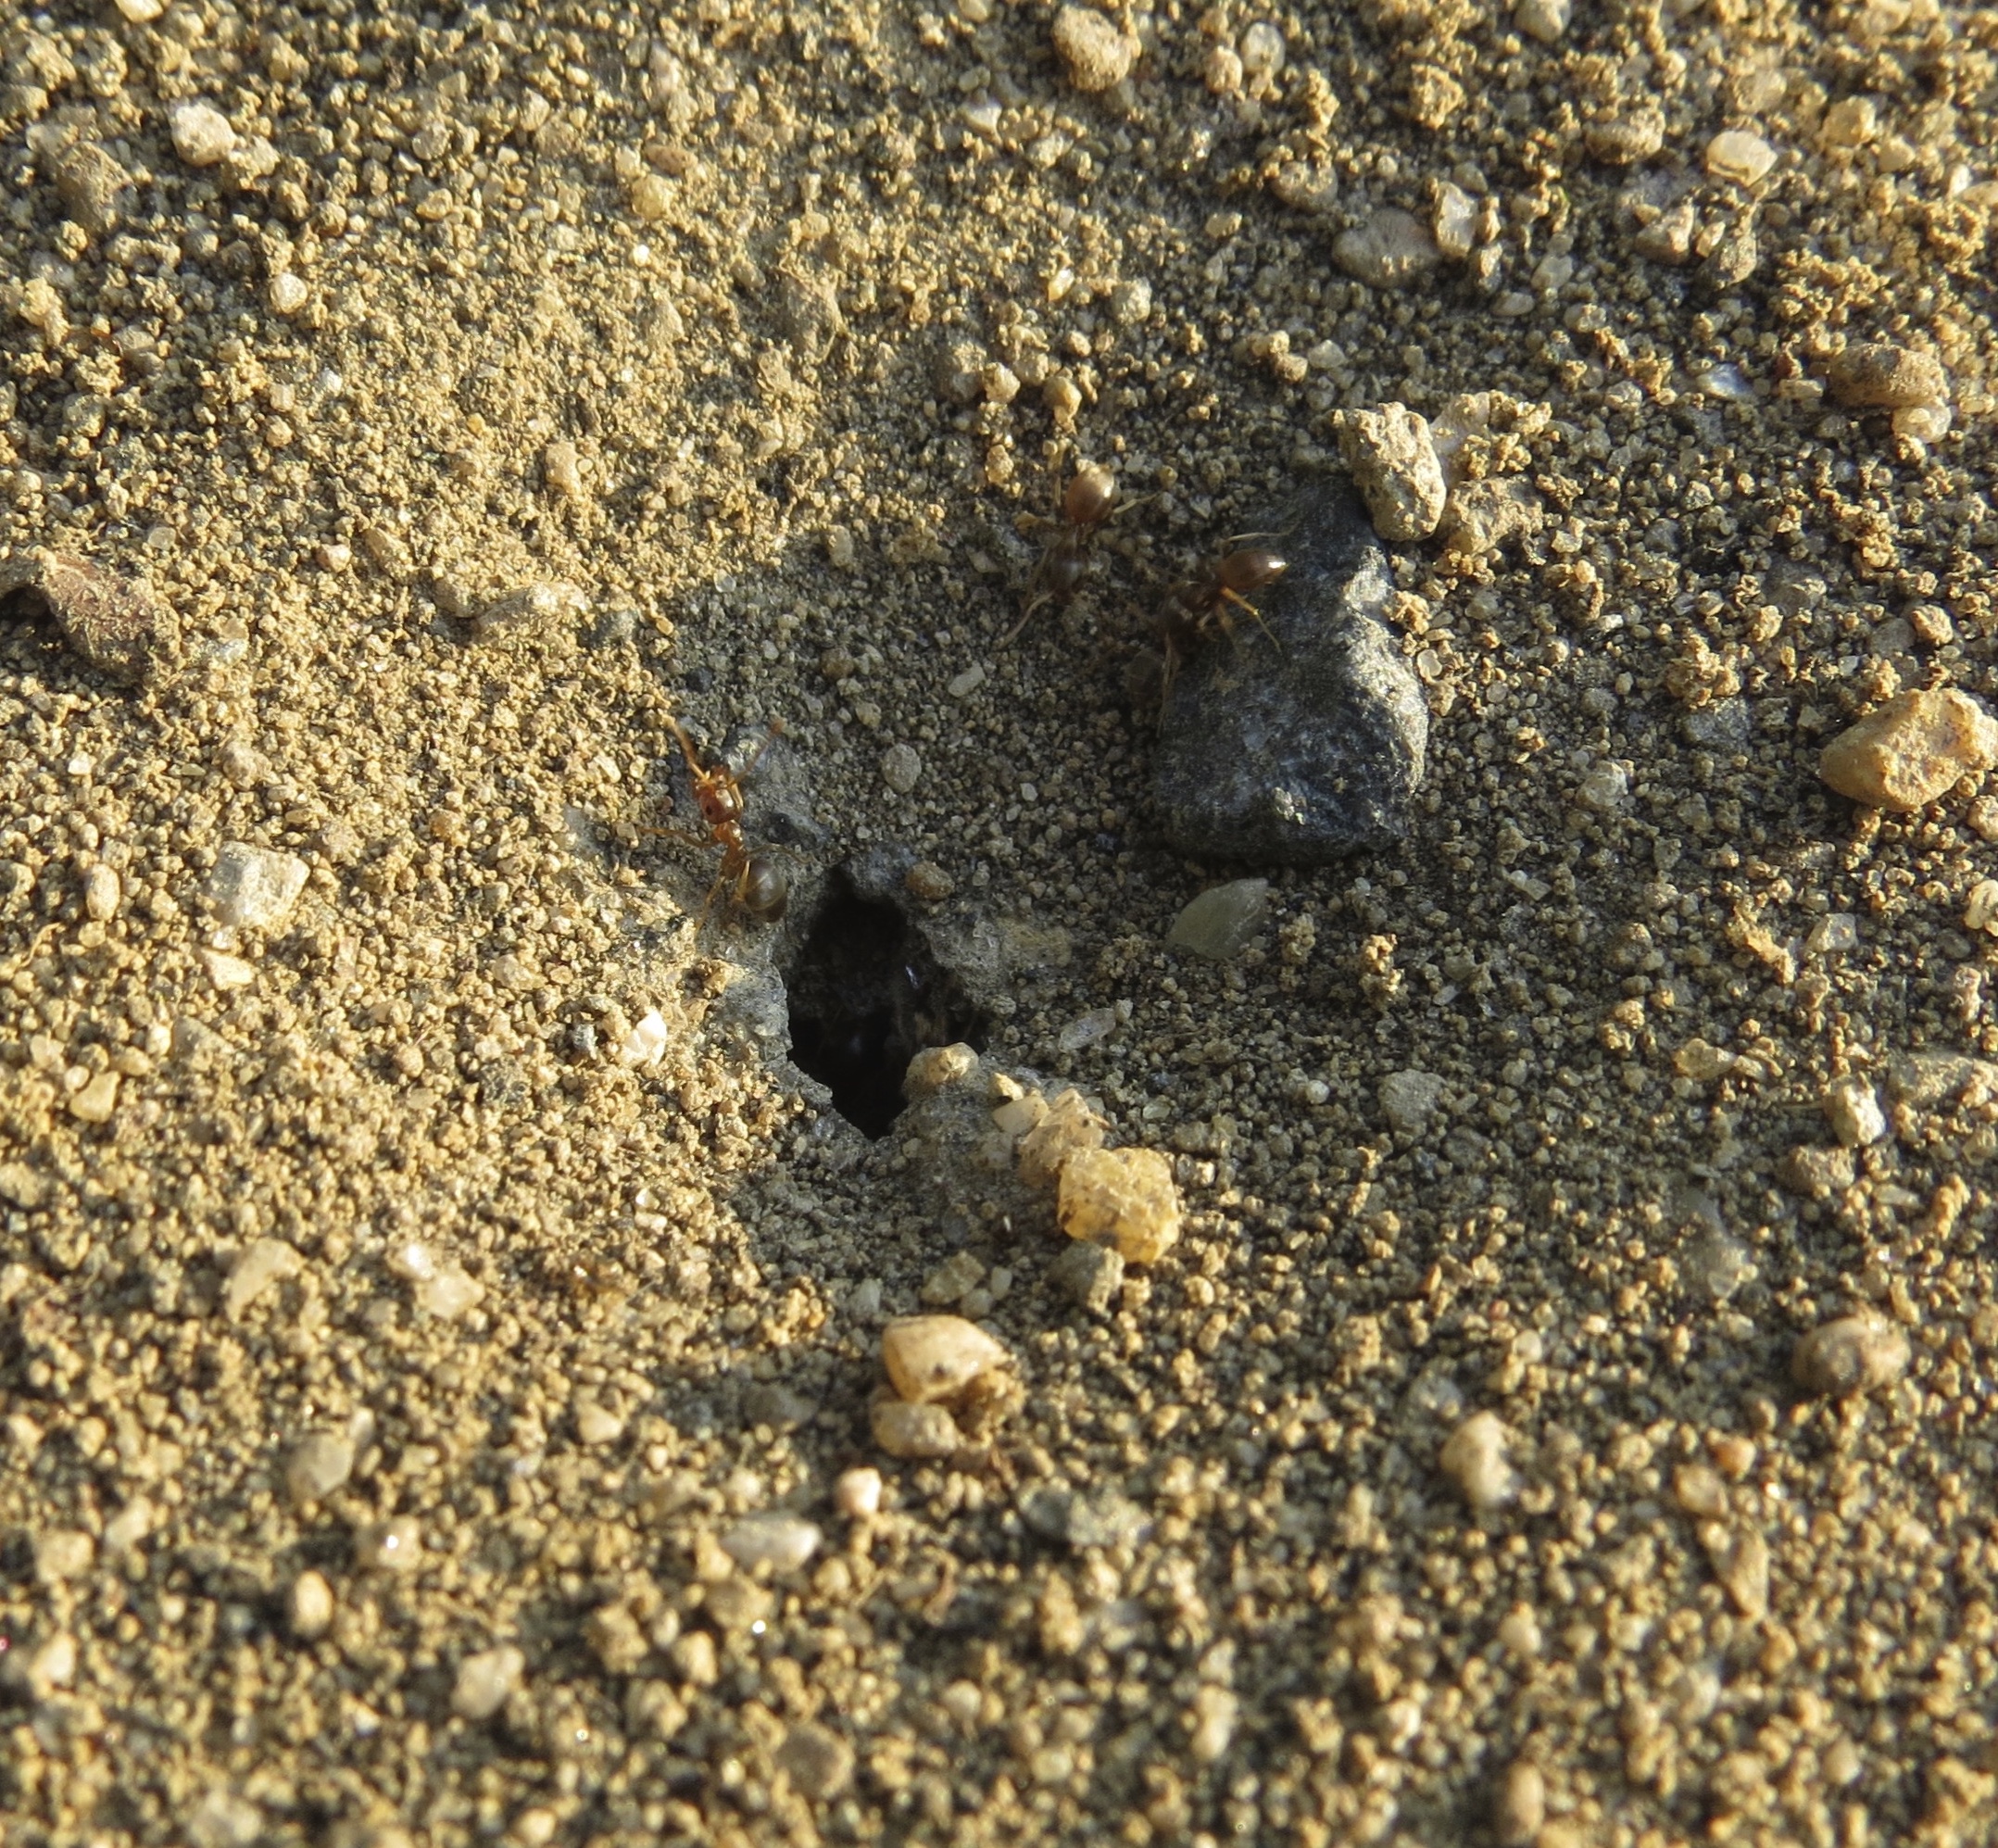
Ant hill built at the entrance to the nest. Cornfield ants (Lasius neoniger) prefer sunny areas with short and sparse grass. Photo courtesy of Matt Frye, NYS IPM.
Now that the weather is getting warmer and you’re spending more time outside, you might notice ant hills in your lawn. Reaching for a can of something that will kill them should not be your first move! These ants may be cornfield ants (known among scientists as Lasius neoniger). They are yellowish brown to dark brown, and about 1/8 of an inch long (or slightly longer). You are most likely to notice the ant hills they produce at the entrance to their underground nest in a sunny lawn where the grass is short and sparse (since this is their preferred nesting area). While the ant hills could be problematic on parts of a golf course where the grass must be kept very short, they aren’t big enough to be a problem in your backyard (if you’re mowing your grass to the correct height, which should be about 3.5 inches).
In addition to being harmless to humans – they don’t sting or bite – these ants are actually good for your lawn! They eat the eggs of grass pests, including Japanese beetles. One study found that when these ants were present in turf grass, they reduced the numbers of white grubs and other grass pest larvae. Choosing not to apply pesticides to kill these ants will help you practice conservation biocontrol in your own backyard! In other words, by protecting the natural enemies of lawn pests, you will have fewer lawn pests (and less damage) to worry about.
Ants entering and exiting their nest. Cornfield ants (Lasius neoniger) are about 1/8 inch long, and range from light to dark brown. Consult an expert for correct identification. Photo courtesy of Matt Frye, NYS IPM.
Although these cornfield ants should be a welcome addition to your lawn for the reasons I’ve just described, if the hills they create are bothering you, there are some simple IPM solutions. Water and fertilize your lawn appropriately and use one of the top two height settings on your mower when cutting your grass. These strategies will help you achieve a denser, taller lawn. This type of lawn is less desirable for building new ant nests, and will make remaining ant hills less noticeable. For more information on maintaining healthy lawns, see the Cornell Turfgrass program’s Lawn Care: The Easiest Steps to an Attractive Environmental Asset.
A few final (but important) notes. Cornfield ants in your yard are a good thing. Ants in your home are a different story entirely, and NYS IPM has information on how to avoid in-home ant problems. If you are uncertain about what type of ant you have, consult an expert for proper identification. Your local extension office is a great place to start. Or, you can submit a sample to the Cornell Insect Diagnostic Laboratory.
This coreopsis flower (Coreopsis lanceolata) is more than just pretty; it also provides pollen and nectar for natural enemies to eat (when they aren’t eating pests!).
At this time of year, glossy catalogs start arriving in my mailbox full of pictures of all the beautiful fruits, vegetables, and flowers that I could grow after the snow melts. What these pictures don’t usually show are the arthropod (insect, mite, and related species) pests that can’t wait to eat what I plant. There are many IPM strategies you can use to fight back against these pests, and you can learn more here.
One of these strategies (and seldom is a single strategy sufficient) is to think about what else is growing near the vegetables, fruits, and flowers you want to protect. There aren’t just pest arthropods in your garden. These pests have natural enemies, too. If you provide good habitat for the natural enemies (including food and shelter), you will attract more natural enemies, and they are likely to consume more pests, protecting your plants. This is one way to practice conservation biocontrol – protecting and supporting the biocontrol organisms (natural enemies) that are already present.
So, what makes good habitat for natural enemies? In general, plants that bloom throughout the growing season (early spring to late fall) provide pollen and nectar to the natural enemies that use these as alternate food sources (in addition to pests). These plants also provide good shelter, both for natural enemies and the arthropods (including some pests) they feed on. As these natural enemies reproduce in the habitat you have created for them, they will also venture beyond this habitat and into your fruit, vegetable, and other flower plants, where they will eat more pests.
This butterfly is finding nectar at a purple coneflower (Echinacea purpurea). Pollen and nectar are also important food sources for some natural enemies.
What is good habitat for natural enemies is also (in general) good habitat for pollinators. You have probably already heard how important pollinator protection is. Those glossy catalogs (or wherever else you buy your seeds or plants) likely sell species and varieties labeled as being “good for pollinators”. Just make sure you include plenty of variety. Because most plants (especially perennials) bloom for a limited time, you will need multiple species to ensure season-long blooms. Also, the variation in height and structure of the plants will provide diverse habitat for all of the different natural enemies you want to attract.
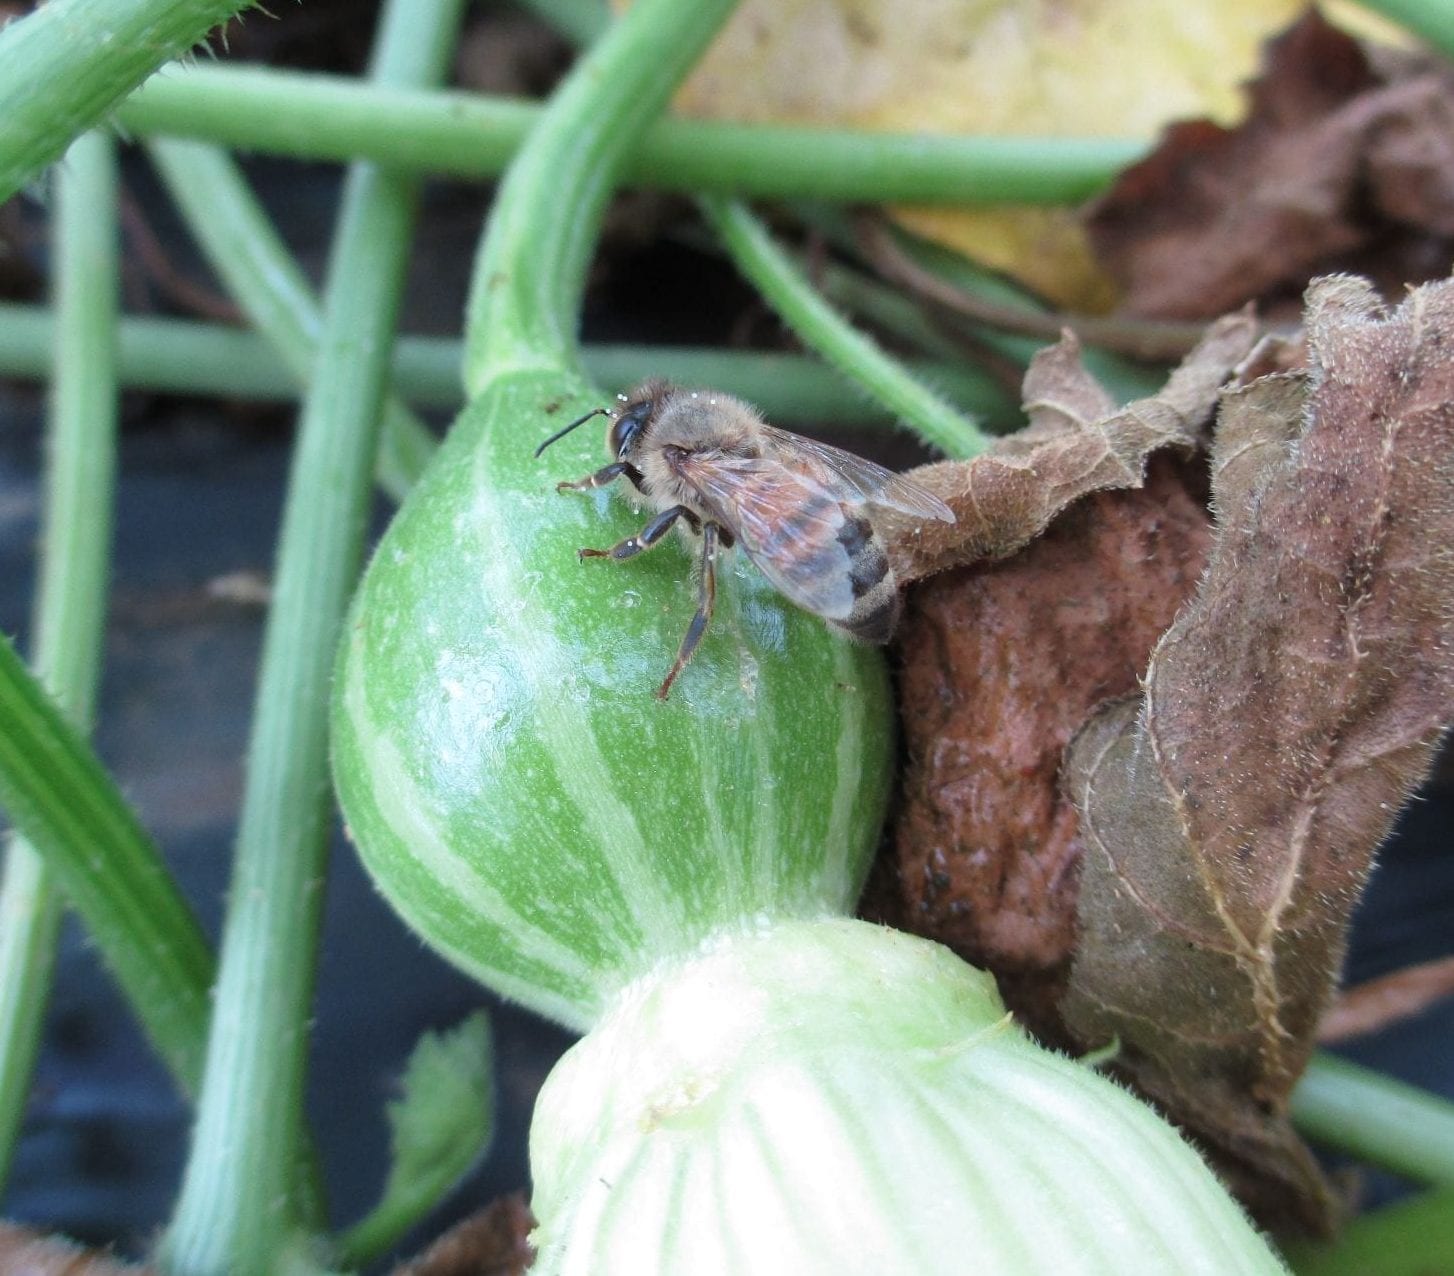
And what about protecting a larger area of plants (like a 5-acre field of pumpkins on a farm)? Will creating habitat for natural enemies help with pest control? The answer is complicated. It probably depends on a lot of things. How big the field is, how much habitat there is and where it’s located, which pests are a problem, and other pest management strategies (especially use of chemical pesticides) will have an impact. Research has shown that in some scenarios, yes, providing habitat for natural enemies can reduce some pest populations in some crops (one example).
Later this spring, I and two of my NYS IPM colleagues (Dr. Betsy Lamb and Brian Eshenaur) will set up a field experiment that will answer this question (over the next several years) in a Christmas tree planting. We will also compare different strategies for creating this habitat (seeds versus plants, and different weed control methods). Stay tuned for updates!


