Raised Beds are a wonderful way to garden, but there’s more to it than buying some wood to build a box and filling it with soil for your transplants and seeds; before you even begin the process of building a raised bed, here are some important considerations:
- Orienting your raised bed: You will need a location that gets at least 6 to 8 hours of full sun. Placing it under trees guarantees failure since nearly all vegetables require ample sunshine. Additionally, never place your raised bed on the north side of a house or other building. The best location for a raised bed is on the south side of a house with the raised bed oriented east to west on its long axis.
- Plan for watering: One of the beauties of raised beds is that they warm and dry out much quicker in the spring than an in-ground garden, enabling you to use the bed earlier. Unfortunately this also means that you will need to water the bed almost daily during hot summer days. Do you have a ready source of water close by? Having a convenient water source will make it much more likely that you will be able to water regularly and help your plants thrive.
- Sourcing soil: Using a good quality soil will greatly improve the chances of success, but purchasing “raised bed” soils in the quantities you will need can be expensive. If you choose to purchase topsoil from a local source, check its source and quality before ordering. Some topsoil providers mix the topsoil with sand to make it go further. Do not use ditch cleanings to fill your bed as they are likely to have high concentrations of road salt and other contaminants.
Here is a great solution that utilizes what you have: use the soil under and around the planned raised bed spot. First mark off the area where you will place the raised bed. If covered with grass, remove the sod from the bed area and the area 18” outside the bed by digging about two inches down, peeling the sod off, and placing it off to the side. By preparing the area around the future bed, you will have a greater area from which to source topsoil. This border will also give the raised bed a buffer from encroaching grass and weeds. Next, dig down about four inches where the raised bed will sit, place this topsoil into a separate pile. Place the raised bed frame in the hole just dug. Put all the sod grass side down in the hole. Cover the sod with the topsoil pile. If you need additional soil, fill the raised bed to no more than an inch or two inch from the top. Source additional soil from the sod-cleared area around the outside of the bed and use it to finish filling the bed. Place cardboard or plastic around the exposed dug areas on the outside of the bed, then fill that outside area with wood chips, crushed stone, or concrete pavers, etc. The end product will be a clean, dry, weed-free walkway and work area around your new raised bed.
- Adding compost: Your raised bed garden will need compost and organic matter to provide nutrients, to hold water, and to shade the soil. Ideally you should provide two inches of compost per year. You can mix in peat moss to provide some of your organic matter in addition to your compost. When purchasing compost make sure the label doesn’t say sand was added. Compost should be light and fluffy, not heavy and dense with added sand.
- Mulching for weed control and moisture retention: Once your plants are up or transplanted into the bed, mulch around the plants with straw or additional compost. This will help suppress weeds, cool the soil, and retain moisture.
- Spacing between your beds and length of beds: Don’t over-do the length of each bed. Remember that you will need to walk around it to weed, water, plant and harvest. Space beds far enough apart so that you can easily move between them and get a wheel barrel between them to move in soil, compost, etc.
- Materials to use for the bed: If you choose to make a wooden raised bed, there are many types of wood to choose from including pine, cedar, hemlock, and larch. Cedar, hemlock or larch will last the longest and resist decay, but it may be difficult to find these types of boards. Cedar, in particular, can be expensive. Hemlock and larch are so dense and hard that each fastening screw may need to be pre-drilled before assembly. Purchasing rough-cut lumber from local sawmills is often an affordable option. There are other types of raised beds that can be purchased which are made of plastic, steel and even rubber. Some gardeners use concrete blocks to build their raised beds. Never use pressure treated lumber in building your vegetable garden raised bed.
Now, on to construction!
Building Your Raised Bed With Optional Hoop Cover
Plans are attached for building a raised bed that is 4’ wide by 8’ long. A materials list is provided with the work diagrams. If the 4’ wide bed is a little too wide for you to work comfortably in, you can reduce the width to 3’. Obviously adjustment in the length of the end boards (in this design) and the top sitting rails will then need to be made.
If you would like the option of planting your new raised bed up to six weeks earlier in the spring and/or would like to extend your growing season later into the fall (perhaps all the way up until snow covers the ground) then the optional hoop cover will meet your needs and extend your growing season by at least one growing zone. Once the hoops are installed, cover the hoops with clear plastic (if you prefer you can purchase greenhouse plastic) for the spring and fall. A row cover fabric can be used for the summer months to protect lettuce and spinach from the hot summer sun and to discourage leaf beetles and other insects. Broccoli grown in this way is protected from Swede midge, a major reason why gardeners fail to successfully grow this vegetable.
Directions For 4 ft x 8 ft Raised Bed With Hoop Cover:
Materials List:
- 3 Boards: 2 inch by 8 inch by 8 ft long (2”x8”x8’)
- 4 Boards: 2 inch by 4 inch by 8 ft long (2”x4”x8’)
- 1 pound 3 inch exterior decking screws
- 1 countersink drill bit (optional)
Directions:
- Measure and cut the three 2”x8”x 8’ boards to 96 inches in length. Note that lumber may be an inch or two longer than 8 feet and measurement and cutting maybe necessary.
- Pre-drill three holes on the long side corner edges of each 2”x8”x8’ board. A countersink drill bit is preferred but not absolutely necessary.
- Screw the four sides of the raised bed “box” together. The two side wall sections should be sandwiched inside the long walls.
- Cut two 2”x4”x8’ boards to 96 inches in length. These will be your long side top rails.
- Cut one 2”x4”x 8’ into two 45 inch boards. These will be your short side rails.
- Cut four 8 inch pieces from the last 2”x4”x8’ board. These will be your inside corner braces. Place one corner brace vertically in each corner and attach with screws from the outside of both the long side and short side of the raised bed.
- Place the two 96 inch top rails on each long side, flush with the outside of the long sideboards and end boards. Screw straight down using four screws for each board. Note that there should be a 1.5 inch overhang on the inside walls. Now place the side top rails on the frame and screw them down.
- For added strength on the long walls, screw 8 inch pieces of 2”x4” lumber under the lip of the rail on each side of the bed. Screw this into the inside wall of the bed and screw down from the top into the support.

 Materials List:
- 4 boards – 2 inch by 4 inch by 8 feet long (2”x4”x8’)
- 3 inch exterior grade screws
- 6 PVC pipe ½ inch end caps
- 1.5 or 2.5 inch exterior deck or drywall screws
- 6, 8 or 10 foot length pieces of ½ inch PVC pipe
- 6 PVC “T” reducer connectors that reduce from ¾ inch to ½ as shown in diagram
- Roll of electrical tape
- 2 – 3 inch hinges
- Metal handle
- 3 pieces of ½ inch by 8 feet long wooden lath strips (or something similar)
- 10 foot by 12 foot sheet of clear plastic (greenhouse plastic preferred) or floating row cover (for summer use).
Directions:
- Assemble base of hoop cover by cutting two pieces of 2 inch by 4 inch by 8 foot lumber into 51 inch pieces. These are the end pieces of your base cover. Then measure and cut two pieces of 2 inch by 4 inch by 8 foot pieces of lumber to 89 inches in length. These are your side pieces of your base cover.
- Drill 2 pilot screw holes on each end of the long 89 inch side pieces as shown in the diagram. Screw holes will be drilled at an angle and will be installed at an angle as shown. Lay the cover frame pieces on a flat level surface and assemble (screw) pieces together. Note that using a countersink drill bit will ensure a nice clean look and will prevent the screws’ top edges from sticking out.
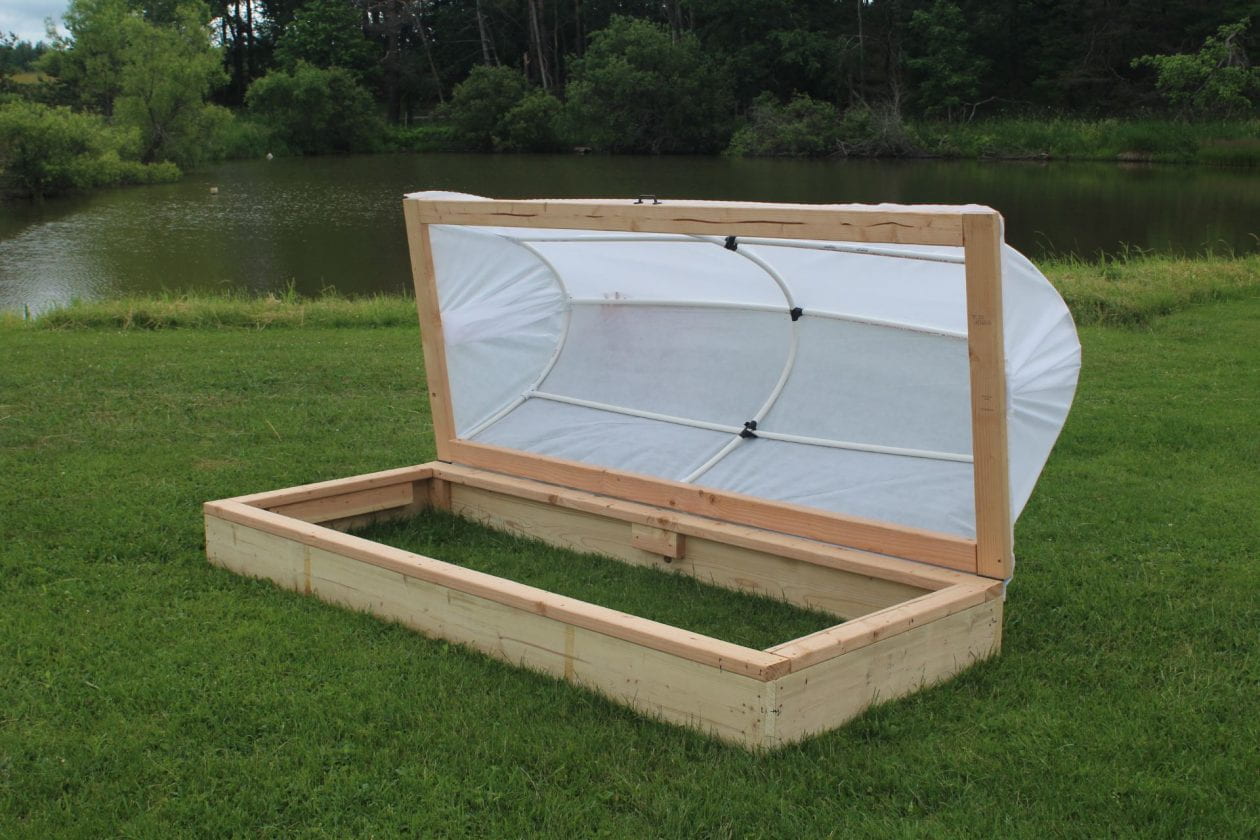
- Pre-drill the ½ inch PVC end caps with a regular ⅛ inch drill bit, then use a 1½ inch screw to screw down an endcap into each of the inside corners (4 total) and attach 2 more caps at the midpoint of the cover as shown. Your PVC Pipe arches will fit into these caps.
- Cut 3 pieces of ½ inch PVC pipe to 72 inch lengths. These form the arches of the cover. Note: On a 3 foot wide raised bed, arch pipe length would be 53 inches.
- Slide 3 of the ¾ inch to ½ inch reducer Ts onto each of the end pipe arches and install the pipe arches by pushing the pipe into the end caps. Note that the Ts will move freely at this time.
- Slide one reducer T to the other side of the cover frame. Take a middle T and bring to the top center of the arch. Point the ½ inch reducer part of the T toward the center of the cover and then permanently hold it in place by drilling a 1 ½ inch screw through the T and into the arch pipe from the outside (not top). Repeat this process with the remaining two Ts halfway down each side of the arch making sure to point the reduced end toward the center of the cover. Repeat this process at the other end of the cover. Note that the center arch piece does not receive any Ts, install this arch as shown.
- Taking the 3 remaining pieces of PVC pipe, push one pipe end into the reducer T on the top of the arch. Make sure the arch is vertical. Then cut the top pipe to the appropriate length as it spans the cover. Mark on the PVC pipe with a pencil where the pipe should be cut so that it will fit snugly into the opposite end T. Cut the pipe to the appropriate length. From the side of the T secure the top horizontal pipe supports into the T using 1½ inch screws. Repeat this process for the other two side horizontal supports. Using electrical tape secure the center of the 3 horizontal supports to the central arch by wrapping the each pipe together with tape.
- Place the framework of your raised cover on top of your raised bed. Install the two hinges on the end of each side board by screwing into the edge of the cover and also into the raised bed. It is important that the hinges be installed on the end of the side boards as shown in the diagram.
- Install your handle on the opposite side of the raised bed from the hinges, center the handle on the cover.
- For late winter/early spring, and then again in the fall, plastic can be used on the cover to extend your growing season.
- For summer use of the cover, remove the plastic and replace with floating row cover fabric. This fabric will help to cool the soil, hold moisture, and keep insects away from your plants.
- The floating row cover or plastic is held in place by the lathe strips screwed in place by 1½ inch screws. Pre-cut your lathe strips so that they will fit tightly to the pipe arch caps. Start on one side of the raised bed and screw plastic/fabric in place using a lathe strip. Then go to the opposite side, stretch tight, and repeat using a lathe strip cut to length. Cut off excess plastic hanging over the sides of the raised bed. On the ends of the cover, pull down on the plastic/fabric, twist the plastic/fabric and hold in place with pre-cut lathe strips. It is important that extra plastic or fabric be hanging far over the ends of the cover so that the edges of the plastic/fabric can be gathered, twisted, and tightly attached to the cover frame.
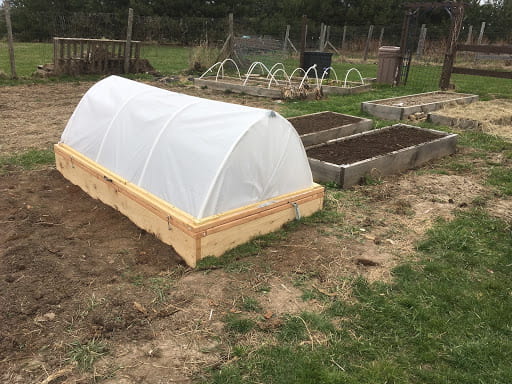
Raised beds are mini-greenhouses and if plastic is used they can quickly overheat and become very warm. Be prepared to hold the cover open with an upright 2”x4” or metal stake. In windy areas tie a piece of rope on eyelets on the raised bed (and cover) to the support to ensure the cover isn’t torn off in windy conditions.
Got a question about gardening? contact the St. Lawrence County Growline at SLCGrowline@gmail.com