Selfies and Snapshots: What’s in Your Closet?

Michele Hamill

Due to the rise of digital photography, photographs are being shared faster and in unprecedented volume than ever before. To learn more about your digital photographs, this Library of Congress resource is a good place to start.

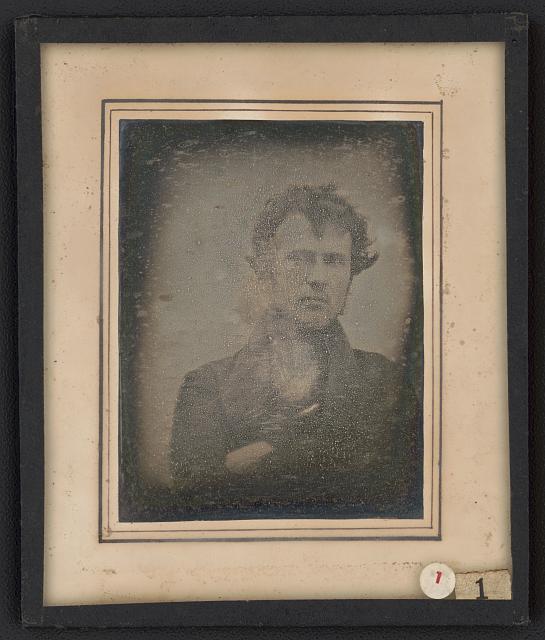
Some credit the first selfie to Robert Cornelius who took a daguerreotype self-portrait in October, 1839. This image, courtesy of The Library of Congress, is believed to be the earliest extant American portrait. Learn more about the fascinating effort currently underway to document Cornelius’ photographs here.

In addition to the plethora of digital photographs, family collections include prints, snap-shots, and studio portraits that form the pictorial history of generations of family members.  Let’s take a look today at some of the types of photographs in family collections.  (And, by the way, an interior closet on the main floor of your home, is a great place to store your family photographs since it tends to maintain a stable temperature and humidity.)

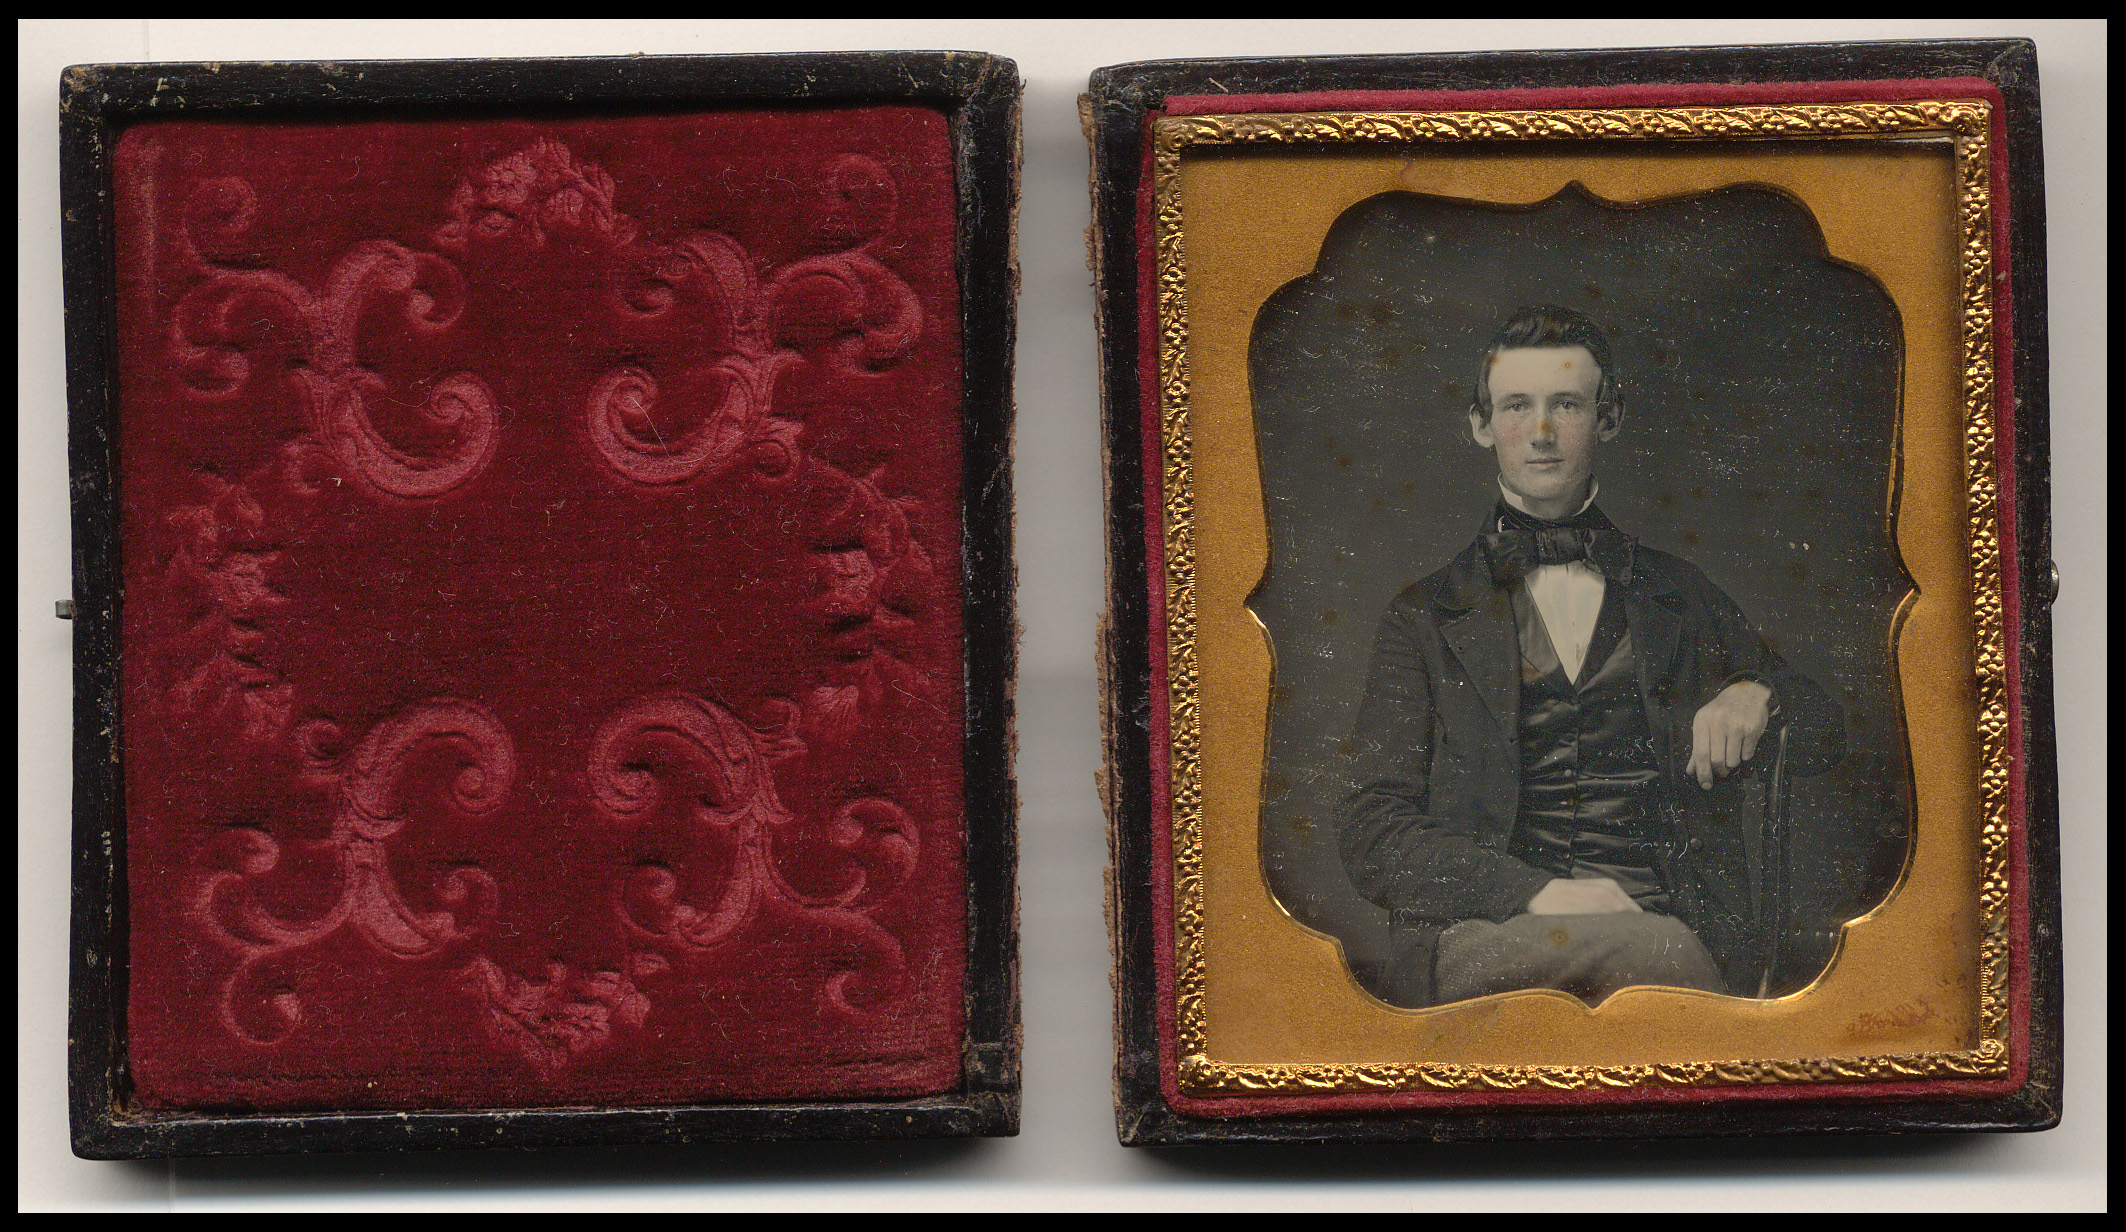
A daguerreotype (1839-1865), like the Cornelius self-portrait, is a treasure in a family collection. It is one of the earliest types of photographs and was most popular from the early 1840s to 1860. Daguerreotypes are comprised of a silver-coated copper plate housed in a sealed package behind glass. The sealed package sits in a protective hinged case made of wood covered by leather, cloth, or paper. Daguerreotypes have a highly polished, mirror-like surface and are often hand-colored with pigments.  They are complex, unique objects that deserve special care.

An Ambrotype, most popular in the late 1850s, is another type of cased photograph, but they differ from daguerreotypes because the emulsion containing the silver image is coated on a sheet of glass rather than metal.  Ambrotypes were a popular means of portraiture and were an economical alternative to daguerreotypes, but were largely replaced by tintypes, which were even cheaper, faster, and easier.

Tintypes were popular from the start of the Civil War until the 20th century. They were less expensive than cased photographs, and they were made on coated iron, not tin. They were placed in paper mats or albums, or left loose, as in this example. Tintypes are most commonly found in the carte-de-visite size (approx. 2 ½” × 4″ to 4 ¼”). Because they often have no protective covering, tintypes are frequently dented, scratched, or rusted.

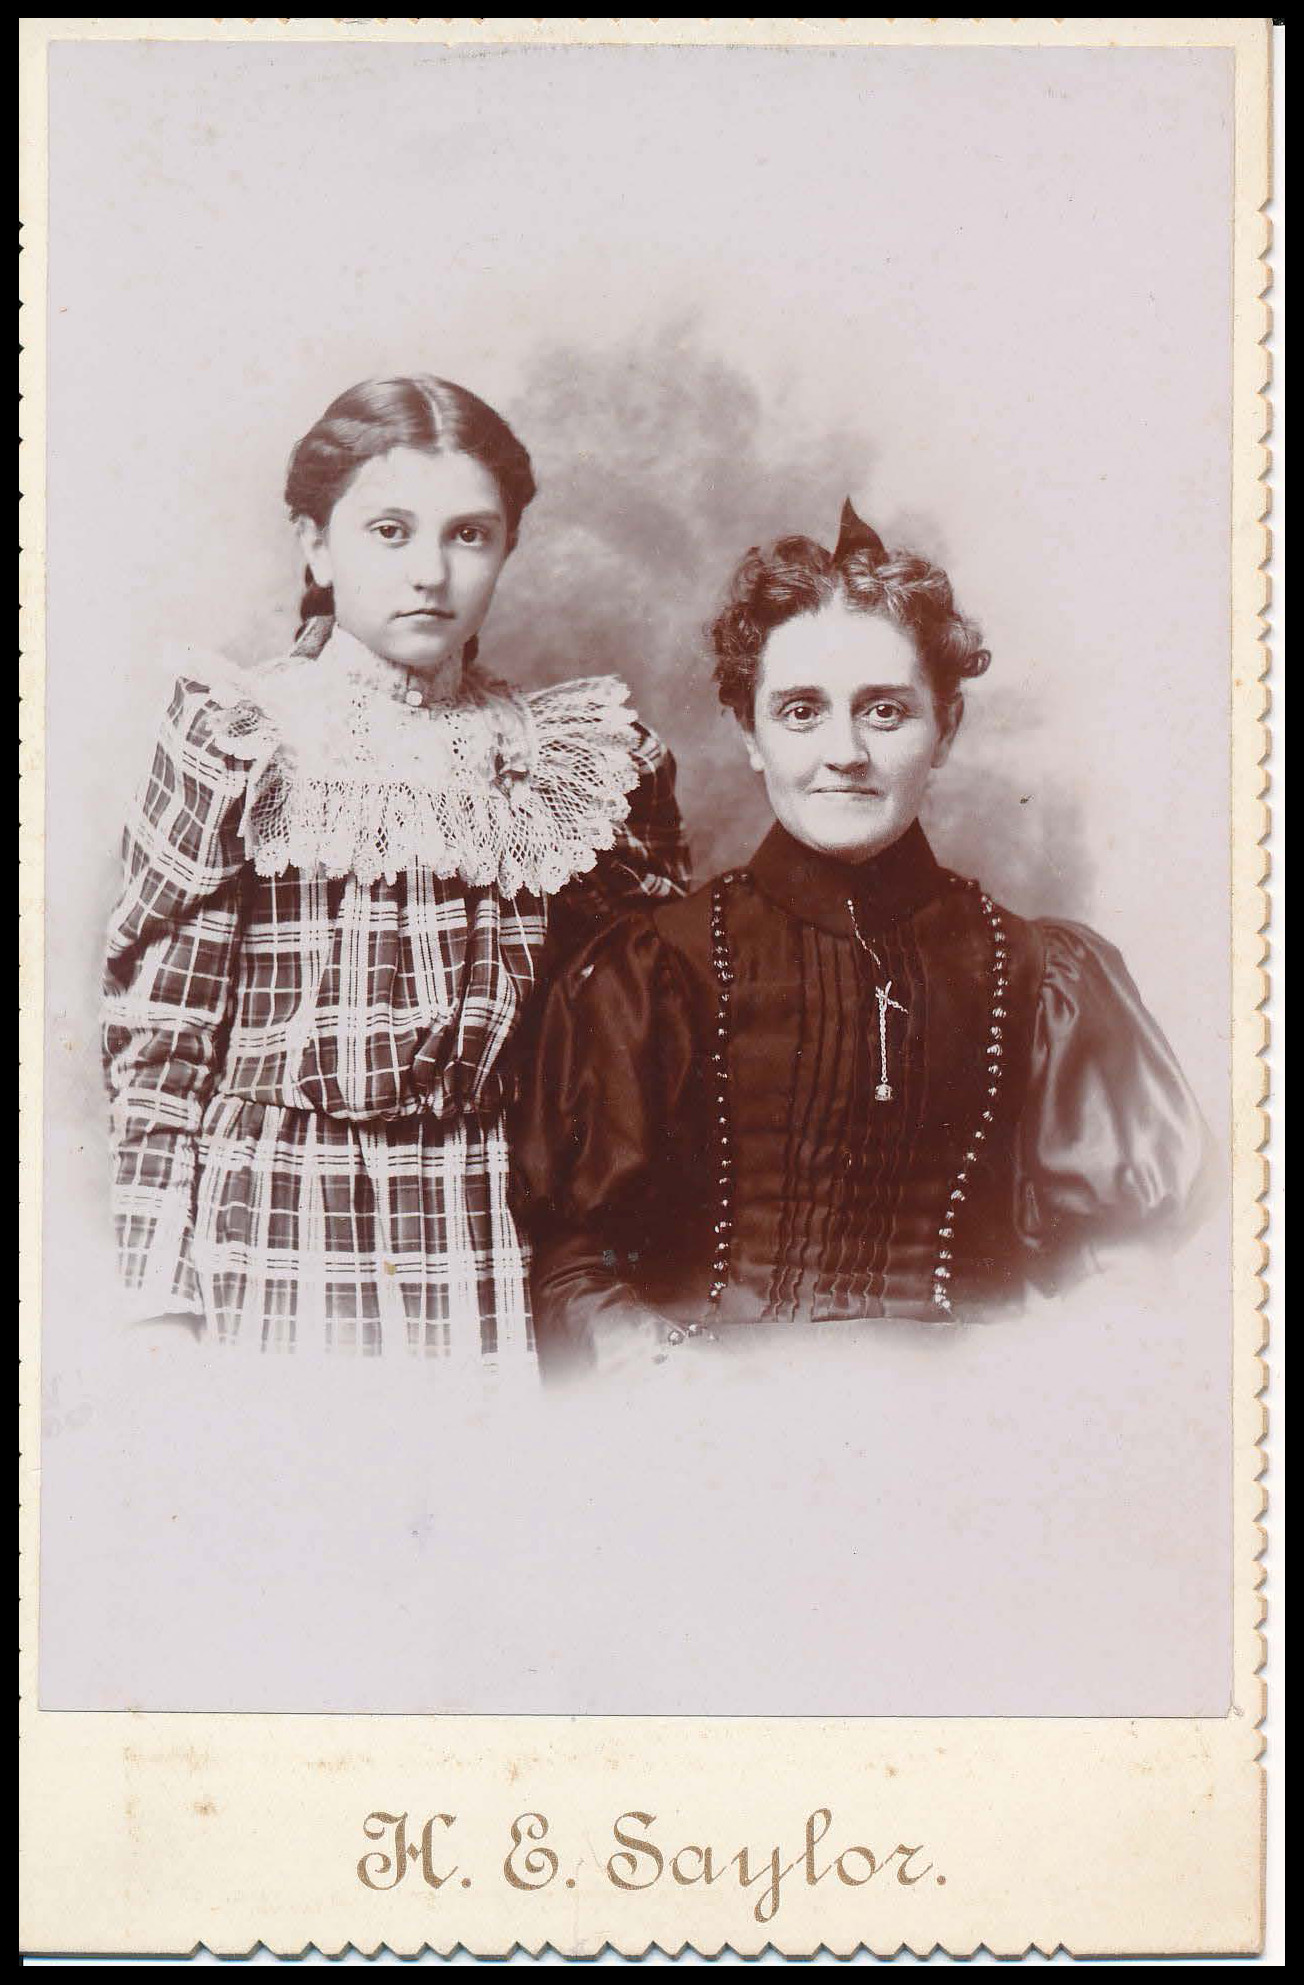
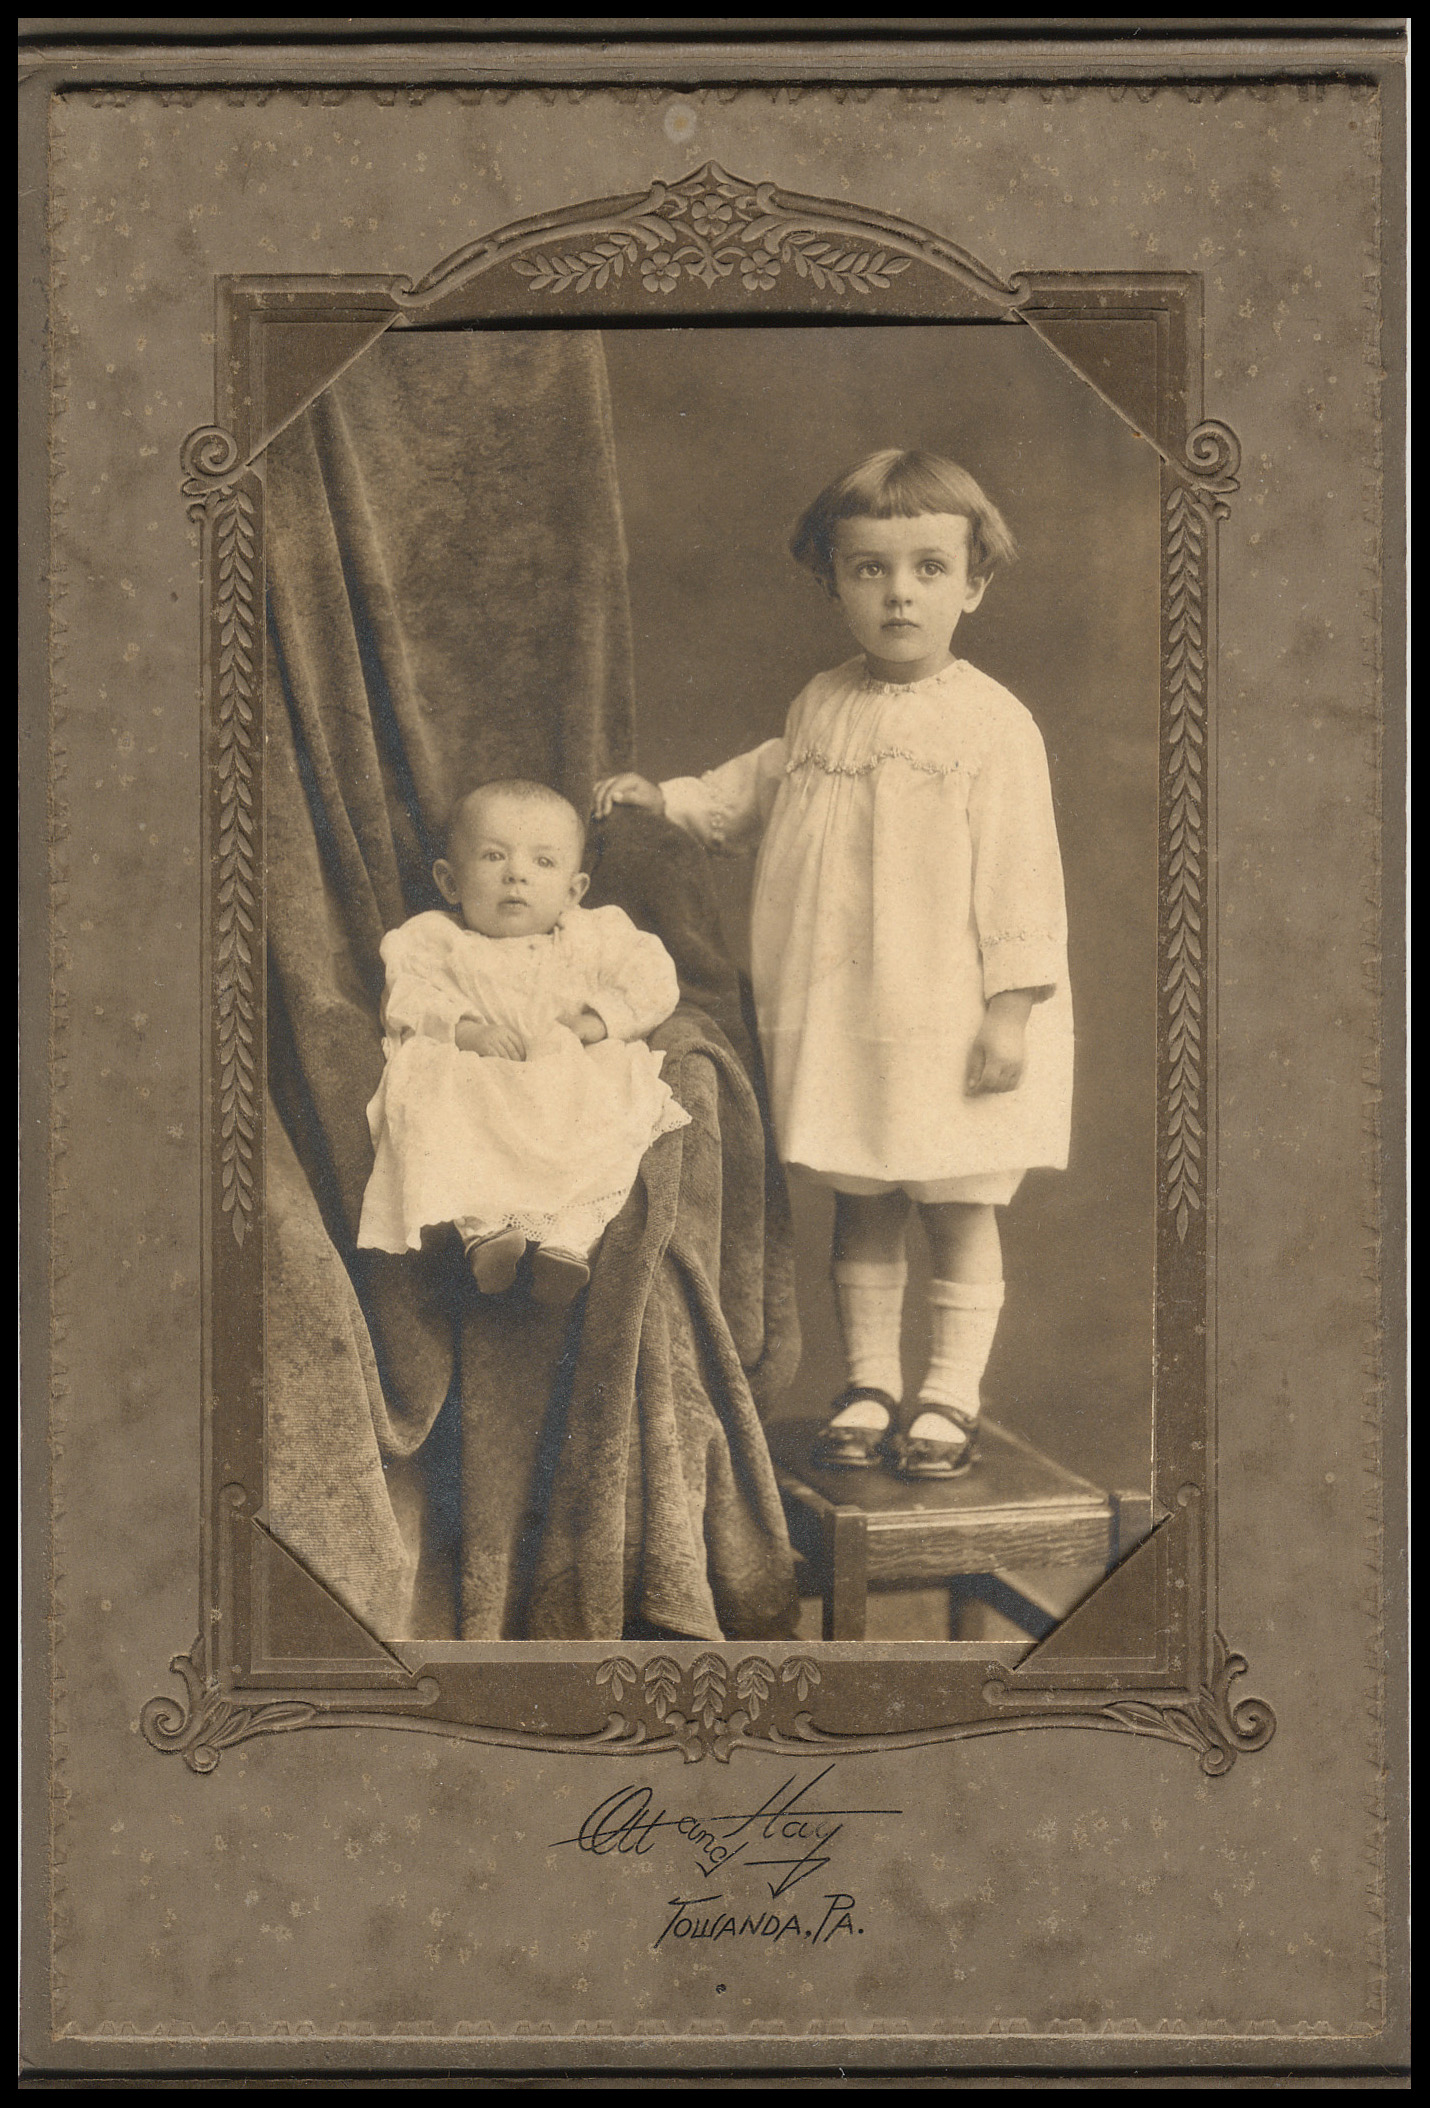
Albumen photographs were most popular from 1850-c. 1895. They have a silver image in an albumen emulsion coated on thin paper, like this cabinet card portrait. Albumen, the white part of an egg, was the most common emulsion for 19th-century prints. To make them studier, most albumen photographs were mounted to a secondary support or card. Cabinet refers to the format used to present the image, not the photographic process used to create the image.  Cabinet cards measure approximately 4 ½ by 6 ¼ inches and often have information about the photographer or studio which is useful for dating and identifying images. Albumen was gradually superseded by gelatin and collodion printing-out papers around 1885.

Another format of the albumen print is the carte-de-visite – which, at 4 ¼ by 2 ½ inches, is smaller than a cabinet card and about the size of calling cards or modern-day business cards. They were an enormously popular form of presentation for 19th-century portraits.

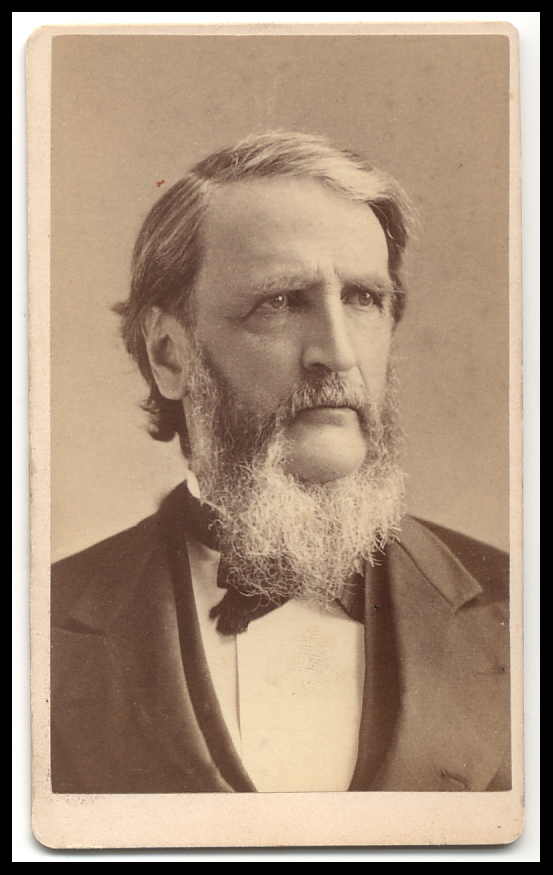
Printed-out photographs, such as this 19th-century cabinet portrait, have a warm brown-purple image rather than a neutral tone, because the silver image was formed from “printing-out” in daylight, not from chemical development. Printed-out photographs can look similar to albumen prints but have a major difference.  Printed-out photographs have a very white baryta layer between the paper support and the emulsion. Emulsions for printed out photographs can be either gelatin or collodion.  Many glossy collodion prints exhibit a subtle iridescent effect on their surface.

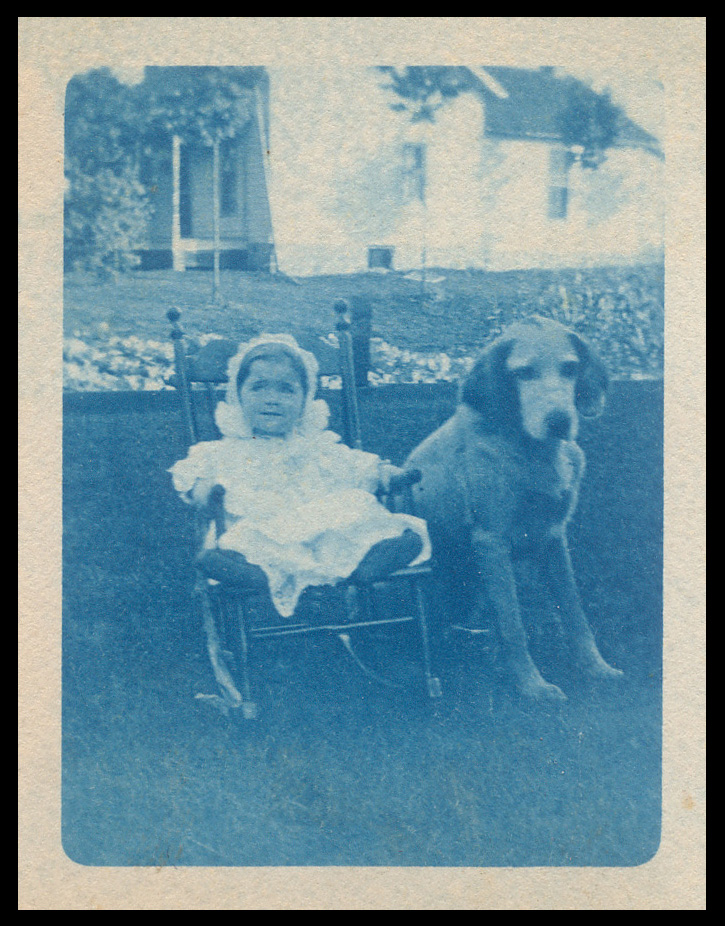
Cyanotypes, most popular from 1880 to the 1920s, are readily identified by their distinctive blue color, which results from using iron rather than silver as the image material. Family collections often contain cyanotypes, because their low cost and easy processing appealed to amateur photographers.

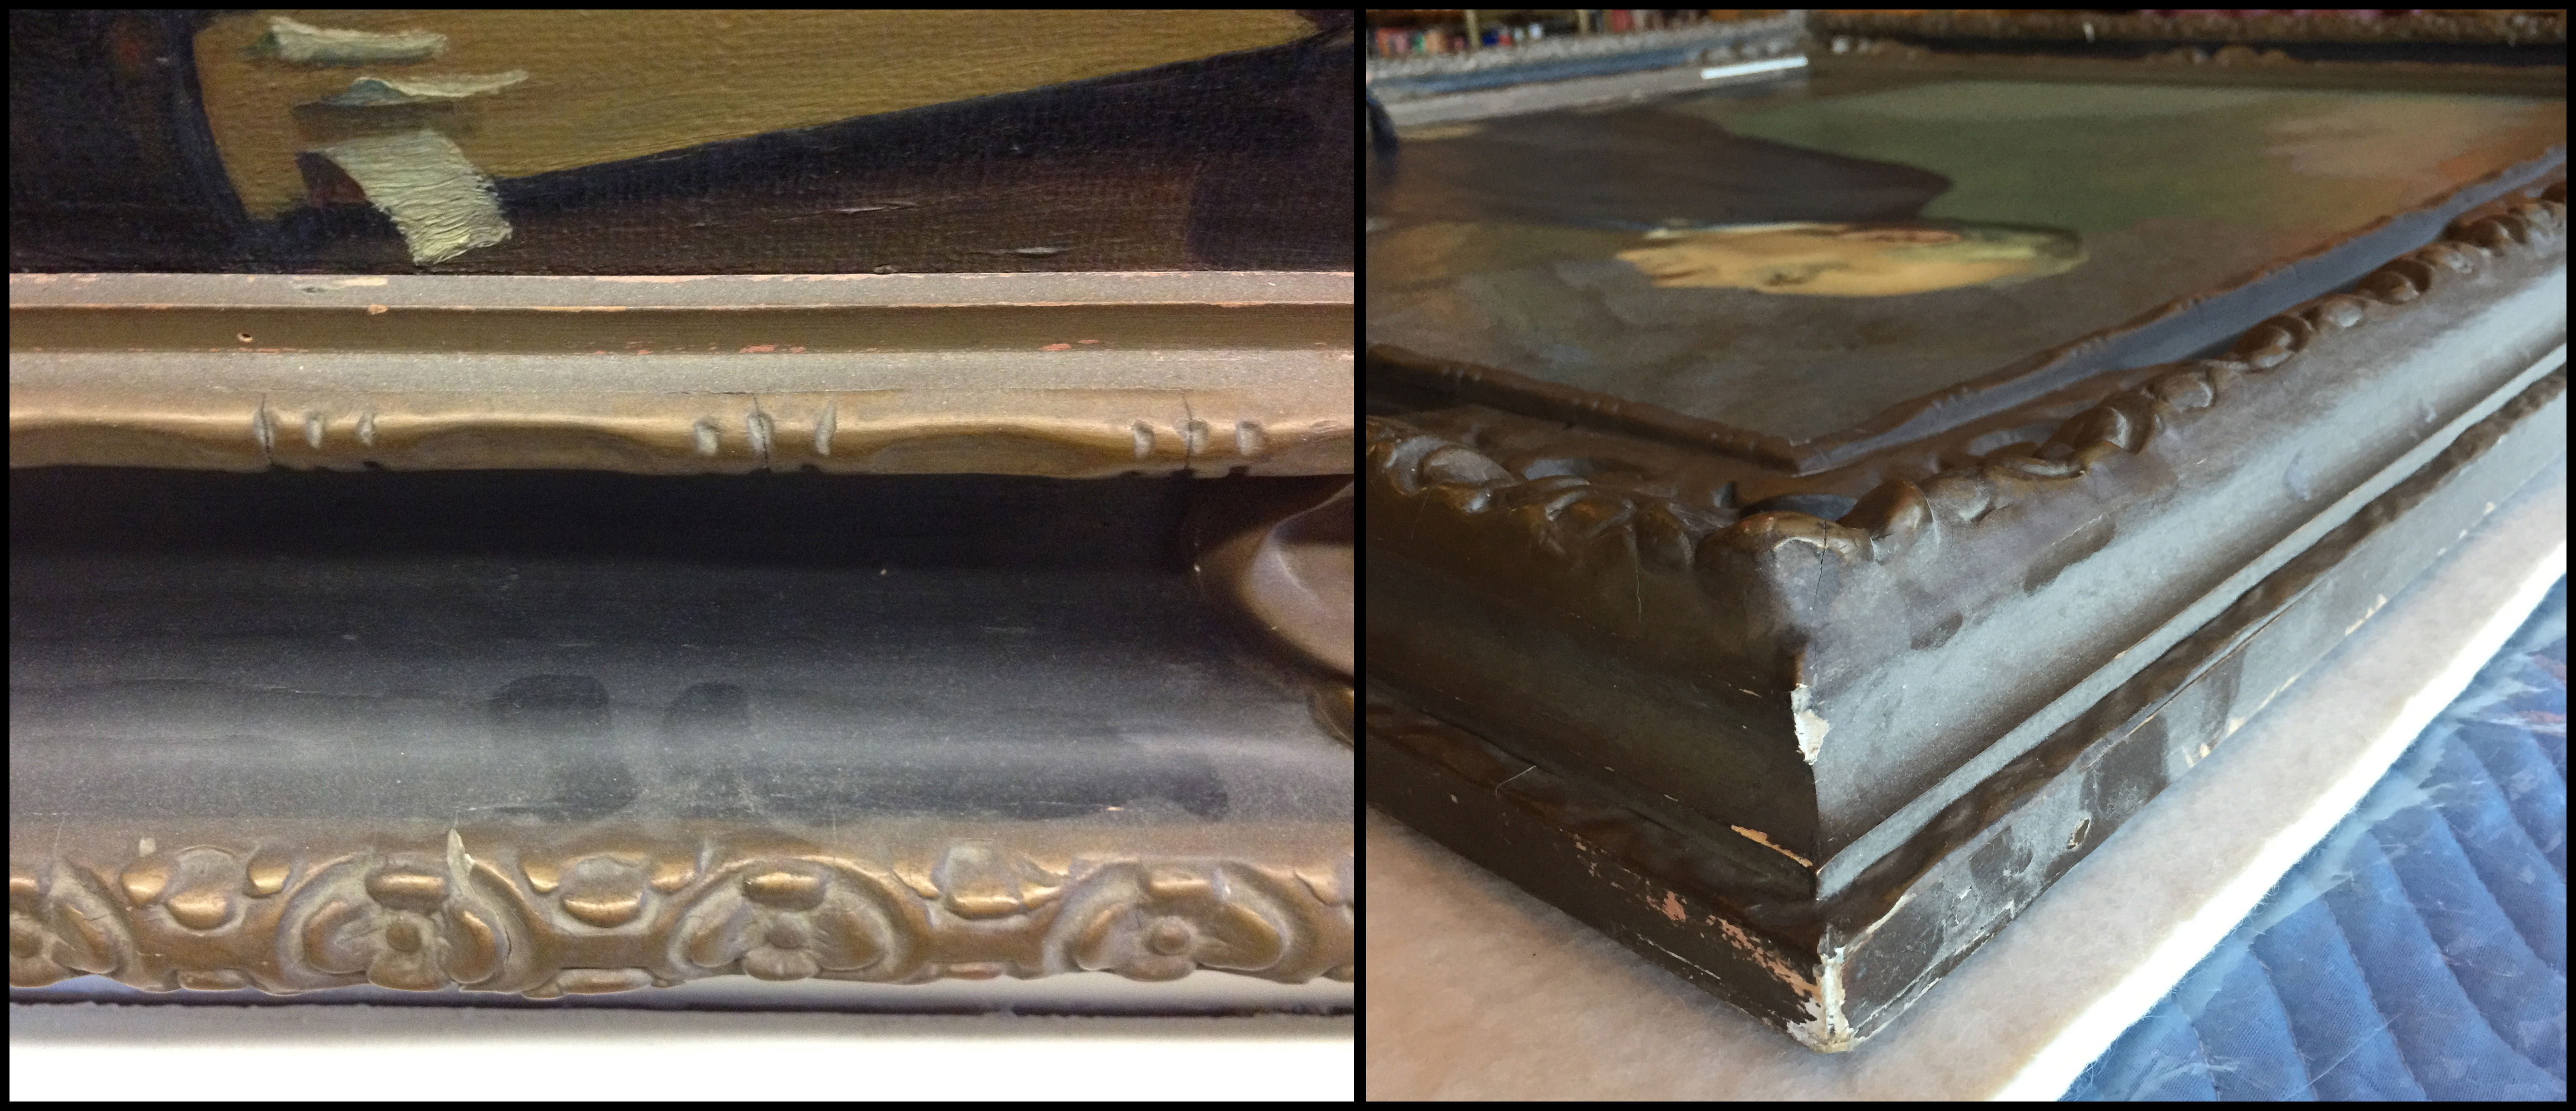
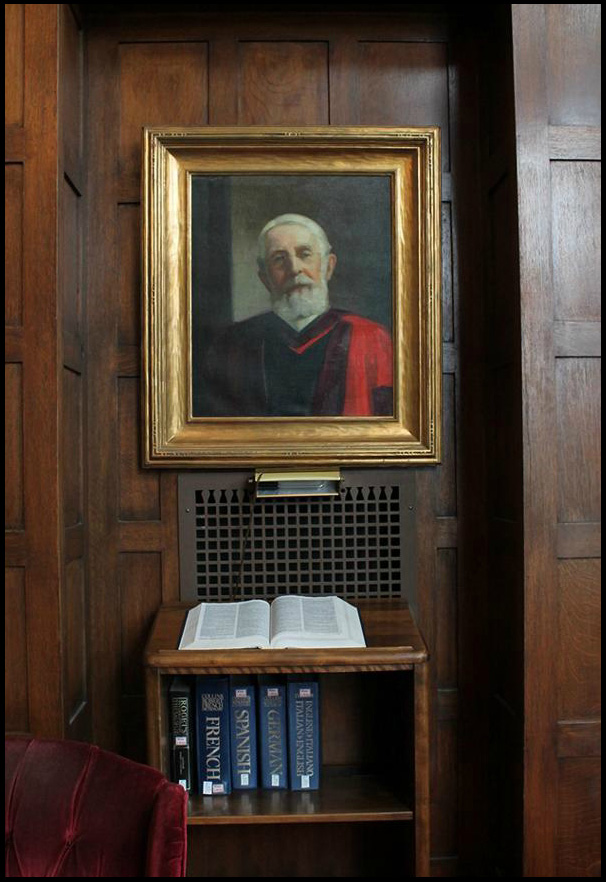
Crayon portraits, popular from the 1880s to the 1920s, were enlargements that could be life-size. They were made using a weak photographic base extensively hand-colored with pastels and charcoals, among other artist materials. Crayon enlargements were sometimes mounted to cloth and often placed in decorative frames. This 19th-century crayon enlargement shows the line of discoloration in the upper right corner where the cracked glass of an old frame let in atmospheric pollutants. It also shows overall darkening from damaging light exposure. The edges were protected from light exposure by the frame. Crayon enlargements can be brittle and are best stored in shallow boxes.

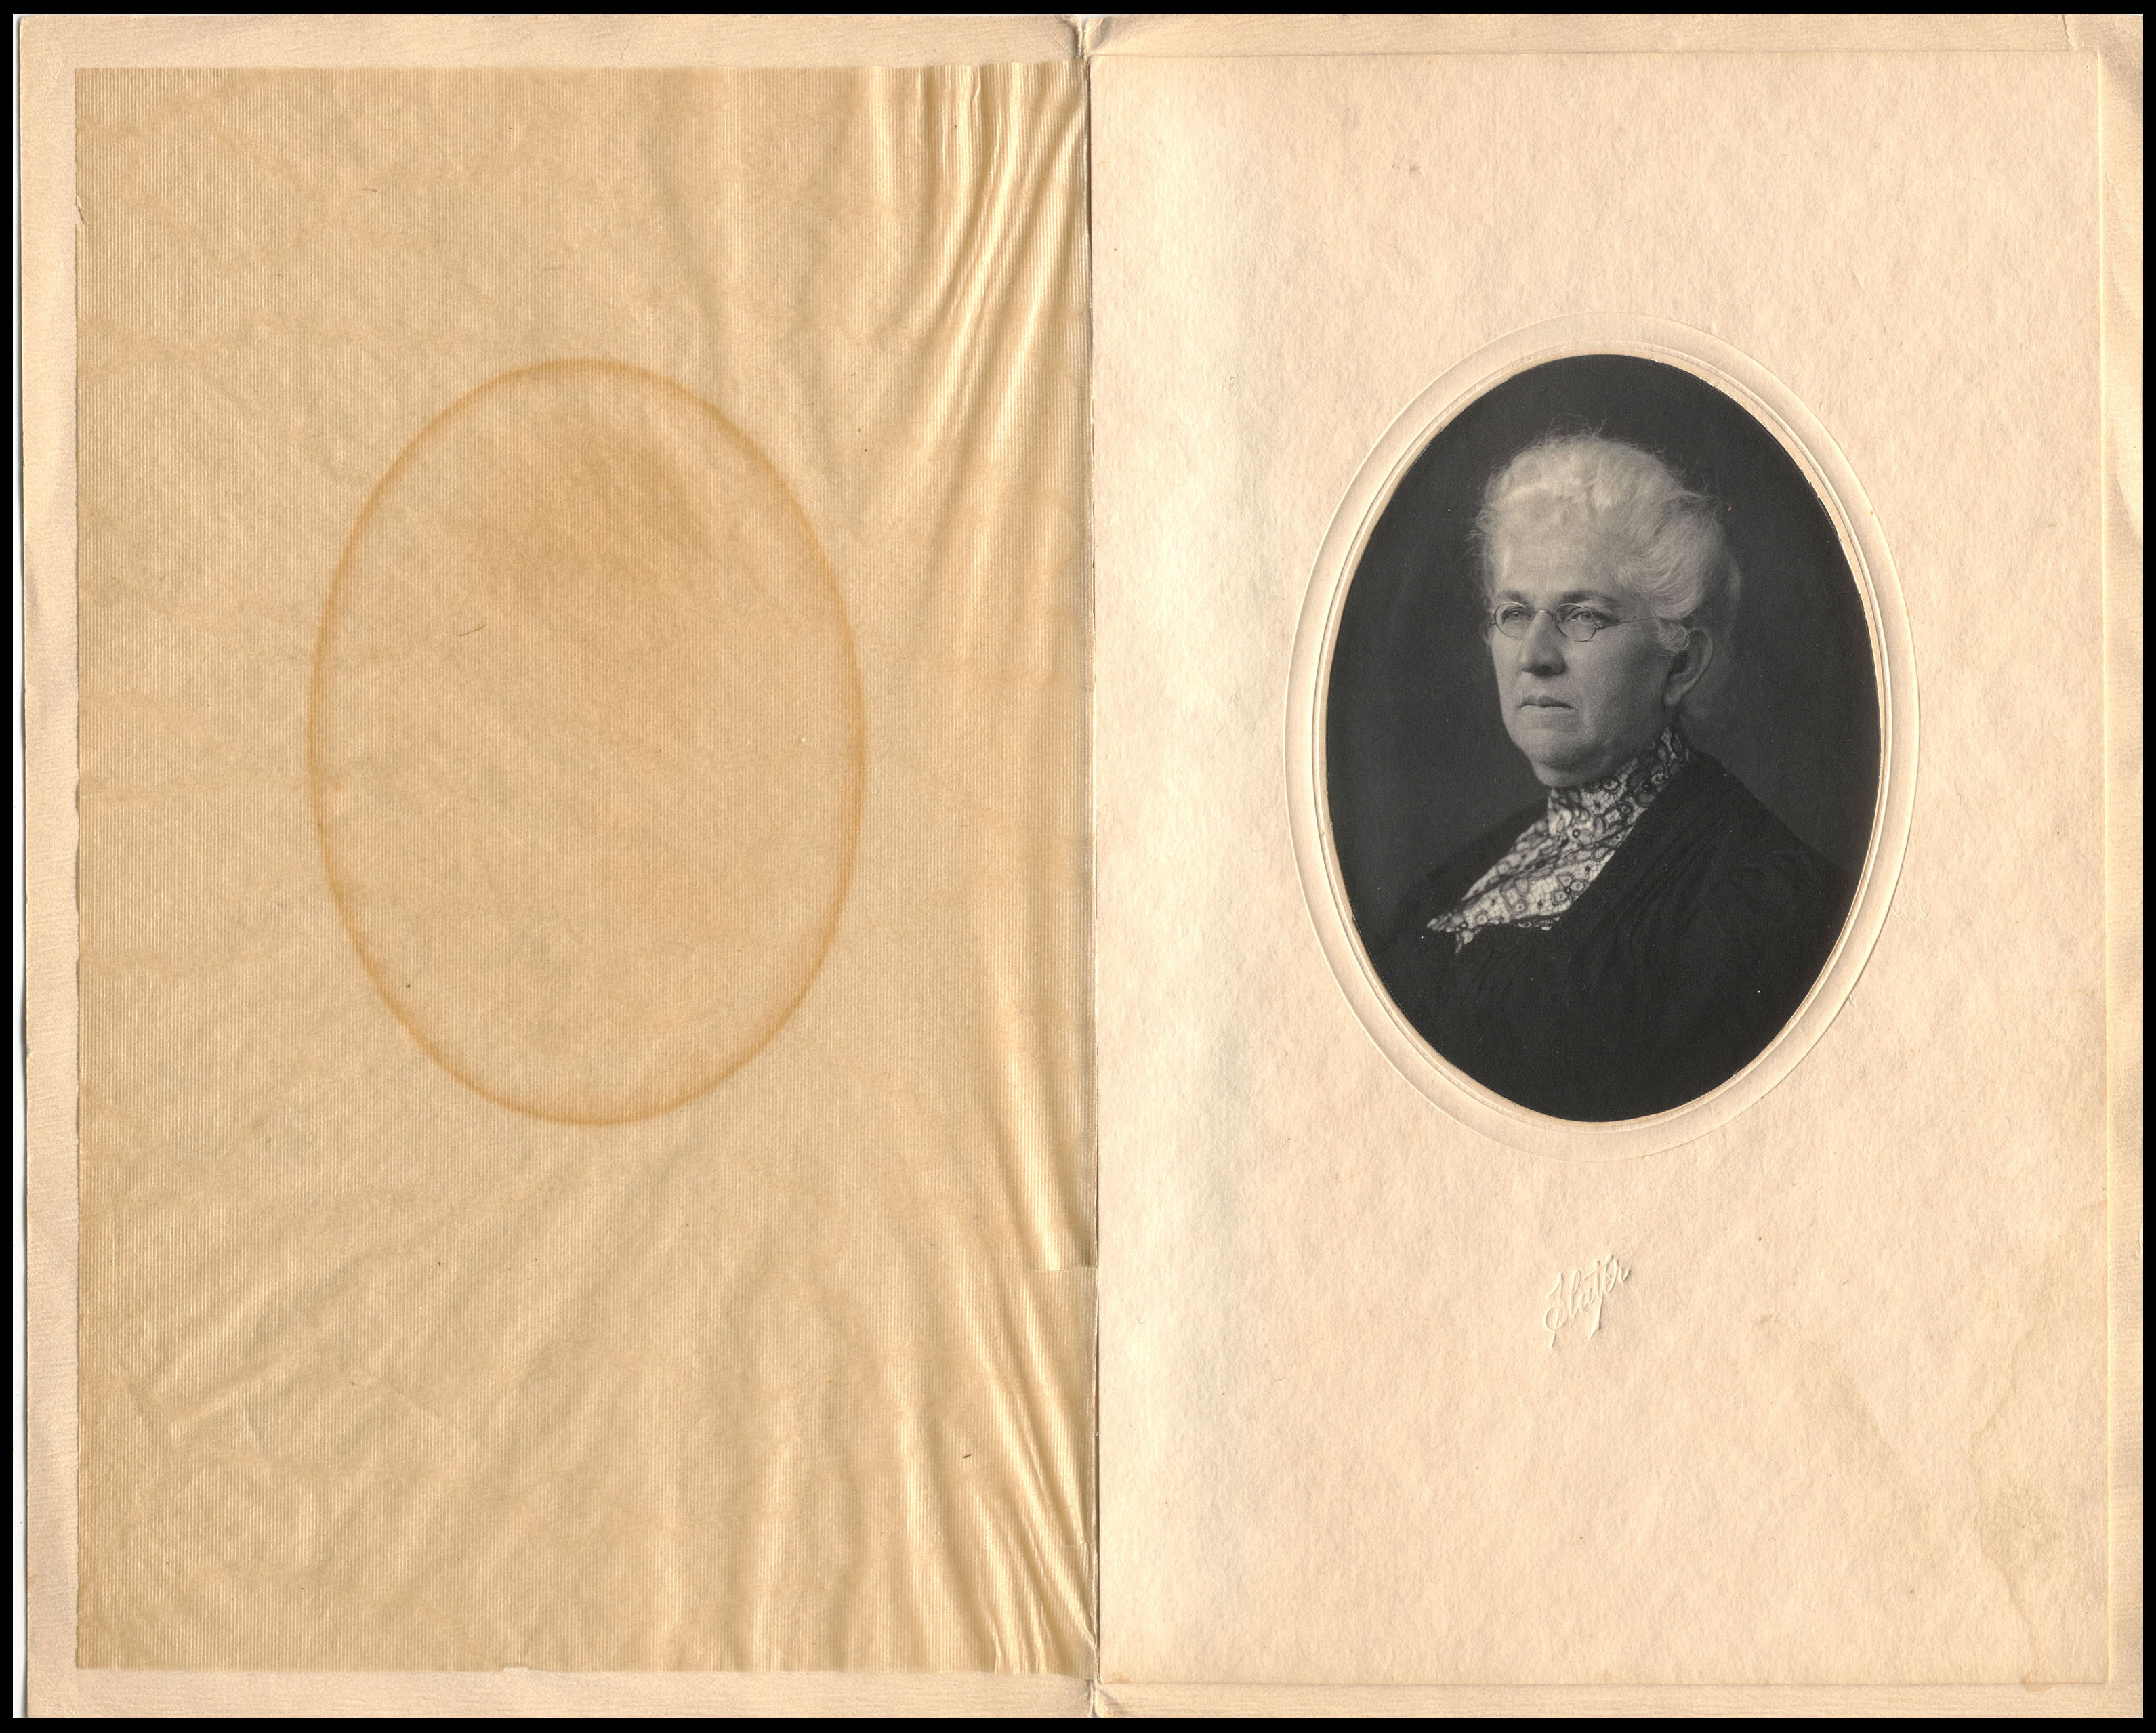
Platinum prints (1880-1930), in which platinum and not silver is the image material, have rich details, a velvety black color, and good image stability with no fading. Platinum prints were often used for studio portraits presented in a folder format. The characteristic image transfer of a ghost-print to the paper folder helps identify this print as platinum.

This 20th-century, silver gelatin, black-and-white snapshot shows one of photography’s popular themes: children.  People, pets, weddings, and vacations are common subjects. The image is made of silver suspended in a gelatin emulsion, the most common emulsion used for photographic prints in the 20th century. Remnants of the black paper corners are not harmful and can remain.  This wedding portrait was well-processed and remains in superb condition.

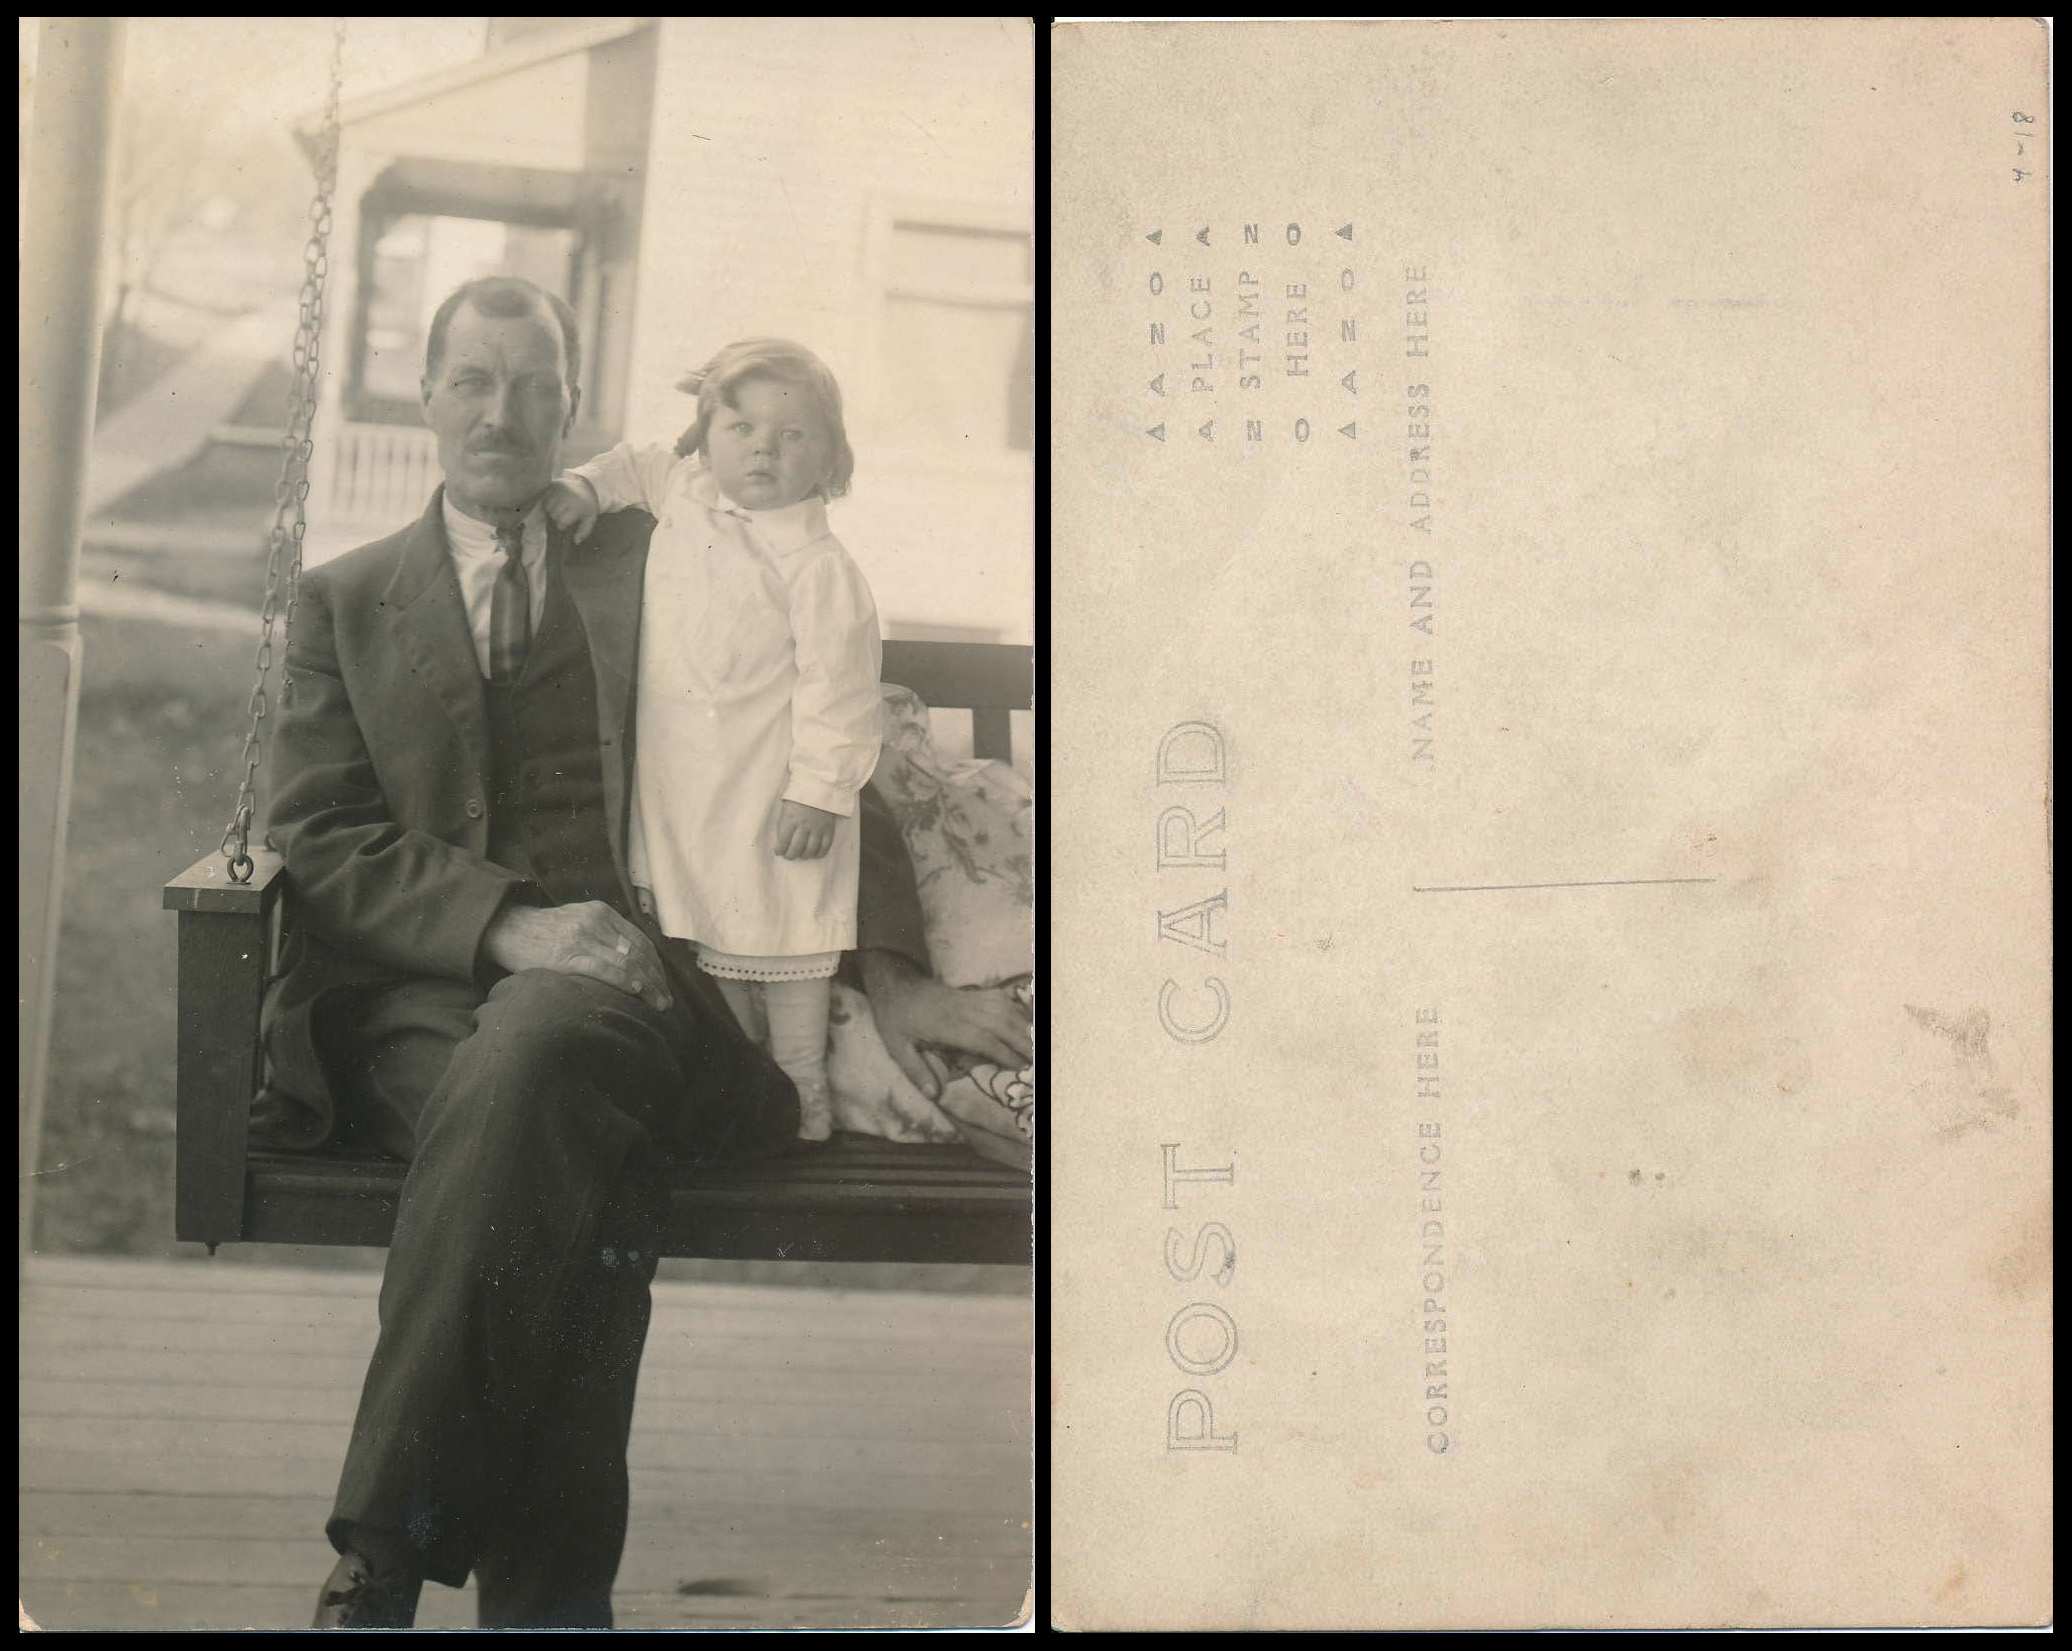
Most postcards were made using ink printing process, like lithography.  However some postcards are true photographs, or “real photo postcards”, with a postcard back, such as this silver gelatin postcard.  There are many resources to learn more about the history of postcards and for dating the stamp box found on real photo postcards.

Sepia-toned silver gelatin photographs, like this portrait in its complementary brown presentation folder, were created by toning 20th-century black-and-white photographs to a warm brown or “sepia” reminiscent of the 19th century. Sepia-toned photographs are very stable and show little image deterioration or fading. Because the brown folder is the original presentation for this photograph and is not causing damage, the folder and photograph can remain together.

Hand-colored silver gelatin photographs, like this example from the 1940s, were an early attempt to bring color to black-and-white photographs using artist’s materials. For this 1940’s print, dyes (which readily fade) were used to color the image.

Color photographs formed the largest segment of the snapshot market, beginning in the 1960s. Dyes used in color prints are prone to fading, exacerbated by light and heat. Early color photographs often show fading, or a shift in color, where one color predominates. Improvements in the 1990s resulted in longer-lasting color images.  These 3 color photographs show fading (left), color shift (middle), and modern color (right).

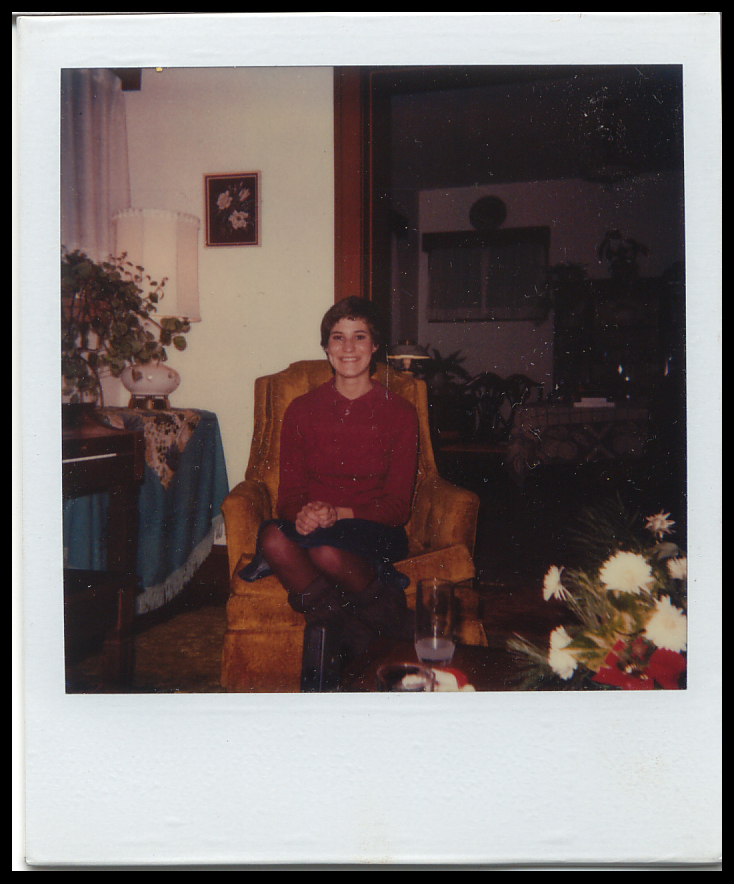
Polaroids, most popular in the 1970s and 1980s, often have a distinctive white border as in this example. They were a form of instant photography with do-it-yourself appeal because they did not require processing in a darkroom. Polaroids are one-of-a-kind images, because no negative is created in the process, so they may be unique images in a family collection. They can suffer from stability problems, including fading, cracking, and delamination.

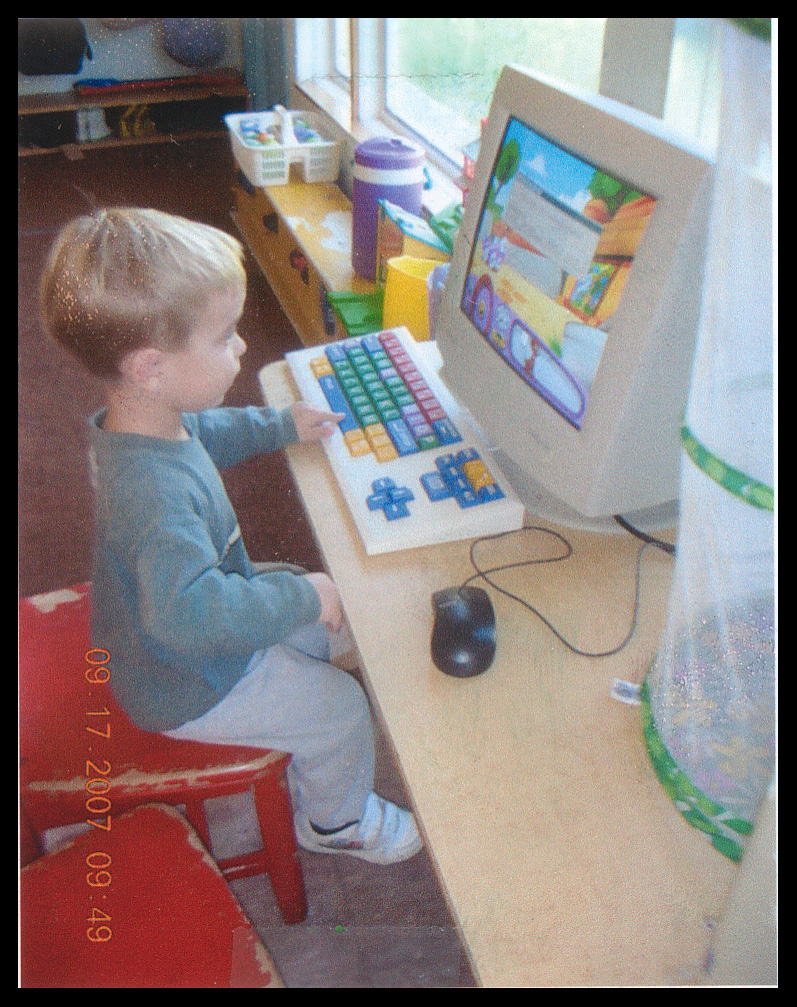
Digital prints can be made using a variety of processes, including ink-jet (the most common printer used at home), electrophotography (office color printers), digital photo processors (used in many photo labs to print snapshots), and dye sublimation (used to make prints at photo kiosks). The stability of the digital prints depends on the process used to make them, the combination of the inks or dyes and paper used, and how they are stored and handled.

Here are some great resources for more information about family photographs:

The Graphics Atlas is a sophisticated resource that presents a unique, object-based approach for the identification and characterization of prints and photographs.
http://www.graphicsatlas.org

The Preservation Self-Assessment Program (PSAP) from the University of Illinois Library has a great format ID guide:
https://psap.library.illinois.edu/format-id-guide

And from the Getty: The Atlas of Analytical Signatures of Photographic Processes
http://www.getty.edu/…/publicat…/pdf_publications/atlas.html


Let’s Roll

Michele Hamill

Some paper artifacts, like oversize maps, posters, and architectural drawings and plans, are larger than available flat storage so a practical solution is to roll them.  It’s tempting to roll oversize artifacts tightly and put them inside narrow cardboard tubes to save space. But, in the case of oversize paper artifacts, it’s better to be on the outside of the tube. Wait—how is it safer to store artifacts on the outside of a tube rather than placing them inside? The first problem starts because tightly rolled paper artifacts placed inside a tube spring open and expand to fit the interior diameter of the tube. (If you’ve ever tried to pull a poster out of a mailing tube, you know it’s hard to reach in the tube and remove it without tugging or having it telescope, with one end of the poster still stuck firmly in the tube).  To add to the first problem, when stored under fluctuating environmental conditions, multiple artifacts inside a tube can become impacted—pressed so firmly together and restricted by the tube–they won’t budge. Then add in age and brittleness and artifacts inside tubes become stuck.

The cardboard tubes holding these architectural drawings had to be cut away to free the drawings safely.

Rolled artifacts are safest stored horizontally. If stored vertically, the contents slip down and the edges become damaged by weight and compression.

Rolling on the outside of the tube provides firm support for the artifact, distributing its weight, and avoids the artifact from getting compacted and stuck in the tube. Rolled storage can be a good choice for large paper artifacts in good condition with enough flexibility to withstand rolling and unrolling.  The recommended method of rolling oversize artifacts is to roll onto a tube with a large diameter–the larger the diameter, the gentler it is on the artifact. Multiple artifacts of similar size, condition, and related content may be rolled together, especially if they aren’t used frequently. Acid-free, buffered tubes are the best but wider diameters and longer lengths increase in price.  A non-archival tube can be used if a barrier layer of polyester film covers the tube and is securely held in place (double-sided tape works—just be sure it is fully underneath the barrier layer).

This fragile barkcloth was rolled onto a wide diameter tube. The artifact, face up, was laid on polyester webbing (polyester film and archival paper are other good choices), with enough extra material at the start to roll onto the tube first. In this way, the support layer can also act as interleaving and provide support, protection, and cushioning. Rolling oversize artifacts can be a 2-person job.

Preservation supply companies offer archival tubes in different lengths and diameters. The tube should be longer than the artifact on both sides to protect the edges of the artifact from being crushed. Long tubes can be cut with a saw to desired lengths.

After rolling, the tube is covered with an outer layer of sturdy archival paper and/or polyester film for light and dust protection.  The newly rolled artifact should be stored horizontally in a single layer on a supportive surface (the top of map cases can work if not too high).  It may be desirable to lift the ends of the tube up, using foam supports or cradles, so a fragile artifact is not bearing any weight.

The outer protective layer can be secured with Velcro (the self-fastener type is handy), or wide cloth ties, and labeled with an image and description of the contents for easier identification and retrieval.

Flat storage is preferred, but sometimes the large size of collection materials necessitates rolled storage. In the recently renovated stacks space of the Rubenstein Library at Duke University, they have incorporated both solutions–oversize flat drawer storage as well as a custom cabinet to store rolled collection materials and tube boxes. Image courtesy of Duke University Libraries.

Tube boxes are another alternative and can be stacked in small groups for efficient storage. The contents can be rolled on tubes that fit inside the boxes. Tube boxes also provide good protection for collection materials, like rolls of modern posters, that are safe to store temporarily rolled without tube support.

Some institutions have created an efficient, supportive honeycomb system of rolled artifacts on tubes placed inside wider diameter tubes. Image courtesy of Syracuse University Photo and Imaging Center.

This video from the Smithsonian Libraries Archives shows a treated panorama photograph being carefully rolled onto an archival tube. Only panorama photographs in good condition, with intact emulsions, and good flexibility can be rolled.

Libraries and archives have an abundance of rolled collection materials.  After stabilization, they are stored flat when possible. If not, now you know how we roll.


The Bruce Ferrini Paleography Collection

J.M.Iacchei

In an earlier post, I shared some highlights from the Seminar in Papyrus Conservation at The University of Michigan I attended last summer. I mentioned that the greater majority of papyri at Cornell University were given to The University of Michigan in 1972, but that President Andrew Dickson White’s first papyrus purchase as well as fragments of papyrus contained within the Bruce Ferrini Paleography collection remained here in Ithaca among Cornell University Library’s collections. This later collection includes examples of various historical writing systems – hieroglyphics, Demotic, Greek, and Coptic scripts on fragments of papyrus dating from 1500BC – the 6th century A.D. Due to lack of protective enclosures and condition, this collection has been under-utilized and under-studied.

Applying what I learned at the seminar, I was able to reduce loose surface dirt, open up fragile folds, re-align fibers, bridge areas that had become separated, and rehouse the papyri fragments contained within this paleography collection.

Left: before treatment;  Right: after treatment, including loose fragments previously adhered to verso

These items were removed from their old plastic sleeves (which release plasticizers and hold static, problematic for friable media), treated, and rehoused between glass to improve storage conditions and increase accessibility for study and instruction. Glass, the recommended storage material, allows for greater clarity of the inscription on the fragment as well as the visibility of the laminate structure of the papyrus itself, recto and verso. The disadvantage of glass is that it can break, but most often, especially with smaller examples, it is the glass that takes the impact of the damage rather than the papyrus.

Left: The edges of the glass are aligned (1/8 inch annealed soda-lime glass, with edges sanded, free of bubbles and scratches). Right: One edge of the glass is sealed with Filmoplast SH linen tape.

Left: The fragment is placed on the lower glass surface and held in position with a small weight; Center: The fragment is anchored to the glass using tiny (hard to see, but they are there) strips of glassine coated with dextrin. The glassine strips require very little moisture and pressure to adhere the fragment to the glass. Right: The remaining three edges of the glass are sealed with Filmoplast SH linen tape.

A custom fit tray, labeled for identification, was constructed to hold each glazed piece.

I am grateful to the University of Michigan for sharing their expertise that developed the skills that have allowed these materials to be cared for and safely stored.


Two weeks in Ann Arbor, MI

J.M. Iacchei

The seminar in Papyrus Conservation, June 13-24, 2016 at University of Michigan was one of the highlights of the summer, and of my professional career to date. It was a privilege to be invited, and an invaluable opportunity to attend. Thank you Cornell University Library and Digitization and Conservation Services for making this possible.

For two weeks, 8 of us – an international group of conservators and papyrologists gathered in Ann Arbor to work directly with the University of Michigan’s Papyri collections under the direction of Marieka Kaye, Book Conservator/Conservation Librarian.

Holding one of the largest papyri collections in the western world, the University of Michigan was the ideal institution to host this seminar. Not to mention the University’s history of concern and awareness for the care of papyri collections. The University’s contributions to conservation research began in the 1980s with Professor Ludwig Koener and continued with Julia Miller’s contributions to research and conservation protocol, Leyla Lau-Lamb’s development of the APIS Project, and now with the work of Marieka.

Their collections hold 18,000 items dating from 1000 BCE-1000 CE. About 2/3 of the collections were acquired through purchases made beginning in the 1920’s when the antiquities market was still active and legal. At that time the greater majority of papyri were first treated overseas before being dispersed among international institutions. This resulted in the separation of fragments, loss of archeological context, and questionable treatment methods having repercussions later on – i.e. deterioration and damage to backing materials.


MapKaranisThe remaining 1/3 come from archeological excavations conducted in 1925-1935 by the University of Michigan in the area of Middle Egypt called the Fayum. The site at Karanis proved to be the most fruitful. The findings from this excavation represent the 2nd-4th century Roman Egypt and are important for their insights into everyday life rather than the lives of the elite. The fragments we were working with were from this site, often literally swept into whatever boxes or containers were available on site – like the one shown here:

Fragments

Though not yet fully published, the collection continues to be digitized for the APIS project (The Advanced Papyrological Information System). APIS was started by Leyla Lau-Lamb in 1993 and continued until 2013. It was initially part of a larger international project with other institutions with the goal of reuniting fragments that had become separated during the time of the Antiquities Market. The current APIS site reflects only the University of Michigan’s contributions. A separate link will take you to the previous contributions from other institutions.

Among their collections are also papyri that were once here at Cornell University. They were given to the University of Michigan in 1972’s to receive appropriate care and storage.

The Seminar was divided into lectures, work-time, student presentations, guest lecturers, workshops, and field trips.

worktime

Lectures, work-time, and student presentations: This was time focused on common conditions found among papyri collections, factors contributing to current conditions; treatment methods and materials; current research, technology and analytical practices.

In addition, each of us were asked to give a short presentation about our institution’s collections – the size, needs, and expectations ranged widely from small collections like ours to those housed at the Egyptian Museum in Cairo, and from treatment and condition concerns to setting up a papyrus lab.

JMillerJulia Miller, scholar/historian of bookbinding, discussed her work with the University of Michigan collections of papyri in bound structures. We spent a morning looking at historical models and numerous examples of cartonnage. Conservators will not separate the layers; there is promising technology (x-ray phase contrast imaging) that will enable the layers to be virtually separated in the future without damage to the original format.

Terry Wilfong, Curator of Greco-Roman Egypt, Kelsey Museum of Archeology and Professor of Egyptology) gave an overview of his work and Egyptian script systems, how scripts are used in dating pieces and how they are transcribed.

KelseyA field trip to the Kelsey Museum of Archeology provided archeological context for the Karanis fragments with which we were working, as well as a glimpse into daily practices. Shown here are dice, a lock and key system, and magic bones. Because the Sahara sands have preserved materials so well, archeologists have been given a portrait of everyday life in Karanis. A current goal of the museum is to look at the whole picture in archeological context rather than isolated items (pottery, basketry, etc.) as in previous studies.

PapyrusAt Out of Hand Papermaking Studio we made both papyrus and papyrus paper. You can see the two are quite distinct – papyrus being made from overlapping perpendicular layers of the inner pith of papyrus stalk and then pressing under weight; papyrus paper being made from cooking and beating the fiber obtained from the papyrus stalk, and then forming a sheet on a mold allowing the fibers to collect on a screen and form a sheet (of paper).

remoistenable tissueMaking re-moistenable repair tissue: Many of the papyri fragments contained extremely fragile areas that required stabilization with VERY tiny and discrete pieces of repair tissue. We use “pre-coated”/re-moistenable repair tissue because it offered the advantage of using less moisture and offered quick drying time. Aisha Wahab, Paper Conservator, presented a workshop giving us the opportunity to make our own re-moistenable repair tissue.

REX052_088c_nextday, 8/31/15, 4:15 PM, 8C, 2714x5383 (1772+0), 100%, Repro 2.2 v2, 1/15 s, R56.0, G33.0, B51.5

What this means for our collections here at Cornell University: A year ago, Michele Hamill, Paper and Photograph Conservator, and I worked on stabilizing the funerary text of Usir-Wer in preparation for the Gods and Scholars exhibit. My interest in applying to the seminar was largely directed by this item and what treatment options, if any, were available, but also to address the concerns for the papyri fragments contained within the Bruce Ferrini Paleography collection that presented condition concerns -specifically housing in plastic sleeves (which release plasticizers and hold static which is problematic for friable media), accessibility (under-utilized and under-studied), realignment of fibers, and stabilization. We are currently searching for new housing materials for Cornell University Library’s fragments.

In summary, I left the seminar with increased comfort working with these extremely fragile collections, greater confidence in recognizing when the potential for significant loss out weighs any treatment that can be performed, recognition that with patience and time technological advances may provide new opportunities to benefit these materials, and this: The importance of digitizing items currently held in collections and making them available to researches, and the importance of institutional collaboration to reunite (virtually if not physically) separated fragments.

For more information on about the treatment of papyrus collection please visit the Advanced Papyrological Information System Guidelines for Conservation of Papyrus.


The Funerary Text of Usir-Wer

J.M. Iacchei

REX052_088c_nextday, 8/31/15, 4:15 PM, 8C, 2714x5383 (1772+0), 100%, Repro 2.2 v2, 1/15 s, R56.0, G33.0, B51.5

Three years ago in the Fall of 2013, one of my first assignments here at Cornell was to spend some time in the Division of Rare and Manuscript Collections’ (RMC) reading room with a very old and sizeable papyrus. I was asked prepare a condition report identifying the conditions and factors contributing to its current and future state. The item was a 2300 year old funerary text dating back to the Ptolemaic Period, 330-220 BC, belonging to an Egyptian Stolist priest who went by the name Usir-Wer.  The papyrus measures about 8 feet in width and 1 foot in height.

Fredrika (Freddy) Loew, a former graduate student in Archaeology and current Senior Manuscript Processor in the Division of Rare and Manuscripts Collections, began working on the papyrus translation in 2013. She brought it to the attention of Michele Hamill (Paper and Photograph conservator). It was at this time that I conducted the initial condition assessment, but it wasn’t until the summer of 2015 that we revisited the papyrus in preparation for digitization and the Gods and Scholars exhibit.

In the lengthy text that follows, I will tell you about Usir-Wer, the history of his funerary text, and the conservation treatment in preparation for digitization and exhibition. I will take you through this somewhat chronologically, starting from the very beginning….

320-330 B.C Usir-Wer was a Stolist priest during Ptolemaic Egypt. This was a high ranking position in Egyptian society and carried with it the responsibility of tending to the care of the temples and statuary where it was believed that the spirit of the deceased, the ka, found a permanent resting place. By tending to the needs of the deceased and performing rituals, order was maintained and the gods were appeased. It was believed that failure in these responsibilities would lead to disorder and anger of the gods.

Religious ritual traditions practiced by the Ancient Egyptians have a deep history extending back well before they were documented in written form – objects found at burial sites, extant papyri, inscriptions and imagery found on tomb walls each provide insights. Among archeological findings is a body of texts known collectively as funerary texts. Under scholarly study, separate groupings have been distinguished-the Book of the Dead being only one of them, though perhaps the most secularly familiar.  The others include: Pyramid Texts, Coffin Texts, Books of Breathing, and Books of the Netherworld. These texts contain ‘mortuary liturgies’ and ‘funerary literature’ or similarly ‘collective ritual’ and ‘personal recitations’ to be used on behalf of the deceased or by the deceased in preparation for or during his journey through the afterlife.

The origins of these spells, recitations, litanies, and hymns are unknown. Separate and distinct, the texts span across time periods, and present differences in content and emphasis but all share a common theme: the preparation of the deceased in the afterlife by offering assistance in the form of protection and provisions – and this is what we find in Usir Wer’s funerary text.

This vignette from the papyrus shows Usir-Wer in the Hall of Judgment. Above are the 42 gods to whom he must address in his negative confession–all the sins he has NOT committed. Usir-Wer is on the right facing Anubis as his heart is weighed against the Feather of Truth. Thoth is on the left ready to record the verdict of the balance. Ammit is ready to devour the heart should Thoth not proclaim it righteous.

So how did Usir-Wer’s funerary text find its way to Ithaca? 330BC-1990’s

From the time of Usir-Wer’s burial, circa 330-320 BC, until its excavation in 1887, the papyrus remained rolled and held within his tomb; where exactly in Egypt we are not certain. It was purchased two years later in 1889 by Cornell University President A.D. White while traveling in Cairo. At the time of its purchase, the papyrus was no longer rolled but had been opened flat, mounted, and framed– which White noted, along with some other significant details, in his letters to his colleagues back in Ithaca – more about that in a moment.

About the content, he tells us that it was found in the tomb of a priest of the Ptolemaic period, is written in hieroglyphs, but mainly hieratic, and the text was “an extract from the Book of the Dead”. Over time this became “telephoned” into “It is the Book of the Dead,” likely due to its prominent vignette of the Judgment Scene, Spell 30B from the Book of the Dead. This mis-interpretation was not clarified until 2013 when Freddy began to translate the text and verified her findings with the letters. The parts of the text that are not from the Book of the Dead, are more like rituals and prayers to be said on behalf of or by the deceased to ease his passage into the underworld.

Upon arrival in Ithaca, the papyrus was hung in the Seminary room of McGraw Hall and then moved to Uris Library sometime in the 1890’s, displayed from time to time, and at one point, re-framed. Beyond this there is no record of the papyrus or how it was stored; nor was it ever given a call number. At the time of the construction of Kroch Library in the 1990’s it was moved to the vault for storage.

Before we can talk about the condition assessment or the conservation treatment, it is worth taking a brief moment to talk about Papyrus, how it was made and how this process informs our understanding of the current condition.

papyrus_blogThe papyrus is cut at its base; the outer stem is removed; the inner pith is cut into strips, and the soaked in water until pliable and translucent; the strips are placed in two layers perpendicular to each other, and then pressed. Rolls were made by overlapping the left edge one piece over the right of the next with the horizontal fibers on the inside. This construction facilitated the ease of writing on the inside of the roll from right to left. The papyrus would have then be rolled; this is how we would have expected to find Usir-Wer’s funerary text at the time of excavation.

In 2013, Freddy began her research and I conducted an initial condition assessment. We hadn’t yet learned of the letters from A.D. White mentioned above and so only knew what could be seen through the glass. Un-framing the papyrus at the time of its condition assessment was not an option because it was uncertain how the papyrus would react. Once unframed, we needed to be prepared to react appropriately. Below is a sketch of the papyrus I made to accompany the condition report:

condition_blogI could see that it was constructed of 9 sheets of papyrus adhered, crookedly, overall, to a secondary support of an unidentifiable material, –possibly be a fiber based board, all contained within a wooden oak frame, with a glass cover, and Masonite backing board.

condition2_blogThe view of the papyrus was obscured by a haze on the glass located about the areas of inscription. The secondary support: appeared to be composed of two pieces; the right is raised slightly more than the left. The papyrus itself showed areas of discoloration, delamination, loss, edge fray, cracking; faded media overall with areas of loss due friability and flaking of the pigment.

From this initial assessment we knew that we would need to address 1) The haze on the inner surface of the glass, 2) The secondary support and its lack of support, 3) Potential areas of loss on the papyrus, and 4) The backing materials.

2015 | Preparation for Digitization and Exhibit

We were expecting the glass to be loose, as you would find in a typical picture frame but it was not! Instead we found the glass held in place by a thinner inner frame nailed within the larger frame. This structure holds the glass in place and also keeps the papyrus from contacting the glass, but because of this the glass could not be removed.

The haze on the inner surface of the glass was located above the areas containing the inscription. It was most likely caused by the migration of salts from the papyrus, pigments and/or mounting materials.

You can see the dramatic difference that cleaning made!

glass_blogNow unframed, we were able to see how the papyrus was actually mounted. It was, as we thought, adhered crookedly overall to a secondary support, but that support was not a board. Instead, we found that the papyrus had been adhered to a now brittle paper support, which was then further adhered to a canvas support. This whole unit was then drummed around a wooden stretcher. The drumming is no longer taut and has a significant undulation at the left end which has transferred to the papyrus. This is a concern because it could potentially cause further cracking and fracture to the papyrus. Additionally, because it is drummed, the inner wooden stretcher is not in full contact with the papyrus (or the supports), only along the perimeter and along the center bar; it is not acting fully as a support to the papyrus.

Returning to A.D. Whites Letters regarding the mounting system, frame, and shipping … He tells us it was “mounted to canvas on a wooden frame and securely packed under the direction of Bey (an eminent Egyptologist of the time). The glass I have taken out fearing that it might get broken and damage the papyrus, must be glazed again at Ithaca.”

As we have seen, the glass in the current frame is secured into the frame. Along with his letters, this tells us that it was not the original glass, and we know from Freddy’s research that the papyrus was re-framed sometime in the 1890’s. This was further confirmed by the nail markings we found in the inner frame around which the papyrus is drummed, as they do not line up with markings in the current frame. This means that the only part that is original is the inner wooden stretcher.

nailmarks_blog

Notice that the nail marking in the inner stretcher to which the papyrus is mounted have no corresponding marking in the outer frame

TREATMENT

After these discoveries, one of the first treatment steps was reducing surface soil – dust, dirt, etc. from the item being treated. We used a HEPA-vacuum to remove the buildup of dust and dirt on the surface of the frame. Before we could work on the papyrus, we needed to address the lack of the support prior to stabilizing the front of the papyrus because the stabilization we would be doing to the front would involve drying mended areas under weight. A double layer of support system was fit into the inner stretcher to support the papyrus – the first 4-ply museum board, the second corrugated blue board. We hoped that this would provide enough support to the papyrus to reduce the stress caused by the undulation in the drummed support system.

stabilizationFor the purpose of digitization and the exhibit, we needed to address the areas of instability which would involve using some sort of adhesive to tack down papyrus edges that were frayed and pieces that were beginning to lift of flake. We found wheat starch paste would be best as it is reversible and would not discolor or further embrittle the papyrus.

treatment_blogThe frame, likely because it is not the original, is a little big for the inner wooden stretcher around which the papyrus and secondary supports are drummed. When we unframed it, there were two small wooded shims at each end, but even then the inner frame was a little loose. To make it more secure in the frame we added new shims around the perimeter of the frame, then a backing board of blue corrugated board, and a 20 pt card dust cover.

backing02blogFuture Considerations

The treatment so far has greatly improved the stability and appearance of the papyrus for the purposed of the exhibit and digitization. But there is still concern for the drummed mounting system. It is unlikely that removing the papyrus from the paper and canvas supports is an option. The fragility, brittleness, size, and overlapping joins of the papyrus makes removal from the secondary supports too much of a risk.  We are currently researching a better overall support than the wooden stretcher it is drummed to now.

Shedding Some Light on Medieval Pigments

By Caitlin Moore

Louisa Smieska (postdoctoral researcher, CHESS) and Ruth Mullett (Ph.D. Candidate, Medieval Studies) have been working with Laurent Ferri, (Curator of pre-1800 collections for Cornell University’s Rare and Manuscript Collections) to identify inorganic pigments used in some of the illuminated manuscripts in Cornell’s collection. They will be performing x-ray fluorescence mapping (MA-XRF) experiments at CHESS (Cornell High Energy Synchrotron Source). This analysis will help to determine the chemical makeup of the pigments in a non-invasive way. More specifically, the experiments will yield maps that show the 2D concentrations of chemical elements present in the inks and pigments. Knowing what elements are present can allow researchers to infer the identities of the pigments, and information on chemical impurities might also shed some light on the geographical source of certain pigments.

Louisa and Ruth are particularly interested in using this technology to determine what might lie beneath this image, which you can see has been adhered to the page rather than being painted directly on the parchment. The x-ray analysis could potentially help uncover what is beneath the affixed image, without having to perform the invasive process of physically removing it.

IMG_6241   IMG_6242

Leaf from a Book of Hours, Paris, ca. 1500  Coronation of the Virgin

Conservation treatment of Shakespeare’s Fourth Folio

by Michele Brown

Cornell University Library is commemorating the 400th anniversary of Shakespeare’s death with a series of digital vignettes highlighting Cornell’s Shakespeare collection. Earlier this year, the Fourth Folio came to the conservation lab for treatment and evaluation.

The title page, before repair.

The title page, before repairing the binding.

The binding on Cornell’s Fourth Folio appears to be contemporary with its 1685 printing date. It is a full calfskin binding with a gilt spine.The leather is tightly adhered to the back of the book (this is known as a tight back). When it came into the lab, the front board was detached, the back board was weakly attached, and a large piece of covering was missing from the back board. The tailband was mostly missing, with the core being held on with a few loops. The corners were worn with some losses. It had been previously repaired.

The front board of Shakespeare's Fourth folio, before treatment. The tailband is hanging off.

The front board of Shakespeare’s Fourth Folio, before treatment. Notice how the tailband is hanging off.

The tight bond between the original leather spine and the back of the book  created difficulties for repairing the binding. Usually, when a book is rebacked  the original spine is removed, the back is lined with cloth over  tissue for strength and reversibility, and a new spine made from material similar to the original spine is applied. The original spine would then be stuck on over the new spine. The result is a book with reinforced sewing, new materials in all the areas that take the most stress, and yet with all of its original components retained.

The previous repair leather was applied only to the joints and head and tail caps, indicating perhaps, that the conservator had experienced difficulty removing the original  spine.

The spine of the Fourth Folio, before treatment.

The spine of the Fourth Folio, before treatment. The repair leather is visible at the edges and head of the spine.

Since the spine of a tight back binding is adhered directly to the pages of the book, it is not always possible to remove the spine without damaging it or the pages. When a book is historically significant with a contemporary binding, it is important to retain as many of its original components as possible. That is the case with our copy of the 4th Folio. We can tell our copy was previously repaired not only by the “new”  leather on the outside joints, but also by the treatment of the first few pages and the inner joints.  We don’t know when the earlier repair was done, but the repair leather had deteriorated and needed to be replaced. The front board had become detached and needed to be reattached.

I tried lifting the original spine after first facing it with Hanji paper using methyl cellulose paste as the adhesive. I was able to remove the second panel (containing the title label), and the tail panel, but could only lift the edges of the rest of the spine. The edges of the boards, both inside and outside, were easily lifted.

Once the leather was removed from the second and last panels, these areas were first lined with usu mino tissue using wheat starch paste, and then with unbleached cotton stretch cloth (from Gane Bros) using pva. The stretch cloth was cut wide enough to stretch over onto the boards under the lifted leather. A lining of Conservation Wove paper (from Katie Macgregor), using pva, made for a nice smooth surface on these 2 panels.

Ideally, all of the panels would receive this kind of reinforcement, but the spine adhesion was tenacious. How could I add strength to my repair? I decided to use joint tacketing on the front board. Joint tacketing consists of drilling  several holes into the joint, angled so they come out on the shoulder of the spine. Two corresponding holes for each tacket are drilled into the board. Linen thread is passed through the joint to the spine and secured with a loop. The tails pass through the holes in the board.  A square knot is tied to hold the threads in place. This holds the board to the spine in a way that is similar to its original attachment. The joint tacketing link above provides a detailed description of the procedure.

Before drilling the holes, a strip of Hanji paper was attached to the inside shoulder, one edge aligning with the shoulder, the rest extending towards the fore edge. This would be folded up over the linen thread loops towards the end of the treatment. Then, holes at 5 stations  were drilled into the joint and 2 per each station were drilled into the board. At each station, the thread was passed through the shoulder, looped, and then passed through the board and tied in a square knot.

The front joint, with tackets and the strip of Hanji tissue.

The front joint, with tackets and the strip of Hanji tissue.

This is a closer view of one of the tackets, showing the loop and square knot.

This is a closer view of one of the tackets, showing the loop and square knot.

A new tailband was woven using silk twist over the original tailband core.

The finished tailband and cap.

The finished tailband and cap.

New calfskin (from Hewit’s) was pared, dyed and attached to the second and bottom panels, extending across the spine and onto the boards. New calfskin strips were also added to the headcap and joints under the lifted spine edges and onto the boards under the lifted sides. The lifted board material was put down with wheat starch paste.

New leather attached to the joints and 2 panels.

New leather attached to the joints and 2 panels.

This is a closer view of the tacket and new leather. The spine pieces have not been replaced at this point.

This is a closer view of the tacket and new leather. The spine pieces have not been replaced yet.

The corners were repaired with dyed calfskin or colored tissue.  The Hanji strip in the front inner joint was pulled across the joint and adhered under the lifted paste-down with paste. Then, it was covered with CK color kozo. The back joint was also covered with CK color kozo. Wheat starch paste was used for these steps.

The finished front inner joint. The first few pages also had minor repairs.

The finished front inner joint. Losses on the fly leaf were replaced with color kozo from Hiromi, using paste.

The lifted spine panels and edges of the spine were re-attached using wheat starch paste. This hid the tacketing threads on the shoulder. The corners were repaired with dyed calfskin and toned kozo. The loss on the back board was patched with dyed calfskin.

The front board of the finished repair.

The front board of the finished repair.

The finished spine, with the original pieces reattached.

The finished spine, with the original pieces reattached.

As a result of this treatment, the book is much stronger and more easily handled. If the repair leather fails, the tackets should help keep the front board attached. The cloth liners across the 2 panels that were lifted will also provide extra support.

One of our goals in the conservation lab is to make the physical collections accessible for study and analysis. Here’s hoping that readers of Shakespeare will be able to enjoy Cornell’s copy of the Fourth Folio for another 400 years!


Revealing the Past to Save History for the Future: A.D. White’s Historic Plaster Cast Medallion Collection

By Rachel Mochon
Chemistry and The College Scholar Program
Cornell University Class of 2016
plastercasts In 1881, Andrew Dickson White, Cornell’s first president, gifted several significant collections to the university “…as a slight token of continued interest in the educational work of our country and our own state, as also of devotion to classical studies and culture…” These collections include 19th century architectural photographs, large plaster casts of statuary, plaster gems, and plaster casts of Renaissance and Medieval medallions.

IMG_0154

A.D. White letter to Henry Sage, 1881, Courtesy of RMC.

The plaster cast medallions were stored for over 100 years in locked wooden cabinets in the A.D. White Library in Uris Library. The A.D. White Library is currently undergoing renovations as a result of a highly successful crowdfunding campaign to Bring Light to the A.D. White Library. For the renovation, the two wooden display cabinets will be relocated, requiring the removal of the plaster cast medallion collection.

Medallion1980s

The medallions can be seen in the cabinets in this 1979 photograph.

The collection is being transferred to the Rare and Manuscript Collections where it will join the plaster gems already stored there.  With the transfer to RMC, the collection will have improved cataloguing and access and will now be available for research and exhibit use. However, before the medallions could be available for research and use, their significant condition concerns needed to be addressed.

RachelCabinets02

The medallions were not organized in the display cabinets by content or size, nor were they easily accessible for study in the locked cabinets. Heavy amounts of disfiguring dust and dirt settled on the medallions, particularly those near the front of the drawers, which obscured the features and damaged the soft plaster.

The plaster cast medallions are made from plaster, a mixture of powdered gypsum and water. The plaster surfaces were all relatively soft, so the medallions scratch easily. Most of the medallions are circular and vary in size from quite small (the size of a U.S. quarter) to the largest of 10 cm in diameter. Other medallions are shaped like ovals or rectangles with rounded corners. Every medallion is made of white plaster with a brown paper ring around the edge. Many of the paper rings are painted gold along the top edge. The image of the figure is in the center of the medallion with his or her name around the top or bottom of the portrait. Although many of the portraits are in profile, which originated from ancient coins, many of the plaster portraits depict the personage’s full face directly or only three-quarters of the face. A number of the portraits are cast in high relief that reflects light to evoke expressiveness. However, this three-dimensionality varies too. Many of the plaster medallions are quite flat, especially among those that are of the most common size, 7 cm in diameter. Nevertheless, the texture and patina of the plaster is critical to the viewing experience.

traytryptic

The medallions, shown here after treatment and rehousing, vary in size and shape.

The plaster casts were made from existing metal medallions, including Renaissance medals from as early as the 15th century. For example, the A.D. White collection includes a medallion of Alessandro di Gino Vecchietti, born on October 2, 1472, that was cast from a bronze medal that dates to approximately 1498.

VecchiettiMedal vecchiettiCleanedblog


The major condition concern with the medallions was the heavy layer of damaging and obscuring dust and dirt. In addition, some medallions had broken paper rings and some had chips, breaks, old repairs, or were fully broken.

before_After02


The Alessandro di Gino Vecchietti medallion shows the improvement by surface cleaning.

The first step in the conservation treatment was surface cleaning to remove the disfiguring films of dirt and dust on the surfaces of the medallions.  Because the plaster surfaces are soft, various cleaning methods were investigated to determine what would be the most effective and least harmful method of cleaning. After seeking advice from objects conservators, a HEPA vacuum cleaner, hard and soft bristle brushes, soot sponges, cosmetic sponges, and vinyl erasers were all tested to remove dust and dirt. The combination of the HEPA vacuum, vinyl erasers and a soft bristle brush were determined to remove the most disfiguring dirt without scratching the surface.

RachelCleaningIn addition to surface cleaning, the paper rings on several medallions had torn or two edges had separated where they were originally adhered together. The bands are adhered to the plaster in only one location along the rim, and the remaining paper is wrapped around tightly and secured to itself. To repair broken rings, wheat starch paste and toned Japanese tissue paper were used. In the case of a medallion where the original attachment of two ends had failed, paste was applied with a brush to the underside of the flap that lays on top of the other end of the band. This was then secured with a bridge of toned Japanese tissue and wheat starch paste on the exterior of the band. In the case of a medallion with a torn band, a bridge of toned Japanese tissue was applied underneath the band edges and adhered with wheat starch paste.

The medallions are fragile and several show old glue repairs to reinforce breaks and cracks. In the past some medallions were left un-repaired.

brokenmedallionintray

In the inventory photo below from the 1980s, you can see the medallion on the left is broken, and it remained broken for 30 more years.

brokenBT_ATTo repair broken medallions, the pieces were first thoroughly cleaned using vinyl erasers and a soft bristle brush. A stable, conservation adhesive with good strength and dries clear, was then chosen to secure the medallion pieces to one another.  The adhesive was applied to all edges of all the pieces first as a protective layer. Without this layer, the adhesive would be absorbed into the plaster’s pores and the mend between two pieces would not be as strong as it could be. After the protected layers were allowed to dry, another coat was used to adhere pieces together.

After treatment, the medallions were organized by size and housed in archival paper board boxes. Several trays, made from acid-free board, can fit in each box, and, depending on size, on average each tray can fit up 8-24 medallions, separated by acid free paper and/or foam.

By the end of the project over 1500 plaster cast medallions had been cleaned, stabilized and rehoused.  I learned about the variety of materials that can be used to safely surface clean plaster and was able to determine what would work best for the soft, porous, plaster surfaces of these medallions.  Rehousing the medallions was like a jigsaw puzzle—determining how to effectively and efficiently house the medallions securely without expanding the size of the collection!  During the course of this project, I also learned about how historic teaching collections were used in instruction and how they can continue to be valuable assets in today’s learning environment.  Because of this project, A.D. White’s collection of medallions will once again be used as a teaching collection for Cornell University students and researchers.

P1200614


A.D. White Library Portrait Paintings

By: Michele Hamill

Wonderful progress is being made in the A.D. White Library as part of the enormously successful crowd funding campaign to Bring Light to A.D. White.  Coordinated by our Facilities staff, the large, ornate study table and the two sets of connected study tables have been beautifully refurbished.  Last Fall, we completed the conservation treatment, and archival matting and framing of the original prints and photographs hanging in this historic space.

img1&2 Prints and photographs were framed with protective UV-filtering glazing and strategically positioned around the room to minimize light exposure.

Our current work in the A.D. White Library is to stabilize the portrait paintings.  While we don’t undertake full conservation of paintings, we can conduct beneficial treatments like surface cleaning to remove dust.  The A.D. White Library receives heavy foot traffic since it is a very popular study space and visitor destination.  Over time, dust builds up on surfaces, obscuring the paintings and putting them at risk of chemical and physical damage.  Removing dust improves the appearance and the stability of the paintings.

3img3&4These details show how dust can accumulate, leaving a grey layer over the surface.

The oil on canvas portrait of Andrew Dickson White by Truman E. Fassett, was small enough to transport to the Conservation Lab for assessment and treatment.  Working closely with us, Rachel Mochon, a Cornell senior majoring in chemistry and the College Scholars Program, documented the condition of this painting using digital photography and examination methods. Her thorough report highlights some minor structural issues that will help us care for this painting in the future.

5The dark background, forward pose, and size of the portrait make the image of Andrew Dickson White appear life-like and connect directly with the viewer.

5a This 1966 photograph shows the White painting on the opposite wall. The artwork and furnishings in the A.D. White Library have moved and changed many times in nearly 150 years.

6Digital photography captures the condition of the painting and serves as a reference image for future evaluations.

Rachel, who is pursuing art conservation after graduating from Cornell this spring, executed a skillful cleaning of both the painting and frame. Rachel gained valuable experience treating this painting and helped preserve it for Cornellians and visitors to enjoy.

img7&8After determining that the paint surface is intact, Rachel passes a HEPA vacuum, which has gentle suction and a dedicated soft brush, lightly over the surface. Cotton–tipped swabs were also used to clean the gilt frame.

The oil painting of George Lincoln Burr, by Christian Midjo, was too large to be moved to the conservation lab.  So, on a quiet day before the Spring semester, we assessed and cleaned the painting in situ in the A.D. White Library.  Christian Midjo was an art professor at Cornell and an accomplished portrait painter.   George Lincoln Burr, Midjo’s subject in this 1921 painting, was a history professor at Cornell and A.D. White’s personal librarian.

9Midjo painted Burr in an unusual pose, showing him pausing during a lecture and looking out intently to his class.  His head covers the portion of the map of Europe that was most devastated in World War I.

9aThe Burr painting used to hang over the front entrance of the A.D. White Library, as seen in this early photograph.

9aaBefore renovations in the 20th century, the north wall, where the Burr painting now hangs, was an open archway into the adjacent Dean Room of Uris Library, as seen in this early cyanotype.

Our HEPA (high efficiency particulate air) filter conservation vacuum, which traps dust onto the filter and doesn’t blow it back out into the room like a conventional vacuum, was the perfect tool to give this painting a gentle cleaning.  We assessed the paint surface and the frame to ensure they were stable and determined the paint surface to be in excellent condition and firmly attached to the canvas.  The frame has a few small losses of decorative elements, typical of large, ornate frames nearly 100 years old, but otherwise is in stable condition. After vacuuming removed much of the dust we also used soft conservation sponges to dislodge dirt from the carved elements on the frame. After treatment, the painting was greatly improved in both appearance and condition.

10&10aClose work, such as surface cleaning, allows us to detect condition issues, such as this small puncture seen in the detail of the Burr painting. This detail also shows Midjo’s impasto technique that creates thickly textured paint.

11&12The back of the Burr painting had a noticeable layer of dust, possibly related to a nearby heating unit. Along with our Facilities staff we are investigating deflectors for the heating units to direct air and heat away from the paintings.

13&14 In addition to signing the painting on the lower right corner of the front, Midjo also wrote an inscription on the back, seen here before and after cleaning. The canvas support Midjo used has a distinct, nubby texture like that of burlap.

The A.D. White Library has such historic significance to Cornell.  Students enjoy its quiet beauty as they study and alumni remember it with great fondness.  A project like Bring Light to A.D. White gives us the opportunity to enhance our spaces to meet the needs of our students, care for Cornell’s collections and preserve the Library that A.D. White described as “the heart of the University”. We have 2 more paintings to surface clean in the coming months–the portraits of Andrew S. White and Mrs. Andrew S. White, which are mounted high on the walls (I see ladders in our future!) Check back for updates on that work, as well as the new light fixtures and carpeting slated to be installed.

14aThe portrait of Mrs. Andrew S. White hangs near the arched windows as seen in this photograph, likely from the 1970’s. Note the No Smoking sign over the fireplace.

15Thank you to Ronnie Clark and Adam Spry, CUL Facilities, for their expert assistance on our conservation projects in the A.D. White Library.


3 DIRECTORS – 30 YEARS

By Michele Hamill

August 2015 marked the 30th anniversary of the Cornell Library’s conservation program. The traditional gift for a 30th anniversary is a pearl–a gemstone of great beauty, and a term meaning something rare, fine and valuable. We’ve had three gifts– three very fine directors–in our 30 years. Tre Berney, Barbara Berger Eden, and John Dean are each a pearl in their own right.

libescopetb_4It is with great pleasure that we welcome Tre Berney as Director of Digitization and Conservation Services. (Interesting note: Tre hails from Tennessee—whose state gem is the pearl and has the only freshwater pearl cultivation outside of Asia!). This new position was created to provide leadership for both Preservation and Conservation Services and the Digital Media Group.

Tre has been at Cornell for almost 3 years developing and implementing AV digitization workflows to preserve Cornell University’s unique A/V holdings and digital collections. He designed and established a digitization lab to digitize fragile recordings and older legacy formats. Tre and Library colleagues just completed a campus-wide A/V census, the first of its kind at Cornell, as part of a larger A/V initiative partnering the library with Cornell IT to inform a preservation strategy for those formats at imminent risk of degradation, loss and obsolescence. He works closely with Cornell’s Lab of Ornithology, Indiana University, Audio/Visual Preservation Solutions, Syracuse University, UCLA, Columbia and the Library of AV_LabCongress. His work in A/V preservation ensures that Cornell’s unique assets in the form of lectures by faculty, Nobel Laureates, writers and artists, and original source recordings used in research in biology, linguistics and art will be available in the future.

Tre brings a wealth of skills and experiences to this position along with energy, enthusiasm and appreciation for the Library’s collections and the work we do in the conservation program. We’re excited to have Tre leading our program and look forward to collaborating to preserve the many formats that comprise the Library’s collections.

IMG_0715We are also celebrating Barbara Berger Eden and her significant contributions to Cornell Library as she retires this week after 30 years of service. In Barbara’s tenure at Cornell Library, she served several key roles including manager for ambitious microfilming projects, grants officer, and Principal Investigator for successful grants including Save America’s Treasures and the Henry Luce Foundation Chinese Librarian Preservation Training Initiative which strengthens Cornell Library’s relationship with our partner libraries in China by fostering exchange between the academic library communities in the United States and China. Due to Barbara’s efforts, the preservation capability across China has been expanded and important materials for teaching and research are being preserved.

As director of Preservation and Conservation Services since 2005, Barbara led the conservation program through times of great change in academic research libraries with insight, advocacy, and collegiality. As a result, our conservation program has thrived, with dedicated staff with deep expertise and the resources to preserve Library collections in their original format.

Barbara is thBarbara_Twoupe past chair of the Preservation and Reformatting Section of the American Library Association and has been an active member of the Preservation Administrators Group of the New York State Comprehensive Research Libraries. Barbara has served as a wonderful mentor to several Library staff as part of the Library’s Mentoring Program sharing her wide experience, knowledge, and perspective to foster the professional growth of our colleagues. We are deeply appreciative of Barbara’s efforts on our behalf and her thoughtfulness, generosity and support. We wish her a healthy, happy retirement filled with good gardening, family and friends. She will be missed.

deanJohn Dean became Cornell University Library’s first conservation and preservation librarian with the establishment of the program in 1985 and served as director for nearly 20 years before retiring in 2003. John’s background, including a 6-year apprenticeship in bookbinding in his native England, some years spent as journeyman bookbinder, leadership of preservation programs at the Newberry Library and Johns Hopkins University, and two graduate degrees (in library science and in liberal arts with a concentration in the history of science), made him a rare and valuable combination of an effective administrator, master bookbinder, and consummate conservator.

As director of the department, John brought a profound knowledge and deep regard for collections in all formats and instilled an appreciation for fine craftsmanship grounded in professional standards for conservation. He mentored and taught at the local, national and international levels. In 2003 John was the recipient of the prestigious Association for Library Collections & Technical Services Paul Banks & Carolyn Harris Preservation Award for his significant contributions to the field.

John2upJohn remains passionate about preservation and conservation and has endeavored to help institutions around the world through education, training and consultancies in developing countries, such as Laos, Indonesia, Thailand, Vietnam, Myanmar, Java, and Cambodia. He created seminal online tutorials for library conservation and preservation in Southeast Asia, Iraq and the Middle East to give librarians and archivists in these and other countries a set of basic guidelines to inform their preservation efforts. In retirement John continues to assist local institutions care for their book collections. John’s legacy has had a lasting impact on the preservation and conservation field, on Cornell University Library, and on those of us who had the honor and privilege of working with him.

Where will we be in the next 30 years? Undoubtedly, there will be new challenges, formats, and discoveries. Thanks to our 3 distinguished directors, Tre, Barbara, and John, Cornell Library’s conservation program is ready to serve the preservation and conservation needs of the Library well into the future. A sincere thank you to Oya Rieger, Associate University Librarian, for her leadership, vision, and support of our program. Stay connected with us on our Facebook page and on this blog for updates on our many projects and for some pearls of wisdom for caring for library collections.