Author Archives: cam366@cornell.edu

Partial Leather Rebacks: A Case Study


Today’s blog describes a book conservation treatment informed by a resource from our Conservation Lab’s library of reference materials.  The Conservation Lab’s library has hundreds of resources on conservation and preservation topics (treatment, handling, environment, disaster planning and recovery), bookbinding, and artist’s materials and techniques. We add new resources to our library frequently and the collection is open to all users. This is the 2nd in our Preservation Week series highlighting Cornell University Library Conservation Lab’s continuing education to better preserve and protect our collections.

Caitlin Jochym


Books bound in leather are susceptible to a number of problems. Because of this, we see a lot of them in the lab. The leather can deteriorate over time, weakening the joints and causing boards to detach and spines to be lost. Part of our working philosophy is to do as little as we can in the way of treatment while stabilizing the item enough that it is not damaged by handling. The following treatment decision was made with that in mind.

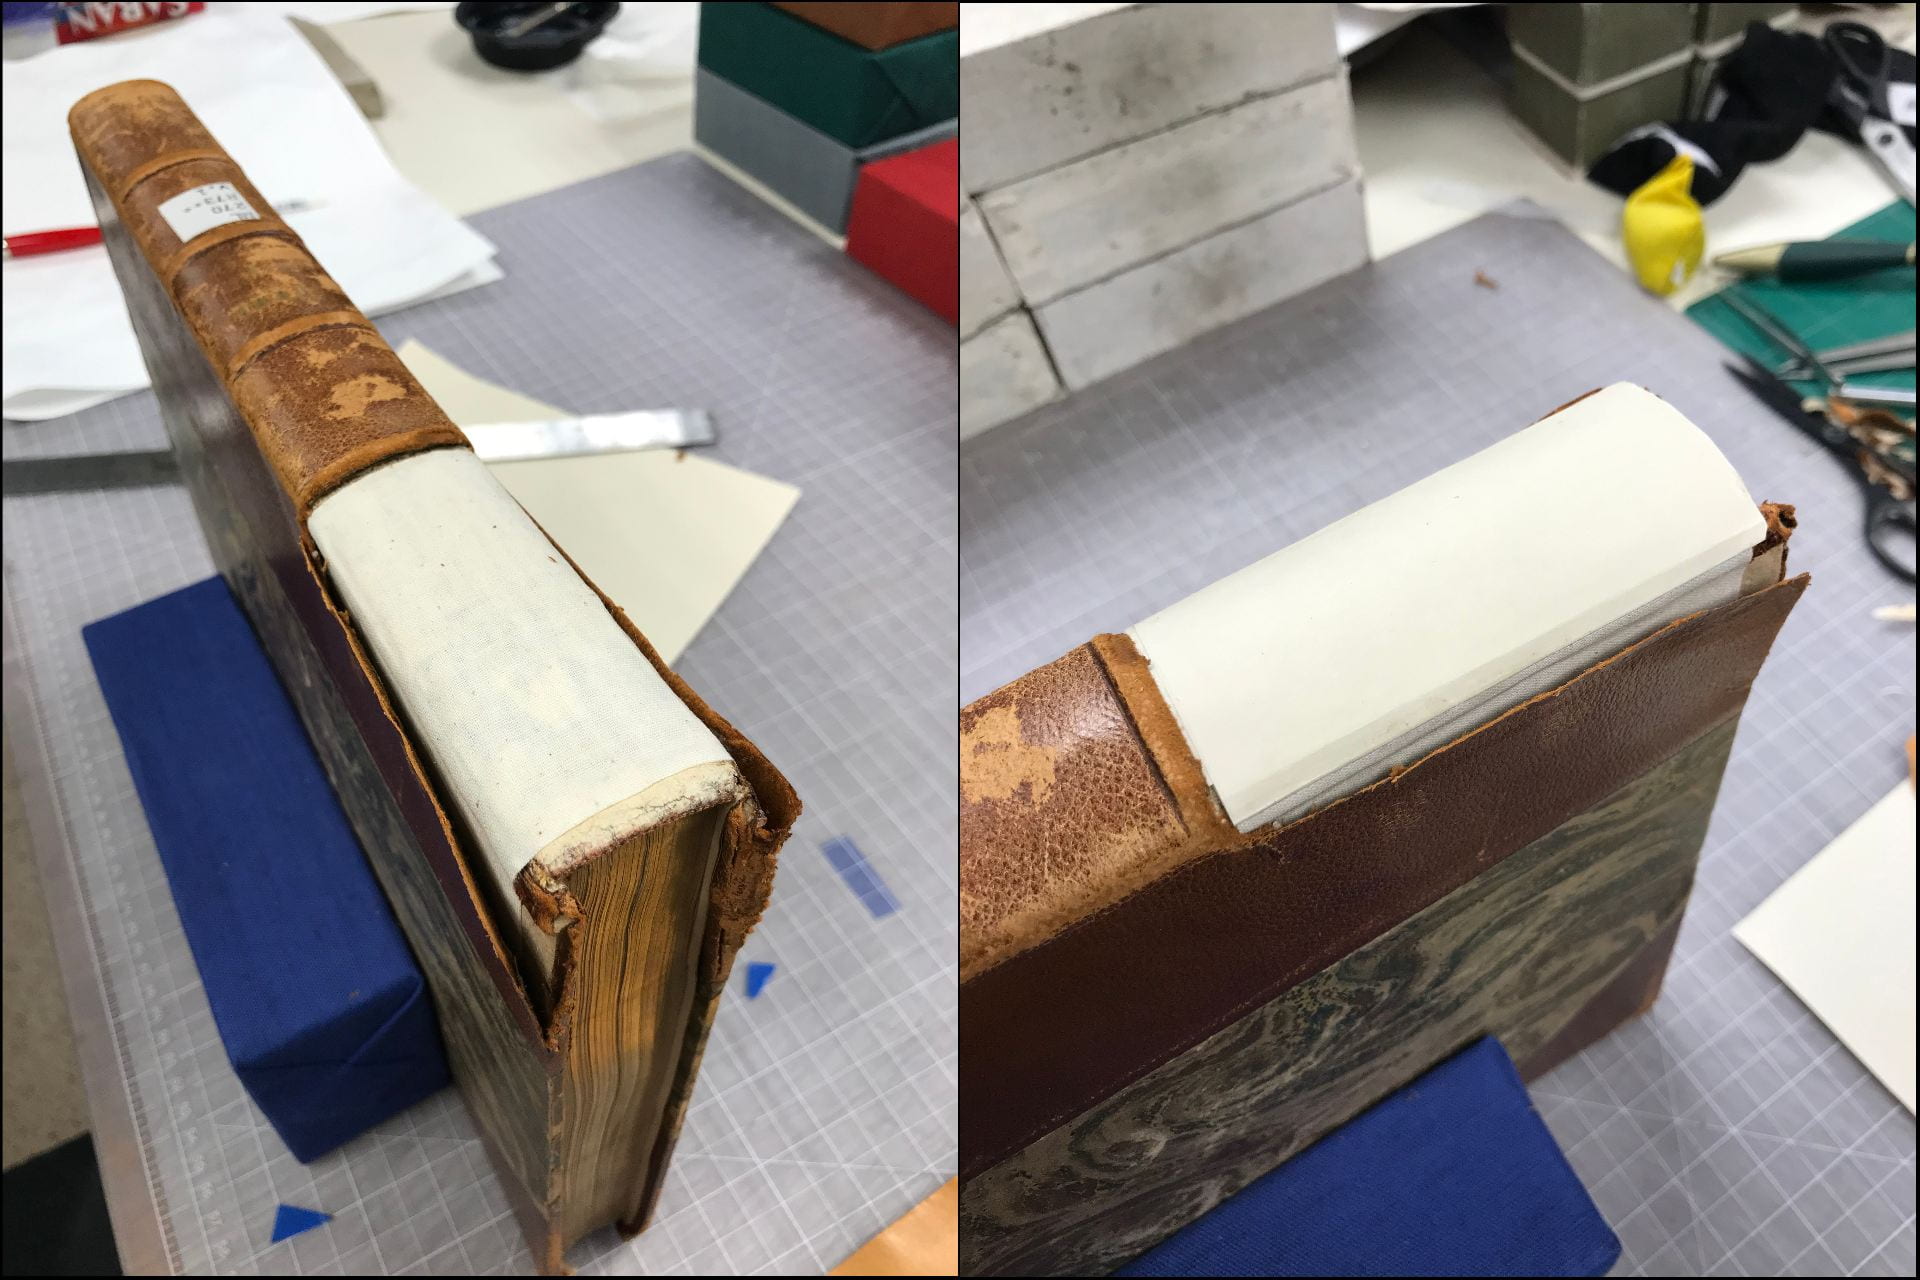
A leather reback is called for in certain cases where a book bound in leather is in a condition that leaves it vulnerable to damage by handling. This often means the leather is deteriorating, the spine is partially detached or missing, the boards are detached, the sewing compromised, or any combination of these things. We “reback” a book by applying a new leather spine to strengthen the book structure while retaining as much of the original material as possible. In the case of this book from the Cornell Music Library, the board attachment was very strong and the spine was in great condition except for one detached section.

The top portion of the spine is detached, exposing the original spine linings.

Rebacking is an invasive and complex treatment that should only be undertaken when absolutely necessary. Since the board attachment was sound and the shoulders of the book where the spine was intact were in great shape, I was reluctant to do a full reback. I knew there was a way the leather of the headcap could be replaced without going to the extreme of a full reback.  A full reback would have required cutting through the shoulder and removing the remaining spine to expose the back of the book.  Though I had never done this particular repair myself, I decided to do a little research and give it a try.

In our conservation library we have a copy of “The Restoration of Leather Bindings” by Bernard Middleton, who is considered to be one of the most skilled and influential bookbinders of our time. This book is an invaluable resource for all types of leather book repairs. It includes detailed instructions and wonderful illustrations on the various ways to repair books bound in leather (there are many). I’ve used this in the past and luckily it has a section on repairing headcaps!

middleton illustrations

Illustrations demonstrating the headcap repair technique I adapted. Middleton, Bernard C. The Restoration of Leather Bindings. Rev. ed., American Library Association, 1984.

In Middleton’s book he is working on a tightback, which means the leather is adhered directly to the spine. This can be more complicated because it’s often very hard to separate the leather from the back of the book without damaging it. The book I was working on had a hollowback which made things much simpler. With a hollowback, the leather is attached to a folded tube of paper adhered to the back of the book, which allows for a more flexible opening. It was fairly easy to adapt Middleton’s method to fit the structure I was working with.

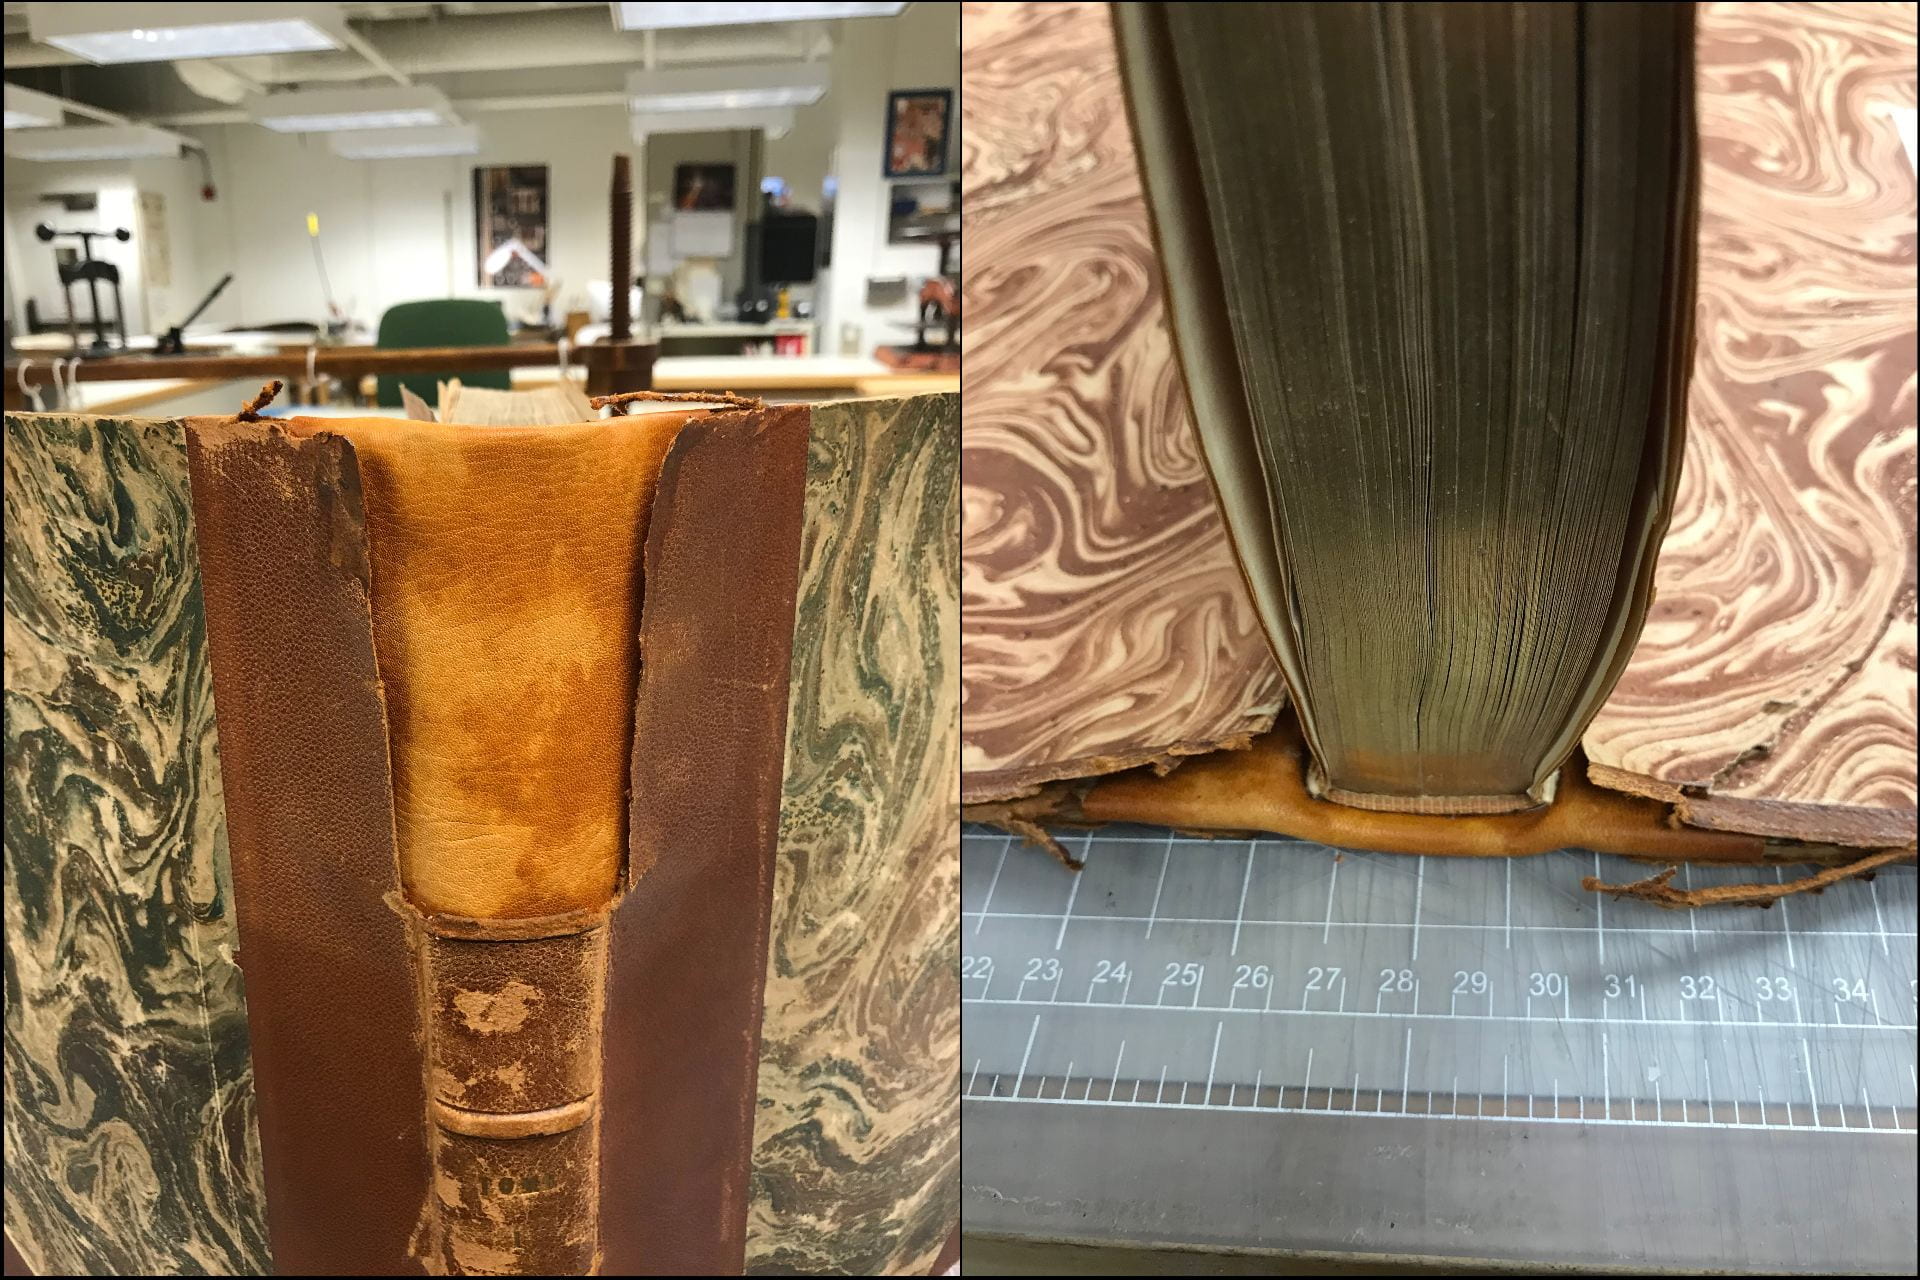
I first removed the linings from the exposed part of the spine. Leaving original linings makes even adhesion of new linings difficult.  It adds bulk and stress to that section of the spine which can inhibit the opening. To remove the linings, I used a poultice of wheat starch paste. This softened the adhesive and allowed me to scrape off the residual paper linings with a dull knife.

lifting leather

Next, I lifted the original leather on the sides of the book and slightly underneath the intact part of the spine. I also lifted the paste downs on the inside corners of the boards where I would tuck the turned in leather.

linings

I lined the exposed spine with Japanese kozo paper and attached a piece of cloth which was carried across the shoulders and adhered to the boards under the lifted leather. A new paper hollow of archival wrapping paper was attached to the spine on top of the cloth lining.

leather

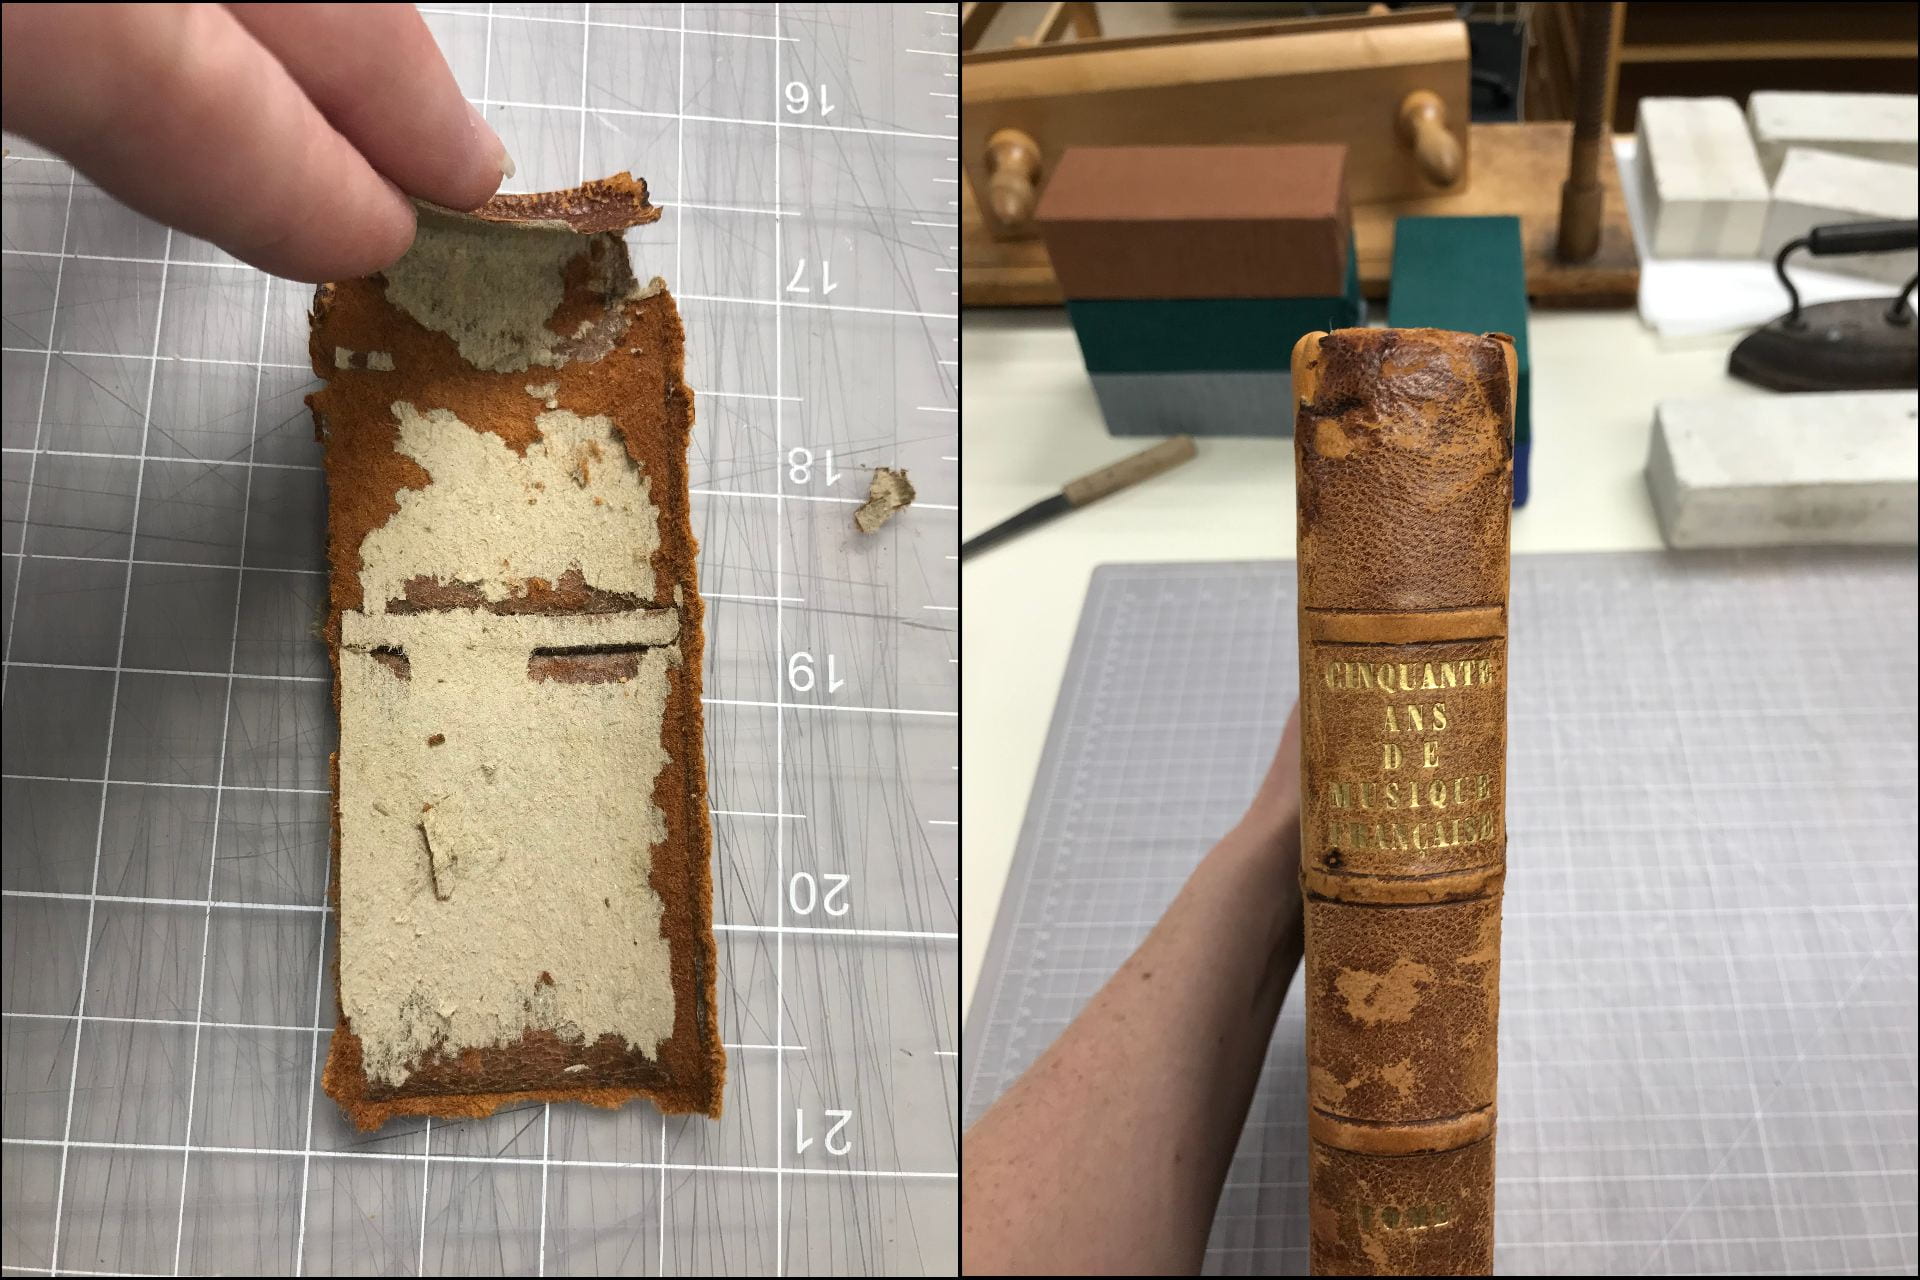
I prepared a new piece of leather (vegetable tanned goat) by paring it very thin around the edges so it could be tucked under the original leather without being too obvious and to minimize the thickness so the functionality of the opening would not be affected.

Normally when doing a leather reback, we would attach the leather to the back of the book and then turn it over to the inside to form the headcaps. What Middleton suggested was to actually adhere the leather “upside down” to the inner boards and back of the book and then turn it back onto the spine. I made two slits in the cloth and the hollow to allow for the new leather being turned over the boards. Using wheat starch paste I attached the new leather around the spine through the slit cloth and hollow and under the paste downs.

new leather

New pared leather inserted “upside down”.

turning in

I then folded it over the slit hollow carefully inserting it under the original leather. Using a bone folder I made sure the leather was stuck down and then formed the headcap.

I set the joint by opening the front and back board and applying a downward pressure while the leather was damp. Setting the joint coaxes the leather into a shape it will “remember” when it dries and allow a free and flexible opening. I used pieces of mylar (precut to size) between the old leather and the new to prevent moisture transferring to the old leather, which can cause discoloration. The book was then put between boards and left overnight to dry.

The next day, I cleaned up and reattached the original spine to the new leather with PVA (Poly Vinyl Acetate is a synthetic adhesive which is useful because it introduces very little moisture which can stain old leather.) The inside paper paste downs were readhered with wheat starch paste.

old spine

The original spine piece was readhered to the new leather.

kozo lining

Lastly, a strip of colored kozo was attached with wheat starch paste to protect the inner joint.

before and after

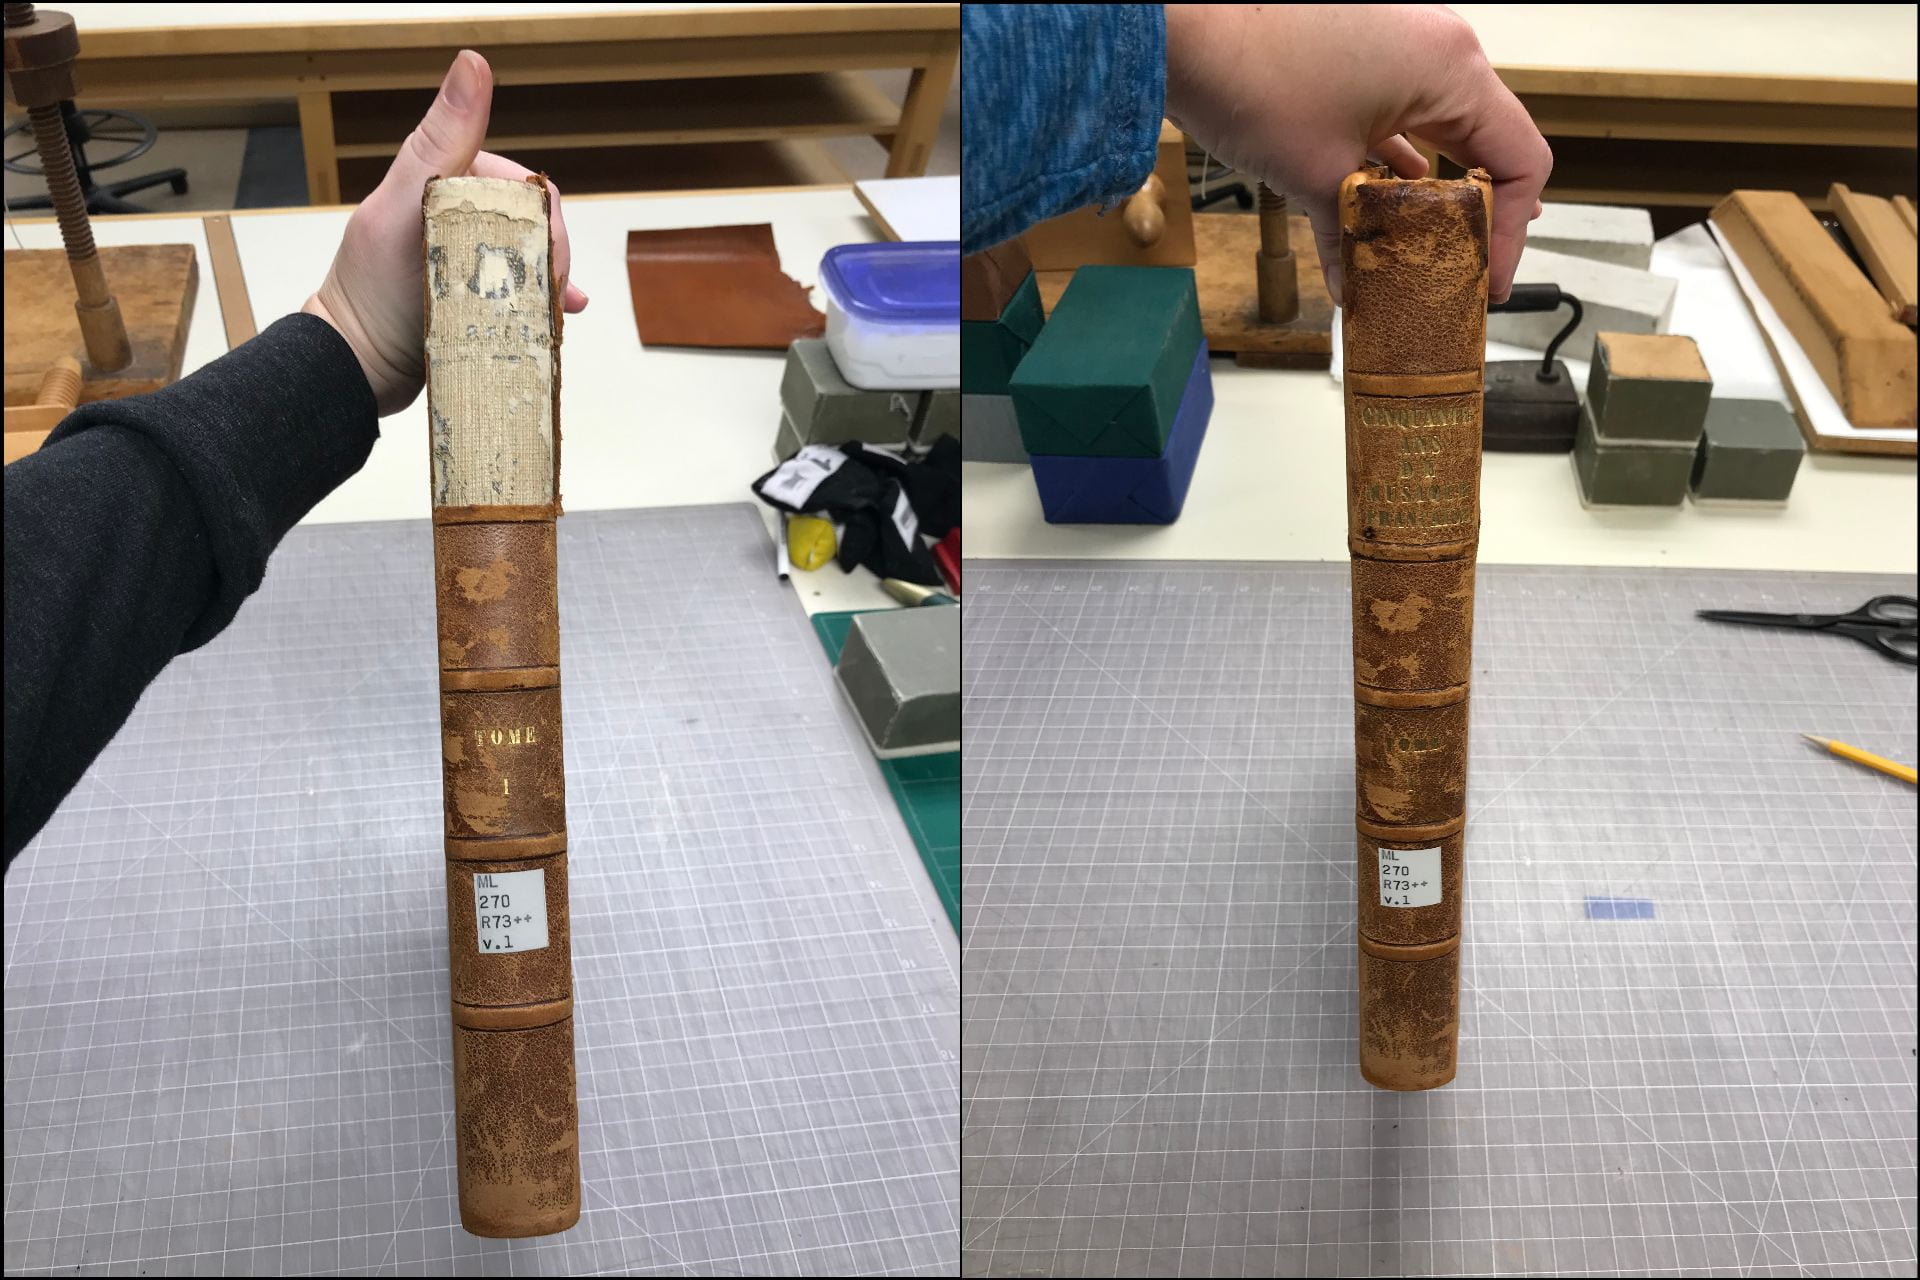
Before treatment on the left; after treatment on the right.

This isn’t a treatment we will use often, but it goes to show what a valuable resource a library can be, and how much can be learned from the countless years of experience gathered in a few books!

For more information on Bernard Middleton’s extraordinary career. See: https://blogs.bl.uk/collectioncare/2019/01/remembering-legendary-bookbinder-bernard-middleton-1924-2019.html

Repairing a 17th c. pop-up book!!!

Caitlin Moore


“Pinax Microcosmographicus” came to us from Cornell’s Rare and Manuscript collection, in preparation for being displayed in an upcoming exhibit. The deceptively plain vellum binding with tattered ribbons hides a remarkable 17th c. “pop-up book”!

These anatomical drawings are constructed in such a way that you can lift various flaps to see different layers of the human body and other hidden images.

The first issue I chose to address was the binding structure. The book consists of four sections sewn on vellum tapes which are laced into the covers. The first page of each folio has a stub that wraps around the back of the inner folio to be sewn through. These stubs had broken and been pushed under the previous section.

I humidified each stub and coaxed it back to it’s original position. I then reinforced weakened areas with Japanese tissue and wheat starch paste to prevent the tabs from coming back through without affecting the flexibility of the structure.

Many of the flaps had become weakened and were curling or creased from time and use. The curling flaps were at risk of being crushed when the pages were turned or the book closed. This required localized humidification which was carried out using very slightly dampened pieces of blotter to relax the paper followed by dry blotter and weight to make sure the paper dried in the correct position. Blotter was also inserted behind the page to draw the moisture through the paper and a sheet of mylar protected the page beneath from any moisture that might carry through.

Once the flaps were flattened, I repaired all edge tears and some of the smaller pieces such as this foot which had to be reinforced as the small toe was beginning to detach and had to be consolidated.

Then came the ribbons… The ribbons were a mess, they were frayed and twisted and looked beyond repair.

I decided to alternate lightly humidification of the ribbons and gentle reshaping with my fingers. This took a considerable amount of time but eventually they became flatter and I was able to start sorting out the fraying fibers. I used a small awl to gently separate the fibers and put them back into position.

I contacted a local textile conservator and asked for advice on consolidating the ribbon. I had planned to back the frayed bits with a tinted tissue. The textile conservator agreed and suggested using Methyl Cellulose instead of paste to attach the tissue. I then used acrylics to tint a lightweight hanji paper to match the color of the ribbon.

I attached the tinted tissue to the ribbons with Methyl Cellulose as suggested and let it dry under weight. This was repeated on all four ribbons with great results!!

Finally I built a drop spine box to protect the book. I added velcro closures to ensure the box would keep the vellum covers in place should they start to warp. You can see the Pinax Microcosmographicus in the artist book exhibit in Kroch Library opening June 8!!!


Shedding Some Light on Medieval Pigments

By Caitlin Moore

Louisa Smieska (postdoctoral researcher, CHESS) and Ruth Mullett (Ph.D. Candidate, Medieval Studies) have been working with Laurent Ferri, (Curator of pre-1800 collections for Cornell University’s Rare and Manuscript Collections) to identify inorganic pigments used in some of the illuminated manuscripts in Cornell’s collection. They will be performing x-ray fluorescence mapping (MA-XRF) experiments at CHESS (Cornell High Energy Synchrotron Source). This analysis will help to determine the chemical makeup of the pigments in a non-invasive way. More specifically, the experiments will yield maps that show the 2D concentrations of chemical elements present in the inks and pigments. Knowing what elements are present can allow researchers to infer the identities of the pigments, and information on chemical impurities might also shed some light on the geographical source of certain pigments.

Louisa and Ruth are particularly interested in using this technology to determine what might lie beneath this image, which you can see has been adhered to the page rather than being painted directly on the parchment. The x-ray analysis could potentially help uncover what is beneath the affixed image, without having to perform the invasive process of physically removing it.

IMG_6241   IMG_6242

Leaf from a Book of Hours, Paris, ca. 1500  Coronation of the Virgin

Stitching the Links Between Ancient and Modern Binding Structures

By Pat Fox and Caitlin Moore

For our recent exhibit in Uris Library, Book and Paper Conservation at Cornell University, we decided to explore a historic structure that is a link between scrolls and modern bindings.

Coptic bindings were first produced in the 2nd century AD by the Egyptian Christians called Copts. The Copts popularized a way to bind together several folded sheets of papyrus using a series of linked stitches forming a chain. This codex format is what we know as a book. It evolved from Roman diptychs, hinged wooden tablets coated with wax.

book

Courtesy of WikiMedia


The codex was easier to use than a scroll because it opened flat to any page, and both sides of the pages could be written on. By the 6th century AD, scrolls had been replaced in Western culture by codices.

Exposed spines of machine sewn books

The link stitch is very similar to the machine sewing used today to produce publisher’s hard cover books.  We chose to produce models of this binding style because the exposed spine makes the book structure visible.

detail of machine sewing


two colored sewing

 This book is bound with a two colored greek coptic stitch using 4 needles and two colors of thread.

detail of greek coptic stitch

preparing to join the halves of the two part greek binding

This book is sewn with the same linked stitch but the halves are sewn independently and then joined with a figure eight shaped knot.  Each half was sewn with 6 needles and the knot to join them required 12 needles.

detail of greek sewing with joining knot

Please join us on July 25, 10:00am in the lower level of Uris Library for a tour of the exhibit!

Davenport, C. (1907) The Book Its History and Development, London, Archibald Constable & Co. Ltd.

Diringer, D. (1953) The Hand-Produced Book, London, Hutchinson’s Scientific and Technical Publications.

Greenfield, J. (1998) ABC of Bookbinding, New Castle, Delaware, Oak Knoll Press.

Smith, K. (1995) Non Adhesive Binding, Vol. 3: Exposed Spine Sewings, Rochester, New York, keith smith BOOKS.


We’re Not All Books and Paper!

By Caitlin Moore

From time to time we get the odd project to shake up our routine a little bit. This one was pretty interesting. Quite a bit different than the books and paper we are used to!

The A.D. White collection of historical medallions is a collection of two thousand copies of antique gems from the Royal Museum of Berlin. These plaster casts are very small and have been adhered into paper lined wooden boxes. Many of them have been on display for years and had gathered a lot of dust.


When they came to the lab we decided to use the Nilfisk vacuum with a micro brush attachment to clean out the boxes. This is a photo of a half cleaned box:


Over time the adhesive holding the casts in place had become brittle and weak in some areas so I also re-adhered the loose pieces into their rightful places using B72 Restoration Adhesive.