Compressing Files
Tips compressing files for your Canvas Course
PowerPoint (with images)
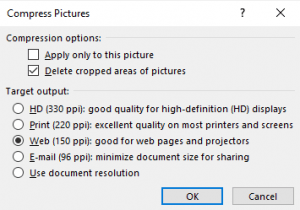
Select an image; select Format > Compress Pictures. On the popup window, un-check ‘apply only to this picture’, check ‘Delete cropped areas’ and check Web (150 ppi), like this:
Word 2016:
Insert your images (rather than pasting)
Pictures are automatically compressed on save. If you notice a loss in image quality or pixilation when inserting pictures, you may want to change the default resolution for your document to high fidelity. Choosing the high fidelity resolution ensures that pictures are not compressed unless they exceed the size of the document canvas, that minimal compression is applied if necessary, and that the original aspect ratio is maintained. Click File> Options > Advanced. Under Image Size and Quality, select High fidelity in the Default resolution
Word –pre 2016:
Insert your images (rather than pasting)
- Select the picture you want to compress.
- Click the Picture Tools Format tab, and then click Compress Pictures.
- To compress your pictures for publication on a Web page, under Resolution, click Web.
Adobe PDF:
compress your file before upload: Tools > Optimize PDF > Compress
Images:
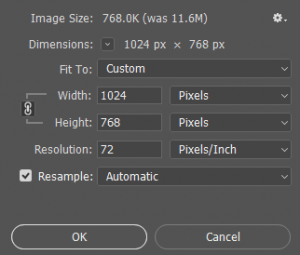
If your images are wider than 1024 pixels, you should first shrink your image before adding to your Document, Canvas page or eTest. Open your image in Photoshop; click Image > Image Size; set the width to 1024 and be sure to check Resample, like this:
