We’re getting to the end of pruning season… but there’s still time! If you’ve ever wondered why late winter / early spring is the ideal time to do most apple pruning, it’s because the tree is dormant, and there aren’t airborne pathogens around. As a bonus, the branch structure is easier to see without the leaves. Pruning is necessary to shape your tree, prevent disease, and encourage the productive fruiting wood, which is 2-3 years old. It is best done annually, as mature trees that are left unpruned can become unproductive.
So… where should you begin?
Stand back and look over your tree from a slight distance. If there’s anything glaring – say a branch that is dead, diseased, or damaged, remove that first, back to a healthy joint (see advice below on where and how to cut). After removing any diseased branches, and after pruning each tree, clean your tools with rubbing alcohol or other disinfectant to avoid spreading pathogens to other branches or other trees. Crossed branches can result in rubbing and injury particularly in high winds or when weighed down by fruit so eliminate one of them. Any branches that are growing toward the center of the tree will not serve the tree’s need for sunlight and airflow. Also remove drooping branches, which are often shaded, reach too close to the ground when laden, and create mowing challenges.
And when should you stop?
Whether you’re working on a young tree or a mature, neglected one, it’s important to remember that you should never remove more than ⅓ of the tree. Exceeding this can cause excessive vegetative growth. So if it’s clear from the start that there’s a large branch that needs to go (because it’s dead, diseased, damaged, or interfering with the shape of the tree), then cut only that one and call it a day, no matter how tempting it may be to continue pruning. You can get to the minor cuts next year. Keep in mind, you can easily reach that ⅓ rule even by cutting a few smaller branches, especially on a young tree. Stepping back occasionally can keep your pruning in perspective and is essential for maintaining an overall balance of the tree.
After you’ve removed any glaring problems, assess the overall shape of the tree.
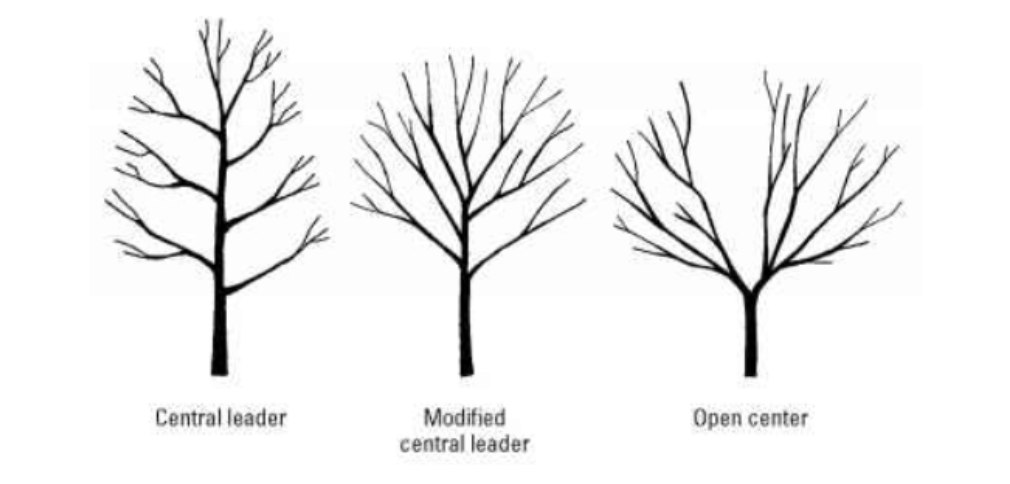
Your aim will likely be production and overall tree health. Two common training systems to achieve this are the “central leader” system, and the “open center” system. The “central leader” system involves maintaining a dominant central stem, encouraging all other branches to spread horizontally in “scaffolds” or whorls around the trunk. A tree trained to the central leader will be taller and narrower than one trained to an “open center,” which yields a vase shape without a central trunk. Regardless of which structure you aim for, each branch will need adequate vertical and horizontal space to allow good airflow through the tree, and good sunlight penetration into the canopy. I’ve heard it said that when you’re done pruning you should be able to throw your hat through the tree without it hitting any branches!
There are many reasons to encourage and select for horizontal branches over branches that grow at a tight angle to the tree. Horizontal branches produce less vegetative growth and more fruit due to good light exposure. These branches also can hold more fruit without breaking. Branches with narrow branching angles tend to be weaker and break more easily under the weight of fruit. Broken branches can serve as an entry point for organisms that cause disease and decay.
Thinning vs heading cuts
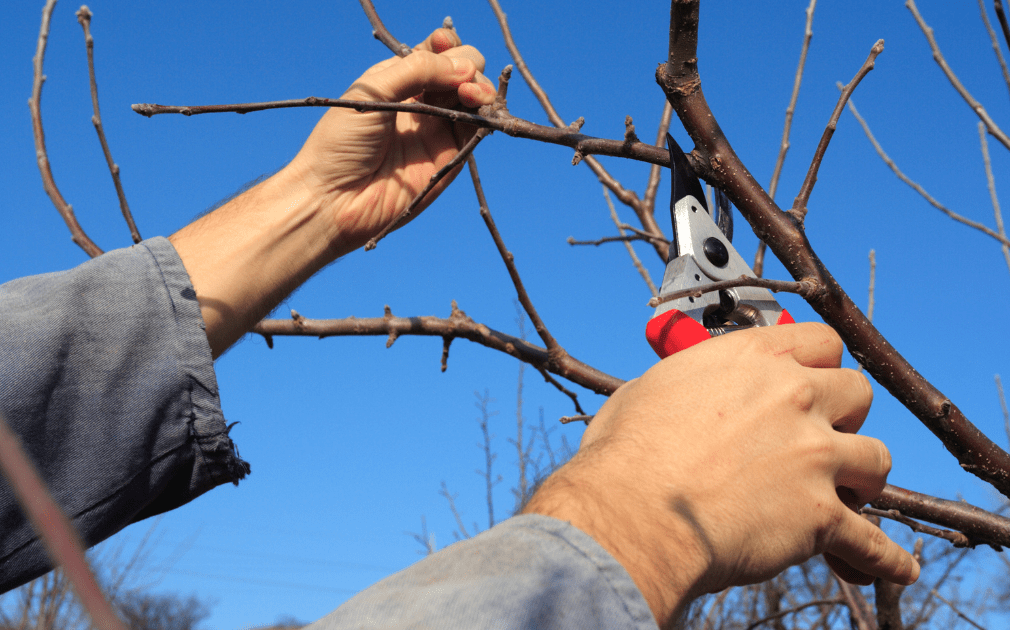
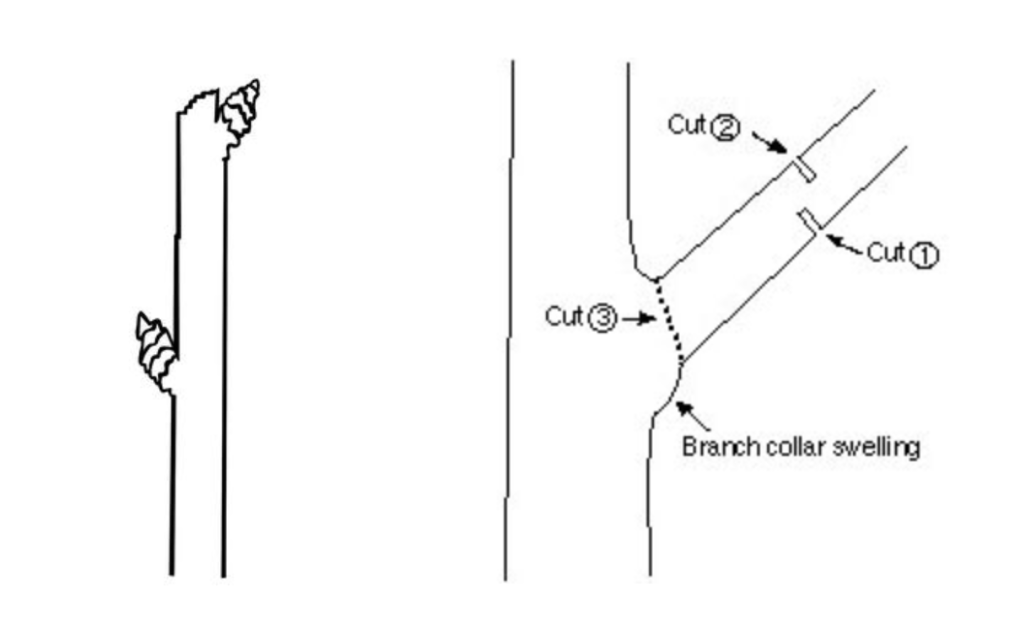
Pruning cuts are either thinning cuts, which remove branches from their point of origin, or heading cuts, which shorten branches. Favor thinning cuts over heading cuts, which can cause unwanted vegetative growth.
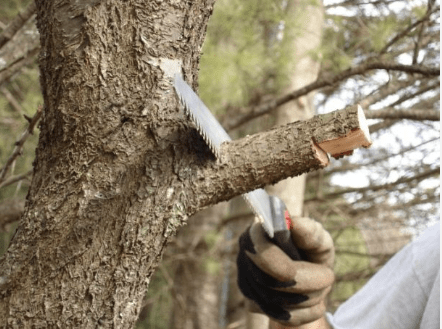
When making a thinning cut, it is important to preserve the branch collar that forms where the shoot meets the branch or trunk. For larger branches, in order to prevent the branch you’re cutting from having bark peel from the underside when it falls, it is best to do a three-step cut. First, find a spot a few inches beyond the site of the final cut, and saw up from the underside ⅓ of the way into the branch (this cut will limit the bark stripping on the next cut). Next, find a spot a few inches further out on the branch to cut all the way through (taking most of the weight off the branch and leaving only a stump). Lastly, cut the stump at the branch collar so that the tree will heal easily from the wound.
When making a heading cut, trim back to an outward-facing bud, which will encourage the branch to grow in the direction of the bud. The cut should be around ¼” beyond the bud, at a 45 degree angle sloping away from the bud so that rain will shed away from it easily.
Using the proper tools for the job is a key part of pruning.
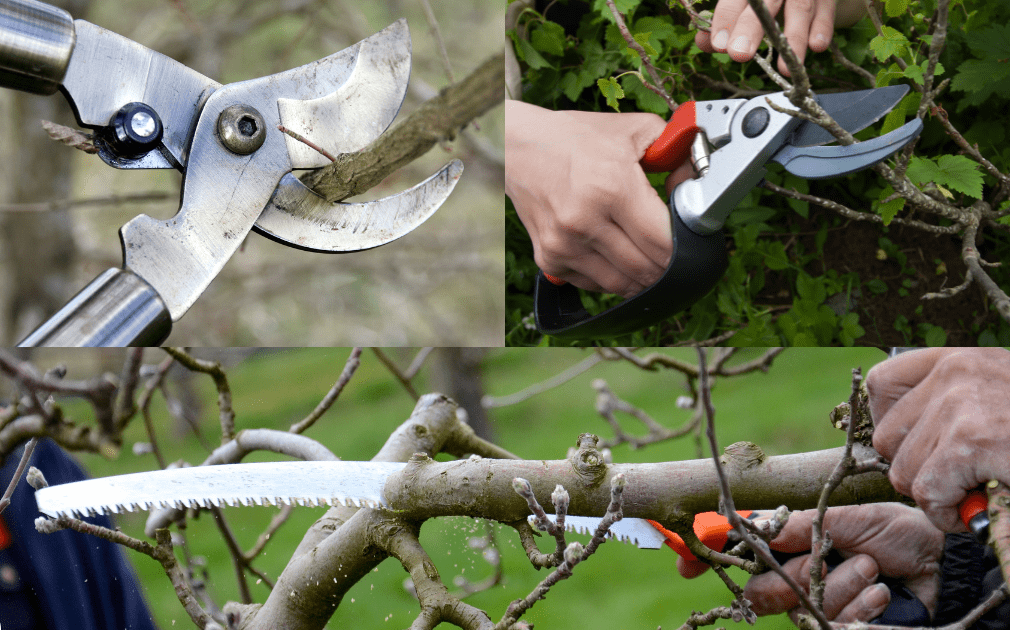
Most pruners will utilize multiple tools depending on the size and placement of the branches they are cutting. Use hand clippers for small branches, up to the diameter of a finger, loppers for medium branches, and a sharp saw for the largest ones. A chainsaw and an orchard ladder may be required for larger trees.
Learn to identify fruiting spurs so that you can envision where the fruit will set and make pruning decisions accordingly. When you’re done, gather up your prunings and put some in a vase inside to watch the flowers and leaves unfurl far earlier than the trees they came from!
Learn more about pruning and training (p. 21-34), establishing an orchard, and growing all kinds of fruit from the Cornell Guide to Growing Fruit at Home.
Here’s a brief summary of pruning information for you to reference in years to come.
Erica LaFountain is Community Horticulture Educator for St. Lawrence County. She has a background in organic vegetable farming, gardening, and orcharding and has a homestead in Potsdam, NY.