Winter Sowing means starting seeds outdoors in Winter. Yes, even here in zone 4, you can winter sow seeds from January through early April. I had heard that winter sowing was an easy and inexpensive way to start plants without the expense of an indoor growing setup. And that winter sowing produced sturdy plants and eliminated the time-consuming process of hardening off (transitioning your plants from indoor growing conditions to outdoor conditions). And it also helps cure that itch to be gardening when the world outside is cold and white.
It may sound crazy to sow seeds in winter but if you think about it, lots of plant seeds overwinter outdoors and then germinate when conditions are right. And not just cold-hardy plants. How many times have you found “volunteer” tomatoes or squash or annual flowers growing in your garden from the previous year’s planting?
Curiosity got the best of me, so I decided to do some research and give it a try. I’ve been starting seeds indoors for several years, so I am eager to compare the results of some winter sown seeds to those started indoors under lights.
As this is my first year to winter sow, I can’t share my experience, but I’d love to share some of what I’ve learned from my research. As with any gardening method, there are various opinions on the best way to accomplish a given task but I hope to give you enough basic information in this article and additional resources to enable you to try this on your own.
There’s still time! As of this writing in mid-March, one look outside tells you it’s still winter!
The process of winter sowing is to create a mini-greenhouse, sow seeds in it, put the mini-greenhouse outside, and wait for the magic of sprouting seedlings in spring. Another version of this winter sowing technique is called No Transplant Winter Sowing (NTWS) which, as the name implies, means you plant your seeds in their permanent location and fashion a temporary greenhouse or cloche over them. This article does not cover NTWS.
“But I live in Zone 4 and it gets well below zero in the winter! Sometimes for weeks! What can I possibly sow?”
Winter sowing is popular for folks in zones 4-8. There are so many things you can winter sow even where temps dip well below zero.
- Native Plants – which makes sense. They are adapted to our harsh winters. [Note: some native plant seeds need special treatments such as cold stratification for a certain number of days. If they need more than 30 days of cold stratification it may be too late to sow this winter.]
- Perennials or tender perennials that self-seed in our zone- this also makes sense.
- Annual flowers – Except for tropical ones, most annual flowers can be winter sown. Tender annuals are recommended for sowing a few weeks before the winter season ends.
- Vegetables – Not just cold-hardy vegetables! I’ve read different approaches on the timing of sowing the more tender, heat-loving vegetables such as tomatoes, peppers, and eggplant. Many folks wait until a couple of weeks before winter’s end but lots of folks plant them in January or February with good results. For this year it seems now is a fine time to start.
“Building a mini greenhouse sounds time-consuming and expensive.”
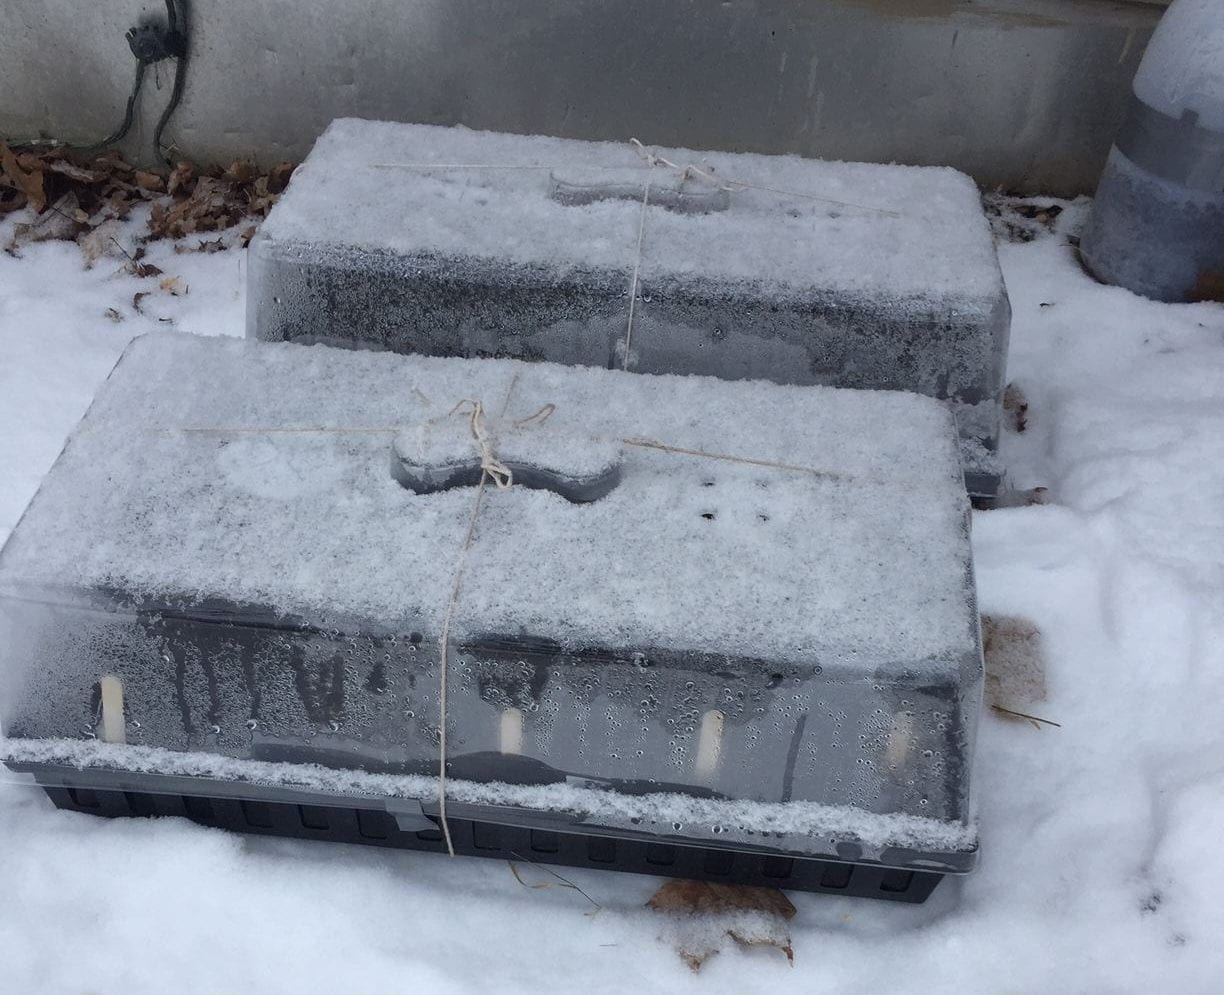
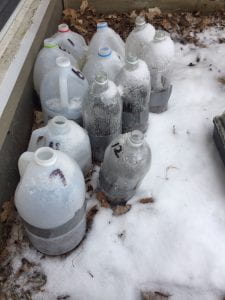
Well, I use the term “greenhouse” loosely, but the effect is similar. The beauty of this is that all kinds of recycled containers work for winter sowing, and you use tools you have on hand. Gallon jugs are the most frequently used containers, but you can use recycled 2-liter soda bottles, produce containers, etc. Jugs and bottles are cut open horizontally to create the greenhouse, leaving a small part uncut to act as a hinge for the lid. You can also use the 6-packs and seedling flats with the clear plastic covers that you use for indoor sowing. Here are the basic guidelines:
[Note: the link for Starting Seeds in Winter at the end of this article gives specific instructions on using gallon jugs. I encourage you to read it to understand the basics of creating the greenhouse even if you plan to use something else.]
- The container needs to hold growing medium 3”-4” deep. If the medium is not deep enough there won’t be enough mass or room for the roots to grow.
- There must be drainage holes to prevent the medium from becoming waterlogged. Holes can be on the bottom or on the sides about ½”-1” above the bottom. They should be spaced all around and not just one hole in the center.
- There must also be openings in the top to allow water to enter (via snow and rain) so the growing medium doesn’t dry out and to vent heat on sunny days.
- The top of the mini-greenhouse must be clear or translucent and tall enough to allow the plant to develop to the point of transplanting. The timing for transplanting is a personal choice. Some folks transplant seedlings to pots while they are small. Others leave the seedlings to grow until they are ready to put directly into the garden or until they have outgrown their container.
“What do you mean by growing medium?”
It is important that you not use garden soil, topsoil, or compost to grow the seedlings. These do not drain well which could cause seeds to rot or encourage damping off in young seedlings. The medium must drain well so the use of potting mix or potting soil is recommended. You can purchase this or mix your own. Some folks suggest using seed starting mix. Your choice depends on how you will treat your seedlings. Seed starting mix doesn’t contain nutrients to foster plant growth. If you use, it be prepared to transplant seedlings when they are very young to a growing medium with nutrients. Potting mixes do contain nutrients so you can keep your plants growing in their greenhouse longer.
“How do I sow the seeds?”
Your growing medium should be wet but not dripping. You can moisten it before or after adding it to your container. I find it easier to fully moisten prior to adding. Sow the seeds and cover them to the recommended depth with more growing medium or vermiculite unless the seeds need light to germinate. If they need light, don’t cover them. Check your seed packet for instructions. After seeding, mist the top with water to moisten, then attach the lid.
Very small seeds are usually thinly broadcast. Larger seeds are often sown in rows. How you sow depends somewhat on how you will be handling the seedlings. Seeds sown in rows are easier to transplant individually without disturbing the roots too much. If you broadcast sow (which is often the only way with extremely small seeds) you can transplant by cutting the medium like brownies and lifting out small clumps.
“What do I do after I’ve sown my seeds?”
Don’t forget to label your containers either on the outside or inside (or both)! Newly sprouted seedlings are often indistinguishable from each other. In addition to the variety it is helpful to include the planting date. Be sure to use a marker that won’t fade from sun or moisture if you label the outside of your containers.
Set your mini-greenhouses outside right on the snow or frozen ground. Place them in a spot where they won’t be blown over in the wind or trampled by foot traffic (human or animal) and where you can keep an eye on them. Leave them alone even if temperatures drop as long as the seeds haven’t sprouted. Since you began by thoroughly wetting the growing medium before sowing the seeds and you have holes in the top of the container so rain and snow can enter, they should not dry out. If you see condensation on the inside of the lid that’s a good sign. If you don’t, check the soil for dryness and water if necessary.
The seedlings will emerge in the spring. Be patient. Once seedlings emerge monitor often. Containers may need to be opened during the day if Spring temperatures get too warm and it’s sunny. You can close them again in the evening. If you’ve planted tender flowers or vegetables that are not cold hardy, you should cover the containers for protection if the nighttime temperatures dip below freezing. And then uncover them during the day.
And there you have it! I’ve included links below to additional resources. You can also find lots of information on the Internet. Keep in mind that some of the information may pertain to a growing zone that is not zone 4. I hope this has sparked your interest in giving winter sowing a try. I’ve completed most of my winter sowing but I will continue sowing seeds through early April. I look forward to sharing my results with you. Happy growing!
Starting Seeds in Winter (from Penn State Extension) includes information on preparing gallon jugs.
All the Dirt on Winter Sowing (a 24-minute webinar from University of Maryland Extension Charles County Master Gardeners).
Carolyn Filippi is a Master Gardener Volunteer who has been growing vegetables and perennials in Old Dekalb for over 40 years. She preserves food from her garden and teaches Seed to Supper classes for beginning gardeners.