Bringing a baby into the world and keeping them safe and healthy can seem really overwhelming—and expensive—sometimes, even when it’s not your first one. I want to assure you that making your own baby food can be super simple and convenient, and often easier on your budget than foods packaged specifically for babies.

First Things First
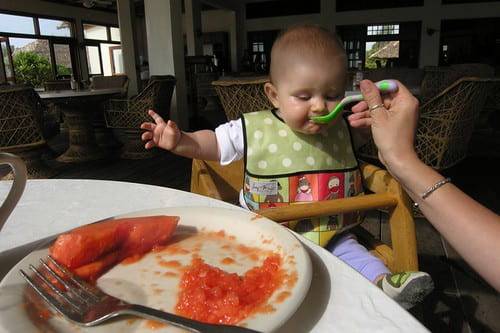
The Dietary Guidelines for Americans 2020-2025 recommends breastfeeding or formula as the primary source of nourishment for the first 12 months. Usually around 4 to 6 months of age, babies are ready to start adding solid foods into their diet in preparation for weaning: their tongue thrust reflex has faded, they can sit up with some support, and are able to hold their head up; they may be reaching for (your) food, tracking food with their eyes, opening their mouths for food, and licking their lips.
And are YOU ready?
You probably have most, if not all, of the tools you will need to make baby food:
-
- Prepping: a cutting board and knife
- Cooking (for foods that are not already soft): a pot, or steamer, or baking dish
- Pureeing: a spoon, or fork, or potato masher, or blender, or strainer, or food mill
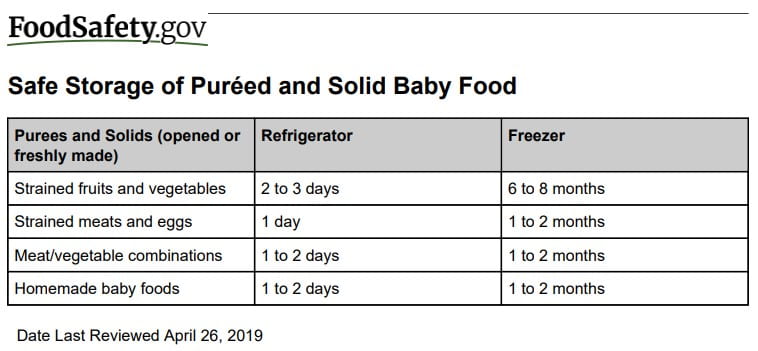
- Storing: heat/microwave safe dish (for 1-2 days in the refrigerator); ice cube tray or baking tray with wax paper, plus plastic wrap, and freezer bags or containers (for 1-8 months in the freezer)
Did You Know?
Sanitation is super important with baby food, because their immune system is not yet fully developed. Short cuts that you might take with your own food might be very unsafe for your baby.
-
- Be sure to use hot, soapy water when cleaning surfaces, tools, and hands when prepping the food
- Give a good washing to fresh produce, especially the ones you’re not going to cook before feeding
- When thawing, be sure to use the safety guidelines to avoid the growth of bacteria. Do not thaw on the countertop!
- Avoid unpasteurized foods (like milk and cheese) and non-commercially prepared canned foods
- Be sure to date the containers you put in the freezer (and refrigerator) to ensure best quality as well as safety
- With meats, use a meat thermometer to ensure it has reached the proper internal temperature, as well as ensuring it is tender enough for baby
No Added Sugars…your baby is sweet enough already!

The Dietary Guidelines for Americans 2020-2025 also recommends that no added salt, sugar, seasonings, or fats/oils be in baby foods before age 1.
-
- If using packaged foods to make baby food, watch for added salt, sugar, and fat in the nutrition label and ingredient list. For example, canned sweet potatoes are often in syrup, and so aren’t ideal for baby food.
- Don’t offer fried foods; instead, use methods that don’t add oils, like steaming, boiling, baking, and roasting. Tip: if boiling, use the smallest amount of water you can, and then use that nutrient-rich water to thin the texture of the food.
The recommendation on no added sugar continues to age 2! It’s also recommended that you not offer fruit/vegetable juice before age 2, either; stick with whole fruits and vegetables instead.
It’s important to expose your baby to a variety of flavors, not just sweet, so be sure to offer vegetables and meats in addition to fruit.
Let’s Get Started!
That ripe banana, avocado, or peach on the counter just needs to have the skin/peel and pit removed. For older babies, you might leave some of the skin/peel on, but for beginners that texture is usually too much. Once peeled, mash it up with a fork—or put it in the blender—until it’s a smooth puree, and it’s ready to go.
Same for that can of peas, beets, or pears. Just remember to make sure there was no added sugar or salt listed in the label: that means looking for fruit canned in its own juice rather than in syrup, and veggies that are not pickled or in a sauce. The same goes for frozen fruit and vegetables.
For fresh foods that aren’t soft enough to be mashed with a fork, cook until they are puree-able. Steaming and roasting are methods that hold nutrition the best, and boiling and baking are also good methods.
Set aside some of what is going on your own plate (but remember not to season or add oil to it); or make a whole batch just for baby (freeze what you can’t feed in a couple of days).
Fresh vs. Canned and Frozen
Starting with canned or frozen (thawed) fruits and veggies can be a real time and energy saver! Many have already been peeled, and cooked to a soft texture.
Commercially canned and frozen fruits and vegetables are good choices for everyone in the family, as they are usually processed within 24 to 48 hours of harvesting. Studies have shown they are as nutritious as the fresh produce you bought in the supermarket (nutrition is lost during the shipping and storage time of fresh produce).
Again, just be sure to choose ones that have no added sugar, salt, or fats, and to thaw frozen foods safely.
A Note on Texture
Peels and seeds may provide too much texture, especially for a beginner. If in doubt, push the food through a fine strainer to remove lumps, strings, seeds, and other solid bits.
Adding a little breastmilk or formula to thin out the texture may also be a help to beginners. Or, as mentioned above, if you boiled the food, use the water you boiled it in (some of the nutrients will have leached into the boiling water).
Please note: thin the food when ready to serve, not in preparation for freezing; if adding before freezing, the texture will likely suffer. Re-freezing is also not recommended because the texture will worsen.
Freezing Your Homemade Baby Food
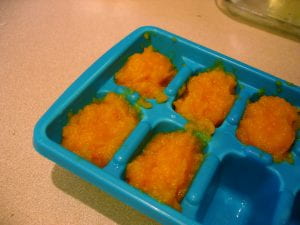
Freeze portion sizes appropriate for your baby—1 to 2 teaspoons for a beginner, or maybe 4 to 6 tablespoons for an older infant—as that will make it more convenient when thawing, with the least waste. Creating individual portions on a baking tray or in an ice cube tray works well, though small, individual, freezer-safe containers can also be convenient.
If using a baking tray, line it with parchment paper; this will help release the frozen puree. Silicone also releases well, and so would also work as a liner or as the material of the ice cube tray. Place as many portions on the parchment as will fit, cover with plastic wrap, and place in the freezer until frozen. If using ice cube trays, covering with plastic wrap is also recommended. After the puree is frozen, take off (or out of) the tray and store in a freezer bag for 1 to 8 months depending on the food.
The general rules for freezing apply to baby food:
-
- Freezing does not sterilize food
- Leave head space (1/2 to 1 inch) for expansion while freezing
- Most glass is not freezer-safe: don’t re-use glass baby food jars
- If not cooking, you might consider blanching: blanching (placing in boiling water for a minute and cooling quickly) slows the enzymatic processes that cause loss of flavor, color, and texture.
- For best quality, cool before freezing, and freeze only as much at a time as will freeze in a few hours (general rule is a maximum of 2 to 3 pounds per cubic foot)
- If transferring the frozen puree to a freezer bag, take out as much air from the bag as you can. Air space allows for more crystals to form, which can affect texture.
- For best texture, don’t thin the puree before freezing
- Remember to label and date the frozen food!
——————————————-
Wishing you and your baby years of happy, healthy eating! If you are interested in more helpful tips or nutrition information, or to participate in our free nutrition/cooking classes, visit our website (cceschoharie-otsego.org/nutrition-health) or contact our nutrition educators: Michelle Leveski, mml39@cornell.edu, 518-234-4303 ext. 115, or Kimberly Ferstler, kmf2349@cornell.edu, 518-234-4303 ext. 120