
Building the Surveillance Copter [Software]
This post outlines the steps taken by the team to get the software part of the Surveillance Copter ready:
Pre-Requisites:
- Odroid U3 – Our choice for on-board computer that will be running ROS
- Pixhawk PX4 – Our choice for flight controller
- Logitech c920 Camera – Our choice for USB camera
- UART Cables – To connect PX4 to U3
- Network Cables – We are using a router for SSH-ing our development desktop to U3 [U3 has USB ports to connect keyboard & mouse, and a micro HDMI port to connect to a monitor]
DISCLAIMER:
- Before we begin, we would like to thank the people behind PX4 for providing wonderful tutorials!
- We are using Ubuntu on our development desktop, so all instructions below assume that you are using Ubuntu as your OS.
Step 1: Setting up Odroid U3
Our on-board computer will be running ROS, and will be used to gather image data from the C290 connected via USB. It will also act as a bridge to transfer telemetry data from PX4 using MAVLINK.
- Flashing the eMMC card with Ubuntu –
- Download the latest (stable) version of ubuntu from odroid site.
- Connect the card to your desktop via a card reader.
- Install pv to monitor data transfer
$ sudo apt-get install pv
- Know your device (card) name and number
$ ls-al /dev/sd*
- Unmount that device
$ unmount /dev/sdX#
- Extract OS Image
$ xz -d ubuntu-COMPLETE-NAME-HERE.img.xz
- Flash the image
sudo dd if=ubuntu-14.04lts-server-odroid-u-20140604.img | pv | sudo dd of=/dev/sdb
- Call sync to make sure write is finished
$ sync
- Logging into your U3 –
- Connect your U3 to a router via ethernet cable
- Connect your desktop to the router
- Using nmap (Network map) or zenmap (GUI for Network Map) to find the IP address of the U3
[In our setup, the desktop got 192.168.2.2 and the U3 got 192.168.2.3] - SSH into U3 [Default username: odroid , default password: odroid]
$ ssh 192.168.2.3 -l odroid
- Installing ROS on U3 –
- Add ROS Repository to index
$ sudo sh -c 'echo "deb http://packages.ros.org/ros/ubuntu trusty main" > /etc/apt/sources.list.d/ros-latest.list'
- Get the official ROS key
wget https://raw.githubusercontent.com/ros/rosdistro/master/ros.key -O - | sudo apt-key add -
- Update the package list
sudo apt-get update
- Install ROS Packages [Base packages, MAVLINK packages, OpenCV Packages and Libuvc Camera Packages]
sudo apt-get install ros-indigo-ros-base ros-indigo-usb-cam ros-indigo-mavlink ros-indigo-mavros ros-indigo-cv-bridge ros-indigo-libuvc-camera
- Install rosdep , which auto-magically installs any ROS dependancies
sudo apt-get install python-rosdep
sudo rosdep init
rosdep update
- Setup catkin workspace
mkdir -p ~/catkin_ws/src
cd ~/catkin_ws/src
catkin_init_workspace
- Add ROS Repository to index
- Connecting PX4 to U3 –
- Connecting PX4 to U3 is very simple, if you have a UART cable.
- For other methods of connecting them, I suggest follow: Pixhawk Companion Link Guide
- Creating our Copter Package –
- Initialize the catkin workspace
$ cd ~/catkin_ws
$ catkin_make
- Create a package [We don’t do any processing on this node, so it has no dependencies]
$ catkin_create_pkg adra_s
- Create the launch file
$ cd ~/catkin_ws/src/adra_s
$ mkdir launch</code>
$ touch base.launch
- Open the launch file with vi and paste the following configuration from our git repository : link
Explanation for the above launch file:- We create 2 ROS Nodes – Mavros and Uvc_cam
- Mavros relays telemtry data to the master
- Uvc_cam gathers image data [We have used libuvc_camera package over default usb_cam]. We specify image size and type for this camera.
- We want our nodes to automatically start on boot. So we create shell script in /etc/init.d/ , register it as a service (create symlink) and run it whenever the system restarts:
-
- Service Script: Copy this file and paste it into
/etc/init.d/adra_s - Make it an executable:
$ sudo chmod +x /etc/init.d/adra_s - Test it to see that the nodes fire up:
$ sudo /etc/init.d/adra_s - Register it:
$ sudo update-rc.d adra_s defaults - Verify service is registered:
$ sudo service adra_s start - Open:
/etc/rc.local - Paste the service call [just before
exit 0]:sudo service adra_s start &
- Service Script: Copy this file and paste it into
- All done, now reboot your U3:
$ sudo reboot
- Initialize the catkin workspace
- Check everything is running –
- Run
roscoreon your desktop - Power up your U3
- Verify that everything is working using
rqtfor Image viewing and Topic Visualization.
- Run
Some snapshots of the process:

S_Copter Hardware Connections
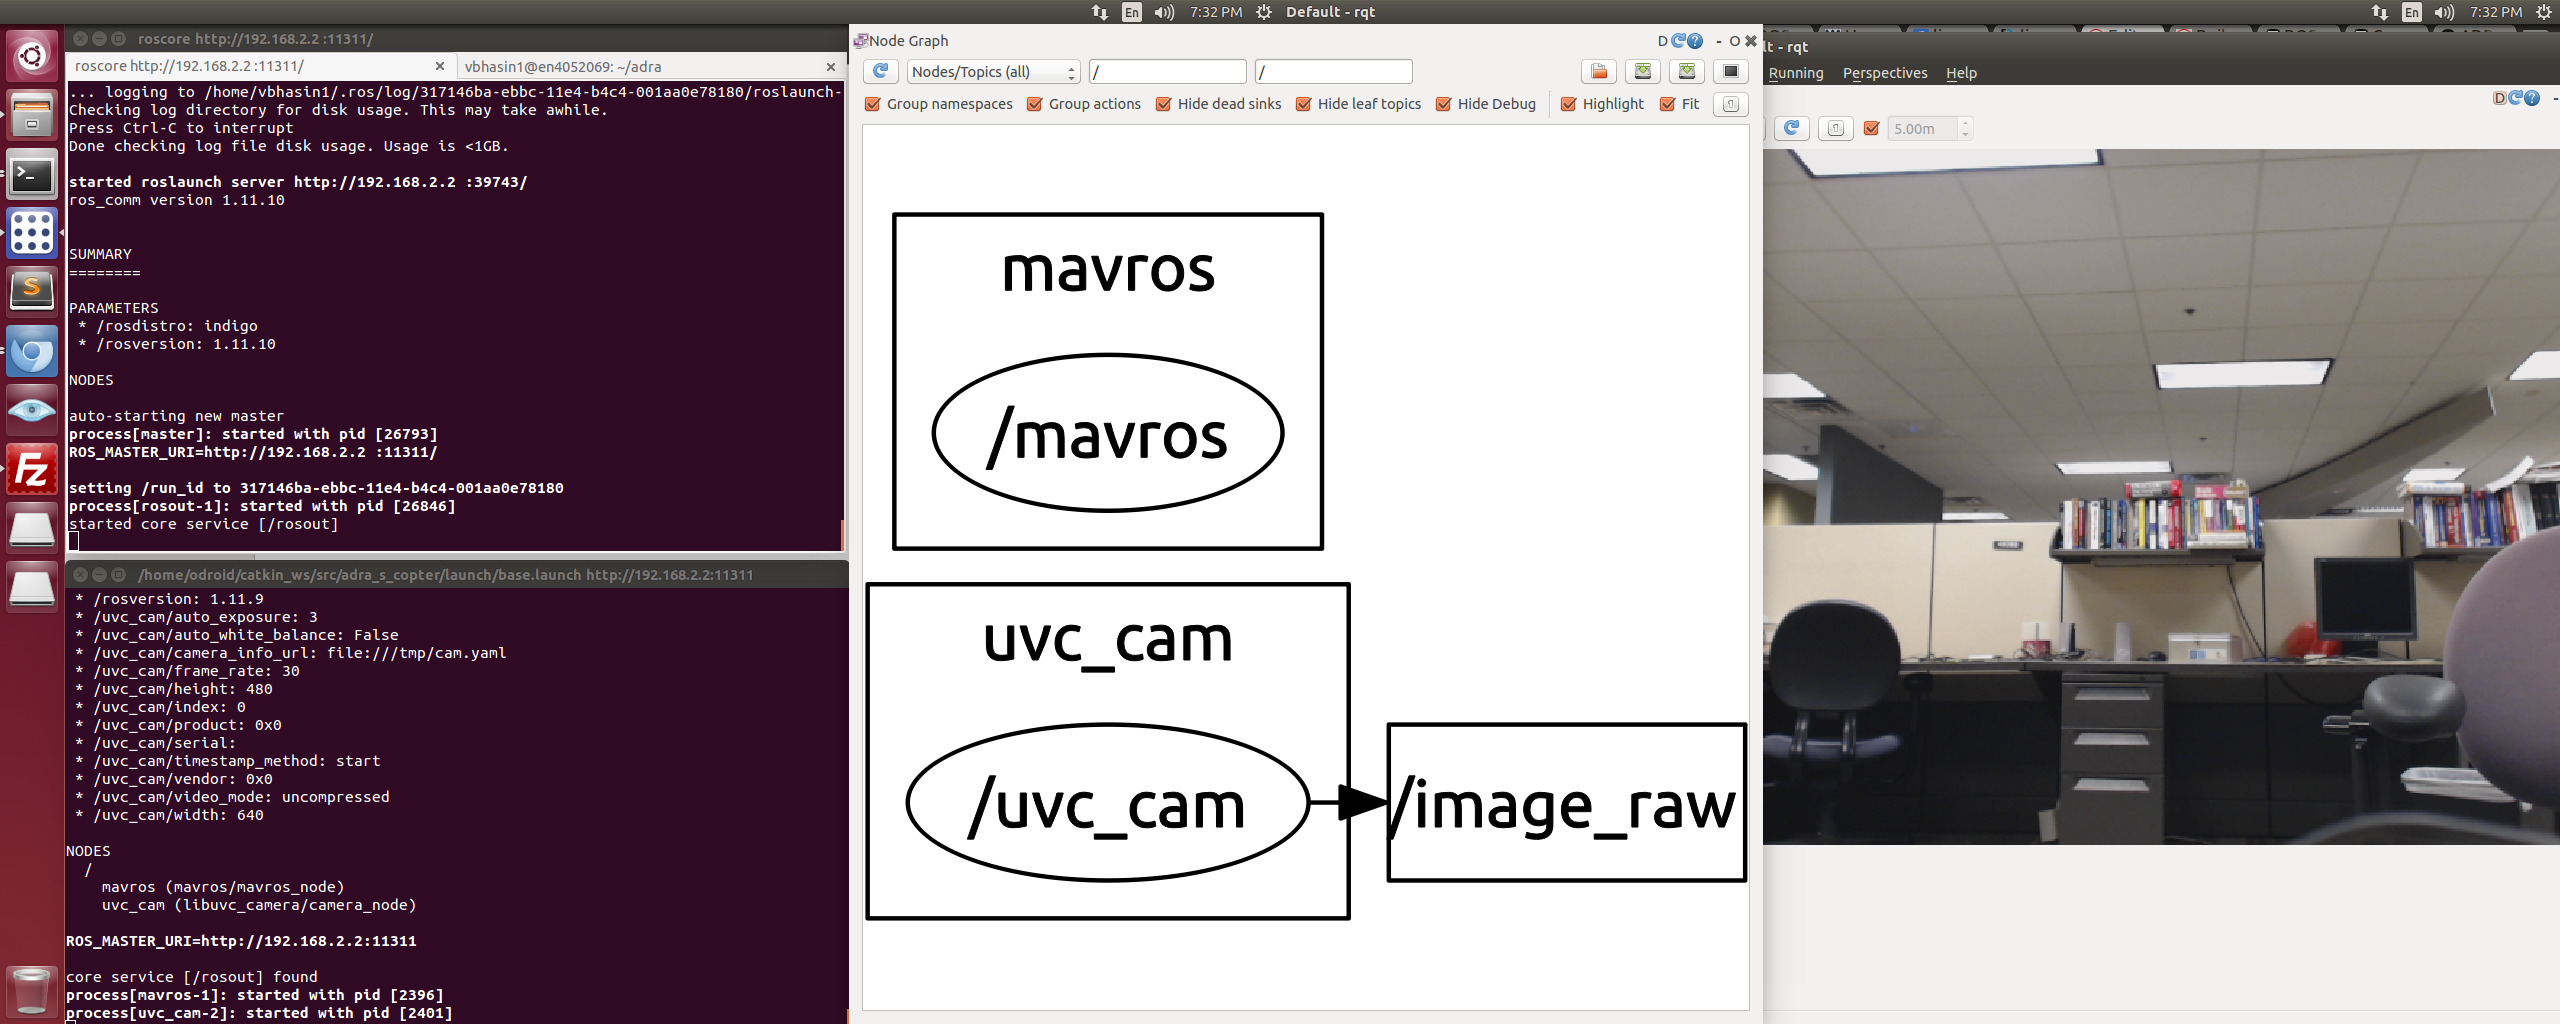
Software Up & Runnin