The Cornell “Standard” AWS VPC 2.0

By Paul Allen

In a previous post, I described the standard VPC configuration we use for Cornell AWS accounts requiring network connectivity back to the campus network. This post is to share minor updates of that configuration. Differences from the original are:

  • Using AWS Direct Connect instead of a VPN to establish network connectivity between campus and AWS VPCs. Our current primary DC connection is 1Gbs, and our secondary connection is 100Mbs.
  • Continued allocation of a /22 CIDR block (1024 addresses) to the VPC, but no longer allocating all of those addresses to subnets within the VPC. This allows for future customization of the VPC without having to vacate and delete /24 subnets as was necessary for VPC customization with the original design.
  • Reducing the size of the four subnets to /26 CIDR blocks (64 addresses) instead of /24 CIDR blocks (256 addresses). This allows the flexibility described above, while still allowing /24 subnets to be created as part of VPC customizations.

Cornell Standard VPC in AWS version 2.0

Amazon AppStream 2.0 for Neuroscience Research

By Bertrand Reyna-Brainerd

It will come as news to few of you that the pace of advancement in computer technology has exceeded all expectations.  In 2013, 83.8% of American households owned at least one personal computer.[1]  In 1984, when the US census first began to gather data on computer ownership, that number was only 8.2%.  At that time, a debate was raging about the scope of personal computing.  Would every household need to own a computer, or would they remain a specialized tool for researchers and IT professionals?  Even the mere existence of that debate seems inconceivable today, and yet the era of personal computing may already be drawing to a close.  This is not due to a decline in the need for or utility of computing resources, but by the explosive growth of cloud computing.  Amazon Web Services’ AppStream 2.0 is a significant step toward “cloudification,” and toward a future in which all forms of computation are increasingly delocalized.

Our laboratory, which labors under the title of “The Laboratory for Rational Decision Making,” applies a variety of approaches in its search for patterns in human behavior and the brain activity that underlies them.  In 2016, David Garavito, a J.D./PhD graduate student at Cornell, Joe DeTello, a Cornell undergraduate, and Valerie Reyna, PhD, began a study on the effects of risk perception on sports-related concussions.  Joe is a former high school athlete who has suffered a number of concussions himself during play, and is therefore able to provide personal, valuable insights into how these injuries occur and why they are so common.

Bertrand Reyna-Brainerd
David Garavito
David Garavito
Valerie Reyna, PhD
Valerie Reyna
Joe DeTello
Joe DeTello

The team has previously conducted research for this project by physically traveling to participating high schools and carrying a stack of preconfigured laptops.  This is not an uncommon method of conducting research in the field, but it imposes several limitations (such as the cost of travel, the number of students that can be physically instructed in a room at one time, and by the number of laptops that can be purchased, carried, and maintained).  What’s more, the type of information required for the research could be easily assessed online—they only needed to collect the typical sort of demographic data that has long been gathered using online polls, as well as measures such as memory accuracy and reaction time.  Most of this legwork is performed by software that was designed to operate only in a physical, proctor-to-subject environment.


At that point – Joe and David came to me and asked if we could find a better solution.


Marty Sullivan, Cloud Engineer
Marty Sullivan

I was not initially sure if this would be possible.  In order for our data to be comparable with data gathered on one laptop at a time our applications would have to be reprogrammed from scratch to run on the web.  However, I agreed to research the problem and consulted with the IT@Cornell Cloudification Team. Marty Sullivan, Cloud Engineer, helped us discover that Amazon Web Services (AWS) and Cornell were testing AWS’s then-unreleased product: AppStream 2.0.  Amazon AppStream 2.0 is a fully-featured platform for streaming software, specifically desktop applications, through a web browser. The most attractive component is the fact that the end-users are not required to install any software – they can simply access the software via their preferred personal device.


Figure 1 - Screenshot of our assessment software running on an ordinary desktop.
Figure 1 – Screenshot of our assessment software running on an ordinary desktop.


Figure 2 - The same software running on AppStream.
Figure 2 – The same software running on AppStream.


AppStream 2.0 Application Selection Screen
Figure 3. AppStream 2.0 Application Selection Screen


The AppStream 2.0 environment has a number of advantages over a traditional remote desktop approach.  When a user connects to our system they are presented with an option to choose an application. After selecting an application, only that application and its descendants are displayed to the user.  This avoids several of the usual hassles with virtual computing, such as sandboxing users away from the full Windows desktop environment.  Instead, the system is ready-to-go at launch and the only barriers to entry are access to a web browser and an activated URL.

Once the virtual environment has been prepared, and the necessary software has been installed and configured, the applications are packaged into an instance that can then be delivered live over the web, to any number of different devices. Mac, PC, tablets and any other device that has a web browser can be used to view and interact with your applications!  This package resets to its original configuration periodically in a manner similar to how Deep Freeze operates in several of Cornell’s on-campus computer laboratories.  While periodic resets would be inconvenient in other contexts, this system is ideal for scientific work as it ensures that the choices made by one participant do not influence the environment of the next.

It is difficult to overstate the potential of this kind of technology.  Its advantages are significant and far-reaching:

  • Scalability: Because Amazon’s virtual machine handles most of the application’s processing demands, the system can “stretch” to accommodate peak load periods in ways that a local system cannot. To put it another way, if a user can run the AppStream web application, they can run the software associated with it.  This means that software that would otherwise be too large or too demanding to run on a phone, tablet, or Chromebook can now be accessed through AppStream 2.0.
  • Ease of use: End-users do not have to install new software to connect. Applications that would normally require installing long dependency chains, compilation, or complicated configuration procedures can be prepared in advance and delivered to end users in their final, working state.  AppStream 2.0 is more user friendly than traditional remote desktop approaches as well, all they need to do is follow a web link.  It is not necessary to create separate accounts for each user, but there is a mechanism for doing so.
  • Security: AppStream 2.0 can selectively determine what data to destroy or preserve between sessions. Because the virtual machine running our software is not directly accessible to users, this improves both security and ease of use (a rare pairing in information technology) over a traditional virtual approach.
  • Cross-platform access: Because applications are streamed from a native Windows platform, compatibility layers (such as WINE), partition utilities (such as Apple’s BootCamp), or virtual desktop and emulation software (such as VirtualBox or VMWare) are not needed to access Windows software on a non-Windows machine. This also avoids the performance cost and compatibility issues involved in emulation.  Another advantage is that development time can be reduced if an application is designed to be delivered through AppStream.
  • Compartmentalized deployment: Packaging applications into virtual instances enforces consistency across environments, which aids in collaborative development. In effect, AppStream instances can perform the same function as Docker, Anaconda, and other portable environment tools, but with a lower technical barrier for entry.


Disadvantages:

  • Latency: No matter how optimized an online system of delivery may be, streaming an application over the web will always impose additional latency over running the software locally. Software that depends on precise timing in order to operate, such as video games (or response time assessments in our case) may be negatively impacted.  In our case, we have not experienced latency above a barely-perceptible 50 ms.  Other users have reported delays of as much as 200ms, which is variable by region.
  • Compatibility: Currently AppStream 2.0 only has Windows Server 2012 instances available, and access to hardware-accelerated graphics such as OpenGL is not supported. This is expected to change in time.  In terms of the software itself, there are often additional configuration steps that are required to get a piece of software running within the Appstream environment compared to ordinary software install procedures.
  • Cost: To use AppStream 2.0 you must pay a recurrent monthly fee based on use. This includes costs associated with bandwidth, processing, and storage space.  You are likely to be presented with a bill on the order of tens to low hundreds of U.S. dollars per month, andyour costs will differ depending on use.


Ultimately, the impact of AppStream 2.0 will be determined by its adoption.  The largest hurdle that the product will need to clear is its cost, but its potential is enormous.  If Amazon leverages its position to purchase and deploy hardware at low rates, and passes these savings on to their customers, then it will be able to provide a better product at a lower price than the PC market.  And if Amazon does not do this another corporation will, and an end will come to the era of personal computing as we have known it.

[1] U.S. Census Bureau. (2013). Computer and Internet Use in the United States: 2013. Retrieved March 29, 2017, from https://www.census.gov/history/pdf/2013computeruse.pdf.

Redshift at Vet College

Data Vet College Style 
Using AWS Redshift, AWS Batch, NodeJS and Docker to accomplish data in the cloud
Team Members:  Craig Riecke, Daniel Sheehan and Scott Ross (sr523)

In 2015, the Animal Health Diagnostic Center at Cornell University changed its laboratory information management system implementing VetView as a replacement to the legacy system- UVIS.  With limited time, budget and resources, our team was forced to deploy our main business intelligence tool, Tableau, directly over VetView’s operational data model, which used Oracle.  While this worked initially giving our business staff access to data, we quickly realized that we were outgrowing the inherent constraints implicit on having Tableau on an operational data model.   These constraints included speed/performance issues, business logic embedded in sql, duplication of sql across various tableau dashboards and data silo’ed in that operational model.  At the end of the day, we needed something faster, reduced complexity for our report writers, and a building block for the future.

This blog post is the story of how the VMIT development team moved data to Redshift, a discussion on Redshifts capabilities and the tooling used to move data.

Redshift:

Pros:

  • It is affordable to start: I am not saying that it is affordable, period. Redshift can get expensive if you shove all your data into it, and your data is growing fast. That said, compared to its on-premises and appliances-based alternatives, Redshift is incredibly cheap to start with at $0.25 per hour or $180 per month.  We also had a 30 day free trail.
  • It is mostly PostgreSQL: Redshift has a different query execution engine, but in terms of the interface, looks like Postgres.  This means it has rich client tools and connectivity can be done via both JDBC and ODBC.
  • It plays nice with Tableau:  Because of the above, it plays very nicely with Tableau and other BI tools.   This is incredibly important for our group because we are targeting BI tools.
  • Scalability: it’s horizontally scalable. Need it to go faster? Just add more nodes…
  • AWS:  It’s part of the AWS ecosystem.  So while other tools, like Google’s BigQuery, are interesting, we have settled on AWS as our platform for infrastructure.

Cons:

  • Loading data can be tricky: The process we are using to load data into redshift requires extracting the data from our source database, creating a csv file, loading that csv file to S3, then using the COPY command to get data into redshift.  Parallel processing is very important in this step to reduce the amount of time it takes to do the ETLs.  It does take time to master this process.

Things to think about:

  • Distkey/Sortkey required for optimal performance.  This is a new concept for our developers group, and took us some time to think about it (and will require time as we move into the future)
  • Compute and storage are tied together.  There are some interesting talks about how this is an anti-pattern for data warehousing.  For us, this doesn’t matter at the moment.
  • Mutli AZ is painful

Decision:
At the end of the day, we were basically were comparing Redshift to other RDBMS solutions hosted in AWS RDS.  We settled on Redshift more because of our future needs, than our current needs. And so far, we love it.

Setting up Redshift:

One of the tenants of our developer group when building solutions is to implement infrastructure as code .  In that vein, here are the steps to build the redshift cluster along with the json configuration to make it happen:

Steps:

  1. Install the aws cli
  2. Run this command: $ aws redshift –cli-input-json `cat cluster.json`
  3. Create users / schemas

The output of the above should give you the endpoint of your cluster. Use that information to connect your SQL tool to the new Redshift cluster. Amazon recommends SQL Workbench/J.  But other tools work just as well (DBVisualizer).

* All of these steps are stored in our git repository on Bitbucket.  We can automate this using Jenkins, but in this case, we really don’t have a need to have Redshift creation be automated.  However, if we have to rebuild this cluster, we will rebuild it from these scripts.  We do not use the aws console to make changes on the fly to systems.

Writing ETL Process:

Here were our requirements for an ETL tool:

  • It had to be maintainable as code (visual coding environment were eliminated, including our Orion Health Rhapsody Interoperability engine)
  • It needed to be able to do parallelism
  • It needed to work with Docker
  • Preferably the tool/language fit our current ecosystem
  • We also wanted to handle secrets gracefully.  

So we landed on NodeJS and specifically TypeScript to do our ETL.  NodeJS is being used as our API language of choice, is easy to run in a docker container, and we also had code available for reuse.  TypeScript adds types to javascript, and easy way to make writing code more bearable then JavaScript.

Again, this was stored in our git repository.  We wrap the entire etl process into a docker container.

Using AWS Batch and Docker for the production pipeline:

The final piece of the puzzle is to setup a pipeline to get data into redshift using the ETL process.  Here we decided to use a newer service from AWS called “Batch.” Batch has these concepts baked in:

  • Jobs represent a unit of work, which are submitted to Job Queues, where they reside, and are prioritized, until they are able to be attached to a compute resource.
  • Job Definitions specify how Jobs are to be run. While each job must reference a Job Definition, many parameters can be overridden, including vCPU, memory, Mount points and container properties.
  • Job Queues store Jobs until they are ready to run. Jobs may wait in the queue while dependent Jobs are being executed or waiting for system resources to be provisioned.
  • Compute Environments include both Managed and Unmanaged environments. Managed compute environments enable you to describe your business requirements (instance types, min/max/desired vCPUs etc.) and AWS will launch and scale resources on your behalf. Unmanaged environments allow you to launch and manage your own resources such as containers.
  • Scheduler evaluates when, where and how to run Jobs that have been submitted to a Job Queue. Jobs run in approximately the order in which they are submitted as long as all dependencies on other jobs have been met.

To use, we just give Batch a docker image using AWS ECR (this started an internal debate about how we use ecr vs. CU dtr vs. docker hub — something for another day).

To kick off a batch job from aws cli for one time run:

$ aws batch submit-job –job-definition vet-dw-etl-sb –job-queue normal –job-name vet-dw-etl-sb-2016-01-10

To create a batch job on AWS:

$ aws batch create-compute-environment --cli-input-json file://compute-environment-normal.json
$ aws batch create-job-queue --cli-input-json file://job-queue-normal.json
$ aws batch register-job-definition --cli-input-json file://vet-dw-etl-sb-job-definition.json

The json file references our docker image on amazon’s docker registry, that image contains our etl code.

For now, we run this nightly but we have the option of running this at any interval.  Our etl process takes about ~40mins for 30million rows.

**If anyone is interested in seeing how json files for creating batch jobs or our redshift environment, please let us know.  Ditto for any code.

AWSCLI S3 Backup via AWS Direct Connect

By Ken Lassey, Cornell EMCS / IPP

Problem

AWSCLI tools default to using the Internet for its connection when reaching out to services like S3. This is due to the fact that S3 only provides public endpoints for network access to the service.  This is an issue if your device is in Cornell 10-space as it cannot get on the Internet.  It also could be a security concern depending on the data, although AWSCLI S3 commands do use HTTPS for their connections.

Another concern is the potential data egress charges for transferring large amounts of data from AWS back to campus. If you need to restore an on-premise system directly from S3, this transfer would accrue egress charges.

Solution

Assuming you have worked with Cloudification to enable Cornell’s AWS Direct Connect service in your VPC, you can force the connection through Direct Connect with a free tier eligible t2.micro Linux instance. By running the AWSCLI commands from this EC2 instance, it can transfer data from your on-premise system, through Direct Connect and drop the data in S3 all in one go.

Note that if your on-premise systems have only public routable IP Addresses, and no 10-Space addresses, your on-premise systems will not be able to route over Direct Connect (unless Cloudification has worked with you to enable special routing). In most campus accounts, VPC’s are only configured to route 10-Space traffic over Direct Connect. If the systems you want to back up have a 10-Space address, you are good to go!

Example Cases

  1. You have several servers that backup to a local storage server. You want to copy the backup data into AWS S3 buckets for disaster recovery.
  2. You want to backup several servers directly into AWS S3 buckets.

In either case, you do not want your data going in or out over the internet, or it cannot due to the servers being in Cornell 10-space.

AWSCLI Over Internet

awscli s3 sync <backupfolder> <s3bucket>

By running the awscli command from the backup server or individual server the data goes out over the internet.

Example Solution

By utilizing a free tier eligible t2.micro Linux server you can force the traffic over Cornell direct connect to AWS.

AWS CLI Over Direct Connect

Running the awscli commands from the t2.micro instance you force the data to utilize AWS direct connect.

On your local Windows server (backup or individual) you need to ‘share’ the folder you want to copy to S3.  You should be using a service account and not your own NetID. You can alternatively enable NFS on your folder if you are copying files from a Linux server, or even just tunnel through SSH. The following examples are copying from a Windows share.

In AWS:

  1. Create an s3 bucket to hold your data

On your systems:

  1. Share the folders to be backed up
  2. Create a service account for the backup process
  3. Give the service account at least read access to the shared backup folder
  4. If needed allow access through the Managed Firewall from your AWS VPC to the server(s) or subnet where the servers reside

On the t2.micro instance you need to:

  1. Install the CIFS Utilities:
    sudo yum install cifs-utils
  2. Create a mount point for the backup folder:
    mkdir /mnt/<any mountname you want>
  3. Mount the shared backup folder:
    sudo mount.cifs //<servername or ip>/<shared folder> /mnt/<mountname> -o \ 
    name=”<service account>”,password=”<service account password>”,domain=”yourdomain>”
  4. Run the s3 sync from the t2.micro instance:
    aws s3 sync \\<servername/IP>/\<share> s3:\\<s3-bucket-name>


Instead of manually running this I created on the t2.micro instance a script to perform the backup.  The script can be added to a CRON task and run on a schedule.

Sample Script 1

  1. I used nano to create backup.sh
       #!/bin/sh
       backupfolder=/mnt/<sharedfoldername>
       s3path=s3://<s3bucketname>
       aws s3 sync $backupfolder $s3path
  1. The script needs to be execuatable so run this command on the t2.micro instance
    sudo chmod +x <scriptname>

Sample Script 2

This script mounts the share and backups up multiple folders on my backup server then unmounts the shared folder

#!/bin/bash
sudo mount.cifs //128.253.109.11/ALC -o user="<serviceaccount>",password="<serviceaccount pwd>",domain=”<your domain"
srvr=(FOLDER1 FOLDER2 FOLDER3 FOLDER4 FOLDER5 FOLDER6)
for s in "${srvr[@]}"; do
    bufolder=/mnt/<mountname>/$s
    s3path=s3://<s3bucketname>/$s
    aws s3 sync $bufolder $s3path
done
sudo umount /mnt/<mountname> -f

Class Roster – Launching Scheduler in the Cloud

by Eric Grysko

Introduction

Class Roster
Class Roster – classes.cornell.edu

In Student Services IT, we develop applications that support the student experience. Class Roster, classes.cornell.edu, was launched in late 2014 after several months of development in coordination with the Office of the University Registrar. It was deployed on-premises and faced initial challenges handling load just after launch. Facing limited options to scale, we provisioned for peak load year-round, despite predictable cyclical load following the course-enrollment calendar.

By mid-2015, Cornell had signed a contract with Amazon Web Services, and Cornell’s Cloudification Team was inviting units to collaborate and pilot use of AWS. Working with the team was refreshing, and Student Services IT dove in. We consumed training materials, attended re:Invent, threw away our old way of doing things, and began thinking cloud and DevOps.

By late 2015, we were starting on the next version of Class Roster – “Scheduler”. Display of class enrollment status (open, waitlist, closed) with near real-time data, meant we couldn’t rely on long cache lifetimes. And new scheduling features, were expected to grow peak concurrent usage significantly. We made the decision, Class Roster would be our unit’s first high-profile migration to AWS. (more…)

Using Docker Datacenter to launch load test

by Shawn Bower

As we at Cornell move more of our workloads to the cloud an important step in this process is to run load test against our on premise infrastructure and the proposed AWS infrastructure. There are many tools that can aide in load testing one which we use frequently is called Neustar. This product is based on selenium and allows up to spin up a bunch automated browser users. It occurred to me that a similar solution could be developed using docker and Docker Datacenter.

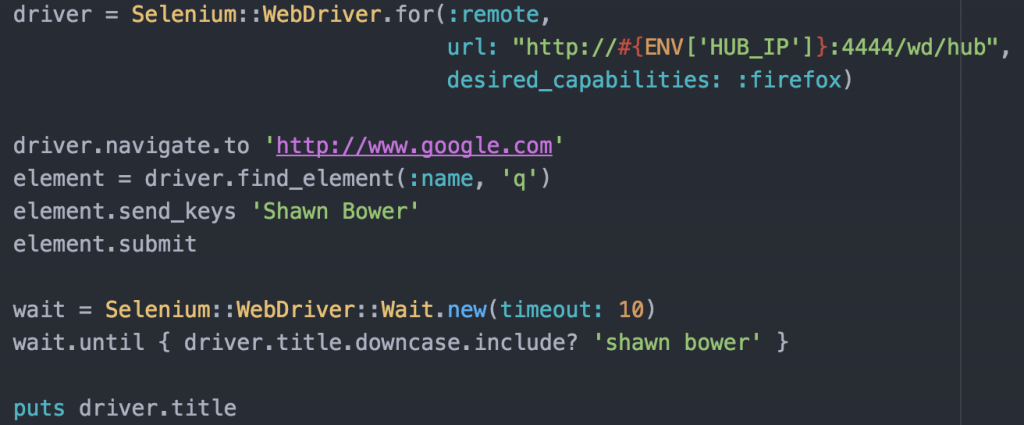
To get started I took a look at the docker containers provided by Selenium, I love companies that ship their product in Containers!  I was able to get a quick test environment up and running locally.  I decided to use Selenium grid that provides a hub server which nodes can register with.  Each node registers and lets the hub know what kind of traffic it can accept.  In my case I used nodes running firefox on linux.  To test the setup I created a simple ruby script using the Selenium ruby bindings to send commands to a node.

sample-test_rb_—__Users_srb55_projects_docker-selenium-load-test

This simple test will navigate to google and search for my name then wait for the window title to include my name.  While testing locally I was able to get the hub and node up and running with the following commands:

docker run -d -p 4444:4444 --name selenium-hub selenium/hub:2.53.0
docker run --rm --name=fx --link selenium-hub:hub selenium/node-firefox:2.53.0

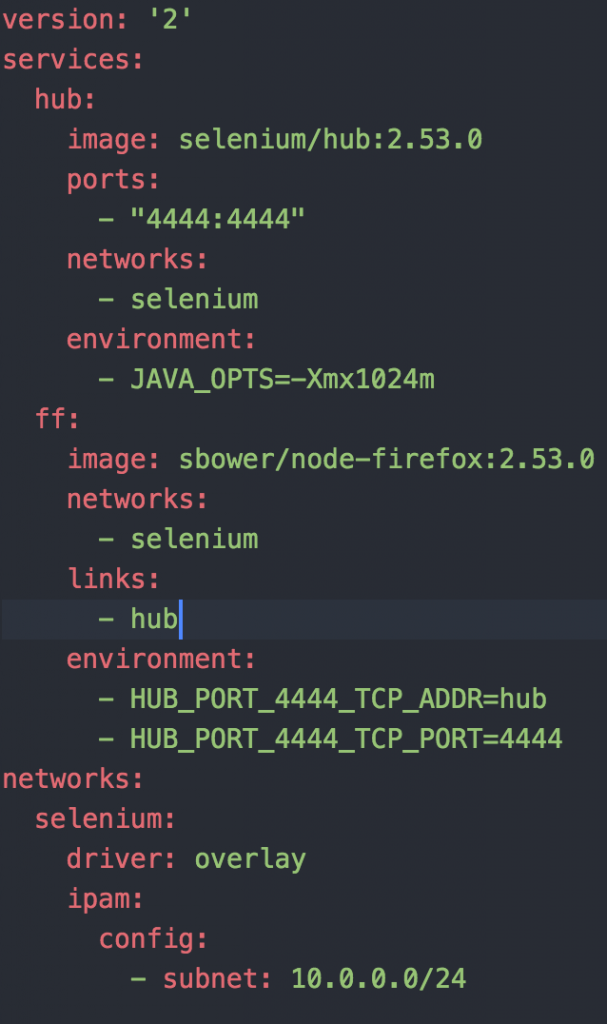
I was then able to run my script (exporting HUB_IP=localhost) and life is good.  This approach could be great for integration tests in your application but in my case I wanted to be able to throw a bunch of load at an application.  Since we have some large Docker Datacenter clusters it seemed to make sense to use that spare capacity to generate load.  In order to deploy the grid/hub to our cluster I created a docker-compose.yaml file.


docker-compose_yaml_—_selenium_infrastructure_—__Users_srb55_projects_docker-selenium-load-test

One thing to note is that I’m using a customized version of the node container, I will come back to this later.  Now I am able to bring up the grid and node as such:

selenium_infrastructure_—_-bash_—_159×41

I can now use the docker-compose ps command to find out where my hub is running.

selenium_infrastructure_—_-bash_—_159×41

Now I’m ready to launch my test.  Since all the things must run inside containers I created a simple Dockerfile to encapsulate my test script.

Then I can kick off the test and when it finishes I want to grab the logs from the firefox node.

selenium_infrastructure_—_-bash_—_159×41

docker build -t st .
docker run -e “HUB_IP=10.92.77.33” st .
docker logs ldtest_ff_1

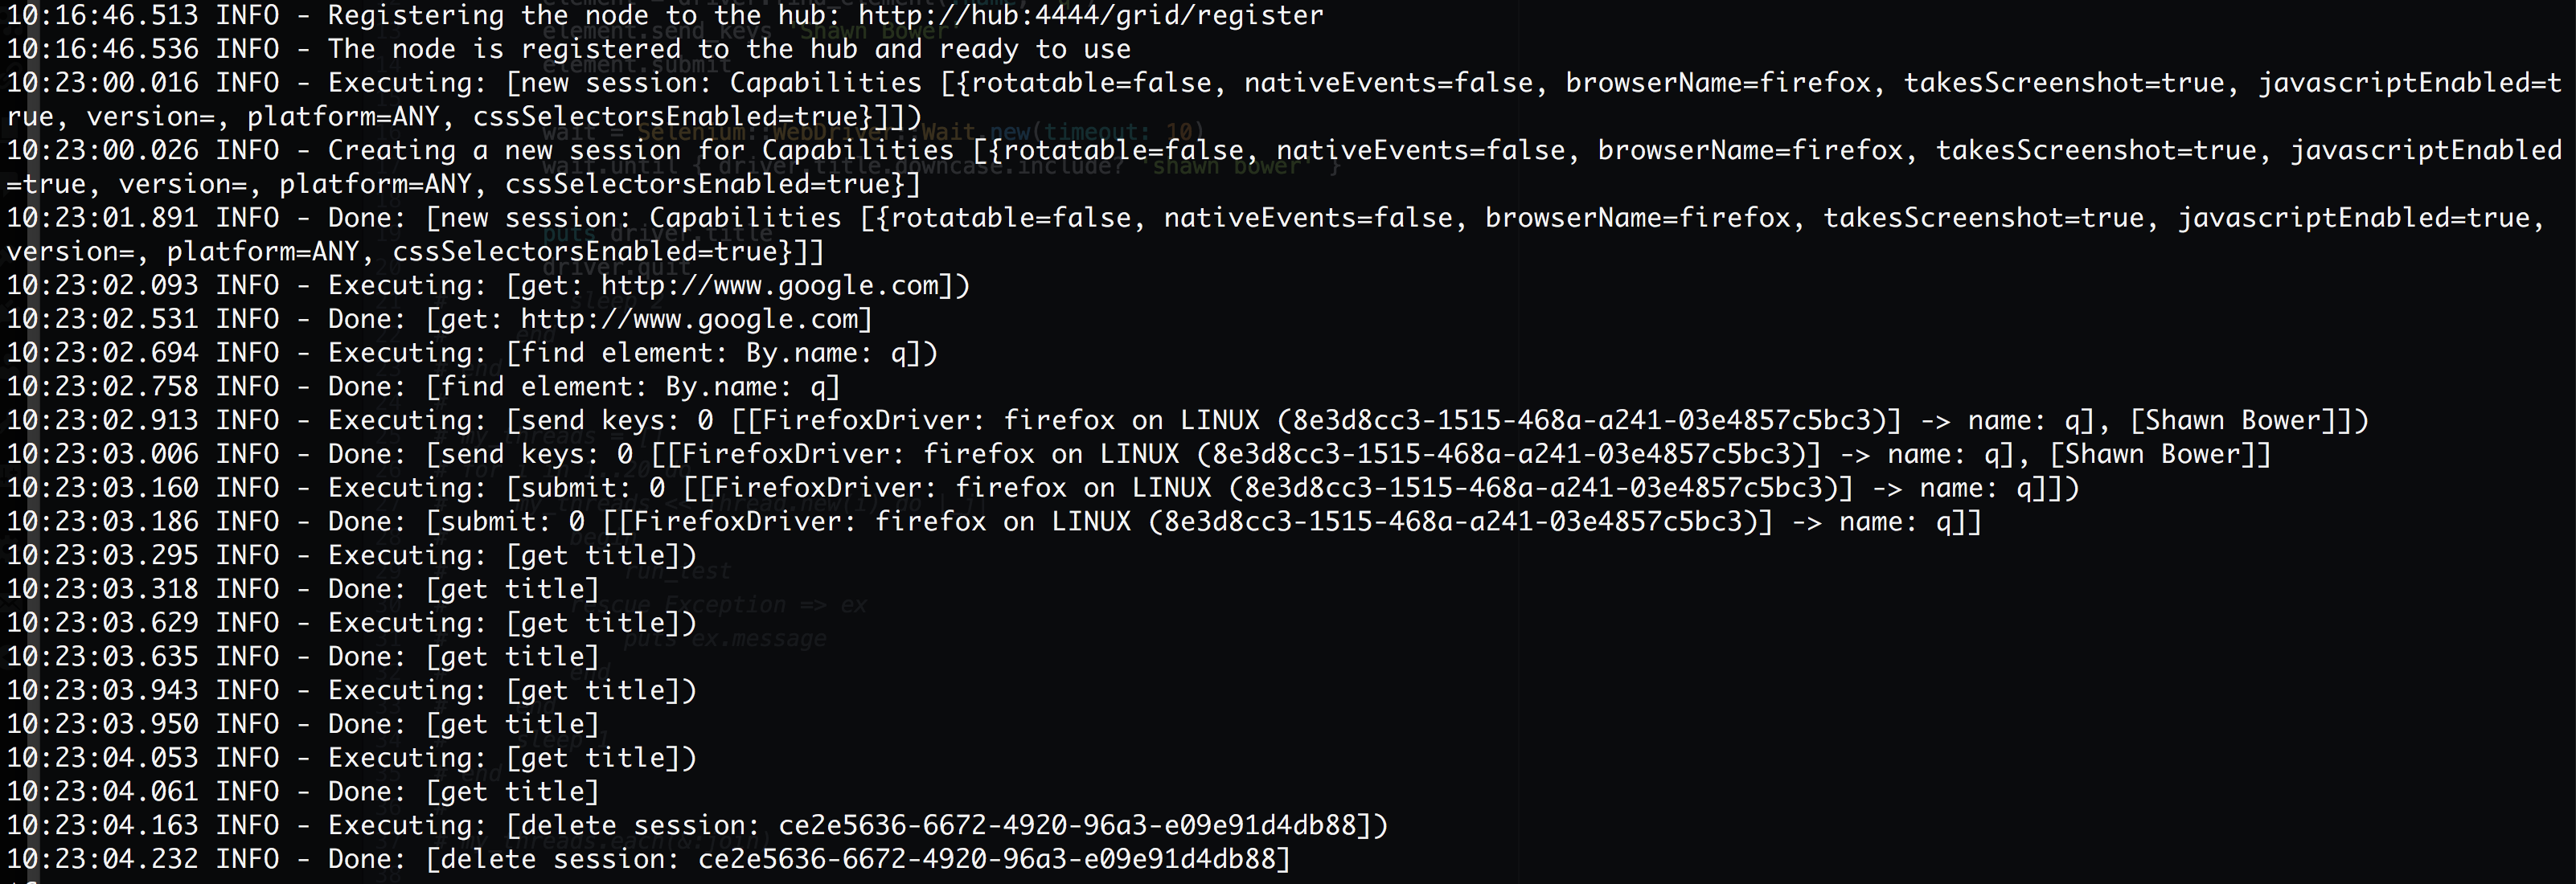
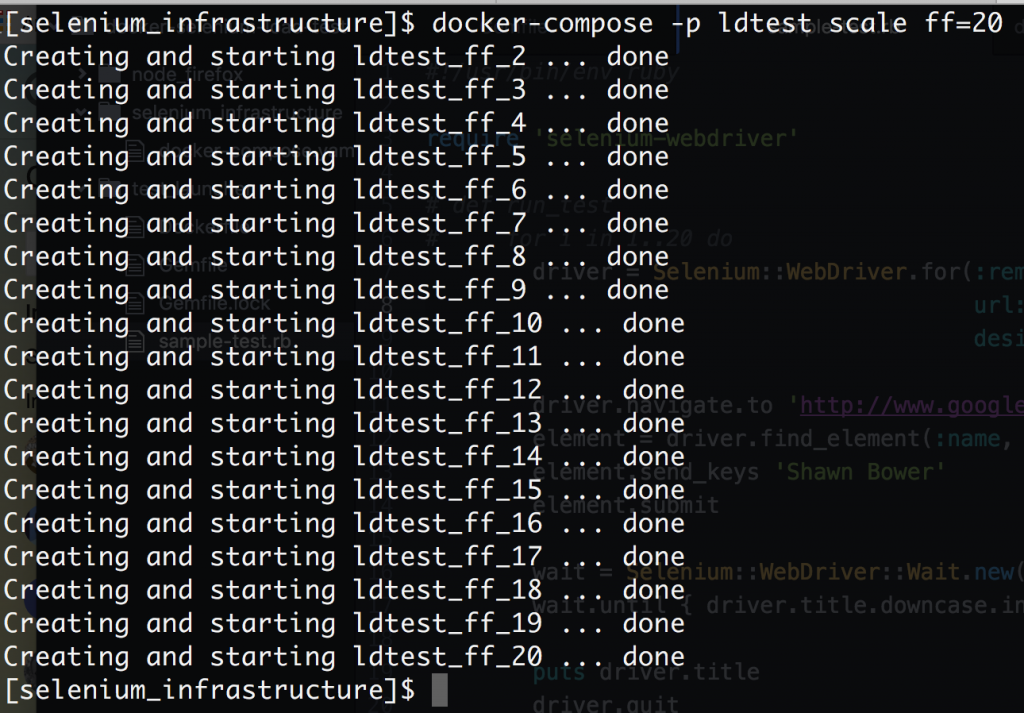
We can see the how Selenium processes the script on firefox. Note that “get title” is executed multiple times.  This is because of the waiter that is looking for my name to show up in the page title.  Sweet!  Now that we have it up and running we can scale out the firefox nodes, this is super easy using Docker Datacenter!

selenium_infrastructure_—_-bash_—_159×41

Now we can ramp up our load!  I took the script above and ran it on a loop with a small sleep at the end then spun up 20 threads to run that script.  In order to get everything working in Docker Datacenter I did have to modify the node startup script to register using the IP for the container on the overlay network.  It turns out this is a simple modification by adding an environment variable for the IP

export IP=`hostname -I | perl -lne ‘print $1 if /(10.\d.\d.\d+)/’`

Then when the node is launched you need to add “-host $IP”

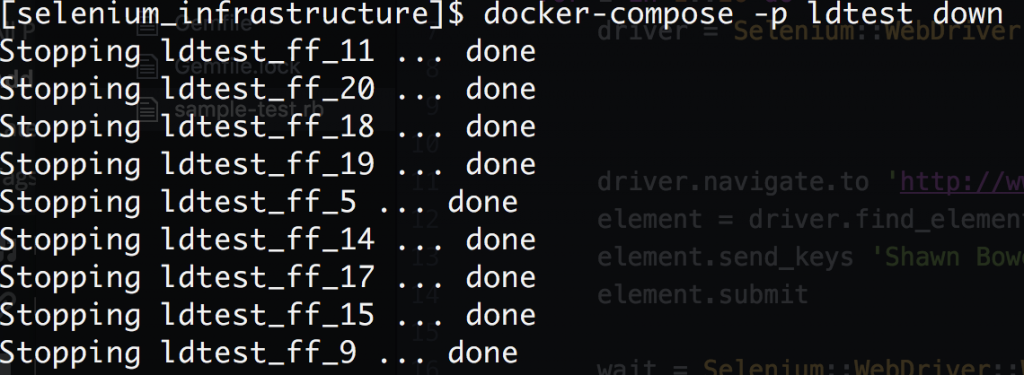
When are finished we can quickly bring everything down.

selenium_infrastructure_—_-bash_—_159×41


Conclusion

It is relatively simple to setup a load driver using Docker Datacenter.  The code used for this example can be found here: https://github.com/sbower/docker-selenium-load-test.  This is super bare bones.  Some neat ideas for extensions would be, to add a mechanism to ramp the load, a mechanism to create a load profile comprised of multiple scripts, and a mechanism to store response time data.  Some useful links for using selenium with ruby and Docker.

  • https://github.com/SeleniumHQ/selenium/wiki/Ruby-Bindings
  • https://github.com/SeleniumHQ/docker-selenium
  • https://gist.github.com/kenrett/7553278

Configure Jenkins to use Cornell Shibboleth Authentication

by Brett Haranin

Introduction

At RAIS, Jenkins has become integral to our development workflow.  Developers use it throughout the day to view the output of CI build/test jobs and to deploy application changes.  The basic Jenkins user management tools worked great when only one or two developers were using it, however, as we grow our team and usage of Jenkins, we wondered if there might be a way to integrate with Cornell central authentication.  We’re happy to report that there is a SAML plugin for Jenkins that works well with the Cornell Shibboleth service.

This post will focus on the “how” of setting up Shibboleth with Jenkins.  For a deeper look at Shibboleth and how it works, see Shawn’s post here: https://blogs.cornell.edu/cloudification/2016/07/11/using-cornell-shibboleth-for-authentication-in-your-custom-application

Getting Started – Basic Test IdP Setup

Add and configure plugin

The first step is to install the Jenkins SAML plugin under Manage Jenkins -> Manage Plugins. The plugin information page is available here: https://wiki.jenkins-ci.org/display/JENKINS/SAML+Plugin. Note, v0.6 or higher is required for compatibility with Cornell Shibboleth.

2016-08-04_05-53-43

Next, let’s configure the plugin. Go to Manage Jenkins -> Configure Global Security. Scroll to “Access Control” as shown here:

2016-08-04_06-02-56

For this step, the IdP metadata field should be filled with the Cornell IdP test metadata available here: https://shibidp-test.cit.cornell.edu/idp/shibboleth.  Just copy it and paste it in the text box.

Fill in the Cornell Shibboleth attributes that best map to the Display Name, Group and Username attributes — the attributes we used are:

displayName: urn:oid:2.16.840.1.113730.3.1.241
edupersonprimaryaffiliation (for group): urn:oid:1.3.6.1.4.1.5923.1.1.1.5
uid (netid): urn:oid:0.9.2342.19200300.100.1.1

Finally, if you are using matrix/project based authorization (we recommend it!) ensure that usernames are lowercase netids.  Also, make sure that you have at least one user (presumably yours, if you are doing administration) with administrative rights to Jenkins.  After saving these settings, you will no longer be able to login with Jenkins usernames/passwords.

Save and Test

To save these settings, click “Apply”.  Then, navigate to your Jenkins instance in a fresh browser (perhaps Incognito/Private Browsing).  You should be redirected to a CUWebAuth screen for the test shibboleth instance.

2016-08-04_06-46-16

After logging in, you should be redirected back to Jenkins and your session should be mapped to the user in Jenkins that matches your netid.  There are some notable limitations to the Shibboleth test system: newer employees (hired in the last several months) will not yet be synced to the TEST directory (i.e., they won’t be able to login), and the login screen will show “TEST INSTANCE” as pictured above.  In the next section, we’ll move to the PROD system for full functionality.

Next Steps – Move to Production IdP

Now that you’ve implemented and tested against the TEST instance of Shibboleth, the next step is to register your application with Cornell Identity Management so that you can use the PROD login systems.

Generate Metadata

First, you’ll need to output the metadata for your Jenkins SAML service provider.  To do that, go back to Manage Jenkins -> Configure Global Security.  Then click “Service Provider Metadata” (highlighted below).

2016-08-04_06-02-56 2

This will output a block of XML that looks like this, which is the metadata for your Jenkins SAML service provider:

2016-08-04_20-14-01

Register metadata with Cornell Identity Management

Next, we need to register this metadata with Identity Management (IDM).

Go to: https://shibrequest.cit.cornell.edu/

Fill out the initial page of contact information and choose the scope of netid roles (Staff, Faculty, etc) that should be allowed to use the tool.  Note – ultimately Jenkins will authorize users based on their netid — the settings here are simply another gate to prevent folks that aren’t in specified roles or groups from logging in at all (i.e., their assertion will never even be sent to Jenkins).  You can safely leave this blank if you don’t have specific restrictions you want to apply at the CUWebAuth level.

On the second page, specify that the metadata has not been published to InCommon, then paste your metadata into the provided box:

2016-08-04_07-09-58

Click Next and submit your request.  Submitting the request will open a ticket with Identity Management and you should receive confirmation of this via email.  Once your application is fully registered with Cornell Shibboleth, you will receive confirmation from IDM staff (normally a quick process ~1 day).

Tell Jenkins to use PROD IdP

Finally, once you receive confirmation from IDM that your application is registered, you’ll need to update Jenkins to use the production IDP metadata.

Go here to get the PROD Shibboleth metadata: https://shibidp.cit.cornell.edu/idp/shibboleth

Then, in Jenkins, return to Manage Jenkins -> Configure Global Security.  Paste the metadata in the IdP metadata block (everything else can stay the same):

2016-08-04_06-02-35

Save, then test that you are able to login.  This time you should see the regular CUWebAuth screen, rather than the “TEST INSTANCE” version.

Advanced Setup Options/Notes

  • It is possible to configure your endpoint metadata to request additional attributes from the Cornell directory.  If you would like to map a different value for group and then use Jenkins group permissions, you can work with IDM to get the desired attribute included in SAML assertions sent to your Jenkins endpoint, then specify those attributes on the Configure Global Security screen.
  • The underlying SAML library can be very sensitive (with good reason) about any mismatch between the stated URL in a user’s browser, and the URL that the webserver believes it is running at.  For example, if you terminate SSL at an ELB, a user may be visiting https://yourjenkins/jenkins/, but the webserver will be listening on port 80 and using the http scheme (i.e., http://yourjenkins/jenkins/).  This manifests with an error like “SAML message intended destination endpoint did not match recipient endpoint”.  Generally, the fix for this is to tell the Tomcat connector that it is being proxied (proxyPort and scheme attributes).  More here: http://beckje01.com/blog/2013/02/03/saml-matching-endpoints-with-tomcat/

That’s It

Now your team should be able to login to Jenkins with their Cornell NetID and Password.  Additionally, if using DUO, access will be two-factor, which is a great improvement.

For more information about Cornell Shibboleth, see the Confluence page here: https://confluence.cornell.edu/display/SHIBBOLETH/Shibboleth+at+Cornell+Page

Docker + Puppet = Win!

by Shawn Bower

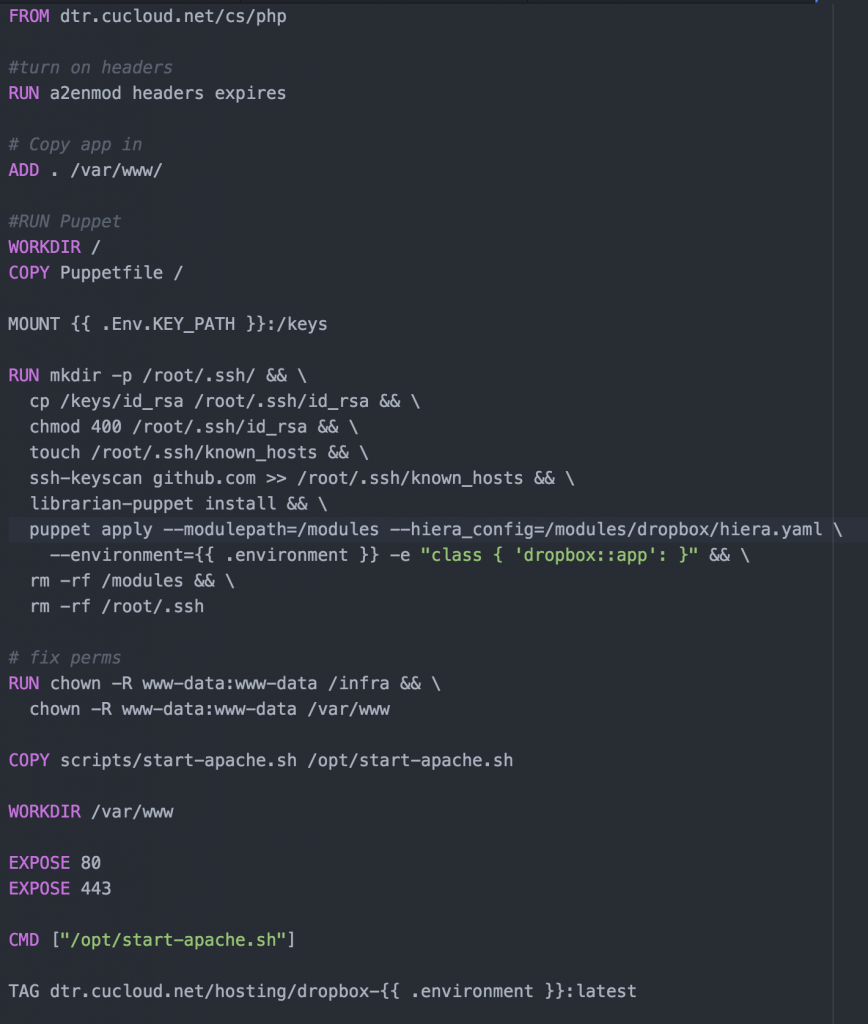
On many of our Cloudification projects we use a combination of Docker and Puppet to achieve Infrastructure as code. We use a Dockerfile to create the infrastructure; all the packages required to run the application along with the application code itself. We run puppet inside the container to put down environment specific configuration. We also use a tool called Rocker that adds some handy directives for use in our Docker file.  Most importantly Rocker adds a directive called MOUNT which is used to share volumes between builds.  This allows us to mount local disk space which is ideal for secrets which we do not want copied into the Docker image.  Rocker has to be cool so they us a default filename of Rockerfile.   Let’s take a look at a Rockerfile for one of our PHP applications, dropbox:

dorpbox-dockerfile


This image starts from our standard PHP image which is kept up to date a patched weekly by the Cloud Services team.  From there we enable a couple of Apache modules that are needed by this application.  Then the application is copied into the directory ‘/var/www/.’
Now we mount the a local directory that contains our ssh key and encryption keys.   After which we go into the puppet setup.  For our projects we use a masterless puppet setup which relies on the librarian puppet module.  The advantage is we do not need to run a puppet server and we can configure the node at the time we build the image.  For librarian puppet we need to use a Puppetfile, for this project is looks like this:

dropbox-puppetfile

The Puppetfile list all the modules that use wish puppet to have access to and the git path to those modules.  In our case we have a single module for the dropbox application.  Since the dropbox module is stored in a private github repository we will use ssh key we mounted earlier to access it.  In order to do this we will need to add github to our known host file.  Running the command ‘librarian-puppet install’ will read the Puppetfile and install the module into /modules.  We can then use puppet to apply the module to our image.  We can control the environment specific config to install using the “–environment” flag, you can see in our Rockerfile the variable is templated out with “{{ .environment }}”.  This will allow us to specify the environment at build time.  After puppet is run we clean up some permissions issues then copy in our image startup script.  Finally we specify the ports that should be exposed when this image is run.  The build is run with a command like “rocker -var environment=development.”

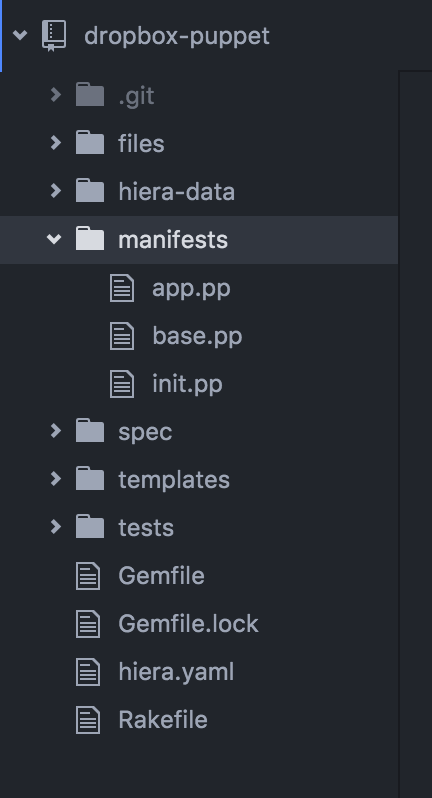
It is outside the scope of this article to detail how puppet is used, you can find details on puppet here. The puppet module is laid out like this:

dropbox-puppet-layout

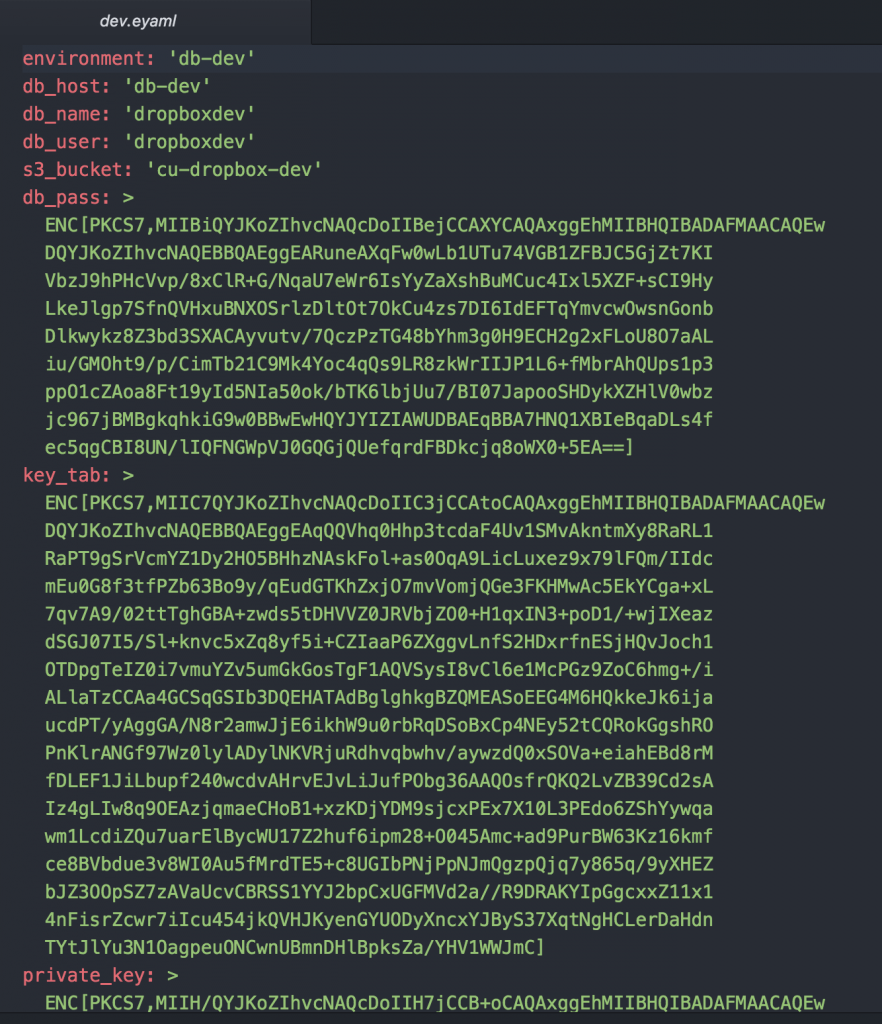
The files directory is used to store static files, hier-data is used to store our environment specific config, manifest stores the puppet manifests, spec is for spec test, templates is for storing dynamically generated files and tests is for test that are run to check for compilation errors.  Under hiera-data we will find an eyaml (encrypted yaml) file for each environment.  For instance let us look at the one for dev:

dev_eyaml

You can see that the file format is that of a typical yaml file with the exception of the fields we wish to keep secret.  These are encrypted by the hiera-eyaml plugin.  Early in the Rockerfile we mounted a “keys” folder wich contains the private key to decrypt these secrets when puppet runs.  In order for the hiera-eyaml to work correctly we have to adjust the hiera config, we store the following in our puppet project:

hiera_yaml1

The backends are the order in which to prefer files, in our case we want to give precedence to eyaml.  Under the eyaml config we have to specify where the data files live as well as where to find the encryption keys.  When we run the pupp apply we have to specify the path to this config file with the “–hiera_config” flag.

With this process we can use the same basic infrastructure to build out multiple environments for the dropbox application.  Using the hiera-eyaml plugin we can store the secrets in our puppet repository safely in github as they are encrypted.  Using Rocker we can keep our keys out of the image which limits the exposure of secrets if this image were to be compromised.  Now we can either build this image on the host it will run or push it to our private repository for later distribution.  Given that the images contains secrets like the database password you should give careful consideration on where the image is stored.

Using Cornell Shibboleth for Authentication in your Custom Application.

by Shawn Bower

Introduction

When working on your custom application at Cornell the primary option for integrating authentication with the Cornell central identity store is using Cornell’s Shibboleth Identity Provider (IDP).  Using Shibboleth can help reduce the complexity of your infrastructure and as an added bonus you can enable access to your site to users from other institutions that are members of the InCommon Federation.

How Shibboleth Login Works

Key Terms

  • Service Provider (SP) – requests and obtains an identity assertion from the identity provider. On the basis of this assertion, the service provider can make an access control decision – in other words it can decide whether to perform some service for the connected principal.
  • Identity Provider (IDP) – also known as Identity Assertion Provider, is responsible for (a) providing identifiers for users looking to interact with a system, and (b) asserting to such a system that such an identifier presented by a user is known to the provider, and (c) possibly providing other information about the user that is known to the provider.
  • Single Sign On (SSO) – is a property of access control of multiple related, but independent software systems.
  • Security Assertion Markup Language (SAML) – is an XML-based, open-standard data format for exchanging authentication and authorization data between parties, in particular, between an identity provider and a service provider.

samlsp

  1. A user request a resource from your application which is acting as a SP
  2. Your application constructs an authentication request to the Cornell IDP an redirects the user for login
  3. The user logins in using Cornell SSO
  4. A SAML assertion is sent back to your application
  5. Your application handles the authorization and redirects the user appropriately.

Shibboleth Authentication for Your Application

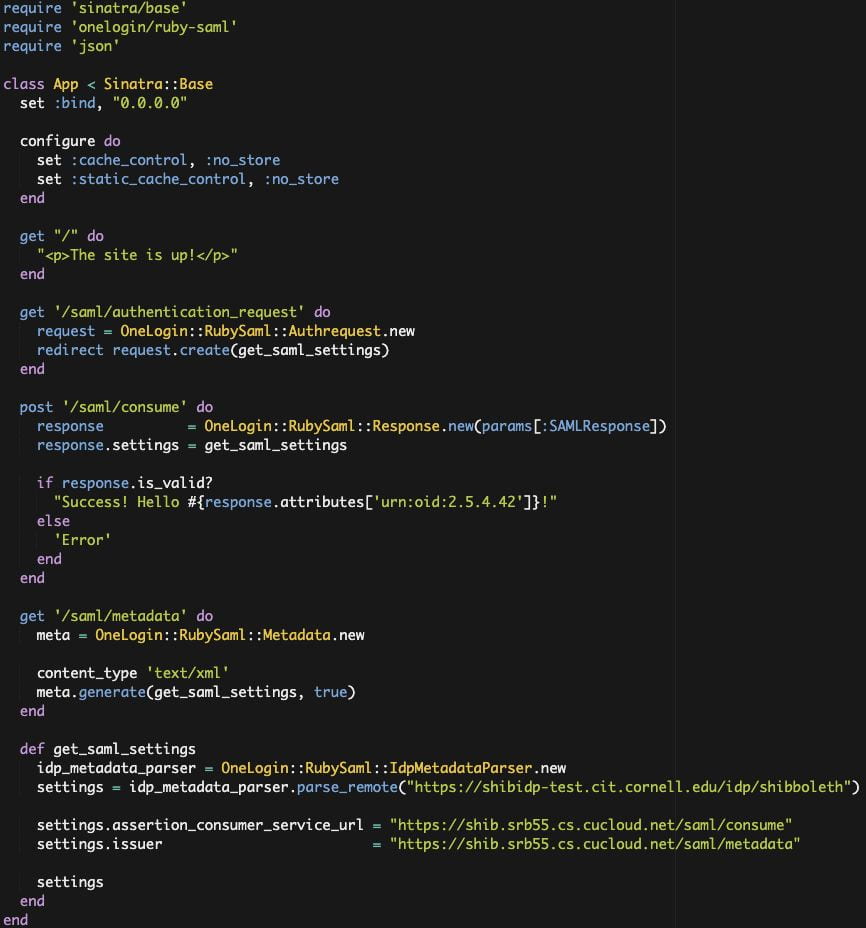
Your application will act as a service provider.  As an example I have put together a Sinatra application in ruby that can act as a service provider and will use the Cornell Test Shibboleth IDP.  The example source can be found here.  For this example I am using the ruby-saml library provided by One Login, there are other libraries that are compatible with Shibboleth such as omniauth.  Keep in mind that Shibboleth is SAML 2.0 compliant so any library that speaks SAML should work.  One reason I choose the ruby-saml library is that the folks at One Login provide similar libraries in various other languages, you can get more info here.  Let’s take a look at the code:

First it is important to configure the SAML environment as this data will be needed to send and receive information to the Cornell IDP.  We can auto configure the IDP settings by consuming the IDP metadata.  We then have to provide an endpoint for the Cornell IDP to send the SAML assertion to,  in this case I am using “https://shib.srb55.cs.cucloud.net/saml/consume.”  We also need to provide the IDP with an endpoint that allows it to consume our metadata.

We will need to create an endpoint that contains the metadata for our service provider.  With OneLogin::RubySaml this is super simple as it will create it based on the SAML settings we configured earlier.  We simply create “/saml/metadata” which will listen for get request and provided the auto generate metadata.

Next lets create an endpoint in our application that will redirect the user to the Cornell IDP.  We create “/saml/authentication_request” which will listen for get requests and then use the  OneLogin::RubySaml to create an authentication request.  This is done by reading the  SAML settings which include information on the IDP’s endpoints.

Then we need a call back hook that the IDP will send the SAML assertion to after the user has authenticated.  We create “/saml/consume” which will listen for a post from the IDP.  If we receive a valid response from the IDP then we will create a page that will display a success message along with the first name of the authenticate user.  You might be wondering where “urn:oid:2.5.4.42” comes from.  The information returned in the SAML assertion will contain attributes agreed upon by InCommon as well as some attributes provided by Cornell.  The full list is:

AttributeNameInEnterpriseDirectory
AttributeNameInSAMLAssertion
edupersonprimaryaffiliation urn:oid:1.3.6.1.4.1.5923.1.1.1.5
commonName urn:oid:2.5.4.3
eduPersonPrincipalName (netid@cornell.edu) urn:oid:1.3.6.1.4.1.5923.1.1.1.6
givenName (first name) urn:oid:2.5.4.42
surname(last name) urn:oid:2.5.4.4
displayName urn:oid:2.16.840.1.113730.3.1.241
uid (netid) urn:oid:0.9.2342.19200300.100.1.1
eduPersonOrgDN urn:oid:1.3.6.1.4.1.5923.1.1.1.3
mail urn:oid:0.9.2342.19200300.100.1.3
eduPersonAffiliation urn:oid:1.3.6.1.4.1.5923.1.1.1.1
eduPersonScopedAffiliation urn:oid:1.3.6.1.4.1.5923.1.1.1.9
eduPersonEntitlement urn:oid:1.3.6.1.4.1.5923.1.1.1.7

Conclusion

We covered the basic concepts of using Shibboleth and SAML creating a simple demo application.  Shibboleth is a great choice when looking at architecting your custom application in the cloud, as it drastically simplifies the authentication infrastructure while still using Cornell SSO.  An important note is that in this example we used the Cornell Test Shibboleth IDP which allows us to create an anonymous service provider.  When moving your application into production you will need to register your service provider from https://shibrequest.cit.cornell.edu.  For more information about Shibboleth at Cornell please take a look at IDM’s Confluence page.


This article was updated May 2021 to remove outdated information.

Using Shibboleth for AWS API and CLI access

by Shawn Bower


Update 2019-11-06: We now recommend using awscli-login to obtaining temporary AWS credentials via SAML. See our wiki page Access Keys for AWS CLI Using Cornell Two-Step Login (Shibboleth)


This post is heavily based on “How to Implement Federated API and CLI Access Using SAML 2.0 and AD FS” by Quint Van Derman, I have used his blueprint to create a solution that works using Shibboleth at Cornell.

TL;DR

You can use Cornell Shibboleth login for both API and CLI access to AWS.  I built docker images that will be maintained by the Cloud Services team that can be used for this and it is as simple as running the following command:

docker run -it --rm -v ~/.aws:/root/.aws dtr.cucloud.net/cs/samlapi

After this command has been run it will prompt you for your netid and password.  This will be used to login you into Cornell Shibboleth. You will get a push from DUO.  Once you have confirmed the DUO notification, you will be prompted to select the role you wish to use for login, if you have only one role it will choose that automatically.  The credentials will be placed in the default credential file (~/.aws/credentials) and can be used as follows:

aws --profile saml s3 ls

NOTE: In order for the script to work you must have at least two roles, we can add you to a empty second role if need be.  Please contact cloud-support@cornell.edu if you need to be added to a role.

If there are any problems please open an issue here.

Digging Deeper

All Cornell AWS accounts that are setup by the Cloud Services team are setup to use Shibboleth for login to the AWS console. This same integration can be used for API and CLI access allowing folks to leverage AD groups and aws roles for users. Another advantage is this eliminates the need to monitor and rotate IAM access keys as the credentials provided through SAML will expire after one hour. It is worth noting the non human user ID will still have to be created for automating tasks where it is not possible to use ec2 instance roles.

When logging into the AWS management console the federation process looks likesaml-based-sso-to-console.diagram

  1. A user goes to the URL for the Cornell Shibboleth IDP
  2. That user is authenticated against Cornell AD
  3. The IDP returns a SAML assertion which includes your roles
  4. The data is posted to AWS which matches roles in the SAML assertion to IAM roles
  5.  AWS Security Token Services (STS) issues a temporary security credentials
  6. A redirect is sent to the browser
  7. The user is now in the AWS management console

In order to automate this process we will need to be able to interact with the Shibboleth endpoint as a browser would.  I decided to use Ruby for my implementation and typically I would use a lightweight framework like ruby mechanize to interact with webpages.  Unfortunately the DUO integration is done in an iframe using javascript, this makes things gross as it means we need a full browser. I decided to use selenium web driver to do the heavy lifting. I was able to script the login to Shibboleth as well as hitting the button for a DUO push notification:
duo-push

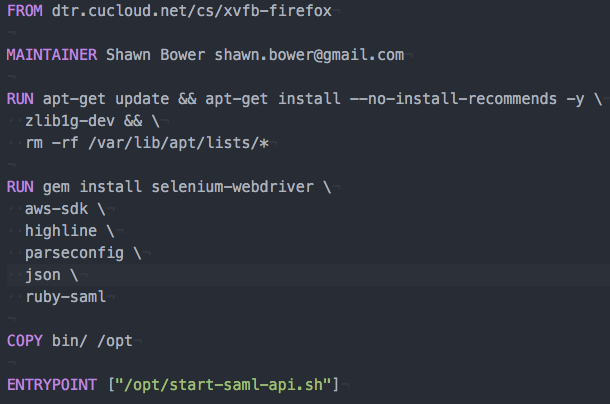
In development I was able to run this on mac just fine but I also realize it can be onerous to install the dependencies needed to run selenium web driver.  In order to make the distribution simple I decided to create a docker images that would have everything installed and could just be run.  This meant I needed a way to run selenium web driver and firefox inside a container.  To do this I used Xvfb to create a virtual frame buffer allowing firefox to run with out a graphics card.  As this may be useful to other projects I made this a separate image that you can find here.  Now I could create a Dockerfile with the dependencies necessary to run the login script:

saml-api-dockerfile

The helper script starts Xvfb and set the correct environment variable and then launches the main ruby script.  With these pieces I was able to get the SAML assertion from Shibboleth and the rest of the script mirrors what Quint Van Derman had done.  It parses the assertion looking for all the role attributes.  Then it presents the list of roles to the user where they can select which role they wish to assume.  Once the selection is done a call is made to the Simple Token Service (STS) to get the temporary credentials and then the credentials are stored in the default AWS credentials file.

Conclusion

Now you can manage your CLI and API access the same way you manage your console access. The code is available and is open source so please feel free to contribute, https://github.com/CU-CloudCollab/samlapi. Note I have not tested this on Windows but it should work if you change the volume mount to the default credential file on Windows. I can see the possibility to do future enhancements such as adding the ability to filter the role list before display it, so keep tuned for updates. As always if you have any questions with this or any other Cloud topics please email cloud-support@cornell.edu.