Tag Archives: vegetable problems

Does Your Basil have Downy Mildew?

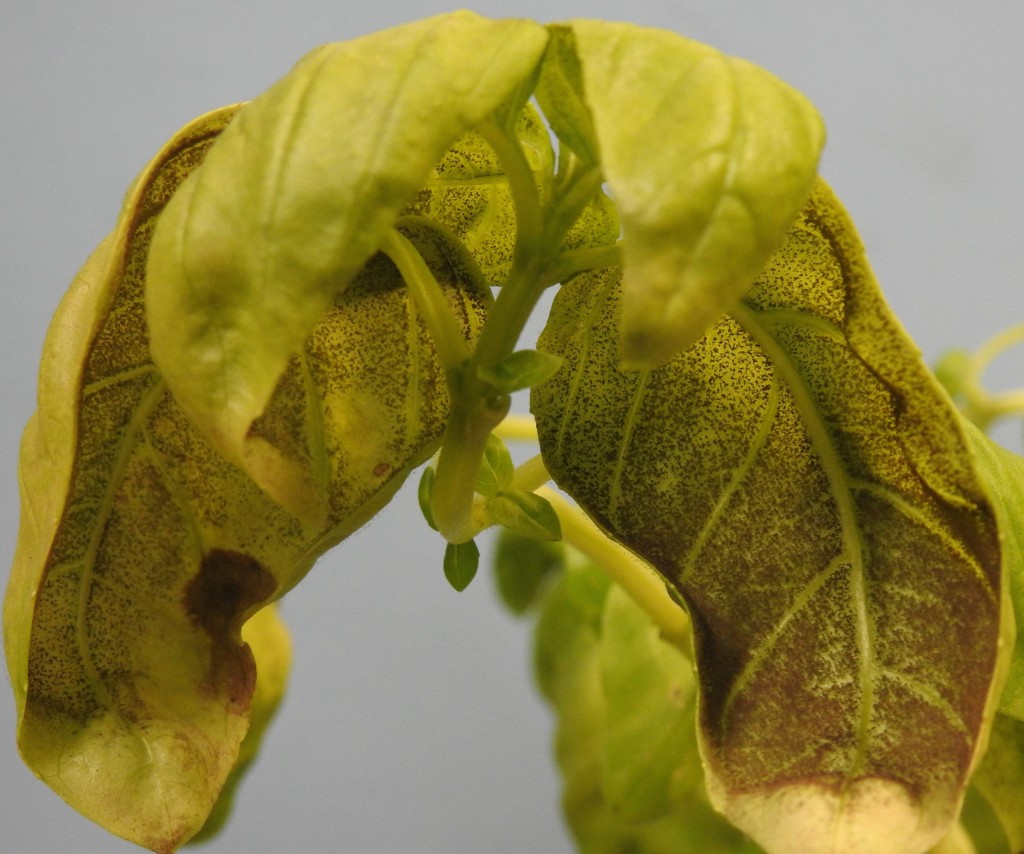
If your basil leaves have turned yellow and display a dark-brown sooty growth on their underside, then your plants have downy mildew, a regularly occurring disease on Long Island since it first appeared here in 2008. Click on the photo gallery on my Vegetable Pathology – Long Island Horticultural Research & Extension Center webpage to look at pictures of diseased basil to help determine if your herbs are affected.

basil-downy-mildew

Photo © by Dr. Margaret McGrath

There’s also lots of information about basil downy mildew on my webpage at Cornell Vegetable MD Online. If you’d like to log a report of your diseased basil to help me with a study on basil downy mildew, click here at Basil Downy Mildew Monitoring Records 2016. And for a national perspective about where it has appeared in the United States, visit Where in the USA is Basil Downy Mildew? This is a good web reference to visit in the future to learn when other gardeners are starting to find the disease on Long Island and elsewhere, too.

Downy mildew is hard to manage in basil plants. My recommendation for gardeners is to grow basil in pots and not expose them to high humidity (above 85%) which the pathogen requires to be infectious. Low humidity can be maintained by keeping plants indoors overnight and on rainy days. For more information, visit my webpage How Gardeners Can Manage Downy Mildew in Basil

Starting in late July, I grow my second planting of basil in pots because downy mildew typically begins developing for me on Long Island during August. Also, since basil is very cold sensitive, bringing plants into a warm house overnight maintains basil quality when night temperatures start dropping to below 55F.

If your basil is still green and healthy, consider yourself lucky and go knock on wood! And then drop me an e-mail. Cheers!

Dr. Meg McGrath is Associate Professor at Cornell University’s Long Island Horticulture Research and Extension Center in Riverhead, New York, where she conducts research and extension activities to help farmers manage diseases.

Tomato and Potato Late Blight: What to do NOW!

Late blight is arguably the worst problem that can appear in a vegetable garden! Its highly contagious and very destructive nature means everyone growing susceptible tomato and potato plants – gardeners and farmers alike – needs to take action to prevent late blight from occurring and needs to respond quickly when it appears. The major epidemics of this disease on Long Island in 2009 and 2011 are thought to have started with just a few infected plants.

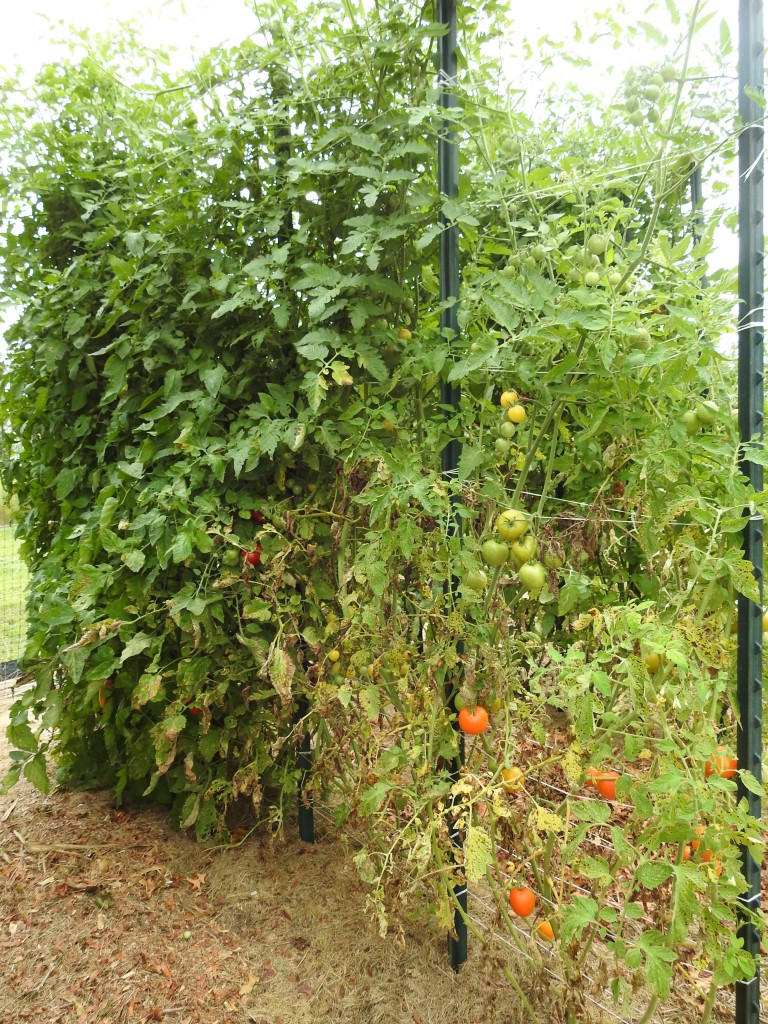
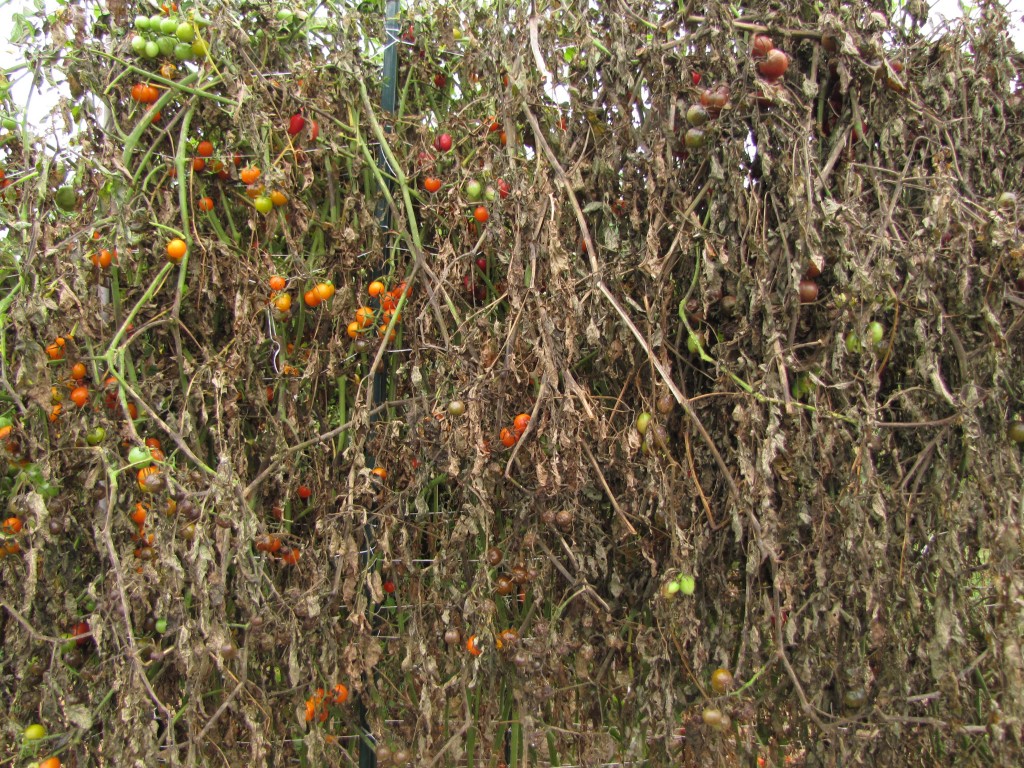
Sungold cherry tomato can be devastated by late blight, as it was here in my garden in 2013.

SunGold cherry tomato can be devastated by late blight, as it was here in my garden in 2013. Photo by Meg McGrath.

Early Season Action Steps to Prevent Late Blight:

  • Select varieties that have resistance to late blight. For example, the popular SunGold cherry tomato is susceptible to it; Jasper cherry tomato is not. Information about tomato varieties can be found at http://www.extension.org/pages/72678/late-blight-management-in-tomato-with-resistant-varieties#.VRNfGkZwfsM
  • Plant certified potato seed. Do not plant potatoes from last year’s garden or from the grocery store. There is a higher probability for the late blight pathogen (Phytophthora infestans) to be in “table-stock” potatoes.
  • Destroy any potato plants that grow as “volunteers” in compost piles or in the garden from potatoes not harvested last year.
  • Inspect tomato seedlings carefully for symptoms before purchasing them. The pathogen as it exists in the United States is not known to survive in tomato “true” seed and then infect the seedlings, so if you grow your own seedlings, late blight is not a concern until they are planted. Seedlings become infected by growing near other affected plants.
  • Become knowledgeable about the different symptoms of late blight and its imitators. I have posted photographs of this at http://livegpath.cals.cornell.edu/gallery/tomato/tomato-late-blight/.
  • Monitor the occurrence of late blight in the United States at usablight.org. You can sign up on that website to get an alert by text or e-mail when a report has been logged nearby, so you can be one of the first to know when late blight has been found on Long Island.
  • Inspect your tomato and potato plants for symptoms at least once weekly.
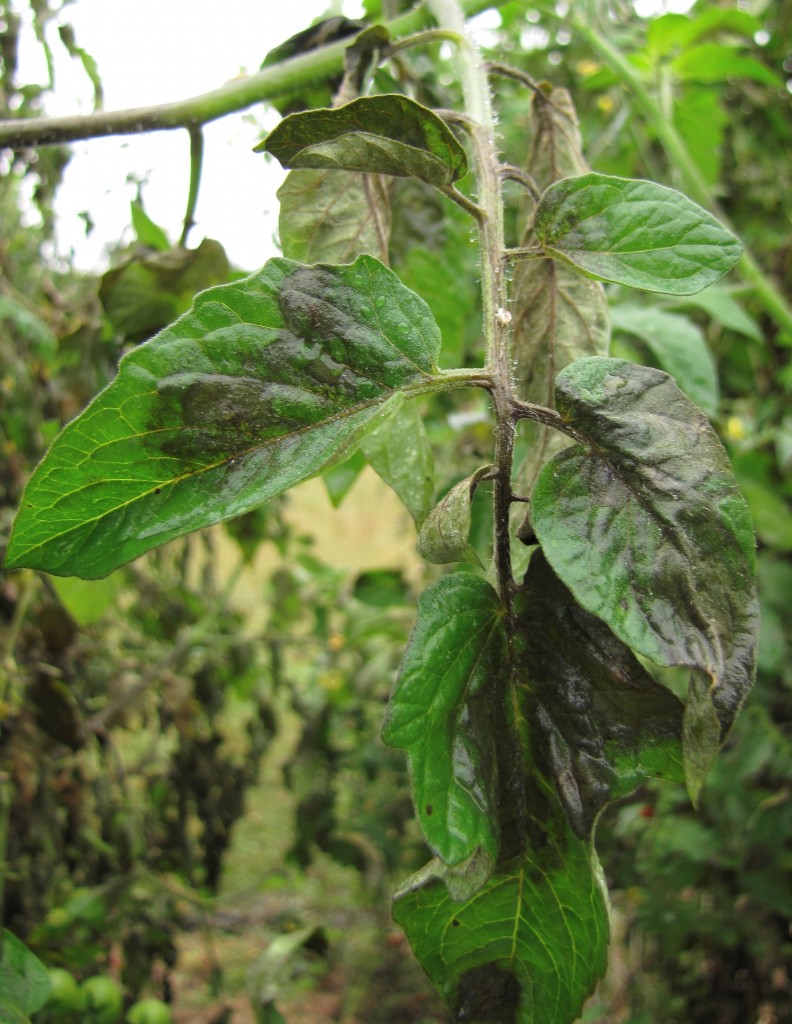
Inspect tomato plant leaves for symptoms of late blight, such as the discoloration you see here. Photo by Meg McGrath.

Inspect tomato plant leaves for early symptoms of late blight, such as the discoloration shown here. And then act fast! Photo by Meg McGrath.

What to do when late blight symptoms are found: Immediately call our Horticulture Diagnostic Lab at our hot line at 631-727-4126 from 9 a.m. to noon, Monday through Friday. Alice Raimondo and Sandra Vultaggio, our Horticulture Consultants, can help determine whether you do, indeed, have late blight, and answer questions about proper handling of an outbreak.

Best management steps for dealing with disease are based on knowledge of the pathogen’s biology and life cycle. The late blight pathogen in the United States is not known to reproduce sexually, as it does elsewhere in the world including in parts of Europe. Where it does reproduce sexually, it produces a type of spore (oospore) that enables the pathogen to survive in true seed and in soil; consequently, rotation is an important management step in Europe, but this is not necessary for controlling late blight in the United States.

Dr. Meg McGrath is Associate Professor at Cornell University’s Long Island Horticulture Research and Extension Center in Riverhead, New York, where she conducts research and extension activities to help farmers manage diseases.
Sample Soil Now for Healthier Landscapes Next Year

Spring is by far the busiest time for gardeners. Between selecting plants, starting seeds, and preparing beds, we often forget about what’s basic: the soil. Suddenly remembering, in April gardeners furiously submit handfuls of soil to our Horticulture Diagnostic Lab for testing, expecting immediate turnaround, and then realize, “What!? It takes how long for limestone to change the pH of my soil!?”

This is why autumn is the perfect time to start preparing your gardens for the growing season ahead. Submitting soil samples to us now allows you enough time to collect your samples properly, understand the test results, and if you need to make amendments to the soil, time for them to activate before next spring.

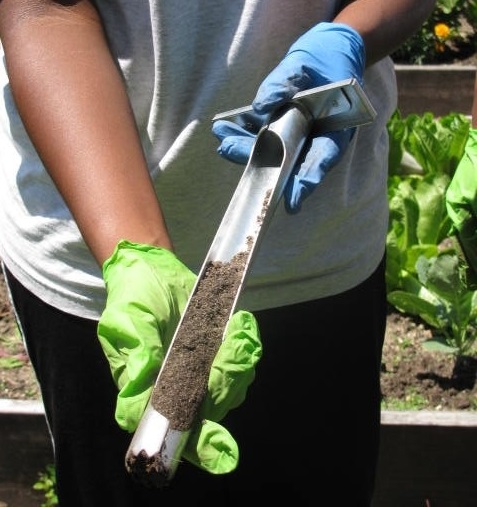
Using a soil auger makes collecting samples easy, but a trowel will work just as well.

Using a soil auger, shown above, makes collecting samples easy, but a trowel will work just as well. Photo by Robin Simmen.

Maintaining the proper soil pH is just as important for maximum crop yields as fertilizing, watering, and pest control. The decision to add lime to raise the soil pH and the amount to apply must be based on a soil pH test and the crop species to be grown. Do not guess. Some plants, like rhododendrons, azaleas, and blueberries as well as other members of the Ericaceae family grow best in acid soil (pH 5.0). Most vegetable garden plants grow best in soil with a pH in the 6.2 range. The recommended range for a lawn is between 6.0 and 7.0.

Instructions for taking a soil sample

First determine how many samples to take. Different gardens/beds, lawns, areas with different soil types, places where such amendments as limestone were added, areas with plants having different pH requirements, and good/bad areas should be sampled separately as described below:

  • In gardens or areas planned for new plantings where the soil will be turned under or rototilled, individual samples should be taken from the upper 6 to 8 inches of soil.
  • In established plantings or lawns where the soil won’t be turned under, individual samples should be taken from the upper 3 inches of soil.
  • Each soil sample should be comprised of 5 to 10 individual samples obtained by walking back and forth diagonally across the area to be sampled.
  • Use a trowel to dig a small hole to the desired depth. Remove a slice of soil from the entire side of the hole and place this in a clean plastic container. Repeat this procedure at each of your 5 to 10 random spots, and place the soil from these spots in the same container, discarding any stones, grass, or other debris.
  • Next, remove two 8-ounce cupfuls of the soil in this container and place them in a plastic bag. Secure the bag. This is your soil sample for that area. Mark the outside of the bag with an identification (i.e. #1, #2, or “A”, “B”, or “East”, “West”). Keep the identification simple.
  • Repeat this entire procedure for each additional garden, landscape bed, and/or lawn area you wanted tested.

You can find soil testing submission forms to accompany your samples on our website at http://ccesuffolk.org/agriculture/horticulture-diagnostic-labs. The cost of a soil pH test is $5 per sample; if you submit five or more samples, they cost $3.50 each. Mail or drop off your samples at 423 Griffing Avenue, Riverhead, NY 11901. Our office hours are Monday through Friday 8:30 a.m. to 4:30 p.m.

Sandra Vultgaggio is Horticulture Consultant for CCE Suffolk. She can be reached by email at sib7@cornell.edu or by phone at 631-727-7850 x387.

Late Blight on Long Island – Did We Dodge the Bullet?

While gardeners and farmers elsewhere, including upstate New York, have been battling late blight in 2015, so far it hasn’t been found on Long Island! At least, not yet . . . This is the first year since 2008 that this highly contagious and very destructive disease of tomatoes and potatoes hasn’t been observed here in spring and summer. Its absence means that on Long Island, we are successfully managing plant sources of the late-blight pathogen, Phytophthora infestans, in three ways by:

  • not planting infected potato tubers to grow new crops
  • not leaving infected potato tubers from previous crops in the ground or putting them in cull or compost piles
  • not planting infected tomato seedlings
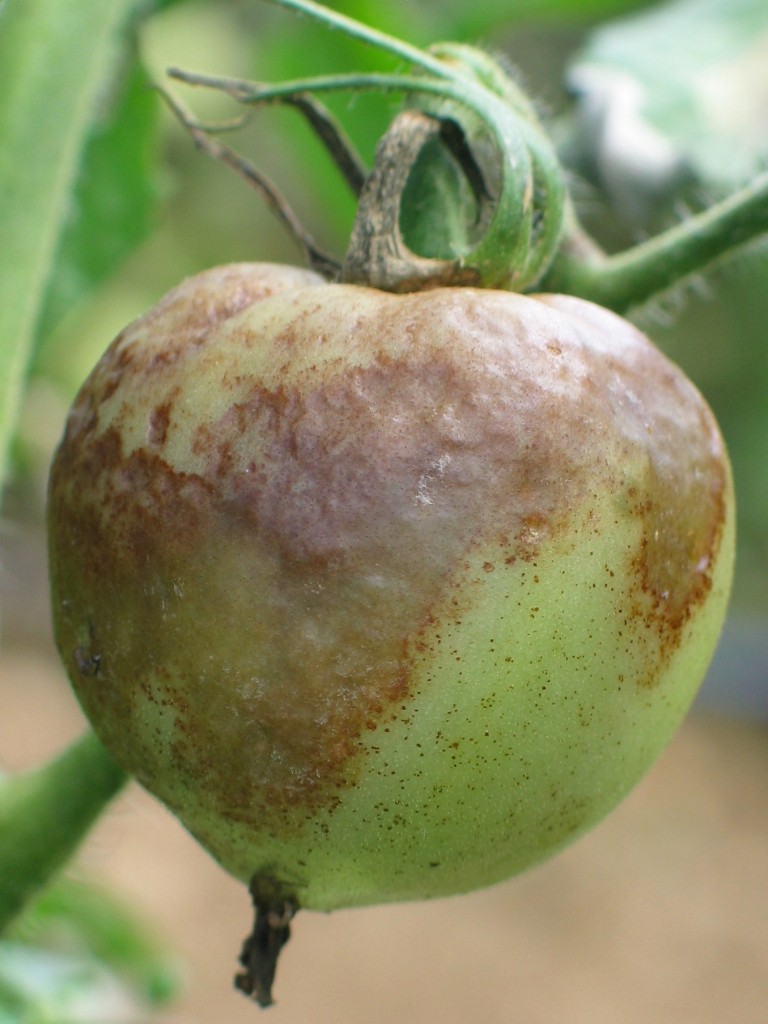
We all dread seeing these symptoms of late blight appear on our tomatoes!

We all dread seeing these symptoms of late blight appear on our tomatoes! Photo by Meg McGrath.

But one source of late blight remains on the scene and continues to be a threat until frost: spores blown long distances by wind. Typically spores of Phytophthora infestans blow no more than about 30 miles, but their farther wind dispersal is possible. A Long Island outbreak of late blight in August 2007 was, I think, the result of a storm carrying spores here from Lancaster, Pennsylvania. And in October of 2002 and 2008, late blight made its first appearance of the year on Long Island. There have been reports recently of late blight in New Jersey, so we’re not out of the woods yet.

Here is when late blight was first observed on Long Island in recent years:

  • October 3, 2002
  • July 5, 2006
  • Aug 26, 2007
  • October 3, 2008
  • June 23, 2009
  • June 18, 2010
  • June 24, 2011
  • May 29, 2012
  • July 25, 2013
  • June 20, 2014

Do you want to know where late blight has been reported in the United States this year? Check out www.usablight.org. Anyone can sign up on this website to get an alert by text or e-mail when a report has been logged nearby, so you can be one of the first to know when late blight has been found on Long Island. But realize your plants could be the first affected; therefore, signing up for alerts is not a substitution for looking for symptoms at least once a week. My own garden plants were part of the August 2007 outbreak!

Considering the potential impact of late blight, everyone who grows tomatoes and potatoes is responsible for inspecting their plants for late blight, reporting it when seen, and managing affected plants to minimize its spread. Photographs and information about late blight are posted on my website at: http://livegpath.cals.cornell.edu/gallery/tomato/tomato-late-blight/

If you see symptoms you think might be late blight (rather than one of its imitators, also shown on my website) call our Horticulture Diagnostic Lab at our hot line at 631-727-4126 from 9 a.m. to noon, Monday through Friday, where Alice Raimondo and Sandra Vultaggio, our Horticulture Consultants, can help determine whether you do, indeed, have late blight, even this late in the year.

Dr. Meg McGrath is Associate Professor at Cornell University’s Long Island Horticulture Research and Extension Center in Riverhead, New York, where she conducts research and extension activities to help farmers manage diseases.
Tomato Troubles? There’s an App for That

As Cornell University’s vegetable pathologist doing research at the Long Island Horticulture Research and Extension Center (LIHREC) in Riverhead, NY, I’ve seen a lot of sick tomatoes over the years, and I’ve been posting photographs of what I’ve seen on my website: http://livegpath.cals.cornell.edu/gallery/. When not at work, I’m an avid home gardener, too, so I have first-hand experience with the diseases popping up in Long Island gardens. In fact, many photographs on my website were taken at home.

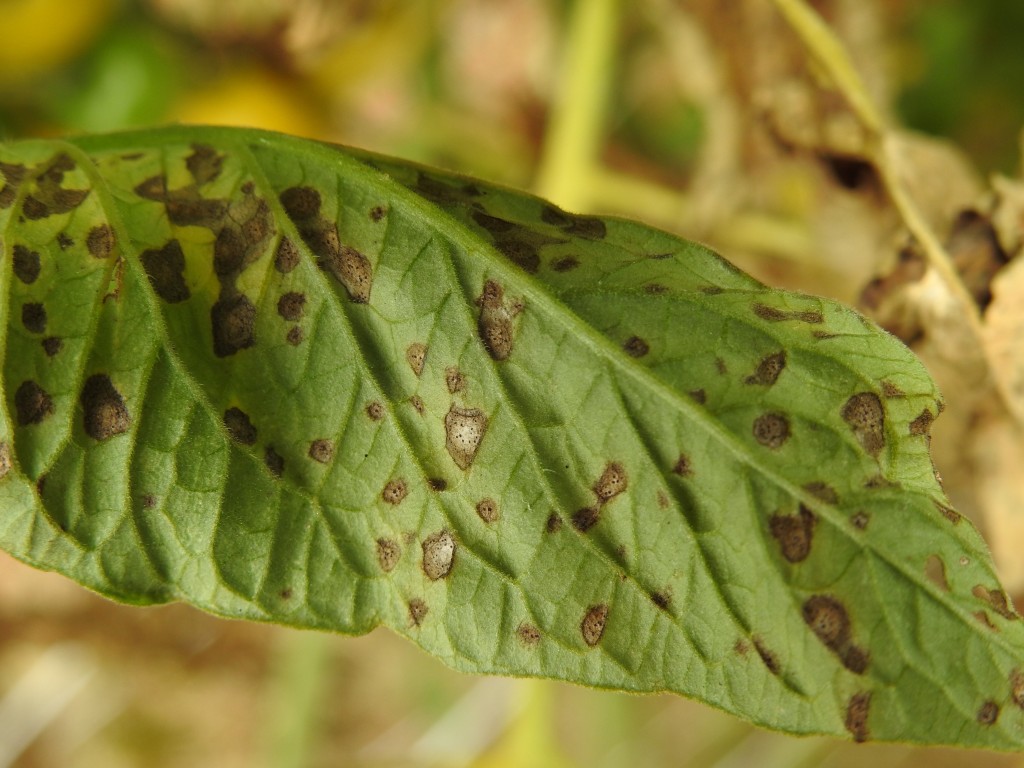
Septoria leaf spot symptoms usually first appear on the lowest, oldest leaves after fruit start to ripen.

Septoria leaf spot symptoms usually first appear on the lowest, oldest leaves after tomatoes start to ripen.

This year my tomatoes have Septoria leaf spot, which started on one plant and has been slowly spreading to others. The spores of this fungal pathogen, Septoria lycopersici, are spread by splashing water. It hasn’t rained much this summer, and I usually water at the base of plants rather than use an overhead sprinkler, but the few rains we’ve had spread the pathogen a lot. Septoria gets into a garden when seed containing the pathogen or infected seedlings are planted, or a windy rainstorm moves it from a nearby infected plant. Once in a garden, this pathogen survives overwinter in tomato debris; hence the recommendations to remove infected plant debris and to rotate the areas where you grow tomatoes. Other diseases and disorders I’ve seen on my garden tomatoes include anthracnose and blossom end rot (both every year), drought stress on leaves, leaf mold, powdery mildew, and late blight, all of which appear on my website.

Small dark brown spots with tan centers containing very tiny black specks called pycnidia (spore structures) are characteristic of Septoria leaf spot.

Small dark brown spots with tan centers containing very tiny black specks called pycnidia (spore structures) are characteristic of Septoria leaf spot.

Recently some colleagues and I at the American Phytopathological Society, including Dan Gilrein and Margery Daughtrey from LIHREC, developed a new app for smart phones called Tomato MD. It costs $2.99 and is available for both Apple and Android phones. Learn more about it here: http://www.apsnet.org/apsstore/shopapspress/pages/apps.aspx

This interactive reference tool is set up for fast identification of tomato problems, based on symptoms of root, leaf, stem, and fruit. The goal of the app is to move you quickly through the most difficult part of dealing with a sick plant: what’s wrong and what is causing it. The app includes an index of nearly 30 diseases and insect disorders, an extensive photo gallery of the most common problems, and a list of diseases according to their characteristics. Tomato MD does more than just help with identification; management tips are included, too.

For more help in identifying what’s wrong, take a look at my website (above), then read our online fact sheets about dealing with tomato problems, which can be found here: http://ccesuffolk.org/gardening/horticulture-factsheets/vegetable-diseases. If you’re still stumped, call our Horticulture Diagnostic Lab at our hot line at 631-727-4126 from 9 a.m. to noon, Monday through Friday, where Alice Raimondo and Sandra Vultaggio, our Horticulture Consultants, are available to answer all your horticulture questions.

Dr. Meg McGrath is Associate Professor at Cornell University’s Long Island Horticulture Research and Extension Center in Riverhead, New York, where she conducts research and extension activities to help farmers manage diseases.
Stop Blossom-End Rot from Ruining Vegetables

There’s nothing like putting your heart and soul, sweat, and tears into creating a beautiful vegetable garden only to have your fruits turn out all wrong. Over the coming weeks, I’ll be writing about some reasons your vegetables might not shape up to be county-fair contestants this year. Blossom-end rot is the first early season roadblock most people encounter.

Blossom-end rot occurs in tomatoes, peppers, zucchini, and other cucurbits. Early in the season as fruits develop quickly, they require a lot of calcium. Moisture plays a crucial role in calcium uptake in the plant. Though it may look like disease or insect injury, blossom-end rot is a physiological disorder caused by a lack of calcium transferring from the soil to developing fruits during dry weather.

Blossom End Rot

When a dry spell follows a time when plants get adequate moisture, calcium uptake into tomato plants is interrupted, causing the blossom-end of some fruits to develop a water-soaked, rotten appearance. Symptoms in peppers and cucurbits are similar in appearance, and occur for the same reason. Other factors that contribute to blossom-end rot include overly deep cultivation that damages plant roots and excessive applications of fertilizer containing ammonia and/or salts.

Growing vegetables in containers can be particularly tricky because containers tend to dry out quickly, leading to more extreme fluctuations in soil moisture than what plants experience in the ground. Be sure to water your container plants on a consistent schedule, and apply a fertilizer specifically formulated for tomatoes or vegetables that contains calcium as a micronutrient.

Blossom-end rot is typically an early season garden problem that balances itself out as summer progresses. Here are steps for minimizing blossom-end rot:

  • Maintain even soil moisture by adhering to a regular irrigation schedule. Consider mulching around plants to minimize moisture loss.
  • Avoid cultivating the soil too deeply and too close to the root systems of vegetable plants.
  • Use a fertilizer high in superphosphate and low in nitrogen. When adding nitrogen, use calcium nitrate rather than ammonia or urea forms.
  • Have your soil pH tested. Your vegetable garden should have a pH between 6.5 and 7. Visit our website for soil testing instructions.
  • As a last resort, use a foliar spray of calcium chloride. Be aware that calcium chloride can be phytotoxic if applied too frequently or in excessive amounts.

Sandra Vultgaggio is Horticulture Consultant for CCE Suffolk. She can be reached at sib7@cornell.edu or 631-727-7850 x387.