Please request a meeting with Academic Technologies or you may download the software from the CIT iClicker site and follow the detailed instructions on this page.
The following information is for your class if you are using Blackboard for your course web site or if you are using Blackboard only to display clicker question points to your students.
- What to tell students
- How to set up your iClicker program
- How to connect your students’ clickers to their names
What to tell students
Include the following information on your Blackboard course as a content item, an announcement and/or send in an email message to all students:
| How to register your iClicker remote through Blackboard: To register your iClicker remote:
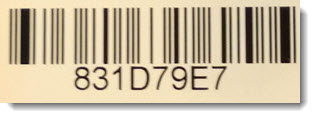
NOTE: Registering your iClicker remote for one Blackboard course will automatically register your iClicker remote for ALL Blackboard courses each semester Please do not register iClickers at the iclicker.com site. If you cannot read the iClicker remote ID, to find your iClicker ID #:
and one of the staff can confirm your iClicker remote ID #. Once it has been confirmed, please write it on a small piece of paper and place it inside the battery compartment. |
How to set up your iClicker program
Setting up the iClicker software for the first time:
- Either you received the iClicker software from Academic Technologies in a meeting or you downloaded the software from the CIT iClicker site – to request a meeting, please fill out the request form
- Connect the white iClicker receiver base to your computer – If you need one please contact the Academic Technologies staff at acadtech@cornell.edu
- If you are running the iClicker software from a flash drive, connect the flash drive to the USB port on the white receiver base – You may also need to plug in the power cord to the white receiver base
- Your computer will recognize the USB flash drive and you may be prompted to Open Folders and Files (PC) or it will be displayed automatically on your desktop (Macintosh)
- Double-click on the iClicker icon to open this drive
- Locate the iclicker Win or iclicker Mac folder on the USB flash drive and double-click the correct folder for your computer
- Double-click the iClicker program icon to start the program

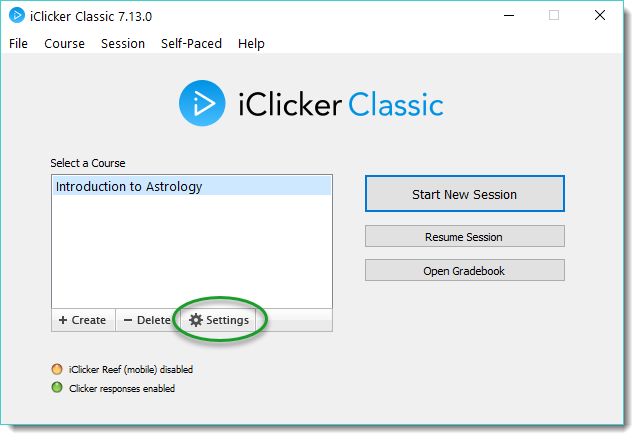
- At the main iClicker screen, click +Create
- In the Create a New Course window, enter your Course Name – Introduction to Astrology, for example and click Create
- Back at the main iClicker screen, click on your course name and then click on the Settings button
- The Course Settings window has tabs along the top. You can edit the settings in each tab and then save all settings once when done. Under the tab:

- General: type in your clicker ID on the back of your blue instructor remote in the Instructor Remote ID field:
The rest of the settings for the General tab can be left as is - Registration: Leave as set for you
- Mobile: If you choose to allow use of the iClicker Reef Polling app by your students, please follow the steps at the iClicker Reef Polling for Instructors page. This is not required. You may skip this tab if you will not be allowing iClicker REEF Polling to be used in your class. For full details about REEF Polling, see the Mobile/Web Polling page.
- Gradebook:
- In the Primary Institution field, start to type in Cornell University and then choose it from the list that will be displayed
- Click the Select Course button
- The Learning Management System window will open:
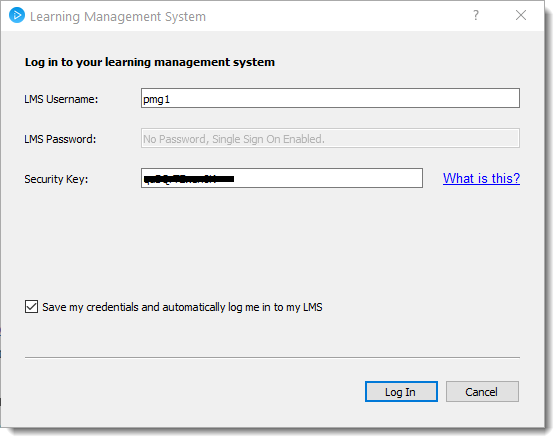
- Type your Cornell NetID in the LMS Username field
- For the Security Key, you will need to go to your Blackboard course
- Login to Blackboard (which is Cornell’s LMS, Learning Management System) at blackboard.cornell.edu and click on your course site
- Under the course Control Panel, click on Course Tools and then click i>clicker Instructor Tools at the bottom of the Course Tools list
- Click SSO Security Key and copy the characters displayed after Security Key:
- Paste the characters into the Security Key field of the iClicker Learning Management System window
- Click the check-box Save my credentials and automatically log me in to my LMS
- Click the Log In button
- From the list of courses, choose the correct one for the class you are teaching and click the Select button
- Now on the iClicker Gradebook tab, this course will be listed next to LMS Course:
- The Server URL under the Locally-hosted registration database heading should be blank
- Check the two boxes:
Upload zero scores as zero
Upload Ab (absent) scores as zero - NOTE: Students are not released from the Registrar into Blackboard courses for the Fall 2017 semester until starting on Tuesday, August 15, 2017.
- Roll Call: Since you will not be using the roll-call method of student clicker registrations, do not modify the In-class (roll call) registration settings
- Toolbar: You may choose to change the size of the toolbar by clicking on the choices next to Toolbar size:, but most likely you will leave this setting at Normal
You may change the Polling timer from Count up from 0 seconds to Count down from a specified time. Most instructors leave this setting at Count up from 0 seconds, but you may have a need to limit the amount of time students may respond to your questions, such as an in-class quiz. If you want to set a Count down from time, choose it from the drop-down menu and click the radio button to the left. - Scoring: If you will be providing points to your students for responding to clicker questions, this tab is where you will set the points and thresholds for achieving those points. This is broken into two type of points: Participation and Performance. The settings that you make here in iClicker are set for all questions and all class sessions. You may, however, modify any individual question’s point settings after that class if you need to in iClicker’s Gradebook. Please note that points can be awarded as fractions of a point, allowing you to set points less than 1.00 for both Participation and Performance.
- Results: This tab describes the settings for the Results Chart that you display in class after responses have been collected for a question and you have stopped the poll. The default setting of Multiple choice results as Color is recommended. The Numeric and Short Answer settings do not apply, since clickers cannot respond to those type of questions. The Results display setting is recommended to be unchecked.
- Base Display: You can view the responses in real-time as they are submitted by the students on the white iClicker receiver base, which will be in front of you at your lectern. The default setting for Multiple choice display – Show the number of votes for each answer choice – is recommended. The Numeric and Short Answer settings do not apply, since clickers cannot respond to those type of questions.
- Demographics: You can ask anonymous questions based on certain demographics that you choose, and then view your course content question responses with the demographics included.
- Click the Save button to save the settings for all tabs that you have modified
- If you are prompted with a message “Roster Not Found: Your course roster will not appear in the gradebook until you sync it from your LMS or get the correct file in your course folder.” click OK to clear this message
When you are returned to the main iClicker window, click the Start New Session button to start a poll.
How to connect your students’ clickers to their names
To connect your students to their clickers for providing clicker points and to display their points in your Blackboard course, follow these steps to connect your Blackboard roster with iClicker:
Your student roster and clicker points are managed using the iClicker Integrate for Blackboard plug-in.
- Features
- iClicker Integrate for Blackboard set-up
- Upload clicker points to Blackboard Grade Center
- Clicker point set-up in your Grade Center
For assistance, please send an email to acadtech@cornell.edu.
Features of iClicker Integrate for Blackboard
- Eliminates manual download/upload of class roster files – updates are made with just a couple clicks
- Allows you to update your iClicker student list from your Blackboard roster
- Allows you to post student clicker points to your Blackboard Grade Center
To set up iClicker Integrate for Blackboard
- An additional file, in addition to the iClicker software, is required and it may not have been provided in your iClicker folder. Please contact the Academic Technologies staff at acadtech@cornell.edu for help in determining if you already have the Integrate for Blackboard file.
- Request the proper settings file to be given to you by:
- requesting a meeting with the Academic Technologies staff. Send an email to acadtech@cornell.edu to request this short meeting.
OR
- Download the proper settings file:
iClicker Integrate for Blackboard: Macintosh and Windows computers
- requesting a meeting with the Academic Technologies staff. Send an email to acadtech@cornell.edu to request this short meeting.
If you request a meeting with the Academic Technologies staff, the steps listed below will be completed at that meeting and do not need to complete them. Please skip down the page to Upload clicker points to the Blackboard Grade Center
If you downloaded the software from the CIT iClicker site, the file is included, so you can skip to step #2. If you downloaded the i>clicker software from iclicker.com’s web site, and downloaded the iClicker Integrate for Blackboard file above, please follow these steps:
- After you have downloaded the file to your computer, it must be placed in the Resources folder of your iClicker folder: iClicker Mac or iClicker Win: Resources
- Open the iClicker program and choose your course
- Click Open Gradebook
- Click the Sync Roster button
NOTE: Students are not released from the Registrar into Blackboard courses for the Fall 2017 semester until starting on Tuesday, August 15, 2017. - If you have not already set up your connection to your Blackboard course, click here for the steps.
After you have set up for iClicker Gradebook to connect to your Blackboard course, an updated roster will then be displayed in the iClicker Gradebook - You will now see the current list of students who are enrolled in your Blackboard course
Please Note: Your students will need to use their clickers once in order to connect their clicker IDs to the names in the roster
To upload clicker points to the Blackboard Grade Center
After you have used iClicker in at least one class session, follow the steps below to upload clicker points to the Blackboard Grade Center:
- In your iClicker Gradebook, first click the Sync Roster button – this will update your students as well as update their clicker registrations
- Then click the Sync Scores button

- Choose Select All or just certain sessions to upload and click Next
- Choose the settings to Upload Scores to LMS as described:
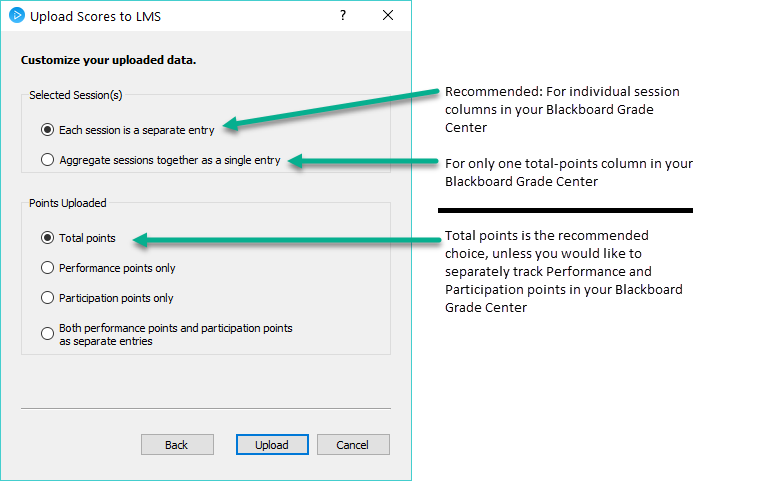
- To upload the scores to your Blackboard course site, click Upload
- Now go to your Blackboard course’s Grade Center. Here you can view the clicker points as assigned for each student.
To set up the Clicker points in your Blackboard Grade Center
- Go to your Blackboard course Grade Center and view the new column(s) created when you uploaded the clicker points from your iClicker Gradebook
NOTE: Individual sessions will be displayed as Session 1, Session 2, etc. These new columns have been categorized for you so if you chose not to upload a single, Aggregate column you can create a single calculated column to compile the clicker points for all class sessions that you collect clicker points. Please follow these steps:- Near the top of your Blackboard Grade Center, move your mouse over Create Calculated Column and choose Total Column
- The settings for this new calculated column are:
- Column Name: Class Participation or Clicker Points, for example
- Grade Center Name: can be left blank, or choose a shorter name that only you will see in the Grade Center
- Description: Can be left blank or may include “A running total of all in-class participation from clicker questions”, for example
- Primary Display: Score
- Secondary Score: None
- For Select Columns, click Select Columns and Categories and then choose the Category (in the lower list of Categories, not columns) iclicker polling scores. Click the > button to the right to add it to the Selected Columns section
- You may choose to drop certain grades (2 lowest grades, for example to allow two days of absence or no clicker in class) or you may leave this set as is
- Modify the Options settings as appropriate and click Submit
- The students will see this new total clicker column in their My Grades and this will continue to automatically accumulate throughout the semester as you upload more sessions to the Grade Center from iClicker’s Gradebook