AWSCLI S3 Backup via AWS Direct Connect

By Ken Lassey, Cornell EMCS / IPP

Problem

AWSCLI tools default to using the Internet for its connection when reaching out to services like S3. This is due to the fact that S3 only provides public endpoints for network access to the service.  This is an issue if your device is in Cornell 10-space as it cannot get on the Internet.  It also could be a security concern depending on the data, although AWSCLI S3 commands do use HTTPS for their connections.

Another concern is the potential data egress charges for transferring large amounts of data from AWS back to campus. If you need to restore an on-premise system directly from S3, this transfer would accrue egress charges.

Solution

Assuming you have worked with Cloudification to enable Cornell’s AWS Direct Connect service in your VPC, you can force the connection through Direct Connect with a free tier eligible t2.micro Linux instance. By running the AWSCLI commands from this EC2 instance, it can transfer data from your on-premise system, through Direct Connect and drop the data in S3 all in one go.

Note that if your on-premise systems have only public routable IP Addresses, and no 10-Space addresses, your on-premise systems will not be able to route over Direct Connect (unless Cloudification has worked with you to enable special routing). In most campus accounts, VPC’s are only configured to route 10-Space traffic over Direct Connect. If the systems you want to back up have a 10-Space address, you are good to go!

Example Cases

  1. You have several servers that backup to a local storage server. You want to copy the backup data into AWS S3 buckets for disaster recovery.
  2. You want to backup several servers directly into AWS S3 buckets.

In either case, you do not want your data going in or out over the internet, or it cannot due to the servers being in Cornell 10-space.

AWSCLI Over Internet

awscli s3 sync <backupfolder> <s3bucket>

By running the awscli command from the backup server or individual server the data goes out over the internet.

Example Solution

By utilizing a free tier eligible t2.micro Linux server you can force the traffic over Cornell direct connect to AWS.

AWS CLI Over Direct Connect

Running the awscli commands from the t2.micro instance you force the data to utilize AWS direct connect.

On your local Windows server (backup or individual) you need to ‘share’ the folder you want to copy to S3.  You should be using a service account and not your own NetID. You can alternatively enable NFS on your folder if you are copying files from a Linux server, or even just tunnel through SSH. The following examples are copying from a Windows share.

In AWS:

  1. Create an s3 bucket to hold your data

On your systems:

  1. Share the folders to be backed up
  2. Create a service account for the backup process
  3. Give the service account at least read access to the shared backup folder
  4. If needed allow access through the Managed Firewall from your AWS VPC to the server(s) or subnet where the servers reside

On the t2.micro instance you need to:

  1. Install the CIFS Utilities:
    sudo yum install cifs-utils
  2. Create a mount point for the backup folder:
    mkdir /mnt/<any mountname you want>
  3. Mount the shared backup folder:
    sudo mount.cifs //<servername or ip>/<shared folder> /mnt/<mountname> -o \ 
    name=”<service account>”,password=”<service account password>”,domain=”yourdomain>”
  4. Run the s3 sync from the t2.micro instance:
    aws s3 sync \\<servername/IP>/\<share> s3:\\<s3-bucket-name>


Instead of manually running this I created on the t2.micro instance a script to perform the backup.  The script can be added to a CRON task and run on a schedule.

Sample Script 1

  1. I used nano to create backup.sh
       #!/bin/sh
       backupfolder=/mnt/<sharedfoldername>
       s3path=s3://<s3bucketname>
       aws s3 sync $backupfolder $s3path
  1. The script needs to be execuatable so run this command on the t2.micro instance
    sudo chmod +x <scriptname>

Sample Script 2

This script mounts the share and backups up multiple folders on my backup server then unmounts the shared folder

#!/bin/bash
sudo mount.cifs //128.253.109.11/ALC -o user="<serviceaccount>",password="<serviceaccount pwd>",domain=”<your domain"
srvr=(FOLDER1 FOLDER2 FOLDER3 FOLDER4 FOLDER5 FOLDER6)
for s in "${srvr[@]}"; do
    bufolder=/mnt/<mountname>/$s
    s3path=s3://<s3bucketname>/$s
    aws s3 sync $bufolder $s3path
done
sudo umount /mnt/<mountname> -f

Using Shibboleth for AWS API and CLI access

by Shawn Bower


Update 2019-11-06: We now recommend using awscli-login to obtaining temporary AWS credentials via SAML. See our wiki page Access Keys for AWS CLI Using Cornell Two-Step Login (Shibboleth)


This post is heavily based on “How to Implement Federated API and CLI Access Using SAML 2.0 and AD FS” by Quint Van Derman, I have used his blueprint to create a solution that works using Shibboleth at Cornell.

TL;DR

You can use Cornell Shibboleth login for both API and CLI access to AWS.  I built docker images that will be maintained by the Cloud Services team that can be used for this and it is as simple as running the following command:

docker run -it --rm -v ~/.aws:/root/.aws dtr.cucloud.net/cs/samlapi

After this command has been run it will prompt you for your netid and password.  This will be used to login you into Cornell Shibboleth. You will get a push from DUO.  Once you have confirmed the DUO notification, you will be prompted to select the role you wish to use for login, if you have only one role it will choose that automatically.  The credentials will be placed in the default credential file (~/.aws/credentials) and can be used as follows:

aws --profile saml s3 ls

NOTE: In order for the script to work you must have at least two roles, we can add you to a empty second role if need be.  Please contact cloud-support@cornell.edu if you need to be added to a role.

If there are any problems please open an issue here.

Digging Deeper

All Cornell AWS accounts that are setup by the Cloud Services team are setup to use Shibboleth for login to the AWS console. This same integration can be used for API and CLI access allowing folks to leverage AD groups and aws roles for users. Another advantage is this eliminates the need to monitor and rotate IAM access keys as the credentials provided through SAML will expire after one hour. It is worth noting the non human user ID will still have to be created for automating tasks where it is not possible to use ec2 instance roles.

When logging into the AWS management console the federation process looks likesaml-based-sso-to-console.diagram

  1. A user goes to the URL for the Cornell Shibboleth IDP
  2. That user is authenticated against Cornell AD
  3. The IDP returns a SAML assertion which includes your roles
  4. The data is posted to AWS which matches roles in the SAML assertion to IAM roles
  5.  AWS Security Token Services (STS) issues a temporary security credentials
  6. A redirect is sent to the browser
  7. The user is now in the AWS management console

In order to automate this process we will need to be able to interact with the Shibboleth endpoint as a browser would.  I decided to use Ruby for my implementation and typically I would use a lightweight framework like ruby mechanize to interact with webpages.  Unfortunately the DUO integration is done in an iframe using javascript, this makes things gross as it means we need a full browser. I decided to use selenium web driver to do the heavy lifting. I was able to script the login to Shibboleth as well as hitting the button for a DUO push notification:
duo-push

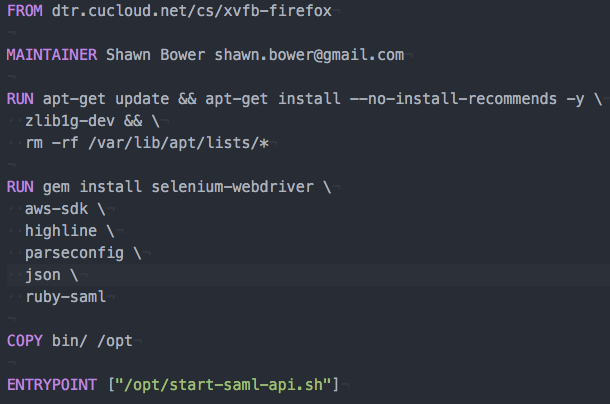
In development I was able to run this on mac just fine but I also realize it can be onerous to install the dependencies needed to run selenium web driver.  In order to make the distribution simple I decided to create a docker images that would have everything installed and could just be run.  This meant I needed a way to run selenium web driver and firefox inside a container.  To do this I used Xvfb to create a virtual frame buffer allowing firefox to run with out a graphics card.  As this may be useful to other projects I made this a separate image that you can find here.  Now I could create a Dockerfile with the dependencies necessary to run the login script:

saml-api-dockerfile

The helper script starts Xvfb and set the correct environment variable and then launches the main ruby script.  With these pieces I was able to get the SAML assertion from Shibboleth and the rest of the script mirrors what Quint Van Derman had done.  It parses the assertion looking for all the role attributes.  Then it presents the list of roles to the user where they can select which role they wish to assume.  Once the selection is done a call is made to the Simple Token Service (STS) to get the temporary credentials and then the credentials are stored in the default AWS credentials file.

Conclusion

Now you can manage your CLI and API access the same way you manage your console access. The code is available and is open source so please feel free to contribute, https://github.com/CU-CloudCollab/samlapi. Note I have not tested this on Windows but it should work if you change the volume mount to the default credential file on Windows. I can see the possibility to do future enhancements such as adding the ability to filter the role list before display it, so keep tuned for updates. As always if you have any questions with this or any other Cloud topics please email cloud-support@cornell.edu.