An Intrusion on Cornell AWS Turf

By Paul Allen

So, it’s finally happened. Earlier this week Cornell University had an intrusion into one of the 80+ AWS accounts that Cornell uses. With that kind of scale, it was only a matter of time until a human made a mistake.

What Happened?

The short story is that a Cornell developer accidentally included AWS credentials in source code committed to a public git repository. Within a matter of minutes, the intruder had found those credentials and begun using them to fire up large AWS EC2 instance types across all AWS regions. Presumably, the goal was to steal compute cycles for cryptocurrency mining. The  developer working with the account noticed a problem when the intruder terminated the EC2 instances hosting development, test, and production deployments.

The Good

The good news is that it could have been worse.

Once the intrusion was noticed, it took only minutes to identify the IAM credentials that were being used by the intruder and deactivate them. Then cleanup began—shutting down EC2 instances that the intruder had launched to stop the AWS charges from mounting further.

More good news is that the leaked credentials had privileges limited to the AWS EC2 service. That limited the blast radius so forensics were not required for the myriad of other AWS services that are available.

A few other ways we were lucky:

  • The affected AWS account wasn’t being used for holding or processing any Cornell confidential data. This would have complicated things immensely.
  • The intruder terminated existing instances, triggering a look at what was going on in the account.
  • Beyond terminating those instances, the intruder didn’t seem to be bent on destroying existing resources, like EBS volumes or snapshots. This made recovery a bit easier.
  • The soft limits that AWS imposes on numbers of instance types that can be running at any given time restricted the number of instances that the intruder was able to start up. No doubt the bill would have been much larger if those limits weren’t in place.
  • Because the intruder only had privileges to EC2, he couldn’t create new IAM policies, users, or credentials thus saving us from playing whack-a-mole with a myriad of other IAM principals or credentials beyond the one originally leaked.
  • The affected AWS account had CloudTrail turned on so it was easy to see how the leaked credentials were being used. This is part of the standard audit configuration we enforce for Cornell AWS accounts.

The Bad

The total AWS bill resulting  from the intrusion was about $6,500. The normal daily spend in the affected AWS account was about $200/day and the bill ballooned to about $6,700 on the day of the intrusion. Ouch!

The Ugly

This intrusion resulted from a simple mistake, and mistakes happen whether we are newbies or experts. The challenge we face is determining what practical mechanisms should be in place to reduce the likelihood of mistakes or to limit the impact of those mistakes.

The leaked credentials granted a lot of privileges

The credentials that were compromised had privileges associated with the AmazonEC2FullAccess managed policy. That’s a lot of privileges. The blast radius of the intrusion could have been limited by better scoping those privileges in some way:

  • Often, privileges can be scoped reasonably to a specific AWS region without impairing their usability. It’s easy to restrict privileges to a specific region. Our intruder was able to launch instances in every public AWS region. The cost impact of our intrusion could have been reduced by over 90% if the privileges had been restricted to a specific region of interest.
  • The privileges granted by the compromised credentials could have been scoped to work just from a limited set of source IPs. Most of us at Cornell are using AWS from a limited set of IP addresses (Cornell campus IPs and maybe our home IP address) so scoping to that limited set of IPs wouldn’t have hindered legitimate use of the credentials. Here’s an example policy that you can use to help limit access to Cornell IP addresses.
  • Was full access to all EC2 operations required for the intended use of these credentials? Maybe, maybe not. While it can be challenging to figure out the itemized list of specific AWS operations that an IAM principal should have access to, it may have helped limit the scope of this intrusion. For example, our intruder was able to create new EC2 key-pairs with which to connect to his stolen instances. Did the intended use of these credentials require the ec2:CreateKeyPair permission? Were other limitations possible?

Avoid leaking credentials in the first place

It is well known that bad guys watch commits to public git repos for credentials and other secrets accidentally committed.  However, there is help available.

  • Tools like git-secrets can be used to avoid accidentally committing secrets like AWS credentials to git repos.
  • It is often possible to use temporary credentials instead of static, fixed credentials. Tools like aws-vault make it possible to improve your AWS credential hygiene in a variety of scenarios. In fact, one team at Cornell has integrated aws-vault into their development processes.
  • You can avoid AWS credentials entirely if you are operating from an EC2 instance. In that case, you can use IAM instance profiles to give your EC2 instance privileges to perform AWS operations without having to configure AWS access key credentials.

Better monitoring of activity in AWS accounts

The intrusion could have been recognized earlier.

  • We use CloudCheckr at Cornell for campus AWS accounts, giving our AWS users access to reports on billing, inventory, utilization, security, and best practices. CloudCheckr has a lot of information and could have alerted us about unexpected spending (among other things), but it isn’t designed as a realtime tool. So that wouldn’t have provided timely alerts in this situation.
  • AWS account users can set up billing alarms in CloudWatch to get alerted based on the billing parameters they choose. Unlike CloudCheckr alerts, these are based on real-time data so could have provided a warning that something untoward was happening in this situation.
  • The free tier of AWS Trusted Advisor provides Service Limit checks that could have told us that the EC2 instance limits had been reached in AWS regions around the globe.  CloudWatch Alarms can be combined with Trusted Advisor metrics to get notifications about that situation.

Conclusion

It is easy to come up with a list of things that could have been done differently in a situation like this. The items above are just a starting point, and there are a gabillion compilations of best practices for AWS security. It can be overwhelming.

Even though this intrusion happened elsewhere on campus, I am going to take Cornell’s brush with an intruder as an opportunity to critically review the practices that I and my team use. I won’t let myself get overwhelmed with all that could be done. Instead we’ll focus on incremental improvement to the practices we have in place and assess where more effort might have a disproportionately great payoff. If you or your team at Cornell would like help doing the same in AWS, please reach out to the Cloud Team.

The Cornell “Standard” AWS VPC 2.0

By Paul Allen

In a previous post, I described the standard VPC configuration we use for Cornell AWS accounts requiring network connectivity back to the campus network. This post is to share minor updates of that configuration. Differences from the original are:

  • Using AWS Direct Connect instead of a VPN to establish network connectivity between campus and AWS VPCs. Our current primary DC connection is 1Gbs, and our secondary connection is 100Mbs.
  • Continued allocation of a /22 CIDR block (1024 addresses) to the VPC, but no longer allocating all of those addresses to subnets within the VPC. This allows for future customization of the VPC without having to vacate and delete /24 subnets as was necessary for VPC customization with the original design.
  • Reducing the size of the four subnets to /26 CIDR blocks (64 addresses) instead of /24 CIDR blocks (256 addresses). This allows the flexibility described above, while still allowing /24 subnets to be created as part of VPC customizations.

Cornell Standard VPC in AWS version 2.0

Benchmarking Network Speeds for Traffic between Cornell and “The Cloud”

by Paul Allen

As Cornell units consider moving various software and services to the cloud, one of the most common questions the Cloudification Services Team gets is “What is the network bandwidth between cloud infrastructure and campus?” Bandwidth to cloud platforms like Amazon Web Services and Microsoft Azure seems critical now, as units are transitioning operations. It’s during that transition that units will have hybrid operations–part on-premise and part in-cloud–and moving or syncing large chunks of data is common.

(more…)

Benchmarking On-Premise and EC2 Clients Running Against RDS

by Paul Allen

At Cornell, as engineers contemplate moving infrastructure and applications to AWS it is tempting to ask whether they can start just by moving database instances to the AWS Relational Database Service (RDS) and leaving other application components on premise. The reasons behind this probably stem from the fact that the on-premise relational databases represent a very well-defined component with well-defined connectivity to other components. And, tools like the AWS Database Migration Service promise to make the move fairly painless.

So, how feasible is it to leave applications on campus while using an RDS database as a back end? When I queried the Cornell cloud community about this, I got several anecdotal responses that this had been tried, without much success, with web applications.

(more…)

How to Setup AWS Route53 to Work with Cornell-Managed DNS

by Paul Allen

If you are at Cornell developing and deploying sites or services using AWS, one of the things you’ll usually want to do is ensure that those sites and services can be accessed using a hostname in the cornell.edu domain. Keeping an existing cornell.edu hostname is even more critical if you are moving a service from Cornell infrastructure to AWS infrastructure. This article describes how to use the Cornell DNS system in conjunction with AWS Route53 to deploy services in AWS that respond to cornell.edu host names.

Scenario

Let’s say we want to deploy a web site running on AWS at URL http://example.cloud.cit.cornell.edu. The Cornell DNS system and Cornell IT policy won’t let you directly reference an AWS IP address in a Cornell DNS “A” record. Further, even if we could do that, we wouldn’t get to take advantage of all the flexibility and features that Route53 offers–for example health checks on backend servers and dynamic failover.

At Cornell, in order to create the example.cloud.cit.cornell.edu hostname, I need to be an administrator of the cloud.cit.cornell.edu sub-domain in the Cornell DNS system. I also need privileges to  a public hosted zone in Route53. In this example, I’ll use cs.cucloud.net, a public Route53 hosted zone which I have permissions to administer in AWS.

Here’s the short version of what needs to happen in this scenario:

  1. Setup Route53 to serve content from example.cs.cucloud.net.
  2. Add a CNAME to Cornell DNS so that example.cloud.cit.cornell.edu is an alias for example.cs.cucloud.net.

The rest of this article goes through the specifics of how to accomplish that. This particular example will use:

Step 1 – Get a site running in AWS

This doesn’t necessarily need to be your first step, but the explanation is easier if we start here. In this example I have an EC2 instance running a generic Apache server showing a generic test page. AWS provides very detailed instructions for setting up Apache on an EC2 instance. Right now, you don’t have to worry about any hostnames–the goal is to make sure you have content being delivered from AWS. My example instance is below.

EC2 Instance Configuration

There are many other ways to serve content or applications in AWS, but I’m just picking one of the simplest ways for this article. Other options might include using CloudFront and S3 to serve a static web site or using Elastic Beanstalk to run an application. There are a plethora of other ways to accomplish this as well.

Here are the important things about this instance configuration:

  • It is running in a public subnet with a public IP assigned. In a real situation, we would run the instance on a private subnet. But, this configuration is easier to test as you work through the example.
  • The Security Group (named “dns-example”) attached to the instance allows HTTP (port 80) and SSH (port 22) access from anywhere (0.0.0.0./0). Again, not how we’d setup things in real life, but good enough for now to accomplish our current goals.
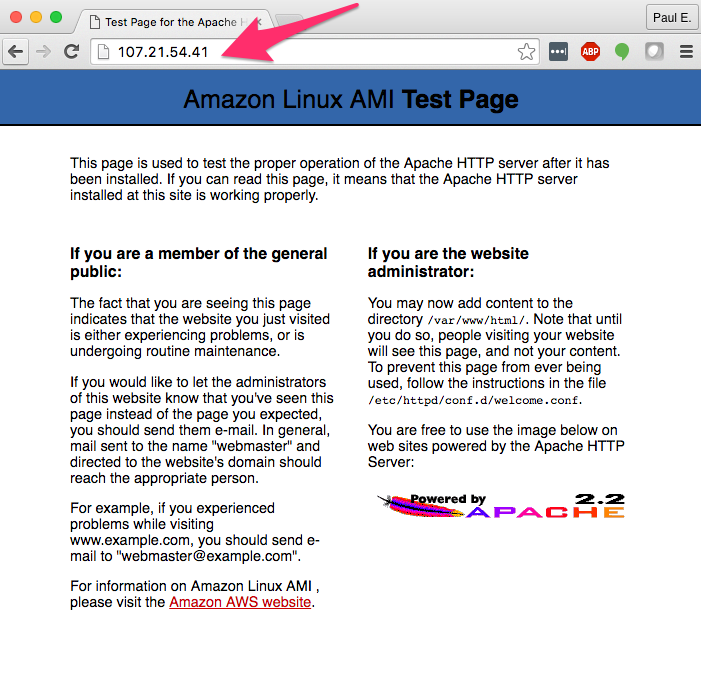
  • Apache is installed and running in the instance. You can check that by pointing your browser to the public IP address of your instance as shown below.

Apache is running

Step 2 – Configure an Elastic Load Balancer

Strictly speaking I don’t need an ELB to accomplish my goal, but using an ELB is a best practice and allows us to easily configure Route53 to direct users to our content.

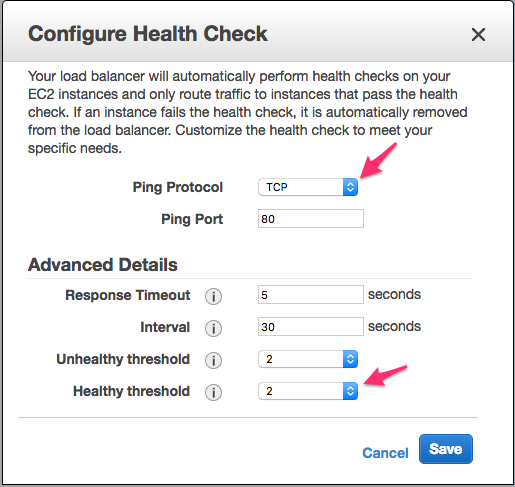
Again, AWS provides step-by-step instructions for creating an ELB and I’ll register the instance I already have running to my new load balancer. Those AWS instructions are great for our situation, except for one thing: the ELB health check configured in the instructions won’t quite work if the only content I’m serving from my instance is that default test page. The reason for that is that the test page returns a HTTP status of code 403 instead of 200.  That 403 code will cause the ELB heath check configured in the instructions to fail and the ELB will take your instance offline. Instead of a having the ELB check whether “http:/107.21.54.41:80/” returns a 200 status, we need to loosen that up to a TCP check on port 80 as shown below. The TCP  check just makes sure that something on my instance is accepting connections on port 80. I’ll set the “Healthy threshold” value to 2 so that the ELB will bring my instance back online more quickly–useful for our scenario but maybe not in real life.


Modified ELB Health Check

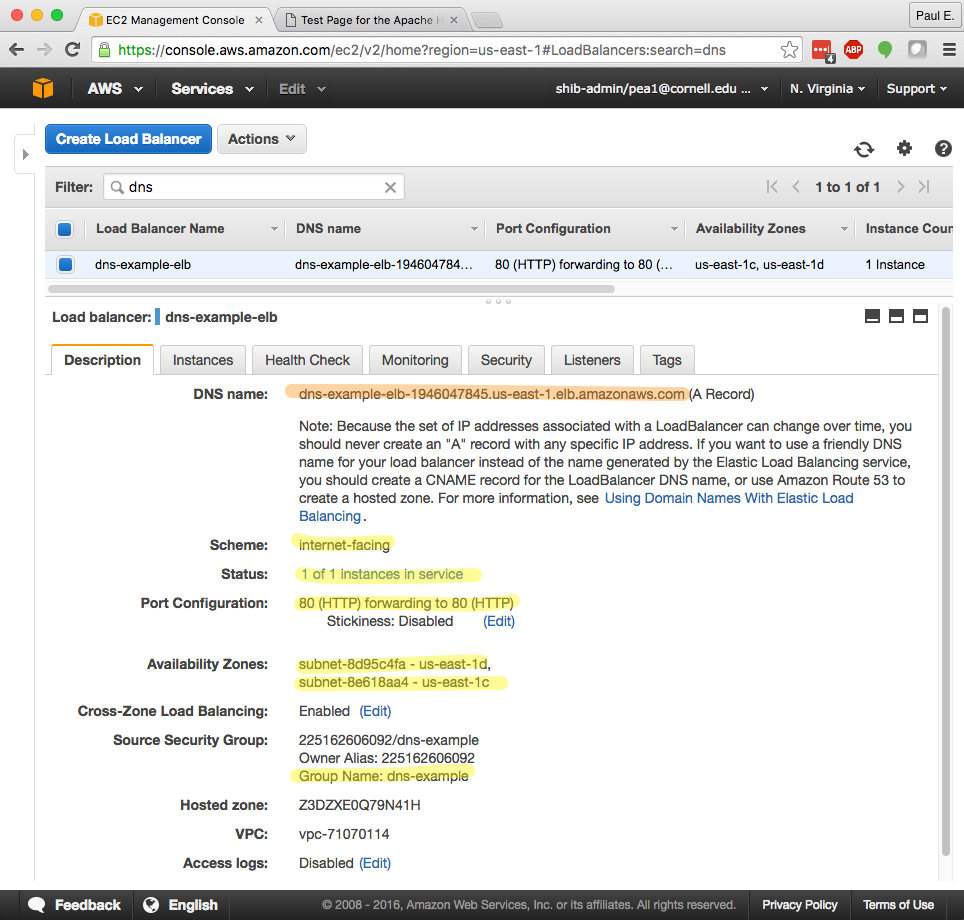
Besides the health check configuration, the key points of my ELB configuration are highlighted in yellow on the screenshot below:

  • The ELB scheme is “internet-facing”.
  • My EC2 instance is registered with the ELB and it is recognized as healthy (because of the looser health check). I.e., “1 of 1 instances in service”.
  • The ELB is configured to use public subnets in my chosen availability zones.  You’ll have to take my word for it that “subnet-8d95c4fa” and “subnet-8e618aa4” are the public subnets in my VPC.
  • The Source Security Group allows HTTP traffic to the ELB on port 80. In this case I’m using the same security group as I did for my EC2 instance.

ELB Configuration

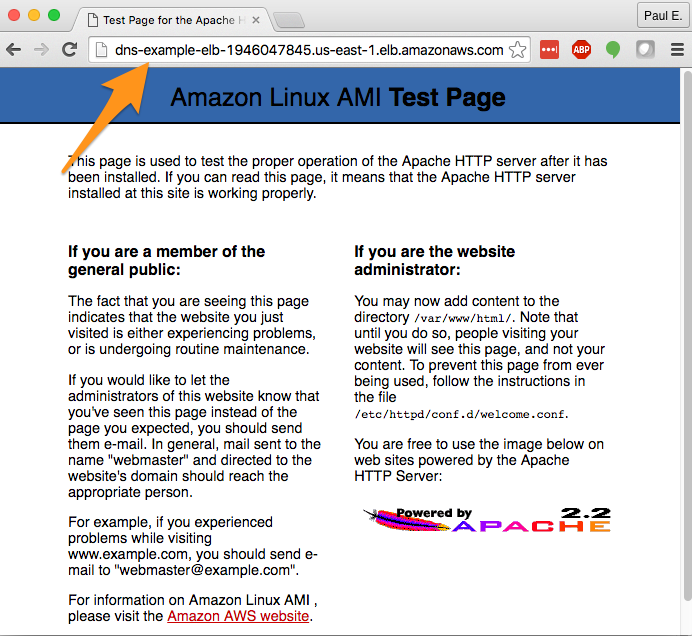
Note that the ELB “Description” tab also provides you with information about the DNS name for the ELB, highlighted in orange above. You should be able to point your browser to that name and see your test page appear. If not, go back and confirm the key configuration details in your EC2 instance and ELB.

The ELB is serving our test page.

Step 3 – Configure Route53

Now we are ready to get Route53 looped into our configuration.

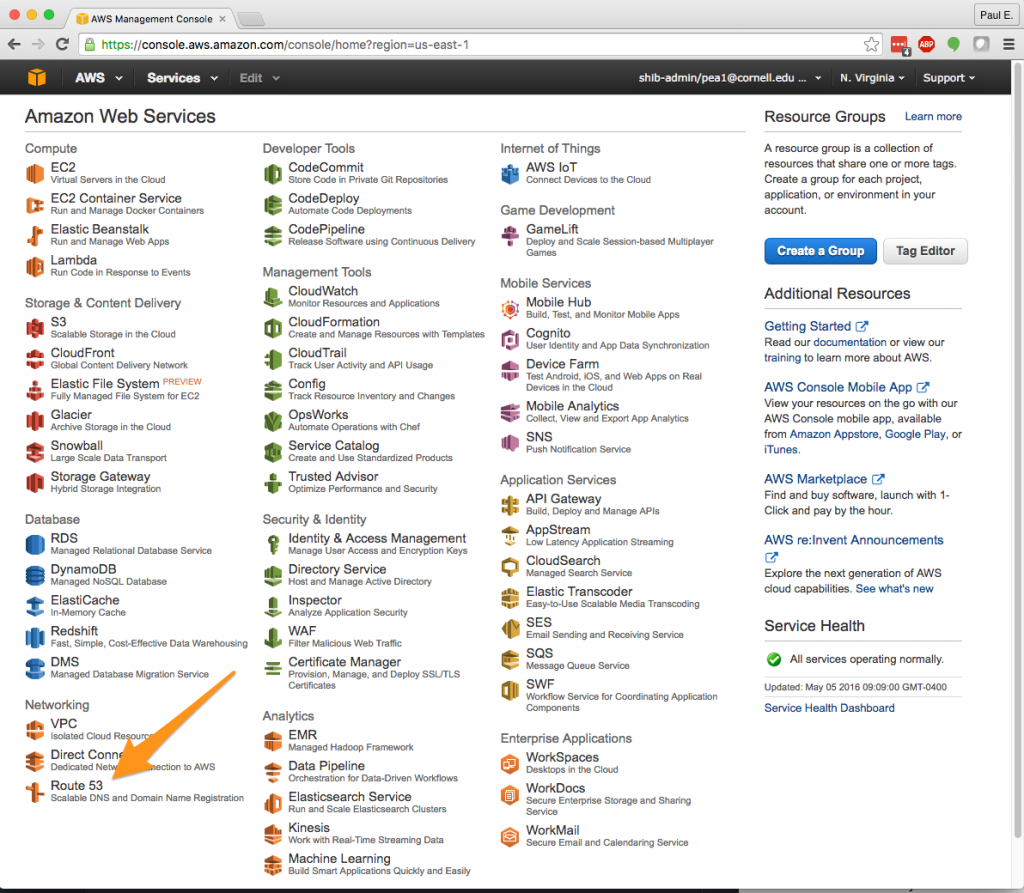
1. Start by pointing your AWS Console to the Route 53 service.

Route53 in the AWS Console

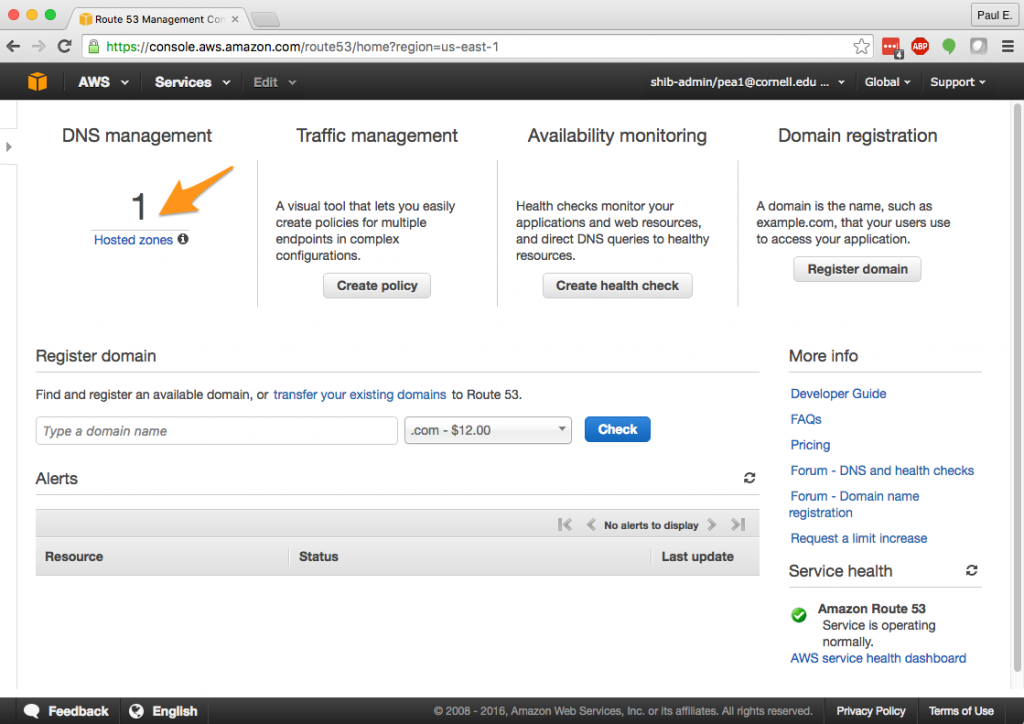
2. You will need to have privileges over at least one public Route 53 hosted zone. Setting up a public hosted zone is beyond the scope of this article, but contact cloud-support@cornell.edu if you need a hosted zone for your Cornell AWS account but don’t have one. I’ll be using cs.cucloud.net as the hosted zone for this article.

Route 53 Hosted Zone

cs.cucloud.net Zone in Route 53

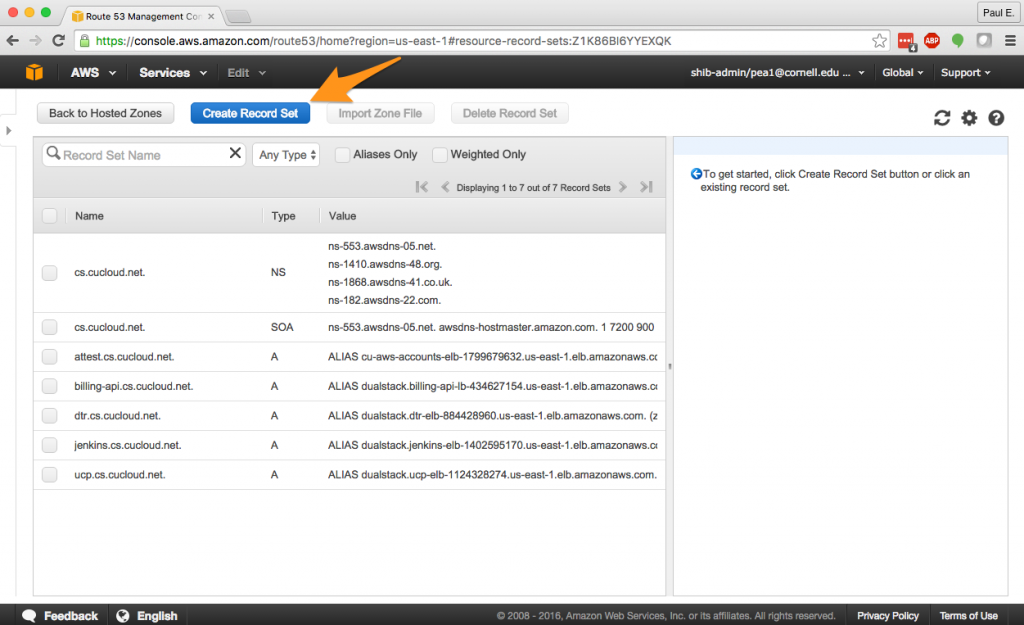
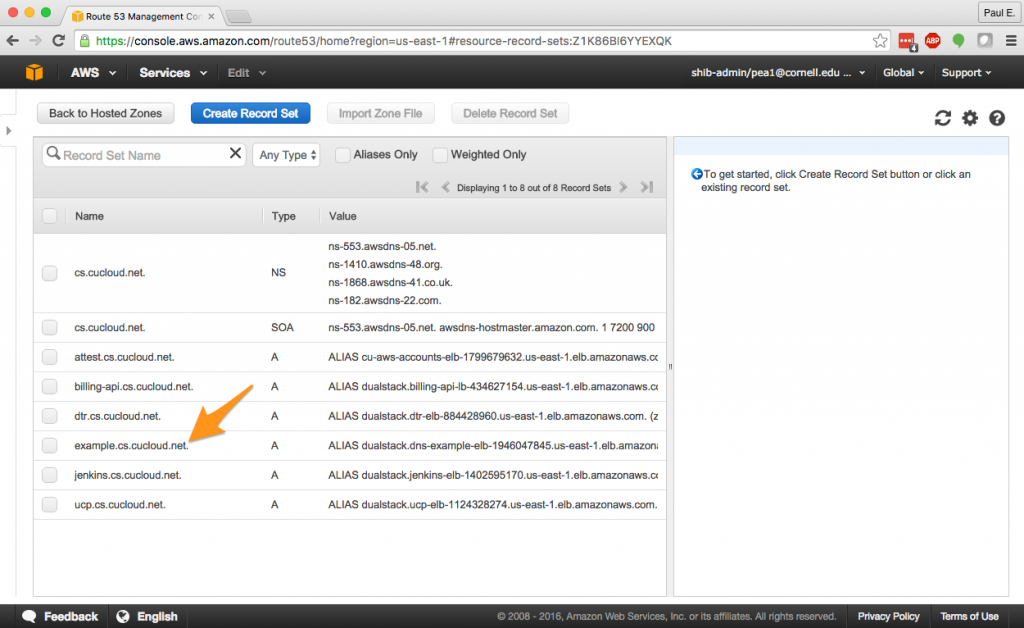
3. In the cs.cucloud.net hosted zone, I’m going to “Create Record Set”.

Route 53 New Record Set

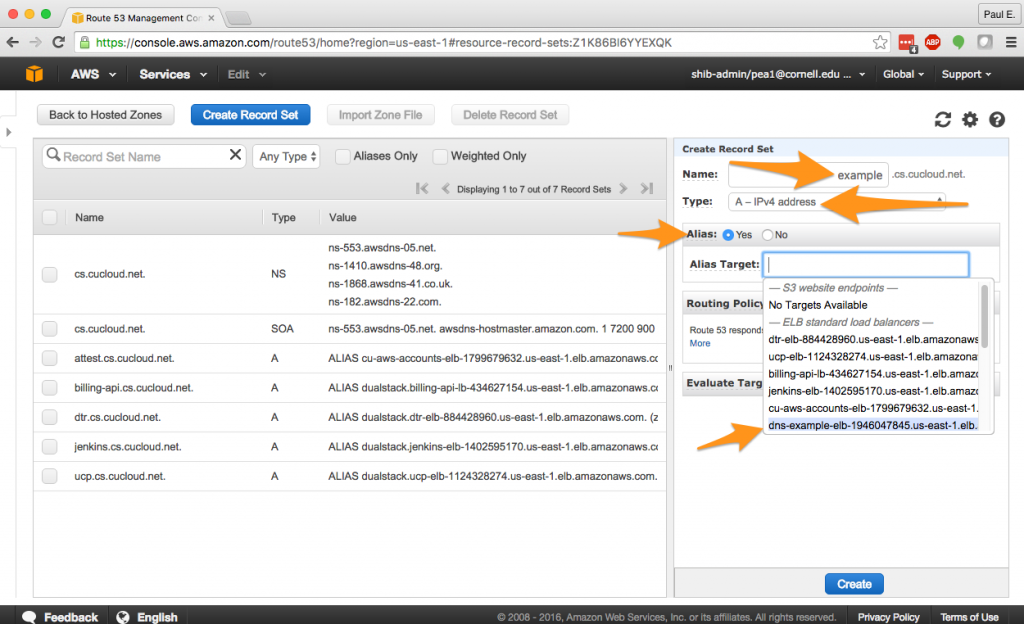
4. In the “Create Record Set” dialog, enter “example” as the name, which will configure the name “example.cs.cucloud.net”. Ensure that the record type is “A – IPv4 address”. Select “Yes” for “Alias.” and then choose your ELB from the dropdown menu. Leave the remaining items with their default values, and select the “Create” button.

Route 53 Alias Record

This should have created a new name in your hosted zone. That’s great, but you might find yourself asking what the heck is an “Alias” record? AWS calls the Route53 Alias functionality an “extension” to the standard DNS system as we know it. Alias records in Route 53 will automatically track changes in certain AWS resources and always ensure that a Route 53 name points to the right IP address. For example, if the IP address of our ELB ever changes, the Alias functionality will automatically track that change and keep our name working. AWS documentation contains more about deciding between alias and non-alias records. If you go back and look at the fine print on the ELB “Description” tab you will see a warning there about avoiding using the IP address of an ELB in DNS records because, over time, the IP address of the ELB may change through no fault of your own.

Route 53 Name

5. Now you should be able to point your browser at the new Route 53 name and see your test page being delivered from your EC2 instance via the ELB.

Test Route 53 Name

You are now done with the AWS side of things. Time to move on to Cornell DNS.

Step 4 – Configure Cornell DNS

The goal in this step is to setup a new CNAME in the Cornell DNS system pointing to the new Route 53 name we just created. You will need admin privileges to the Cornell sub-domain in which you want to create the name. Here, I have privileges to the cloud.cit.cornell.edu sub-domain.

1. Navigate to the Cornell DNS batch processing interface. You will need to authenticate with your Cornell netID to access the batch interface.

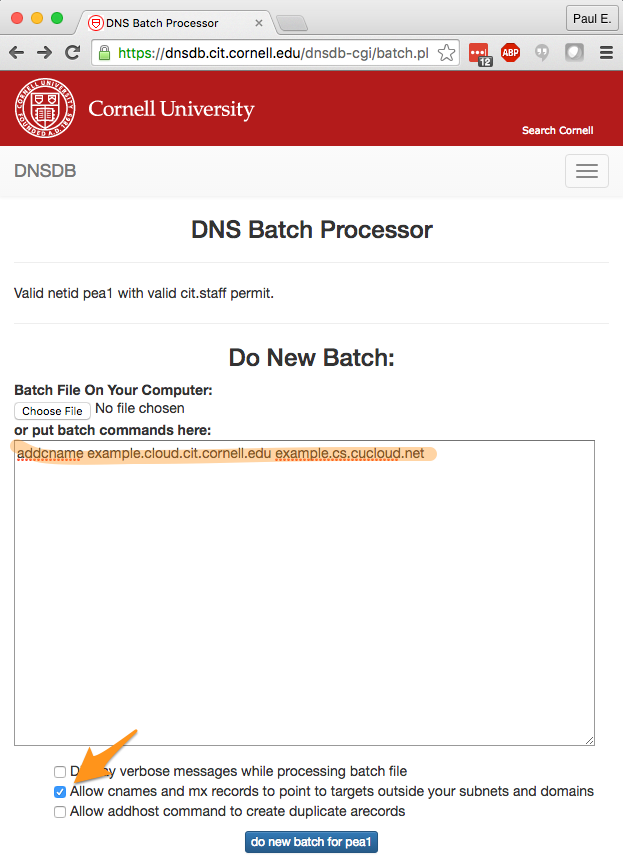
2. Enter “addcname [your-host-and-subdomain].cornell.edu [your-route-53-name]” into the batch processor. The batch command for this example is “addcname example.cloud.cit.cornell.edu example.cs.cucloud.net”. Also be sure to check the box that says “Allow cnames and mx records to point to targets outside your subnets and domains”.

Cornell Batch Processor Input

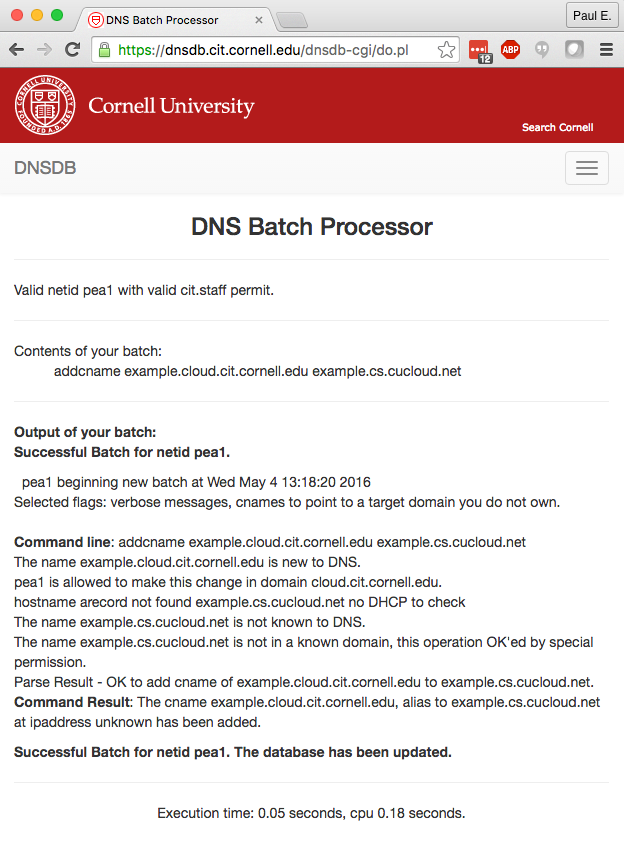
This should result in output confirming that the CNAME was created.

Cornell Batch Processor Output

3. Now wait. The Cornell DNS changes may not take effect immediately. In the worst case, they are pushed out about 5-10 minutes after the top of each hour. You can use ping to test whether the Cornell name has been published. E.g., “ping example.cloud.cit.cornell.edu”. As soon as ping stops reporting that it cannot resolve the name, you are in business.

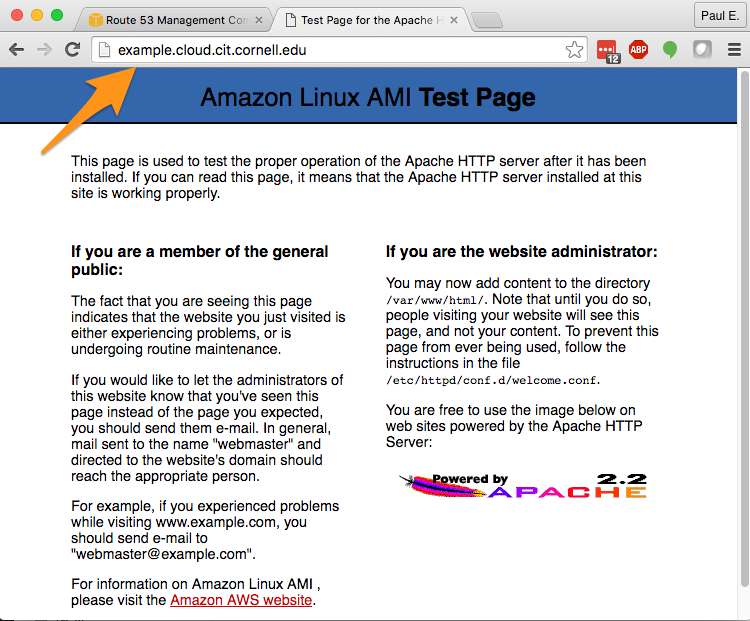
4. Point your browser to your new Cornell DNS name. If you see your your AWS Apache test page, you have achieved your goal. If not go back and troubleshoot, examining the key configuration items pointed out earlier in this article.

Final Result

Improvements

Now that you know how to configure an AWS service to respond to Cornell DNS names, there are several things you might want to do to transform this example into something nearing a production configuration.

  • To achieve better fault tolerance, add more EC2 instances serving your content/service. You might even want to setup an AWS autoscaling group. If you manually add instances, be sure not to forget to register them with your ELB.
  • Instead of running EC2 instances on public subnets, move them to your private subnets to better protect them from the bad guys.
  • Review the Security Groups you used for the ELB and your EC2 instance(s). Improve them by reducing access to the minimum needed for your service. That might mean allowing only HTTP/HTTPS traffic on ports 80 and 443 to your ELB. For the EC2 instance(s), you could reduce the scope of traffic on ports 22, 80, 443 to just the IP range in your VPC subnets. Be sure that the ELB sitting on your public subnet(s) can still access the appropriate ports (e.g., 80, 443) on your EC2 instances. Also be sure not to block yourself from getting to port 22 if you need to admin your EC2 instance(s).
  • Once you begin serving real content on your backend server (i.e., not the default test page), change the ELB health check to use an HTTP or HTTPS check.
  • Consider adding health checks and failover to your Route 53 configuration.
  • Setup the ELB to serve HTTPS traffic by uploading a server certificate into AWS Identity and Access Management Service and configuring your ELB to use it.
  • Turn on access logging for the ELB.

The Cornell “Standard” AWS VPC

by Paul Allen

This post describes the standard AWS Virtual Private Cloud (VPC) provisioned for Cornell AWS customers by the Cornell Cloudification Service Team. This “standard” VPC is integrated with Cornell network infrastructure and provides several benefits over the default VPC provisioned to all AWS customers when a new AWS account is created.

So we don’t get confused, let’s call the VPC provisioned by the Cornell Cloudification Service Team the “Cornell VPC” and the VPC automatically provisioned by AWS the “default  VPC”. AWS itself calls this latter VPC by the same name (i.e. default VPC). See AWS documentation about default VPCs (more…)