Aspirating oocytes from bovine ovaries – upping your game
Background In vitro fertilization (IVF) is the main assisted reproductive technology that our lab uses to advance our understanding of reproductive physiology as well as improve our ability to manipulate reproduction for increased fertility or sterility.
The starting point of this process is the recovery of oocytes from slaughterhouse bovine ovaries via aspiration. While there are other methods for recovering cumulus oocyte complexes (COCs) such as ovary slicing and follicle dissection, aspiration using 18-gauge needles and a vacuum unit allows 3 experienced workers to efficiently collect up to 800 oocytes from 7 lbs of ovaries in less than 2 hours.
Target audience If you are new to in vitro fertilization or hoping to improve your technique, you have come to the right place. This abbreviated protocol focuses on the aspiration sub-skill, from set up to the COC recovery. The full IVF protocol is found here (requires access privilege to the Cheong Lab Box).
Protocol
1.0. Preparing for oocyte collection (Day -2, typically Mondays)
Estimated time to complete the task: 15 minutes
1.1. Preparation of materials and solutions.
1.1.1. Ensure that there are at least one (1) full 50 mL bag of holding media, two (2) 50 mL aliquots of flush media, and one (1) 1000 mL bottle of PBS for 7 lbs. of ovaries. If not, flush media can be substituted as holding media as a last resort. PBS cannot be substituted for flush media.
1.1.2. Prepare to work in the Biological Safety Cabinet (BSC). Turn on the blower and light. Make sure to wear gloves before working in the cabinet. Spray the inside of the BSC with 70% EtOH and wipe it down. Douse the following supplies (except for single-use sterile consumables) in 70% EtOH before placing them in BSC:
-
- Sharpie
- 1000 uL micropipettor and barrier tips
- Autoclaved D.I. water
- 5-well plate
- Bottle of BO-IVM
1.1.2.1. Complete all the following steps in the BSC.
1.1.2.2. Remove the parafilm from the bottle of BO-IVM.
1.1.2.3. Label the 5-well plate lid “IVM” at the top. Label the bottom tab with your initials and date, as well as “IVM” again. Place 700 uL of BO-IVM in each well.
1.1.2.4. Fill in the space between the 5 wells with 3.5-4mL of autoclaved distilled water.
1.1.2.5. Clean BSC if done being used for the day with the 3-step cleaning protocol listed on BSC.
1.2. Aspiration table set up. You will need the following items:
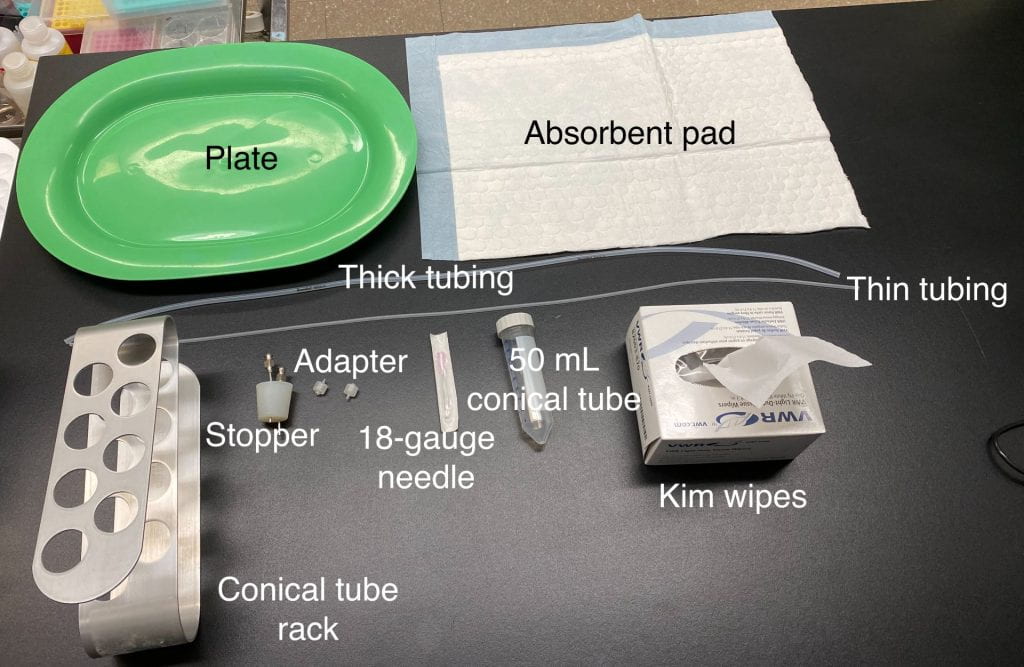
1.2.1. Set up the aspiration unit with the appropriate number of attached lines and 50 mL conical tubes.
1.2.2. The thick tubing is for the 18-gauge needle and the thin tubing is for the pump.
1.2.2.1. The thick tubing goes onto the lower connector of the stopper while the thin tubing goes to the taller connector (Big=bottom, tiny=top). If this arrangement is reversed, follicular fluid and COCs would flow toward the pump instead of being collected in the conical tube – not the desired outcome.
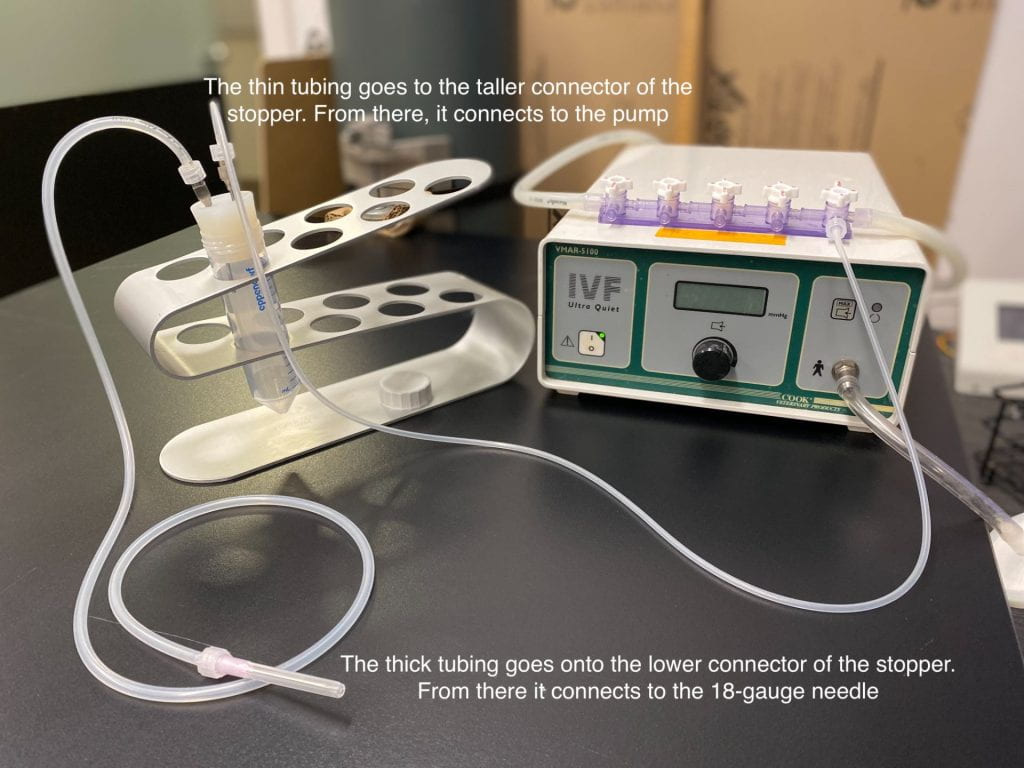
Proper set up of the thick and thin tubing
1.2.2.2. If there is not enough thin tubing you can use thick tubing as a substitute, but thin tubing cannot be used in place of thick tubing.
1.2.3. Set up green plates with a folded pad on top.
1.2.4. Place a pair of gloves and scissors in the top compartment of the cooler.
1.2.5. Place bottle of 1000mL room-temperature .9% saline in the main compartment of cooler.
1.2.5.1. Make 0.9% saline if needed (45 g NaCl in 5000 mL distilled H2O).
1.2.5.2. Ensure that there are three (3) bottles of 500mL 0.9% saline solutions. The carboy containing 0.9% saline can be used to refill the bottles. The bottles and the carboy are located beside the sink.
2.0. Aspirating the ovaries (Day -1, typically Tuesday afternoons)
Estimated time to complete the task: 2 hours or more (depends on the number of people aspirating and their skill level)
2.1. Preparing ovaries for aspiration
2.1.1. Open the bag containing ovaries and empty them into the white colander.
2.1.2. Scoop ovaries into a large beaker. Add saline to the beaker and massage the ovaries. Massaging the ovaries helps remove blood.
2.1.3. Drain the liquid and then pour fresh saline to cover the ovaries. Repeat the massaging and draining steps two times.
2.1.4. Pour enough saline to cover the ovaries and bring the beaker to the aspiration bench.
2.1.5. Warm 50 mL of holding media and thaw two (2) 50 mL flush media to room temperature on the warming plate. Flush media aliquots are stored in the -20 freezer next to the gas tanks.
2.2. Aspirating the ovaries
2.2.1. Press the power button on the aspiration pump. Step on the pedal of the aspiration unit to start it. The pump should be aspirating at a flow rate of 22.5-25 mL H2O/min.
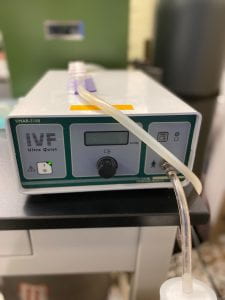
Picture showing the craft suction pump used to aspirate ovaries
2.2.1.1. Pay attention to the direction of the knobs:
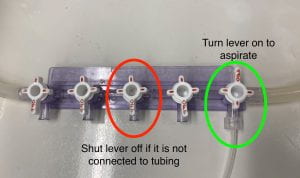
Picture showing how to turn the air flow on or off on the valve
2.2.2. Aspirate the follicles in each ovary. Use KimWipes or an absorbent pad to dry ovaries for easier handling.
2.2.3. Don’t aspirate follicles that are bigger than 8 mm in diameter or are dark-colored (indicating blood). Also, avoid aspirating follicles near the corpus luteum and cysts.
2.2.4. Replace the tube each time it is filled between 15-20mL, OR should the follicular fluid in 50 mL conical tube foam up to the top of the tube, place that tube in a plastic rack (room temperature) and get a new tube for aspirating. Label the cap with the time the tube was placed on the rack.
2.2.5. Once you are done aspirating all the ovaries in the beaker, insert the needle into a large follicle to clean out any oocytes in the tubing.
2.2.6. How to clear blood from a line.
2.2.6.1. Leave the needle in an ovary to prevent the blood from flowing into the conical tube. Blood causes clotting during the oocyte search.
2.2.6.2. Unplug the stopper from your conical tube and move it to a spare conical tube designated as the blood tube.
2.2.6.3. Clear the line with fluid from a large follicle, then remember to switch back to the original conical tube.
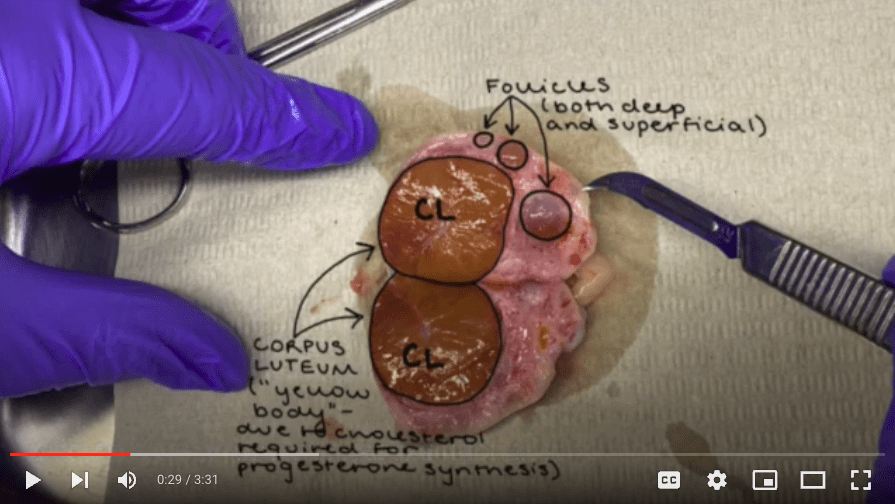
Link to bovine ovary aspiration sub-skill video
2.3. Place the tubes containing the oocytes in a plastic rack and allow oocytes to sit in the follicular fluid for at least 30 minutes to 2 hours.
2.3.1. The rationale for this step is to prevent the loss of cAMP when COCs are removed too soon from the follicular fluid. Loss of cAMP could lead to lower blastocyst rates (Albuz et al. 2010)
This protocol ends here for the aspiration sub-skill. The full IVF protocol can be found here (requires access privilege to the Cheong Lab Box).

