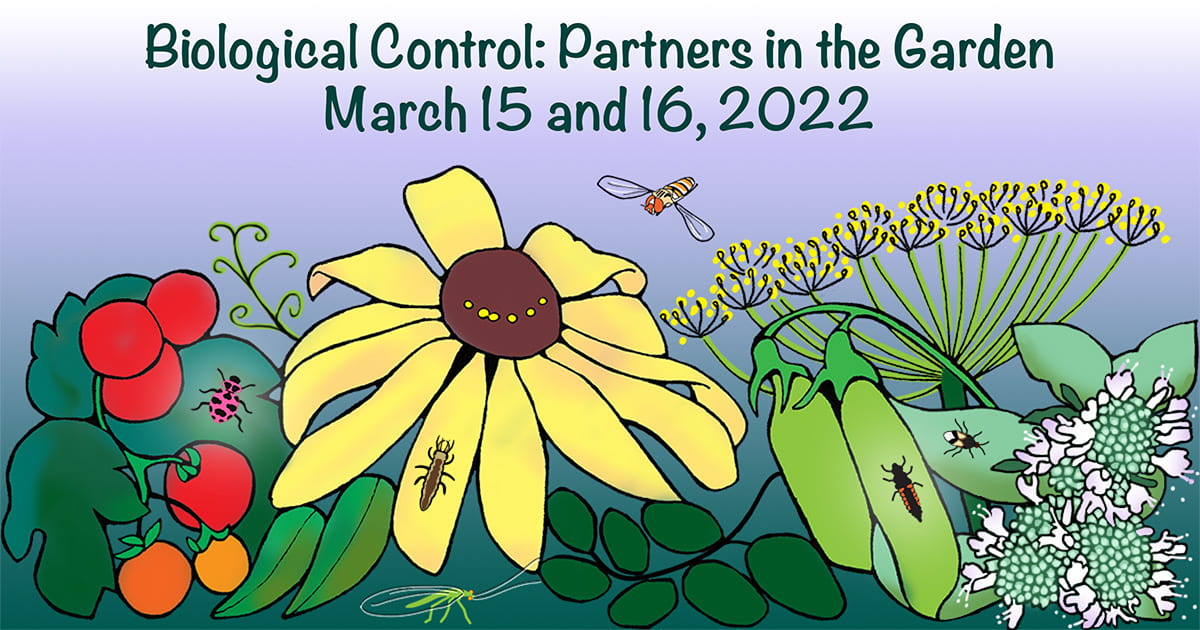
I don’t know about you, but I can’t wait to get some seeds into potting mix and some plans for my garden on paper! While you’re planning your garden, why not join NYS IPM for our virtual conference? This year we’re talking about “Biological Control: Partners in the Garden” and we’ve got a great line up of speakers!
Carol Glenister form IPM Labs talks about looking for signs that natural enemies (biocontrol agents) are already at work in your garden
John Losey from Cornell University talks about everyone’s favorite biocontrol agent – ladybugs
NYS IPM staff will talk about biocontrol for weeds (is there any?), conserving our biocontrol partners in the garden, and more!
Mary Centrella from the Cornell Pesticide Safety Education Program will talk about proper use of pesticides to protect garden partners
Kyle Wickings will talk about using tiny worms (entomopathogenic nematodes) to deal with lawn grubs
The conference will take place the mornings of Tuesday and Wednesday March 15 and 16, with a special interactive workshop being offered (by yours truly) on Tuesday afternoon (1-3 PM). You’ll receive some pre-workshop materials to help you get the most out of the workshop, and leave with a plan to plant flowers that will feed and support natural enemies in your garden.
The conference is just a little more than a week away, so register soon! Pay what you can afford, and please reach out if the registration fee is a barrier. NYS IPM is committed to making this conference (and all of our resources) accessible.
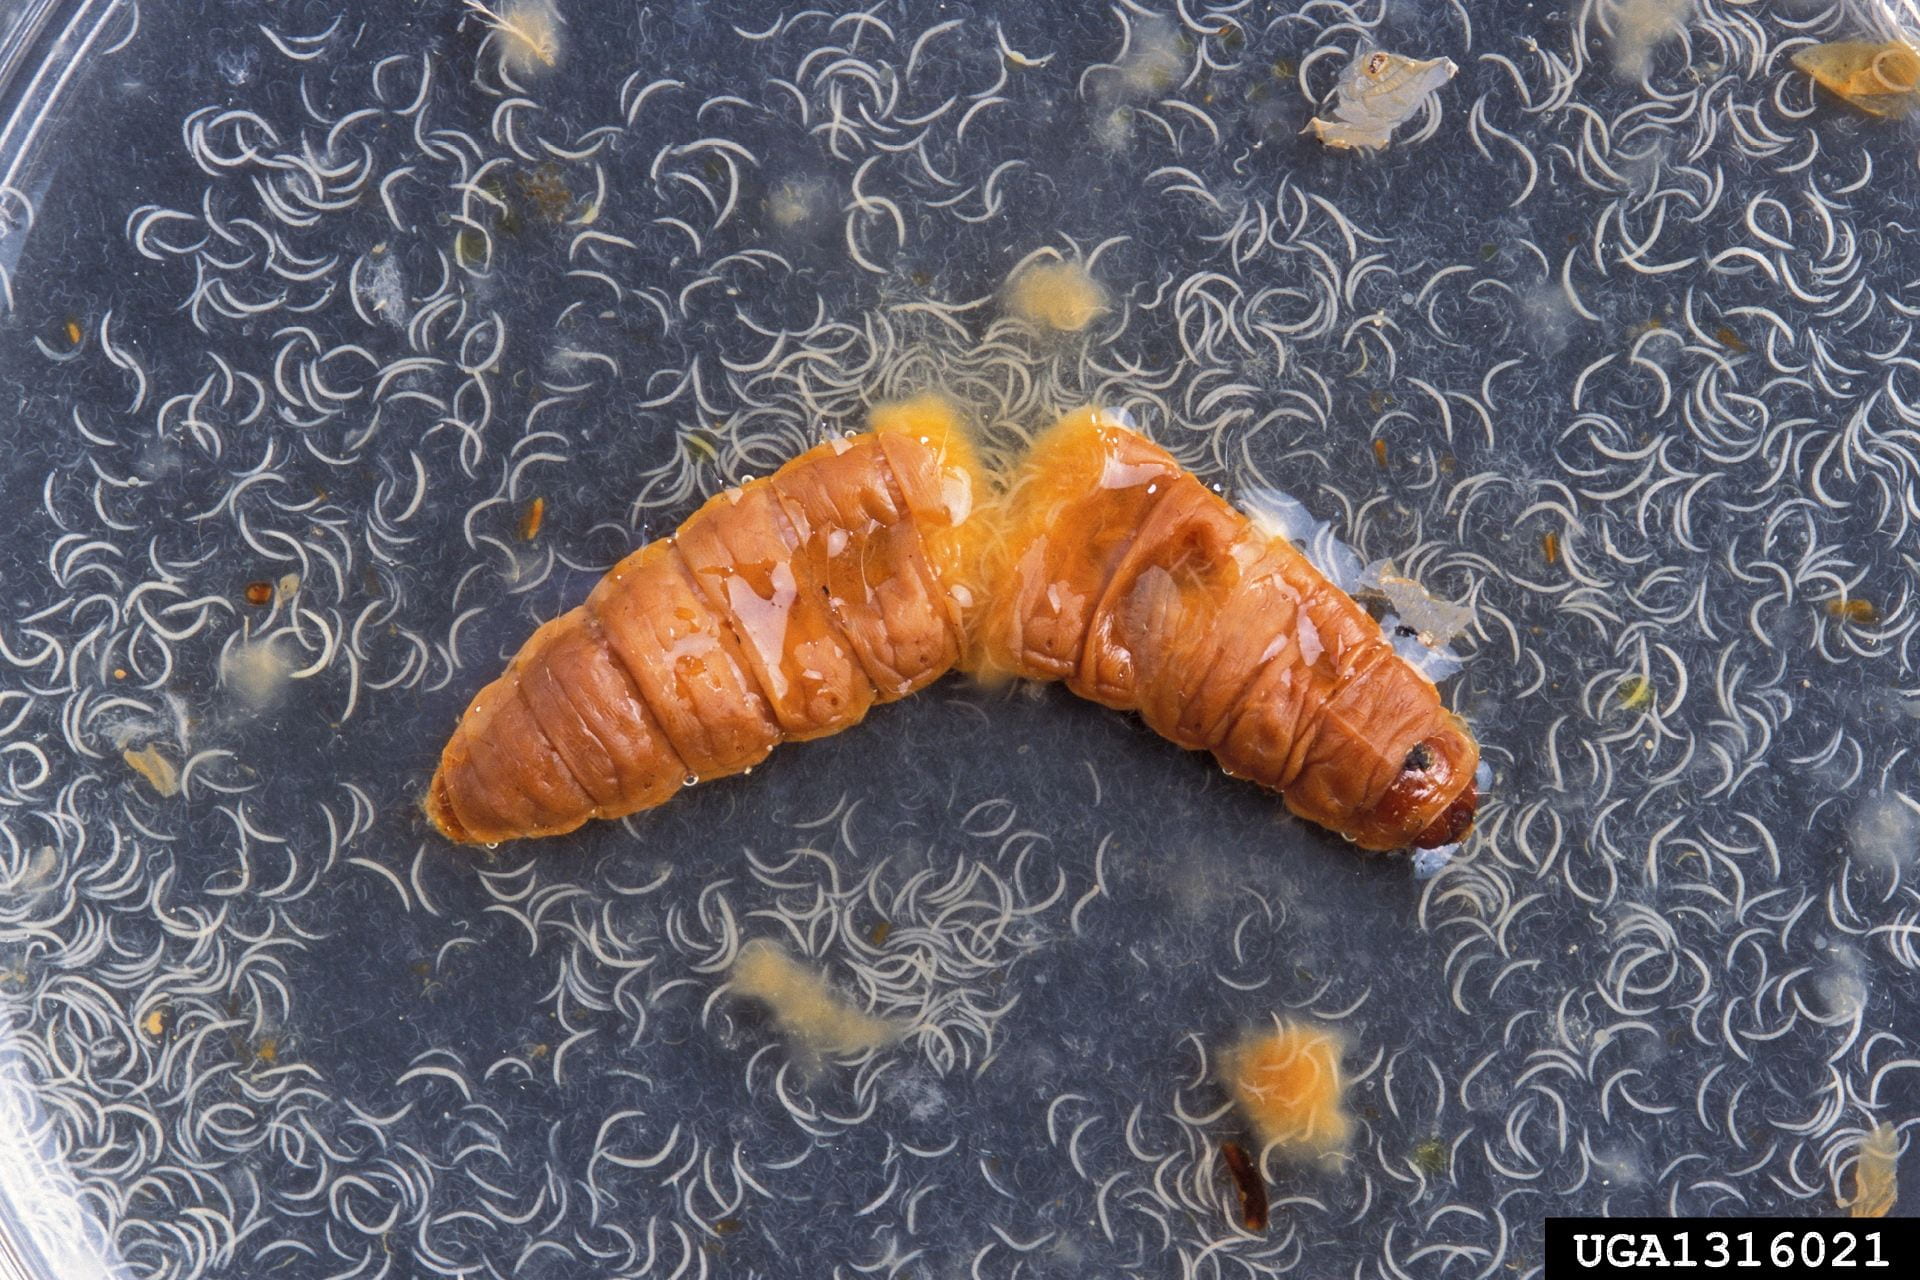
Insect-killing nematodes (tiny white crescent) emerging from a dead insect larva. Photo credit: Peggy Greb, USDA Agricultural Research Service, Bugwood.org
Nematodes are tiny worms. While some of them can damage plants, some prefer to eat insects, and these “good worms” (entomopathogenic nematodes is the technical term, but we can call them EPNs for short) can be helpful biocontrol agents. Teresa Rusinek (Cornell Cooperative Extension eastern NY Commercial Horticulture Program) wrote a guest blog post about her work testing EPNs for control of wireworms in sweet potatoes. Elson Shields (Cornell Entomology) has spent many years perfecting the use of persistent EPNs that are native to New York in agricultural fields where they control insect pests. Kyle Wickings is my go-to expert on using EPNs to manage white grubs in turf. A former graduate student in Kyle’s lab (Max Helmberger) made an amazing video describing the life cycle of EPNs. John Sanderson is the Cornell guru of greenhouse biocontrol (including EPNs for greenhouse insect pests).
So many people have developed so many great materials on EPNs, the purpose of this post is to point you to some of these great resources. Why re-invent the wheel? And if I’ve missed something, please let me know!
John Sanderson (Cornell University) has done some great work evaluating different EPN species for controlling insect pests in greenhouses. You can watch a webinar summarizing this work here.
Carol Glenister (IPM Laboratories) and Elson Shields (Cornell University) did a presentation on “Getting the Most Out of Beneficial Nematodes in Organic Production” for the UMass Amherst Extension Vegetable Program. You can watch the recording on YouTube, and you can read their answers to frequently asked questions online.
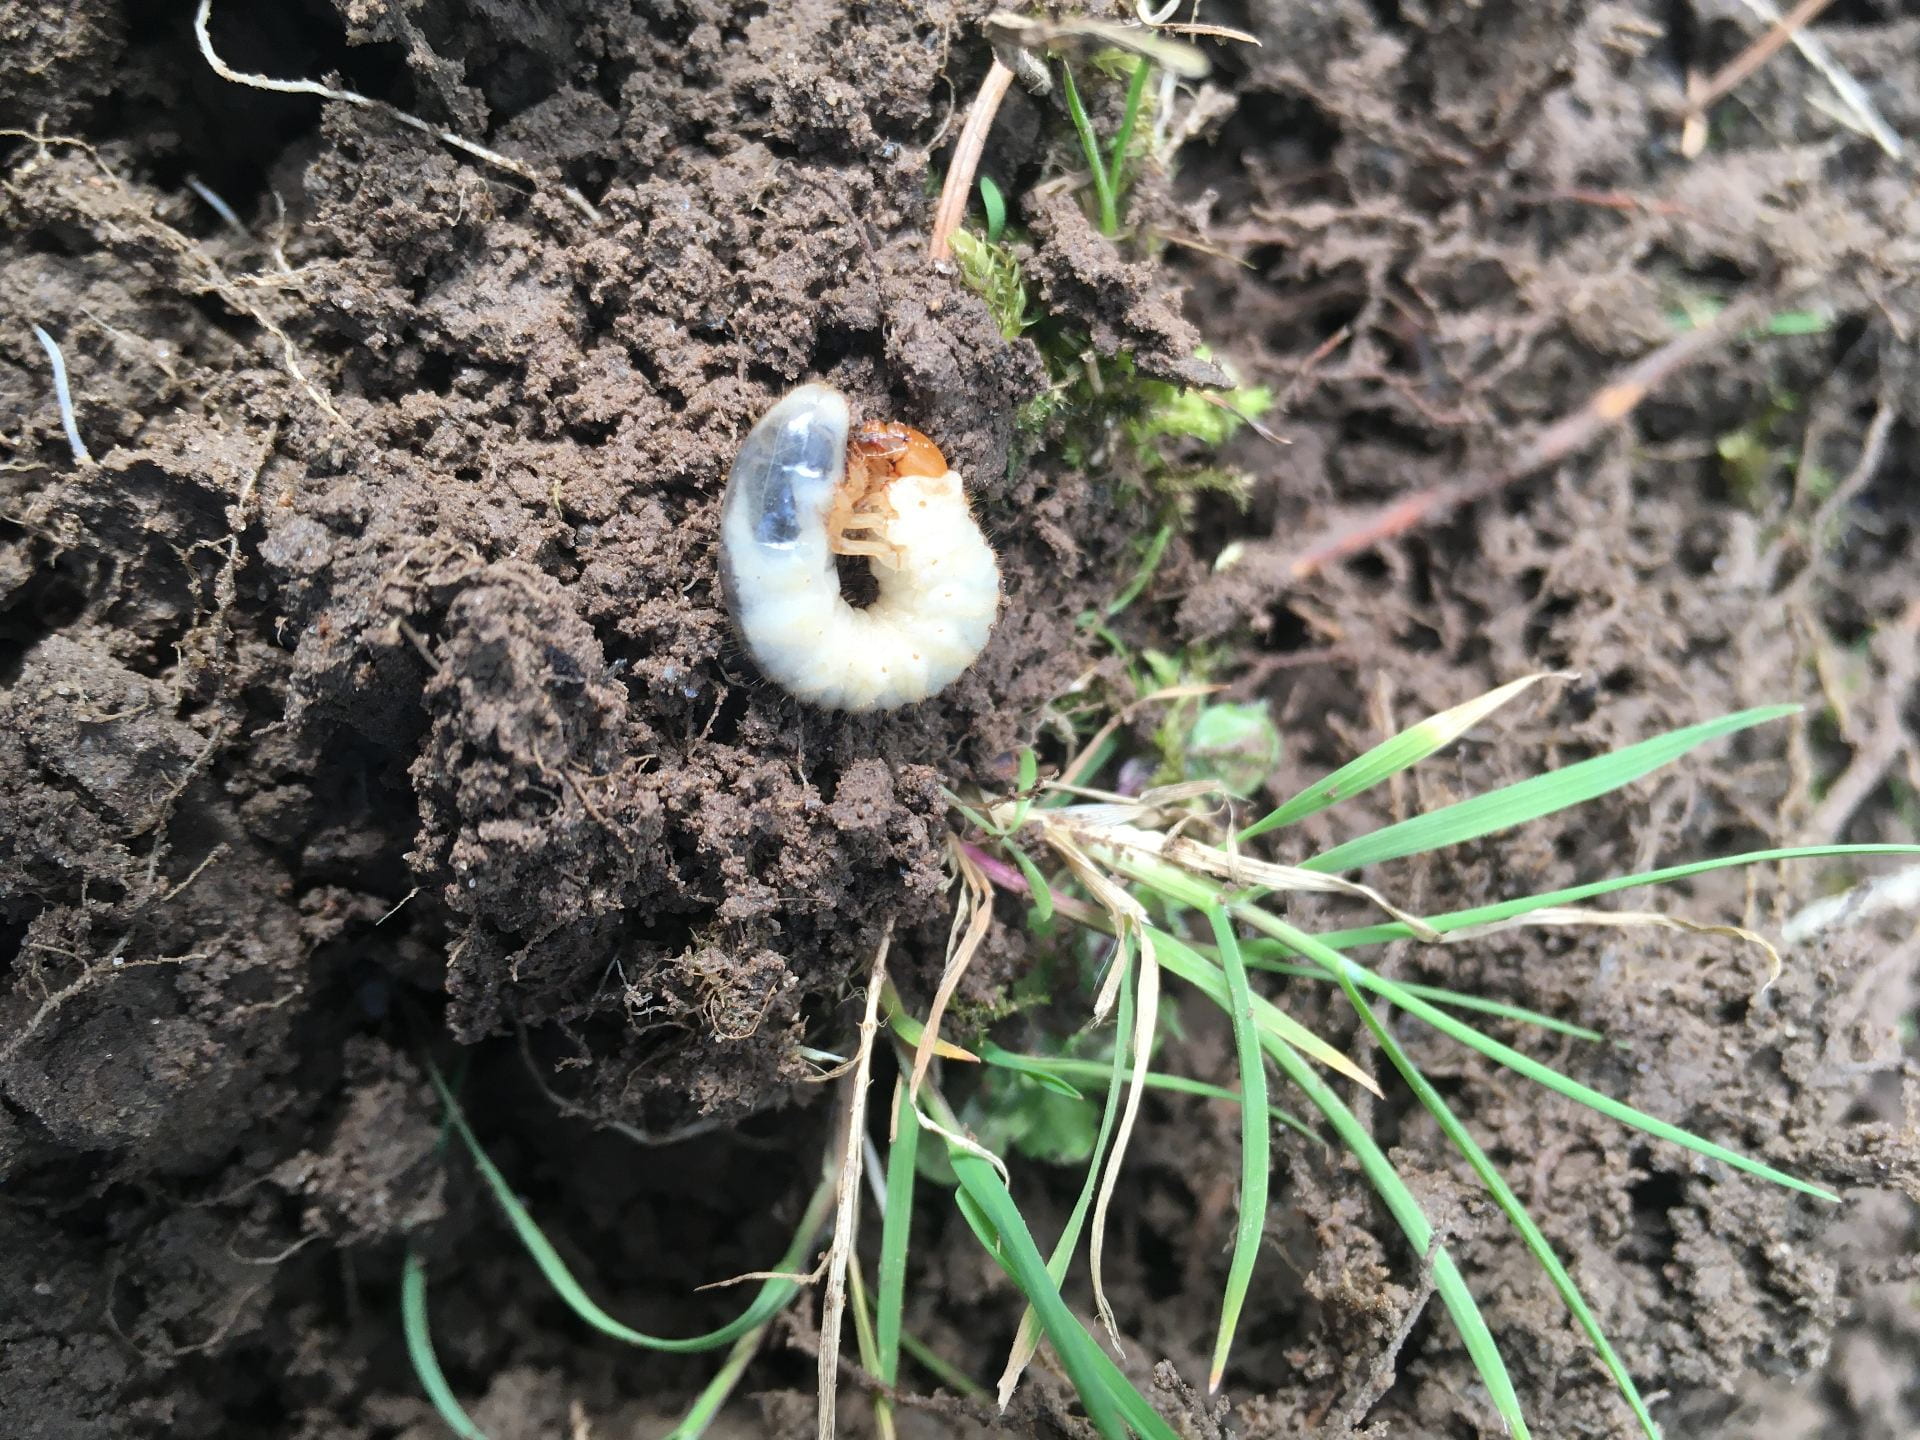
Proper identification is essential to good IPM, and Kyle Wickings’ Grub ID key helps you do just that.
Need help identifying your white grubs (a critical first step to using EPNs effectively in your lawn)? Kyle Wickings developed a simple key.
Are you concerned about grub damage in your home lawn? Put back that pesticide bottle, and start by scouting and identifying grubs, then apply some EPNs (only if you need them). You can find all the details here.
Count how many white grubs you actually have per square foot (and identify them) before deciding if an EPN application would help.
If you are growing alfalfa, Elson Shield’s lab has all the information you need to successfully use EPNs to control alfalfa snout beetles, starting with an overview, and including detailed resources to help you be successful.
Wondering if EPNs can help you control fruit and vegetable insect pests? In consultation with my colleagues, I developed a summary of what we know about which fruit, vegetable, and ornamental pests you are likely to be able to manage with EPNs. More research is ongoing, so this list will continue to evolve.
This work is supported by NYS Departments of Environmental Conservation and Agriculture and Markets.
This post was written by Amara Dunn, Biocontrol Specialist with the NYSIPM program, but was only possible due to the great work done by colleagues. All images are Amara’s, unless otherwise noted.
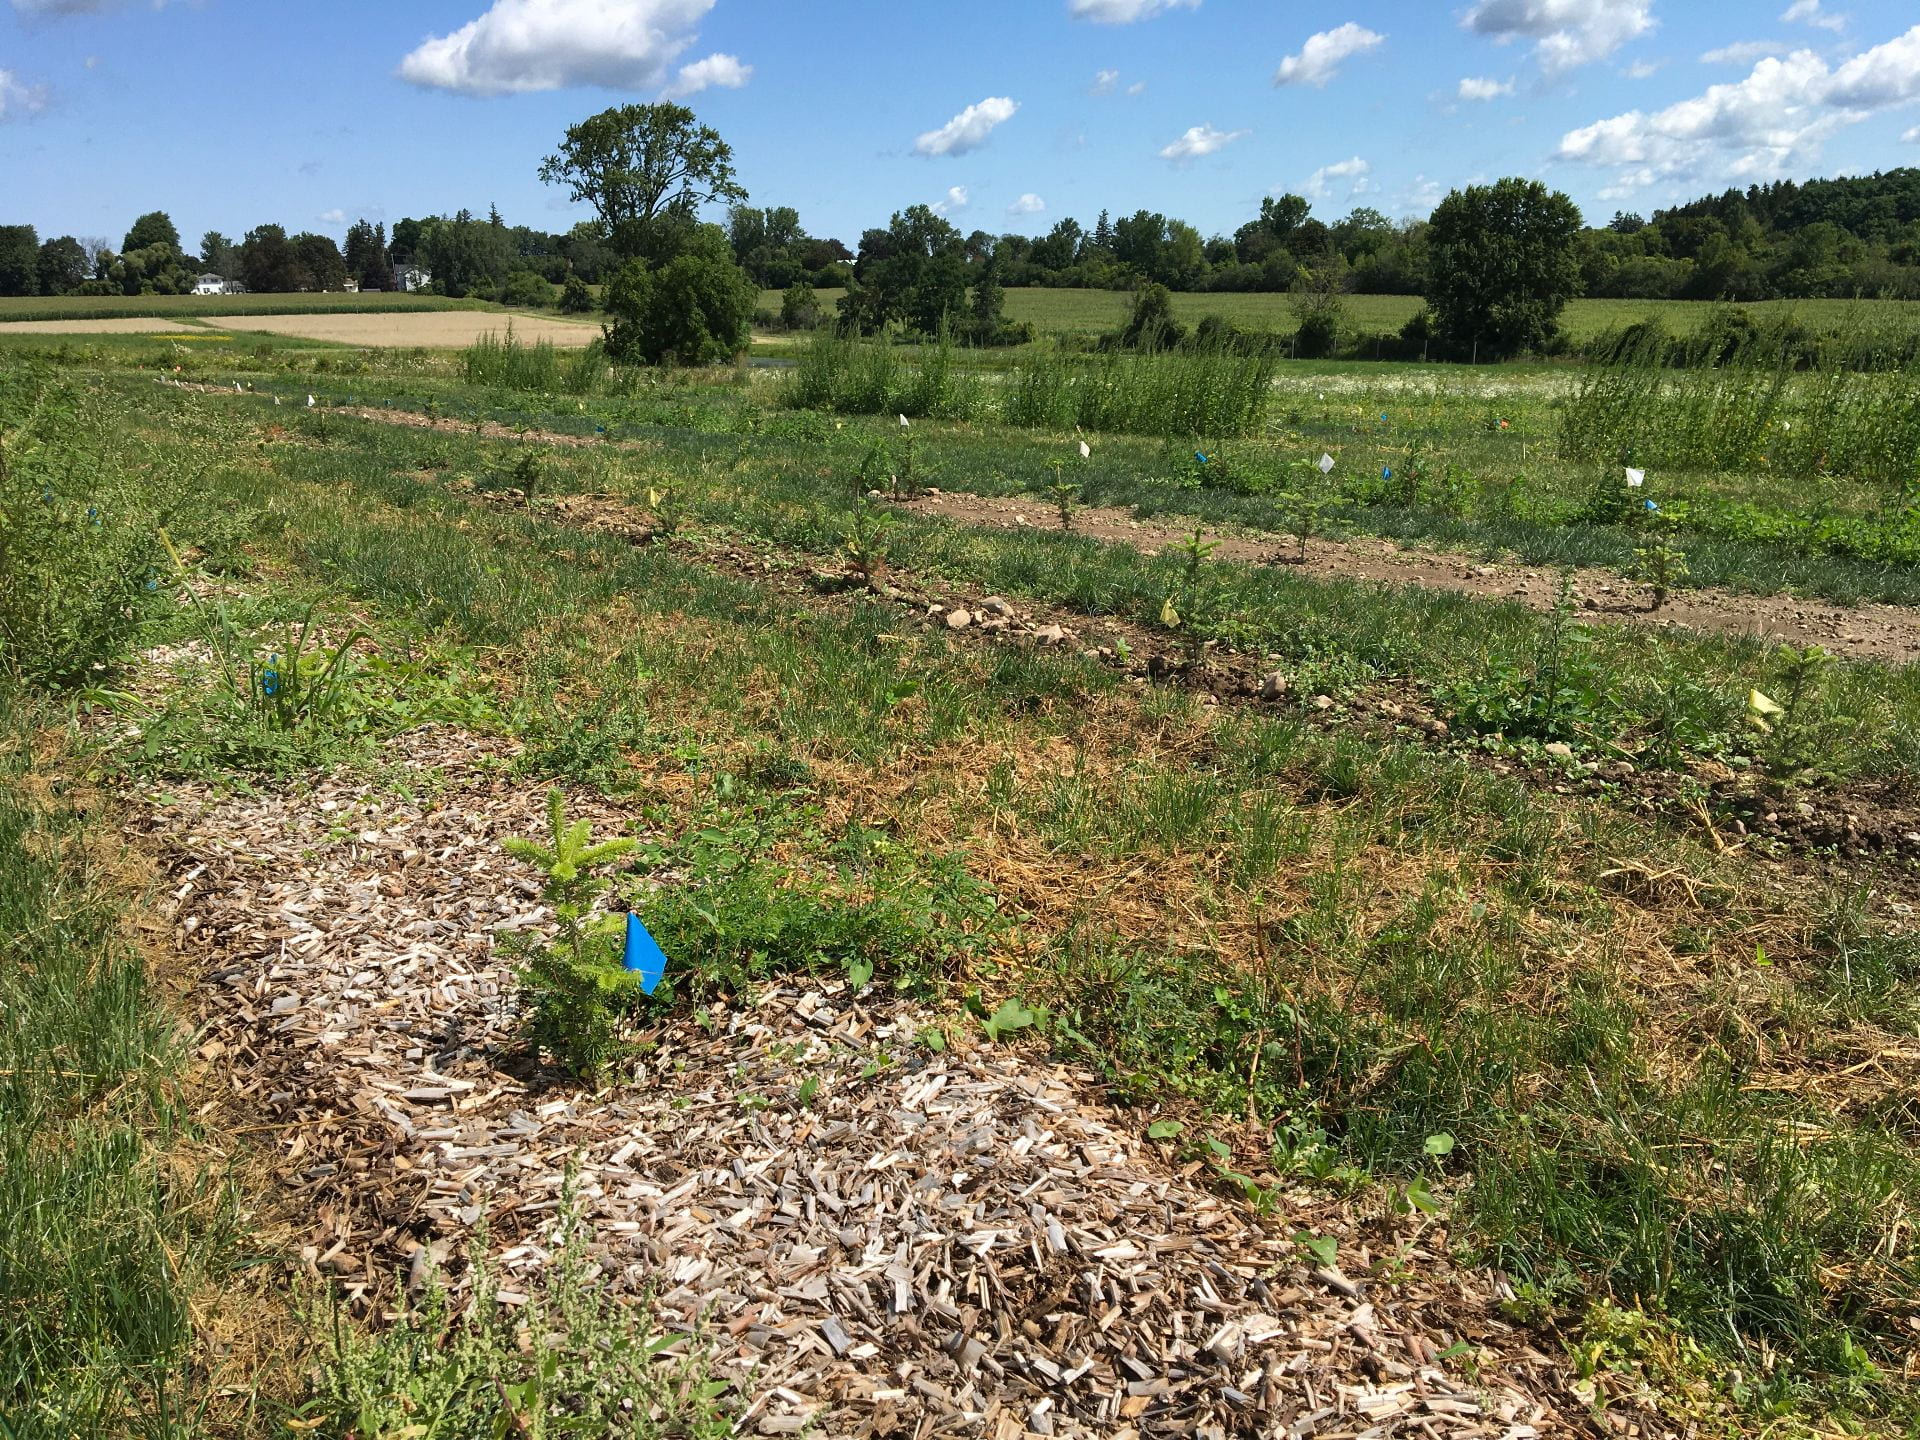
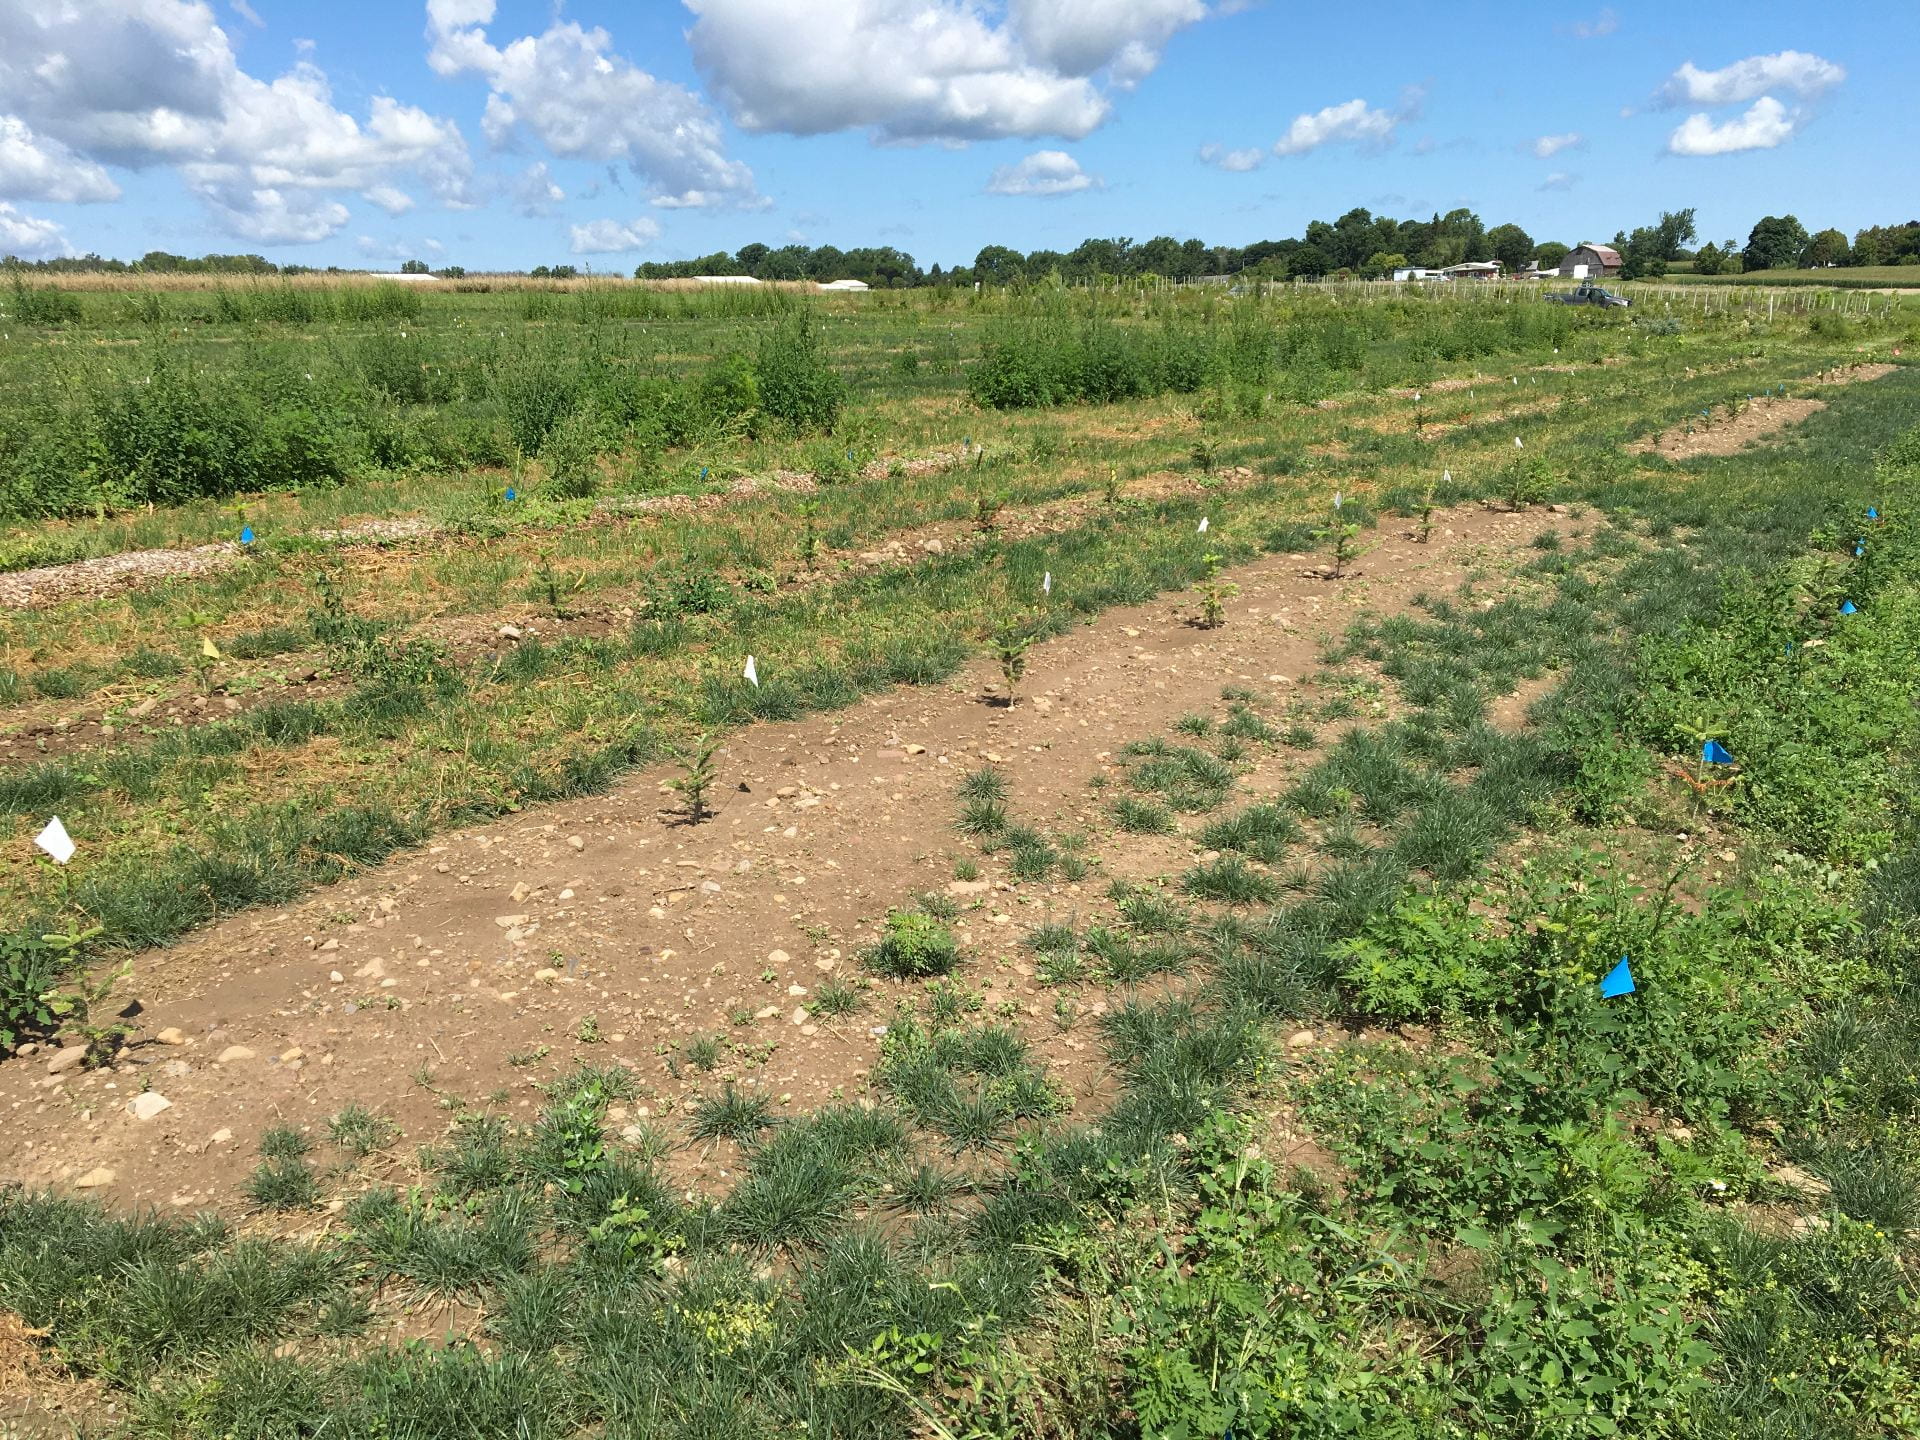
The different weed management strategies we are comparing certainly look different in the field. But how do they impact tree growth and quality?
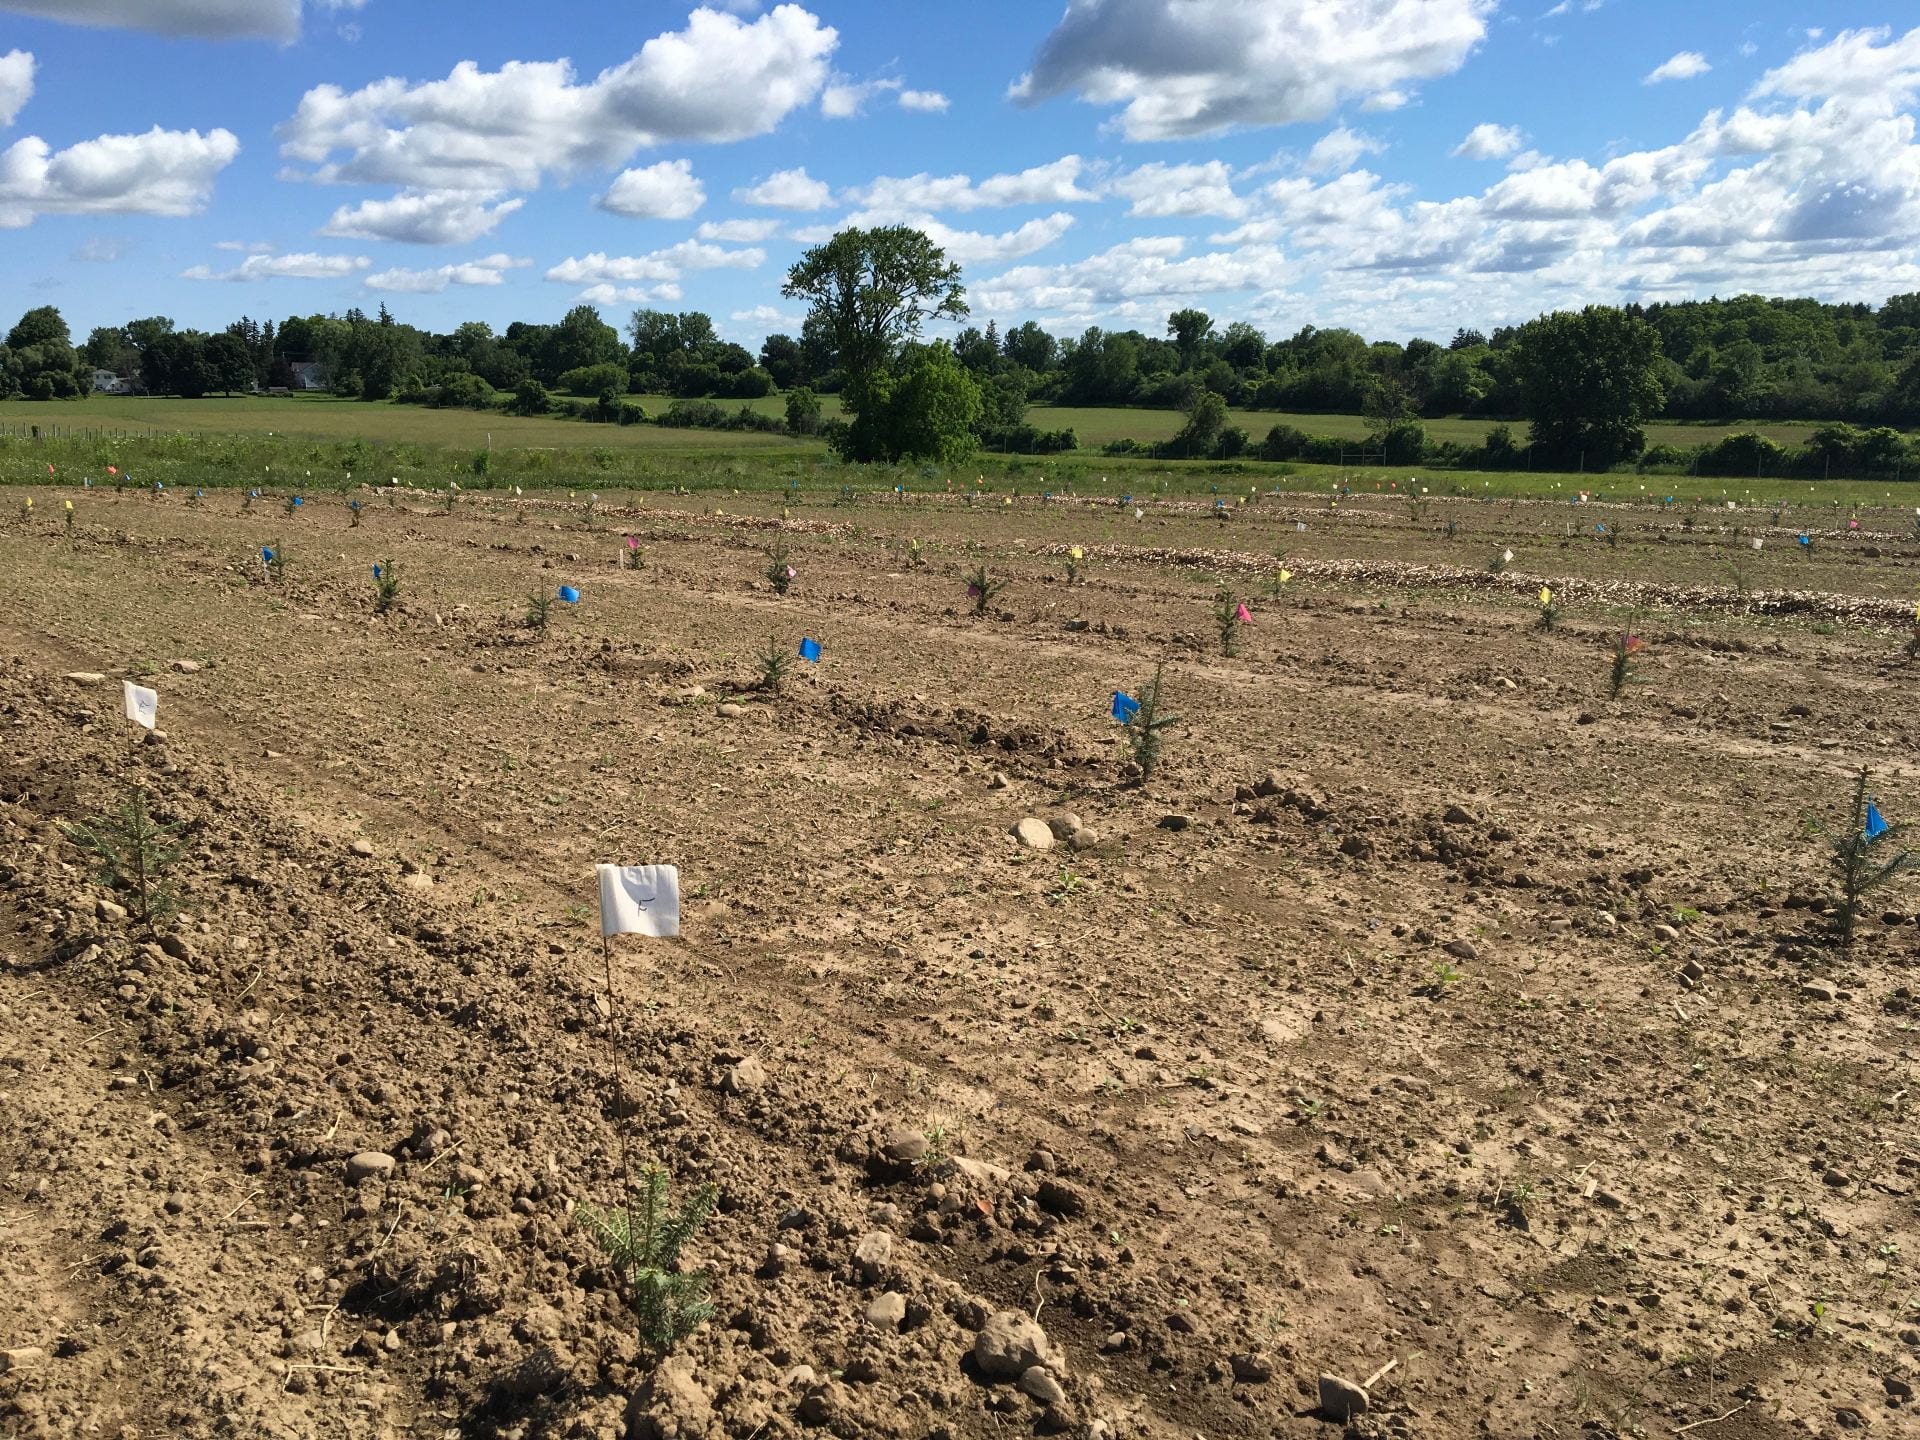
Back in June we introduced you to a new project comparing different methods for weed and root disease management when establishing Christmas tree seedlings. Recall that this is a collaboration among Bryan Brown, Amara Dunn, Brian Eshenaur, Betsy Lamb, and Lynn Sosnoskie. We wrapped up our first season in October, and we have a first look at some of the data. In this post, we’ll focus on tree survival and tree growth. There’s a lot more weed data!
Treatments
Let’s start with a quick reminder of the treatments we were comparing. Each row of 28 trees received the same weed management treatment. Each row was also divided into four plots of seven trees each. Each plot within a row received a different root treatment. Here’s a map of how the treatments were laid out in the field.
Weed management (in-row, within a 30” band around the row of trees; between row zones were seeded with grass and mowed 4 times) :
Cultivate – three times early in the season using a tractor drawn KULT Kress Argus Toolbar with sweeps, finger weeders, and a rear side-shift adjustment
Herbicide – conventional active ingredients (oxyfluorfen and pendimethalin applied shortly after planting, with a fall application of glyphosate) as a control treatment
Mow – mow about every two weeks with a walk-behind mower
Mulch – 3 inches of chipped shrub willow mulch
Untreated – No weed management at all
Root disease management:
ProPhyt (active ingredient: potassium phosphite) – a biopesticide applied by dipping bare roots of seedlings just before planting; mixed 1.28 fl oz in 2 gallons of water for 140 trees (11 fl oz/A if you plant 1,200 trees/A)
RootShield PLUS WP (active ingredient: Trichoderma harzianum Rifai strain T-22 and Trichoderma virens strain G-41) – a biopesticide applied twice (the day after planting and 7 weeks later) as a drench around each tree (24 oz/A in 171 gallons of water/A)
Subdue Maxx – a conventional fungicide applied twice (the day after planting and 5 months later) as a soil-directed spray (2.5 pt/A in 140 gal/A in a 6-inch band on either side of the row of trees). We made the application with a hand-pump backpack sprayer fitted with a TeeJet TTI11005 nozzle with a shield rotated parallel to the row of trees. The maximum pressure possible with this sprayer is 60 psi. After application, we applied an extra 0.45 gallon of water per plot of 7 trees with the same sprayer (280 gal/A additional water).
Water – 1 pt of water poured around each tree at planting, as a control.
What we measured
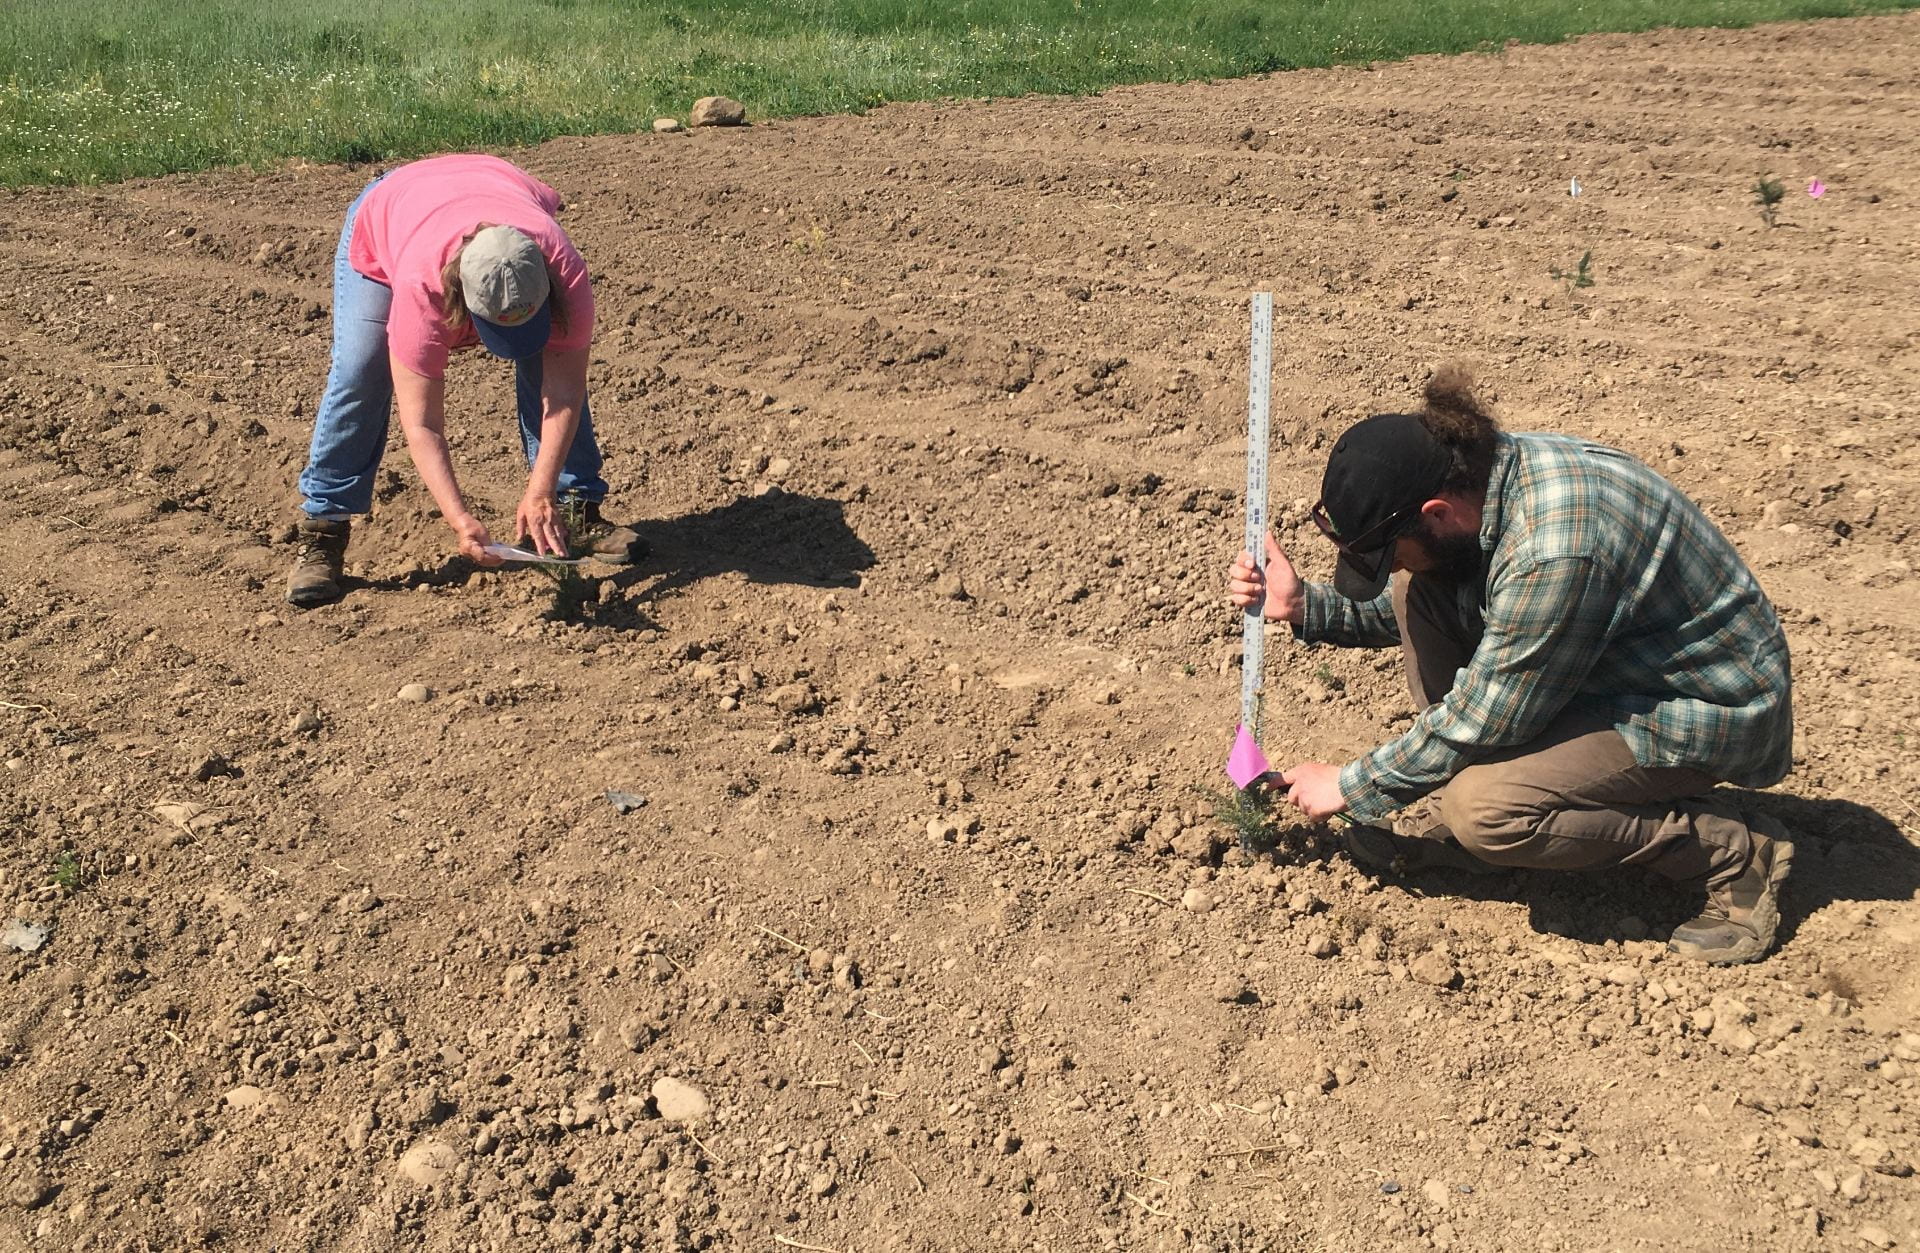
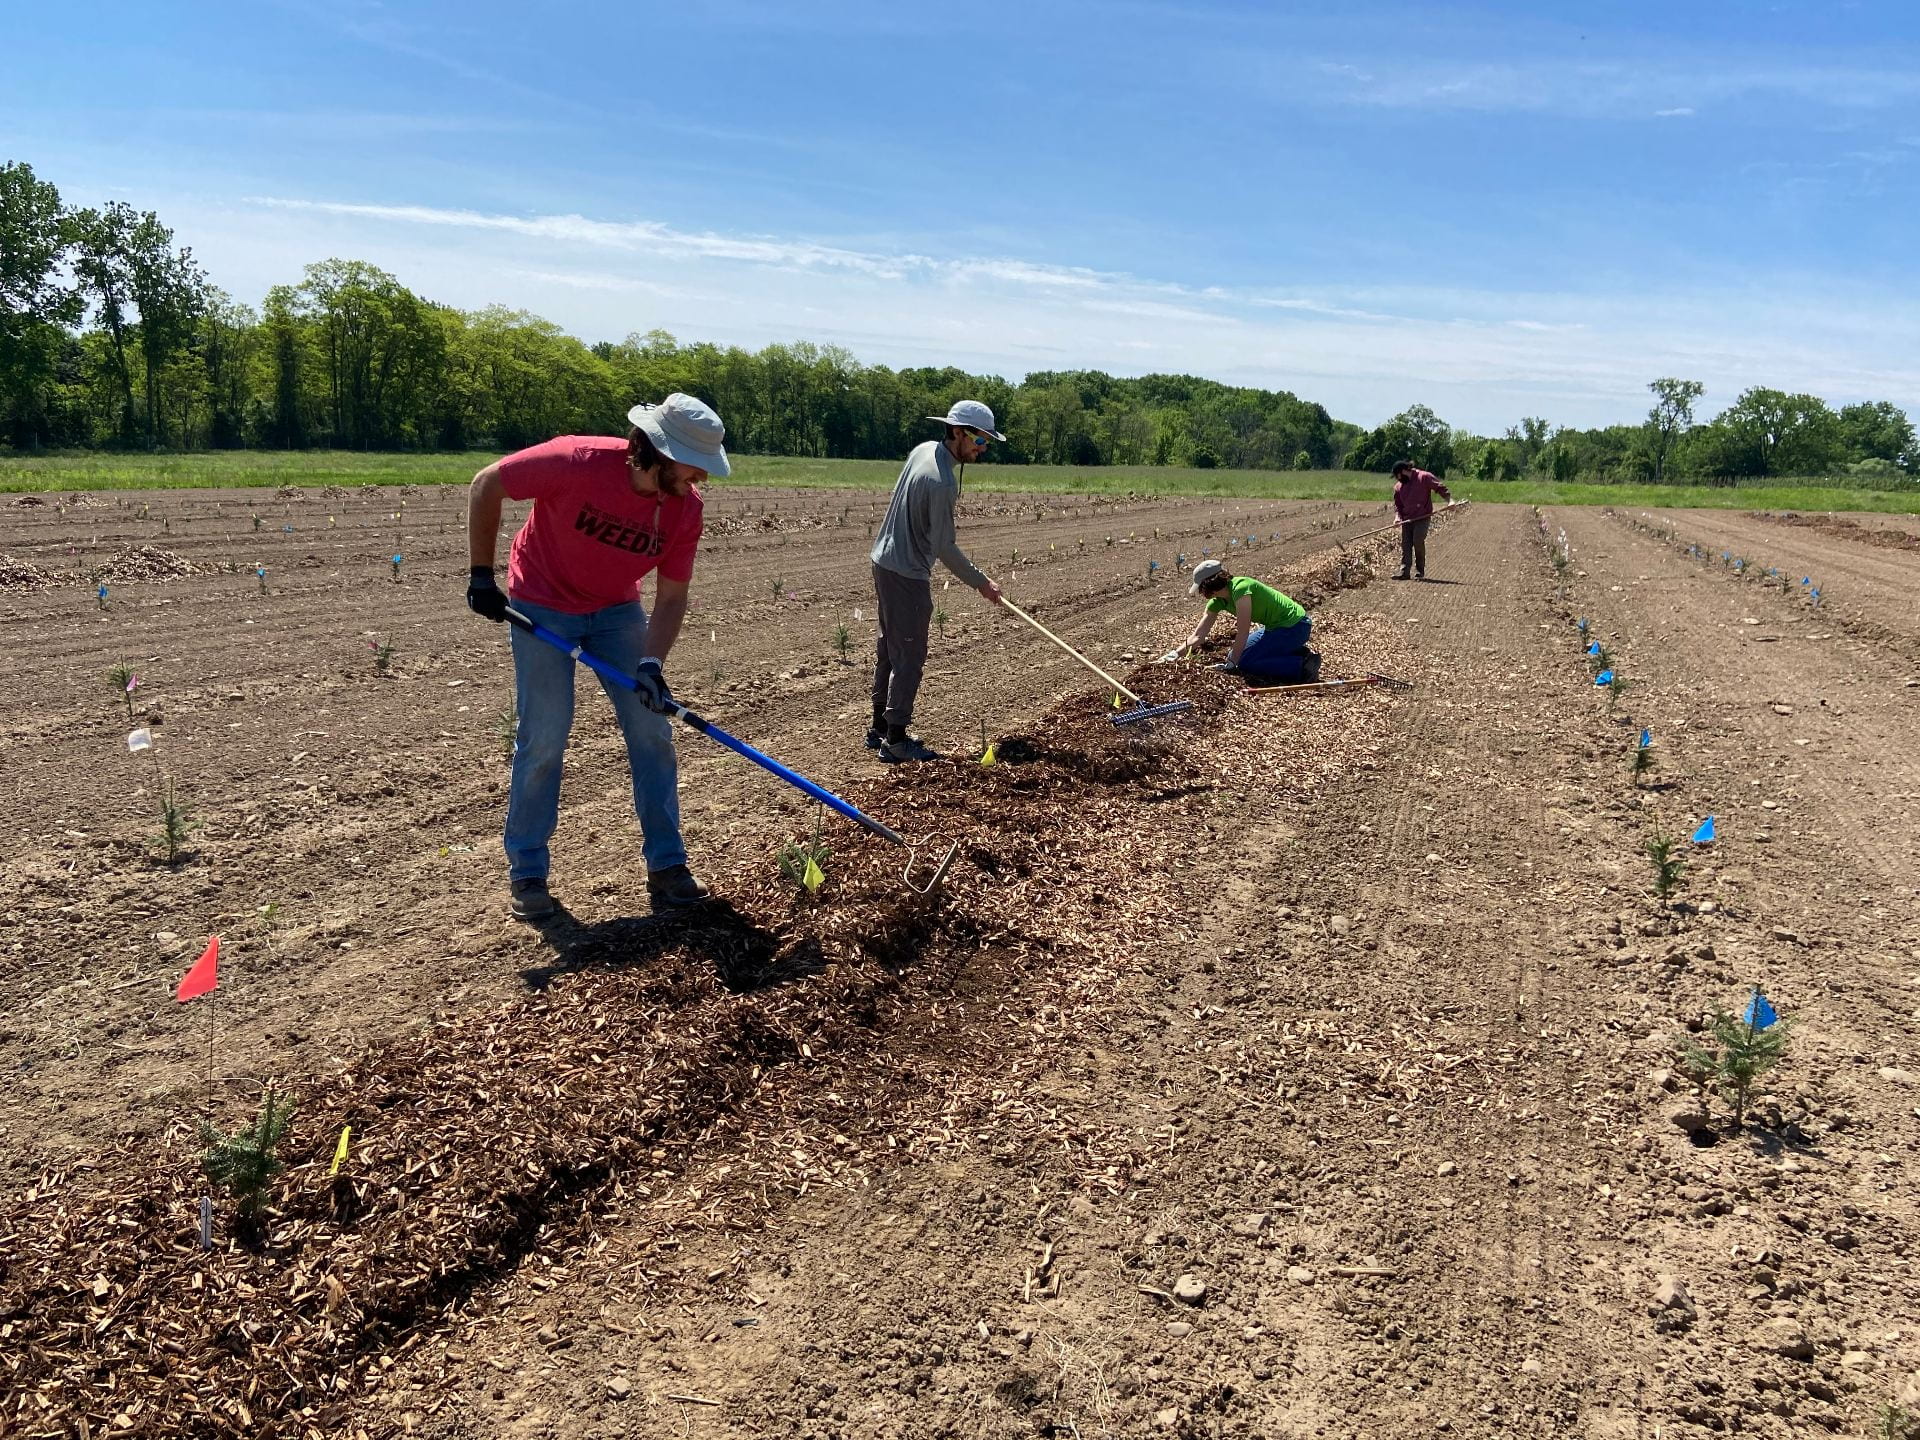
We’re interested in how the weed and root disease treatments impact survival, growth, and quality of these trees. Thanks to our excellent technicians, Marcus and Erik, for helping us measure all of these trees! Betsy and Amara were helping, too, but in this picture Amara is behind the camera.
Betsy and Marcus measuring trees and evaluating needle color in May.
On May 25 (about a week after planting) and again on October 6 we measured the height of each tree (from the soil to the tallest part of the tree, even if it wasn’t the leader anymore) and the diameter of the tree trunk 4 inches above the soil. In both May and October, we also rated the color of the needles using this scale. However, we only used: 2 (darkest green), 5 (medium green), 7 (paler green), and 9 (yellow or brown).
Of course, measuring and rating each tree also allowed us to take note of which trees had died (versus a few that unfortunately succumbed to “mower blight”).
What we found
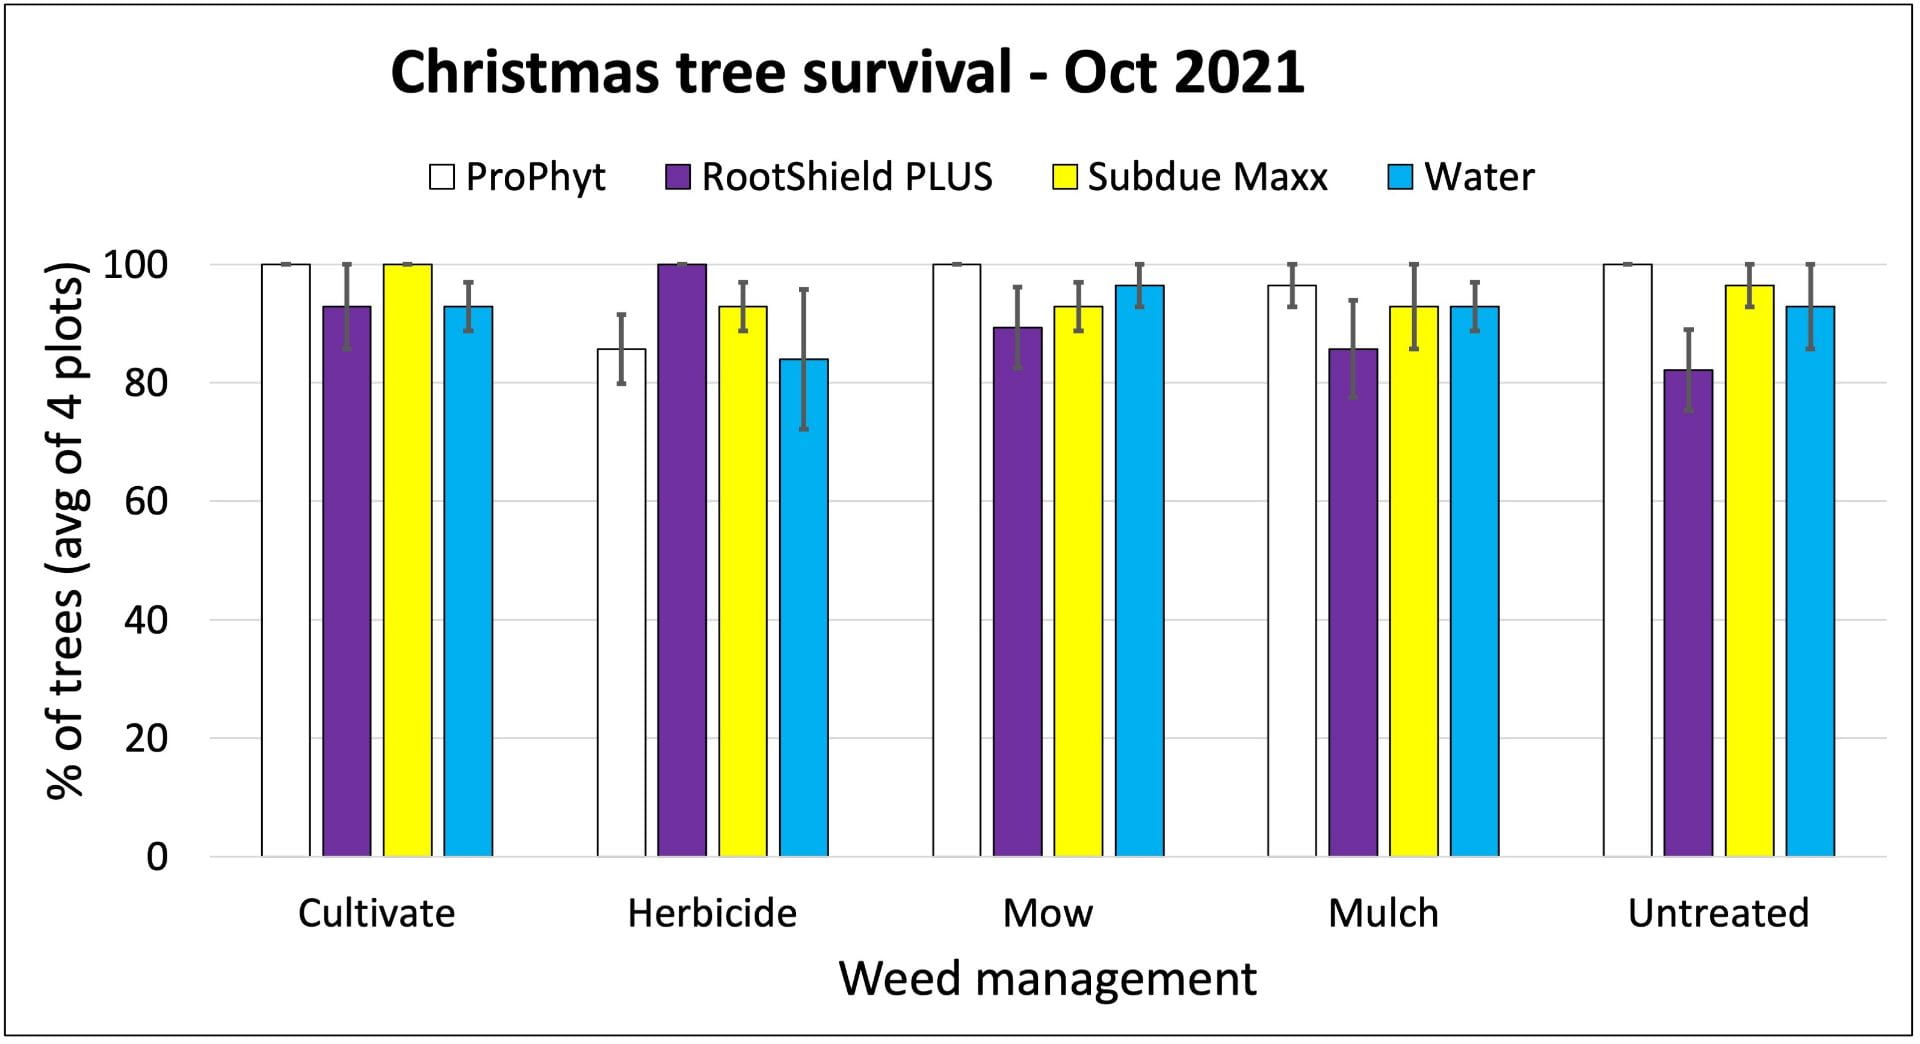
Percentage of trees in each plot (out of seven trees total) that were still alive by October 2021, not counting a couple that were accidentally mowed. Each bar is the average of four plots for each combination of root treatment (color of bars) and weed management strategy (along x-axis). The lines on each bar show variability (one standard error above and below the mean value).
It’s too early to know for sure, but it’s possible that the root treatment that results in the best seedling survival might depend on which weed management strategy you use. For example, after just one year, the RootShield PLUS-treated trees did better than the ProPhyt-treated trees where herbicide was used, but not where the weeds were allowed to grow unchecked (‘Untreated’). We haven’t done a statistical analysis on the data, yet, but the little lines at the top of each bar are an indication of the amount of variability amongst the four plots in each treatment (one standard error above and below the mean percent survival, for those who might be interested).
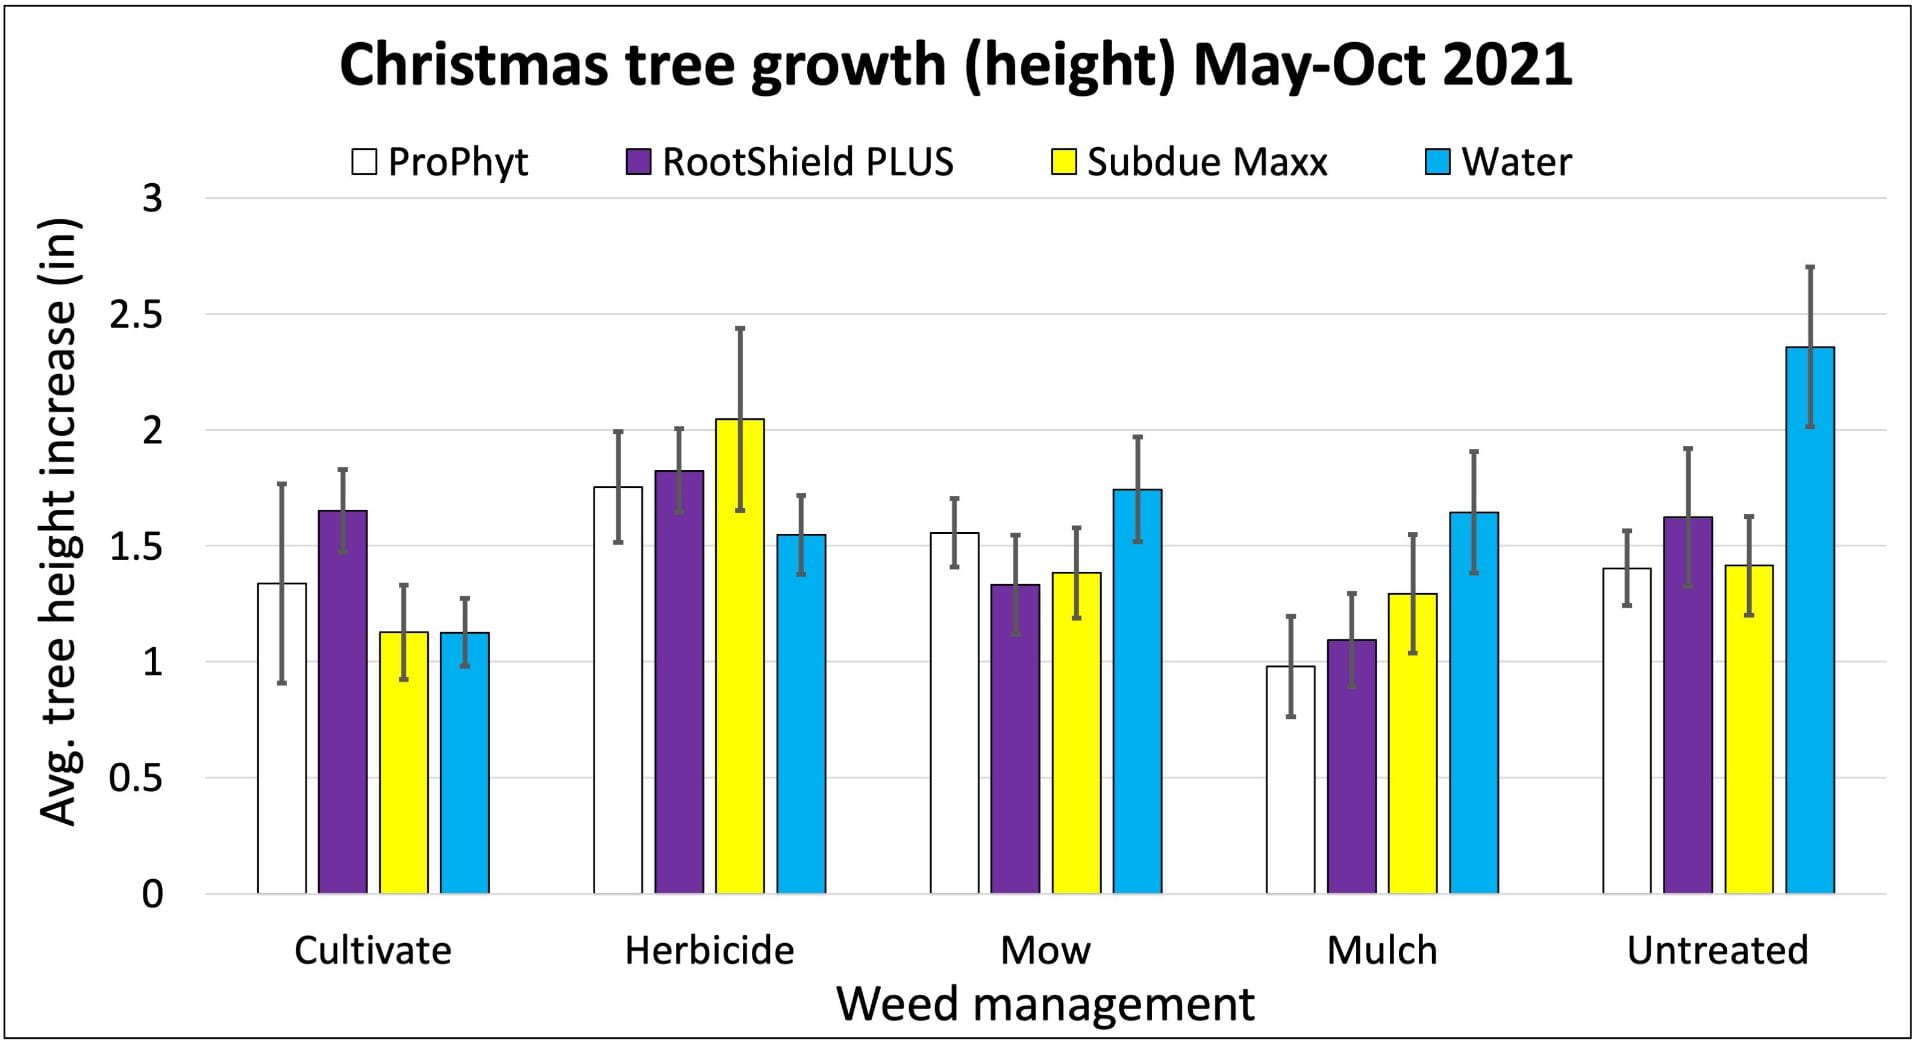
Change in height of Christmas trees from May to October 2021. Each bar is the average of up to 28 trees (7 trees in each of 4 plots) for each combination of root treatment (color of bars) and weed management strategy (along x-axis). The lines on each bar show variability (one standard error above and below the mean value).
These Fraser fir seedlings grew between 1 and 2.5 inches during their first season. Much like the tree survival, the root treatment that produced the most growth wasn’t consistent across all weed management strategies. Results for tree trunk diameter were similar.
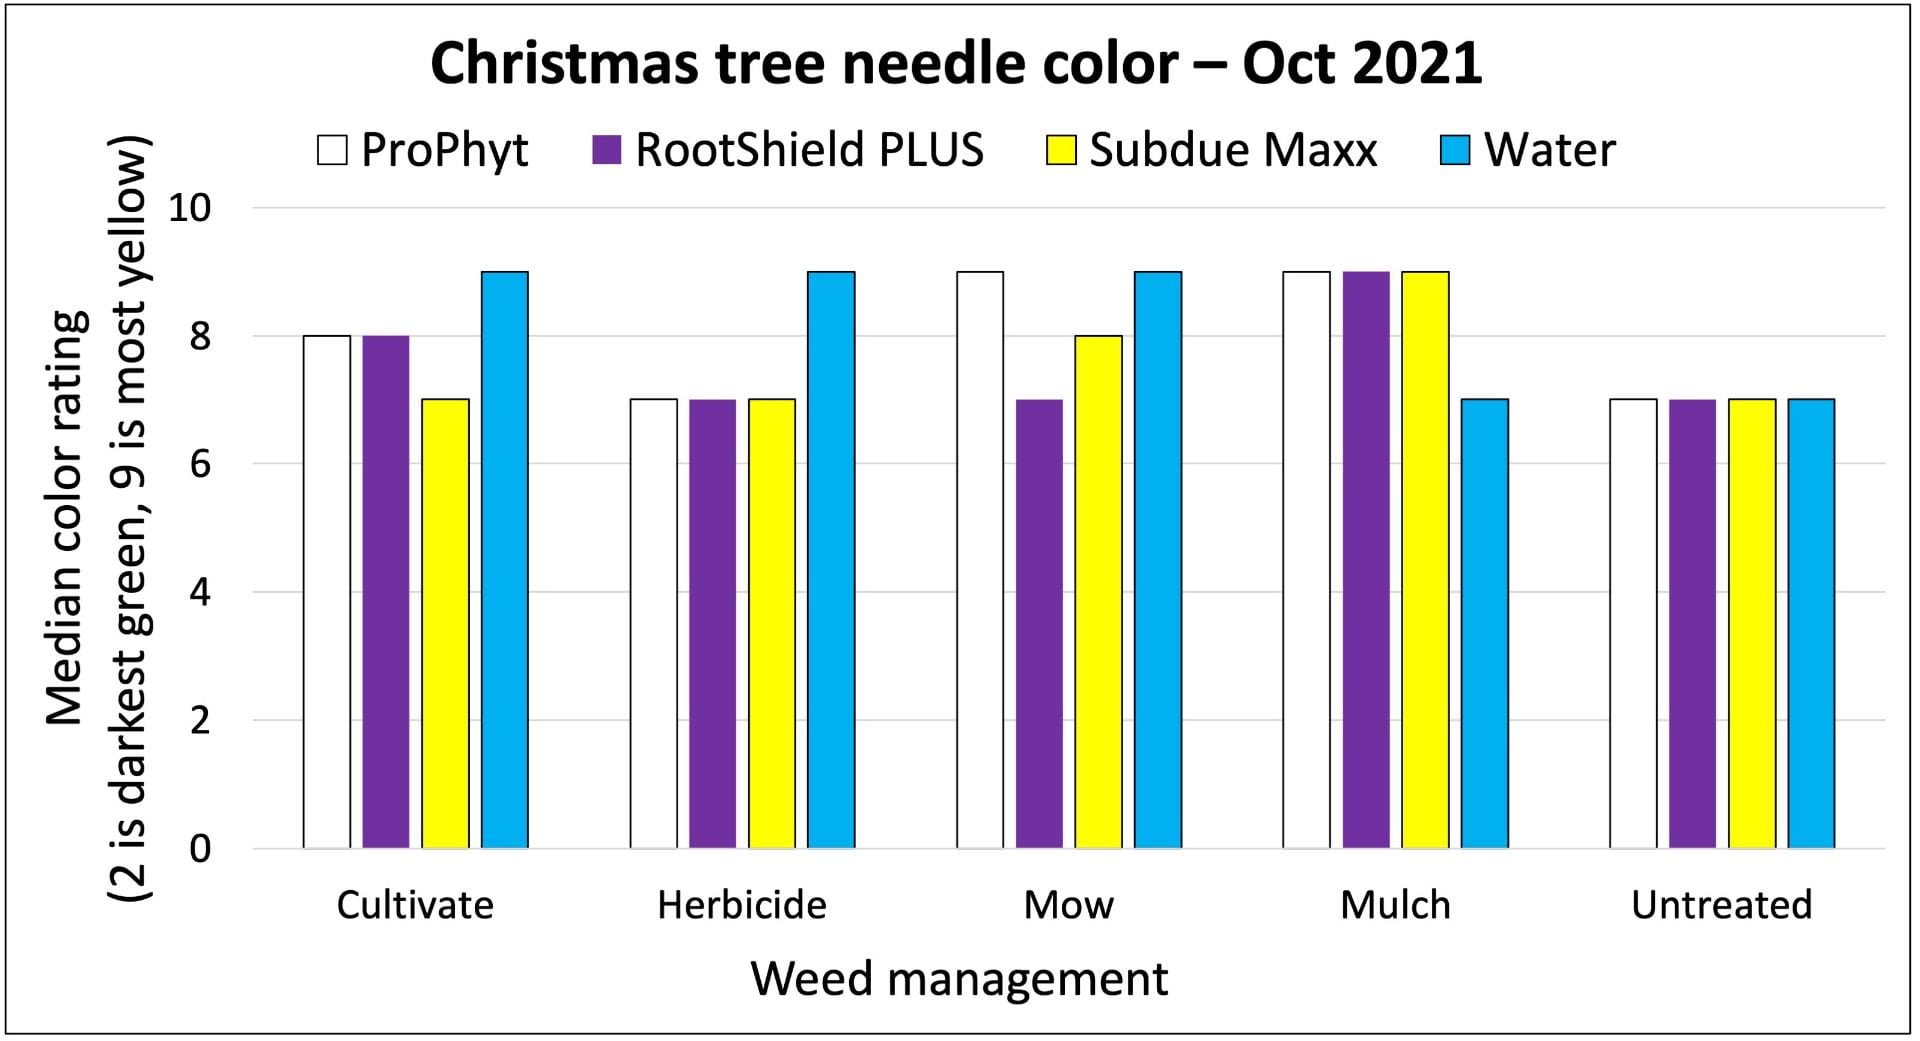
Average needle color when trees were rated in October. Lower numbers indicate darker green color. Each bar is the median value of up to 28 trees (7 trees in each of 4 plots) for each combination of root treatment (color of bars) and weed management strategy (along x-axis).
Recall that needle color was rated as 2 (darkest green), 5, 7, or 9 (most yellow or brown). So on this graph, shorter bars indicate better needle color. Also, this rating scale impacted how we summarized the data. Instead of taking the mean needle rating, we used the median. (Here’s a quick refresher on the difference.) And the graph doesn’t have those little lines to summarize the variability in each treatment. Too early to draw firm conclusions, but again, there might be some interactions between root treatment and weed management strategy.
What does it cost?
Economic risk is one of the risks we seek to reduce through IPM, so we’ve been keeping track of the costs associated with our pest management strategies. Based on the way we applied the root treatments and some local price estimates, here’s what we would have spent per acre for these treatments, assuming we planted 1,200 trees on each acre (that’s 6 ft x 6 ft spacing).
Fungicide
Rate/A
Number of applications
Cost/A (Supplies)
Cost/A (Labor1)
ProPhyt
11 fl oz2
1
$4
$1,037
RootShield PLUS WP
24 oz3
2
$123
$4,150
Subdue Maxx
2.5 pt3
2
$82
$2,074
Water
–
1
$0
$2,075
1We assumed a labor rate of $20/hr. These costs were calculated based on the time it took us to apply the products. This includes drenching each tree by hand (RootShield PLUS WP and water) and applying Subdue Maxx (and additional water to move it into the soil) with a backpack sprayer. On a larger scale, there’s surely a more efficient way to do this.
2Seedling roots were dipped in a ProPhyt solution prior to planting. The rate on the label is 4 pt/100 gallons of water. We mixed up 2 gallons of root dip solution (containing 1.28 fl oz of ProPhyt) to treat 140 trees. If we had used a fresh 2 gallons for every set of 140 trees, we would have used 11 fl oz of ProPhyt on an acre of 1,200 trees.
3Because RootShield PLUS WP was applied as a drench to each tree and Subdue Maxx was applied as a soil-directed spray banded on either side of the row, these rates are per acre of ground to which pesticide was applied. This is less than the total space taken up by these trees in the field. Read and follow the pesticide label for instructions on calculating quantity of product needed for banded applications.
And here’s a summary of our weed management costs. You can see all the details of these costs (including labor and supplies) here.
In-row weed management
Cost/A (labor and supplies)
Cultivate
$248
Herbicide
$86
Mulch
$1,153*
Mow
$293
Untreated
$0
*Assumes woodchips can be obtained locally at no cost
Take home
With only one season of data, it’s too early to draw conclusions about the effectiveness (or cost effectiveness) of each treatment. So far, survival of trees treated with ProPhyt is looking very good across most weed management strategies. And we’re seeing some indication that the best (in terms of tree survival, growth, or color) root treatment to use may vary depending on what you’re doing to manage weeds.
In late October we also dug up five dead trees and sent them to the Cornell Diagnostic lab to check for Phytophthora. The trees had been dead for a while, so they were only able to test for the presence of any Phytophthora species (which could include some that don’t cause disease on Christmas trees). Four out of five trees came back positive, which makes us feel more confident that we picked a good field for this trial…if by “good” you mean one where trees will be exposed to Phytophthora. For the purposes of this project, that’s exactly what we mean.
Please let us know if you have questions and stay tuned for more updates on this project. We’ve got at least two more years to go! You can check back on this blog (subscribe so you’ll know when new posts are available!), follow Lynn Sosnoskie and Amara Dunn on Twitter or on Instagram (@specialtycropweedscience and @biocontrol.nysipm), or check out Bryan Brown’s webpage. We’ll also be hosting another field event in 2022 and hope to provide updates at future Christmas Tree Farmers Association of NY meetings.
This work is supported by Agriculture and Food Research Initiative – Foundational and Applied Science Grant no. 2021-68008-34179/project accession no. 1025660 from the USDA National Institute of Food and Agriculture.
This post was written by Amara Dunn, Biocontrol Specialist with the NYSIPM program, with helpful input from project collaborators. All images are hers, unless otherwise noted.
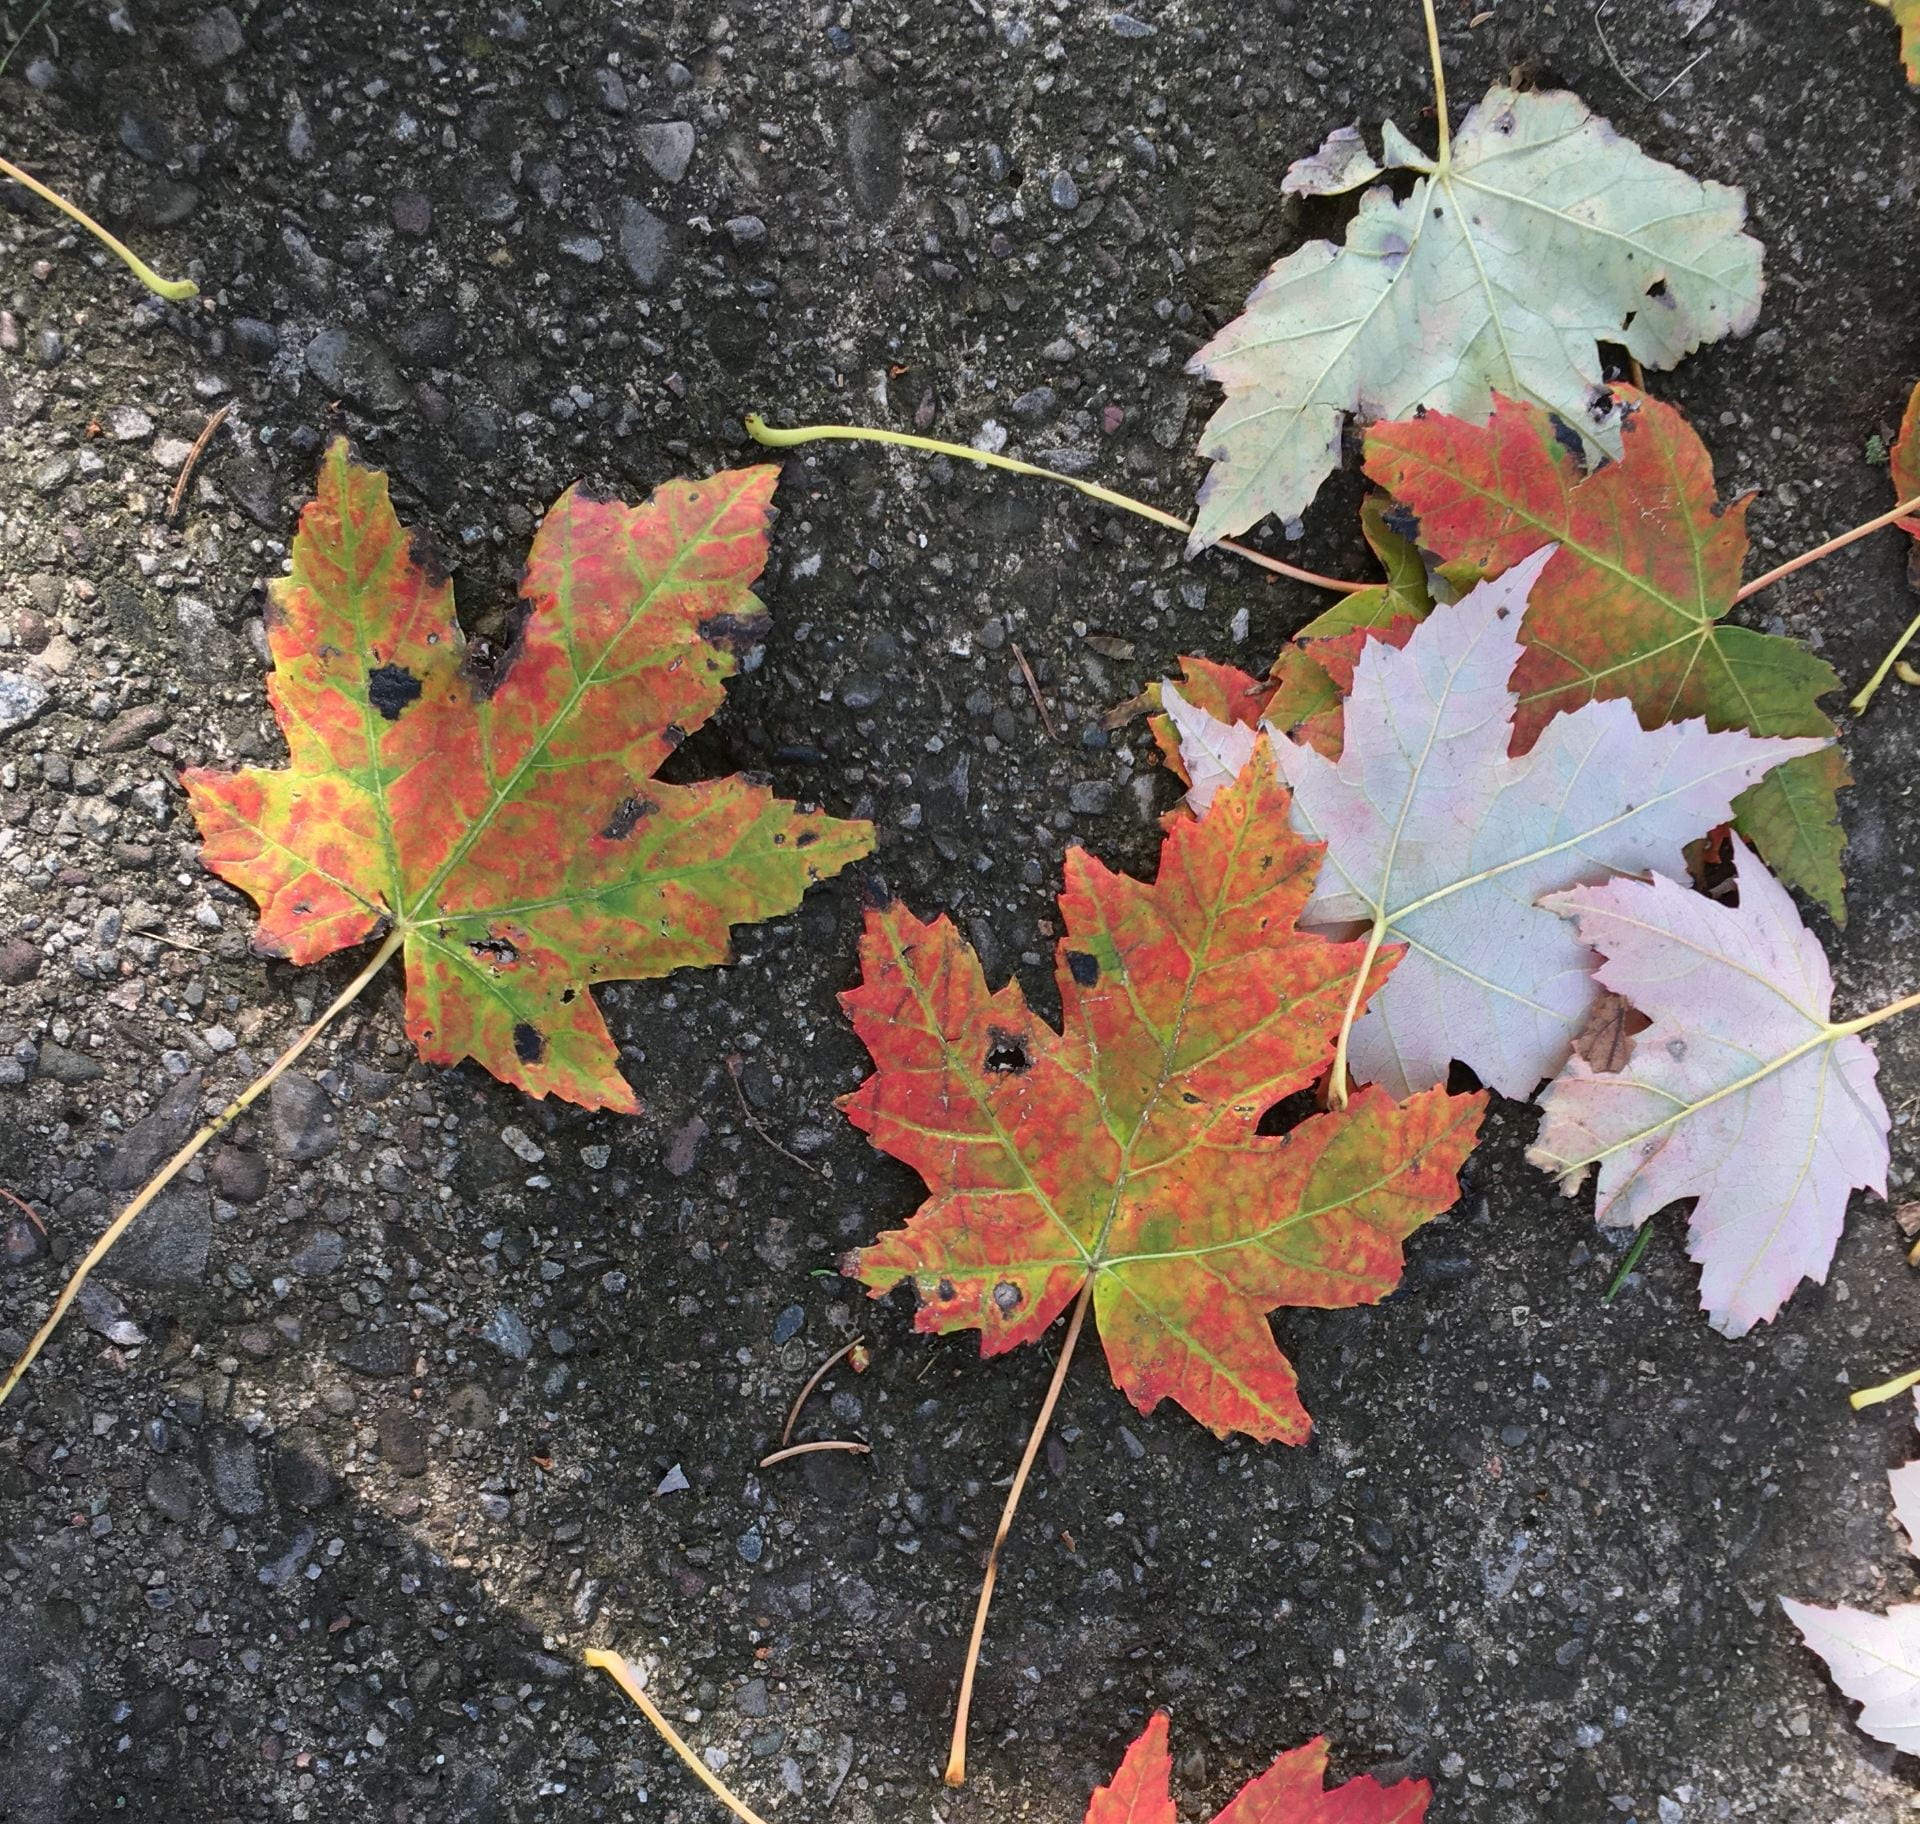
Fall leaves are beautiful…but fall garden clean-up isn’t always fun. Maybe skip some of that clean-up this year.
If you have been procrastinating on your fall garden clean-up (like me), I’ve got good news for you! You may want to just erase some of those tasks from your to-do list altogether. And you can do it guilt-free!
As you may recall from my post this spring, a messy garden provides good shelter for friendly insects like pollinators and natural enemies of pests over the winter. Whether it’s leaves on the ground or dead plant stems, it’s not a bad idea to leave at least some debris in your yard and garden. The Xerces Society provides a nice summary of the benefits fallen leaves offer to insects and other creatures. You can read an eloquent description of all the benefits of a messy yard here.
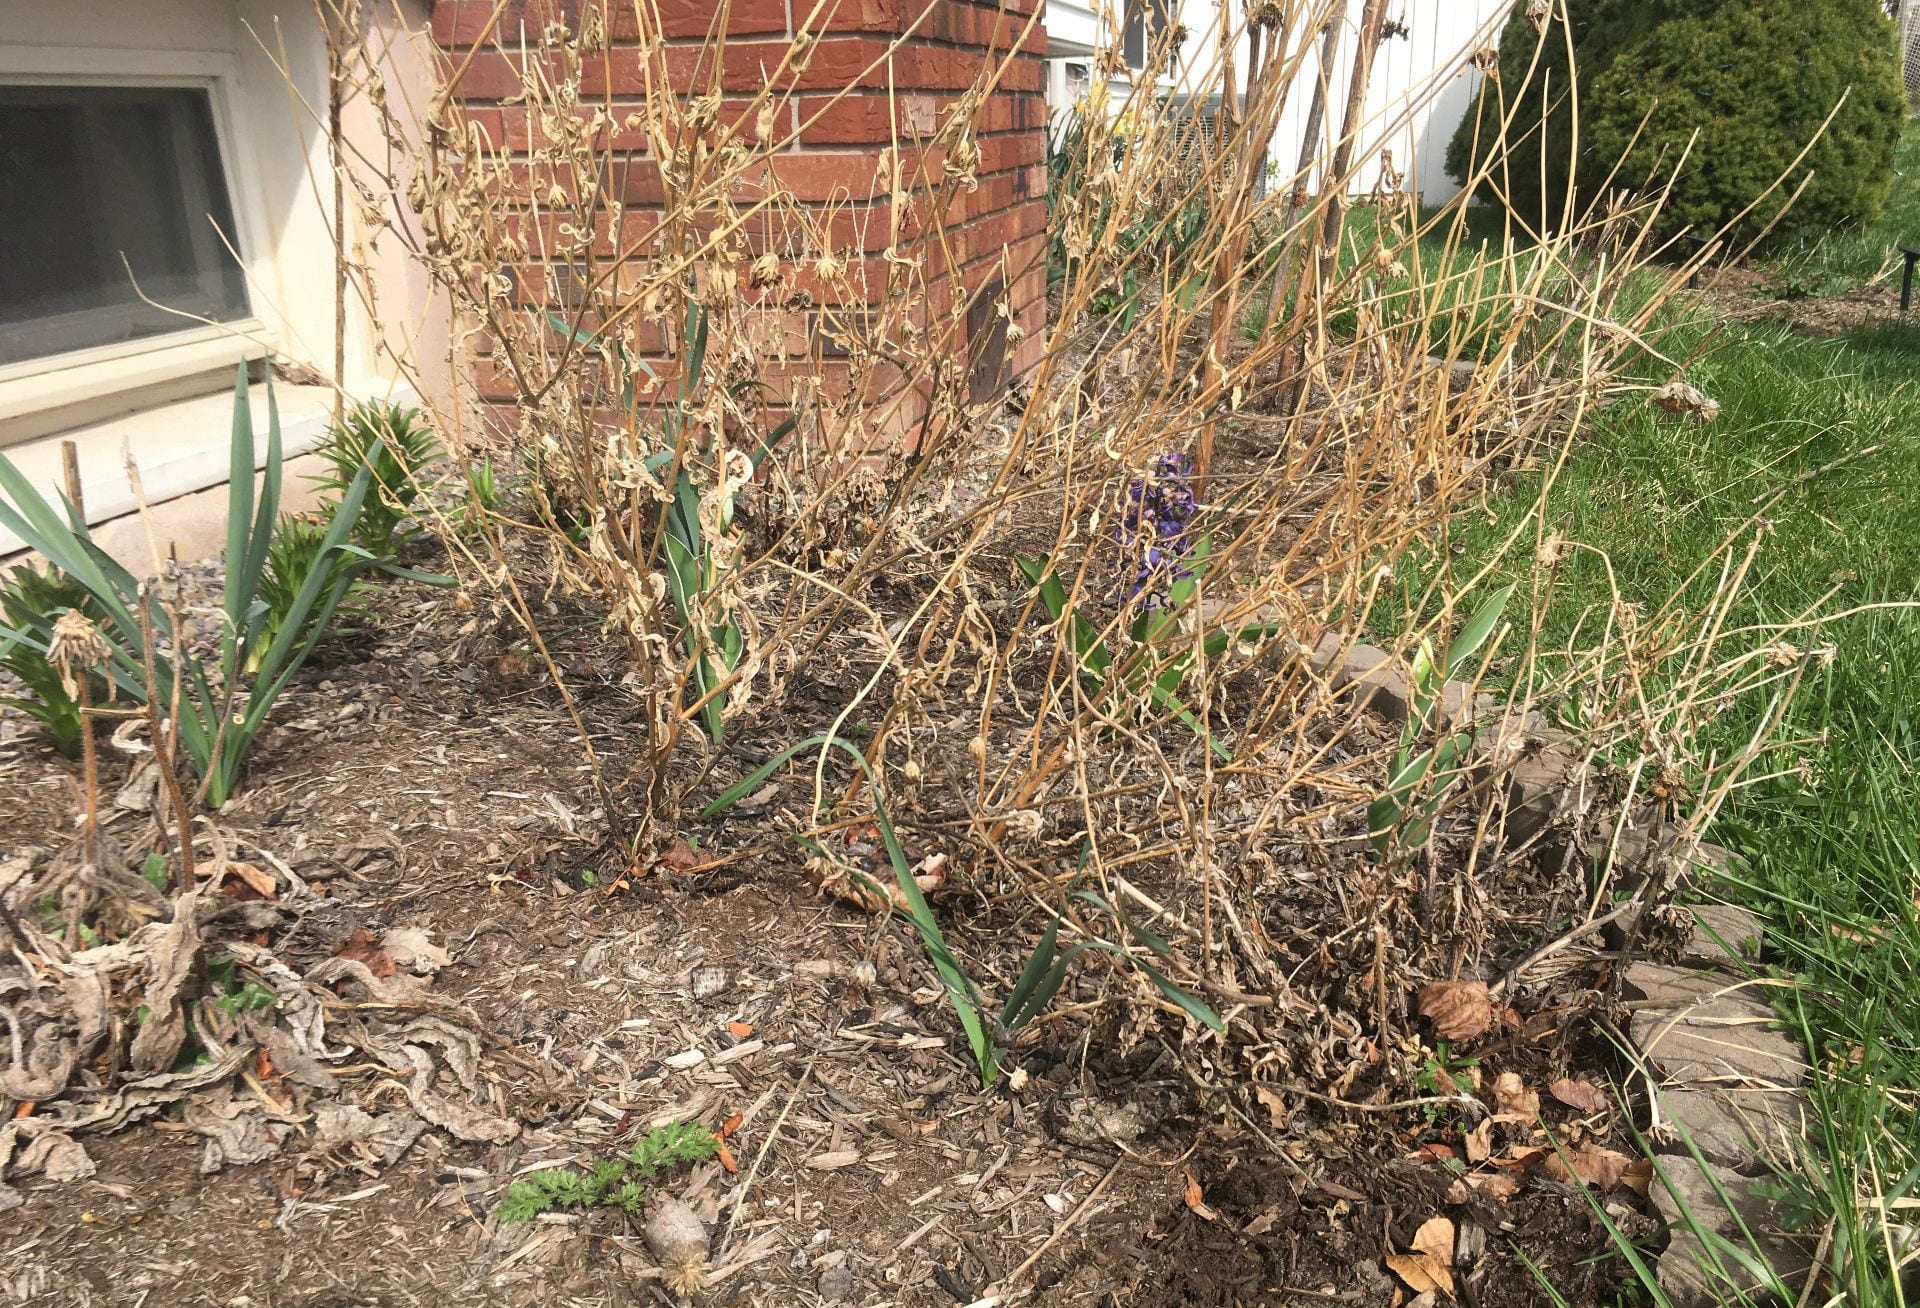
As these plants continue to senesce, I will leave the stems in the garden over the winter.
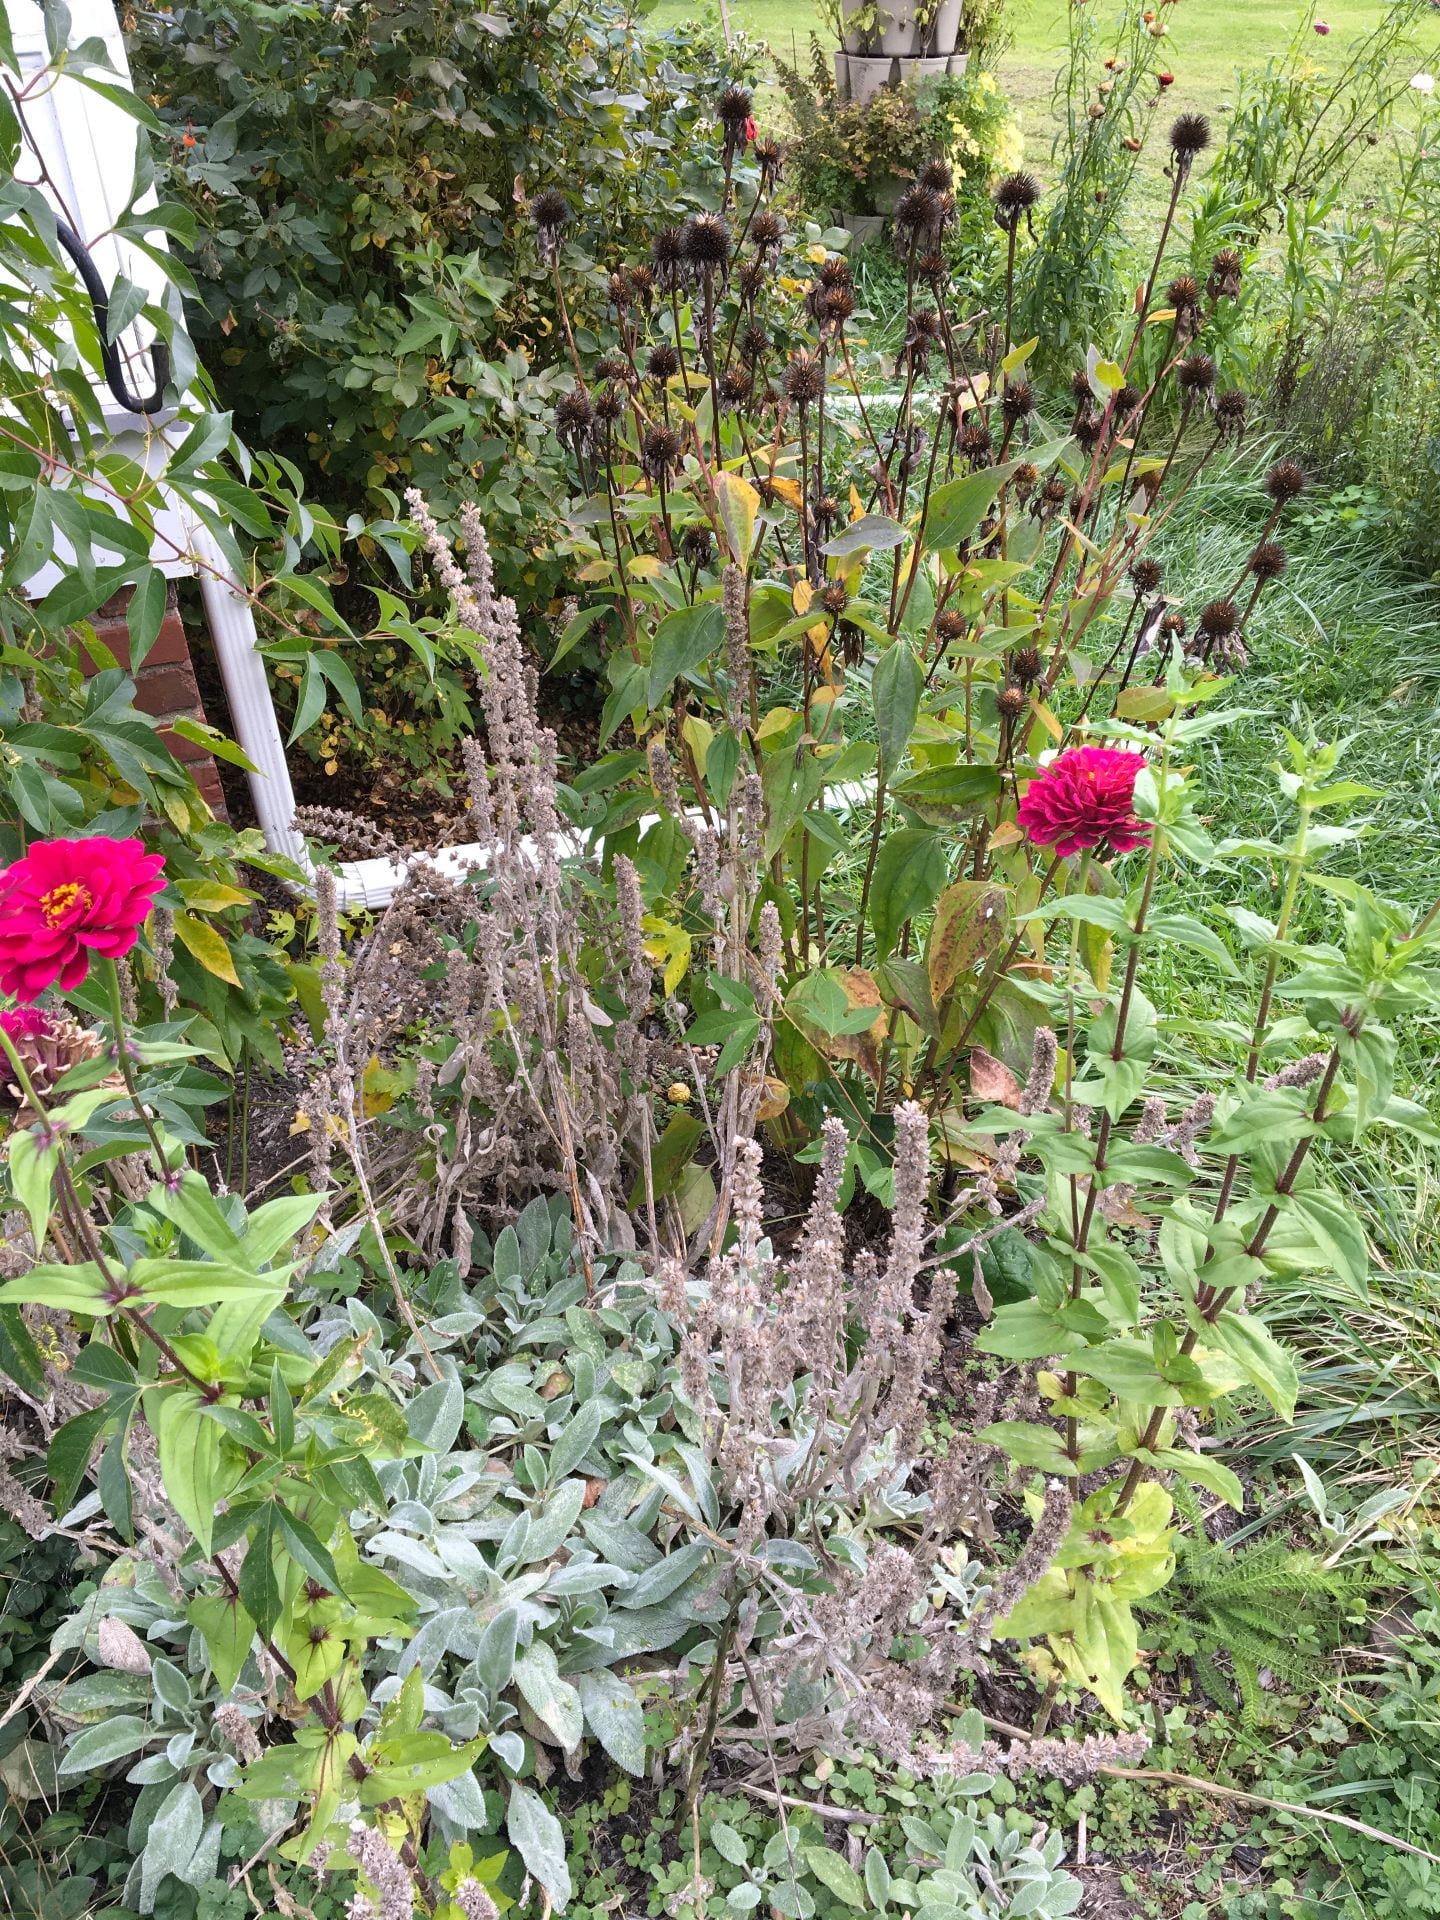
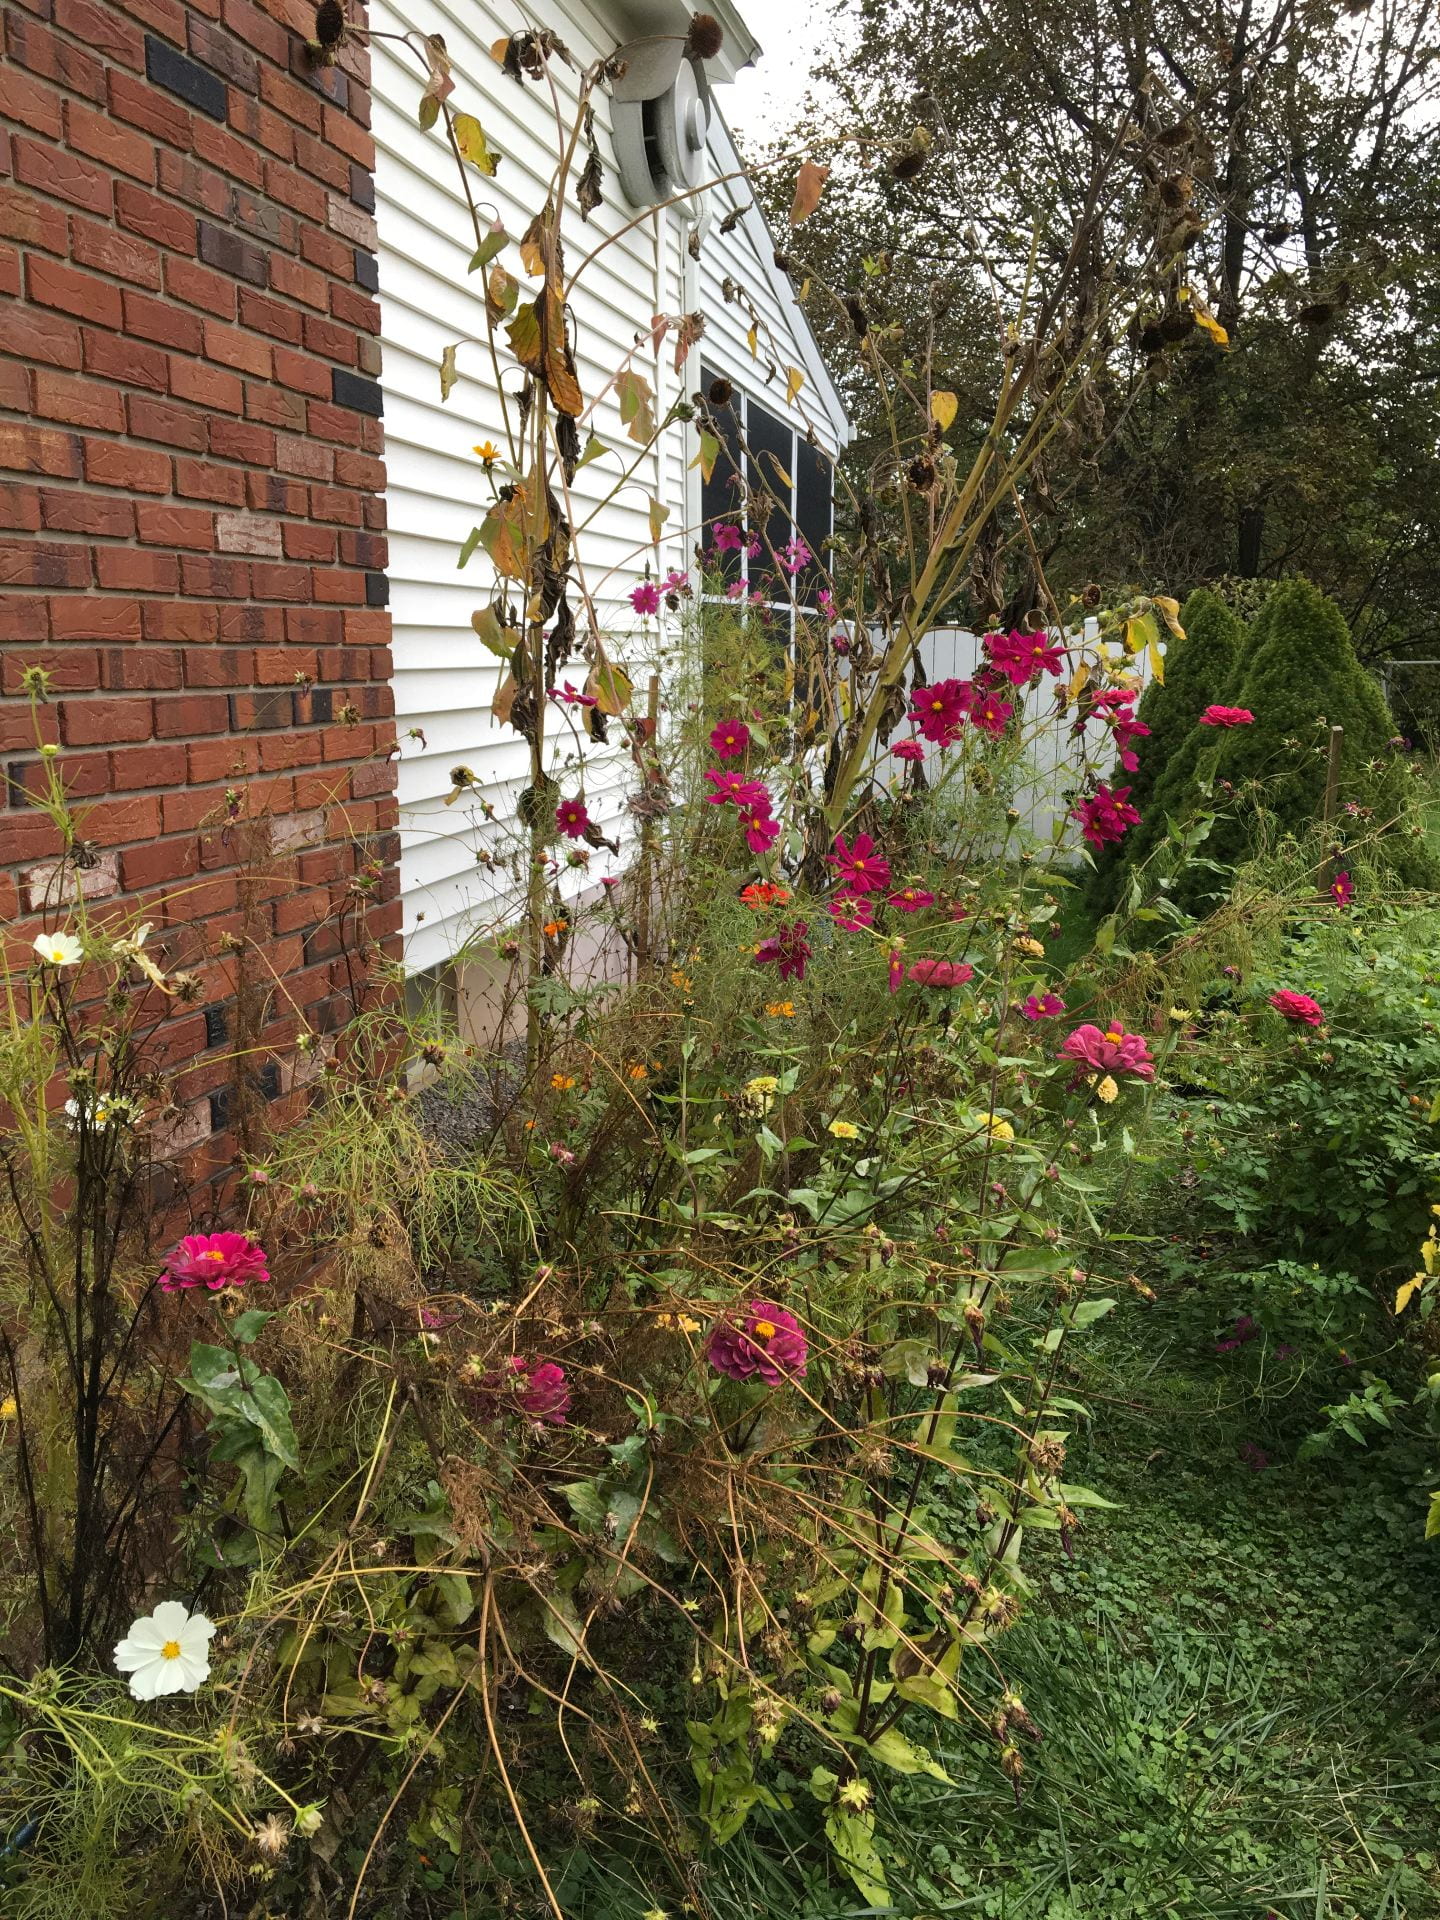
Just to prove I’m putting my money where my mouth is, here are some pictures from my own yard. I’m thinking about cutting down the sunflower stalks and propping them up next to my compost bin in the back yard, just to make things a little tidier in the front yard.
These sunflowers, cosmos, and zinnia plants are no longer looking so nice. But I will leave many of them in the garden until spring.
I’m going to still take out (and send to my local municipal compost facility) my vegetable plants (tomatoes and peppers). Leaving dead stems from healthy plants in your garden is one thing, but this year’s vegetable plants can harbor next year’s vegetable diseases and insect pests if left over the winter. Disposing of diseased or insect-infested plants away from your garden is just good IPM.
A few more caveats…
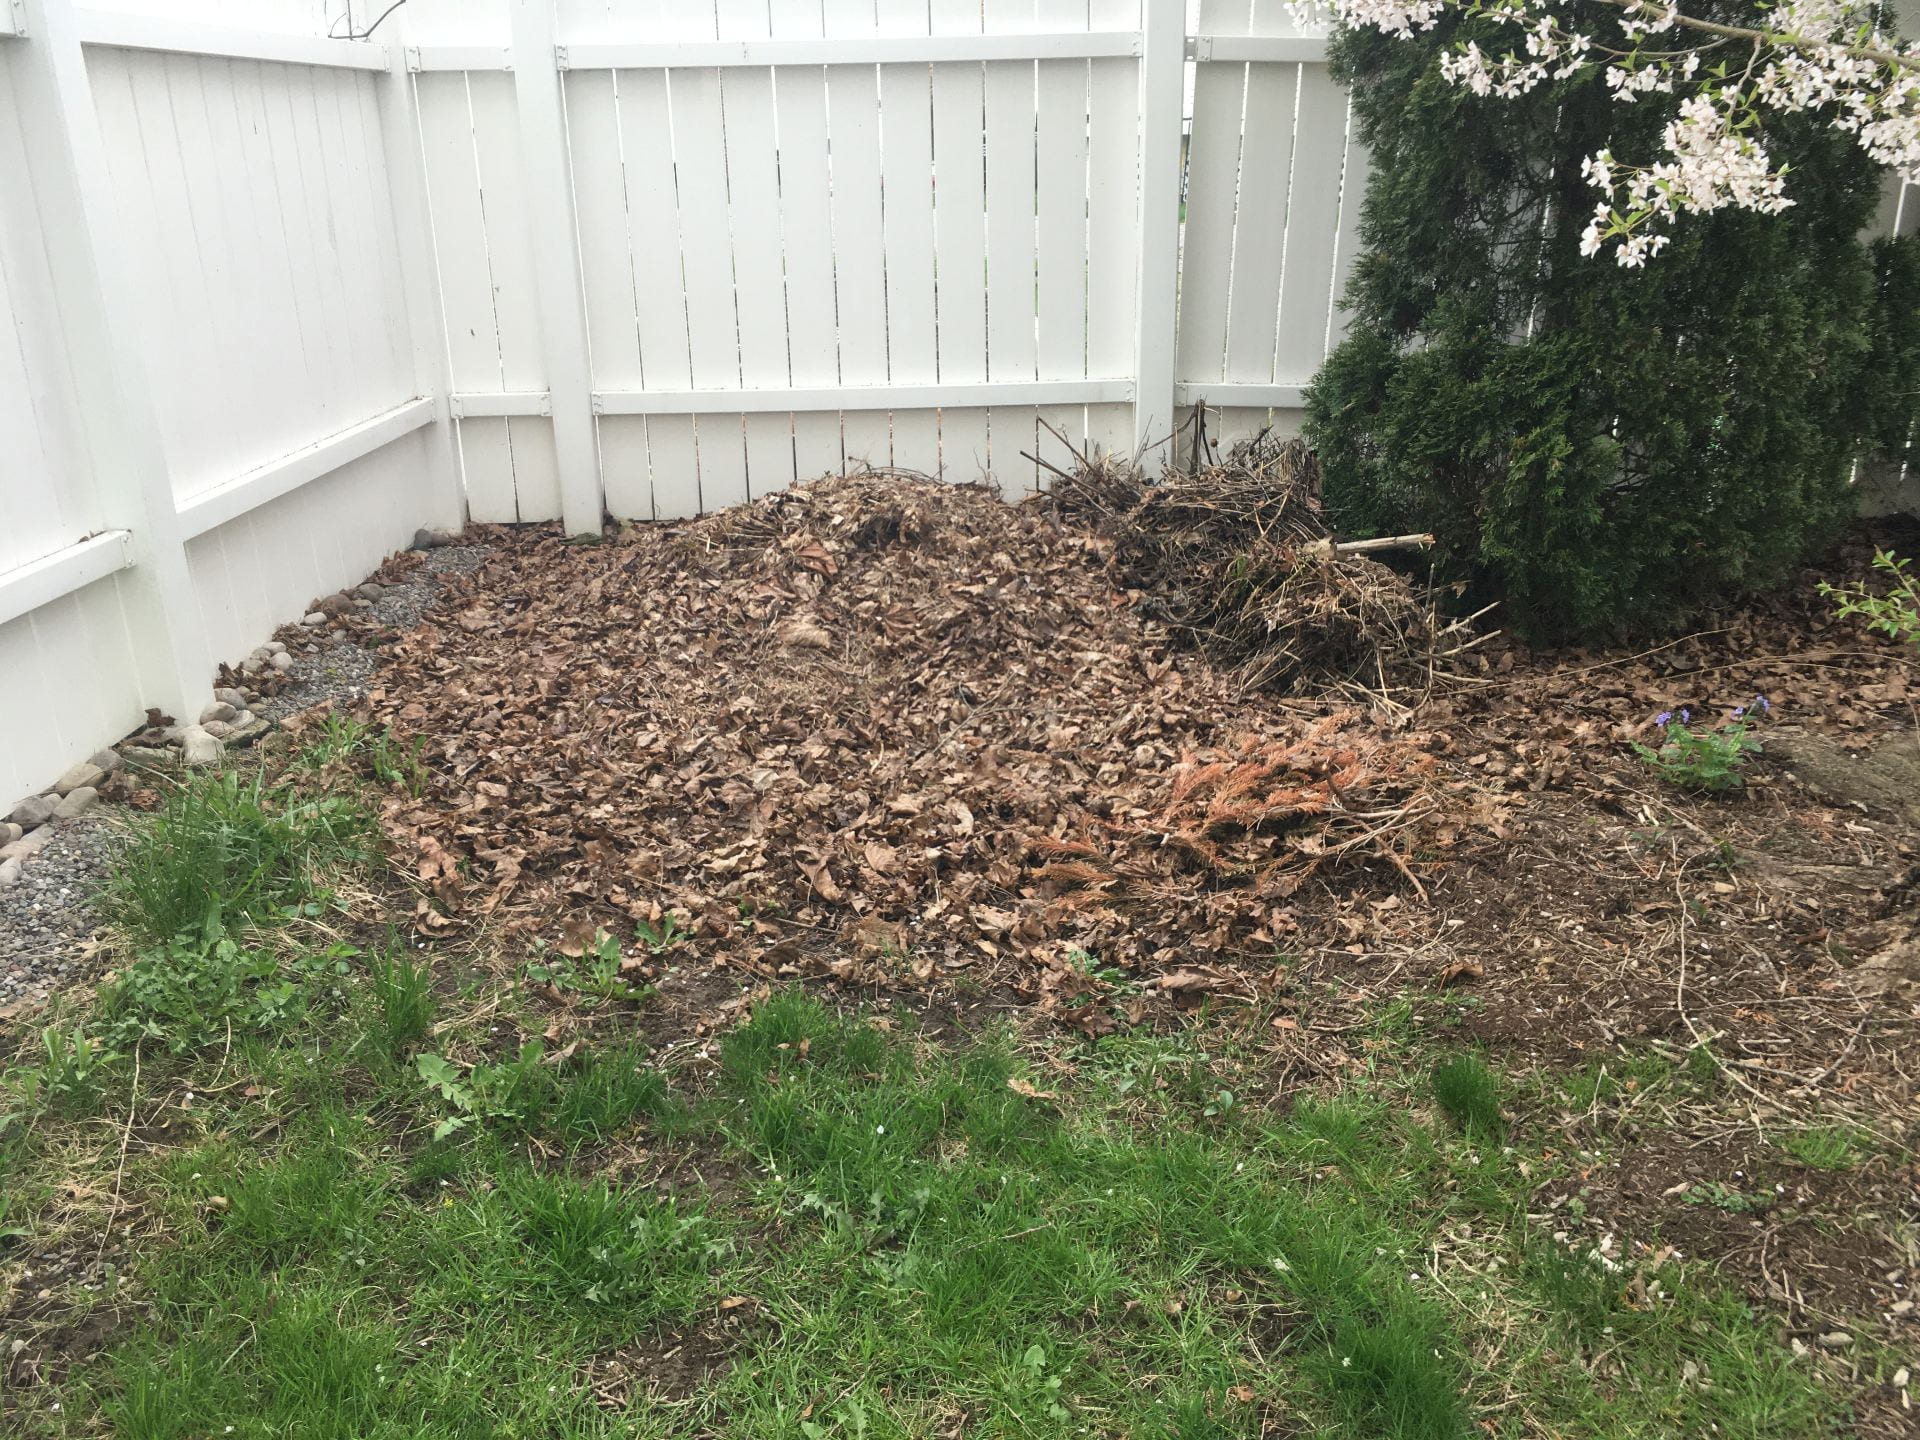
First, you should know that ticks complicate the simple advice to “leave the leaves”. If you’ve had problems with ticks in your yard (learn how to monitor for ticks here), be strategic about where you leave things messy, and where you clean them up. For example, consider cleaning up areas where your family and pets spend more time. You should also be careful about where you pile leaves. My co-worker Joellen explains why here. And definitely use other IPM strategies to protect yourself from ticks, regardless of your yard clean-up plans.
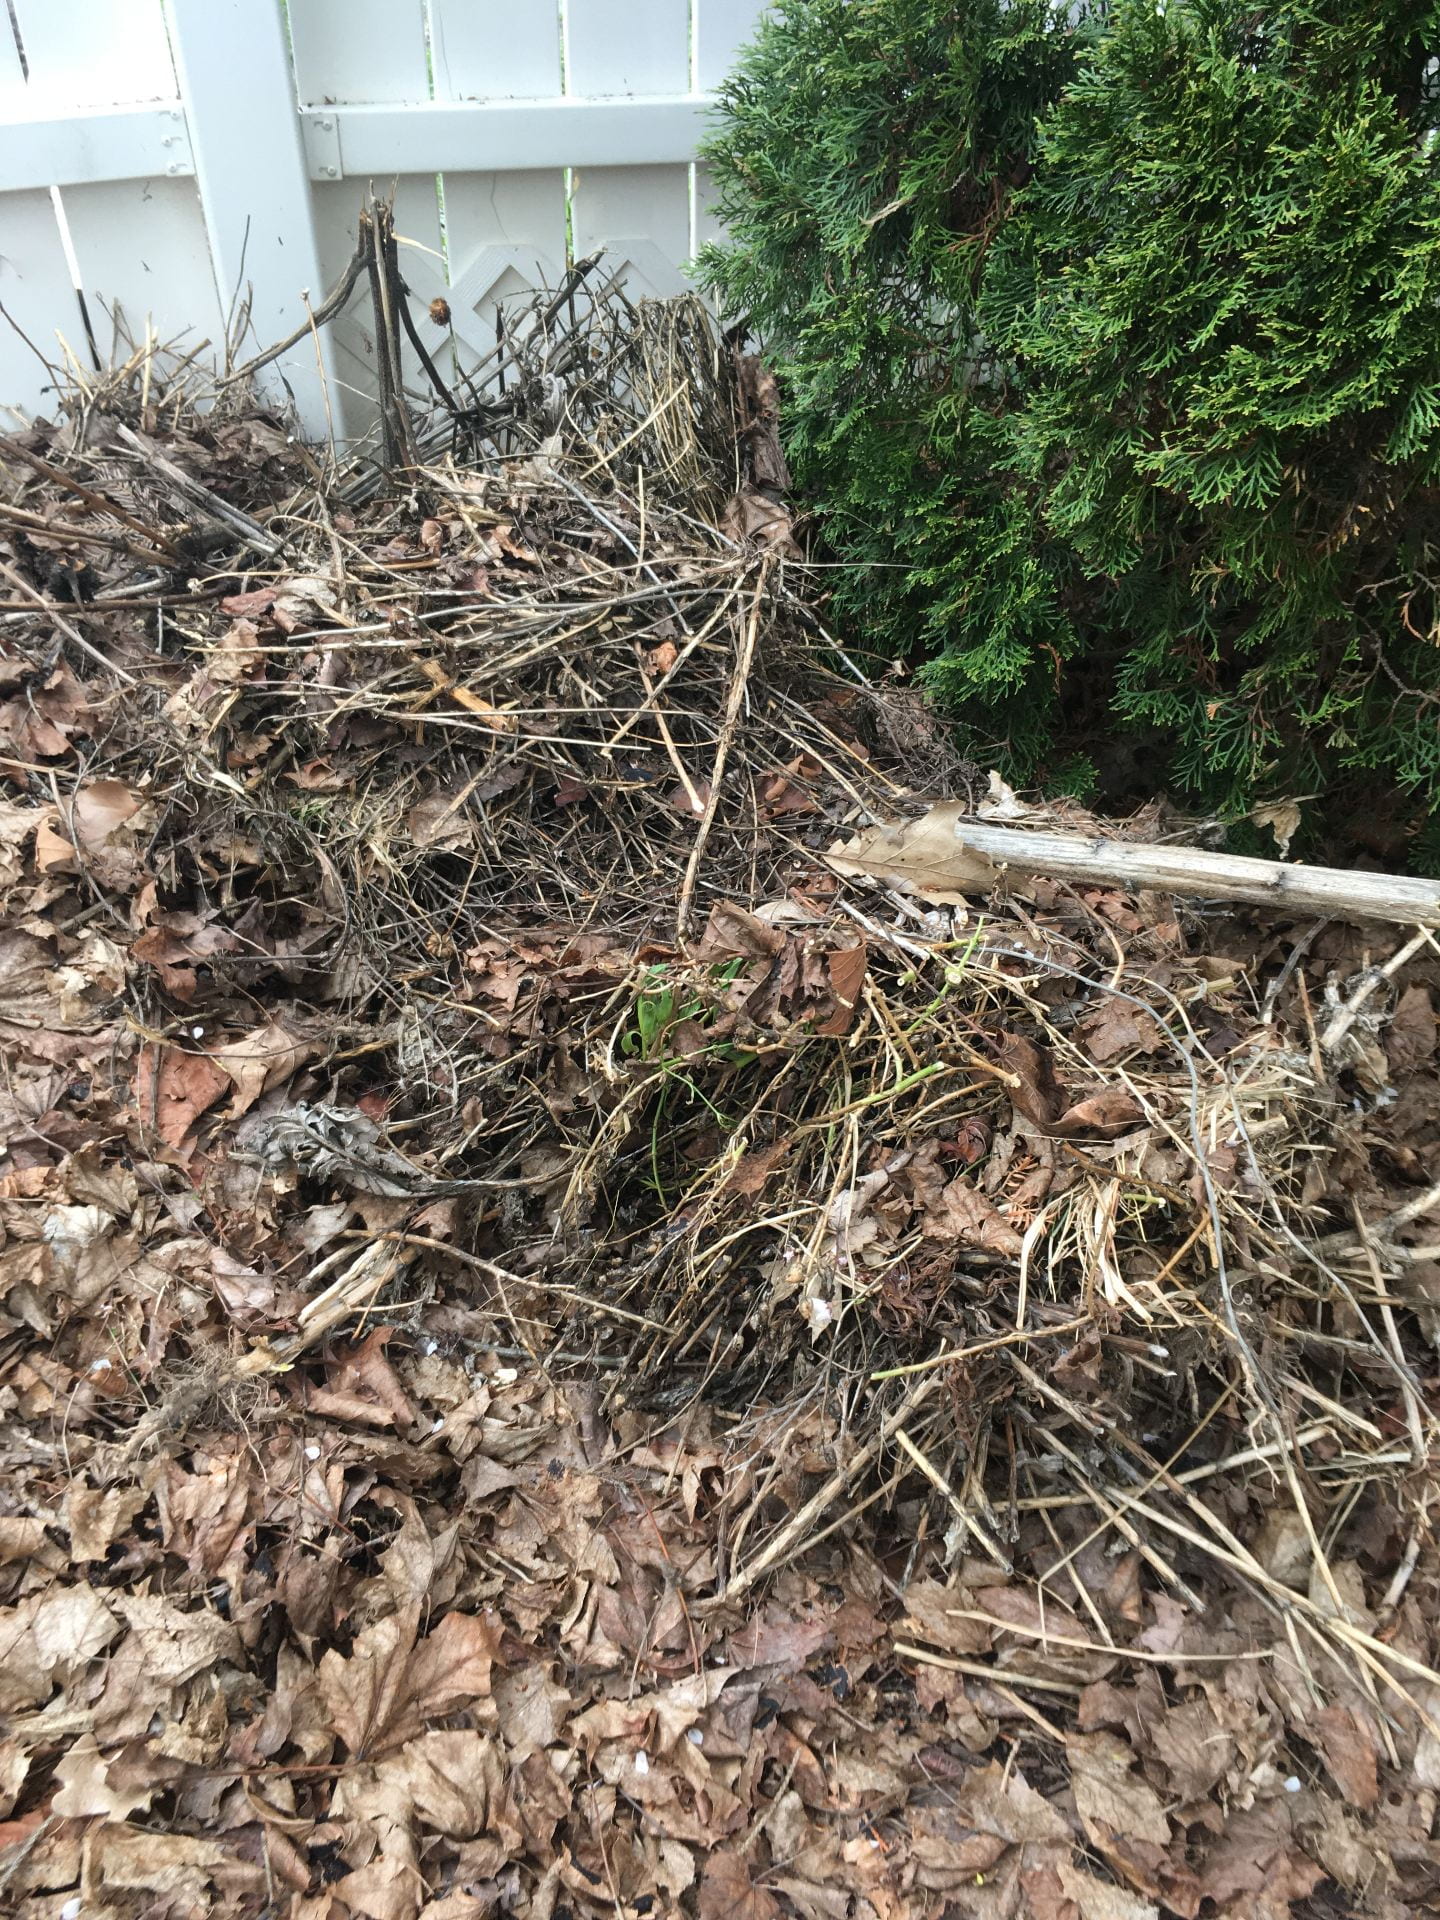
This was the leaf (and other plant debris) pile in my backyard this spring. Piles like this can shelter lots of invertebrates…including ticks.
Second, if you’ve got a garden bed in the front yard that you just can’t stand to leave messy through the winter, it’s ok to clean it up and not feel guilty. Maybe pick another part of your yard that you can leave a bit messy instead. Don’t let the perfect become the enemy of the good.
Happy Fall!
This post was written by Amara Dunn, Biocontrol Specialist with the NYSIPM program. All images are hers, unless otherwise noted.
This work is supported by:
New York State Department of Agriculture and Markets
New York State Department of Environmental Conservation
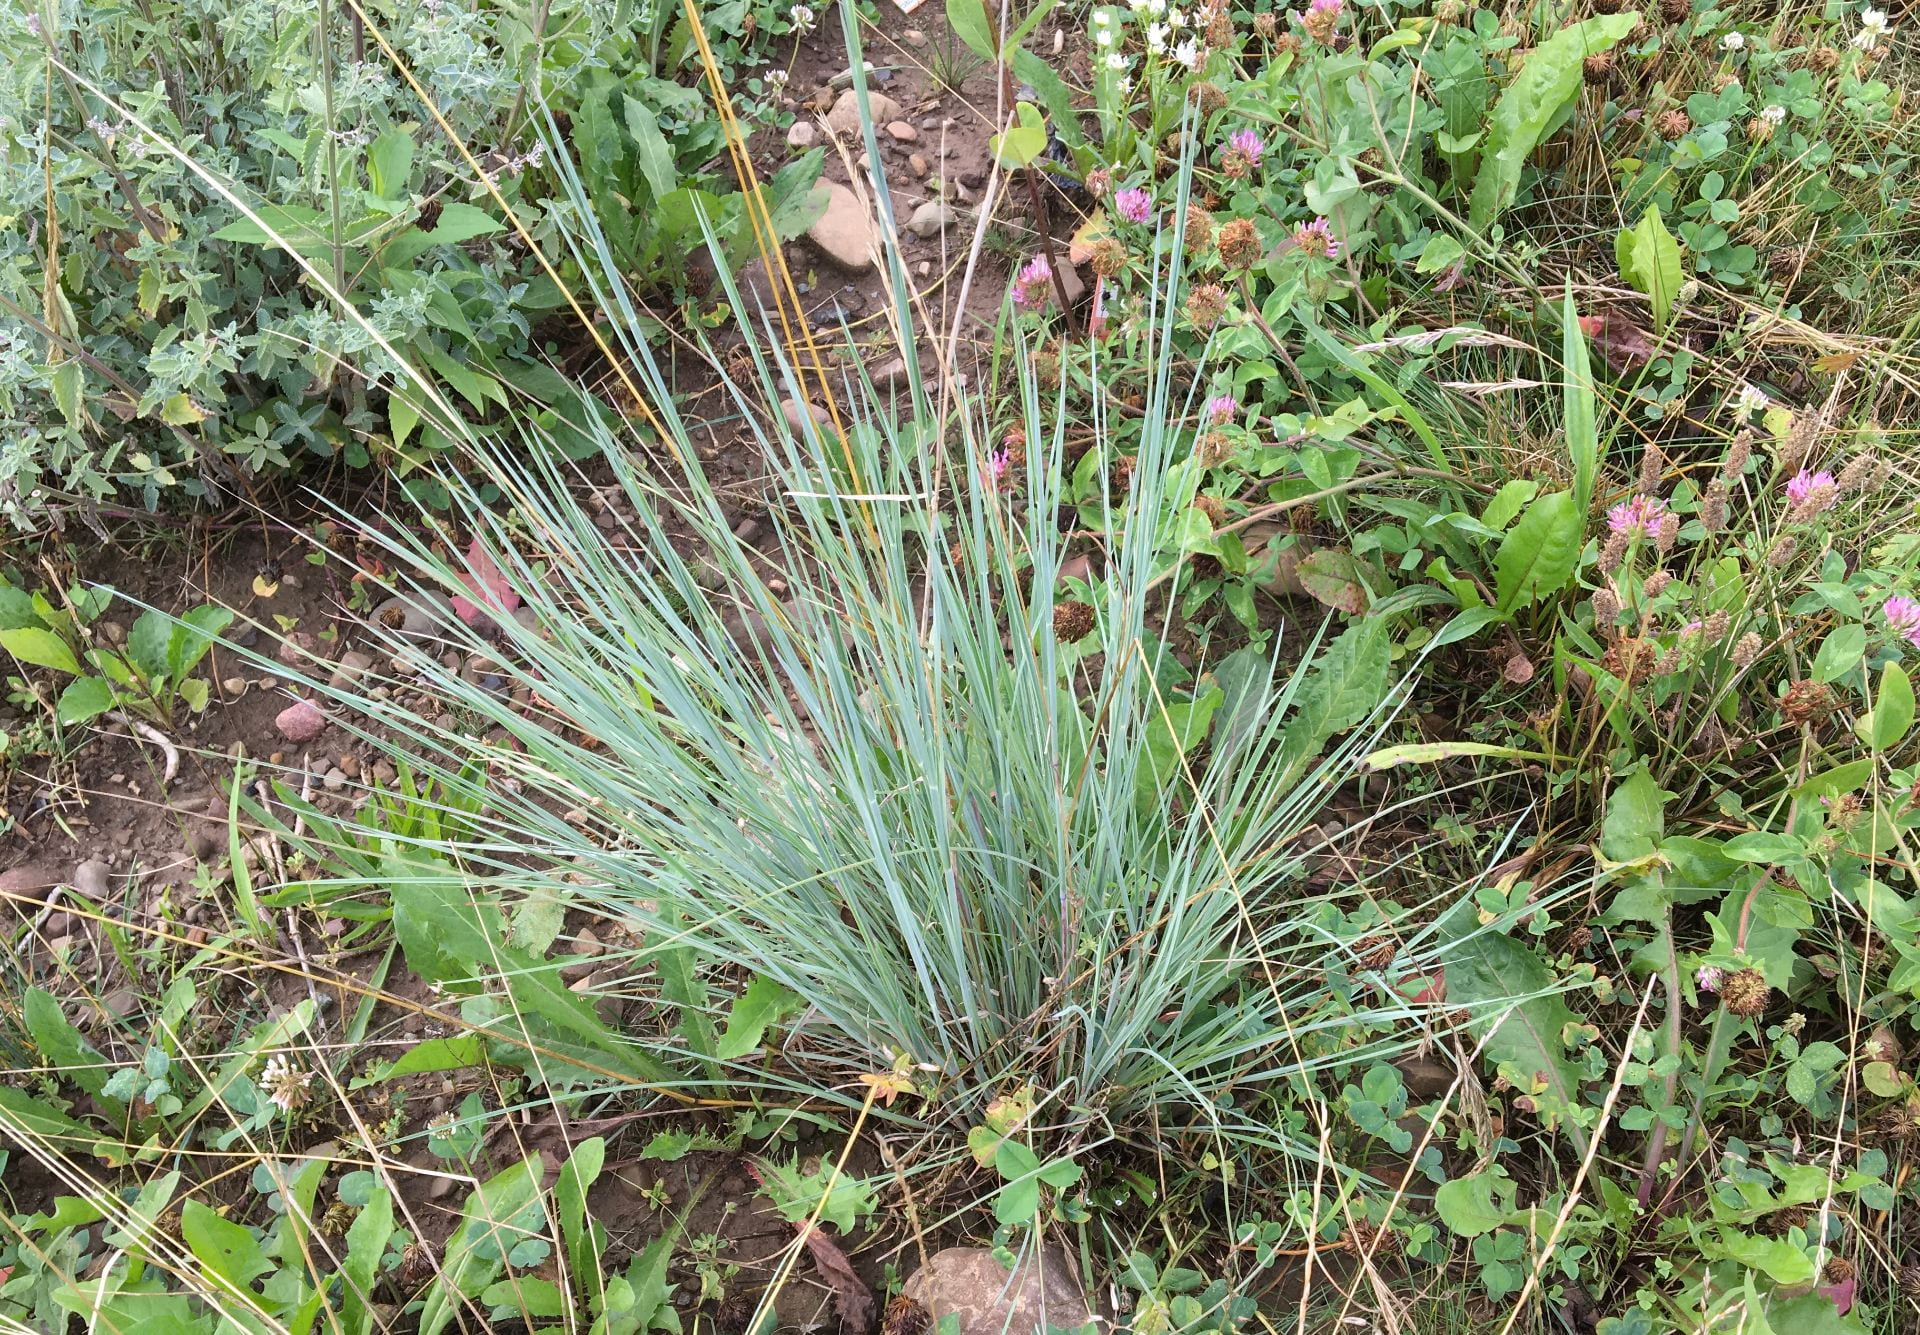
We may not spend a lot of time looking at the ground, but there are plenty of friendly insects living at the soil surface and taking shelter in plants like this little bluestem grass that don’t produce pollen-rich flowers, but still support beneficial insects.
In August I wrote about some of the friendly insects that might be visiting your garden this summer. I promised to write more about the natural enemies of pests that you might find at ground level. That time has come! Because these insects (and some other arthropods) live at or near the soil surface, you’re much less likely to see them, unless you happen to be cleaning out a garden bed this fall (which is not actually recommended). Also, they may be more active at night. But they are still doing lots of good things in your garden or on your farm, so they’re worth knowing about.
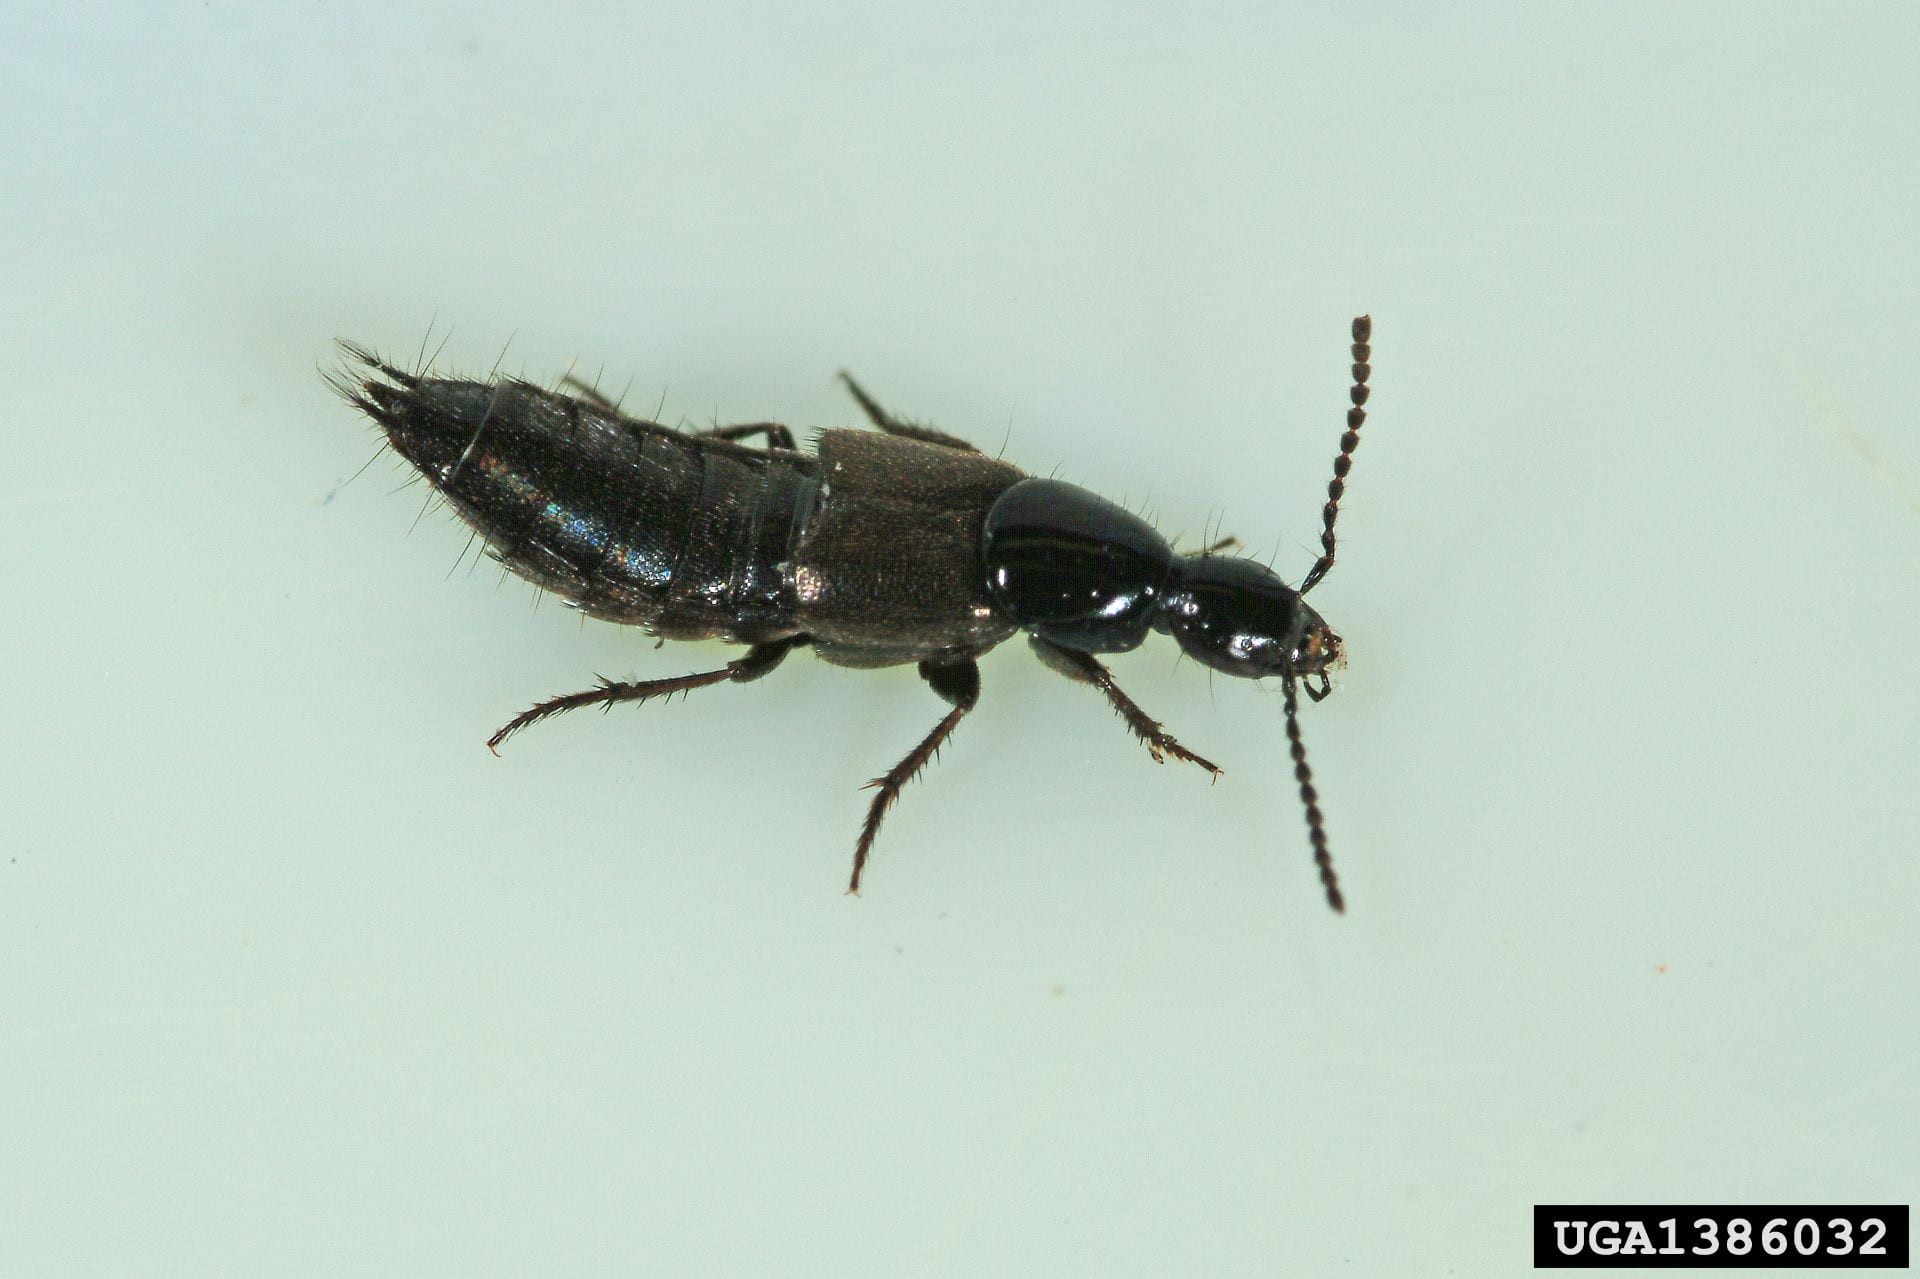
Rove beetles
Rove beetles have wing covers that are much shorter than the rest of their body. Image courtesy of Joseph Berger, Bugwood.org.
These beetles live in the soil or at the soil surface and they eat lots of different soil invertebrates, including pests like slugs, snails, thrips, and eggs of other insects. They also eat seeds, so they could help reduce your weed seed bank, too. Like other beetles, they have hard covers over their wings called elytra. Because these covers are much shorter than their bodies, I think it makes them look like they are wearing little capes.
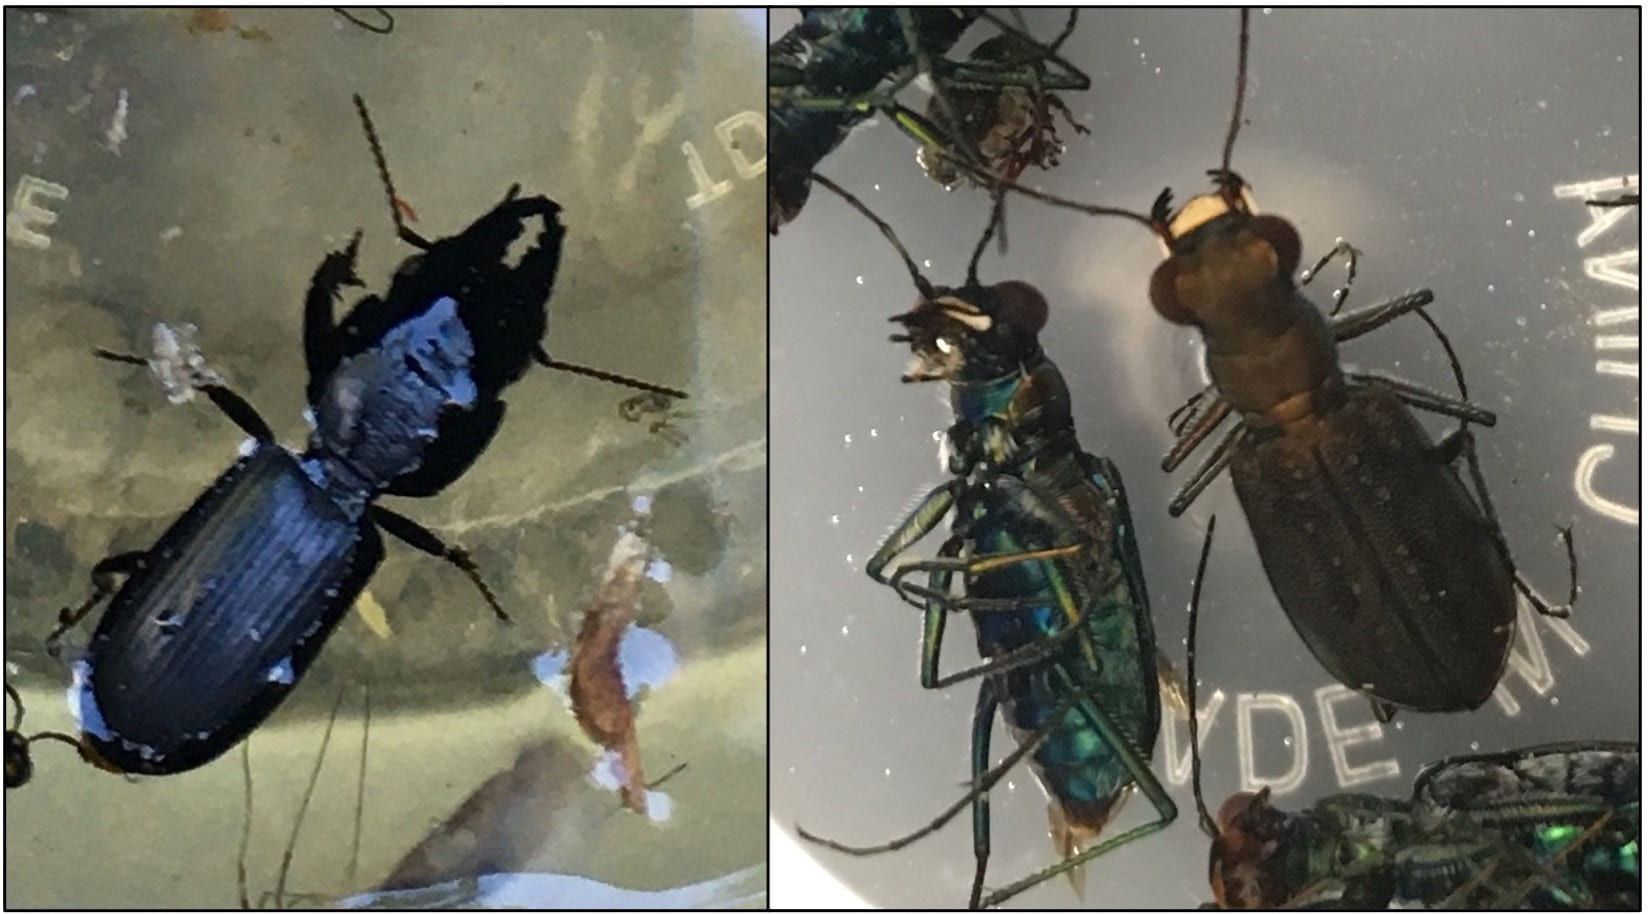
Carabid beetles
Ground beetles may not look very exciting, but they’re great predators to have in fields and yards. Image courtesy of Mary C Legg, Bugwood.org.
Also called ground beetles, this large group of insects mostly live on the ground, and tend to have prominent jaws and move very fast. Their speed makes them great predators of many insects, as well as snails and slugs. Depending on the species, they may also eat seeds. They like to spend the winter in sheltered places including perennial grasses that grow in clumps. In the spring, they can travel almost 200 feet from these grassy shelters (Landis et al. 2000. Annual Review of Entomology 45:175-201). They come in different sizes, but tend to be darker colored.
Just a few more examples of ground beetles, because they’re so cool!
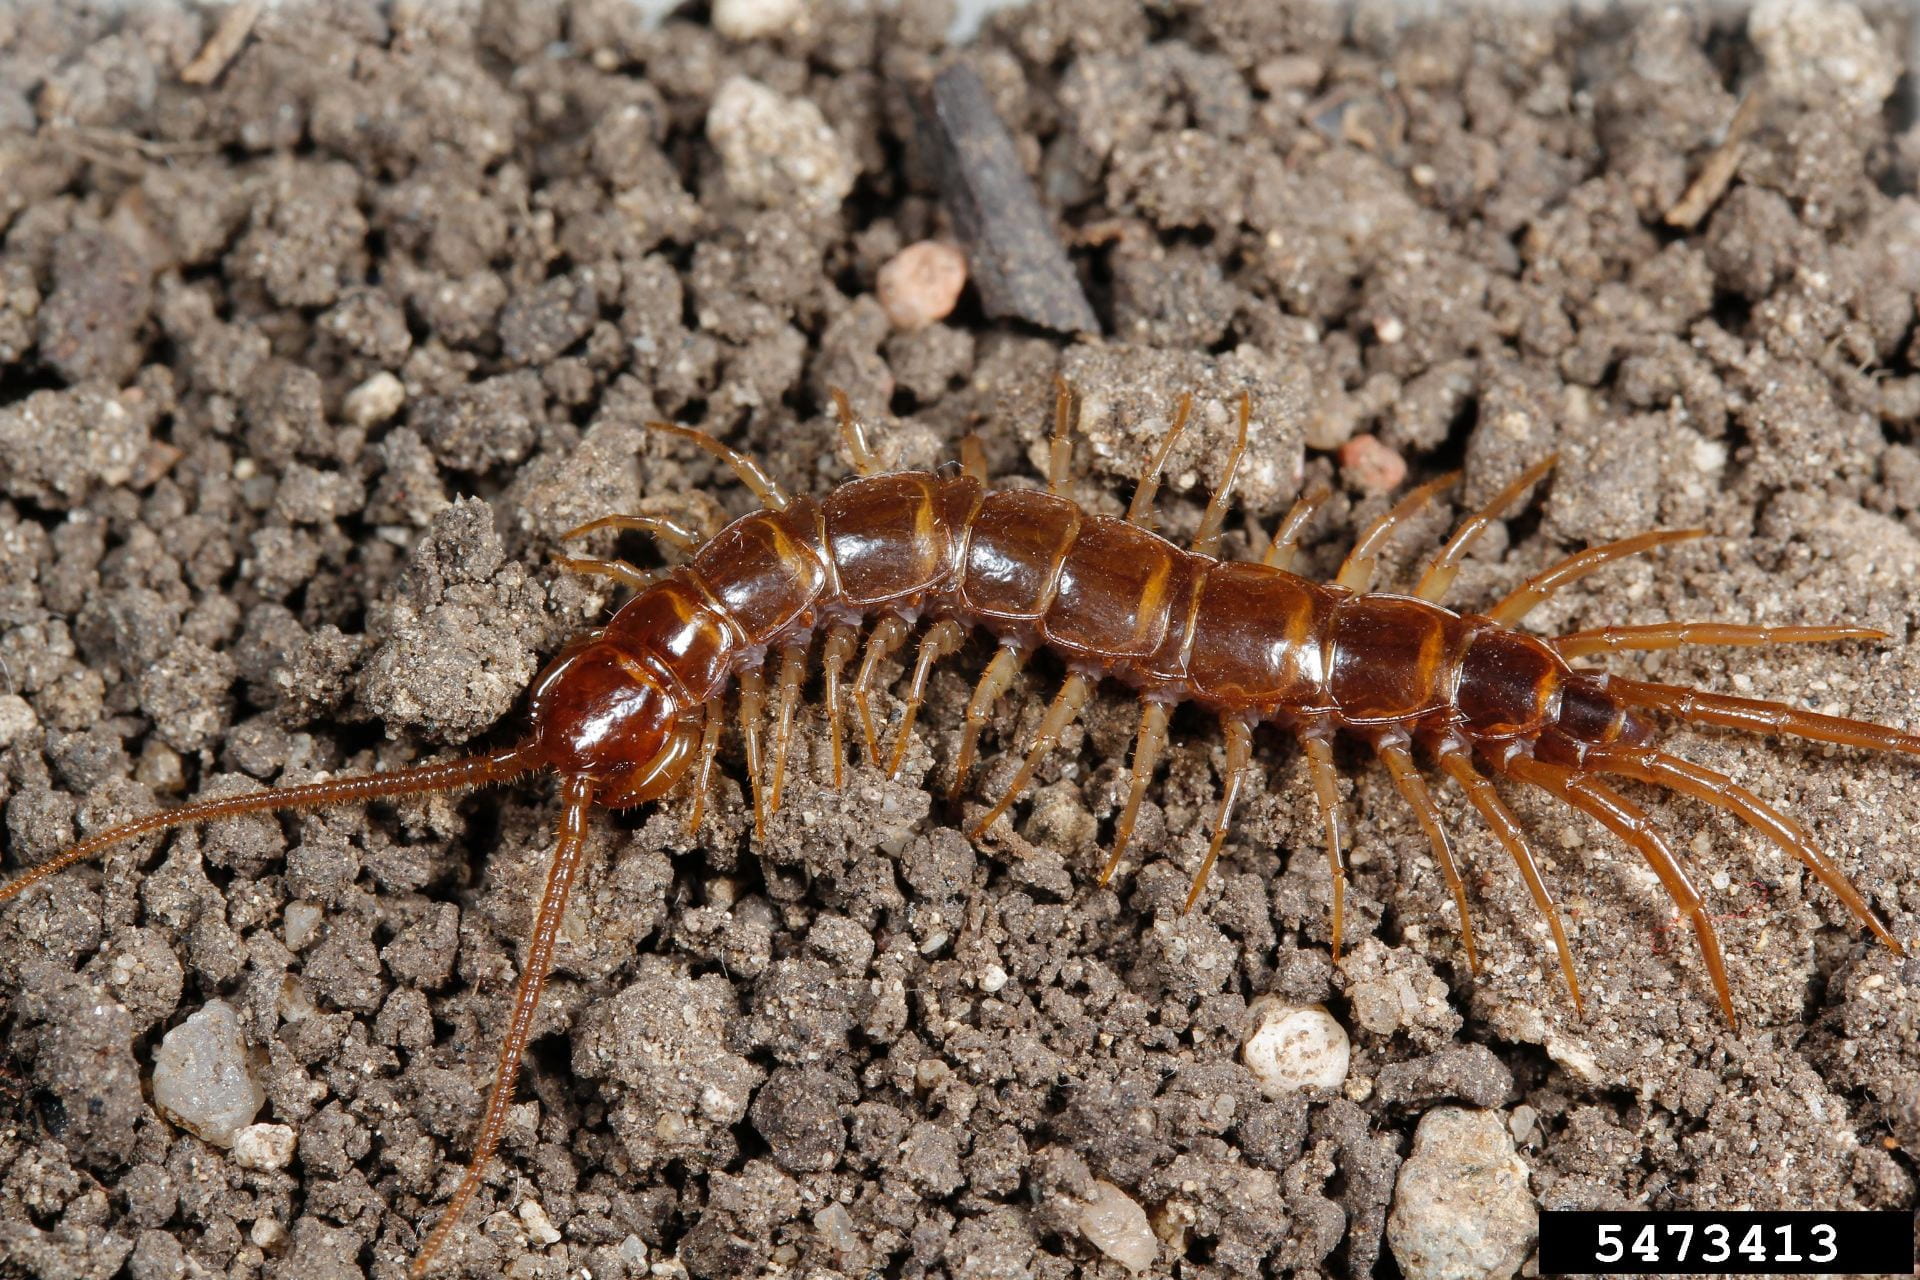
Centipedes
Centipedes may not be so pretty to look at, but they’re good predators to have around. Image courtesy of Joseph Berger, Bugwood.org.
They may not look as friendly as lady beetles, but centipedes are also generalist predators that eat lots of invertebrates (including pests) in the soil. In case you were wondering, the difference between a centipede and a millipede is that centipedes have only two legs (one pair) on each segment of their body, while millipedes have four legs (two pairs) per body segment. But they can move pretty quickly, so it’s understandable if you don’t have time to count.
Spiders and harvestmen
These are just a few of the eight-legged friends you might find in your garden or fields. Some species you’re more likely to find on plants, and others spend more time on the ground.
I wrote about spiders in my previous post, but many species live on or near the ground. Both are good predators, and friends you’d like to have in your fields or garden. Technically, harvestmen (also called daddy long legs) are not spiders, but they do have eight legs. Because they don’t have an obvious “waist” they appear as though their head and body are a single “blob”.
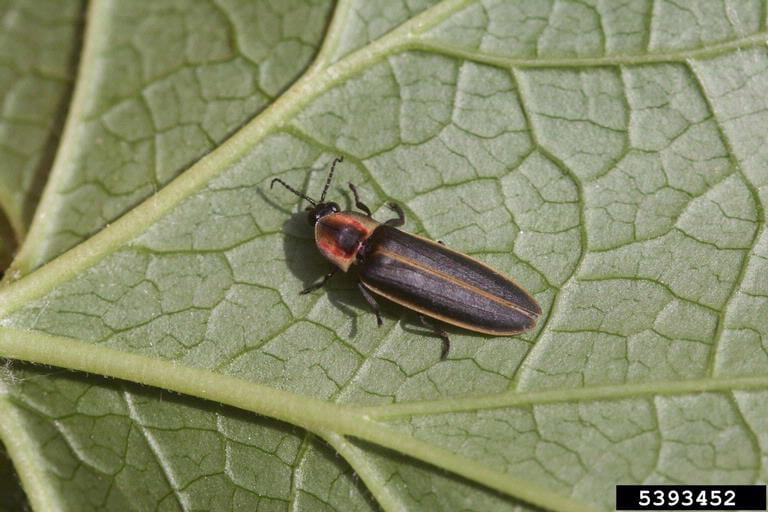
Fireflies
Adult fireflies are more easily recognizable, even when they aren’t lit up. Image courtesy of Whitney Cranshaw, Colorado State University, Bugwood.org.
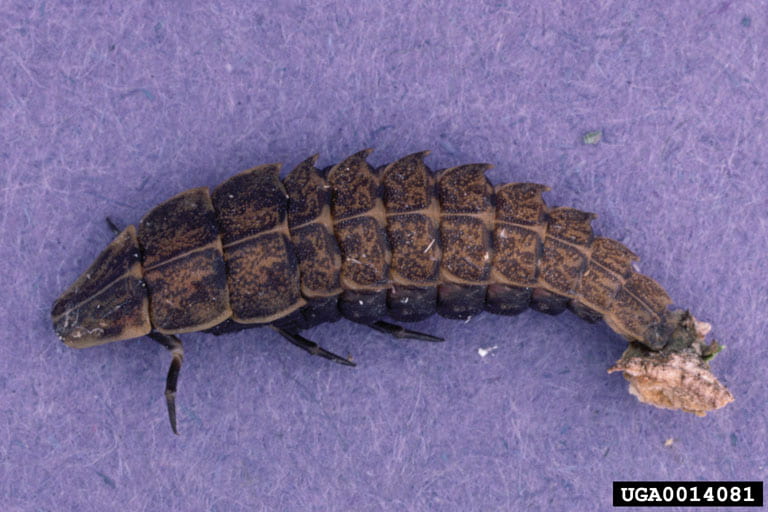
Yes, you read that correctly. When they are immature, fireflies (or lightening bugs, depending on where you grew up) look a bit more like worms than beetles (which is what they actually are). They live on the ground (especially in places with more moisture) and feed on invertebrates with soft bodies, including both snails and insects. Although we tend to notice them when they are flying, adult fireflies (depending on the species) also spend plenty of time on the ground, and may or may not be predators. The Xerces Society has some really good information about fireflies and their conservation.
Immature fireflies may not be so familiar, but are good “friends” because they eat soft-bodied invertebrates, including pests. Image courtesy of Gerald J. Lenhard, Louisiana State University, Bugwood.org.
So remember, not everything that creeps or crawls through your fields or garden is a problem. There are lots of friendly insects (and other arthropods) that can help you with pest control. Take a closer look and you might be surprised!
This post was written by Amara Dunn, Biocontrol Specialist with the NYSIPM program. All images are hers, unless otherwise noted.
This work is supported by:
New York State Department of Agriculture and Markets
New York State Department of Environmental Conservation
The different weed management treatments are most noticeable, but we’re also comparing at-planting treatments to prevent root disease and improve seedling survival.
You may recall that we started a new project on Christmas tree IPM this year. Now you can come hear more about how the project is going, and see the in-progress treatments in person!
When
The event will be held outdoors on August 19, 2021 from 5:00 to 7:30 PM in Geneva, NY. Please register by August 18th so we have enough food for everyone.
Where
To get to our field, put this address into your GPS:
1097 County Rd. 4
Geneva, NY 14456
Then look for these signs to find our field and park:
Cost
In order to help improve access to this event, we are inviting attendees to pay what they can. $25 will cover the cost of the meeting, but if this poses a barrier to your attendance, we are suggesting a reduced rate of $15. If you wish to support someone else who might need help attending, you can choose to pay $35. Any questions or concerns, please reach out to me.
5:45 Alternative weed management systems for Christmas trees – Dr. Bryan Brown (20 minutes)
6:15 Herbicides for weed management in Christmas trees – Dr. Lynn Sosnoskie (20 minutes)
6:45 Biopesticides for Christmas tree root diseases – Dr. Amara Dunn (20 minutes)
7:05 Visit the Christmas tree fields and the beneficial habitat project
7:30 Safe travels home
COVID precautions
In order to offer an experience that is accessible and as safe as possible for all attendees, we are requesting that everyone wear a mask unless you maintain at least 6 feet of distance between yourself and people you do not live with, regardless of your vaccination status. There will be plenty of space at the field to spread out (both for eating and drinking, and for participating in the programming). Speakers will be using microphones so that you will still be able to hear even if you are standing further from the speaker than usual. We will have masks available if you do not have one. (But if you have a favorite Christmas tree mask, we definitely want to see it!) These recommendations follow Cornell’s current guidance and if that guidance changes, we will let you know.
More details
1.5 DEC pesticide recertification credits available for categories 1a, 3a, 25 and 10
A light supper will be provided.
Funds for this project were provided by the Toward Sustainability Fund, NYS Dept of Ag and Markets, and the National Institute of Food and Ag
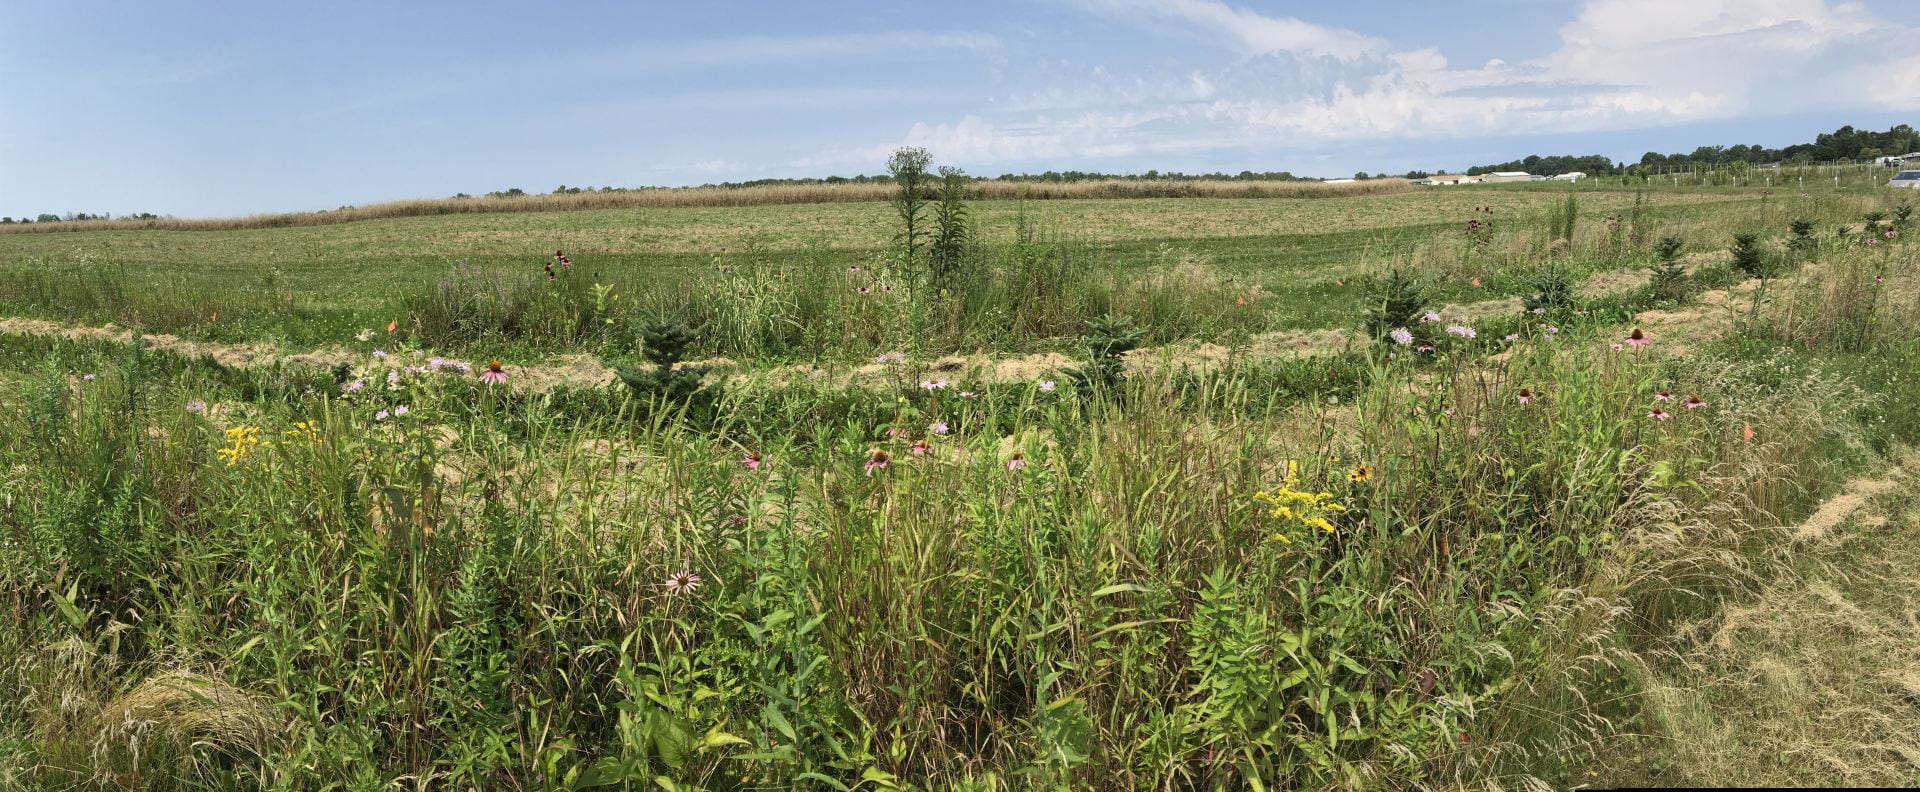
It’s hard to believe it, but we are in our fourth year of a project establishing perennial wildflowers and grasses to support populations of pollinators and natural enemies of pests. You can read more about this ongoing project in past blog posts, but in just a few weeks, you can also come visit these plots in person (if you live near Geneva, NY)!
Our Habitat for Beneficial Insects Open House is taking place on Thursday, August 19, 2021. We’re inviting members of the public, home gardeners, and beneficial insect enthusiasts to stop in between 1:30 and 3:30 PM to:
see how the wildflower plots are looking
learn about the methods we’ve used to establish them
practice recognizing some of the beneficial insects we’ve attracted
In order to offer an experience that is accessible and as safe as possible for all attendees, we are requesting that everyone wear a mask unless you maintain at least 6 feet of distance between yourself and people you do not live with, regardless of your COVID vaccination status. There will be plenty of space at the field to spread out, and we will have microphones available so that you will still be able to hear even if you are standing further from a speaker than usual. We will have masks available if you do not have one. (But if you have a favorite insect or wildflower themed mask, we want to see them!) These recommendations follow Cornell’s current guidance and if that guidance changes, we will let you know.
To get there, put this address into your GPS:
1097 County Rd. 4
Geneva, NY 14456
Then look for these signs to find our field and park:
New York State Department of Agriculture and Markets
Crop Protection and Pest Management -Extension Implementation Program Area grant no. 2017-70006-27142/project accession no. 1014000, from the USDA National Institute of Food and Agriculture.
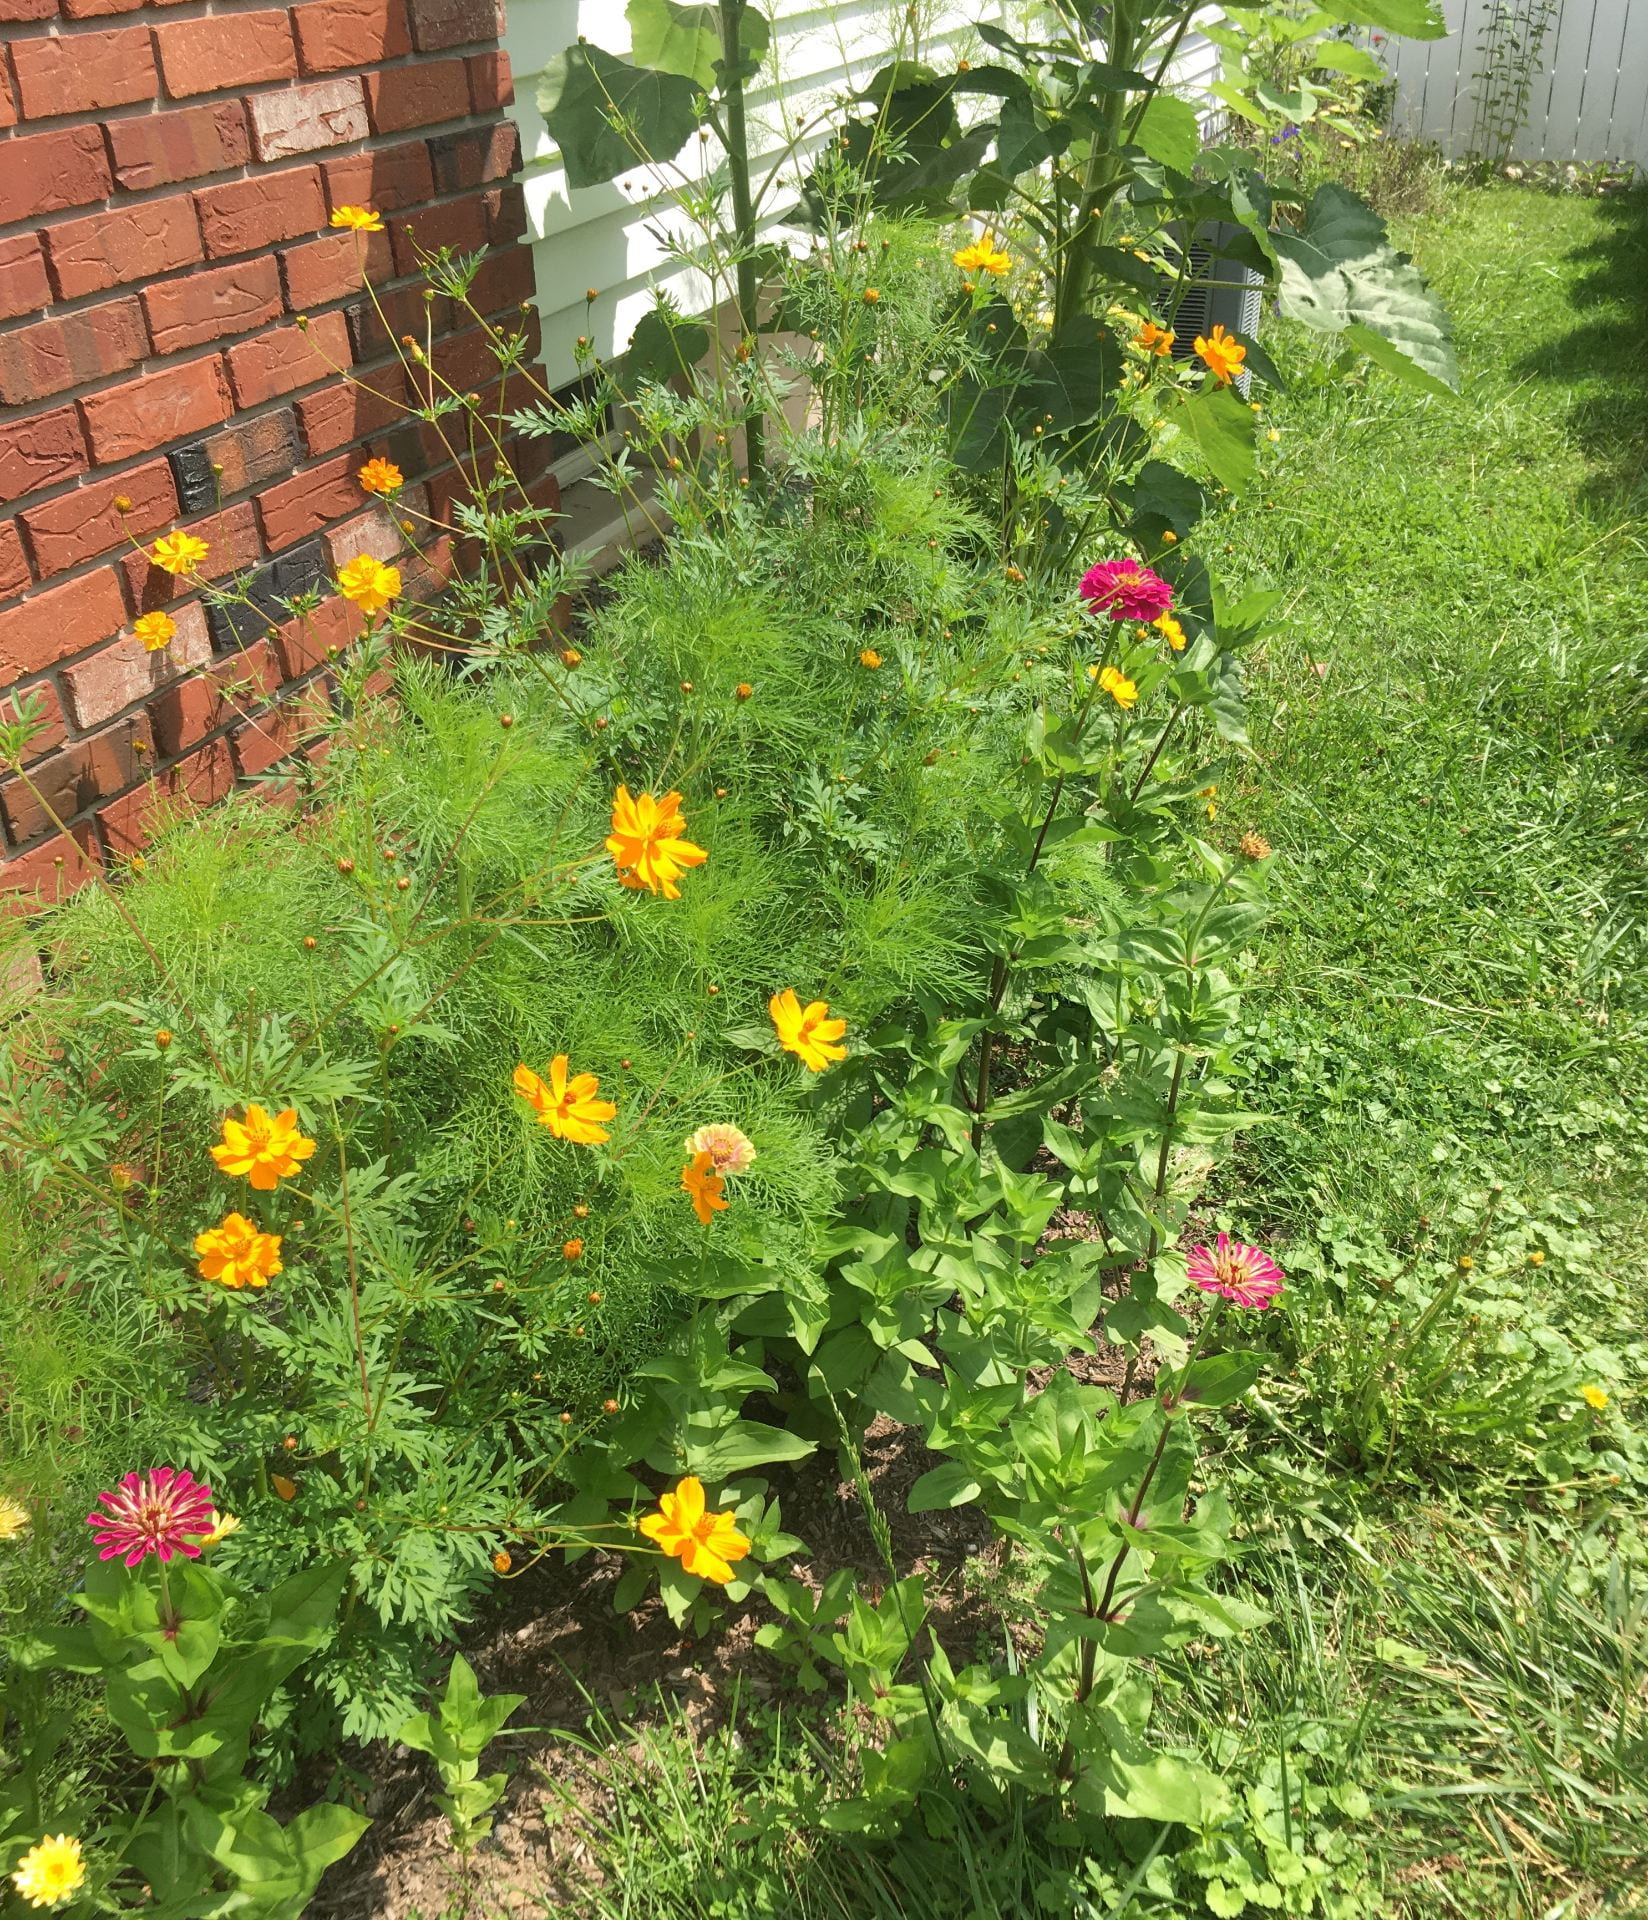
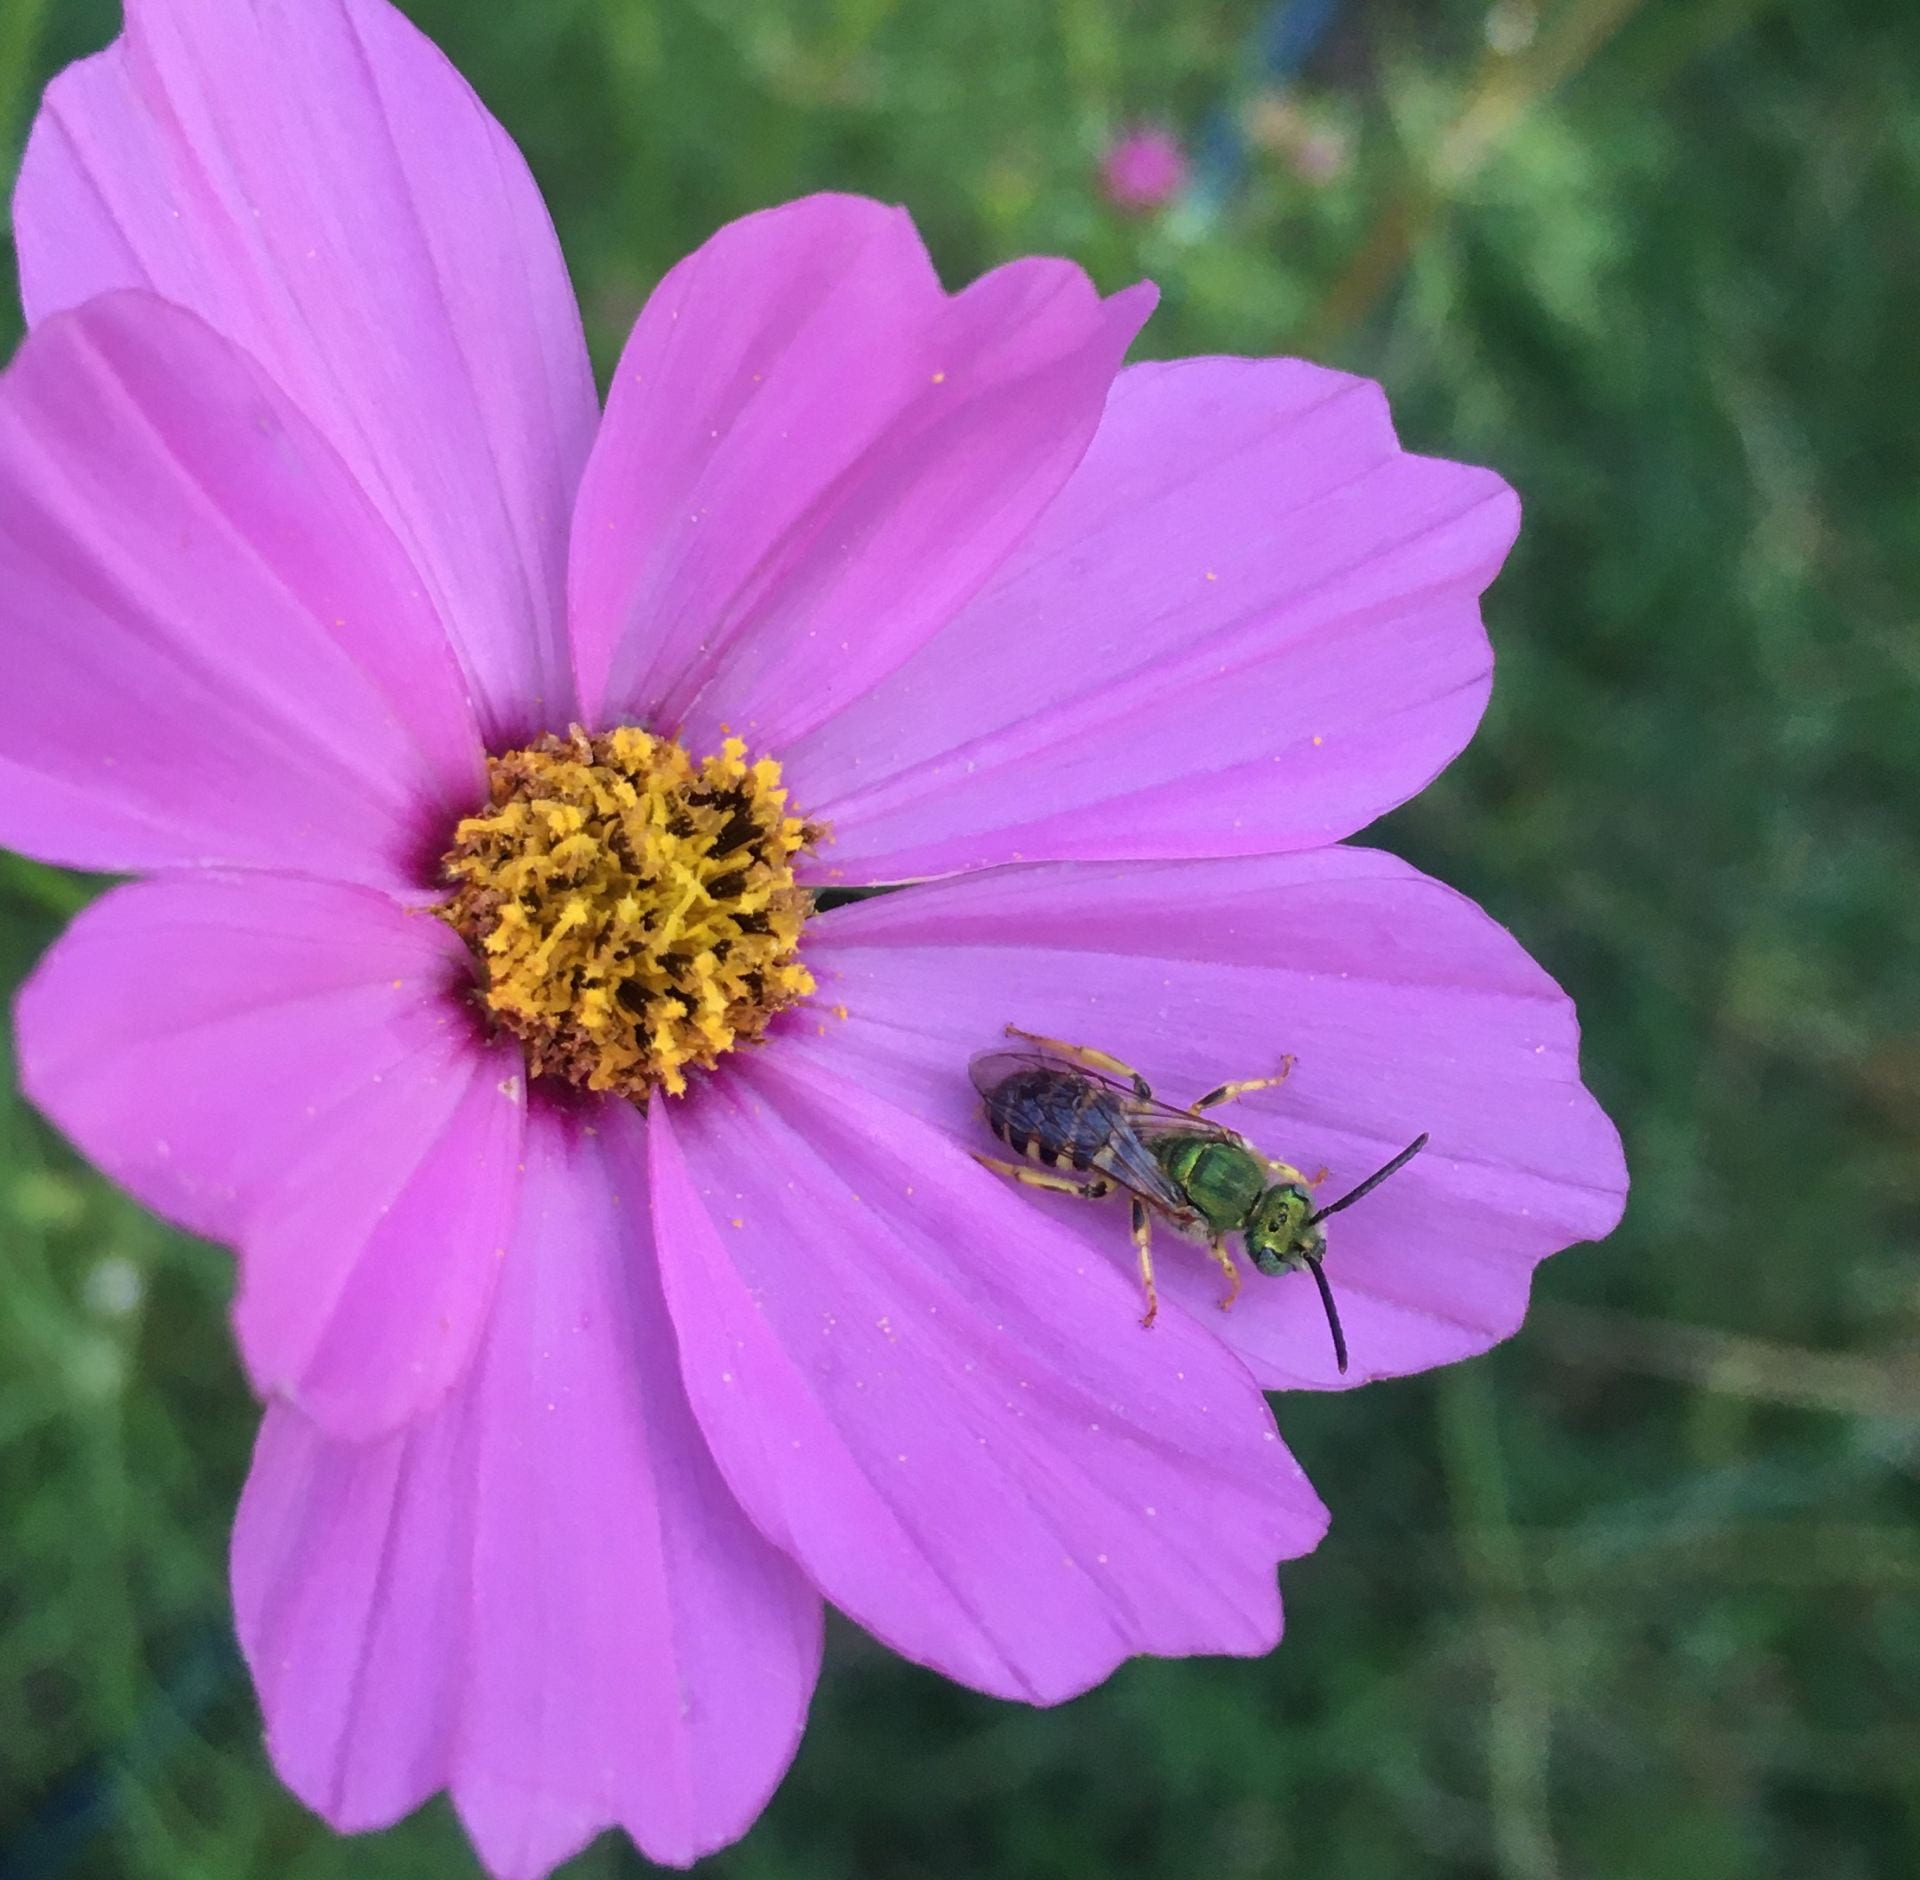
Zinnias and cosmos are great food sources for all kinds of insects.
As we start August in New York, I hope that your gardens and fields are full of abundant blooms, vegetables, fruits, or all of the above. They may also be humming, buzzing, or making other noises as a result of resident insects. If you find an unfamiliar insect, you might be wondering: Is it a friend or a foe? Here are some friendly insects – natural enemies of pests – you might encounter.
Lady beetles
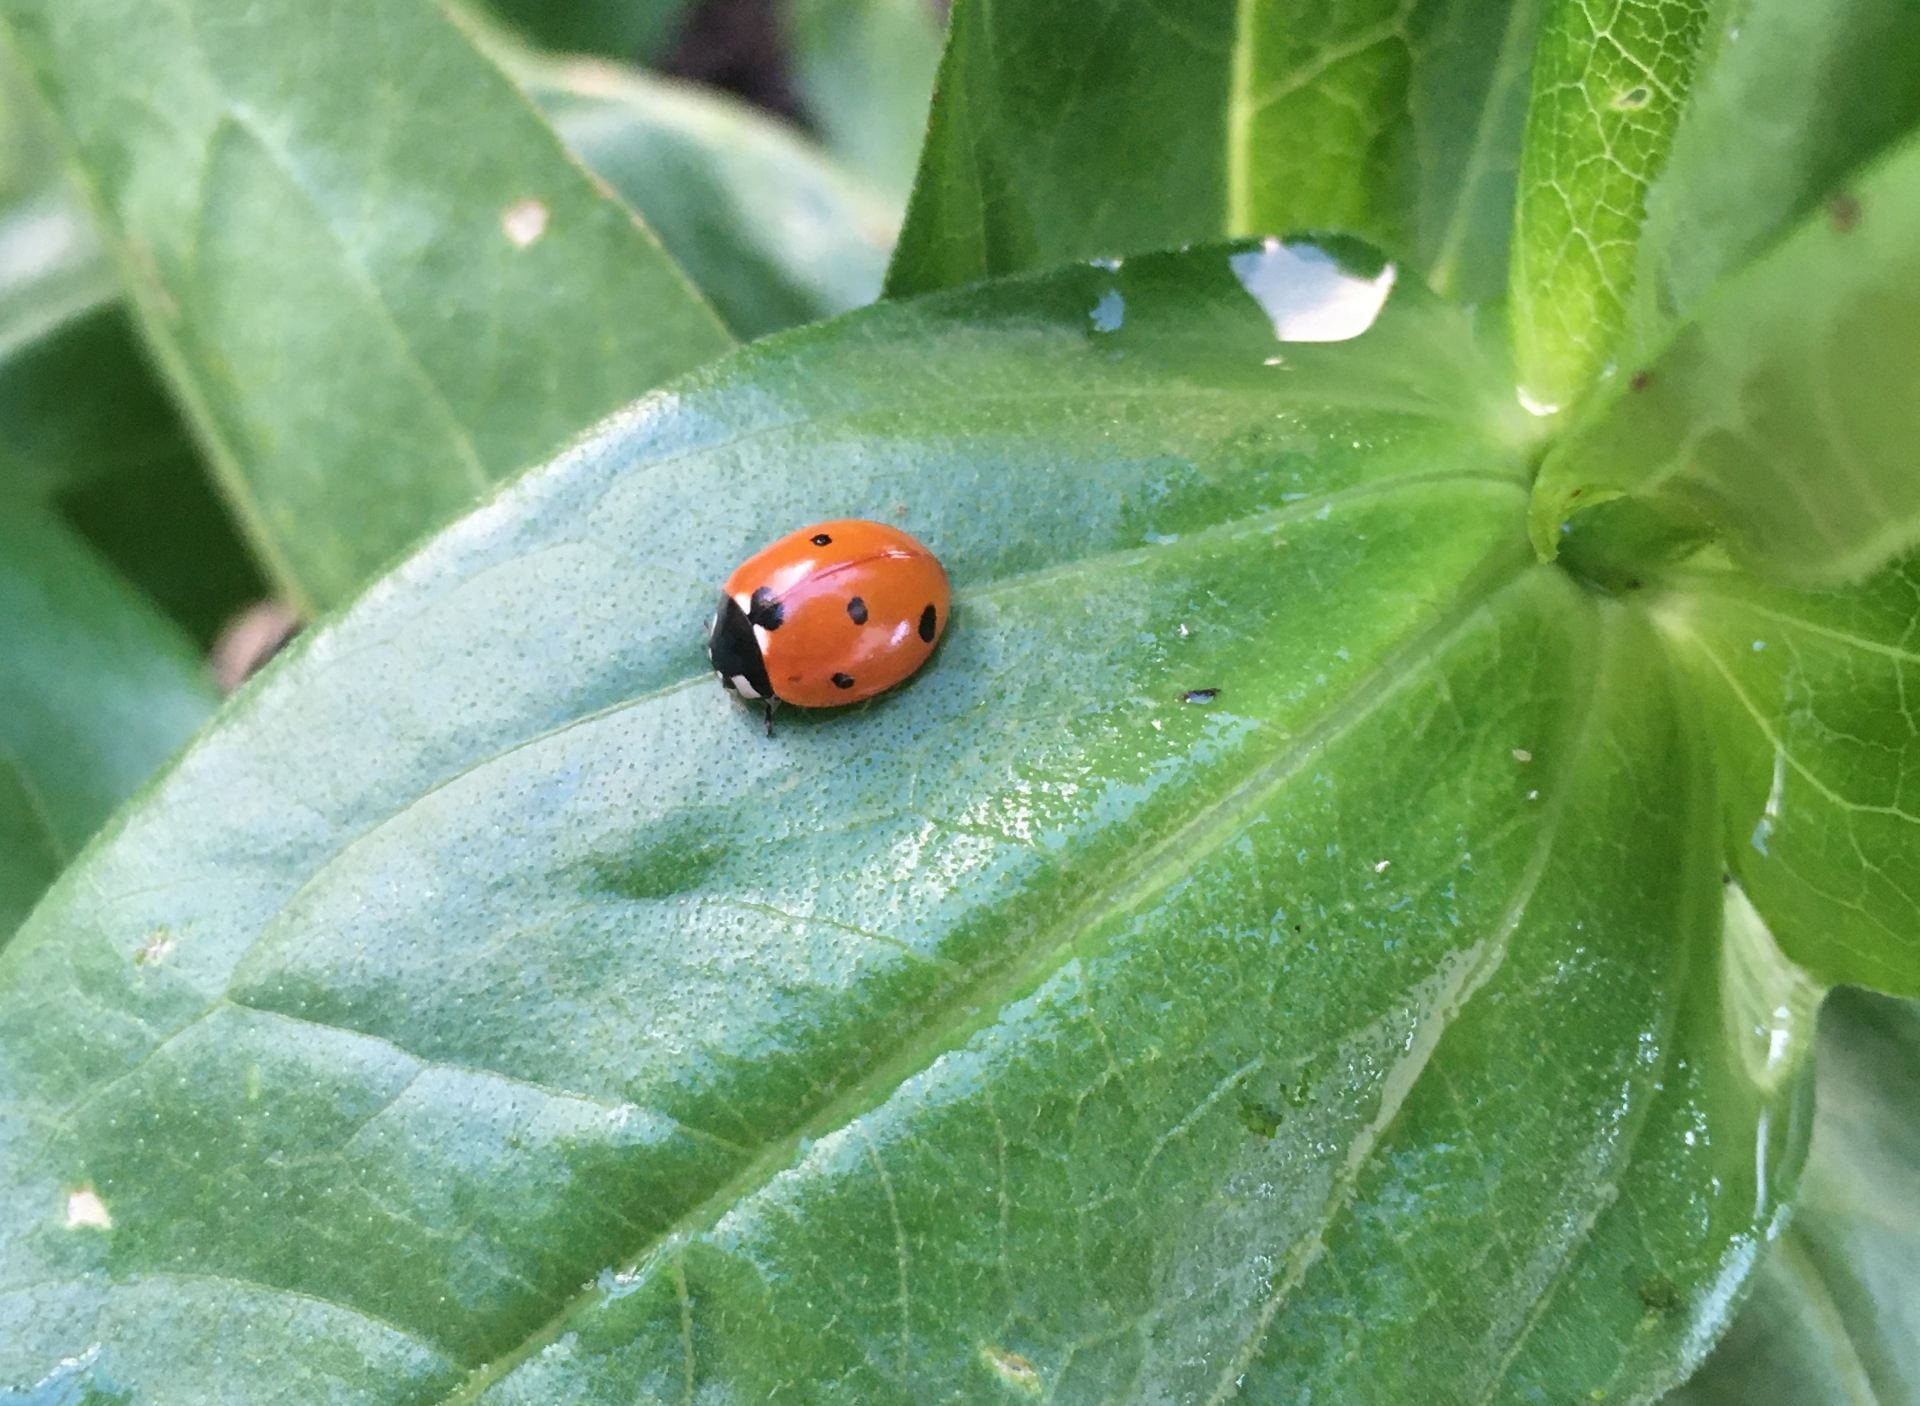
This sevenspotted lady beetle is pretty easy to recognize.
Adult lady beetles are some of the most easily recognized natural enemies. For example, most would know that this sevenspotted lady beetle is a friend. But lady beetles come in many different stripes – err – spots. Here’s another lady beetle that might not be as familiar, but is an equally good predator.
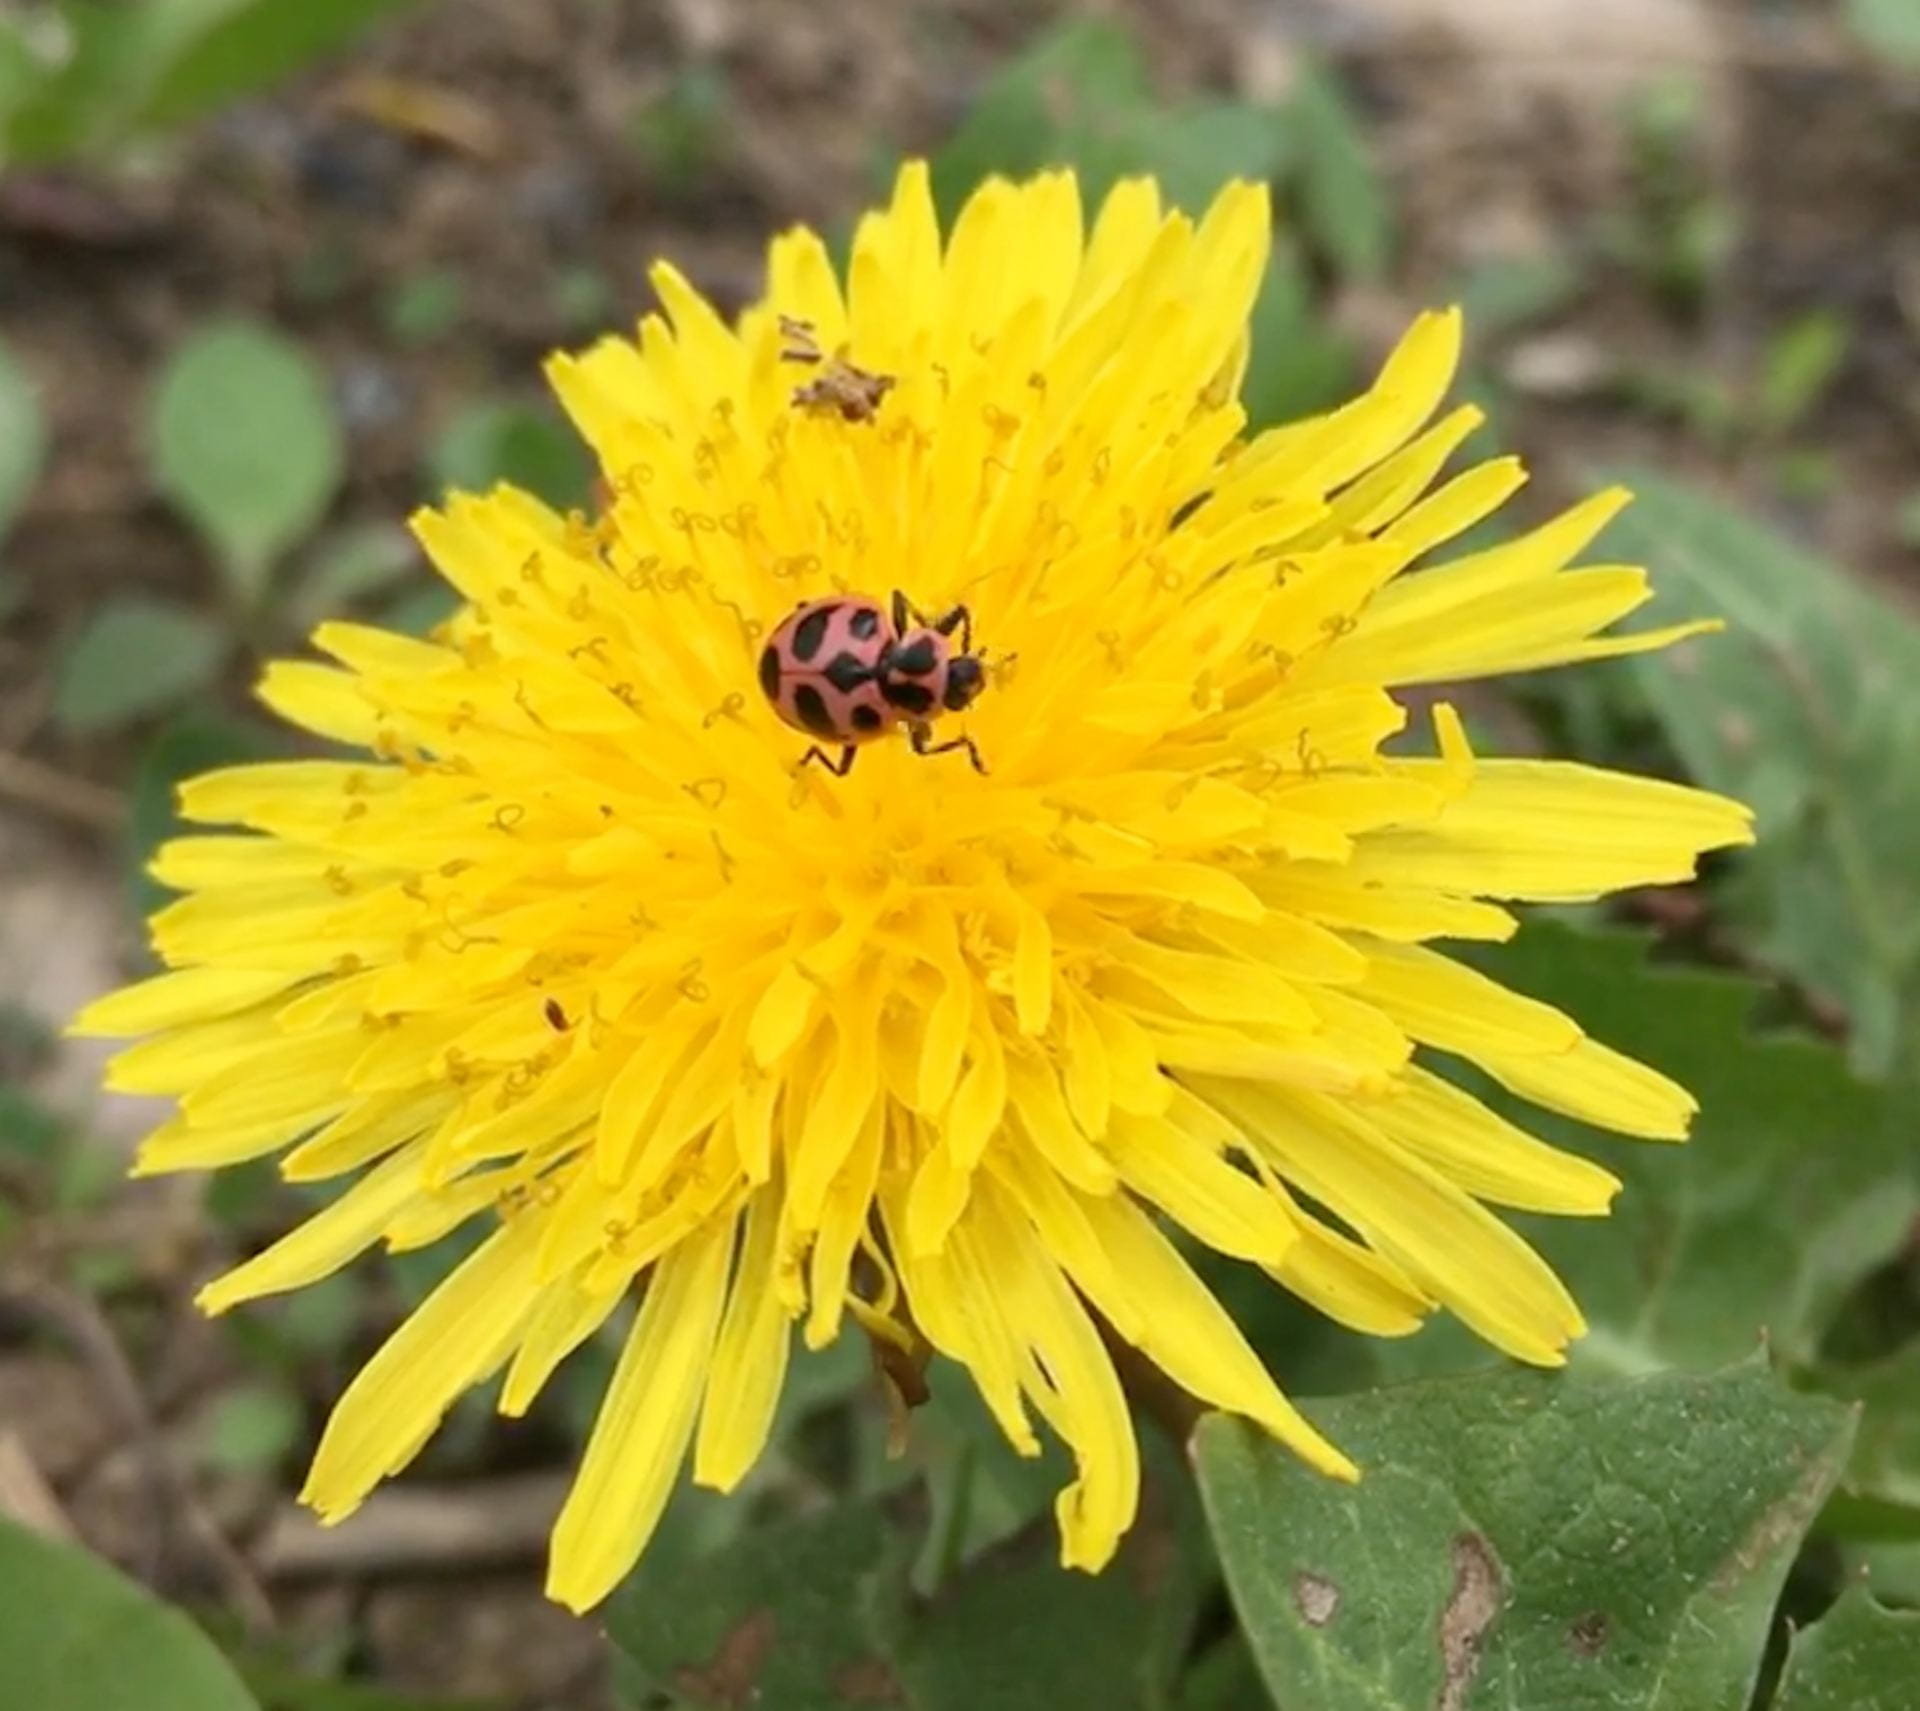
You might be less familiar with the pink spotted lady beetle, but it’s a friendly insect you should get to know.
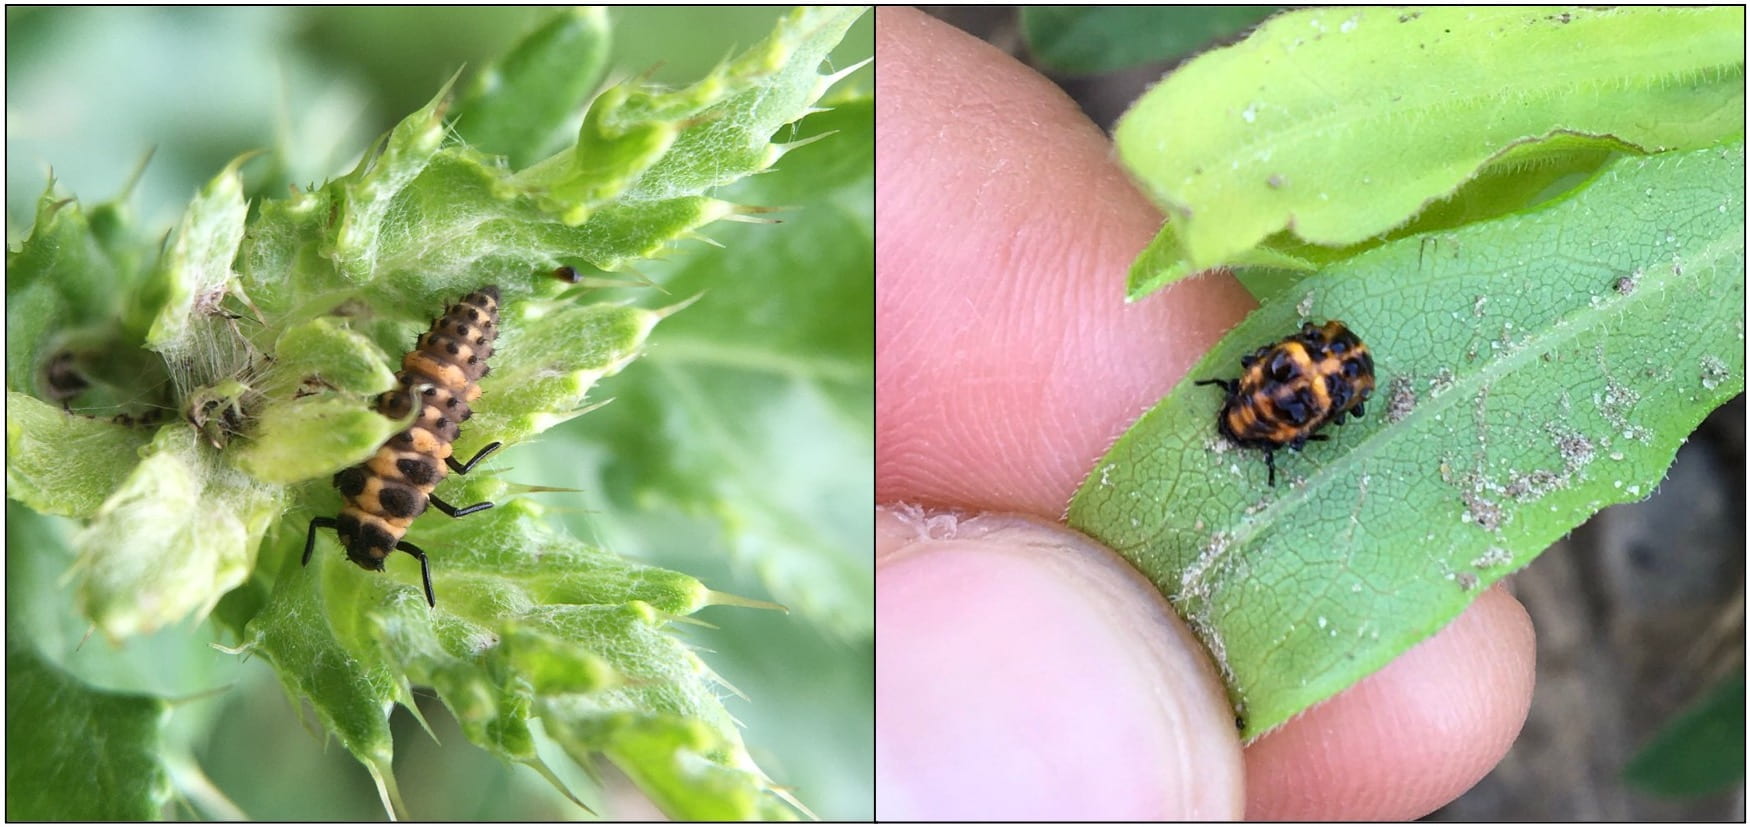
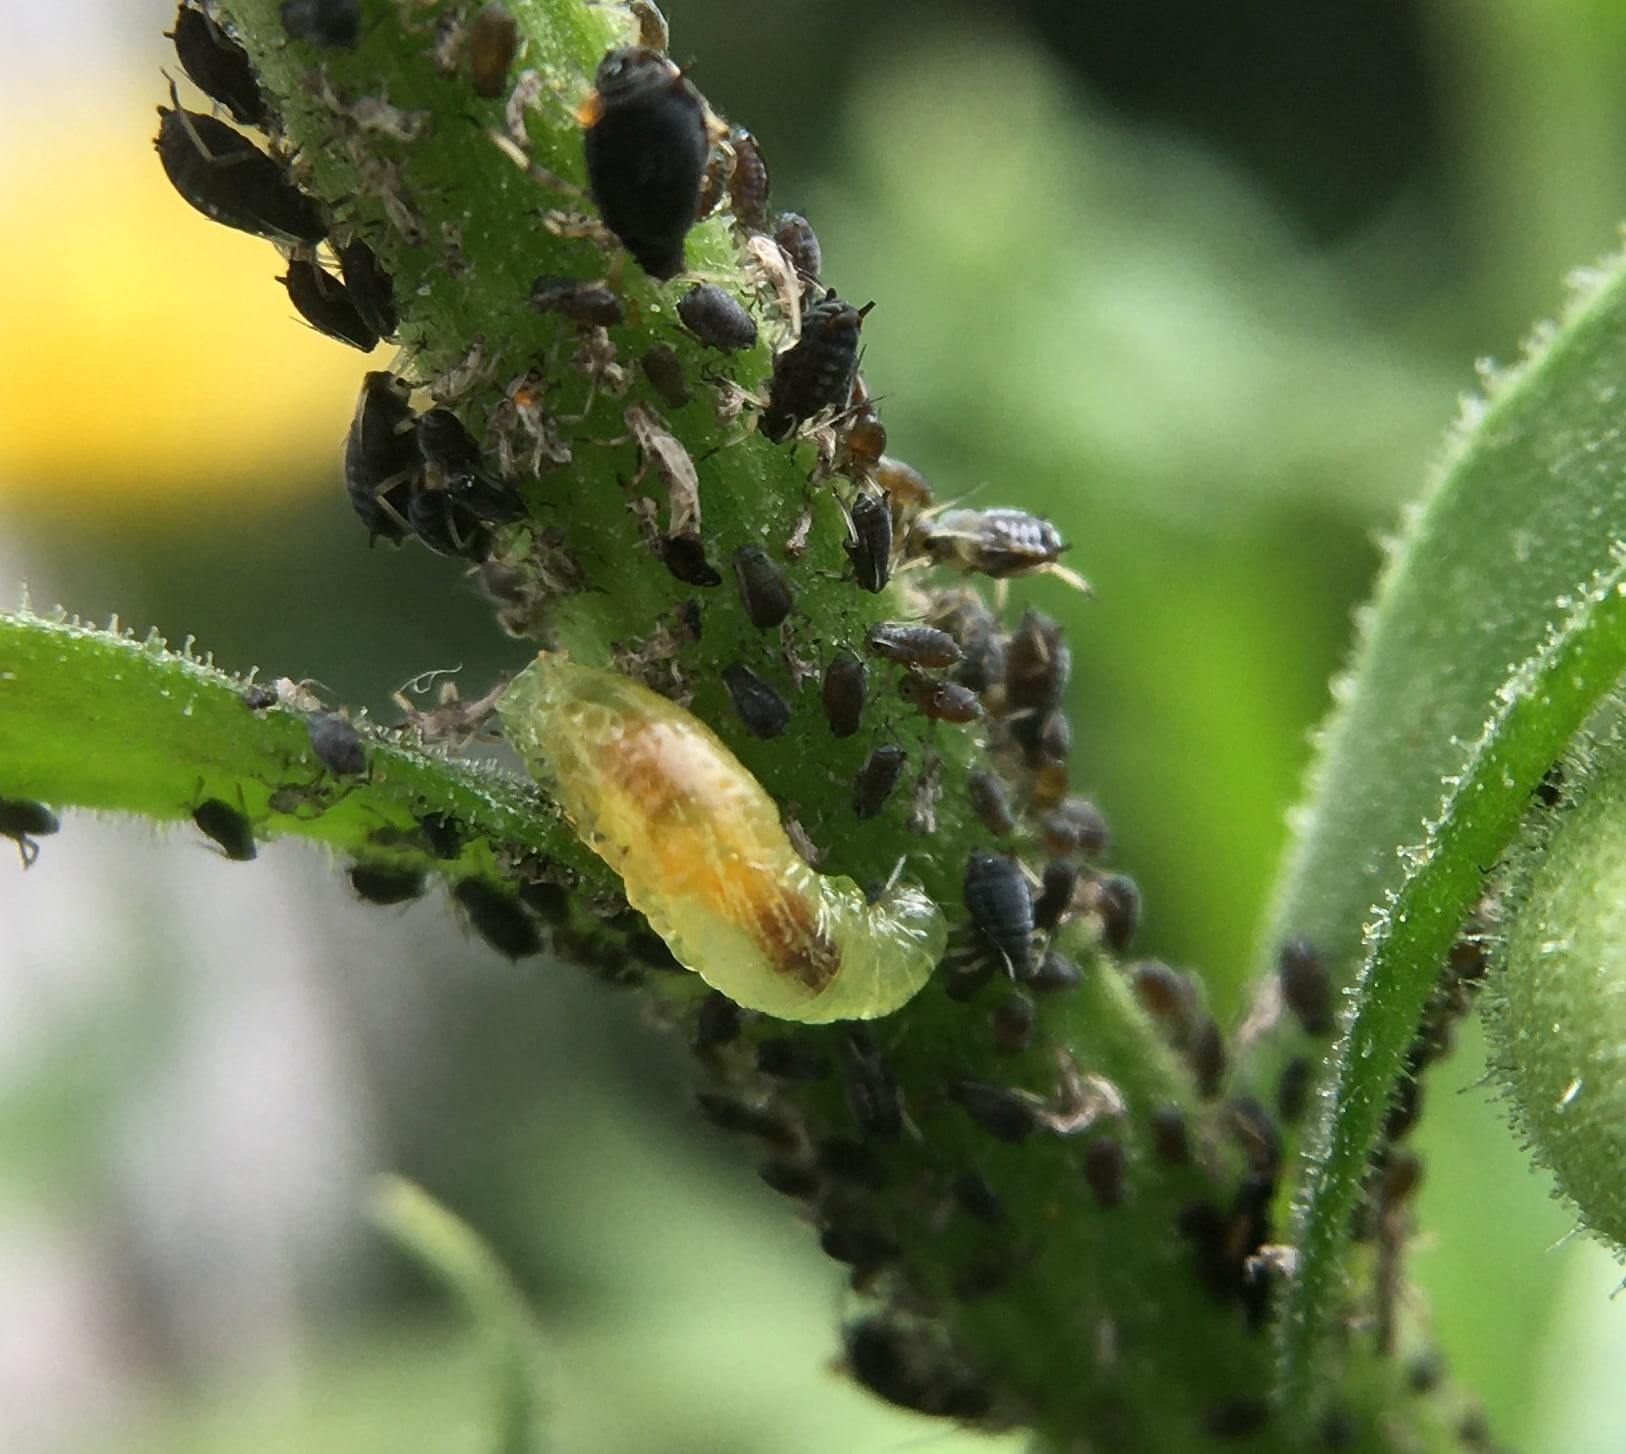
Immature lady beetles look very different from adults. But the larvae are voracious predators, and leaving the pupae undisturbed means you’ll soon have more adult lady beetles around. In addition to aphids, lady beetles will eat whiteflies, thrips, mites, and eggs of other insects.
An immature (larval) lady beetle on the left is a great predator. The pupal (resting) stage of the lady beetle on the right will soon turn into an adult.
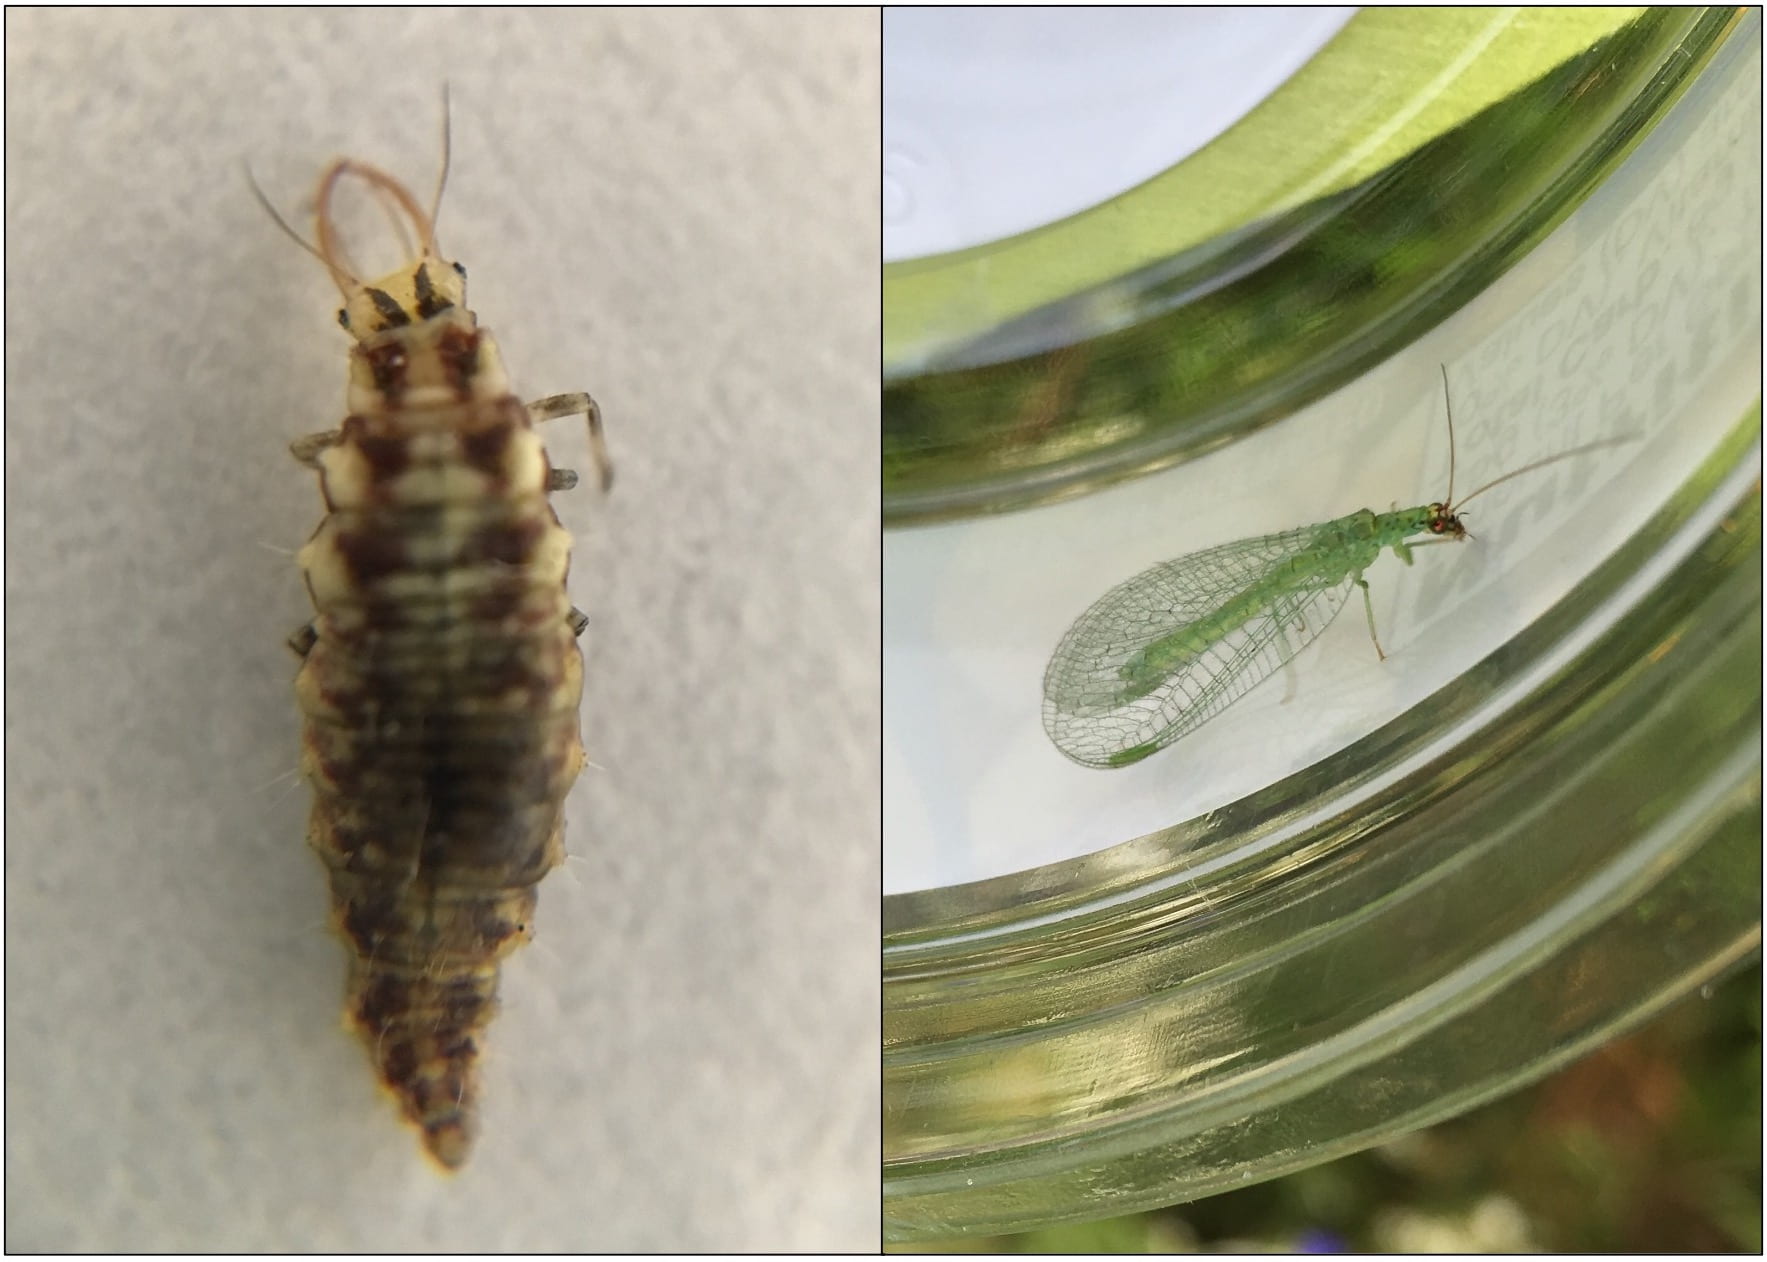
Similarly, while you may be more familiar with the adult lacewings (which can be green, as well as brown), in some lacewing species it’s only the larvae with their formidable jaws that are munching on pests (generally the same ones that lady beetles eat). Adult lacewings will eat pollen and nectar (and some species also eat other insects).
Larval lacewings (left; this one is magnified) look much different than adult lacewings (right).
Minute pirate bugs
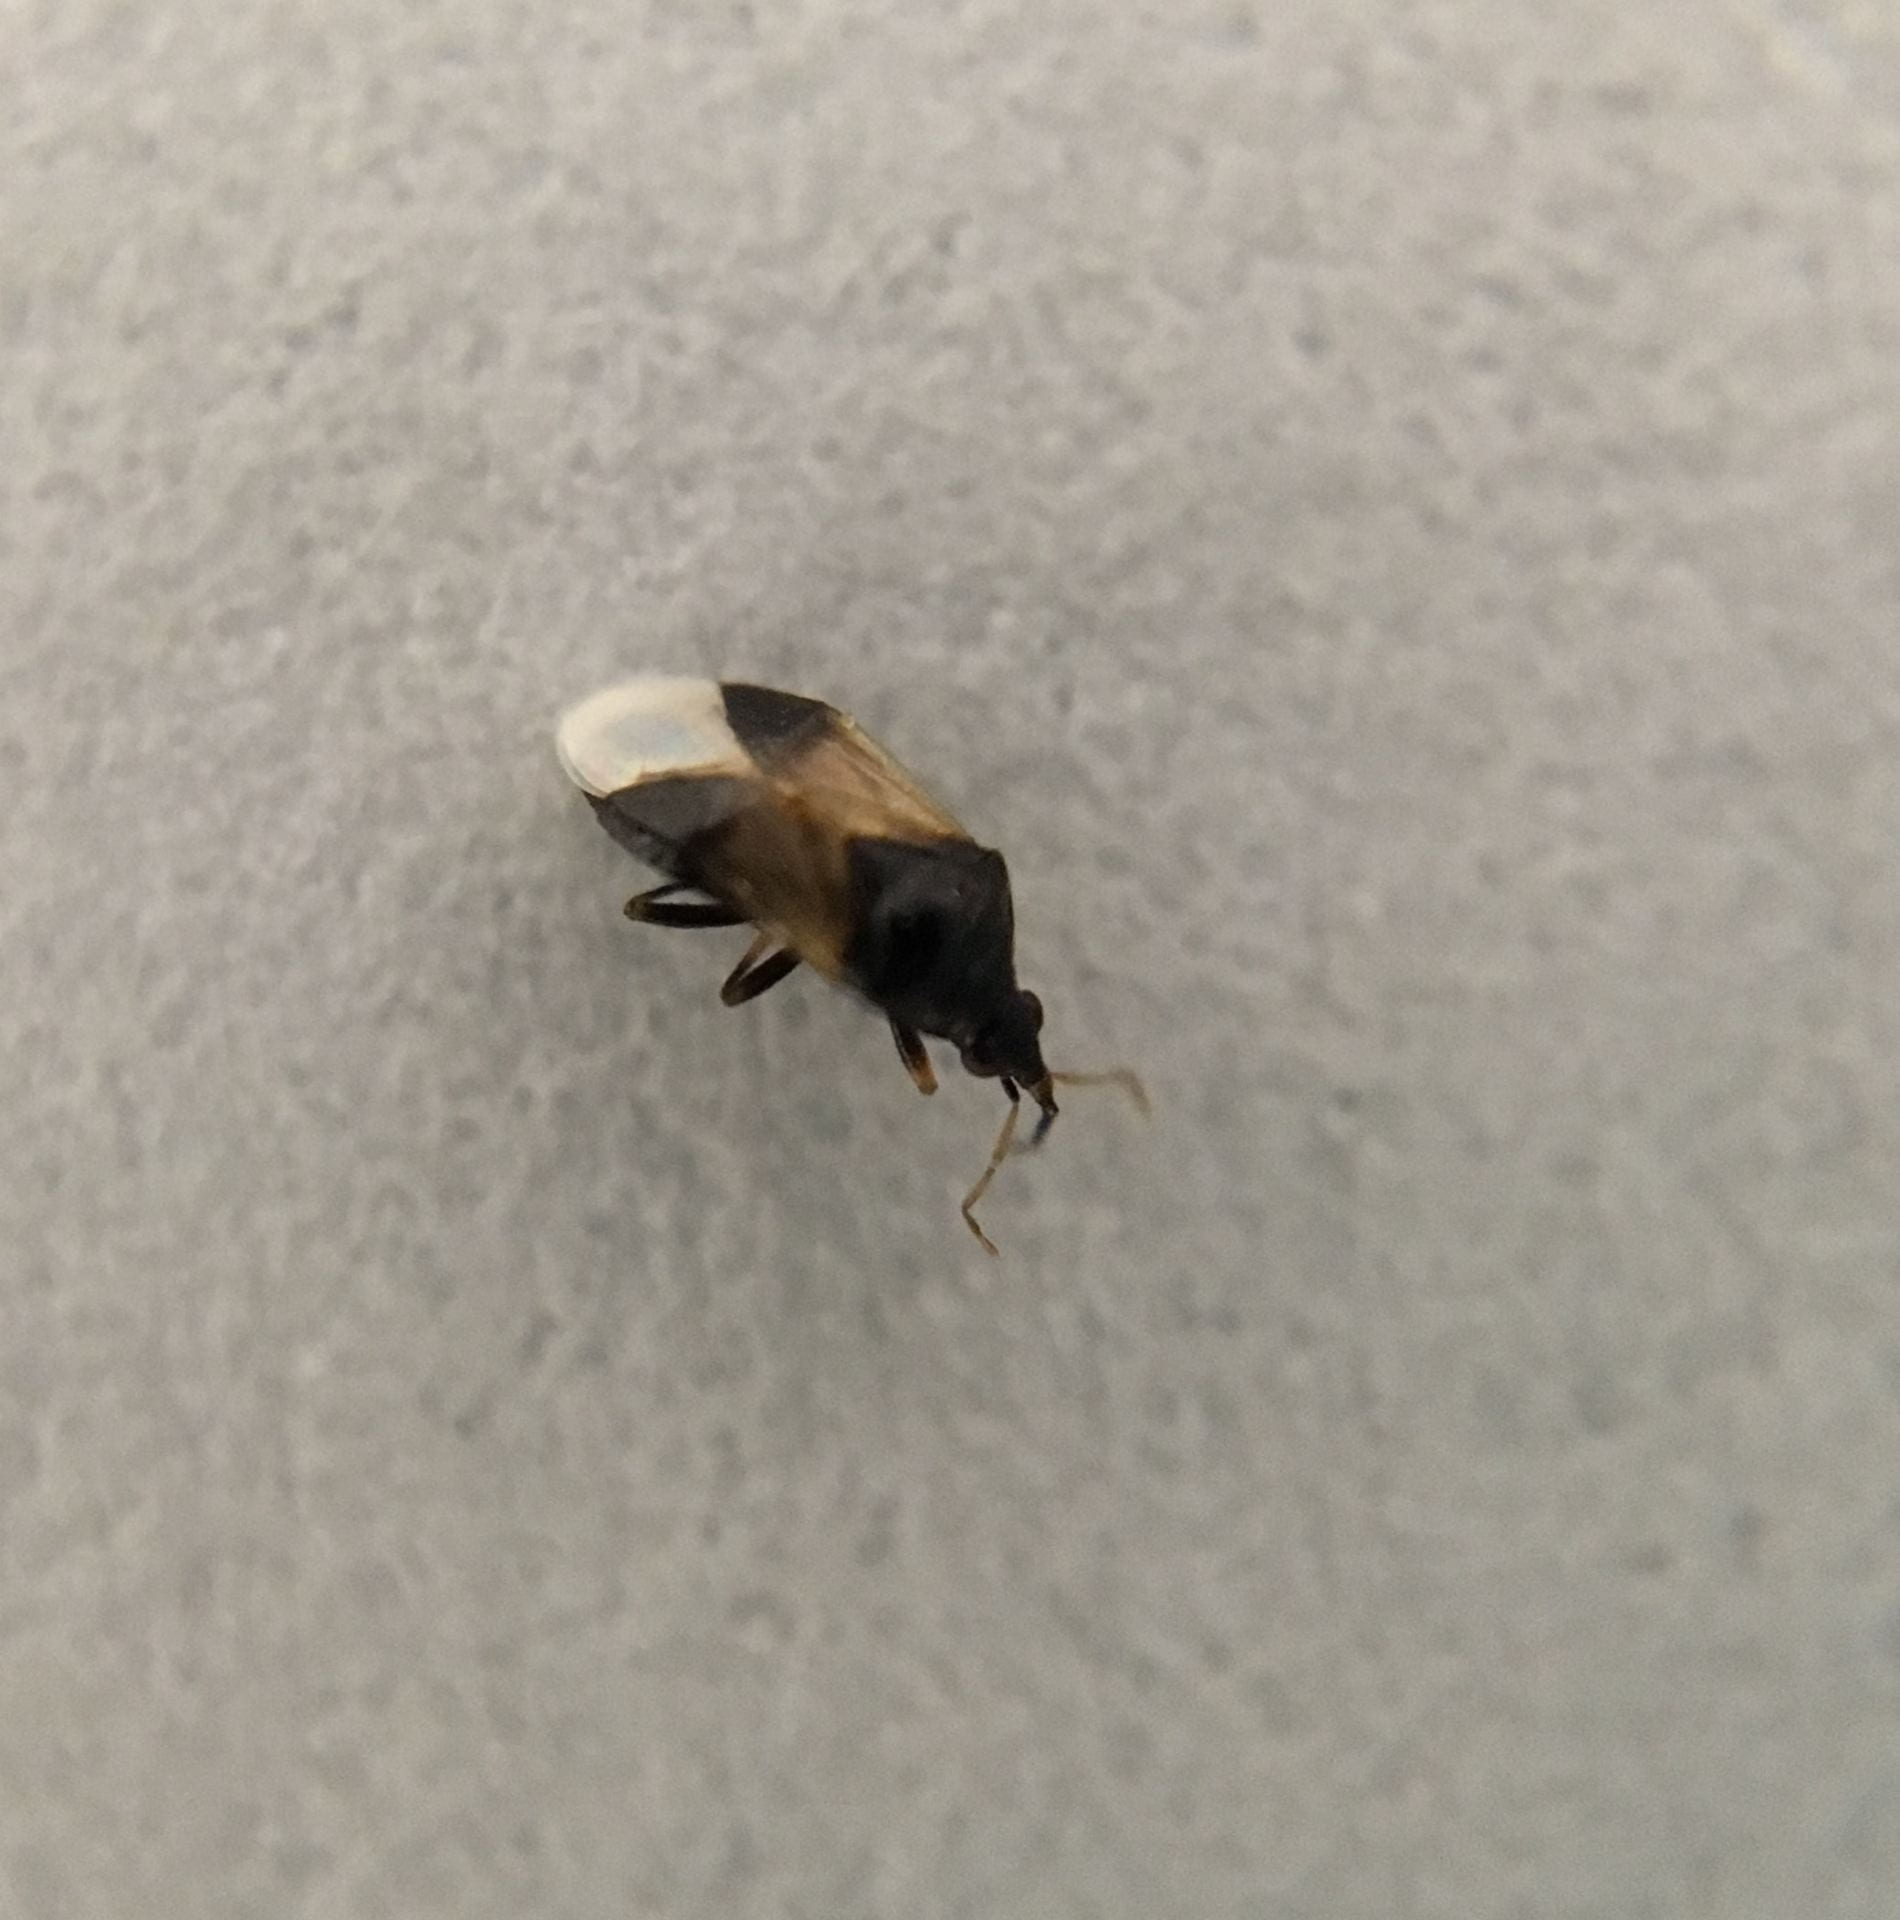
This picture of a minute pirate bug is magnified. They are no more than a quarter of an inch long.
This friendly bug (and it is a true bug!) can be hard to spot because it’s so tiny; truly minute. If you get a chance to look at this (< ¼”) insect with a hand lens, you’ll notice a white diamond shape towards its rear, with a black diamond shape behind its head. At least that’s what the adults look like. Here’s one searching for thrips on a sign at a corn maze. The immature (or nymph) minute pirate bugs are orange and look not much like the adults. In keeping with their size, minute pirate bugs eat small pests like aphids, mites, thrips, and insect eggs. They also eat pollen and nectar, which is probably why I often bring a few inside with me when I cut flowers from my garden. Those same mouthparts that are great at eating pests can also give you a small (but startling) pinch. But it doesn’t hurt much, and if you leave them undisturbed, both you and the pirate bugs will be happier.
Hover flies
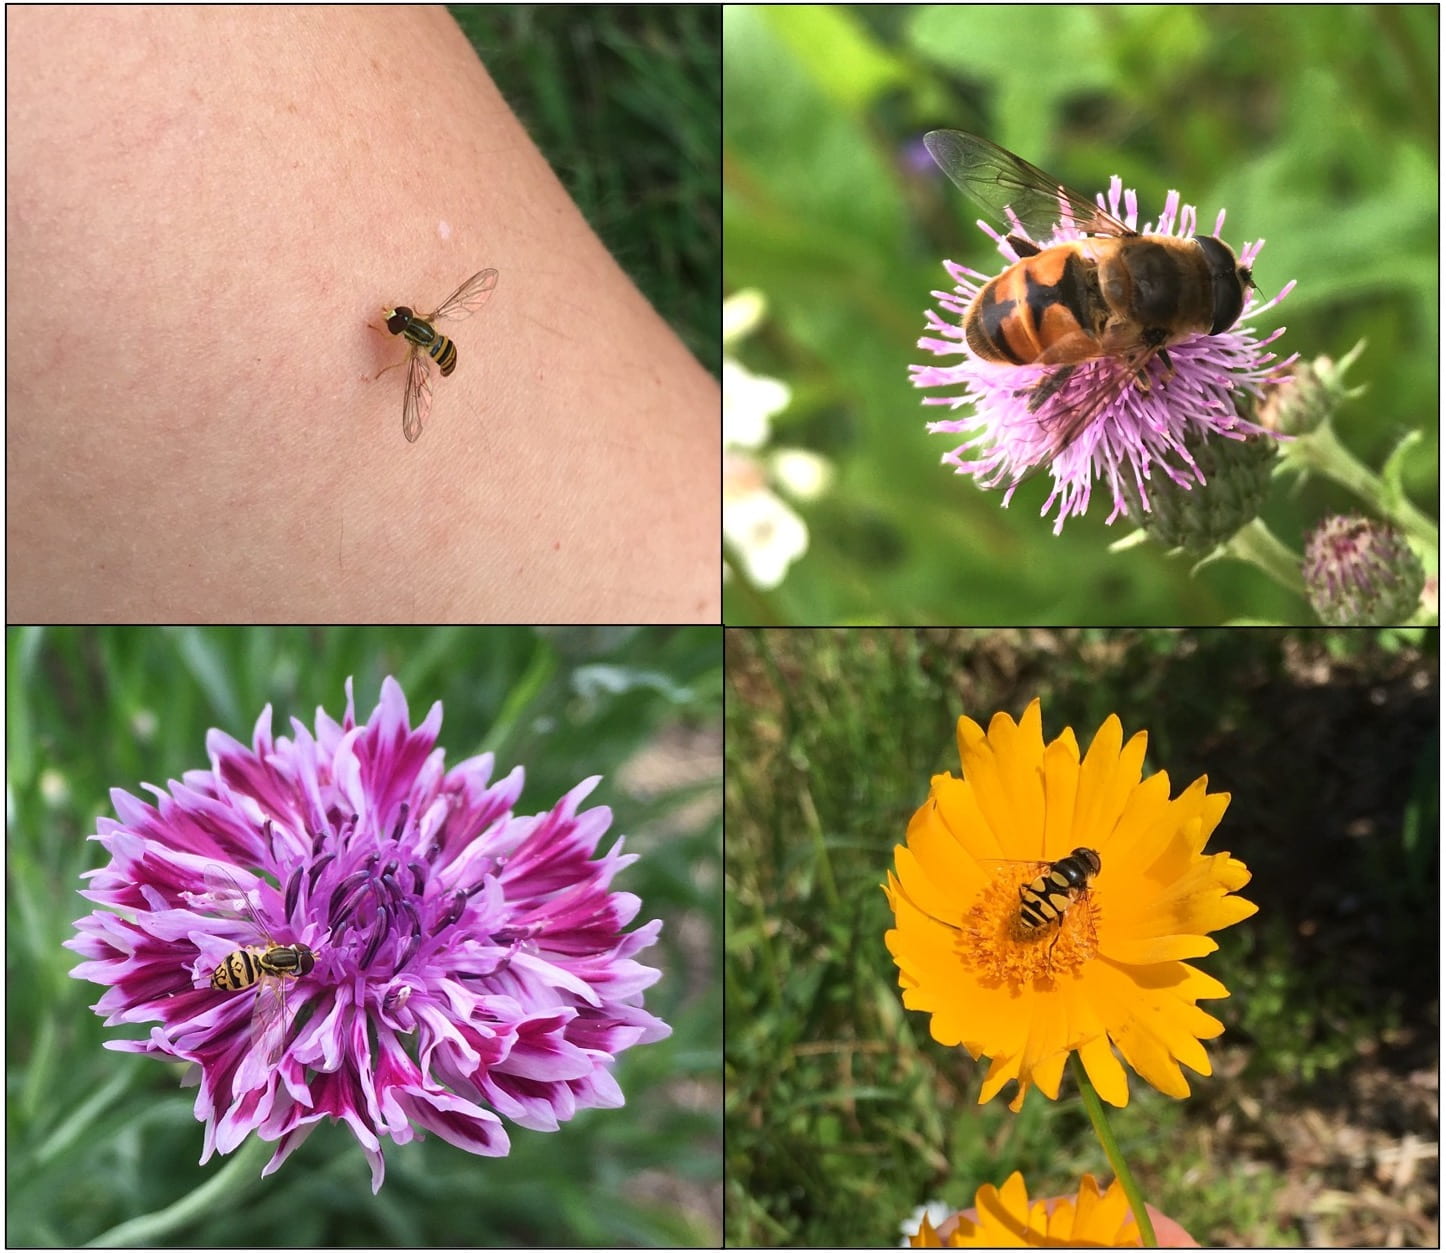
Adult hover flies come in different sizes, shapes, and stripe patterns, but they are great pollinators and good friends to have in the garden or field.
Sometimes hover flies (also called syrphid flies) are incorrectly called sweat bees. Sweat bees are true bees. While many hover flies are black and yellow striped, and some look quite a lot like bees, they are flies. True to their name, hover flies are often spotted hovering around flowers. Here are two tips for distinguishing hover flies from bees:
Hover flies have big eyes that take up most of their head; bee eyes are usually smaller and oval-shaped
Hover flies have only two wings; bees have four
Immature (larval) hover flies are the ones that are eating pests on your plants. They look like small worms, and may come in slightly different sizes or shapes. But they love to eat aphids, whiteflies, and scales.
I’m not 100% sure if this is a hover fly larva, or another predatory fly larva. But this will give you some idea of what you’re looking for.
(Predatory) stink bugs
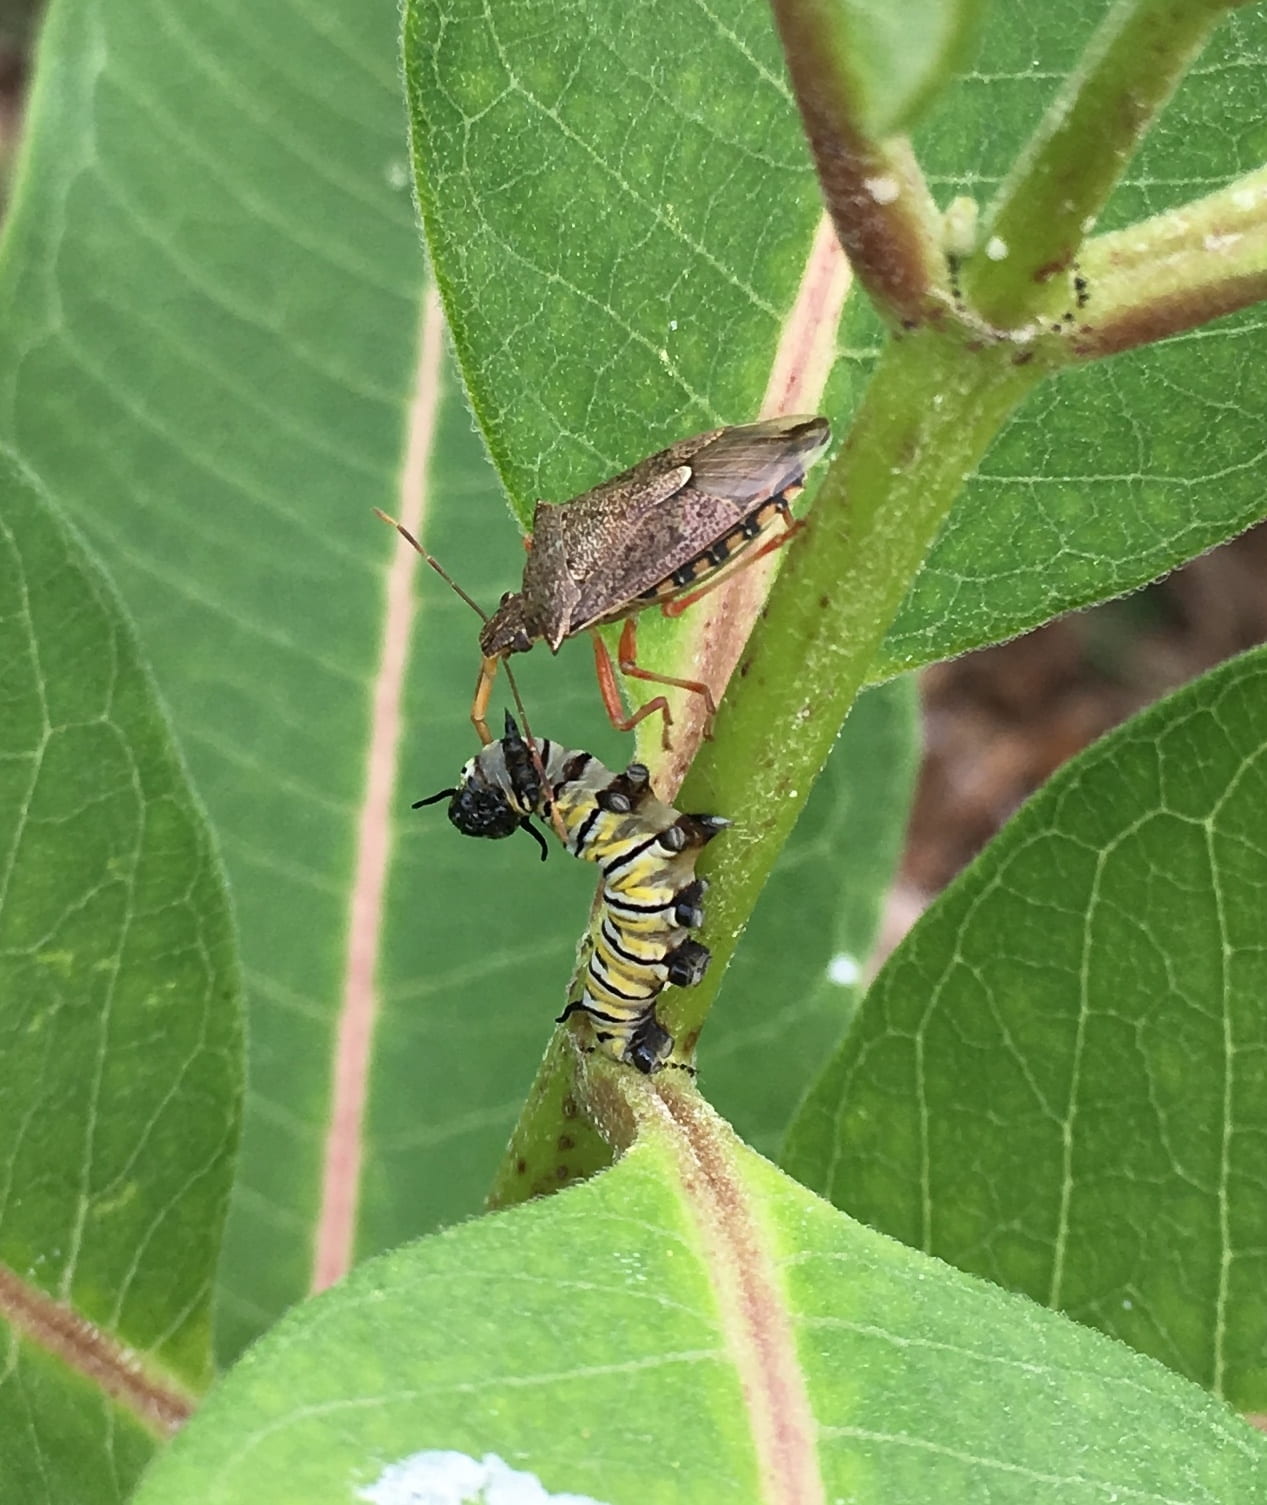
Carnivorous (as opposed to plant-eating) stink bugs are generalist predators, so you may sometimes find them eating other beneficial insects.
None of us are happy to find stink bugs (usually brown marmorated stink bugs, to be specific) invading our homes, but there are many more stink bug species, and some of them are excellent predators. I know, the one above happens to be eating a monarch caterpillar, but they will eat pest caterpillars and other insects, too. The advantage of generalist predators is that they will eat all kinds of pests. The disadvantage is that they may also eat some insects that aren’t pests. This is just part of a balanced ecosystem in your garden or field.
It can be difficult to distinguish a predatory stink bug from a pest stink bug, without looking closely at its proboscis (straw-like mouthparts used for sucking either plant or bug juices), but Virginia Cooperative Extension has a nice field guide available here, which can help. Or you could spend some time observing the stink bug to see if it’s eating a plant or another insect.
Spiders
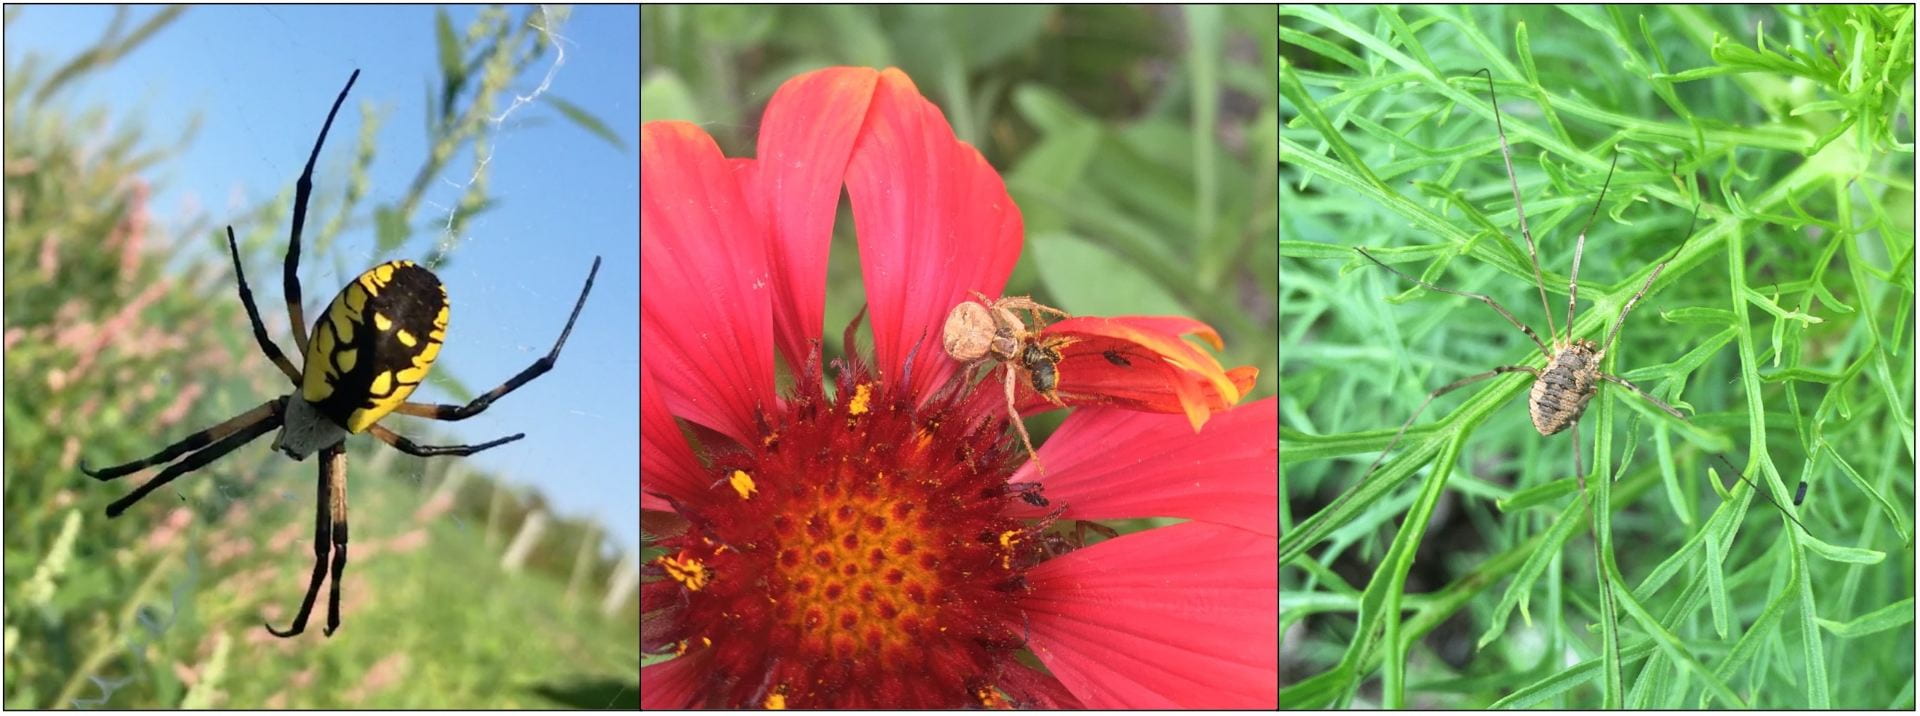
These are just a few of the eight-legged friends you might find in your garden of fields.
Spiders (examples on the left and middle in the above picture) and harvestmen (example on the right) may make some people feel uncomfortable, but both are generalist predators, and therefore good to have around. The spiders you are likely to find in New York are nearly all non-venomous, so welcome them without fear. More info about common spiders of NY can be found here.
Wasps
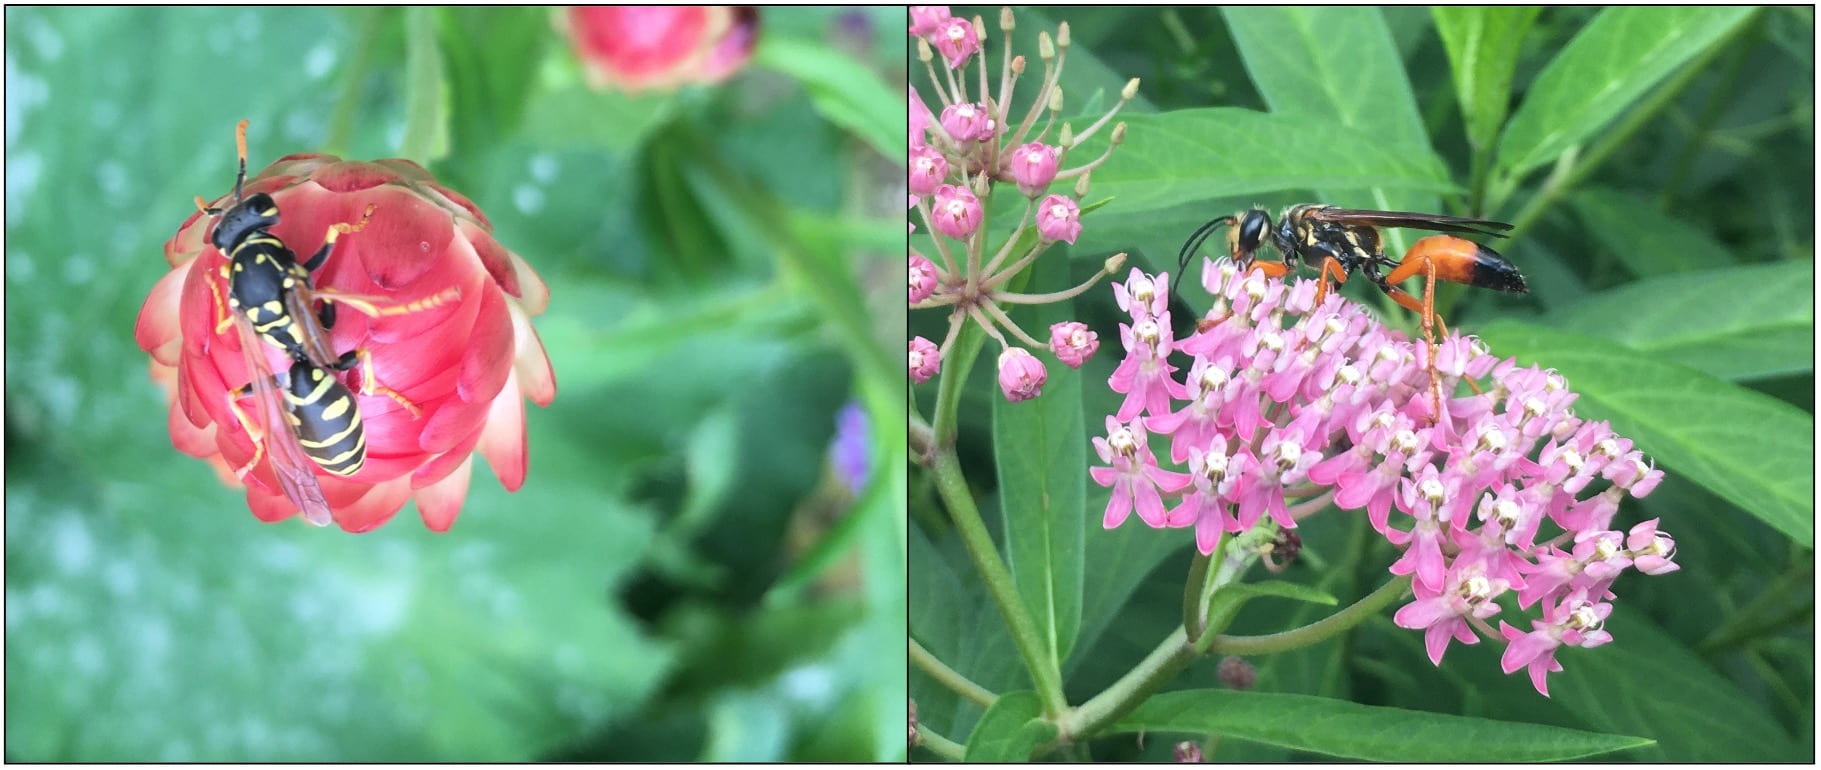
Just two of many wasps you might find visiting flowers in your garden or field.
If you are growing a diversity of flowers that produce lots of pollen and nectar, you may also see a diversity of wasp visitors. Most are unlikely to sting you, and even wasps like yellow jackets or hornets that may sting you are likely also looking for caterpillars and other insects to eat. Many wasps (including tiny ones you won’t notice and larger ones that you will) can also kill pests by laying their eggs in or on them. These are called parasitoid wasps. So if wasps aren’t hurting anyone, leave them alone. Of course, if stinging wasps are building a nest on or near a structure where they are likely to be disturbed by people, action may be required. Learn how to use IPM for stinging wasps here.
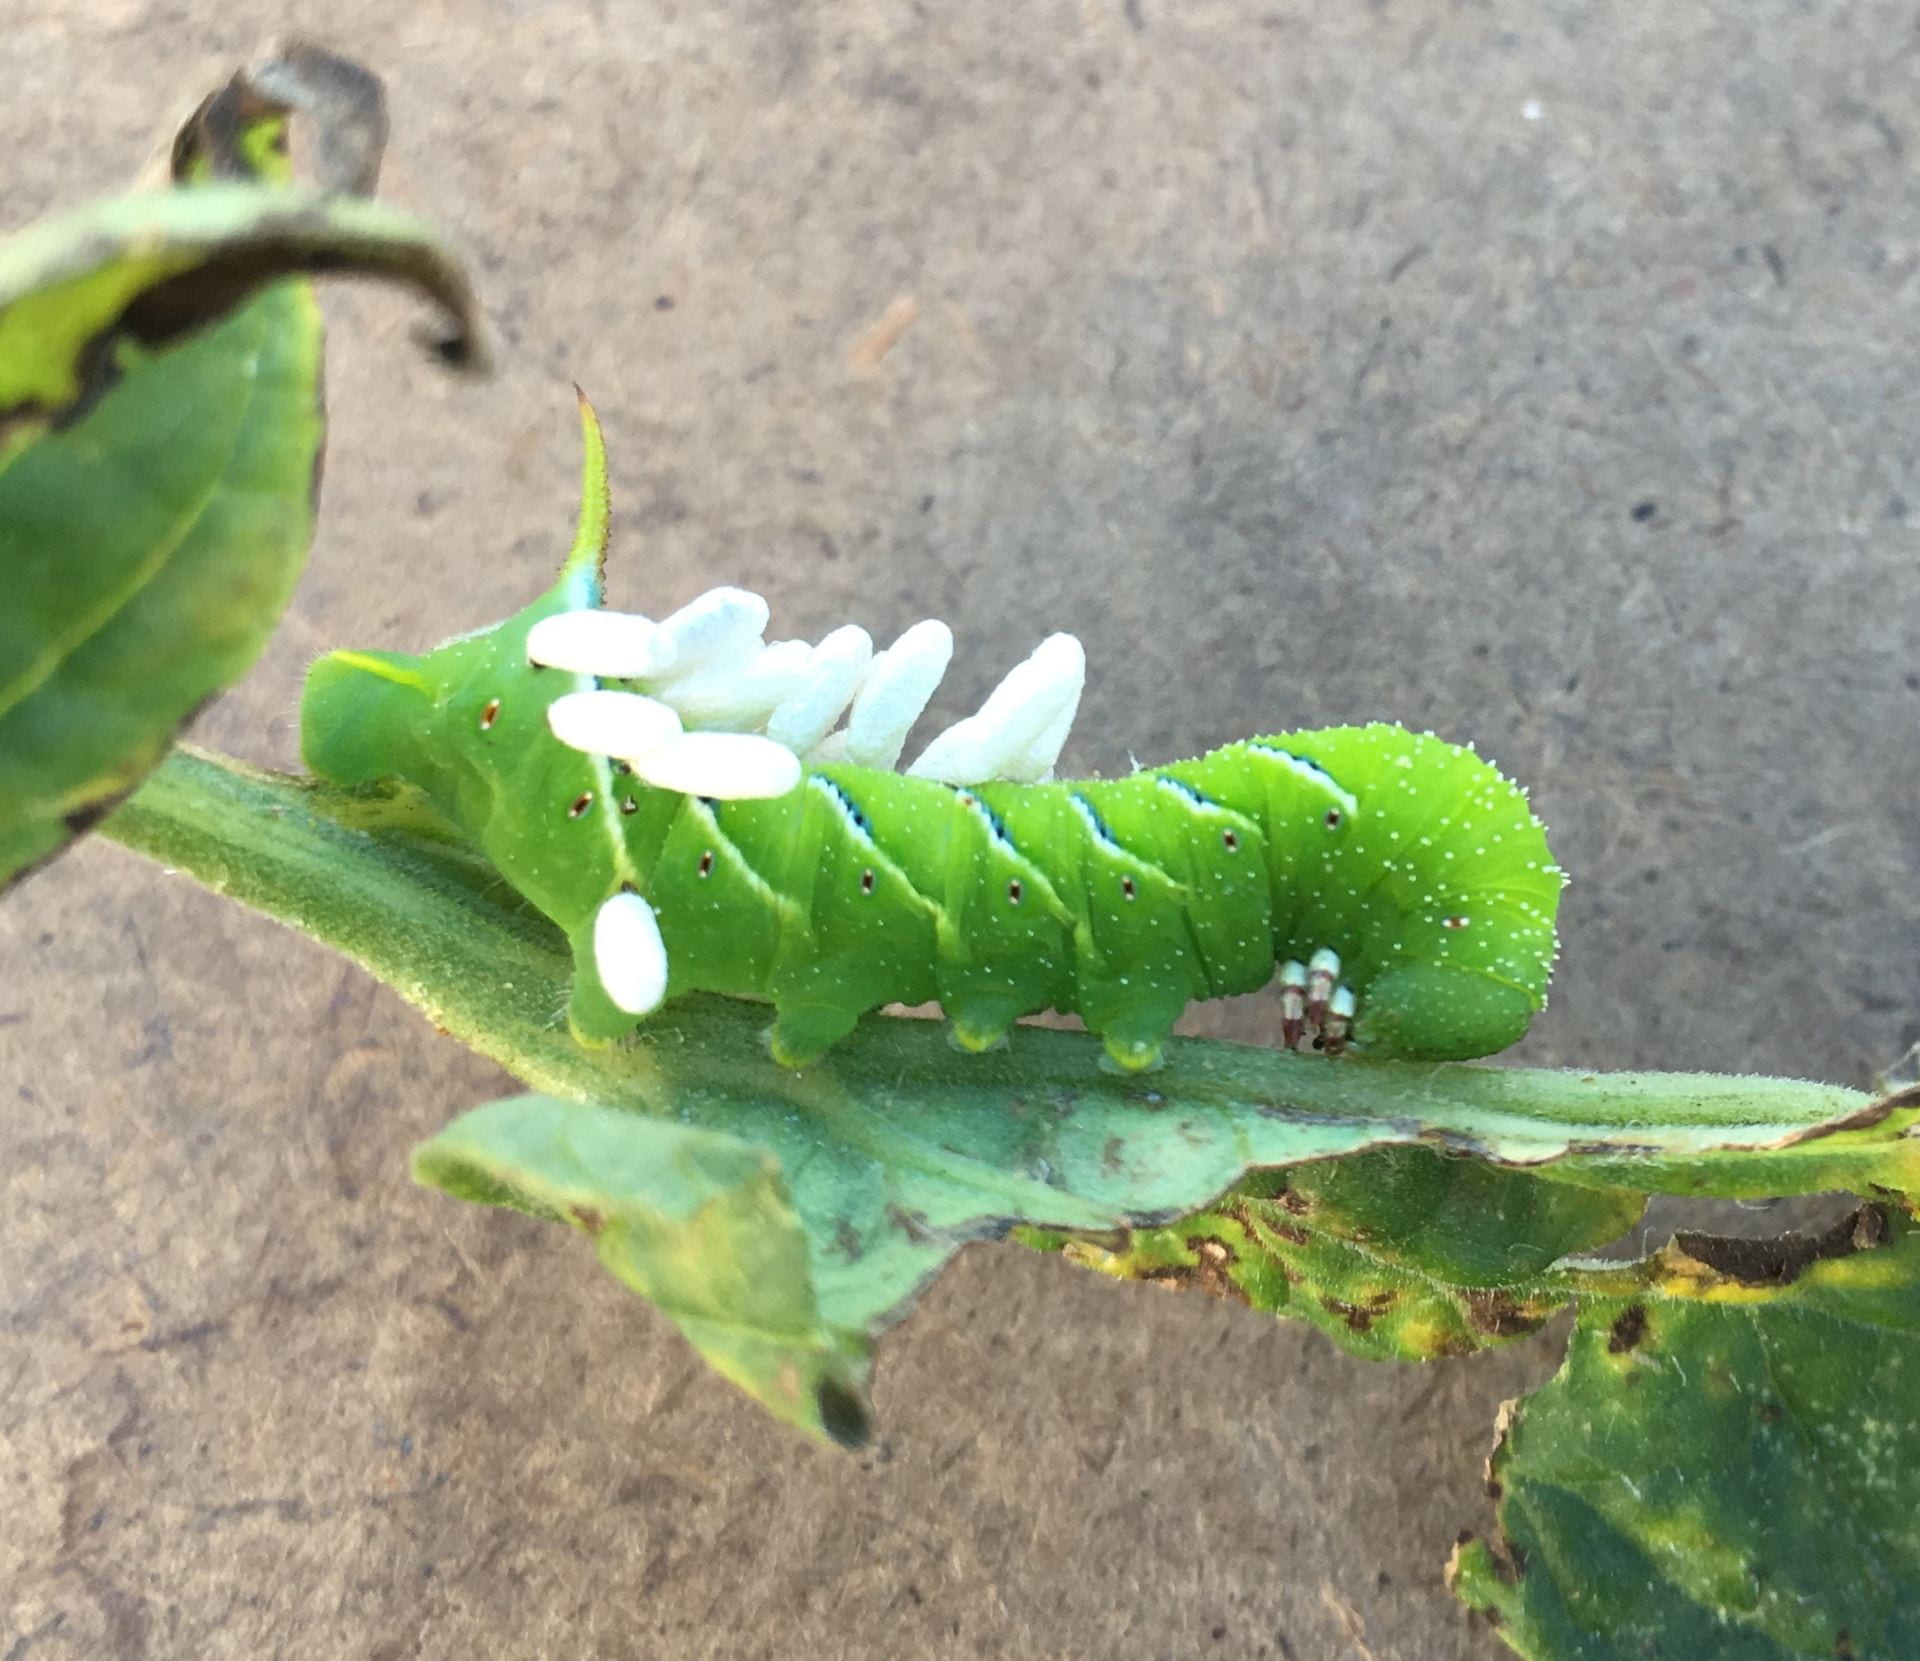
This hornworm was parasitized by a wasp, and its tomato-munching days are numbered. New wasps will emerge from the white sacks on its back.
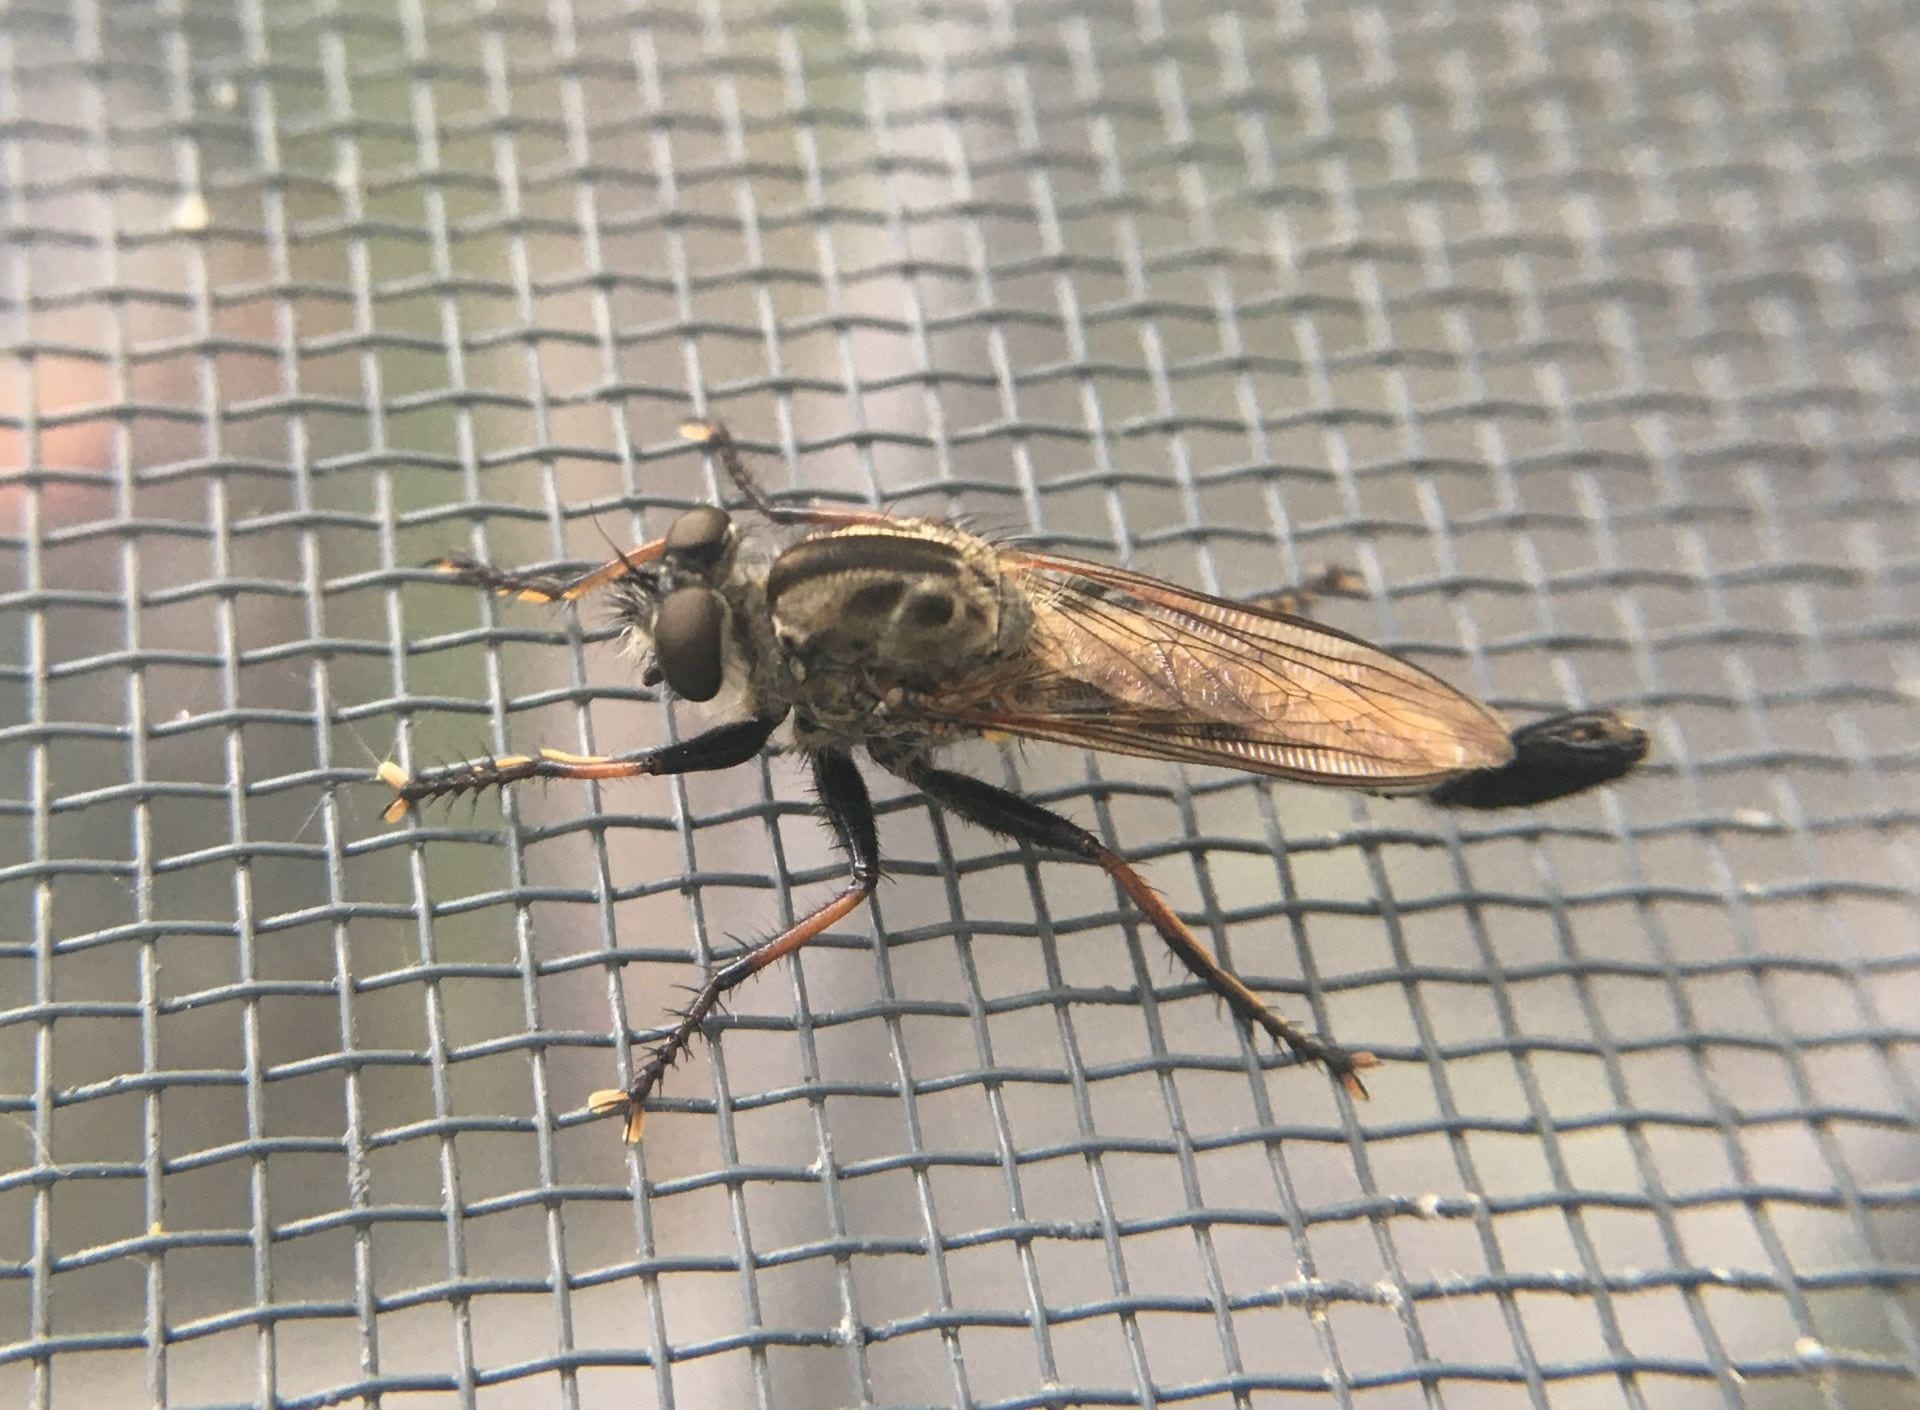
Other flies
Robber flies may not look very pretty, but they are good predators to have around.
Besides hover flies, there are a whole lot more flies visiting gardens and fields, and many will either eat or parasitize pests. The robber fly pictured above is especially large and is a great predator. Of course, there are plenty of flies you don’t want around. For more info on IPM for flies around your home, you can look here. You can find resources for managing livestock flies here.
And there’s more!
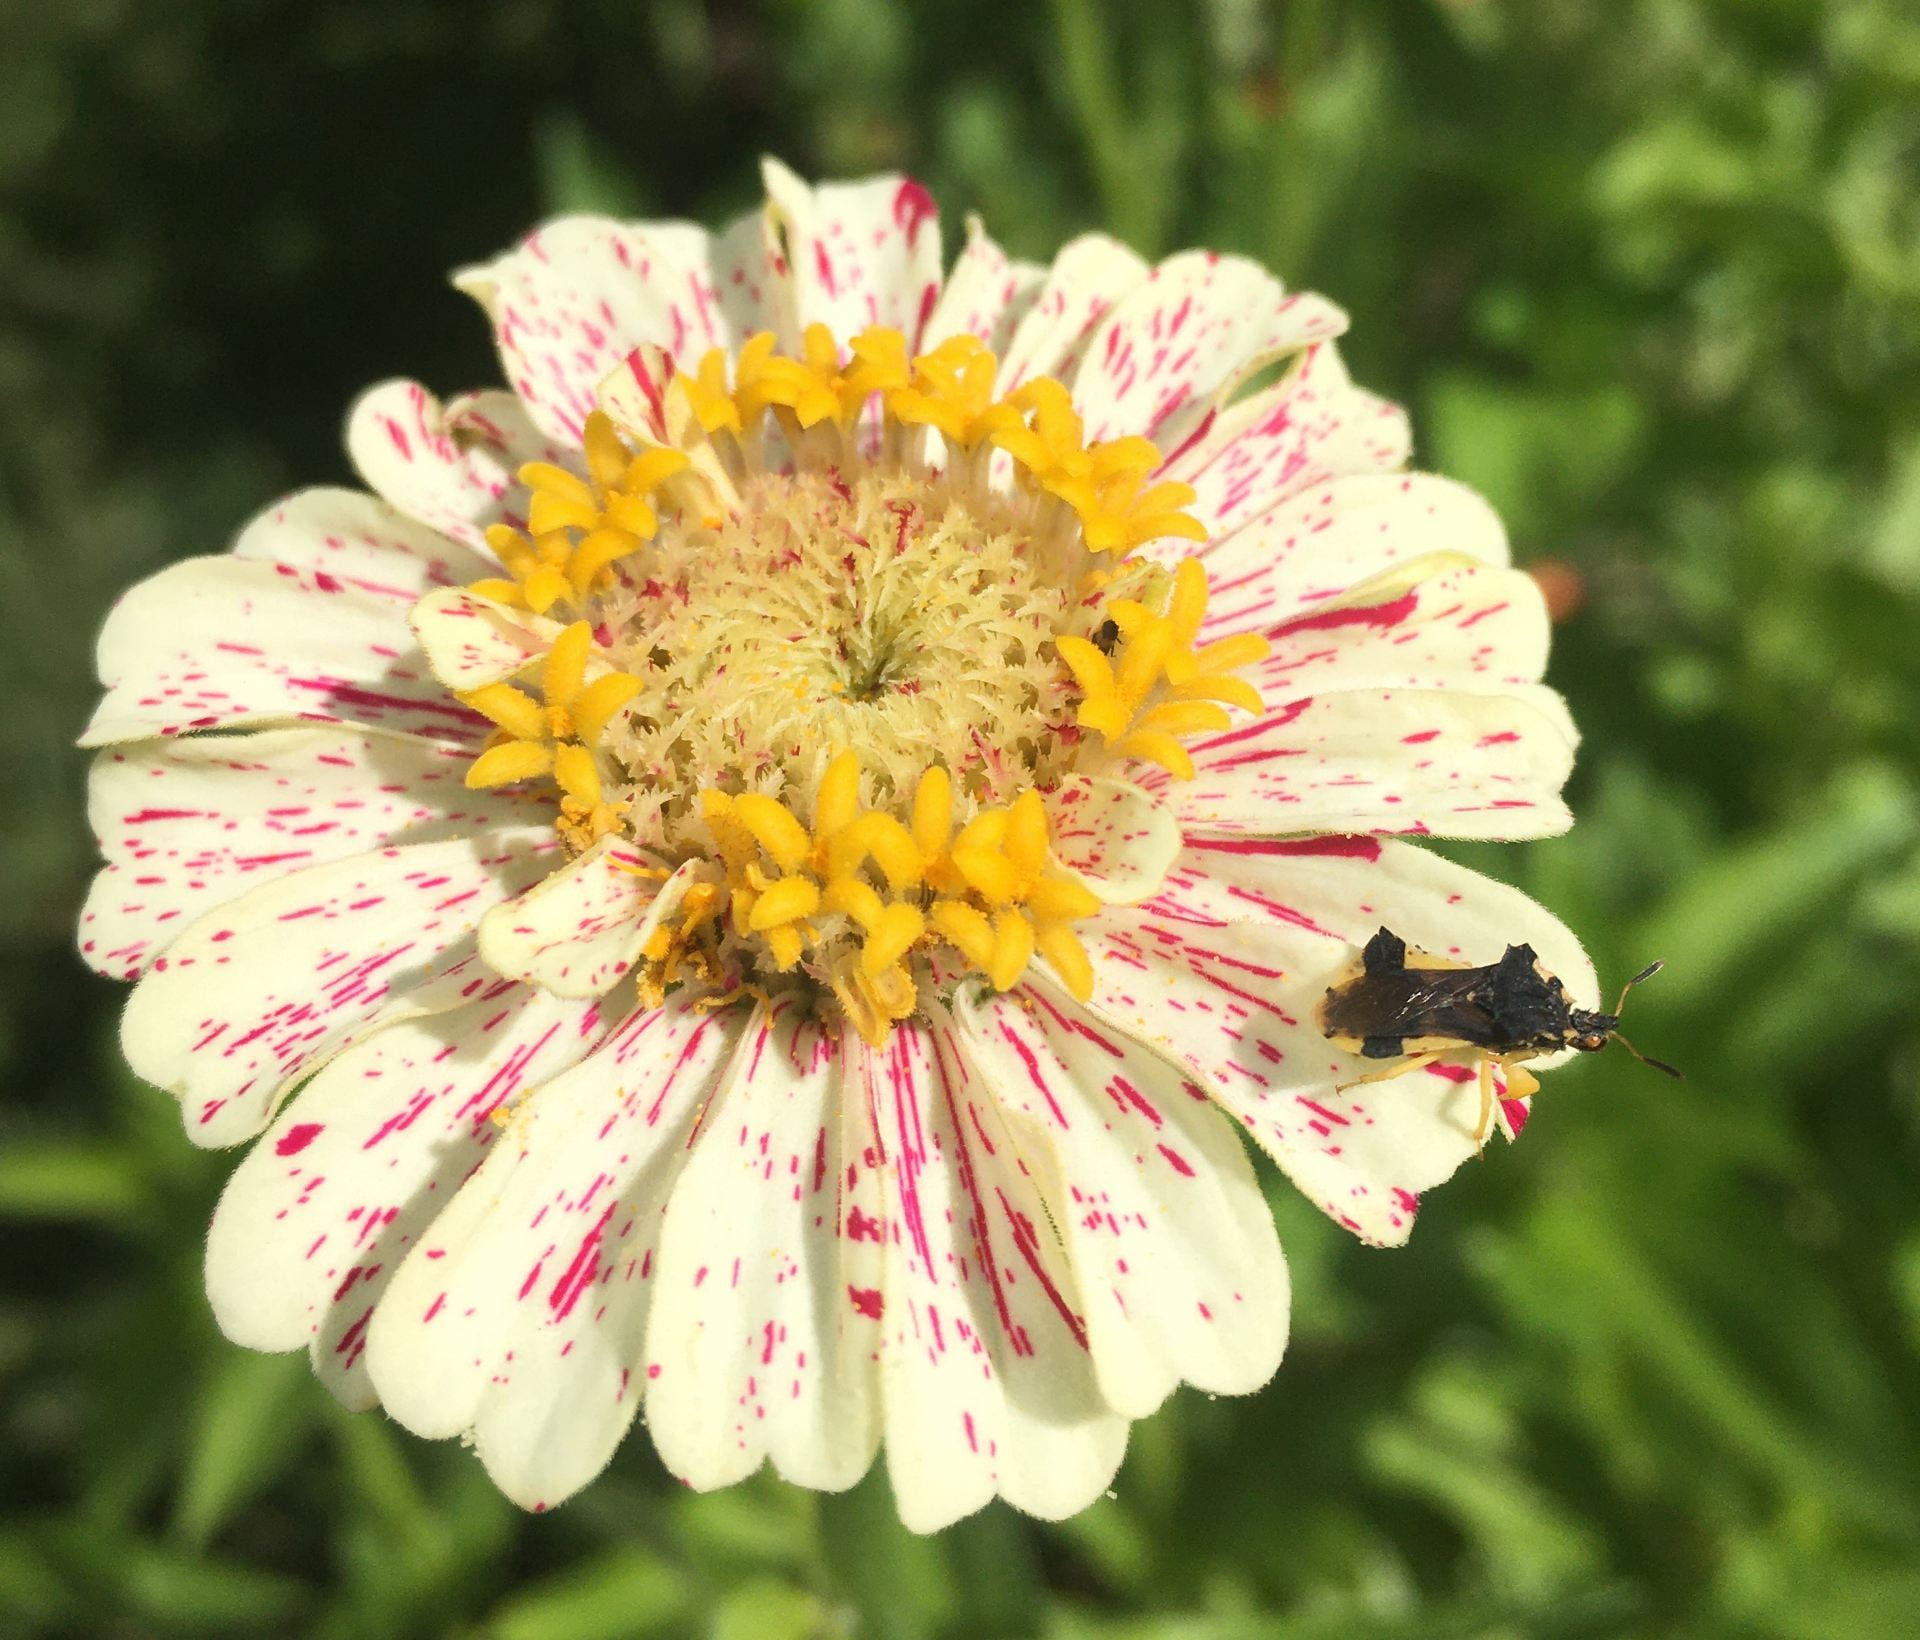
This is by no means an exhaustive list of insect natural enemies. For example, there are a variety of other true bugs, including big-eyed bugs, damsel bugs, assassin bugs, and ambush bugs that will eat pests in your garden or field. The ambush bugs are the easiest to recognize.
This ambush bug isn’t too hard for you or I to spot on this zinnia. Hopefully its prey won’t see it so easily.
And, this list doesn’t touch on most of the ground-dwelling natural enemies (although some spiders are predominantly found on the ground. I’ll cover those in another post.
This post was written by Amara Dunn, Biocontrol Specialist with the NYSIPM program. All images are hers, unless otherwise noted.
This work is supported by:
New York State Department of Agriculture and Markets
New York State Department of Environmental Conservation
We planted a new field of Christmas trees this spring!
If you’ve been following this blog for a bit, you might recall that the beneficial insect habitat plots I’ve been helping to establish and monitor with my colleagues Betsy Lamb and Brian Eshenaur are located on the edges of a field of Christmas trees. Once the trees get a bit bigger, we’ll be able to start assessing whether trees closer to these wildflowers have fewer pests or not.
New in 2021, I’m collaborating with Bryan Brown, Brian Eshenaur, Betsy Lamb, and Lynn Sosnoskie on a three-year project funded by the USDA to look at IPM when you’re establishing a new field of Christmas trees. An important part of IPM is the integration of multiple strategies when managing pests. So in this project we’re looking at some tools for managing both weeds and root diseases (specifically Phytophthora).
Weeds
Our weed management strategies include:
Mulching with approximately 3 inches of chipped shrub willow
Cultivating three times early in the season using a KULT Kress Argus Toolbar with rear side-shift adjustment pulled by a tractor
Mowing grass seeded around the trees
Conventional herbicides (oxyfluorfen and pendimethalin applied shortly after planting, with the possibility of additional applications depending on the length of the residual control) as a control treatment
No weed management at all (another control treatment)
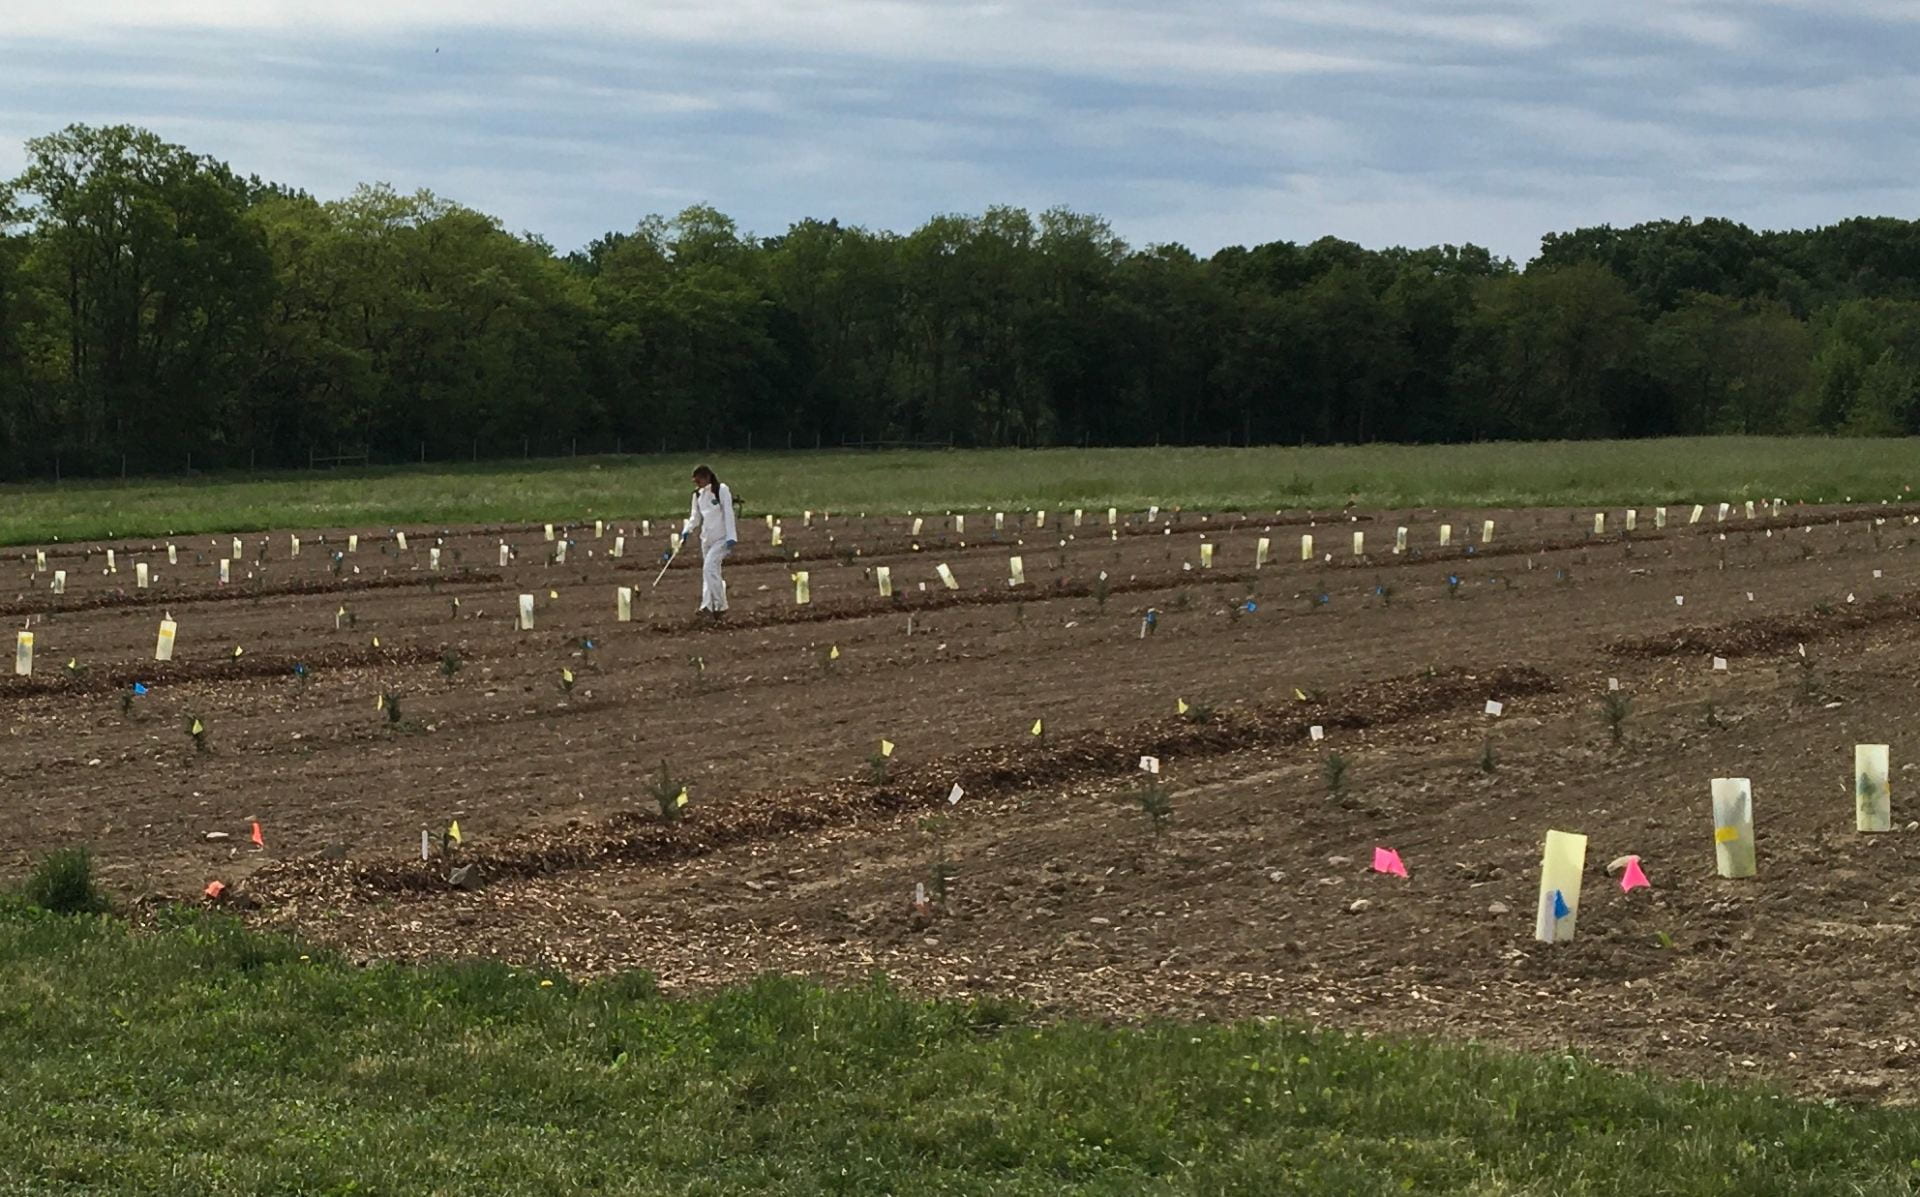
We planted 560 Fraser firs in 20 rows on May 19th, and four of these rows will be receiving each of these different weed management treatments. So far, we’ve spread mulch…
Mulch was dumped in small piles along the row of trees, and we raked it in to place. Photo taken by Lynn Sosnoskie.
…and applied herbicides.
Since a few of the trees were getting close to budbreak, we shielded them when applying the herbicide.
Lynn and her team collected soil from the field to assess which weed seeds are currently present in the seedbank. They will continue to evaluate the weed seedbank yearly to determine whether different weed management programs result in different weed seeds in the seedbank. Bryan, Lynn, and technicians working for them will also be assessing the success of each weed control strategy throughout the season (weed density and biomass).
Disease
Within each row, plots of seven trees have been assigned to one of four different treatments for root disease control. The biocontrol piece of this project is the root disease management tools. The biofungicide RootShield PLUS WP contains two different species of the fungus Trichoderma. These fungi may protect the trees by:
Inducing resistance – turning on the plants defense mechanisms ahead of pathogen attack
Exclusion – growing on the roots so there’s no space for the pathogen to grow
“Eating” the pathogen – Trichoderma is a fungus that parasitizes other fungi (and water molds)
Poisoning the pathogen – Trichoderma produces antimicrobial compounds
Promoting plant growth – Stronger, healthier trees are more likely to survive pathogen attack (and probably be more resilient to water stress).
A study done in Oregon on Douglas fir found that Trichoderma species might help improve survival of trees in pots when they are being attacked by the water mold Pythium. So we’re curious if we can document similar results in the field. We applied RootShield PLUS as a soil drench immediately after transplanting, and will repeat the application 6-8 weeks later.
There’s also been some work done by Richard Cowles in Connecticut suggesting that ProPhyt could improve the color of Fraser firs when they are planted in a field known to have Phytophthora. The active ingredient in ProPhyt is potassium phosphite (equivalent to phosphorous acid), so this product is also classified as a biopesticide by the EPA. I think of it as not really a biological control, since it neither contains a (current or formerly) living organism, nor was made by a living organism. We applied ProPhyt as a root dip immediately before planting. It works by inducing plant resistance, and also inhibiting (“poisoning”) water molds like Phytophthora.
The other two root disease treatments are controls: Subdue Maxx (active ingredient mefenoxam) and just water. Subdue Maxx was applied as a shielded, soil-directed spray the day after we transplanted the trees. All the trees were watered in right after planting because we planted a bit late in the season and it was a pretty warm day. The label calls for a second application in the fall.
So far, we’ve collected data on the initial height, stem diameter (4 inches above the soil) and needle color of every tree in the field. We’ll do this again in the fall to assess tree growth over this first season, and tree health (needle color). We will also record how many trees in each treatment survive. Bi-weekly weed surveys have also been initiated. Bryan has started cultivating the trees in that weed control treatment.
For updates on this project, you can check back on this blog (subscribe so you’ll know when new posts are available), follow Lynn and Amara on Twitter or on Instagram (@specialtycropweedscience and @biocontrol.nysipm), or listen to Bryan’s podcast. We’ll also be hosting events at the field (Geneva, NY) in this and subsequent years (put August 19th on your calendars, and stay tuned for more details), and hope to provide updates at future Christmas Tree Farmers Association of NY meetings.
This work is supported by Agriculture and Food Research Initiative – Foundational and Applied Science Grant no. 2021-68008-34179/project accession no. 1025660 from the USDA National Institute of Food and Agriculture.
This post was written by Amara Dunn, Biocontrol Specialist with the NYSIPM program. All images are hers, unless otherwise noted.
Don’t clean up your garden too early this spring! Pollinators and natural enemies of pests need to stay cozy a bit longer.
The days are getting longer and (sometimes) warmer, trees are beginning to leaf out, spring bulbs are blooming, and lots of people are anxious to clean up their gardens. But you may have heard that cleaning up your garden too early is bad for pollinators and other beneficial insects like natural enemies of pests. Is this true? How long do you need to wait?
What’s the concern with early garden clean-up?
There are two aspects of garden clean-up that pose a risk to beneficial insects in your garden: cutting out dead stems and clearing away leaves or other debris on the ground. Some species of wild bees nest in dead stems, so cutting down and disposing of these stems before the bees emerge for the spring is problematic. Dead leaves and other plant debris on the ground provide shelter for natural enemies like lady beetles, fireflies, and ground beetles. Pristinely-raked garden beds remove this shelter. You can read more about the benefits of messiness in thisThinkIPM blog post.
When should I clean up my garden?
First, please don’t clean your garden up in the fall. With the exception of removing and disposing of diseased or insect-infested plants (especially annuals), let your garden rest in the fall.
Ok, so you’ve waited until spring. But when? It’s complicated. You are trying to protect a diverse group of wild bee species, who are nesting in diverse settings (including both the ground and dead plant stems), in addition to many different species of beetles, spiders, and other arthropod natural enemies of pests. It should come as no surprise that all of these different arthropods emerge from their winter homes at different times. For example, around here (NY) bumble bees, carpenter bees, mason bees, and mining bees emerge earlier (early April) than sweat bees (May). Even within two species of mason bee, researchers found that the temperature during the winter, the sex of the bees, and their size all significantly impacted when they would emerge in the spring (varying by up to 40 days). Winter temperatures also impact when alfalfa leafcutting bees and other bees emerge.
Sweat bees nest in the ground, and emerge a bit later in the spring than some other bee species.
So what should I do?
First, don’t let the complexity of the situation paralyze you. Can you leave just a part of your garden “messy” year round, while you clean up the flower bed right next to the street? Do it. Don’t let the perfect become the enemy of the good. You might also consider making or purchasing a sign that lets your neighbors know why you are keeping your garden a bit untidy. It could spark some interesting conversations, and maybe you’ll start a new trend!
Second – and related to the first suggestion – remember that diversity is a strength. No single way of gardening is good for all beneficial insects. For example, mulch provides shelter for beetles (many of which are predators), but ground nesting bees need bare ground. Different parts of your yard or garden can support different beneficial insects.
Third, the Xerces Society offers some guidelines for timing garden clean-up by watching the weather and what’s happening to other plants around you. However, this advice is specifically for protecting bees, and doesn’t address the needs of natural enemies of pests.
In the northeast, don’t start garden clean-up until your taxes are submitted. But realize that even waiting until mid to late April is still too early for some bee species.
The cool season grasses we usually have growing in our lawns generally require the soil to be about 50° F in order to start growing. Wait to clean up your gardens until you need to mow your lawn regularly. But always remember to mow high.
Wait until apple and pear trees finish blooming. In the northeast U.S., apricots, peaches, plums, and cherries will bloom early (when many ground-nesting bees are emerging), but apples and pears won’t finish blooming until mid-May.
To be extra safe, wait until you are ready to plant tomatoes (when night temperatures are consistently above 50° F). At least in my part of NY, this may not be until late May.
Fourth, if you feel like you absolutely can’t wait to do some garden clean-up, change how you dispose of the debris you remove. Cut back last-year’s dead stems and pile them loosely in a corner of your yard (rather than bagging them and taking or sending them to a compost facility). Insects that have yet to emerge from the stems can still do so. Once you’re well into summer, feel free to compost this debris. But remember that your landscaping choices can also create spaces for ticks to hang out.
I did clean up some garden beds in my front yard a bit on the early side this spring. But I piled the stems I cut in a back corner of my backyard.
Happy gardening!
This post was written by Amara Dunn, Biocontrol Specialist with the NYSIPM program. All images are hers, unless otherwise noted.