The Three Sisters | A Legend | Diversity | How to Plant the Three Sisters | Activities | Information | Evaluation
Experience a Haudenosaunee Garden
In this section you will learn how to plant the Three Sisters according to Haudenosaunee custom. You have already learned many new things about corn and her two sisters and about Haudenosaunee gardening. Now you can try this planting system yourself and recreate an ancient (and modern) practice.
Be aware that this system may provide some unexpected results. Interplanting without the addition of fertilizer may result in a decreased yield. The site may become more crowded than you’re accustomed to when you grow single plantings. It may seem awkward at first to work around plants that have grown so closely together, especially if you are used to tidy wide rows. Feel free to adapt the spacing if necessary. Most importantly, enjoy this exercise as an investigation into Native American culture.
As they begin planting, Haudenosaunee direct their thoughts to the elements that help plants grow. What are the elements that make your garden thrive? As you prepare your garden in the Haudenosaunee tradition, you may want to consider and appreciate these elements as well.
How to Plant the Three Sisters
Before you Plant:
1. Conduct a soil test, and prepare the garden site. Add compost or other materials such as peat moss or manure to the soil. This will improve the soil structure and add nutrients. If you have grown a green manure cover crop such as winter rye, turn it under two to three weeks before planting.
 Planting:
2. Plant corn in late May. It is best if the ground has warmed and is no longer cold and wet. Haudenosaunee tradition holds that planting begins when the leaves of a dogwood are the size of a squirrel’s ear.
Soak corn seeds for several hours, but not more than eight hours, before planting. (Soaked seed may dry out quickly, so keep the seeds well watered for the first week or two if the soil is not kept moist by rain showers.)
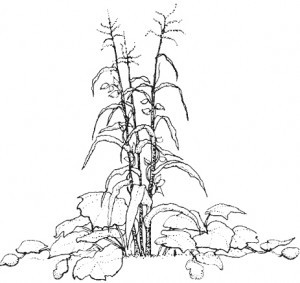
Prepare low hills that are 3 to 4 feet apart within and between the rows. Place five to seven corn seeds, evenly spaced to a depth of I to I ‘/2 inches. Cover with soil.
There are many corn varieties to choose from. Dent, flint, and flour corns are especially suited to this system, while popcorn often does not get tall enough and may be overwhelmed by the beans and pumpkins. If you care to follow Haudenosaunee custom, plant the seeds with kind thoughts three days before the full moon.
Maintaining: 
3. After young corn plants come up, begin removing weeds. As you are weeding, gently mound, or hill, the soil around the young plants.
4. When the corn plants are about 6 inches high, pole beans and pumpkins can be planted around the corn plants. Genuine Cornfield or Scarlet Runner bean and Connecticut Field or Small Sugar pumpkins are heirloom, non-hybrid varieties that are readily available, yet “authentic” crops for your project.
After thoroughly weeding, plant four or five bean seeds in each hill. Plant four or five pumpkin seeds in every seventh hill, placing them around the young corn plants. (Planting pumpkins in every hill would quickly overwhelm your site with viney growth)
5. Your plants will need water each week. If it does not rain at least an inch per week, the planting will need to be irrigated. If you are using presoaked seed, remember to water more frequently at first.
6. Most of the nitrogen converted by the beans will nor be available to the corn and pumpkins the first year; the bean roots have to break down to release nitrogen. Corn is a heavy nitrogen feeder, so sidedressing with fertilizer is necessary to achieve satisfactory yields. You can use manure. compost, or commercial fertilizer.
Pollination:
7. If you are hoping to keep a variety pure–for example, an heirloom variety of corn you will need to isolate the corn from other varieties. If isolation is not possible, you need to hand pollinate. This is a challenge, but it is fun to experiment to see what results you can get.
To hand pollinate, place waxed paper lunch bags over the newly forming silks to keep out unwanted pollen. When the plants are tasseled 2 inches out, remove the bags briefly and shake the desired pollen on the silks, then replace the bags. Your desired pollen may be that of the same variety.
If you are experimenting with crosses, however, the pollen must come from another variety. You can use brown paper lunch bags to collect pollen from the tassels of the desired variety. Be sure to keep track of which plants you have hand pollinated so you can compare them with those that have cross-pollinated.
Harvesting & Storage

The Three Sisters
8. Harvest and store your corn, beans. and pumpkins with care. When the corn husks are dry, pick the ears and spread them out in a dry place, To prevent mold, do not store the ears when they are first harvested. If you plan to grind the corn. let it dry for several weeks. If you plan to save seed, choose seed from your most vigorous, uniform plants from the center of the ear.
After you have shelled the kernels, keep them in a cool, dry place in covered containers or plastic bag. Following Haudenosaunee tradition, do not let a single kernel go to waste! You can harvest your beans when they are green or after the pods have shriveled and dried. Pick pumpkins when their color changes.
Use:
9. Try cooking a new food from the corn, such as hominy or succotash. Save the husks to make baskets or dolls. Weave a basket; create a corn mosaic. Use the plants to decorate your mailbox, a flagpole, or a tree trunk. Compost the remaining plant material. At the end of the season, have a harvest festival, Celebrate Thanksgiving with the fruits of your labor and appreciate your rich American heritage.


