Configure Jenkins to use Cornell Shibboleth Authentication

by Brett Haranin

Introduction

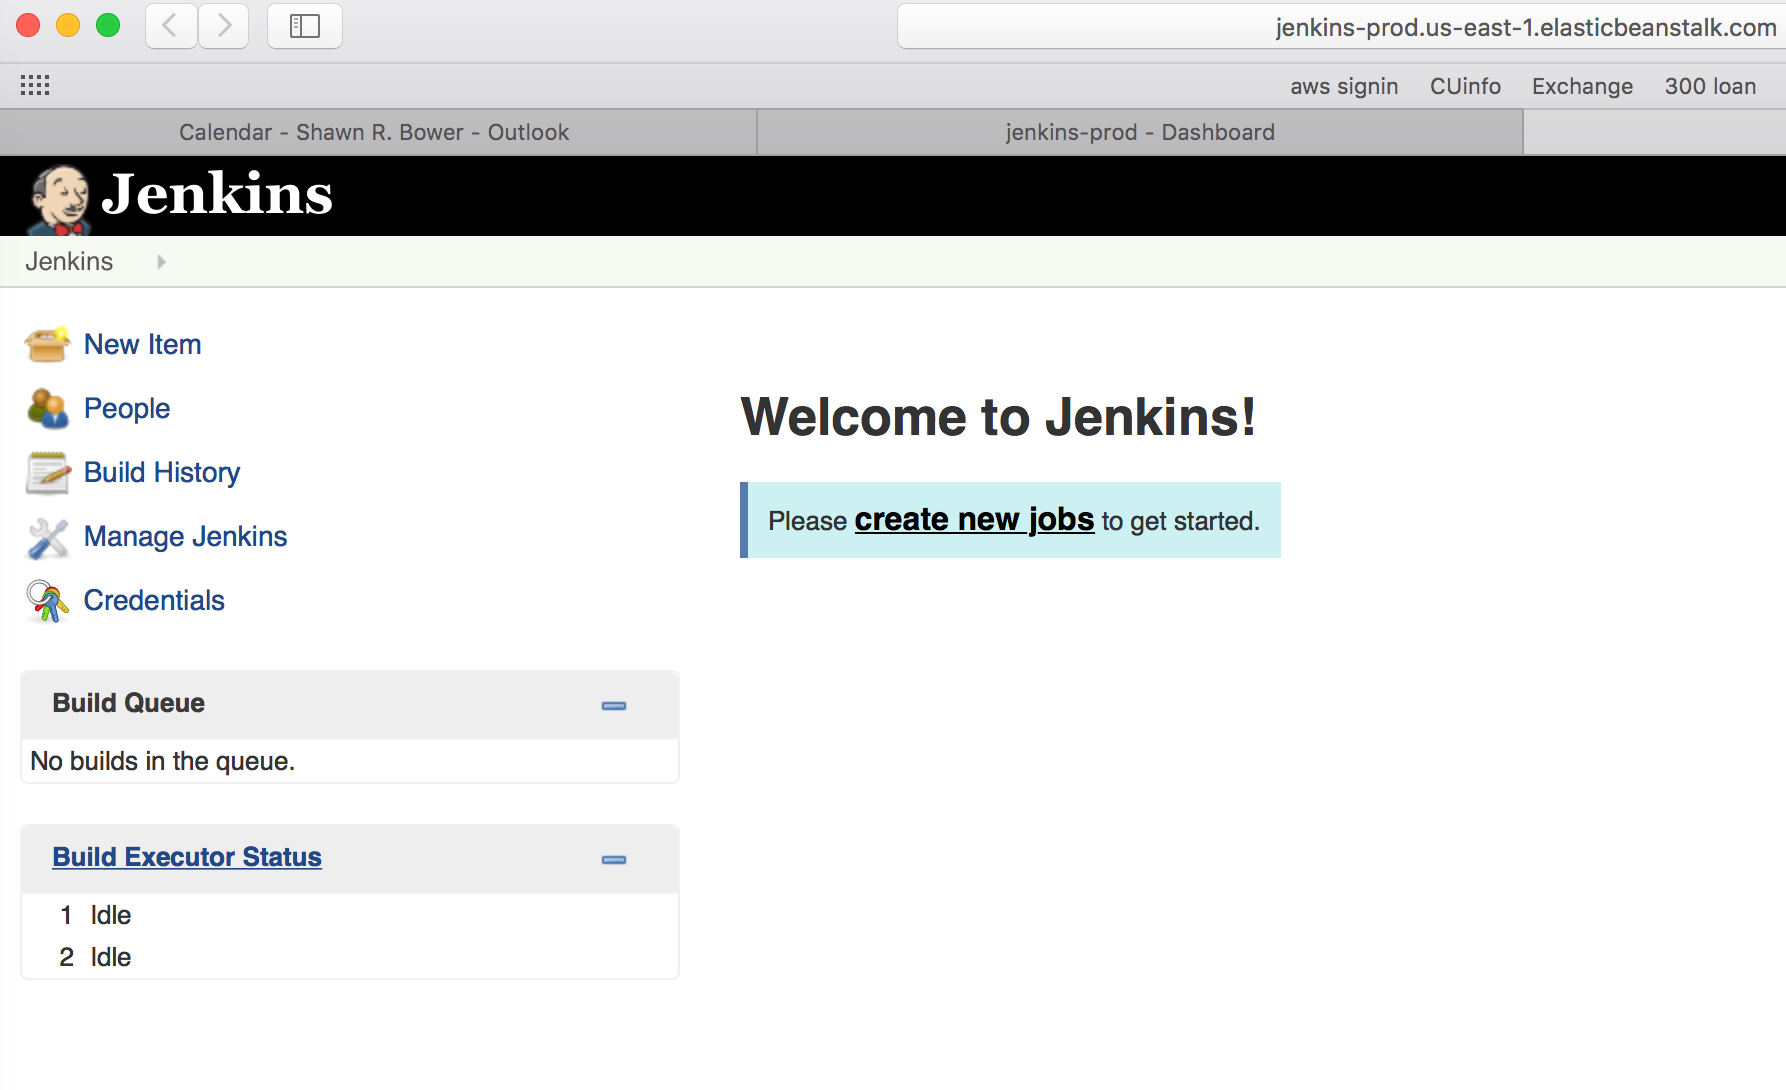
At RAIS, Jenkins has become integral to our development workflow.  Developers use it throughout the day to view the output of CI build/test jobs and to deploy application changes.  The basic Jenkins user management tools worked great when only one or two developers were using it, however, as we grow our team and usage of Jenkins, we wondered if there might be a way to integrate with Cornell central authentication.  We’re happy to report that there is a SAML plugin for Jenkins that works well with the Cornell Shibboleth service.

This post will focus on the “how” of setting up Shibboleth with Jenkins.  For a deeper look at Shibboleth and how it works, see Shawn’s post here: https://blogs.cornell.edu/cloudification/2016/07/11/using-cornell-shibboleth-for-authentication-in-your-custom-application

Getting Started – Basic Test IdP Setup

Add and configure plugin

The first step is to install the Jenkins SAML plugin under Manage Jenkins -> Manage Plugins. The plugin information page is available here: https://wiki.jenkins-ci.org/display/JENKINS/SAML+Plugin. Note, v0.6 or higher is required for compatibility with Cornell Shibboleth.

2016-08-04_05-53-43

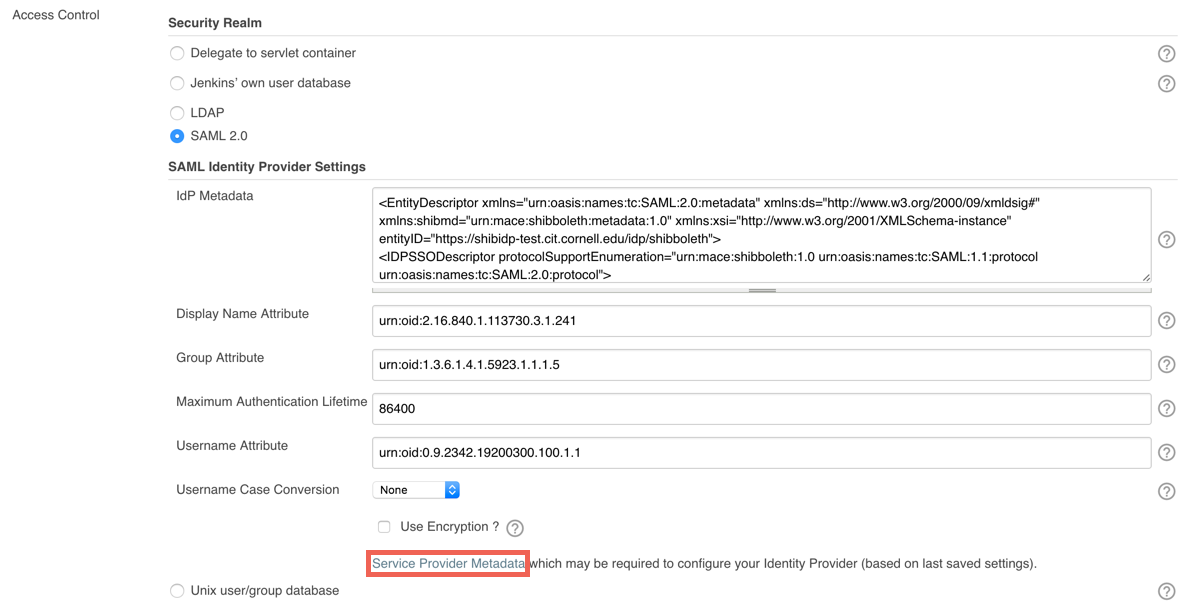
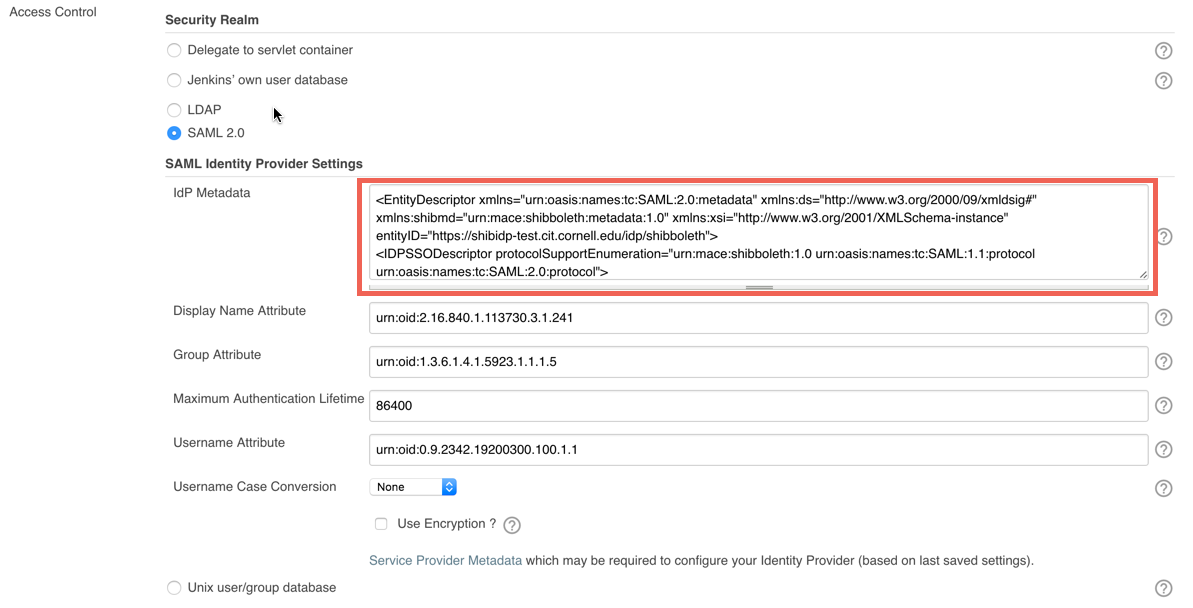
Next, let’s configure the plugin. Go to Manage Jenkins -> Configure Global Security. Scroll to “Access Control” as shown here:

2016-08-04_06-02-56

For this step, the IdP metadata field should be filled with the Cornell IdP test metadata available here: https://shibidp-test.cit.cornell.edu/idp/shibboleth.  Just copy it and paste it in the text box.

Fill in the Cornell Shibboleth attributes that best map to the Display Name, Group and Username attributes — the attributes we used are:

displayName: urn:oid:2.16.840.1.113730.3.1.241
edupersonprimaryaffiliation (for group): urn:oid:1.3.6.1.4.1.5923.1.1.1.5
uid (netid): urn:oid:0.9.2342.19200300.100.1.1

Finally, if you are using matrix/project based authorization (we recommend it!) ensure that usernames are lowercase netids.  Also, make sure that you have at least one user (presumably yours, if you are doing administration) with administrative rights to Jenkins.  After saving these settings, you will no longer be able to login with Jenkins usernames/passwords.

Save and Test

To save these settings, click “Apply”.  Then, navigate to your Jenkins instance in a fresh browser (perhaps Incognito/Private Browsing).  You should be redirected to a CUWebAuth screen for the test shibboleth instance.

2016-08-04_06-46-16

After logging in, you should be redirected back to Jenkins and your session should be mapped to the user in Jenkins that matches your netid.  There are some notable limitations to the Shibboleth test system: newer employees (hired in the last several months) will not yet be synced to the TEST directory (i.e., they won’t be able to login), and the login screen will show “TEST INSTANCE” as pictured above.  In the next section, we’ll move to the PROD system for full functionality.

Next Steps – Move to Production IdP

Now that you’ve implemented and tested against the TEST instance of Shibboleth, the next step is to register your application with Cornell Identity Management so that you can use the PROD login systems.

Generate Metadata

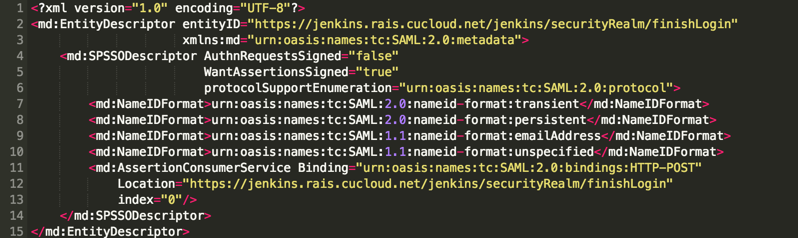
First, you’ll need to output the metadata for your Jenkins SAML service provider.  To do that, go back to Manage Jenkins -> Configure Global Security.  Then click “Service Provider Metadata” (highlighted below).

2016-08-04_06-02-56 2

This will output a block of XML that looks like this, which is the metadata for your Jenkins SAML service provider:

2016-08-04_20-14-01

Register metadata with Cornell Identity Management

Next, we need to register this metadata with Identity Management (IDM).

Go to: https://shibrequest.cit.cornell.edu/

Fill out the initial page of contact information and choose the scope of netid roles (Staff, Faculty, etc) that should be allowed to use the tool.  Note – ultimately Jenkins will authorize users based on their netid — the settings here are simply another gate to prevent folks that aren’t in specified roles or groups from logging in at all (i.e., their assertion will never even be sent to Jenkins).  You can safely leave this blank if you don’t have specific restrictions you want to apply at the CUWebAuth level.

On the second page, specify that the metadata has not been published to InCommon, then paste your metadata into the provided box:

2016-08-04_07-09-58

Click Next and submit your request.  Submitting the request will open a ticket with Identity Management and you should receive confirmation of this via email.  Once your application is fully registered with Cornell Shibboleth, you will receive confirmation from IDM staff (normally a quick process ~1 day).

Tell Jenkins to use PROD IdP

Finally, once you receive confirmation from IDM that your application is registered, you’ll need to update Jenkins to use the production IDP metadata.

Go here to get the PROD Shibboleth metadata: https://shibidp.cit.cornell.edu/idp/shibboleth

Then, in Jenkins, return to Manage Jenkins -> Configure Global Security.  Paste the metadata in the IdP metadata block (everything else can stay the same):

2016-08-04_06-02-35

Save, then test that you are able to login.  This time you should see the regular CUWebAuth screen, rather than the “TEST INSTANCE” version.

Advanced Setup Options/Notes

  • It is possible to configure your endpoint metadata to request additional attributes from the Cornell directory.  If you would like to map a different value for group and then use Jenkins group permissions, you can work with IDM to get the desired attribute included in SAML assertions sent to your Jenkins endpoint, then specify those attributes on the Configure Global Security screen.
  • The underlying SAML library can be very sensitive (with good reason) about any mismatch between the stated URL in a user’s browser, and the URL that the webserver believes it is running at.  For example, if you terminate SSL at an ELB, a user may be visiting https://yourjenkins/jenkins/, but the webserver will be listening on port 80 and using the http scheme (i.e., http://yourjenkins/jenkins/).  This manifests with an error like “SAML message intended destination endpoint did not match recipient endpoint”.  Generally, the fix for this is to tell the Tomcat connector that it is being proxied (proxyPort and scheme attributes).  More here: http://beckje01.com/blog/2013/02/03/saml-matching-endpoints-with-tomcat/

That’s It

Now your team should be able to login to Jenkins with their Cornell NetID and Password.  Additionally, if using DUO, access will be two-factor, which is a great improvement.

For more information about Cornell Shibboleth, see the Confluence page here: https://confluence.cornell.edu/display/SHIBBOLETH/Shibboleth+at+Cornell+Page

How to run Jenkins in ElasticBeanstalk

by Shawn Bower

The Cloud Services team in CIT maintains docker images for common pieces of software like apache, java, tomcat, etc.  One of these images that we maintain is Cornellized Jenkins images.  This image contains Jenkins with the oracle client and Cornell OID baked in.  One of the easiest way to get up and running in AWS with this Jenkins instance is to use Elastic Beanstalk which will manage the infrastructure components.  Using Elastic Beanstalk you don’t have to worry about patching as it will manage the underlying OS of your ec2 instances.  The Cloud Services team releases patched version of Jenkins image on a weekly basis. If you want to stay current the you just need to kick off a new deploy in Elastic Beanstalk.  Let’s walk through the process of getting this image running on Elastic Beanstalk!

A.) Save Docker Hub credentials to S3

INFO:

Read about using private Docker repos with Elastic Beanstalk.

We need to make our DTR credentials available to Elastic Beanstalk, so automated deployments can pull the image from the private repository.

  1. Create an S3 bucket to hold Docker assets for your organization— we use  cu-DEPT-docker 
  2. Login to Docker docker login dtr.cucloud.net
  3. Upload the local credentials file ~/.docker/config.json to the S3 bucket cu-DEPT-docker/.dockercfg 

    Unfortunately, Elastic Beanstalk uses an older version of this file named  .dockercfg.json  The formats are slightly different. You can read about the differences here.

    For now, you’ll need to manually create  .dockercfg & upload it to the S3 bucket  cu-DEPT-docker/.dockercfg

B.) Create IAM Policy to Read The S3 Bucket

    1. Select Identity and Access Management for the AWS management consoleIAM-step-1
    2. Select Policies IAM-step-2
    3. Select “Create Policy” IAM-step-3
    4. Select “Create Your Own Policy” IAM-step-4
    5. Create a policy name “DockerCFGReadOnly,” see the example policy provided. IAM-step-5
Below is an example Policy for reading from a S3 bucket.
{
    "Version": "2012-10-17",
    "Statement": [
        {
            "Sid": "Stmt1466096728000",
            "Effect": "Allow",
            "Action": [
                "s3:ListBucket"
            ],
            "Resource": [
                "arn:aws:s3:::cu-DEPT-dockercfg"
            ]
        },
        {
            "Sid": "Stmt1466096728001",
            "Effect": "Allow",
            "Action": [
                "s3:GetObject",
                "s3:HeadObject",
                "s3:ListBucket"
            ],
            "Resource": [
                "arn:aws:s3:::cu-DEPT-dockercfg/.dockercfg"
            ]
        }
    ]
}


C.) Setup the Elastic Beanstalk environment

  1. Create a Dockerrun.aws.json fileHere’s an example.
  2. {
      "AWSEBDockerrunVersion": "1",
      "Image": {
        "Name": "dtr.cucloud.net/cs/jenkins:latest"
     },
     "Ports": [
       {
         "ContainerPort": "8080"
       }
     ],
     "Authentication": {
       "Bucket": "cu-DEPT-dockercfg",
       "Key": ".dockercfg"
     },
     "Volumes": [
       {
         "HostDirectory": "/var/jenkins_home",
         "ContainerDirectory": "/var/jenkins_home"
       },
       {
         "HostDirectory": "/var/run/docker.sock",
         "ContainerDirectory": "/var/run/docker.sock"
       }
     ]
    }
    

    The Authentication section refers to the Docker Hub credentials that were saved to S3.

    The Image section refers to the Docker image that was pushed to Docker Hub.

  3. We will also need to do some setup to instance using .ebextenstions.  Create a folder called “.ebextensions” and inside that folder create a file called “instance.config”  Add the following to the file:
  4.  

    container_commands:
     01-jenkins-user:
     command: useradd -u 1000 jenkins || echo 'User already exist!'
     02-jenkins-user-groups:
     command: usermod -aG docker jenkins
     03-jenkins-home:
     command: mkdir /var/jenkins_home || echo 'Directory already exist!'
     04-changeperm:
     command: chown jenkins:jenkins /var/jenkins_home


  5. Finally create a zip file with the Dockerrun.aws.json file and the .ebextenstions folder.
    zip -r jenkins-stalk.zip Dockerrun.aws.json .ebextensions/ 


D.) Setup Web Server Environment

  1. Choose Docker & Load balancing, autoscaling
    create_environment
  2. Select your local zip file that we created earlier ( jenkins-stalk.zip ) as the “Source” for the application version section application
  3. Set the appropriate environment name, for example you could use jenkins-prodenvironment
  4. Complete the configuration details

    NOTE: There are several options beyond the scope of this article.

    We typically configure the following:deployment

  5. Complete the Elastic Beanstalk wizard and launch.  If you are working with a standard Cornell VPC configuration, make sure the ELB is in the two public subnets while the EC2 instances are in the private subnets.
  6. NOTE: You will encounter additional AWS features like security groups etc… These topics are beyond the scope of this article.  If presented with a check box for launching inside a VPC you should check this box.

    Create_Application

    The container will not start properly the first time. Don’t panic.  
     
    We need to attach the IAM Policy we built earlier to the instance role used by Elastic Beanstalk.jerkins-prod_-_Dashboard_and__5__Twitter

  7. Select Identity & Access Management for the AWS management console
  8. IAM-step-1

  9.  Select “Roles” then select “aws-elasticbeanstalk-ec2-role”

IAM-step-6

  • Attach the “DockerCFGReadOnly” Policy to the role IAM-step-7


E.) Re-run the deployment in Elastic Beanstalk.  You can just redeploy the current version.


  1. Now find the URL to your Jenkins environment
  2. jenkins-prod-url

  3. And launch Jenkins

jenkins-running

SUCCESS !


F.) (optional) Running docker command inside Jenkins

The Jenkins image comes with docker preinstalled so you can run docker build and deploys from Jenkins.  In order to use it we need to make a small tweak to the Elastic Beanstalk Configuration.  This is because we are keeping the docker version inside the image patched and on the latest commercially supported release however Elastic Beanstalk currently supports docker 1.9.1. To get things working we need to add an environment variable to use an older docker API.  First go to configurations and select the cog icon under Software Configuration.

jenkins-prod_-_Configuration
Now we need to add a new environment variable, DOCKER_API_VERSION and set its value to 1.21 .
jenkins-env-var

That is it! Now you will be able to use the docker CLI in your Jenkins jobs


Conclusion

Within a few minutes you can have a managed Jenkins environment hosted in AWS.
There are a few changes you may want to consider for this environment.

  • Changing the autoscaling group to min 1 and max 1 makes sense since the Jenkins state data is stored on a local volume.  Having more than one instance in the group would not be useful.
  • Also considering the state data, including job configuration, is stored on a local volume you will want to make sure to backup the EBS volume for this instances.  You could also look into a NAS solution such as Elastic File Service to store state for Jenkins, this would require a modification to /var/jenkins_home path.
  • It is strongly encouraged that an HTTP SSL listener is used for the Elastic Load Balancer(ELB) and that the HTTP listener is turned off, to avoid sending credentials in plain text.


The code used in this blog is available at: https://github.com/CU-CloudCollab/jenkins-stalk, Please free to use and enhance it.

If you have any questions or issues please contact the Cloud Services team at cloud-support@cornell.edu