Redshift at Vet College

Data Vet College Style 
Using AWS Redshift, AWS Batch, NodeJS and Docker to accomplish data in the cloud
Team Members:  Craig Riecke, Daniel Sheehan and Scott Ross (sr523)

In 2015, the Animal Health Diagnostic Center at Cornell University changed its laboratory information management system implementing VetView as a replacement to the legacy system- UVIS.  With limited time, budget and resources, our team was forced to deploy our main business intelligence tool, Tableau, directly over VetView’s operational data model, which used Oracle.  While this worked initially giving our business staff access to data, we quickly realized that we were outgrowing the inherent constraints implicit on having Tableau on an operational data model.   These constraints included speed/performance issues, business logic embedded in sql, duplication of sql across various tableau dashboards and data silo’ed in that operational model.  At the end of the day, we needed something faster, reduced complexity for our report writers, and a building block for the future.

This blog post is the story of how the VMIT development team moved data to Redshift, a discussion on Redshifts capabilities and the tooling used to move data.

Redshift:

Pros:

  • It is affordable to start: I am not saying that it is affordable, period. Redshift can get expensive if you shove all your data into it, and your data is growing fast. That said, compared to its on-premises and appliances-based alternatives, Redshift is incredibly cheap to start with at $0.25 per hour or $180 per month.  We also had a 30 day free trail.
  • It is mostly PostgreSQL: Redshift has a different query execution engine, but in terms of the interface, looks like Postgres.  This means it has rich client tools and connectivity can be done via both JDBC and ODBC.
  • It plays nice with Tableau:  Because of the above, it plays very nicely with Tableau and other BI tools.   This is incredibly important for our group because we are targeting BI tools.
  • Scalability: it’s horizontally scalable. Need it to go faster? Just add more nodes…
  • AWS:  It’s part of the AWS ecosystem.  So while other tools, like Google’s BigQuery, are interesting, we have settled on AWS as our platform for infrastructure.

Cons:

  • Loading data can be tricky: The process we are using to load data into redshift requires extracting the data from our source database, creating a csv file, loading that csv file to S3, then using the COPY command to get data into redshift.  Parallel processing is very important in this step to reduce the amount of time it takes to do the ETLs.  It does take time to master this process.

Things to think about:

  • Distkey/Sortkey required for optimal performance.  This is a new concept for our developers group, and took us some time to think about it (and will require time as we move into the future)
  • Compute and storage are tied together.  There are some interesting talks about how this is an anti-pattern for data warehousing.  For us, this doesn’t matter at the moment.
  • Mutli AZ is painful

Decision:
At the end of the day, we were basically were comparing Redshift to other RDBMS solutions hosted in AWS RDS.  We settled on Redshift more because of our future needs, than our current needs. And so far, we love it.

Setting up Redshift:

One of the tenants of our developer group when building solutions is to implement infrastructure as code .  In that vein, here are the steps to build the redshift cluster along with the json configuration to make it happen:

Steps:

  1. Install the aws cli
  2. Run this command: $ aws redshift –cli-input-json `cat cluster.json`
  3. Create users / schemas

The output of the above should give you the endpoint of your cluster. Use that information to connect your SQL tool to the new Redshift cluster. Amazon recommends SQL Workbench/J.  But other tools work just as well (DBVisualizer).

* All of these steps are stored in our git repository on Bitbucket.  We can automate this using Jenkins, but in this case, we really don’t have a need to have Redshift creation be automated.  However, if we have to rebuild this cluster, we will rebuild it from these scripts.  We do not use the aws console to make changes on the fly to systems.

Writing ETL Process:

Here were our requirements for an ETL tool:

  • It had to be maintainable as code (visual coding environment were eliminated, including our Orion Health Rhapsody Interoperability engine)
  • It needed to be able to do parallelism
  • It needed to work with Docker
  • Preferably the tool/language fit our current ecosystem
  • We also wanted to handle secrets gracefully.  

So we landed on NodeJS and specifically TypeScript to do our ETL.  NodeJS is being used as our API language of choice, is easy to run in a docker container, and we also had code available for reuse.  TypeScript adds types to javascript, and easy way to make writing code more bearable then JavaScript.

Again, this was stored in our git repository.  We wrap the entire etl process into a docker container.

Using AWS Batch and Docker for the production pipeline:

The final piece of the puzzle is to setup a pipeline to get data into redshift using the ETL process.  Here we decided to use a newer service from AWS called “Batch.” Batch has these concepts baked in:

  • Jobs represent a unit of work, which are submitted to Job Queues, where they reside, and are prioritized, until they are able to be attached to a compute resource.
  • Job Definitions specify how Jobs are to be run. While each job must reference a Job Definition, many parameters can be overridden, including vCPU, memory, Mount points and container properties.
  • Job Queues store Jobs until they are ready to run. Jobs may wait in the queue while dependent Jobs are being executed or waiting for system resources to be provisioned.
  • Compute Environments include both Managed and Unmanaged environments. Managed compute environments enable you to describe your business requirements (instance types, min/max/desired vCPUs etc.) and AWS will launch and scale resources on your behalf. Unmanaged environments allow you to launch and manage your own resources such as containers.
  • Scheduler evaluates when, where and how to run Jobs that have been submitted to a Job Queue. Jobs run in approximately the order in which they are submitted as long as all dependencies on other jobs have been met.

To use, we just give Batch a docker image using AWS ECR (this started an internal debate about how we use ecr vs. CU dtr vs. docker hub — something for another day).

To kick off a batch job from aws cli for one time run:

$ aws batch submit-job –job-definition vet-dw-etl-sb –job-queue normal –job-name vet-dw-etl-sb-2016-01-10

To create a batch job on AWS:

$ aws batch create-compute-environment --cli-input-json file://compute-environment-normal.json
$ aws batch create-job-queue --cli-input-json file://job-queue-normal.json
$ aws batch register-job-definition --cli-input-json file://vet-dw-etl-sb-job-definition.json

The json file references our docker image on amazon’s docker registry, that image contains our etl code.

For now, we run this nightly but we have the option of running this at any interval.  Our etl process takes about ~40mins for 30million rows.

**If anyone is interested in seeing how json files for creating batch jobs or our redshift environment, please let us know.  Ditto for any code.

Using Docker Datacenter to launch load test

by Shawn Bower

As we at Cornell move more of our workloads to the cloud an important step in this process is to run load test against our on premise infrastructure and the proposed AWS infrastructure. There are many tools that can aide in load testing one which we use frequently is called Neustar. This product is based on selenium and allows up to spin up a bunch automated browser users. It occurred to me that a similar solution could be developed using docker and Docker Datacenter.

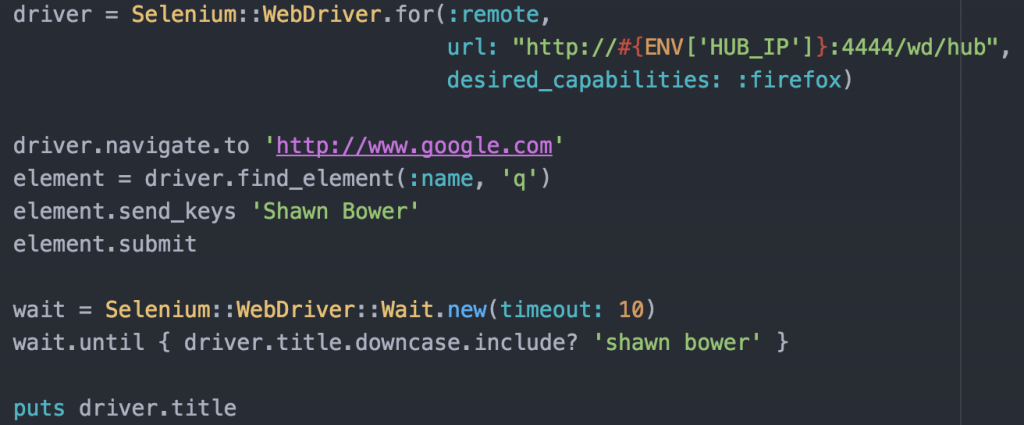
To get started I took a look at the docker containers provided by Selenium, I love companies that ship their product in Containers!  I was able to get a quick test environment up and running locally.  I decided to use Selenium grid that provides a hub server which nodes can register with.  Each node registers and lets the hub know what kind of traffic it can accept.  In my case I used nodes running firefox on linux.  To test the setup I created a simple ruby script using the Selenium ruby bindings to send commands to a node.

sample-test_rb_—__Users_srb55_projects_docker-selenium-load-test

This simple test will navigate to google and search for my name then wait for the window title to include my name.  While testing locally I was able to get the hub and node up and running with the following commands:

docker run -d -p 4444:4444 --name selenium-hub selenium/hub:2.53.0
docker run --rm --name=fx --link selenium-hub:hub selenium/node-firefox:2.53.0

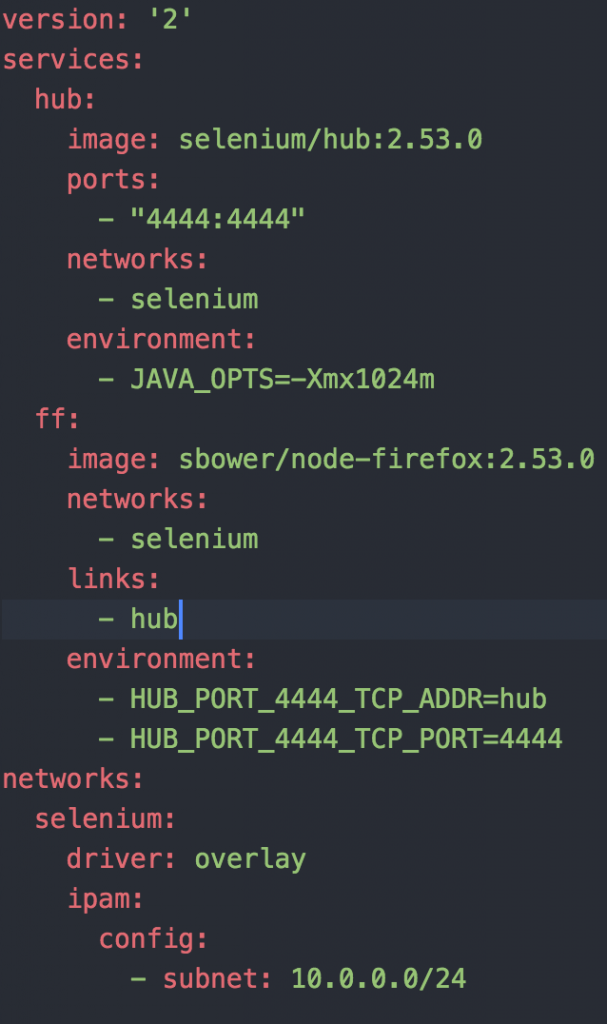
I was then able to run my script (exporting HUB_IP=localhost) and life is good.  This approach could be great for integration tests in your application but in my case I wanted to be able to throw a bunch of load at an application.  Since we have some large Docker Datacenter clusters it seemed to make sense to use that spare capacity to generate load.  In order to deploy the grid/hub to our cluster I created a docker-compose.yaml file.


docker-compose_yaml_—_selenium_infrastructure_—__Users_srb55_projects_docker-selenium-load-test

One thing to note is that I’m using a customized version of the node container, I will come back to this later.  Now I am able to bring up the grid and node as such:

selenium_infrastructure_—_-bash_—_159×41

I can now use the docker-compose ps command to find out where my hub is running.

selenium_infrastructure_—_-bash_—_159×41

Now I’m ready to launch my test.  Since all the things must run inside containers I created a simple Dockerfile to encapsulate my test script.

Then I can kick off the test and when it finishes I want to grab the logs from the firefox node.

selenium_infrastructure_—_-bash_—_159×41

docker build -t st .
docker run -e “HUB_IP=10.92.77.33” st .
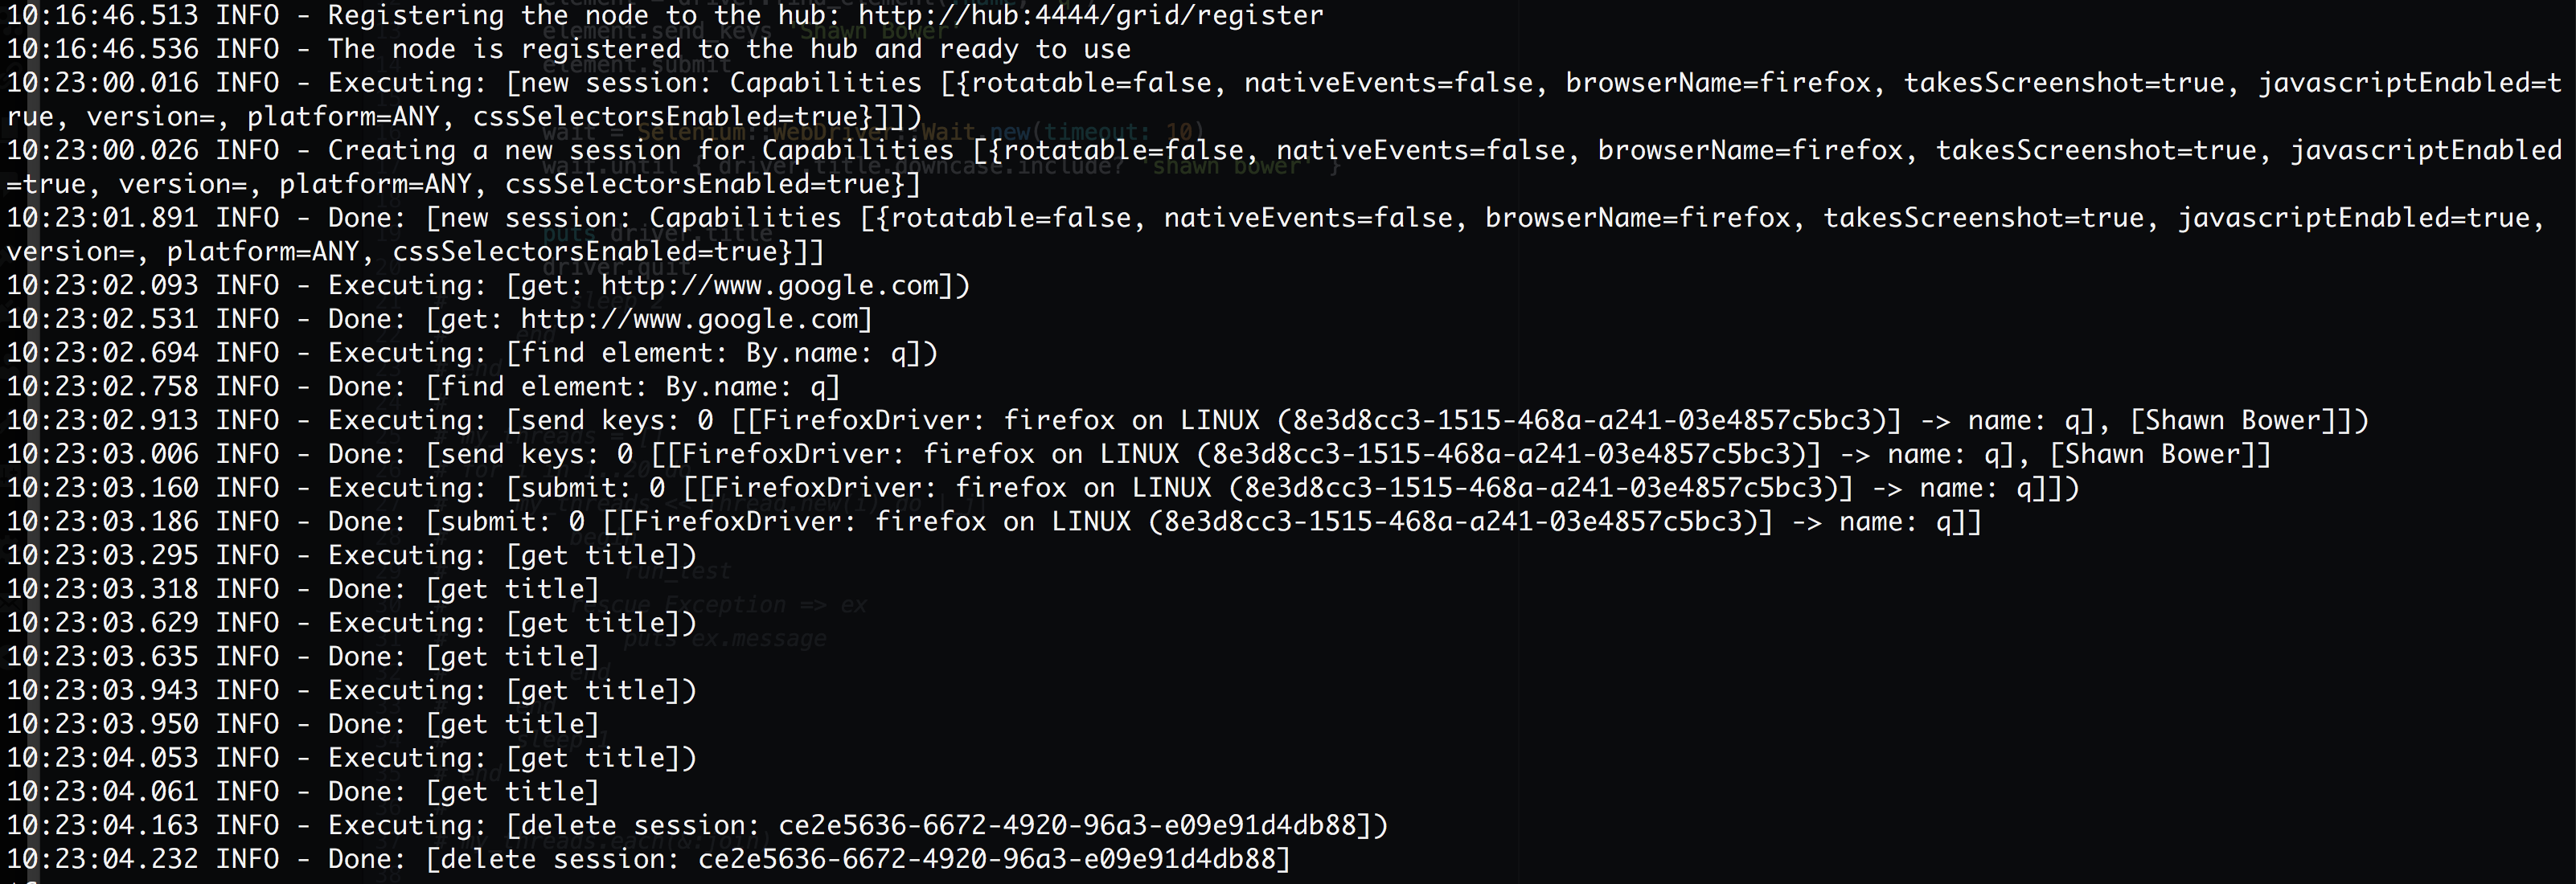
docker logs ldtest_ff_1

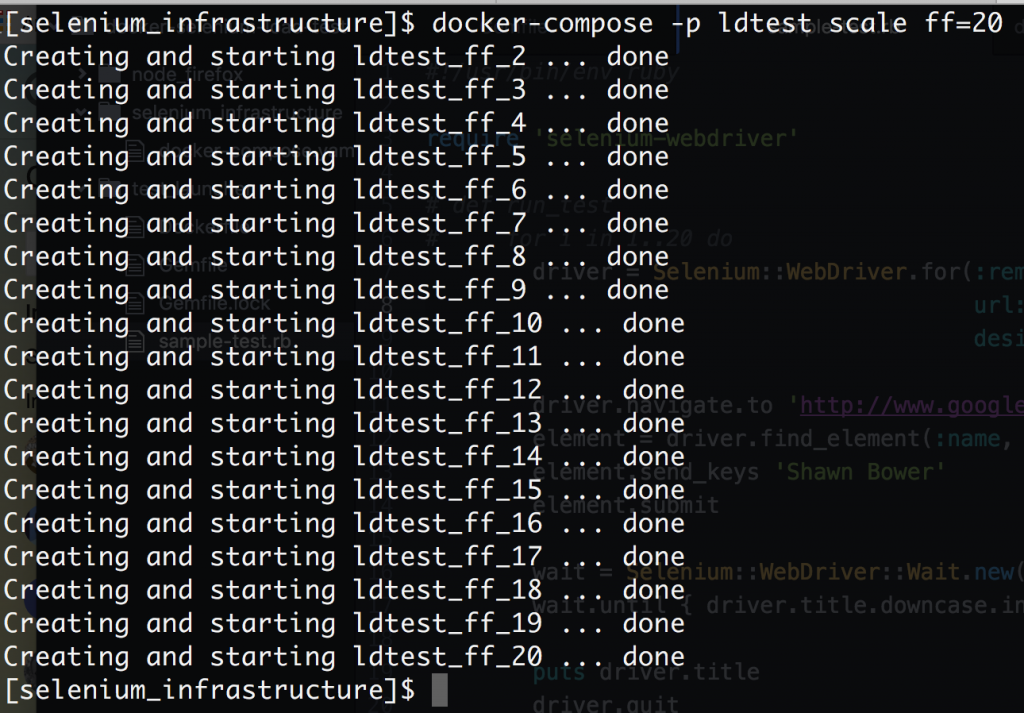
We can see the how Selenium processes the script on firefox. Note that “get title” is executed multiple times.  This is because of the waiter that is looking for my name to show up in the page title.  Sweet!  Now that we have it up and running we can scale out the firefox nodes, this is super easy using Docker Datacenter!

selenium_infrastructure_—_-bash_—_159×41

Now we can ramp up our load!  I took the script above and ran it on a loop with a small sleep at the end then spun up 20 threads to run that script.  In order to get everything working in Docker Datacenter I did have to modify the node startup script to register using the IP for the container on the overlay network.  It turns out this is a simple modification by adding an environment variable for the IP

export IP=`hostname -I | perl -lne ‘print $1 if /(10.\d.\d.\d+)/’`

Then when the node is launched you need to add “-host $IP”

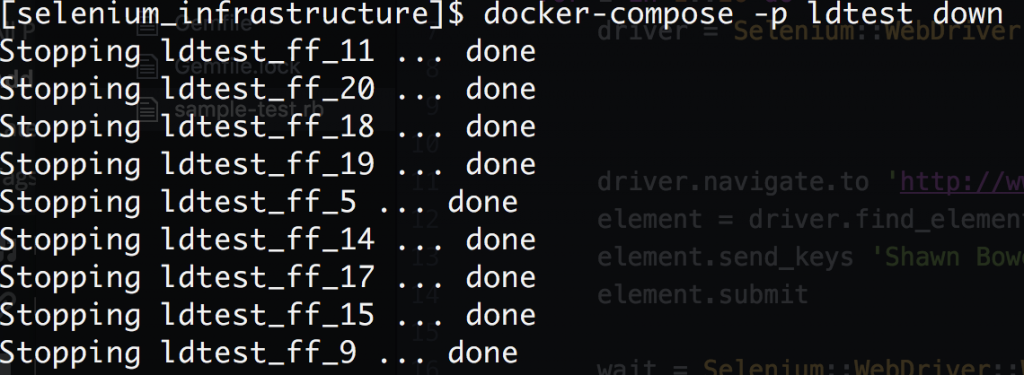
When are finished we can quickly bring everything down.

selenium_infrastructure_—_-bash_—_159×41


Conclusion

It is relatively simple to setup a load driver using Docker Datacenter.  The code used for this example can be found here: https://github.com/sbower/docker-selenium-load-test.  This is super bare bones.  Some neat ideas for extensions would be, to add a mechanism to ramp the load, a mechanism to create a load profile comprised of multiple scripts, and a mechanism to store response time data.  Some useful links for using selenium with ruby and Docker.

  • https://github.com/SeleniumHQ/selenium/wiki/Ruby-Bindings
  • https://github.com/SeleniumHQ/docker-selenium
  • https://gist.github.com/kenrett/7553278

Docker + Puppet = Win!

by Shawn Bower

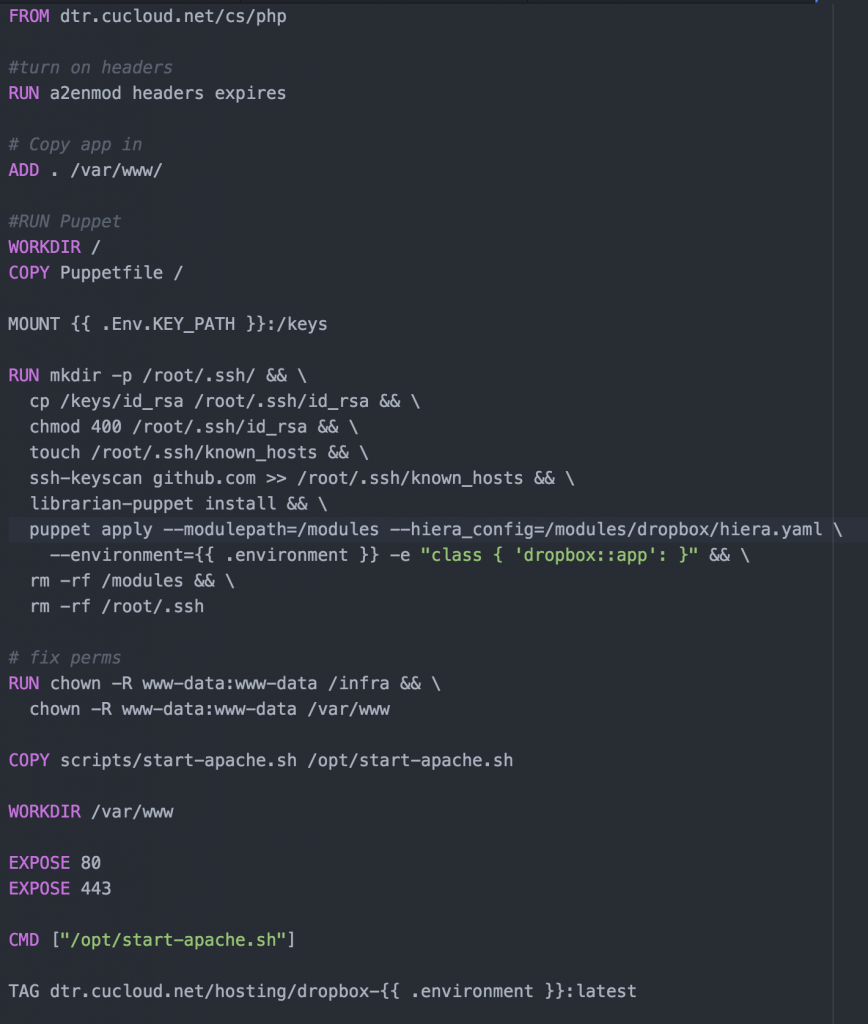
On many of our Cloudification projects we use a combination of Docker and Puppet to achieve Infrastructure as code. We use a Dockerfile to create the infrastructure; all the packages required to run the application along with the application code itself. We run puppet inside the container to put down environment specific configuration. We also use a tool called Rocker that adds some handy directives for use in our Docker file.  Most importantly Rocker adds a directive called MOUNT which is used to share volumes between builds.  This allows us to mount local disk space which is ideal for secrets which we do not want copied into the Docker image.  Rocker has to be cool so they us a default filename of Rockerfile.   Let’s take a look at a Rockerfile for one of our PHP applications, dropbox:

dorpbox-dockerfile


This image starts from our standard PHP image which is kept up to date a patched weekly by the Cloud Services team.  From there we enable a couple of Apache modules that are needed by this application.  Then the application is copied into the directory ‘/var/www/.’

Now we mount the a local directory that contains our ssh key and encryption keys.   After which we go into the puppet setup.  For our projects we use a masterless puppet setup which relies on the librarian puppet module.  The advantage is we do not need to run a puppet server and we can configure the node at the time we build the image.  For librarian puppet we need to use a Puppetfile, for this project is looks like this:

dropbox-puppetfile

The Puppetfile list all the modules that use wish puppet to have access to and the git path to those modules.  In our case we have a single module for the dropbox application.  Since the dropbox module is stored in a private github repository we will use ssh key we mounted earlier to access it.  In order to do this we will need to add github to our known host file.  Running the command ‘librarian-puppet install’ will read the Puppetfile and install the module into /modules.  We can then use puppet to apply the module to our image.  We can control the environment specific config to install using the “–environment” flag, you can see in our Rockerfile the variable is templated out with “{{ .environment }}”.  This will allow us to specify the environment at build time.  After puppet is run we clean up some permissions issues then copy in our image startup script.  Finally we specify the ports that should be exposed when this image is run.  The build is run with a command like “rocker -var environment=development.”

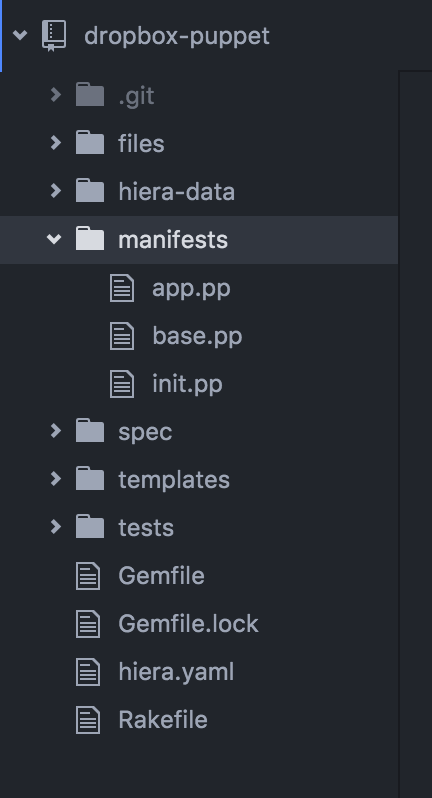
It is outside the scope of this article to detail how puppet is used, you can find details on puppet here. The puppet module is laid out like this:

dropbox-puppet-layout

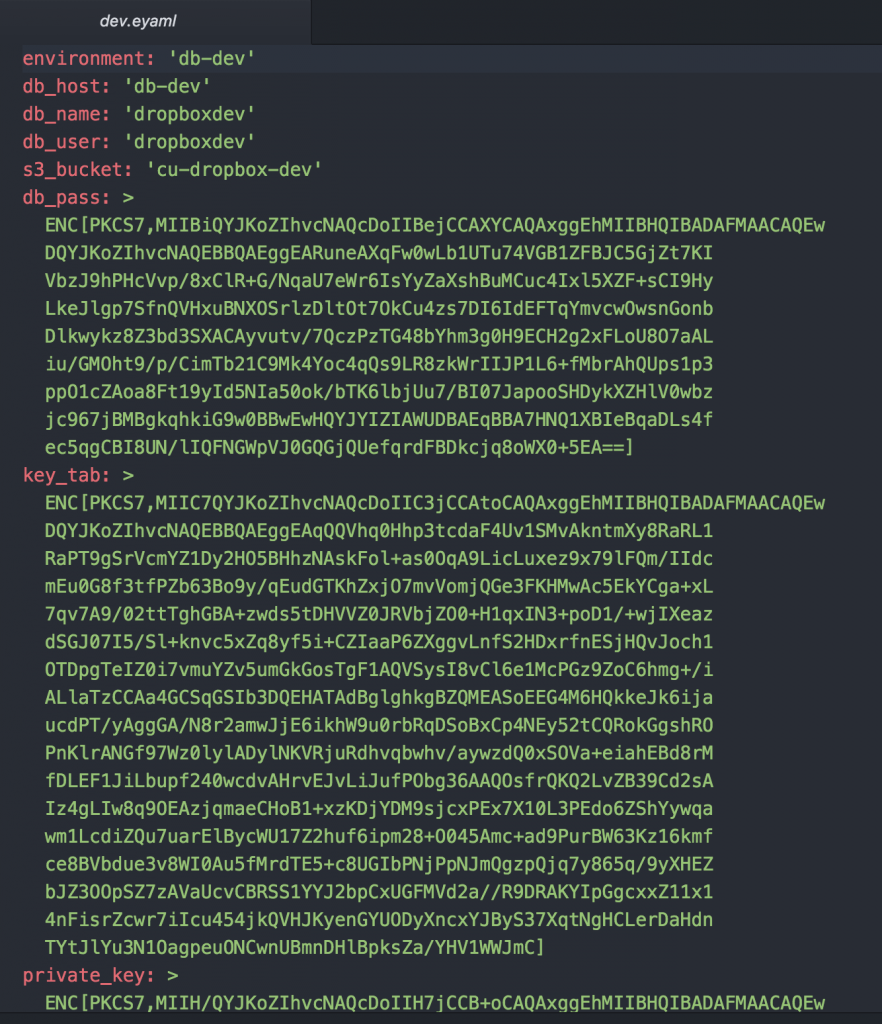
The files directory is used to store static files, hier-data is used to store our environment specific config, manifest stores the puppet manifests, spec is for spec test, templates is for storing dynamically generated files and tests is for test that are run to check for compilation errors.  Under hiera-data we will find an eyaml (encrypted yaml) file for each environment.  For instance let us look at the one for dev:

dev_eyaml

You can see that the file format is that of a typical yaml file with the exception of the fields we wish to keep secret.  These are encrypted by the hiera-eyaml plugin.  Early in the Rockerfile we mounted a “keys” folder wich contains the private key to decrypt these secrets when puppet runs.  In order for the hiera-eyaml to work correctly we have to adjust the hiera config, we store the following in our puppet project:

hiera_yaml1

The backends are the order in which to prefer files, in our case we want to give precedence to eyaml.  Under the eyaml config we have to specify where the data files live as well as where to find the encryption keys.  When we run the pupp apply we have to specify the path to this config file with the “–hiera_config” flag.

With this process we can use the same basic infrastructure to build out multiple environments for the dropbox application.  Using the hiera-eyaml plugin we can store the secrets in our puppet repository safely in github as they are encrypted.  Using Rocker we can keep our keys out of the image which limits the exposure of secrets if this image were to be compromised.  Now we can either build this image on the host it will run or push it to our private repository for later distribution.  Given that the images contains secrets like the database password you should give careful consideration on where the image is stored.

Using Shibboleth for AWS API and CLI access

by Shawn Bower


Update 2019-11-06: We now recommend using awscli-login to obtaining temporary AWS credentials via SAML. See our wiki page Access Keys for AWS CLI Using Cornell Two-Step Login (Shibboleth)


This post is heavily based on “How to Implement Federated API and CLI Access Using SAML 2.0 and AD FS” by Quint Van Derman, I have used his blueprint to create a solution that works using Shibboleth at Cornell.

TL;DR

You can use Cornell Shibboleth login for both API and CLI access to AWS.  I built docker images that will be maintained by the Cloud Services team that can be used for this and it is as simple as running the following command:

docker run -it --rm -v ~/.aws:/root/.aws dtr.cucloud.net/cs/samlapi

After this command has been run it will prompt you for your netid and password.  This will be used to login you into Cornell Shibboleth. You will get a push from DUO.  Once you have confirmed the DUO notification, you will be prompted to select the role you wish to use for login, if you have only one role it will choose that automatically.  The credentials will be placed in the default credential file (~/.aws/credentials) and can be used as follows:

aws --profile saml s3 ls

NOTE: In order for the script to work you must have at least two roles, we can add you to a empty second role if need be.  Please contact cloud-support@cornell.edu if you need to be added to a role.

If there are any problems please open an issue here.

Digging Deeper

All Cornell AWS accounts that are setup by the Cloud Services team are setup to use Shibboleth for login to the AWS console. This same integration can be used for API and CLI access allowing folks to leverage AD groups and aws roles for users. Another advantage is this eliminates the need to monitor and rotate IAM access keys as the credentials provided through SAML will expire after one hour. It is worth noting the non human user ID will still have to be created for automating tasks where it is not possible to use ec2 instance roles.

When logging into the AWS management console the federation process looks likesaml-based-sso-to-console.diagram

  1. A user goes to the URL for the Cornell Shibboleth IDP
  2. That user is authenticated against Cornell AD
  3. The IDP returns a SAML assertion which includes your roles
  4. The data is posted to AWS which matches roles in the SAML assertion to IAM roles
  5.  AWS Security Token Services (STS) issues a temporary security credentials
  6. A redirect is sent to the browser
  7. The user is now in the AWS management console

In order to automate this process we will need to be able to interact with the Shibboleth endpoint as a browser would.  I decided to use Ruby for my implementation and typically I would use a lightweight framework like ruby mechanize to interact with webpages.  Unfortunately the DUO integration is done in an iframe using javascript, this makes things gross as it means we need a full browser. I decided to use selenium web driver to do the heavy lifting. I was able to script the login to Shibboleth as well as hitting the button for a DUO push notification:
duo-push

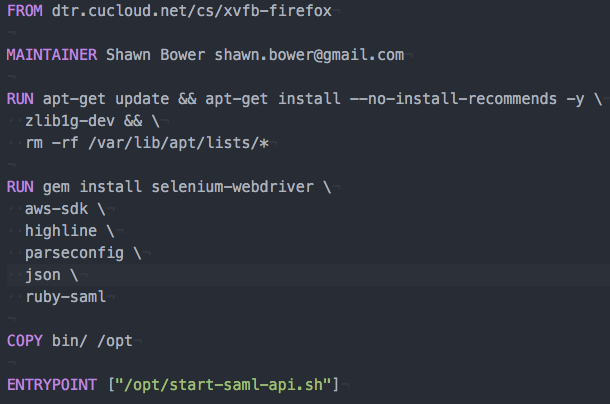
In development I was able to run this on mac just fine but I also realize it can be onerous to install the dependencies needed to run selenium web driver.  In order to make the distribution simple I decided to create a docker images that would have everything installed and could just be run.  This meant I needed a way to run selenium web driver and firefox inside a container.  To do this I used Xvfb to create a virtual frame buffer allowing firefox to run with out a graphics card.  As this may be useful to other projects I made this a separate image that you can find here.  Now I could create a Dockerfile with the dependencies necessary to run the login script:

saml-api-dockerfile

The helper script starts Xvfb and set the correct environment variable and then launches the main ruby script.  With these pieces I was able to get the SAML assertion from Shibboleth and the rest of the script mirrors what Quint Van Derman had done.  It parses the assertion looking for all the role attributes.  Then it presents the list of roles to the user where they can select which role they wish to assume.  Once the selection is done a call is made to the Simple Token Service (STS) to get the temporary credentials and then the credentials are stored in the default AWS credentials file.

Conclusion

Now you can manage your CLI and API access the same way you manage your console access. The code is available and is open source so please feel free to contribute, https://github.com/CU-CloudCollab/samlapi. Note I have not tested this on Windows but it should work if you change the volume mount to the default credential file on Windows. I can see the possibility to do future enhancements such as adding the ability to filter the role list before display it, so keep tuned for updates. As always if you have any questions with this or any other Cloud topics please email cloud-support@cornell.edu.

How to run Jenkins in ElasticBeanstalk

by Shawn Bower

The Cloud Services team in CIT maintains docker images for common pieces of software like apache, java, tomcat, etc.  One of these images that we maintain is Cornellized Jenkins images.  This image contains Jenkins with the oracle client and Cornell OID baked in.  One of the easiest way to get up and running in AWS with this Jenkins instance is to use Elastic Beanstalk which will manage the infrastructure components.  Using Elastic Beanstalk you don’t have to worry about patching as it will manage the underlying OS of your ec2 instances.  The Cloud Services team releases patched version of Jenkins image on a weekly basis. If you want to stay current the you just need to kick off a new deploy in Elastic Beanstalk.  Let’s walk through the process of getting this image running on Elastic Beanstalk!

A.) Save Docker Hub credentials to S3

INFO:

Read about using private Docker repos with Elastic Beanstalk.

We need to make our DTR credentials available to Elastic Beanstalk, so automated deployments can pull the image from the private repository.

  1. Create an S3 bucket to hold Docker assets for your organization— we use  cu-DEPT-docker 
  2. Login to Docker docker login dtr.cucloud.net
  3. Upload the local credentials file ~/.docker/config.json to the S3 bucket cu-DEPT-docker/.dockercfg 

    Unfortunately, Elastic Beanstalk uses an older version of this file named  .dockercfg.json  The formats are slightly different. You can read about the differences here.

    For now, you’ll need to manually create  .dockercfg & upload it to the S3 bucket  cu-DEPT-docker/.dockercfg

B.) Create IAM Policy to Read The S3 Bucket

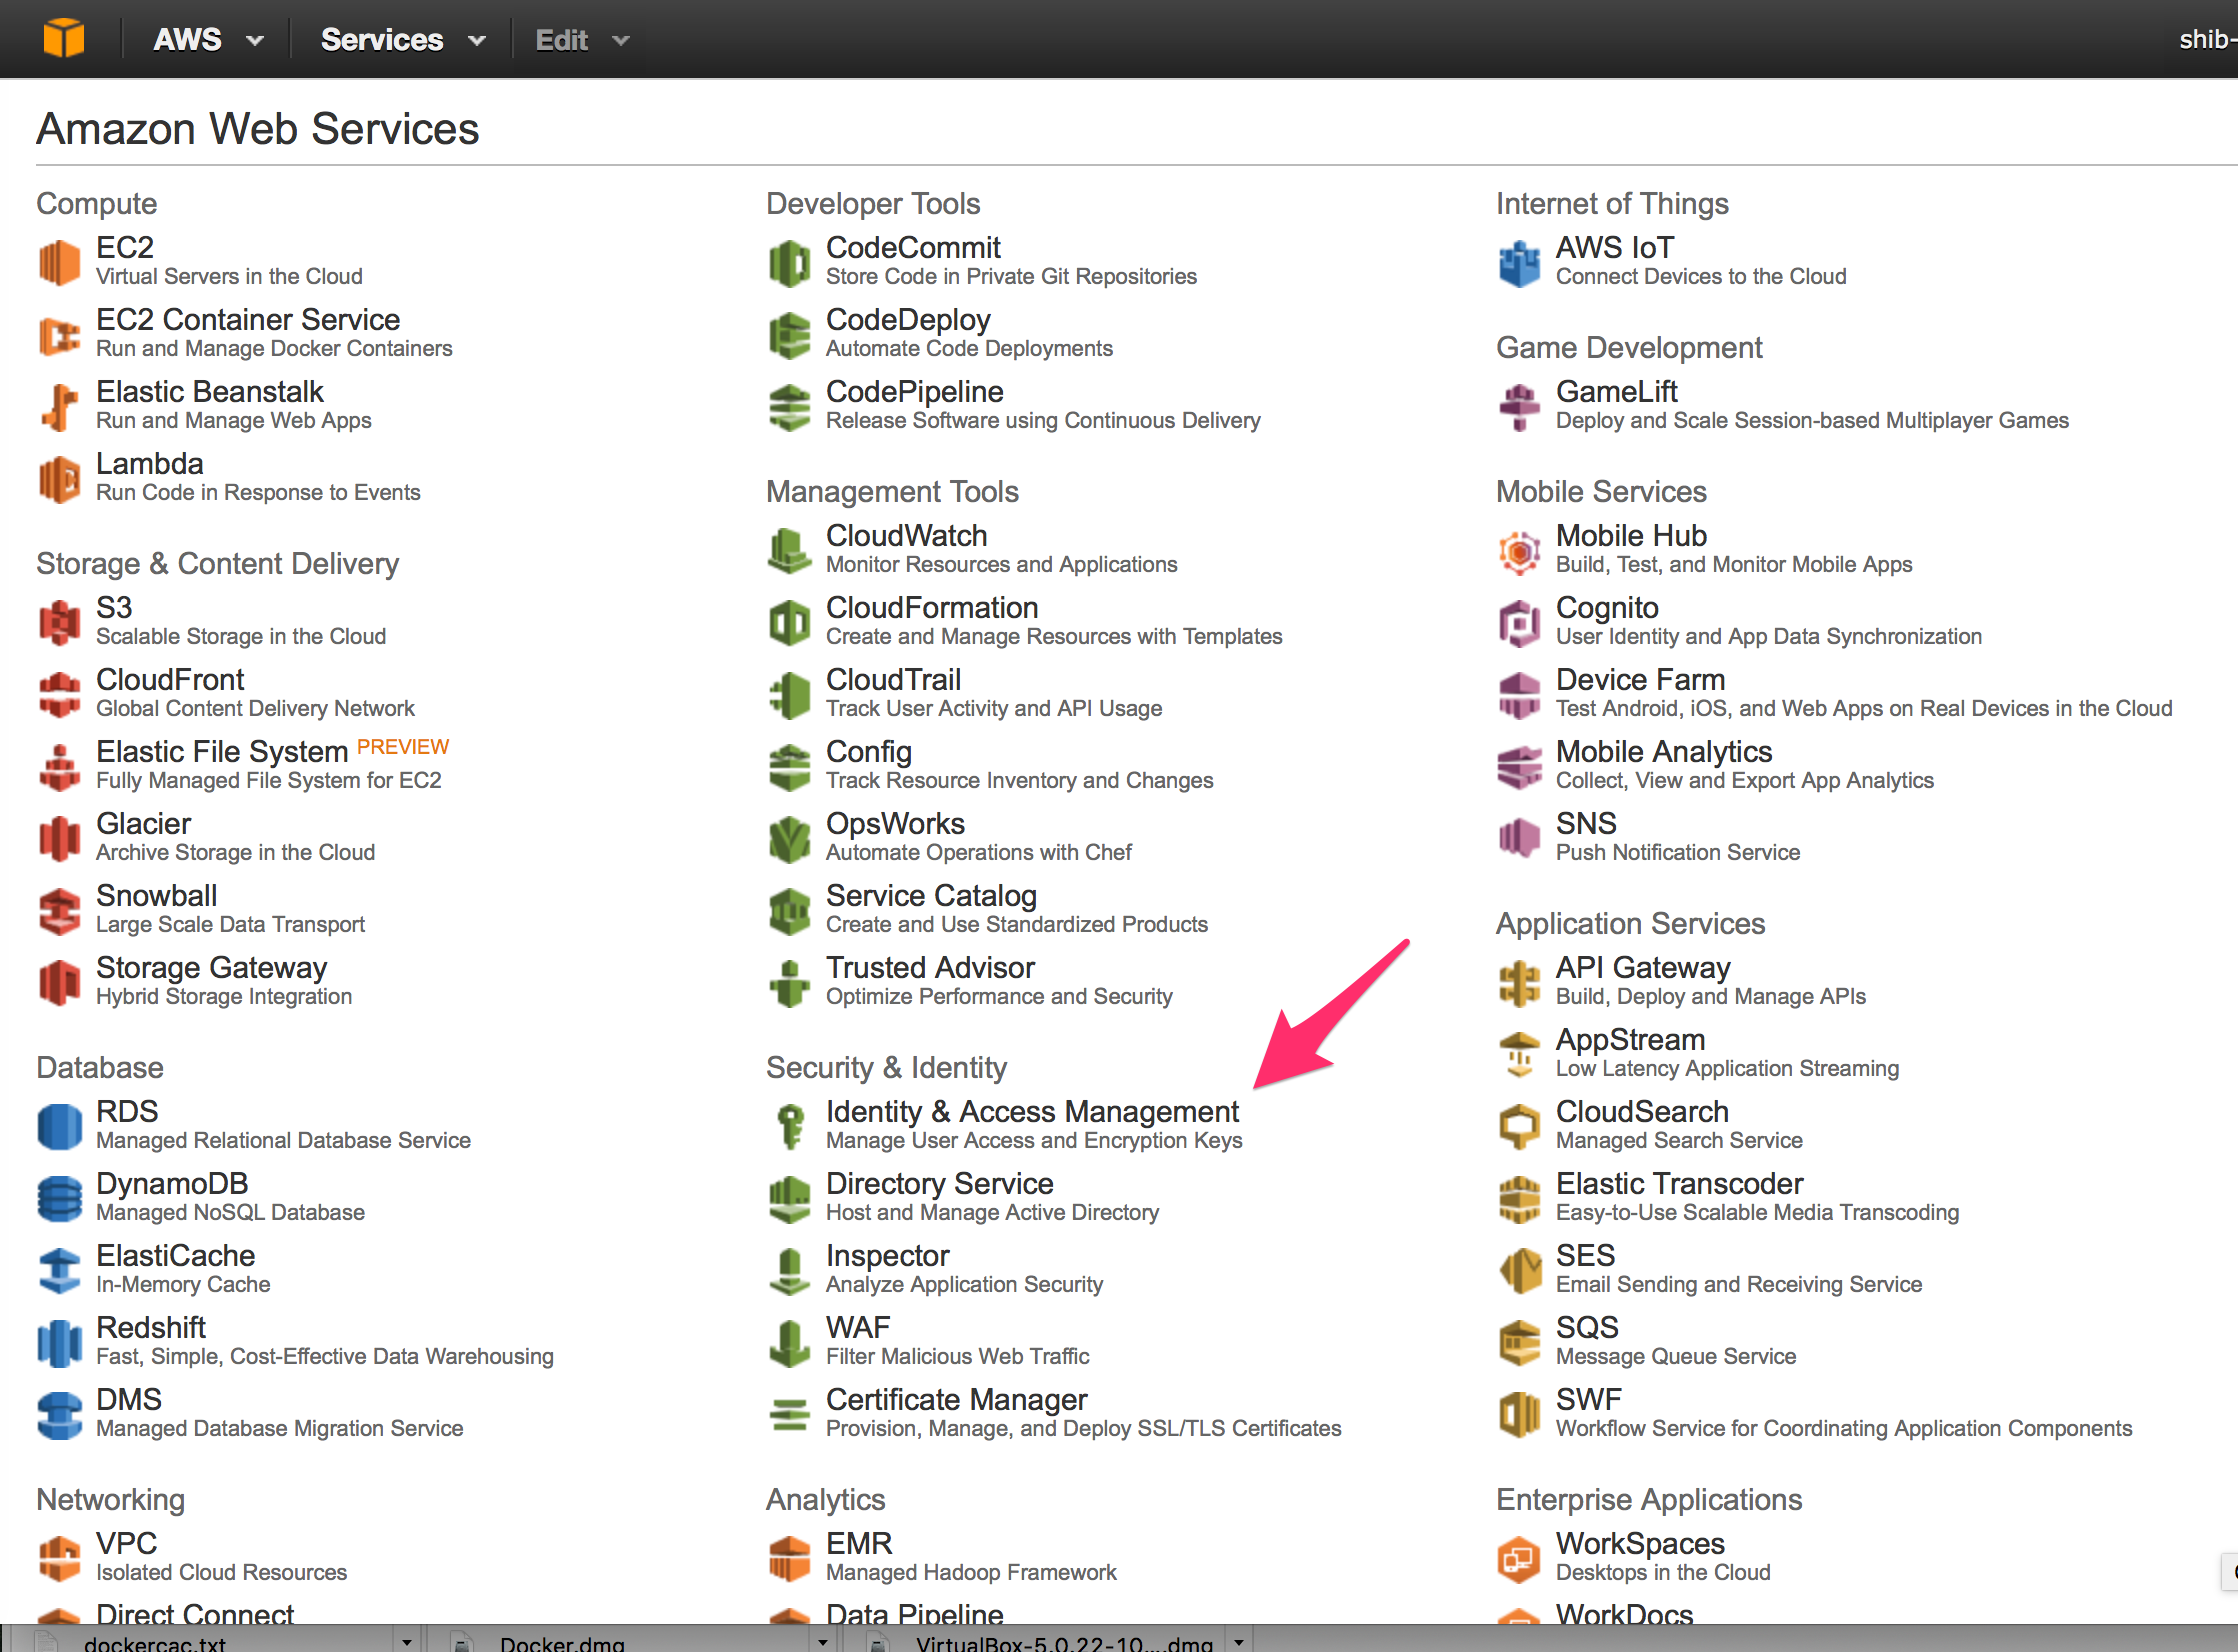
    1. Select Identity and Access Management for the AWS management consoleIAM-step-1
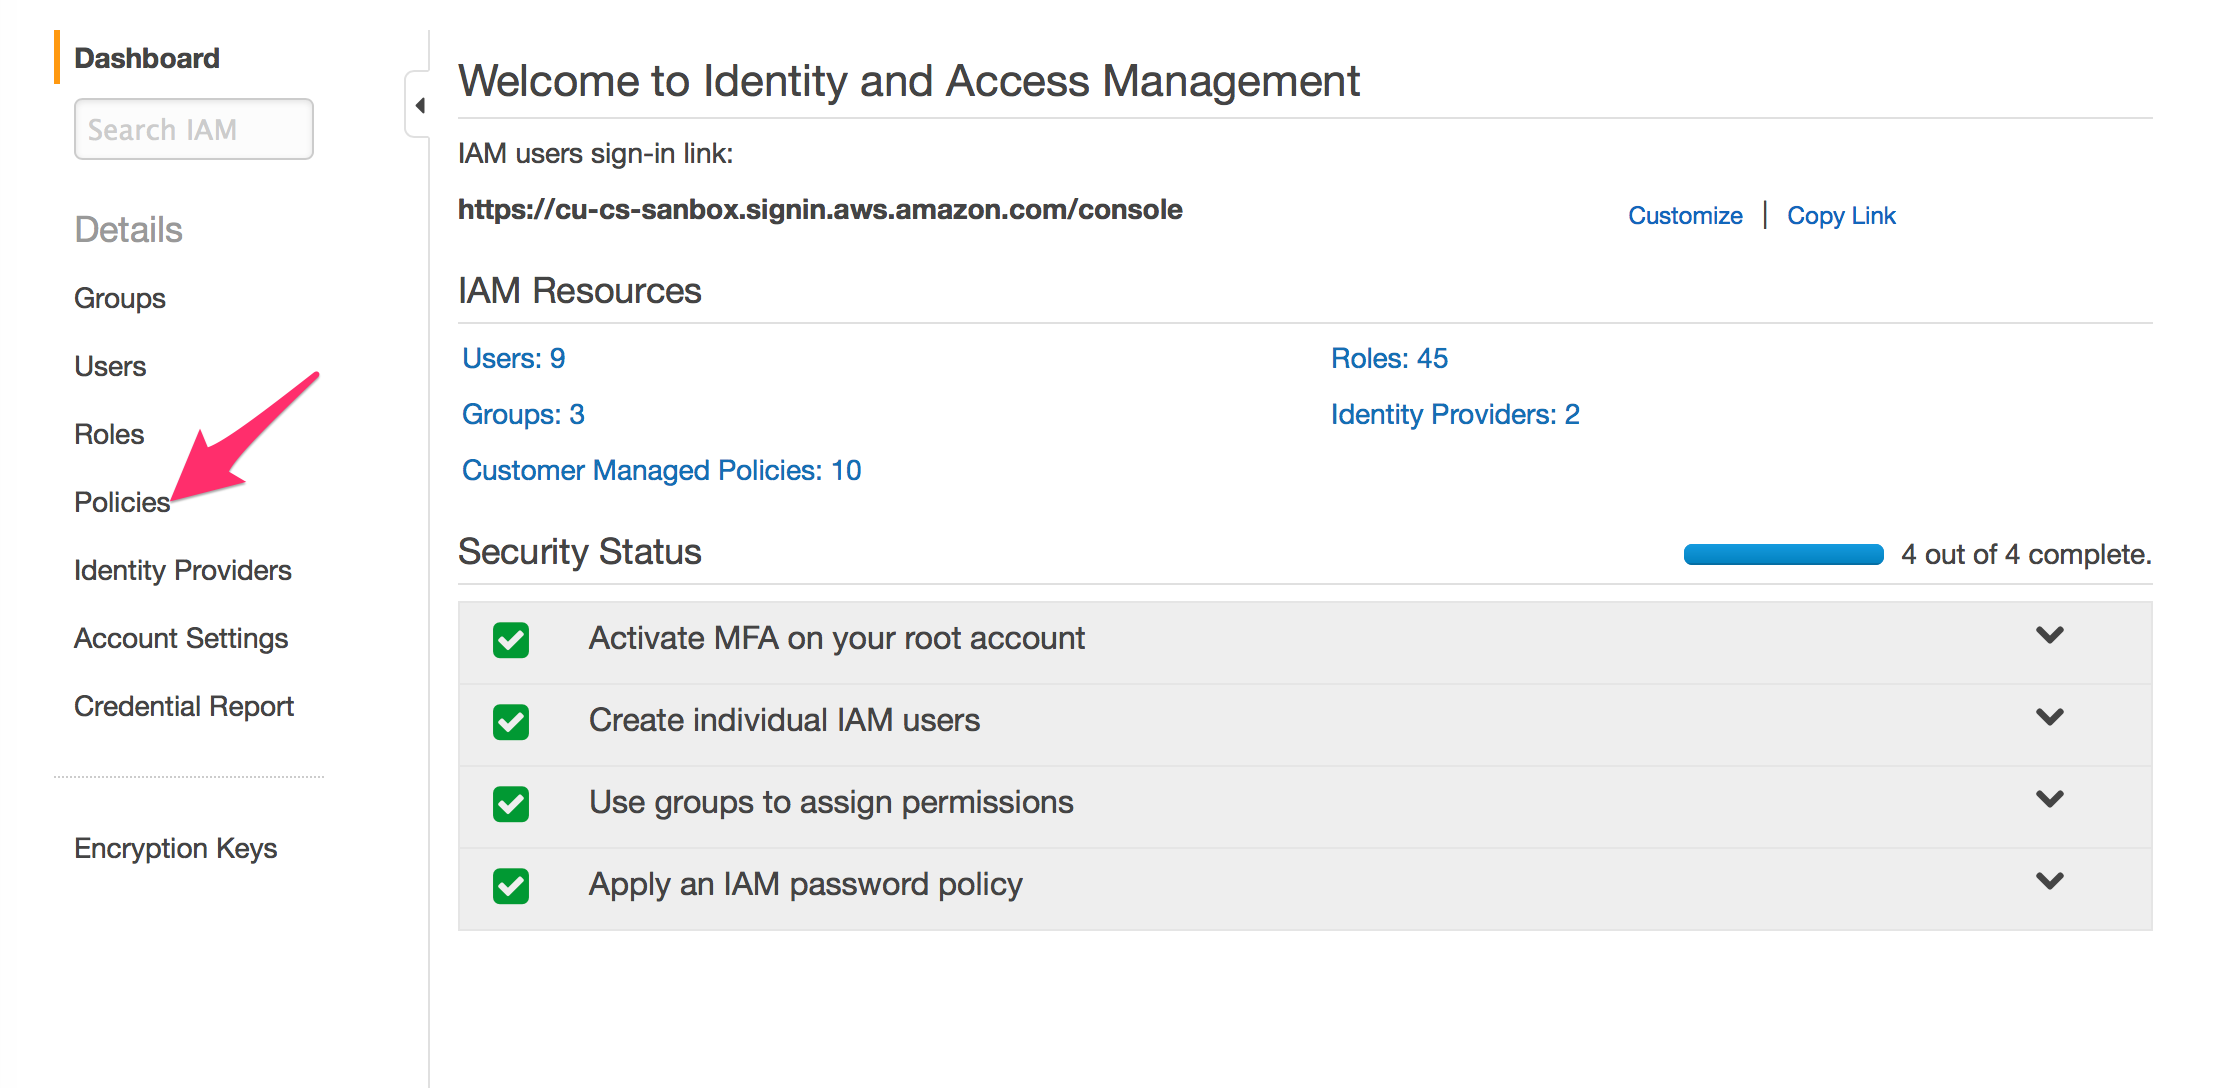
    2. Select Policies IAM-step-2
    3. Select “Create Policy” IAM-step-3
    4. Select “Create Your Own Policy” IAM-step-4
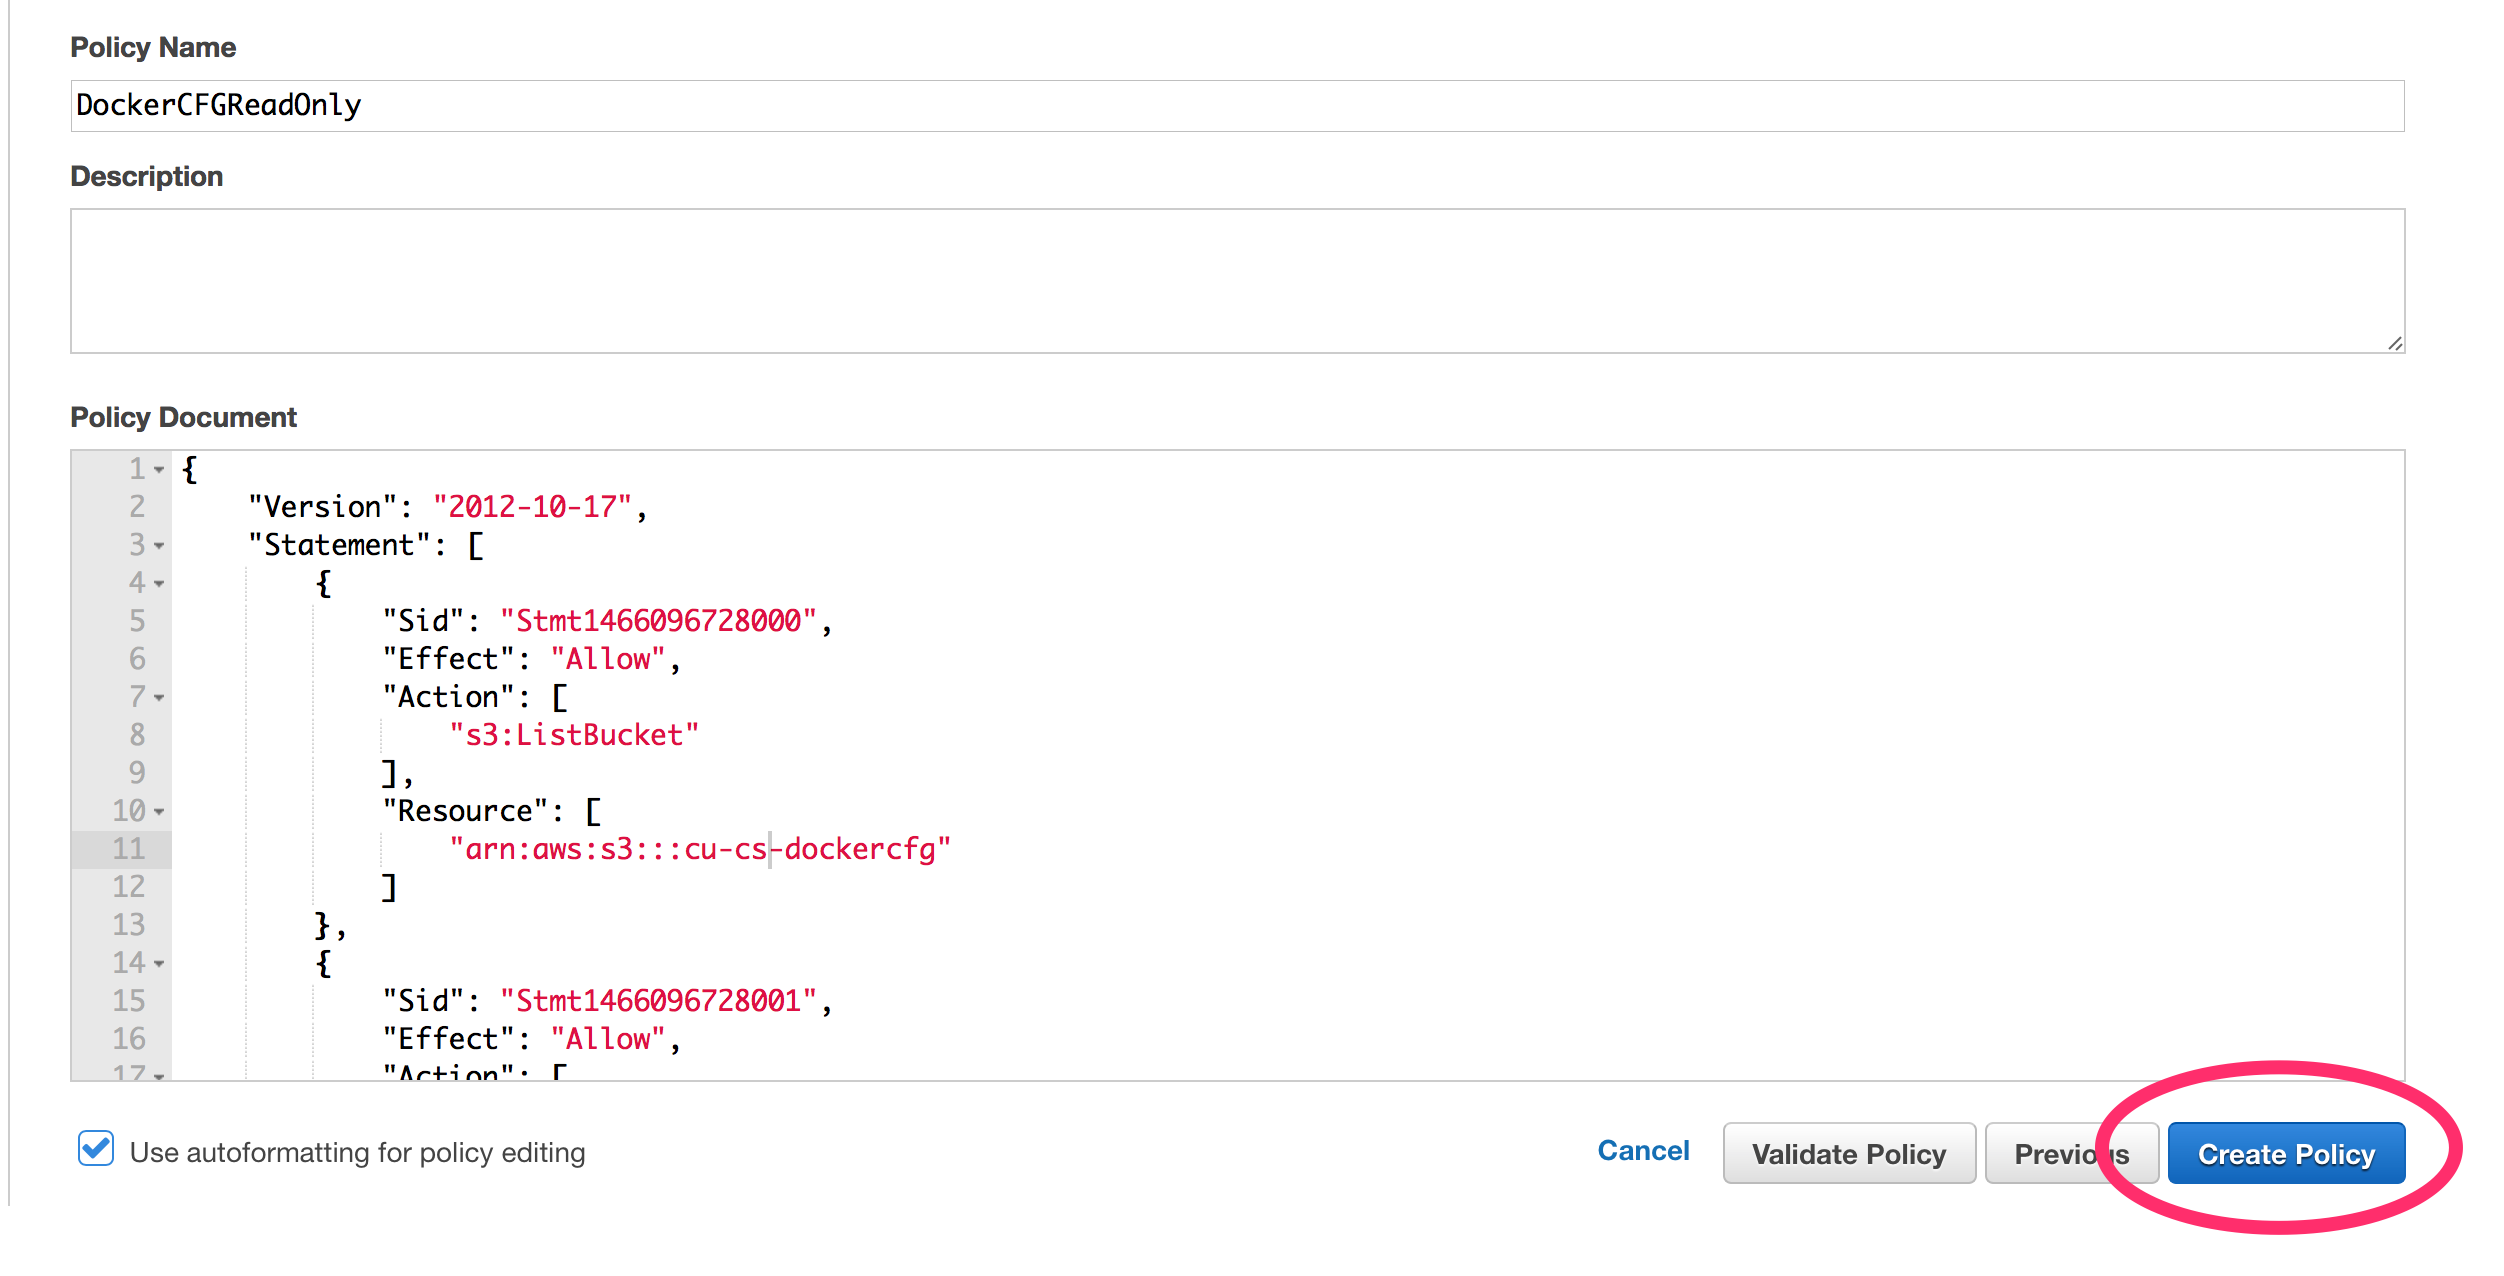
    5. Create a policy name “DockerCFGReadOnly,” see the example policy provided. IAM-step-5
Below is an example Policy for reading from a S3 bucket.
{
    "Version": "2012-10-17",
    "Statement": [
        {
            "Sid": "Stmt1466096728000",
            "Effect": "Allow",
            "Action": [
                "s3:ListBucket"
            ],
            "Resource": [
                "arn:aws:s3:::cu-DEPT-dockercfg"
            ]
        },
        {
            "Sid": "Stmt1466096728001",
            "Effect": "Allow",
            "Action": [
                "s3:GetObject",
                "s3:HeadObject",
                "s3:ListBucket"
            ],
            "Resource": [
                "arn:aws:s3:::cu-DEPT-dockercfg/.dockercfg"
            ]
        }
    ]
}


C.) Setup the Elastic Beanstalk environment

  1. Create a Dockerrun.aws.json fileHere’s an example.
  2. {
      "AWSEBDockerrunVersion": "1",
      "Image": {
        "Name": "dtr.cucloud.net/cs/jenkins:latest"
     },
     "Ports": [
       {
         "ContainerPort": "8080"
       }
     ],
     "Authentication": {
       "Bucket": "cu-DEPT-dockercfg",
       "Key": ".dockercfg"
     },
     "Volumes": [
       {
         "HostDirectory": "/var/jenkins_home",
         "ContainerDirectory": "/var/jenkins_home"
       },
       {
         "HostDirectory": "/var/run/docker.sock",
         "ContainerDirectory": "/var/run/docker.sock"
       }
     ]
    }
    

    The Authentication section refers to the Docker Hub credentials that were saved to S3.

    The Image section refers to the Docker image that was pushed to Docker Hub.

  3. We will also need to do some setup to instance using .ebextenstions.  Create a folder called “.ebextensions” and inside that folder create a file called “instance.config”  Add the following to the file:
  4.  

    container_commands:
     01-jenkins-user:
     command: useradd -u 1000 jenkins || echo 'User already exist!'
     02-jenkins-user-groups:
     command: usermod -aG docker jenkins
     03-jenkins-home:
     command: mkdir /var/jenkins_home || echo 'Directory already exist!'
     04-changeperm:
     command: chown jenkins:jenkins /var/jenkins_home


  5. Finally create a zip file with the Dockerrun.aws.json file and the .ebextenstions folder.
    zip -r jenkins-stalk.zip Dockerrun.aws.json .ebextensions/ 


D.) Setup Web Server Environment

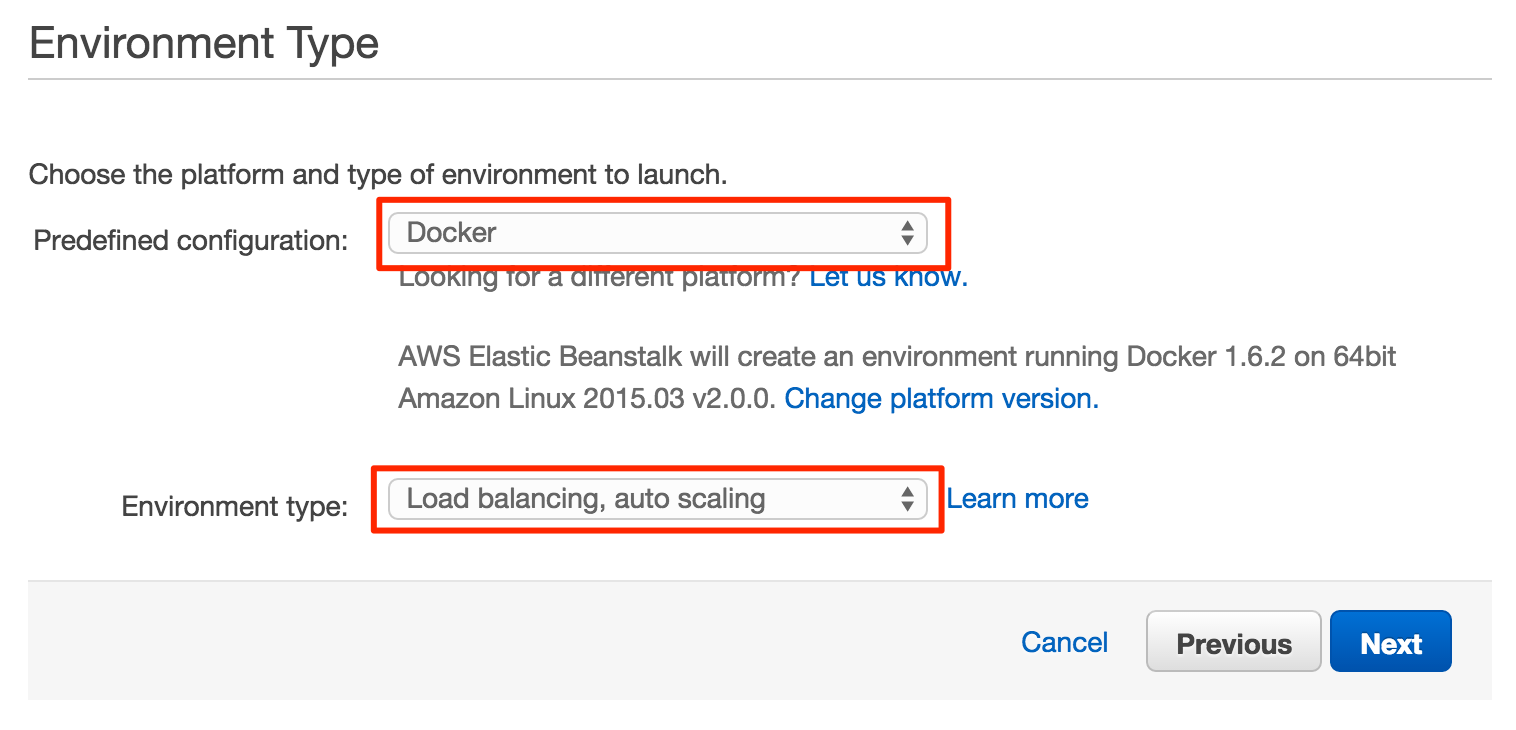
  1. Choose Docker & Load balancing, autoscaling
    create_environment
  2. Select your local zip file that we created earlier ( jenkins-stalk.zip ) as the “Source” for the application version section application
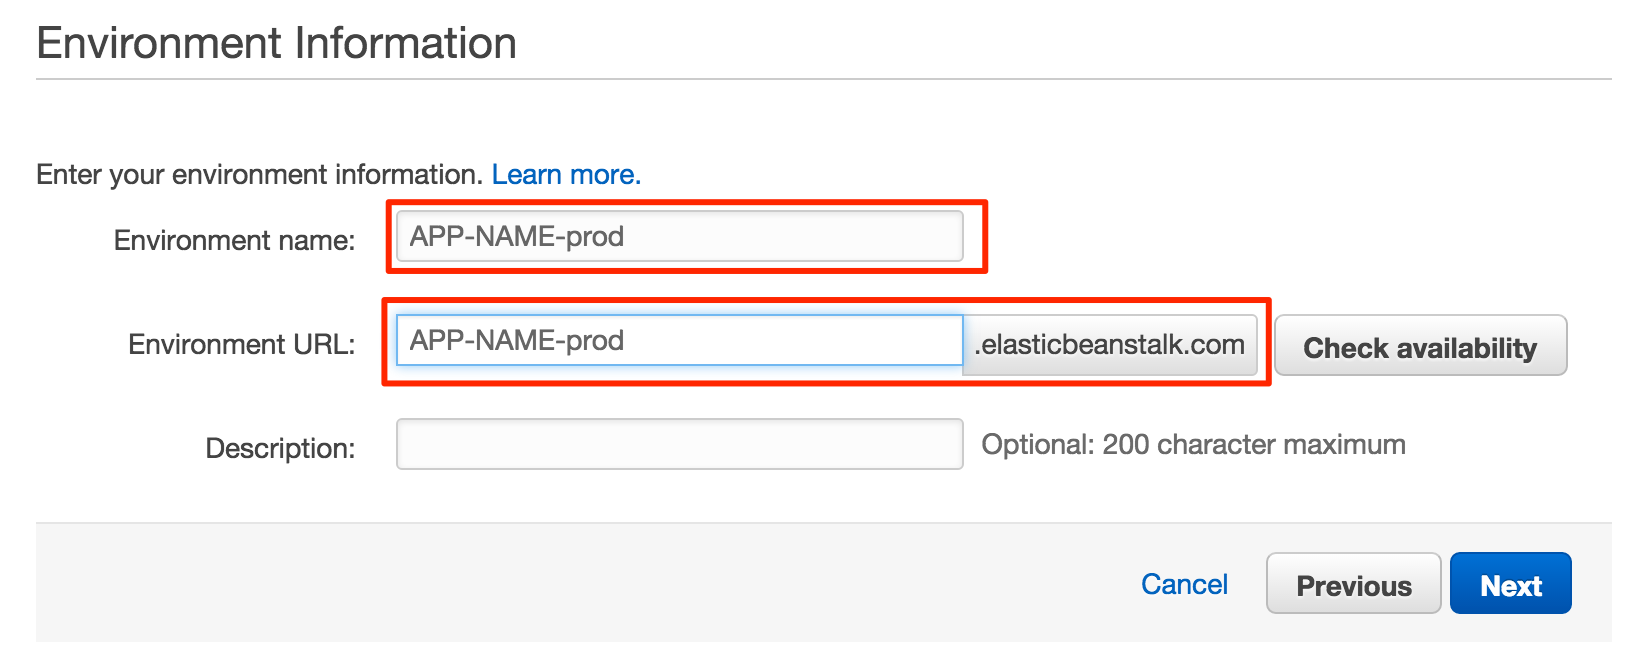
  3. Set the appropriate environment name, for example you could use jenkins-prodenvironment
  4. Complete the configuration details

    NOTE: There are several options beyond the scope of this article.

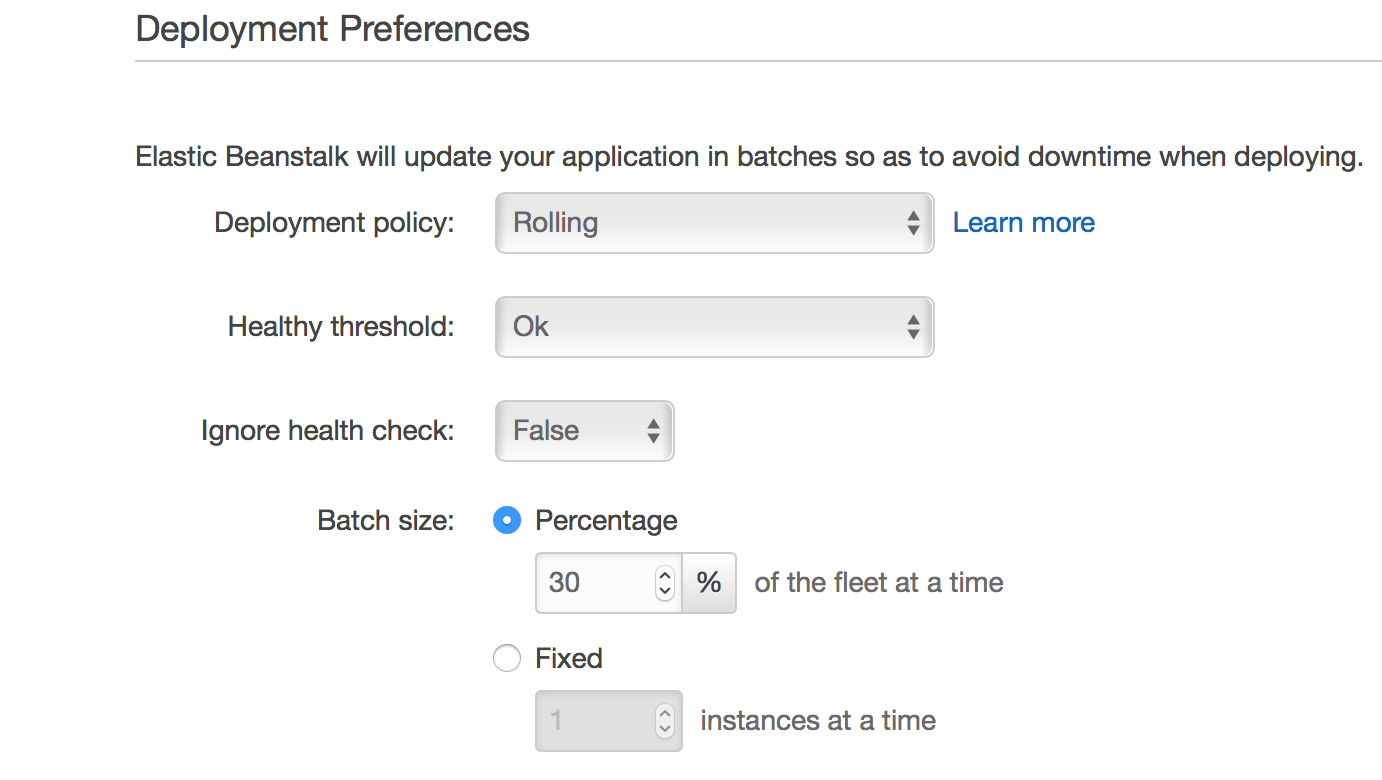
    We typically configure the following:deployment

  5. Complete the Elastic Beanstalk wizard and launch.  If you are working with a standard Cornell VPC configuration, make sure the ELB is in the two public subnets while the EC2 instances are in the private subnets.
  6. NOTE: You will encounter additional AWS features like security groups etc… These topics are beyond the scope of this article.  If presented with a check box for launching inside a VPC you should check this box.

    Create_Application

    The container will not start properly the first time. Don’t panic.  
     
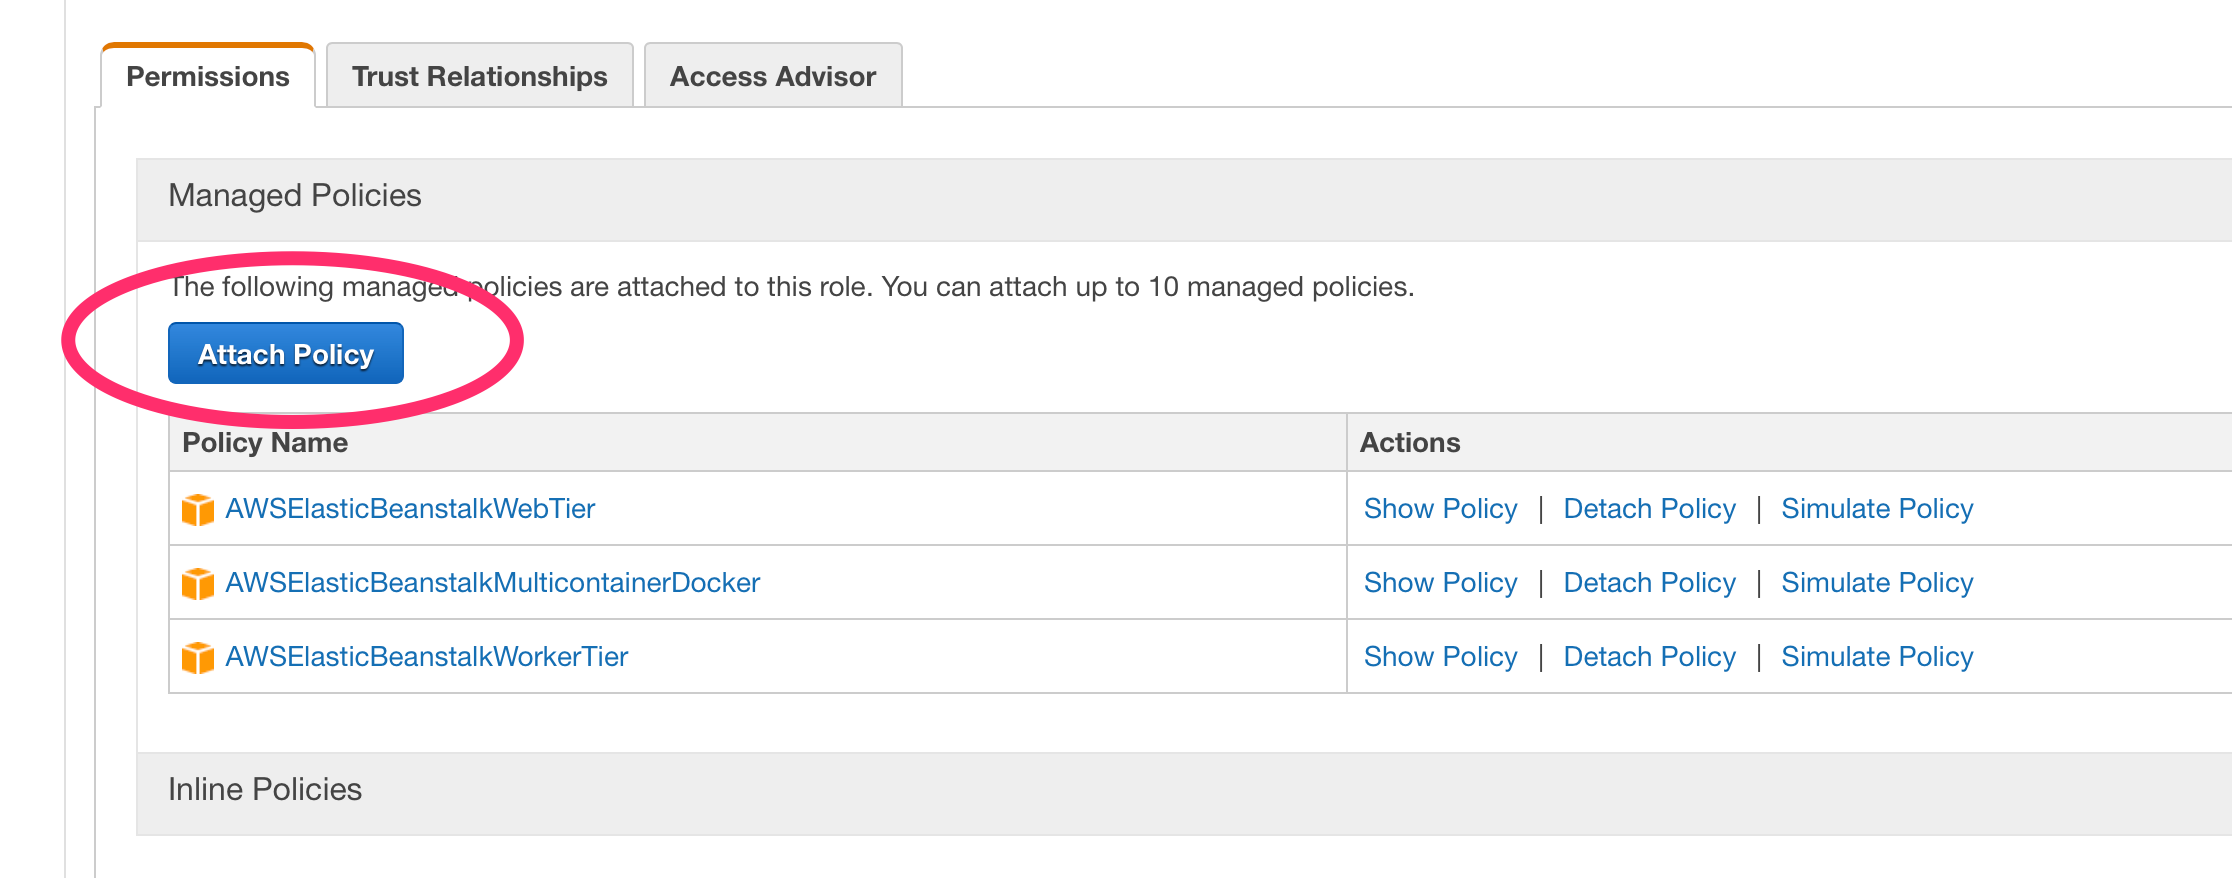
    We need to attach the IAM Policy we built earlier to the instance role used by Elastic Beanstalk.jerkins-prod_-_Dashboard_and__5__Twitter

  7. Select Identity & Access Management for the AWS management console
  8. IAM-step-1

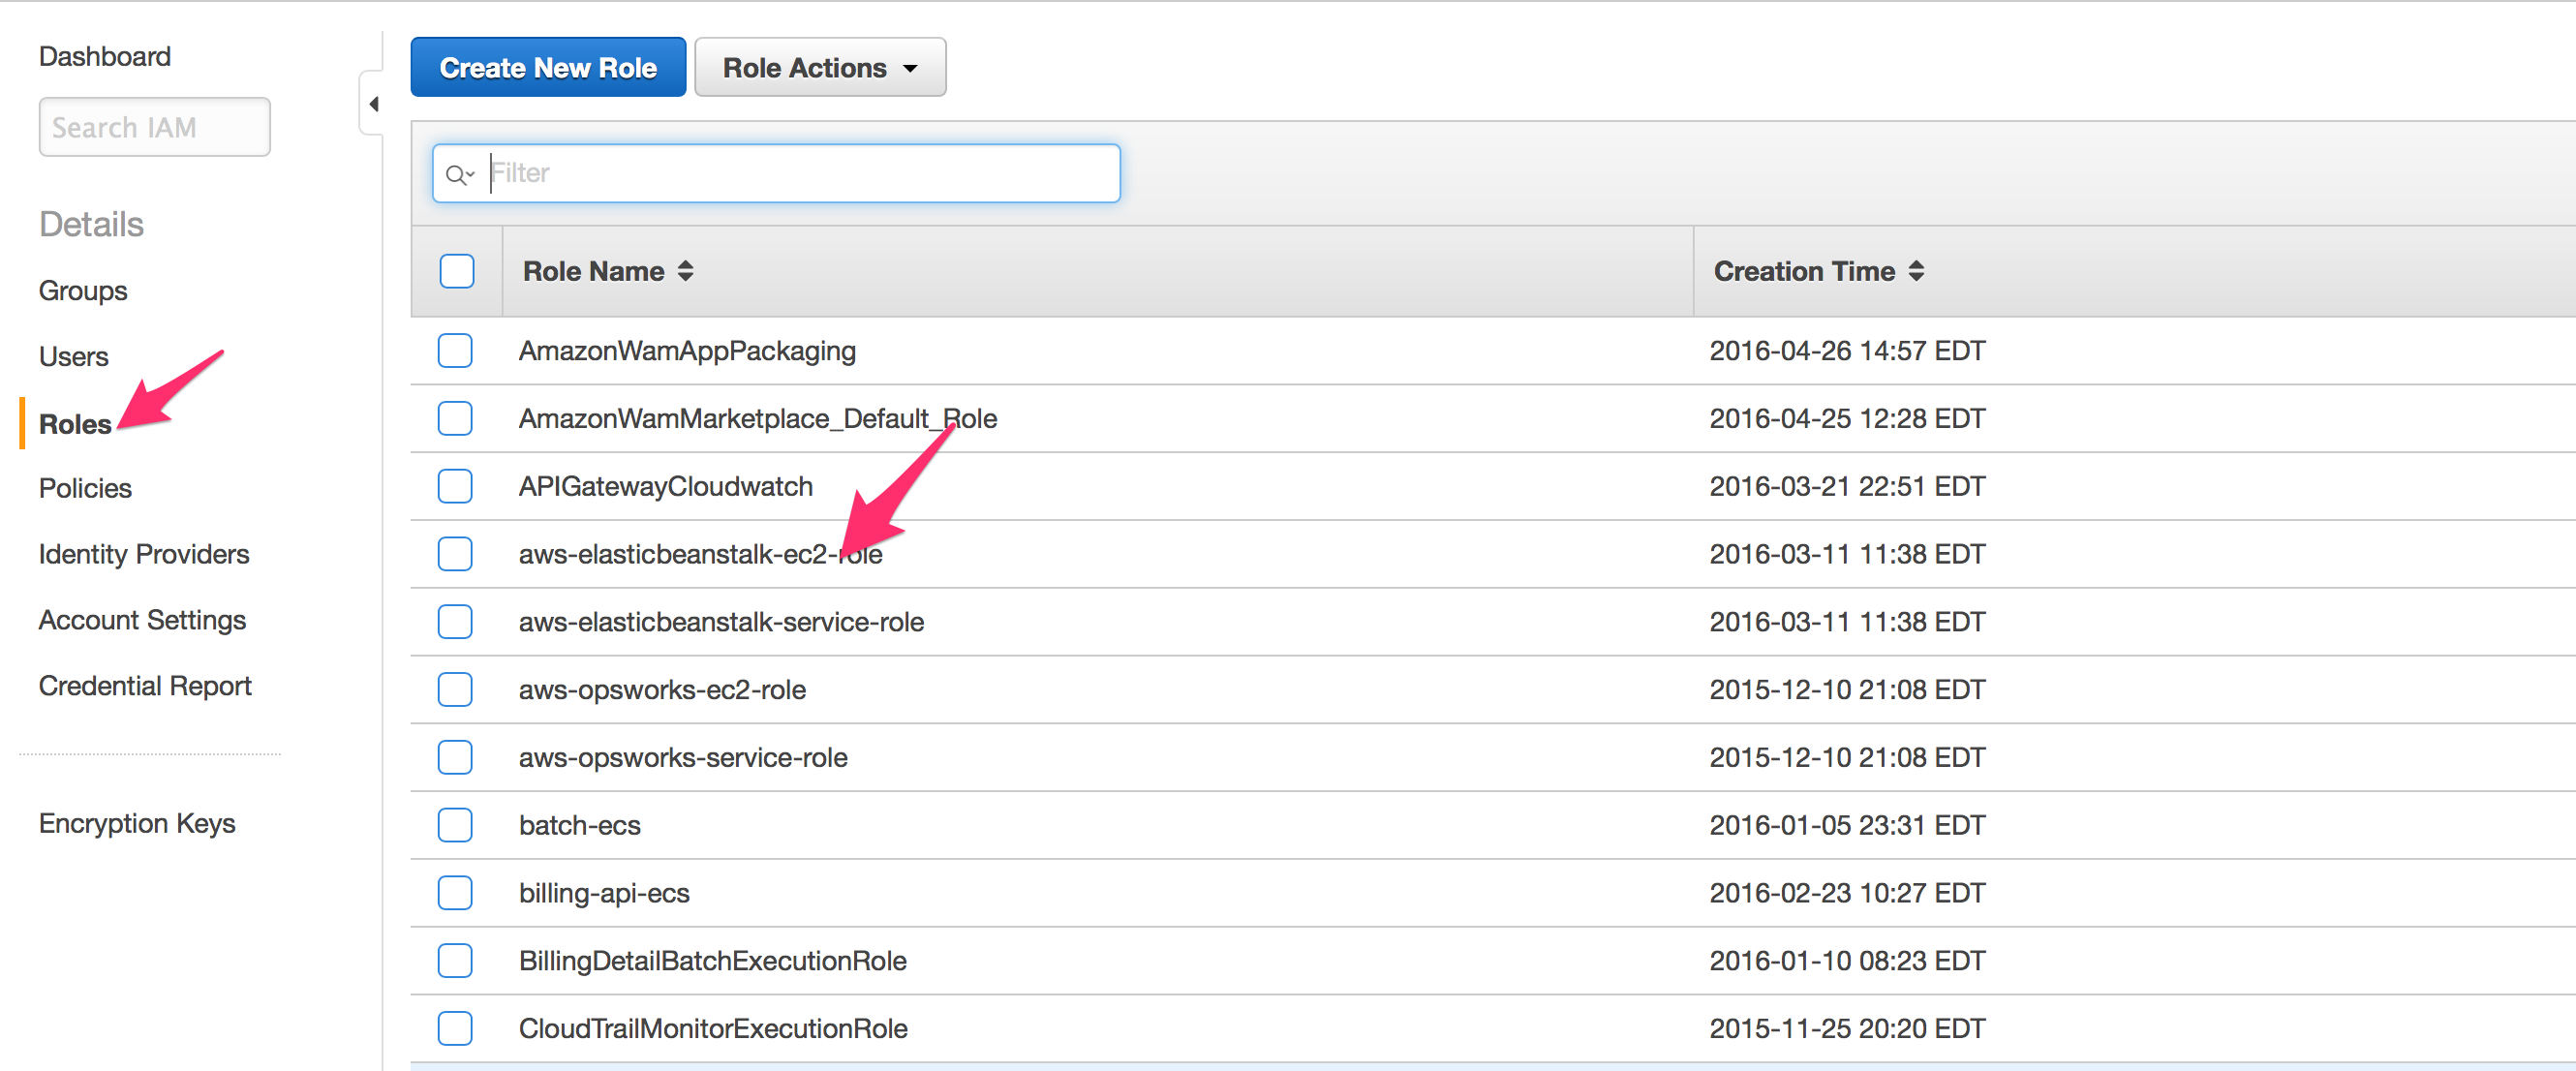
  9.  Select “Roles” then select “aws-elasticbeanstalk-ec2-role”

IAM-step-6

  • Attach the “DockerCFGReadOnly” Policy to the role IAM-step-7


E.) Re-run the deployment in Elastic Beanstalk.  You can just redeploy the current version.


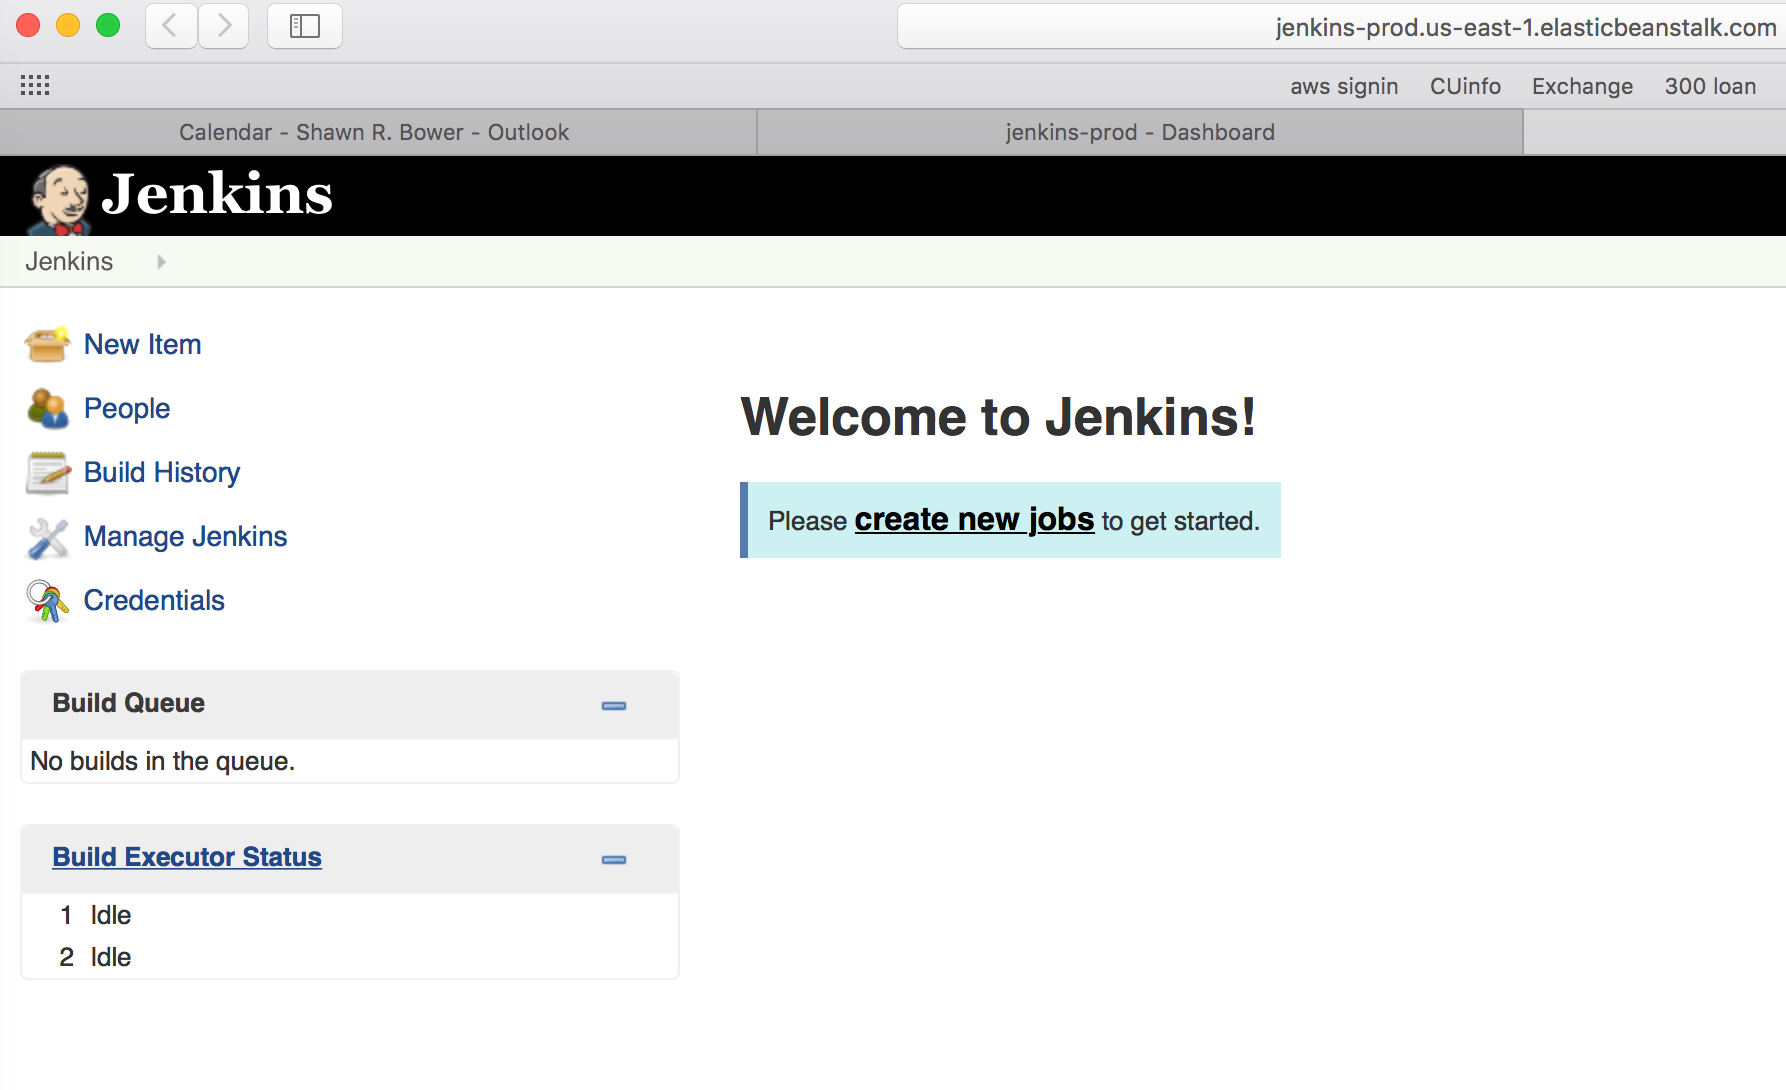
  1. Now find the URL to your Jenkins environment
  2. jenkins-prod-url

  3. And launch Jenkins

jenkins-running

SUCCESS !


F.) (optional) Running docker command inside Jenkins

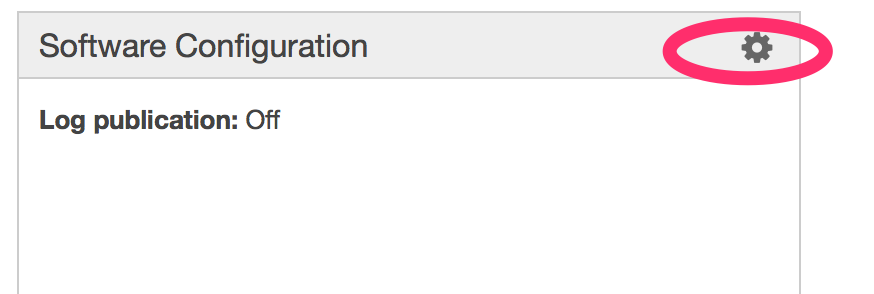
The Jenkins image comes with docker preinstalled so you can run docker build and deploys from Jenkins.  In order to use it we need to make a small tweak to the Elastic Beanstalk Configuration.  This is because we are keeping the docker version inside the image patched and on the latest commercially supported release however Elastic Beanstalk currently supports docker 1.9.1. To get things working we need to add an environment variable to use an older docker API.  First go to configurations and select the cog icon under Software Configuration.

jenkins-prod_-_Configuration
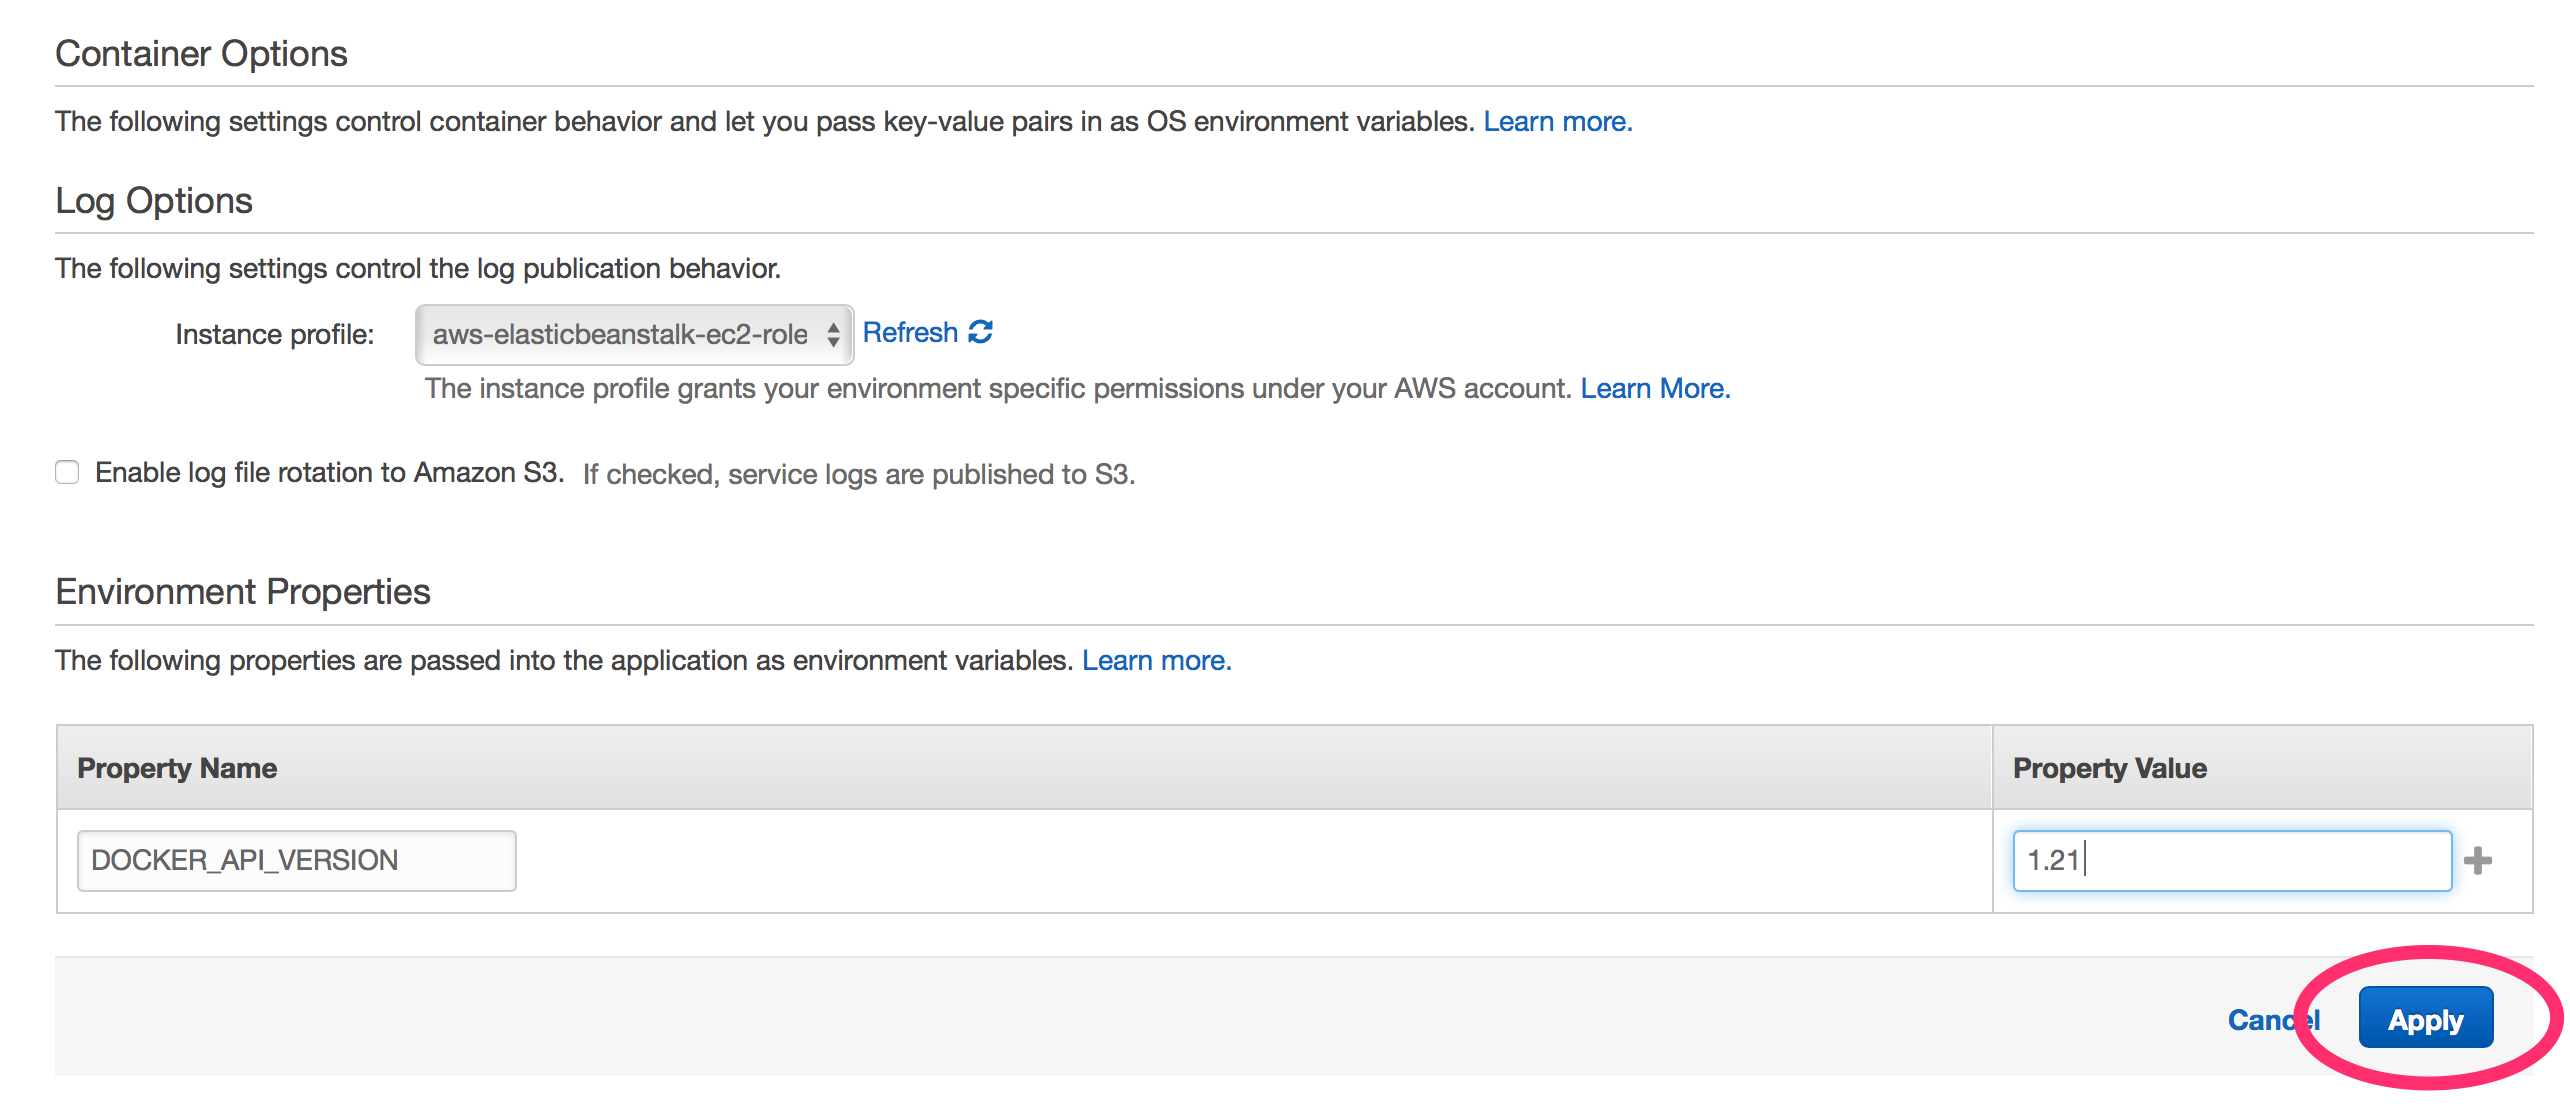
Now we need to add a new environment variable, DOCKER_API_VERSION and set its value to 1.21 .
jenkins-env-var

That is it! Now you will be able to use the docker CLI in your Jenkins jobs


Conclusion

Within a few minutes you can have a managed Jenkins environment hosted in AWS.
There are a few changes you may want to consider for this environment.

  • Changing the autoscaling group to min 1 and max 1 makes sense since the Jenkins state data is stored on a local volume.  Having more than one instance in the group would not be useful.
  • Also considering the state data, including job configuration, is stored on a local volume you will want to make sure to backup the EBS volume for this instances.  You could also look into a NAS solution such as Elastic File Service to store state for Jenkins, this would require a modification to /var/jenkins_home path.
  • It is strongly encouraged that an HTTP SSL listener is used for the Elastic Load Balancer(ELB) and that the HTTP listener is turned off, to avoid sending credentials in plain text.


The code used in this blog is available at: https://github.com/CU-CloudCollab/jenkins-stalk, Please free to use and enhance it.

If you have any questions or issues please contact the Cloud Services team at cloud-support@cornell.edu