Using Docker Datacenter to launch load test

by Shawn Bower

As we at Cornell move more of our workloads to the cloud an important step in this process is to run load test against our on premise infrastructure and the proposed AWS infrastructure. There are many tools that can aide in load testing one which we use frequently is called Neustar. This product is based on selenium and allows up to spin up a bunch automated browser users. It occurred to me that a similar solution could be developed using docker and Docker Datacenter.

To get started I took a look at the docker containers provided by Selenium, I love companies that ship their product in Containers!  I was able to get a quick test environment up and running locally.  I decided to use Selenium grid that provides a hub server which nodes can register with.  Each node registers and lets the hub know what kind of traffic it can accept.  In my case I used nodes running firefox on linux.  To test the setup I created a simple ruby script using the Selenium ruby bindings to send commands to a node.

sample-test_rb_—__Users_srb55_projects_docker-selenium-load-test

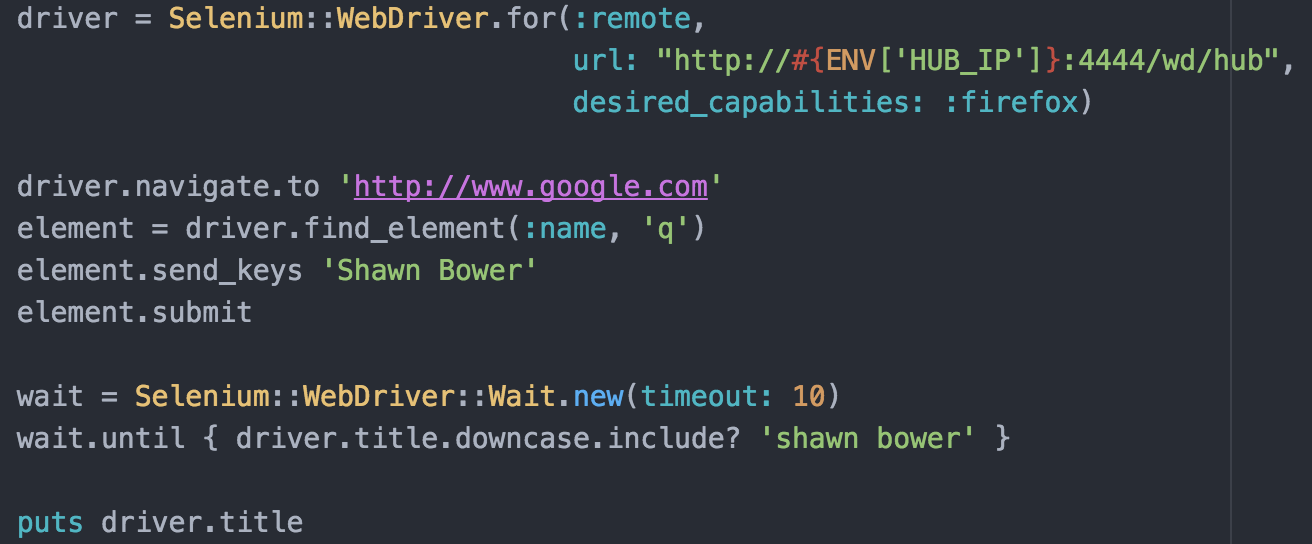
This simple test will navigate to google and search for my name then wait for the window title to include my name.  While testing locally I was able to get the hub and node up and running with the following commands:

docker run -d -p 4444:4444 --name selenium-hub selenium/hub:2.53.0
docker run --rm --name=fx --link selenium-hub:hub selenium/node-firefox:2.53.0

I was then able to run my script (exporting HUB_IP=localhost) and life is good.  This approach could be great for integration tests in your application but in my case I wanted to be able to throw a bunch of load at an application.  Since we have some large Docker Datacenter clusters it seemed to make sense to use that spare capacity to generate load.  In order to deploy the grid/hub to our cluster I created a docker-compose.yaml file.


docker-compose_yaml_—_selenium_infrastructure_—__Users_srb55_projects_docker-selenium-load-test

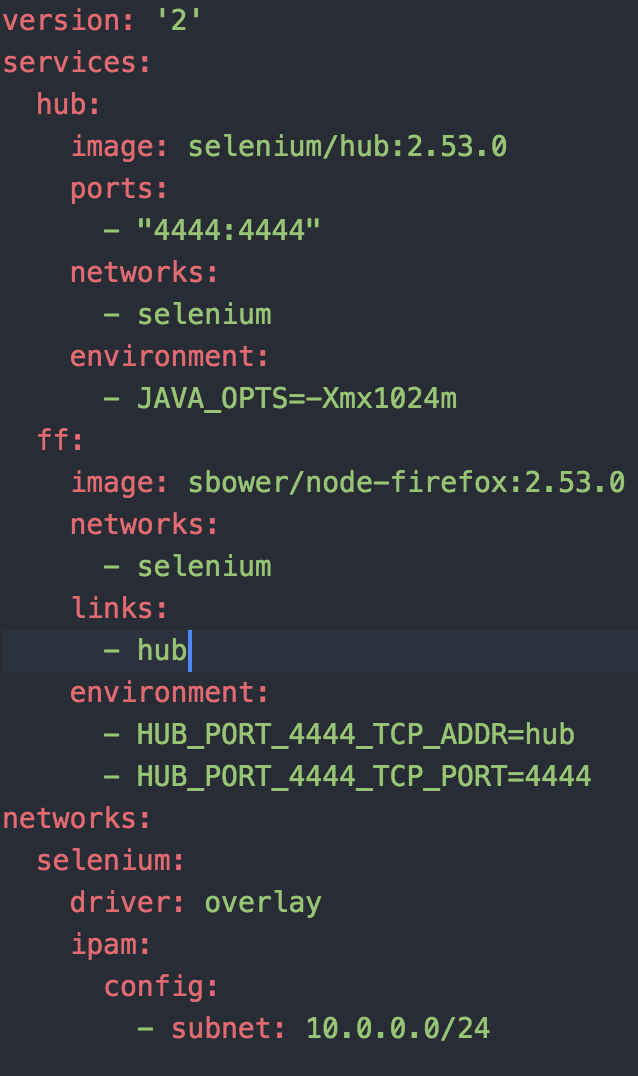
One thing to note is that I’m using a customized version of the node container, I will come back to this later.  Now I am able to bring up the grid and node as such:

selenium_infrastructure_—_-bash_—_159×41

I can now use the docker-compose ps command to find out where my hub is running.

selenium_infrastructure_—_-bash_—_159×41

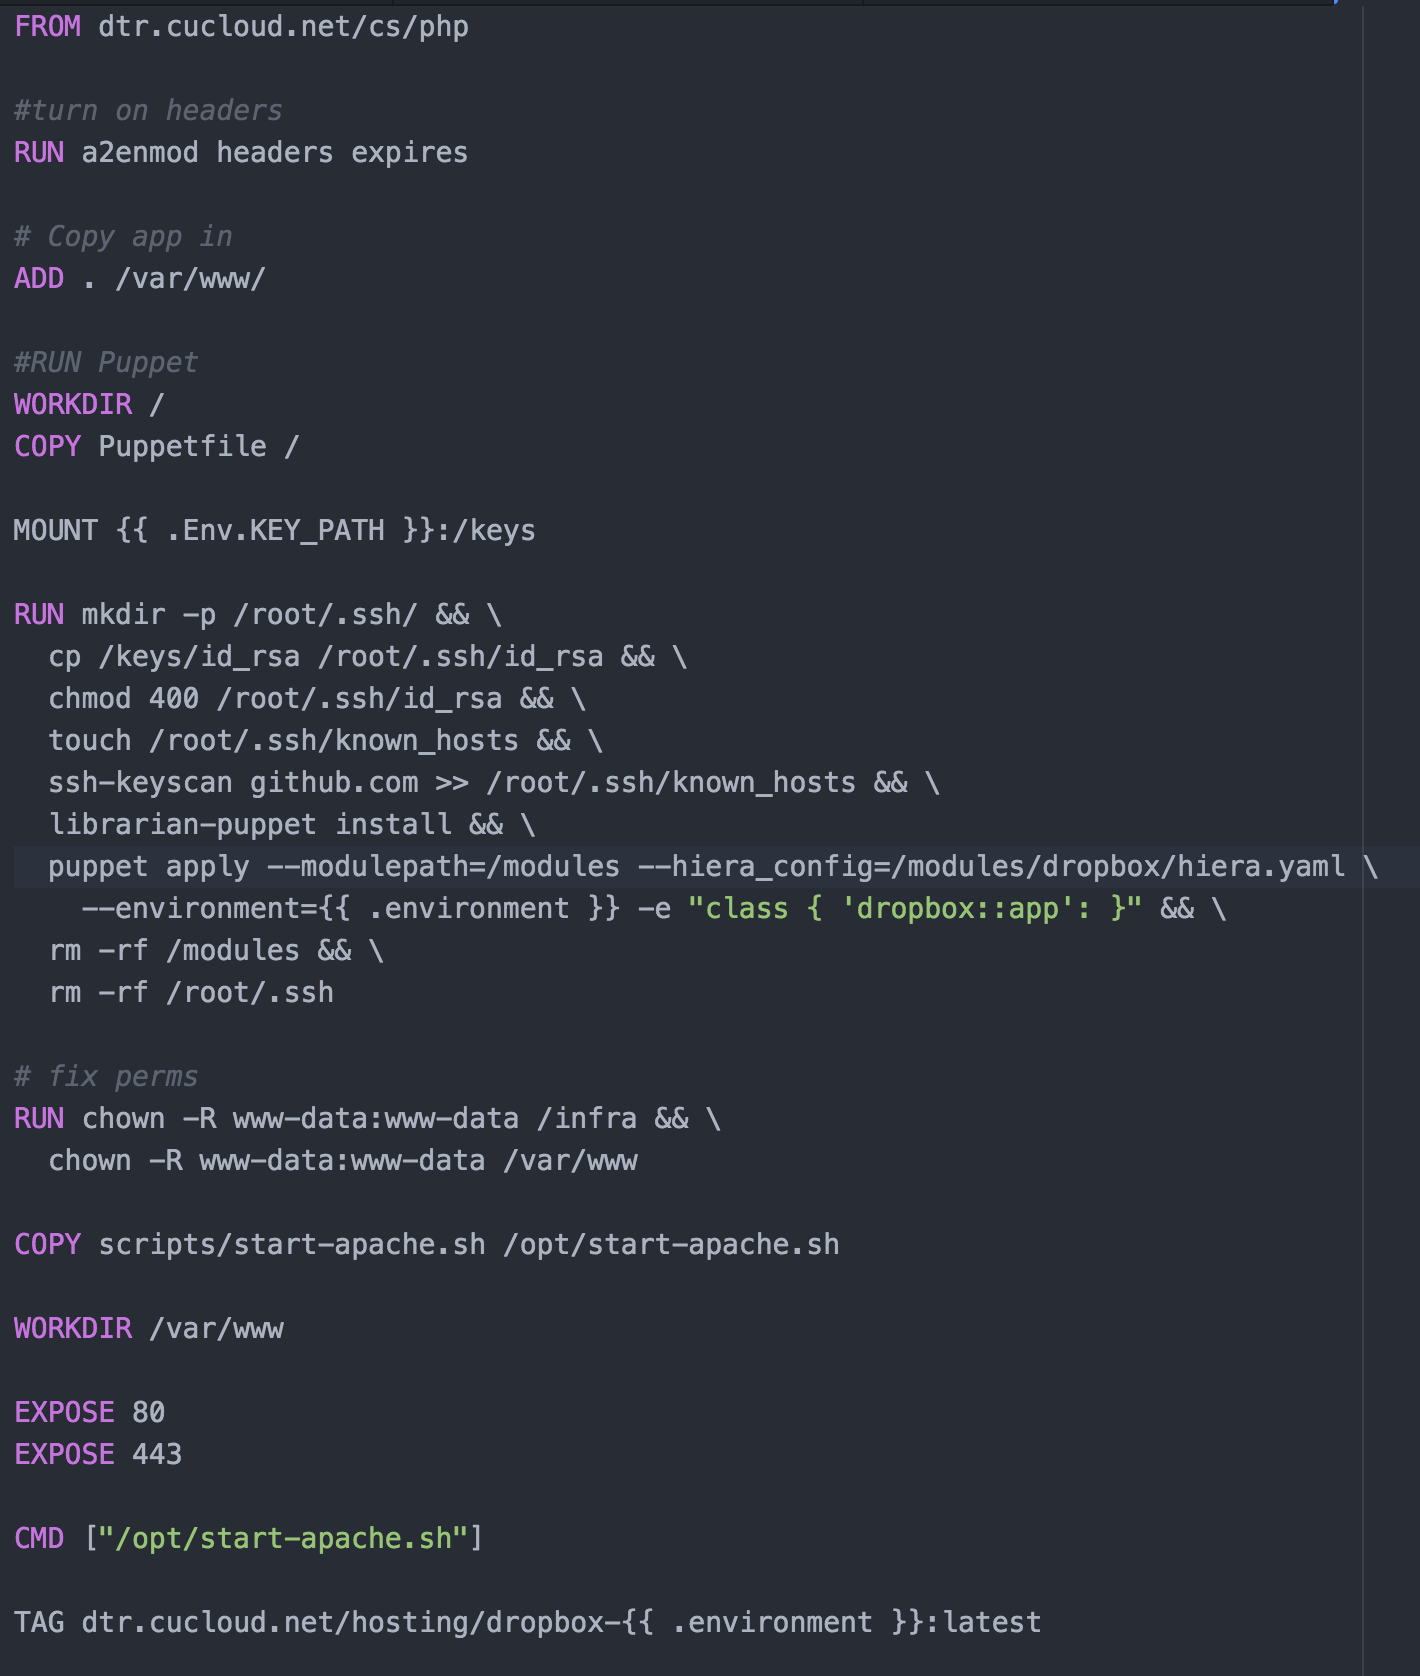
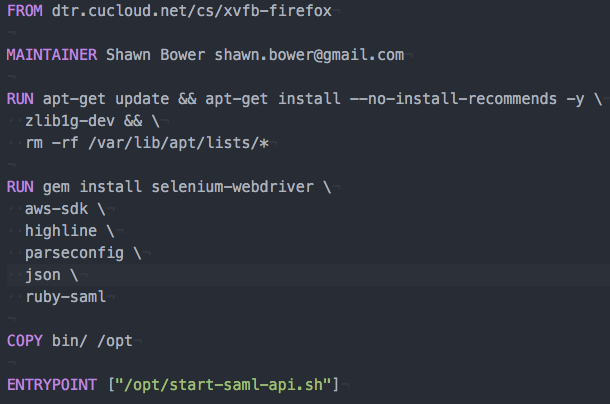
Now I’m ready to launch my test.  Since all the things must run inside containers I created a simple Dockerfile to encapsulate my test script.

Then I can kick off the test and when it finishes I want to grab the logs from the firefox node.

selenium_infrastructure_—_-bash_—_159×41

docker build -t st .
docker run -e “HUB_IP=10.92.77.33” st .
docker logs ldtest_ff_1

We can see the how Selenium processes the script on firefox. Note that “get title” is executed multiple times.  This is because of the waiter that is looking for my name to show up in the page title.  Sweet!  Now that we have it up and running we can scale out the firefox nodes, this is super easy using Docker Datacenter!

selenium_infrastructure_—_-bash_—_159×41

Now we can ramp up our load!  I took the script above and ran it on a loop with a small sleep at the end then spun up 20 threads to run that script.  In order to get everything working in Docker Datacenter I did have to modify the node startup script to register using the IP for the container on the overlay network.  It turns out this is a simple modification by adding an environment variable for the IP

export IP=`hostname -I | perl -lne ‘print $1 if /(10.\d.\d.\d+)/’`

Then when the node is launched you need to add “-host $IP”

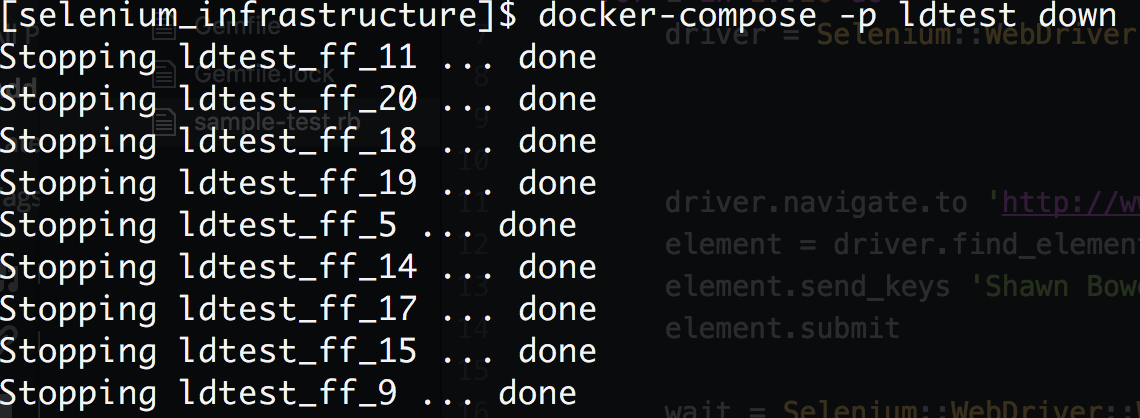
When are finished we can quickly bring everything down.

selenium_infrastructure_—_-bash_—_159×41


Conclusion

It is relatively simple to setup a load driver using Docker Datacenter.  The code used for this example can be found here: https://github.com/sbower/docker-selenium-load-test.  This is super bare bones.  Some neat ideas for extensions would be, to add a mechanism to ramp the load, a mechanism to create a load profile comprised of multiple scripts, and a mechanism to store response time data.  Some useful links for using selenium with ruby and Docker.

  • https://github.com/SeleniumHQ/selenium/wiki/Ruby-Bindings
  • https://github.com/SeleniumHQ/docker-selenium
  • https://gist.github.com/kenrett/7553278

Docker + Puppet = Win!

by Shawn Bower

On many of our Cloudification projects we use a combination of Docker and Puppet to achieve Infrastructure as code. We use a Dockerfile to create the infrastructure; all the packages required to run the application along with the application code itself. We run puppet inside the container to put down environment specific configuration. We also use a tool called Rocker that adds some handy directives for use in our Docker file.  Most importantly Rocker adds a directive called MOUNT which is used to share volumes between builds.  This allows us to mount local disk space which is ideal for secrets which we do not want copied into the Docker image.  Rocker has to be cool so they us a default filename of Rockerfile.   Let’s take a look at a Rockerfile for one of our PHP applications, dropbox:

dorpbox-dockerfile


This image starts from our standard PHP image which is kept up to date a patched weekly by the Cloud Services team.  From there we enable a couple of Apache modules that are needed by this application.  Then the application is copied into the directory ‘/var/www/.’

Now we mount the a local directory that contains our ssh key and encryption keys.   After which we go into the puppet setup.  For our projects we use a masterless puppet setup which relies on the librarian puppet module.  The advantage is we do not need to run a puppet server and we can configure the node at the time we build the image.  For librarian puppet we need to use a Puppetfile, for this project is looks like this:

dropbox-puppetfile

The Puppetfile list all the modules that use wish puppet to have access to and the git path to those modules.  In our case we have a single module for the dropbox application.  Since the dropbox module is stored in a private github repository we will use ssh key we mounted earlier to access it.  In order to do this we will need to add github to our known host file.  Running the command ‘librarian-puppet install’ will read the Puppetfile and install the module into /modules.  We can then use puppet to apply the module to our image.  We can control the environment specific config to install using the “–environment” flag, you can see in our Rockerfile the variable is templated out with “{{ .environment }}”.  This will allow us to specify the environment at build time.  After puppet is run we clean up some permissions issues then copy in our image startup script.  Finally we specify the ports that should be exposed when this image is run.  The build is run with a command like “rocker -var environment=development.”

It is outside the scope of this article to detail how puppet is used, you can find details on puppet here. The puppet module is laid out like this:

dropbox-puppet-layout

The files directory is used to store static files, hier-data is used to store our environment specific config, manifest stores the puppet manifests, spec is for spec test, templates is for storing dynamically generated files and tests is for test that are run to check for compilation errors.  Under hiera-data we will find an eyaml (encrypted yaml) file for each environment.  For instance let us look at the one for dev:

dev_eyaml

You can see that the file format is that of a typical yaml file with the exception of the fields we wish to keep secret.  These are encrypted by the hiera-eyaml plugin.  Early in the Rockerfile we mounted a “keys” folder wich contains the private key to decrypt these secrets when puppet runs.  In order for the hiera-eyaml to work correctly we have to adjust the hiera config, we store the following in our puppet project:

hiera_yaml1

The backends are the order in which to prefer files, in our case we want to give precedence to eyaml.  Under the eyaml config we have to specify where the data files live as well as where to find the encryption keys.  When we run the pupp apply we have to specify the path to this config file with the “–hiera_config” flag.

With this process we can use the same basic infrastructure to build out multiple environments for the dropbox application.  Using the hiera-eyaml plugin we can store the secrets in our puppet repository safely in github as they are encrypted.  Using Rocker we can keep our keys out of the image which limits the exposure of secrets if this image were to be compromised.  Now we can either build this image on the host it will run or push it to our private repository for later distribution.  Given that the images contains secrets like the database password you should give careful consideration on where the image is stored.

Using Cornell Shibboleth for Authentication in your Custom Application.

by Shawn Bower

Introduction

When working on your custom application at Cornell the primary option for integrating authentication with the Cornell central identity store is using Cornell’s Shibboleth Identity Provider (IDP).  Using Shibboleth can help reduce the complexity of your infrastructure and as an added bonus you can enable access to your site to users from other institutions that are members of the InCommon Federation.

How Shibboleth Login Works

Key Terms

  • Service Provider (SP) – requests and obtains an identity assertion from the identity provider. On the basis of this assertion, the service provider can make an access control decision – in other words it can decide whether to perform some service for the connected principal.
  • Identity Provider (IDP) – also known as Identity Assertion Provider, is responsible for (a) providing identifiers for users looking to interact with a system, and (b) asserting to such a system that such an identifier presented by a user is known to the provider, and (c) possibly providing other information about the user that is known to the provider.
  • Single Sign On (SSO) – is a property of access control of multiple related, but independent software systems.
  • Security Assertion Markup Language (SAML) – is an XML-based, open-standard data format for exchanging authentication and authorization data between parties, in particular, between an identity provider and a service provider.

samlsp

  1. A user request a resource from your application which is acting as a SP
  2. Your application constructs an authentication request to the Cornell IDP an redirects the user for login
  3. The user logins in using Cornell SSO
  4. A SAML assertion is sent back to your application
  5. Your application handles the authorization and redirects the user appropriately.

Shibboleth Authentication for Your Application

Your application will act as a service provider.  As an example I have put together a Sinatra application in ruby that can act as a service provider and will use the Cornell Test Shibboleth IDP.  The example source can be found here.  For this example I am using the ruby-saml library provided by One Login, there are other libraries that are compatible with Shibboleth such as omniauth.  Keep in mind that Shibboleth is SAML 2.0 compliant so any library that speaks SAML should work.  One reason I choose the ruby-saml library is that the folks at One Login provide similar libraries in various other languages, you can get more info here.  Let’s take a look at the code:

First it is important to configure the SAML environment as this data will be needed to send and receive information to the Cornell IDP.  We can auto configure the IDP settings by consuming the IDP metadata.  We then have to provide an endpoint for the Cornell IDP to send the SAML assertion to,  in this case I am using “https://shib.srb55.cs.cucloud.net/saml/consume.”  We also need to provide the IDP with an endpoint that allows it to consume our metadata.

We will need to create an endpoint that contains the metadata for our service provider.  With OneLogin::RubySaml this is super simple as it will create it based on the SAML settings we configured earlier.  We simply create “/saml/metadata” which will listen for get request and provided the auto generate metadata.

Next lets create an endpoint in our application that will redirect the user to the Cornell IDP.  We create “/saml/authentication_request” which will listen for get requests and then use the  OneLogin::RubySaml to create an authentication request.  This is done by reading the  SAML settings which include information on the IDP’s endpoints.

Then we need a call back hook that the IDP will send the SAML assertion to after the user has authenticated.  We create “/saml/consume” which will listen for a post from the IDP.  If we receive a valid response from the IDP then we will create a page that will display a success message along with the first name of the authenticate user.  You might be wondering where “urn:oid:2.5.4.42” comes from.  The information returned in the SAML assertion will contain attributes agreed upon by InCommon as well as some attributes provided by Cornell.  The full list is:

AttributeNameInEnterpriseDirectory
AttributeNameInSAMLAssertion
edupersonprimaryaffiliation urn:oid:1.3.6.1.4.1.5923.1.1.1.5
commonName urn:oid:2.5.4.3
eduPersonPrincipalName (netid@cornell.edu) urn:oid:1.3.6.1.4.1.5923.1.1.1.6
givenName (first name) urn:oid:2.5.4.42
surname(last name) urn:oid:2.5.4.4
displayName urn:oid:2.16.840.1.113730.3.1.241
uid (netid) urn:oid:0.9.2342.19200300.100.1.1
eduPersonOrgDN urn:oid:1.3.6.1.4.1.5923.1.1.1.3
mail urn:oid:0.9.2342.19200300.100.1.3
eduPersonAffiliation urn:oid:1.3.6.1.4.1.5923.1.1.1.1
eduPersonScopedAffiliation urn:oid:1.3.6.1.4.1.5923.1.1.1.9
eduPersonEntitlement urn:oid:1.3.6.1.4.1.5923.1.1.1.7

Conclusion

We covered the basic concepts of using Shibboleth and SAML creating a simple demo application.  Shibboleth is a great choice when looking at architecting your custom application in the cloud, as it drastically simplifies the authentication infrastructure while still using Cornell SSO.  An important note is that in this example we used the Cornell Test Shibboleth IDP which allows us to create an anonymous service provider.  When moving your application into production you will need to register your service provider from https://shibrequest.cit.cornell.edu.  For more information about Shibboleth at Cornell please take a look at IDM’s Confluence page.


This article was updated May 2021 to remove outdated information.

Using Shibboleth for AWS API and CLI access

by Shawn Bower


Update 2019-11-06: We now recommend using awscli-login to obtaining temporary AWS credentials via SAML. See our wiki page Access Keys for AWS CLI Using Cornell Two-Step Login (Shibboleth)


This post is heavily based on “How to Implement Federated API and CLI Access Using SAML 2.0 and AD FS” by Quint Van Derman, I have used his blueprint to create a solution that works using Shibboleth at Cornell.

TL;DR

You can use Cornell Shibboleth login for both API and CLI access to AWS.  I built docker images that will be maintained by the Cloud Services team that can be used for this and it is as simple as running the following command:

docker run -it --rm -v ~/.aws:/root/.aws dtr.cucloud.net/cs/samlapi

After this command has been run it will prompt you for your netid and password.  This will be used to login you into Cornell Shibboleth. You will get a push from DUO.  Once you have confirmed the DUO notification, you will be prompted to select the role you wish to use for login, if you have only one role it will choose that automatically.  The credentials will be placed in the default credential file (~/.aws/credentials) and can be used as follows:

aws --profile saml s3 ls

NOTE: In order for the script to work you must have at least two roles, we can add you to a empty second role if need be.  Please contact cloud-support@cornell.edu if you need to be added to a role.

If there are any problems please open an issue here.

Digging Deeper

All Cornell AWS accounts that are setup by the Cloud Services team are setup to use Shibboleth for login to the AWS console. This same integration can be used for API and CLI access allowing folks to leverage AD groups and aws roles for users. Another advantage is this eliminates the need to monitor and rotate IAM access keys as the credentials provided through SAML will expire after one hour. It is worth noting the non human user ID will still have to be created for automating tasks where it is not possible to use ec2 instance roles.

When logging into the AWS management console the federation process looks likesaml-based-sso-to-console.diagram

  1. A user goes to the URL for the Cornell Shibboleth IDP
  2. That user is authenticated against Cornell AD
  3. The IDP returns a SAML assertion which includes your roles
  4. The data is posted to AWS which matches roles in the SAML assertion to IAM roles
  5.  AWS Security Token Services (STS) issues a temporary security credentials
  6. A redirect is sent to the browser
  7. The user is now in the AWS management console

In order to automate this process we will need to be able to interact with the Shibboleth endpoint as a browser would.  I decided to use Ruby for my implementation and typically I would use a lightweight framework like ruby mechanize to interact with webpages.  Unfortunately the DUO integration is done in an iframe using javascript, this makes things gross as it means we need a full browser. I decided to use selenium web driver to do the heavy lifting. I was able to script the login to Shibboleth as well as hitting the button for a DUO push notification:
duo-push

In development I was able to run this on mac just fine but I also realize it can be onerous to install the dependencies needed to run selenium web driver.  In order to make the distribution simple I decided to create a docker images that would have everything installed and could just be run.  This meant I needed a way to run selenium web driver and firefox inside a container.  To do this I used Xvfb to create a virtual frame buffer allowing firefox to run with out a graphics card.  As this may be useful to other projects I made this a separate image that you can find here.  Now I could create a Dockerfile with the dependencies necessary to run the login script:

saml-api-dockerfile

The helper script starts Xvfb and set the correct environment variable and then launches the main ruby script.  With these pieces I was able to get the SAML assertion from Shibboleth and the rest of the script mirrors what Quint Van Derman had done.  It parses the assertion looking for all the role attributes.  Then it presents the list of roles to the user where they can select which role they wish to assume.  Once the selection is done a call is made to the Simple Token Service (STS) to get the temporary credentials and then the credentials are stored in the default AWS credentials file.

Conclusion

Now you can manage your CLI and API access the same way you manage your console access. The code is available and is open source so please feel free to contribute, https://github.com/CU-CloudCollab/samlapi. Note I have not tested this on Windows but it should work if you change the volume mount to the default credential file on Windows. I can see the possibility to do future enhancements such as adding the ability to filter the role list before display it, so keep tuned for updates. As always if you have any questions with this or any other Cloud topics please email cloud-support@cornell.edu.

How to run Jenkins in ElasticBeanstalk

by Shawn Bower

The Cloud Services team in CIT maintains docker images for common pieces of software like apache, java, tomcat, etc.  One of these images that we maintain is Cornellized Jenkins images.  This image contains Jenkins with the oracle client and Cornell OID baked in.  One of the easiest way to get up and running in AWS with this Jenkins instance is to use Elastic Beanstalk which will manage the infrastructure components.  Using Elastic Beanstalk you don’t have to worry about patching as it will manage the underlying OS of your ec2 instances.  The Cloud Services team releases patched version of Jenkins image on a weekly basis. If you want to stay current the you just need to kick off a new deploy in Elastic Beanstalk.  Let’s walk through the process of getting this image running on Elastic Beanstalk!

A.) Save Docker Hub credentials to S3

INFO:

Read about using private Docker repos with Elastic Beanstalk.

We need to make our DTR credentials available to Elastic Beanstalk, so automated deployments can pull the image from the private repository.

  1. Create an S3 bucket to hold Docker assets for your organization— we use  cu-DEPT-docker 
  2. Login to Docker docker login dtr.cucloud.net
  3. Upload the local credentials file ~/.docker/config.json to the S3 bucket cu-DEPT-docker/.dockercfg 

    Unfortunately, Elastic Beanstalk uses an older version of this file named  .dockercfg.json  The formats are slightly different. You can read about the differences here.

    For now, you’ll need to manually create  .dockercfg & upload it to the S3 bucket  cu-DEPT-docker/.dockercfg

B.) Create IAM Policy to Read The S3 Bucket

    1. Select Identity and Access Management for the AWS management consoleIAM-step-1
    2. Select Policies IAM-step-2
    3. Select “Create Policy” IAM-step-3
    4. Select “Create Your Own Policy” IAM-step-4
    5. Create a policy name “DockerCFGReadOnly,” see the example policy provided. IAM-step-5
Below is an example Policy for reading from a S3 bucket.
{
    "Version": "2012-10-17",
    "Statement": [
        {
            "Sid": "Stmt1466096728000",
            "Effect": "Allow",
            "Action": [
                "s3:ListBucket"
            ],
            "Resource": [
                "arn:aws:s3:::cu-DEPT-dockercfg"
            ]
        },
        {
            "Sid": "Stmt1466096728001",
            "Effect": "Allow",
            "Action": [
                "s3:GetObject",
                "s3:HeadObject",
                "s3:ListBucket"
            ],
            "Resource": [
                "arn:aws:s3:::cu-DEPT-dockercfg/.dockercfg"
            ]
        }
    ]
}


C.) Setup the Elastic Beanstalk environment

  1. Create a Dockerrun.aws.json fileHere’s an example.
  2. {
      "AWSEBDockerrunVersion": "1",
      "Image": {
        "Name": "dtr.cucloud.net/cs/jenkins:latest"
     },
     "Ports": [
       {
         "ContainerPort": "8080"
       }
     ],
     "Authentication": {
       "Bucket": "cu-DEPT-dockercfg",
       "Key": ".dockercfg"
     },
     "Volumes": [
       {
         "HostDirectory": "/var/jenkins_home",
         "ContainerDirectory": "/var/jenkins_home"
       },
       {
         "HostDirectory": "/var/run/docker.sock",
         "ContainerDirectory": "/var/run/docker.sock"
       }
     ]
    }
    

    The Authentication section refers to the Docker Hub credentials that were saved to S3.

    The Image section refers to the Docker image that was pushed to Docker Hub.

  3. We will also need to do some setup to instance using .ebextenstions.  Create a folder called “.ebextensions” and inside that folder create a file called “instance.config”  Add the following to the file:
  4.  

    container_commands:
     01-jenkins-user:
     command: useradd -u 1000 jenkins || echo 'User already exist!'
     02-jenkins-user-groups:
     command: usermod -aG docker jenkins
     03-jenkins-home:
     command: mkdir /var/jenkins_home || echo 'Directory already exist!'
     04-changeperm:
     command: chown jenkins:jenkins /var/jenkins_home


  5. Finally create a zip file with the Dockerrun.aws.json file and the .ebextenstions folder.
    zip -r jenkins-stalk.zip Dockerrun.aws.json .ebextensions/ 


D.) Setup Web Server Environment

  1. Choose Docker & Load balancing, autoscaling
    create_environment
  2. Select your local zip file that we created earlier ( jenkins-stalk.zip ) as the “Source” for the application version section application
  3. Set the appropriate environment name, for example you could use jenkins-prodenvironment
  4. Complete the configuration details

    NOTE: There are several options beyond the scope of this article.

    We typically configure the following:deployment

  5. Complete the Elastic Beanstalk wizard and launch.  If you are working with a standard Cornell VPC configuration, make sure the ELB is in the two public subnets while the EC2 instances are in the private subnets.
  6. NOTE: You will encounter additional AWS features like security groups etc… These topics are beyond the scope of this article.  If presented with a check box for launching inside a VPC you should check this box.

    Create_Application

    The container will not start properly the first time. Don’t panic.  
     
    We need to attach the IAM Policy we built earlier to the instance role used by Elastic Beanstalk.jerkins-prod_-_Dashboard_and__5__Twitter

  7. Select Identity & Access Management for the AWS management console
  8. IAM-step-1

  9.  Select “Roles” then select “aws-elasticbeanstalk-ec2-role”

IAM-step-6

  • Attach the “DockerCFGReadOnly” Policy to the role IAM-step-7


E.) Re-run the deployment in Elastic Beanstalk.  You can just redeploy the current version.


  1. Now find the URL to your Jenkins environment
  2. jenkins-prod-url

  3. And launch Jenkins

jenkins-running

SUCCESS !


F.) (optional) Running docker command inside Jenkins

The Jenkins image comes with docker preinstalled so you can run docker build and deploys from Jenkins.  In order to use it we need to make a small tweak to the Elastic Beanstalk Configuration.  This is because we are keeping the docker version inside the image patched and on the latest commercially supported release however Elastic Beanstalk currently supports docker 1.9.1. To get things working we need to add an environment variable to use an older docker API.  First go to configurations and select the cog icon under Software Configuration.

jenkins-prod_-_Configuration
Now we need to add a new environment variable, DOCKER_API_VERSION and set its value to 1.21 .
jenkins-env-var

That is it! Now you will be able to use the docker CLI in your Jenkins jobs


Conclusion

Within a few minutes you can have a managed Jenkins environment hosted in AWS.
There are a few changes you may want to consider for this environment.

  • Changing the autoscaling group to min 1 and max 1 makes sense since the Jenkins state data is stored on a local volume.  Having more than one instance in the group would not be useful.
  • Also considering the state data, including job configuration, is stored on a local volume you will want to make sure to backup the EBS volume for this instances.  You could also look into a NAS solution such as Elastic File Service to store state for Jenkins, this would require a modification to /var/jenkins_home path.
  • It is strongly encouraged that an HTTP SSL listener is used for the Elastic Load Balancer(ELB) and that the HTTP listener is turned off, to avoid sending credentials in plain text.


The code used in this blog is available at: https://github.com/CU-CloudCollab/jenkins-stalk, Please free to use and enhance it.

If you have any questions or issues please contact the Cloud Services team at cloud-support@cornell.edu

DevOps: Failure Will Occur

by Shawn Bower

The term DevOps is thrown around so much that it is hard to pin down it’s meaning.  In my mind DevOps is about culture shift in the IT industry.  It is about breaking down silos, enhancing collaboration, and challenging fundamental design principles.  One principal that has been turned on its head because of the DevOps revolution is the no single point of failure design principle. This principle asserts simply that no single part of a system can stop the entire system from working. For example, in the Financial system the database server is a single point of failure. If it crashes we cannot continue to serve clients in any fashion.  In DevOps we accept that failure is the norm and we build our automation with that in mind.  In AWS we have many tools at our disposal like auto scaling groups, elastic load balances, multi-az RDS, dynamodb, s3, etc.  When architecting for the cloud keeping these tools in mind is paramount to your success.

When architecting a software system there are a lot of factors to balance. We want to make sure our software is working and performant as well as cost effective.  Let’s look at a simple example of building a self healing website that requires very little infrastructure and can be done for low cost.

The first piece of infrastructure we will need is something to run our site.  If its a small site we could easy run it on a t2.nano in AWS which would cost less than 5 dollars a month.  We will want to launch this instance with an IAM profile with the policy AmazonEC2RoleforSSM.  This will allow us to send commands to the ec2 instance.  We will also want to install the SSM agent, for full details please see: http://docs.aws.amazon.com/AWSEC2/latest/UserGuide/install-ssm-agent.html.  Once we have our site up, we will want to monitor its health. At Cornell you can get free access to the Pingdom monitoring tool.  Using Pingdom you can monitor your sites endpoint from multiple locations around the world and get alerted if your site is unreachable.  If you don’t already have a Pingdom account please send an email to cloud-support@cornell.edu.  So now that we have our site running and a Pingdom account lets set up an uptime monitor.


We are doing great!  We have a site, we are monitoring, and we will be alerted to any downtime.   We can now take this one step further and programmatically react to Pingdom alert using their custom webhook notifier.  We will have to build an endpoint for Pingdom to send the alert to.  We could use Lambda and API gateway, which is a good choice for many reasons.  If we want we could start even simpler by creating a simple Sinatra app in Ruby.

pingdom-webhook

This is a very simple bit of code that could be expanded on.  It creates an endpoint called “/webhook” which first looks for an api-key query parameter.  This application should be run using SSL/TLS as it sends the key in clear text.  That key is compared against and environment variable that should be set before the application is launched.  This shared key is a simple mechanism for security only in place to stop the random person from hitting the endpoint.  For this example it is good enough but could be vastly improved upon.  Next we look at the data that Pingdom has sent, for this example we will only react to DOWN alerts.  If we have an alert in the DOWN state then we will query a table in DynamDB that will tell us how to react to this alert.  The schema looks like:

pingdom-dynamo

  • check_id – This is the check id generated by Pingdom
  • type – is the plugin type to use to respond to the Pingom alert.  The only implemented plugin is SSM which uses Amazon’s SSM to send a command to the ec2 host.
  • instance_id – This is the instance id of the ec2 machine running our website
  • command – This is the command we want to send to the machine

We will use the the type from our Dynamo table to respond to the down alert.  The sample code I have provided only has one type which uses Amazon’s SSM service to send commands to the running ec2 instance.  The plugin code looks like:
ssm-rb

This function takes the data passed in and send the command from our Dynamo table to the instance.  The full sample code can be found at https://github.com/CU-CloudCollab/pingdom-webhook.  Please feel free to use and improve this code.  Now that we have a simple webhook app we will need to deploy it to an instance in AWS.  That instance will have to use an IAM profile that will allow it to read from our Dynamo table as well as send SSM commands.  Again we can use a t2.nano so our cost at this point is approximately 10 dollars a month.

We need to make Pingdom aware of out new web hook endpoint.  To do that navigate to “Integrations” and click “Add integration.”

pingdom-integration-step-1 The next form will ask for information about your endpoint.  You will have to provide the DNS name for this service.  While you could just use the IP of the machine its highly encourage to use a real host name with SSL.

pingdom-integration-step-2

Once you have added the integration it can be used by any of the uptime checks.  Find the check you wish to use and click the edit button

pingdom-integration-step-3

Then scroll to the bottom of the settings page and you will see a custom hooks section.  Select your hook and you are all done!

pingdom-integration-step-4

This is a simple and cost effective solution to provide self-healing to web applications.  We should always expect failure will occur and look for opportunities to mitigate it’s effects.  DevOps is about taking a wholistic approach to your application.  Looking at the infrastructure side as we did in this blog post but also looking at the application it-self.  For example move to application architectures which are stateless.  Most importantly automate everything!

Automatic OS Patching

by Shawn Bower

One of the challenges as you move your infrastructure to the cloud is keeping your ec2 machines patched.  One highly effective strategy is to embrace ephemerality  and  keep rotating machines in and out of service.  This strategy is especially easy to employ using Amazon Linux. check this out from the FAQ (https://aws.amazon.com/amazon-linux-ami/faqs/):

On first boot, the Amazon Linux AMI installs from the package repositories any user space security updates that are rated critical or important, and it does so before services, such as SSH, start.

Another strategy, the one we will focus on in this post, is to be able to patch your ec2 instances in place.  This can be useful when your infrastructure has long running 24×7 machines.  This can be accomplished using Amazon’s SSM service and the AWS CLI or SDK.  First we have to install the SSM agent on all the machines we wish to patch.  For example to install the agent (as root) on an Amazon Linux machine in us-east-1 you would:

  1. curl https://amazon-ssm-us-east-1.s3.amazonaws.com/latest/linux_amd64/amazon-ssm-agent.rpm -o /tmp/amazon-ssm-agent.rpm
  2. rpm -i /tmp/amazon-ssm-agent.rpm
  3. rm /tmp/amazon-ssm-agent.rpm

This will download the agent, install it and turn on the service.  The agent will contact AWS over the public internet so makes sure your ec2 instance can send outbound traffic.  Once your machine registers with SSM you should see it listed in the Run Command GUI (ec2>commands>run a command).

run-command-gui


You can also verify that your instance has correctly registered using the AWS CLI, for example:

aws ssm describe-instance-information –instance-information-filter-list key=InstanceIds,valueSet=instance ID

If everything goes well you will get json like below:

srb55_—_ec2-user_dev__sync_—_-bash_—_142×27

If the instance can not be found you will receive an error, if the agent had registered but is no longer responding then you will see the PingStatus is Inactive.  Once we have the SSM agent installed we are good to send commands to our ec2 machines including patching them.  For our implementation I decided to use tags in ec2 to denote which machines should be auto patched.  I also added a tag called “os” so we could support patching multiple OSes.  Our ec2 console looks like:

ec2-tags

With the tags in place and the SSM agent installed I used the Ruby SDK to create a script that would look for ec2 instances that had the auto_patch tag and then determine the patching strategy based on the OS.  This script uses the cucloud module that is being collaboratively developed by folks all over campus.  The main script is:

auto_patch_rb_—__Users_srb55_projects_aws-examples_aws-ruby-sdk_ec2

Finally the function that sends the command via SSM is:

send-patch

This is just one example of how to keep your machines up to date and to improve your security posture.  If you have any questions about patching in AWS or using the cloud here at Cornell please send a note to the Cloudification team.

Security Best Practices

by Shawn Bower

As part of the Cloudification effort before deploying applications to the cloud we go through a rigorous security checklist.

  • Network and security group (firewall) review
  • Application scan/review mitigation suggestions
  • Configuration of monitoring and logging
  • Confidential data encryption
  • Verification that root accounts are protected and limited in use
  • Prod and non-prod application separation
  • Mechanisms in place to quickly/easily grant access to ITSO incase of compromise
  • Multi factor authentication for Developers and admins (anyone with Console access)
  • Outbound transmission of data encrypted (ssl/apache)

After the application has been moved to the cloud it is important to stay vigilant and observe security best practices.  At re:invent this last year a session was given on IAM Best Practices.  You can also find detailed information on best practices on the AWS documentation site.  Today I would like to take some time to point out a few key practices but I encourage folks to watch the presentation and read the IAM documentation thoroughly.
Do not use your AWS root account to access AWS.

Use Shibboleth integration to provide authorization through AD groups and to ensure MFA for all accounts to login to the AWS console.  If you need programatic access through the API create IAM users to.

Grant least privilege.

Apply fine-grained permissions to ensure that IAM users have least privilege to perform only the tasks they need to perform. Start with a minimum set of permissions and grant additional permissions as necessary.

Auditing

Enable logging of AWS API calls to gain greater visibility into users’ activity in your AWS resources. Turn on CloudTrail in all regions to ensure that all API access is logged.  We provided a script that uses the AWS CLI to help with this process.

Rotate security credentials.

Change your own passwords and access keys regularly, and make sure that all IAM users in your AWS account do as well. You can apply a password policy to your AWS account to require all your IAM users to rotate their passwords, and you can choose how often they must do so. If a password is compromised without your knowledge, regular credential rotation limits how long that password can be used to access your AWS account.

Use IAM roles for Amazon EC2 instances.

Use IAM roles to manage credentials for your applications that run on EC2 instances. Because role credentials are temporary and rotated automatically, you don’t have to manage credentials. Also, any changes you make to a role used for multiple instances are propagated to all such instances, again simplifying credential management.

Opsworks Introduction: Creating a NFS Server

by Shawn Bower

Opsworks is a service provided by AWS to provide configuration management for EC2 instances.  The services relies on Chef and allows users to create and upload their own cookbooks.  For this purpose of this blog we will assume a familiarity with chef, for those who are new to chef please check out their documentation.  The first thing we need to do is setup our cookbooks.  First lets get the cookbook for NFS.

chef-nfs-server-download

Cool now we have the cookbook for nfs.  When using Opsworks you have to specify all the cookbooks in the root of the repository.  We will need to move into the nfs directory, resolve all its dependencies and move them to the root.

nfs-deps

Now that we have the nfs cookbook with all its dependencies we can configure our server.  We now have two options to get this to Opsworks we can either upload a zip of the root folder to s3 or we can upload the contents to a git repository.  For this demonstration lets upload what we have to a github repository.  Now we can login into the AWS console and navigate to Opsworks.  The first step we have to go through is to create a new stack.  A stack represents a logical grouping of instances, it could be an application or set of applications.  When creating our stack we won’t want to call it NFS as its likely that the our NFS server is only one piece of the stack.  We will want to use the latest version of chef which is Chef 12, the chef 11 stack is being phased out.  In order to use our custom cookbooks we will select the “Yes” button and add our github repository.

opsworks-stack


One of the first things we will want to do is allow our IAM user to access to these machines.  We will be able to import users from IAM and control their access to the stack as well as their access to the instances we will create.  Each user can set a public ssh key to use for access to instances in this stack.

Edit_srb55_-_Users_–_AWS_OpsWorks

The next step is to create a layer, this represents a specific instance class.  In this case we will want the layer to represent our NFS sever.  Click add a layer and set the name and short name to “nfs”.  From the layer we can control network settings such as EIPs or ELBS, EBS volumes to create and mount and we can add security groups.

Layers_-_cool-stack_–_AWS_OpsWorks

Once we have the layer we can add our recipes.  When adding recipes we have to choose the lifecycle to add it to.  There are five phases to the lifecycle and in our case it makes sense to add the nfs recipe to the setup phase.  This will run when the instance is started and finished booting.

Edit_nfs_-_Layers_-_cool-stack_–_AWS_OpsWorks

Now that we have our stack setup and we have add a layer we can add instances to that layer.  Let’s add an instance using the default settings and an instance type of t2.medium.  Once the instance is create we can start it up.  Once the server is online we can login and verify that the nfs service is running.

chef-nfs-server_—_srb55_nfs2___—_ssh_10_92_77_93_—_126×32_and_nfs2_-_Logs_–_AWS_OpsWorks_and_Dashboard_-_Cornell_University_JIRA_and_HipChat

From above we can see the logs of the setup phase showing that nfs is part of the run list.  We can login to the machine since we setup our user earlier giving it ssh access.  The bare minimum to run an NFS server are now installed, to take this further we can configure what directories to export.  In a future post we will explore expanding this layer.


Backing up DynamoDB

by Shawn Bower

As we have been helping folks move their applications to AWS we have found many of the services to be provided to be amazing.  We started using DynamoDB, the AWS manage NoSQL database, to store application data in.  The story behind DynamoDB is fascinating as it is one of the key building blocks used for AWS services.  We have been very impressed with DynamoDB it-self as it provides a completely managed scalable solution that allows us to focus on applications rather than infrastructure tasks.  Almost.  While the data stored in dynamo is highly durable there is no safeguard against human error; dropping an item is forever.  Originally this problem seemed like it would be trivial to solve, surely AWS offers an easy backup feature.  My first attempt was to try and use the export function from the AWS console.


dynamo - export

Then I ended up here…

dynamo-export-pipeline

What?  Why would I want to create a data pipeline to back up my DynamoDB table?  Some of are tables are very small and most are not much more then a key value store.  Looking into this process the data pipeline actually creates an Elastic Map Reduce cluster to facilitate the backup to s3.  You can get full details on the setup here.  The output of this process is a compressed zip file of a JSON representation of the table.  It seemed to me that this process was too heavy weight for our use case.  I started thinking that this would be a relatively straightforward with lambda given you can now schedule lambda functions with a cron like syntax.  The full code is available here.

The first thing I wanted to do was to describe the table and write that metadata to the first line of the output file.

dyano-backup-describe

Using the api call for describeTable we can get back the structure of the table as well as configuration information such as the Read/Write Capacity.  The results of this call will look something like:

{“AttributeDefinitions”:[{“AttributeName”:”group”,”AttributeType”:”S”},{“AttributeName”:”name”,”AttributeType”:”S”}],”TableName”:”alarms”,”KeySchema”:[{“AttributeName”:”name”,”KeyType”:”HASH”}],”TableStatus”:”ACTIVE”,”CreationDateTime”:”2015-03-20T14:03:31.849Z”,”ProvisionedThroughput”:{“NumberOfDecreasesToday”:0,”ReadCapacityUnits”:1,”WriteCapacityUnits”:1},”TableSizeBytes”:16676,”ItemCount”:70,”TableArn”:”arn:aws:dynamodb:us-east-1:078742956215:table/alarms”,”GlobalSecondaryIndexes”:[{“IndexName”:”group-index”,”KeySchema”:[{“AttributeName”:”group”,”KeyType”:”HASH”}],”Projection”:{“ProjectionType”:”ALL”},”IndexStatus”:”ACTIVE”,”ProvisionedThroughput”:{“NumberOfDecreasesToday”:0,”ReadCapacityUnits”:1,”WriteCapacityUnits”:2},”IndexSizeBytes”:16676,”ItemCount”:70,”IndexArn”:”arn:aws:dynamodb:us-east-1:078742956215:table/alarms/index/group-index”}]}

Having the table metadata makes it easy to recreate the table.  It’s also worth pointing out that we use the knowledge of the provisioned ReadCapacityUnits to limit our scan queries while pulling data out of the table.  The next thing we need to do is write every item out to our backup file.  This is accomplished by scanning the table providing a callback onScan.


dynamo-backup-onscan

In this function we loop through the data items and write them out to a file.  After that we look at the LastEvaluatedKey. If it is undefined then we have scanned the entire table, otherwise we will recursively call the onScan function providing the LastEvaluatedKey as a parameter to mark the starting point for the next scan.  The data is continually shipped to s3 and compressed, this is achieved using a stream pipe.

dynamo-backup-streaming


You will have to update the bucket name to the s3 bucket in your account that you wish to store the dynamo backups in. Once the code was in place we uploaded it to lambda and used a cron schedule to run the process nightly.  For details on how to install and use this backup process please refer to the github repository.  As we move more to AWS and use more of the AWS services, we find that there are some gaps.  We have begun to log them and try to tackle them with our cross campus working group.  As we come up with solutions to these gaps we will post them, so everyone on campus can benefit.  If anyone is interested in contributing to this joint effort please email cloud-support@cornell.edu