Docker + Puppet = Win!

by Shawn Bower

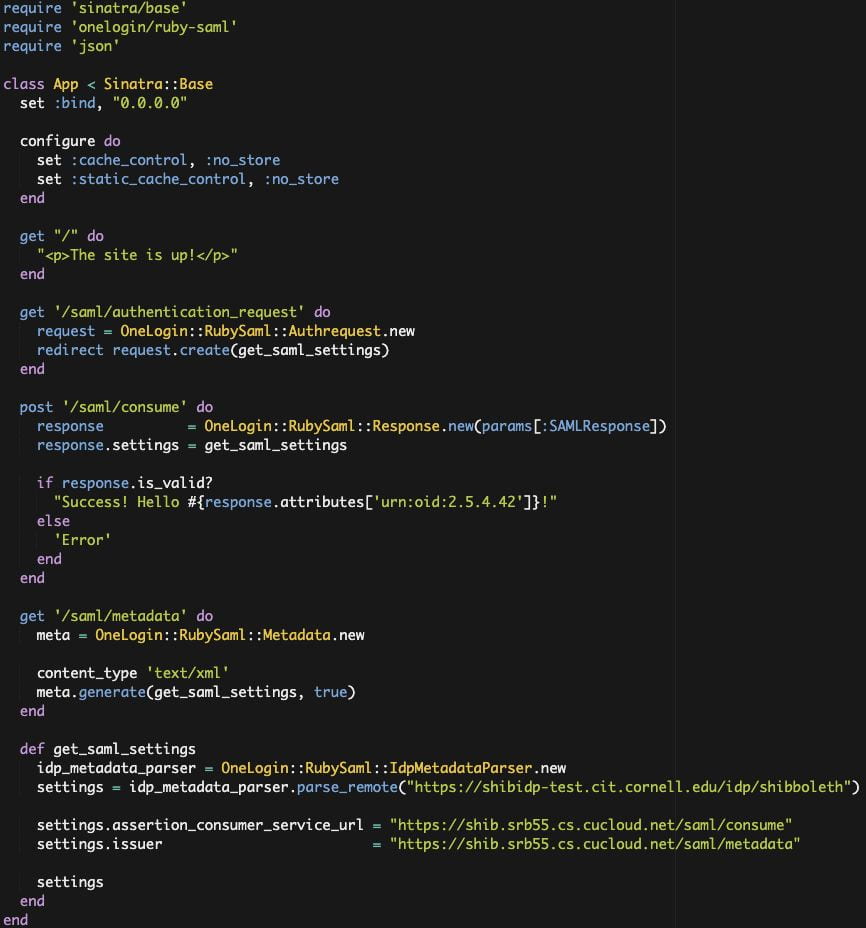
On many of our Cloudification projects we use a combination of Docker and Puppet to achieve Infrastructure as code. We use a Dockerfile to create the infrastructure; all the packages required to run the application along with the application code itself. We run puppet inside the container to put down environment specific configuration. We also use a tool called Rocker that adds some handy directives for use in our Docker file.  Most importantly Rocker adds a directive called MOUNT which is used to share volumes between builds.  This allows us to mount local disk space which is ideal for secrets which we do not want copied into the Docker image.  Rocker has to be cool so they us a default filename of Rockerfile.   Let’s take a look at a Rockerfile for one of our PHP applications, dropbox:

dorpbox-dockerfile


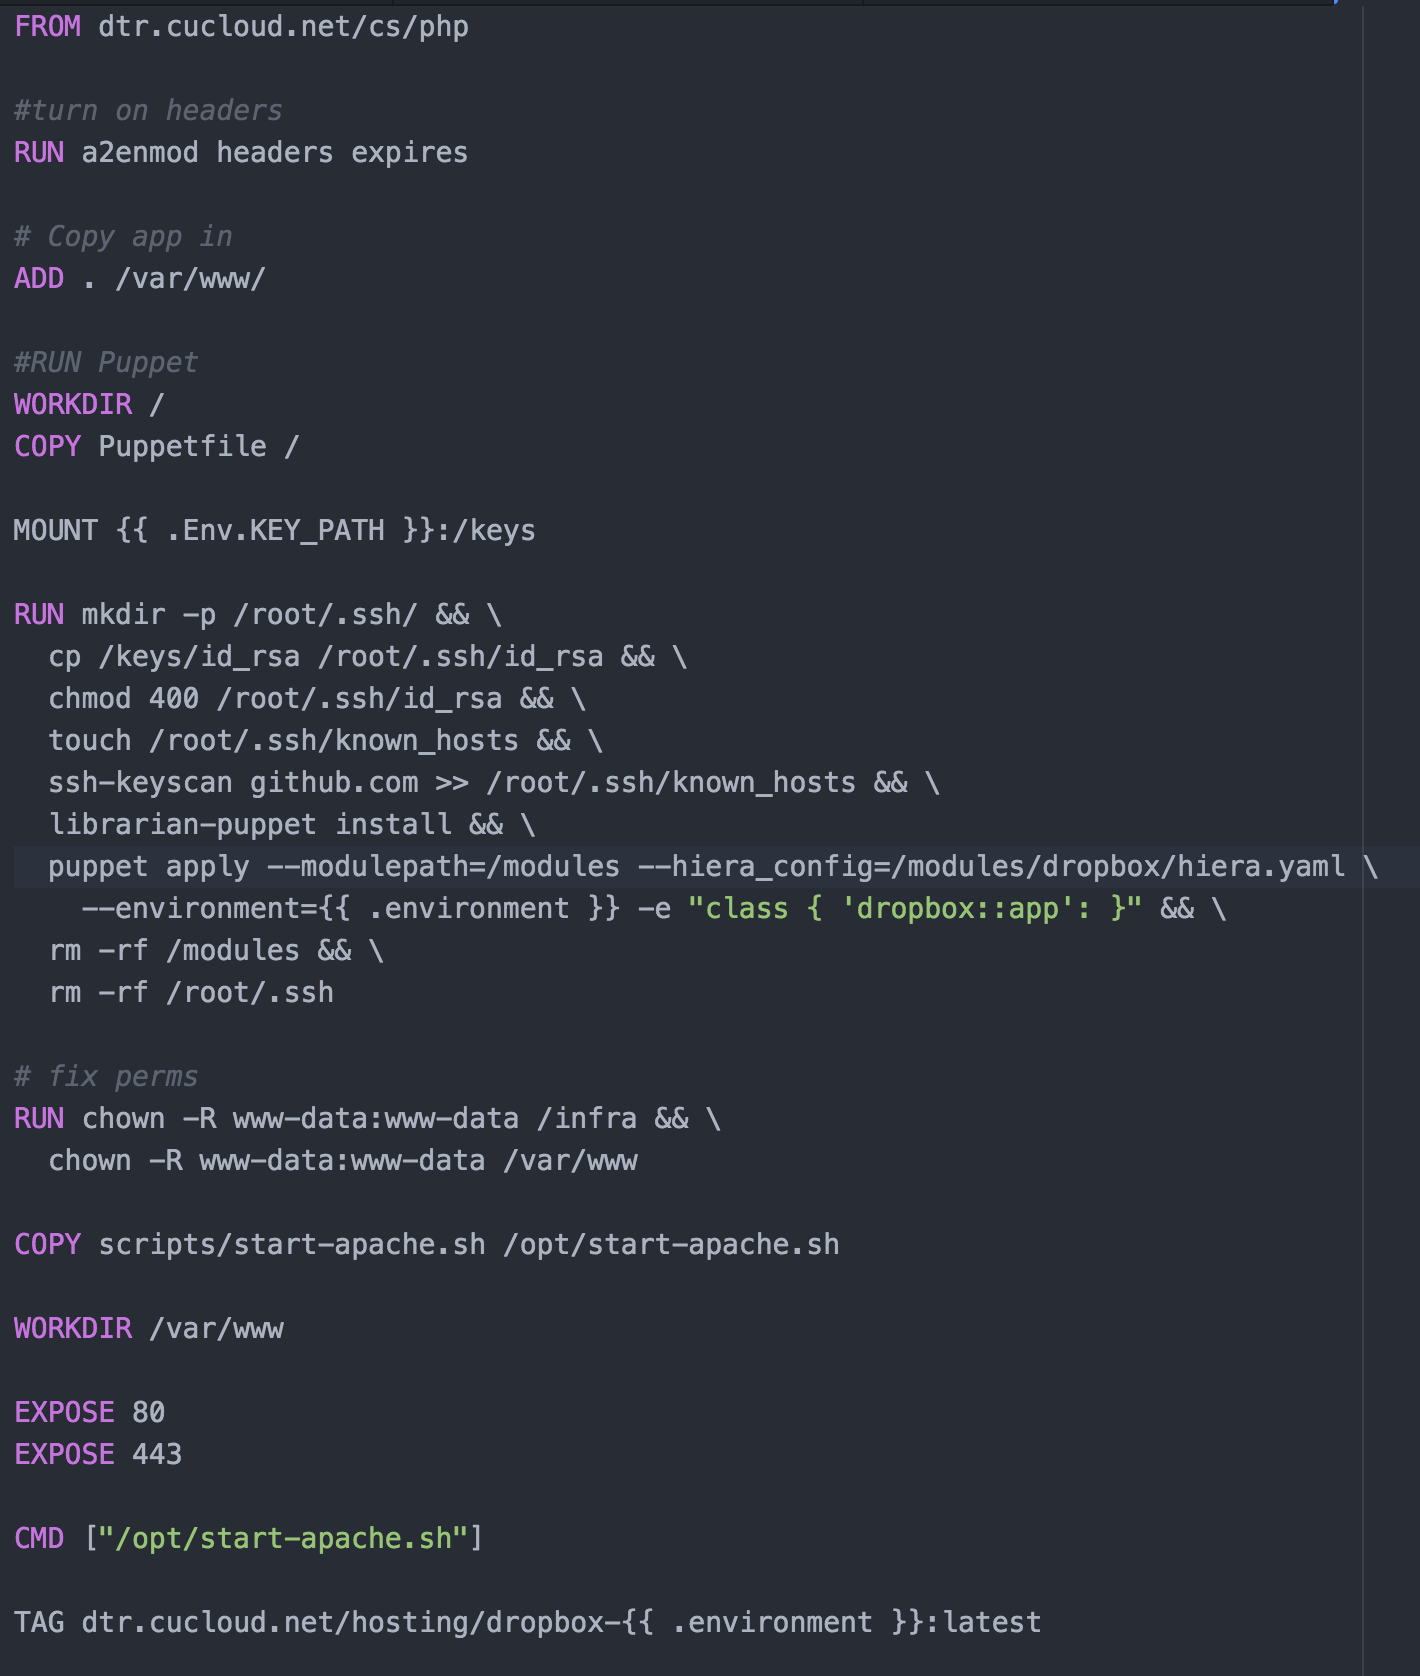
This image starts from our standard PHP image which is kept up to date a patched weekly by the Cloud Services team.  From there we enable a couple of Apache modules that are needed by this application.  Then the application is copied into the directory ‘/var/www/.’

Now we mount the a local directory that contains our ssh key and encryption keys.   After which we go into the puppet setup.  For our projects we use a masterless puppet setup which relies on the librarian puppet module.  The advantage is we do not need to run a puppet server and we can configure the node at the time we build the image.  For librarian puppet we need to use a Puppetfile, for this project is looks like this:

dropbox-puppetfile

The Puppetfile list all the modules that use wish puppet to have access to and the git path to those modules.  In our case we have a single module for the dropbox application.  Since the dropbox module is stored in a private github repository we will use ssh key we mounted earlier to access it.  In order to do this we will need to add github to our known host file.  Running the command ‘librarian-puppet install’ will read the Puppetfile and install the module into /modules.  We can then use puppet to apply the module to our image.  We can control the environment specific config to install using the “–environment” flag, you can see in our Rockerfile the variable is templated out with “{{ .environment }}”.  This will allow us to specify the environment at build time.  After puppet is run we clean up some permissions issues then copy in our image startup script.  Finally we specify the ports that should be exposed when this image is run.  The build is run with a command like “rocker -var environment=development.”

It is outside the scope of this article to detail how puppet is used, you can find details on puppet here. The puppet module is laid out like this:

dropbox-puppet-layout

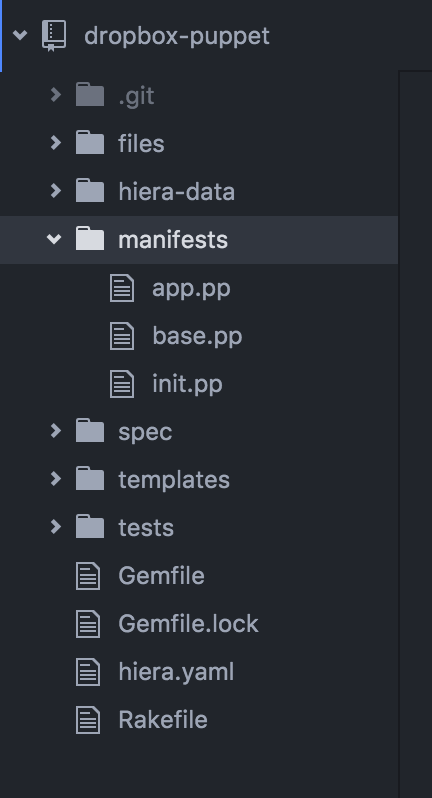
The files directory is used to store static files, hier-data is used to store our environment specific config, manifest stores the puppet manifests, spec is for spec test, templates is for storing dynamically generated files and tests is for test that are run to check for compilation errors.  Under hiera-data we will find an eyaml (encrypted yaml) file for each environment.  For instance let us look at the one for dev:

dev_eyaml

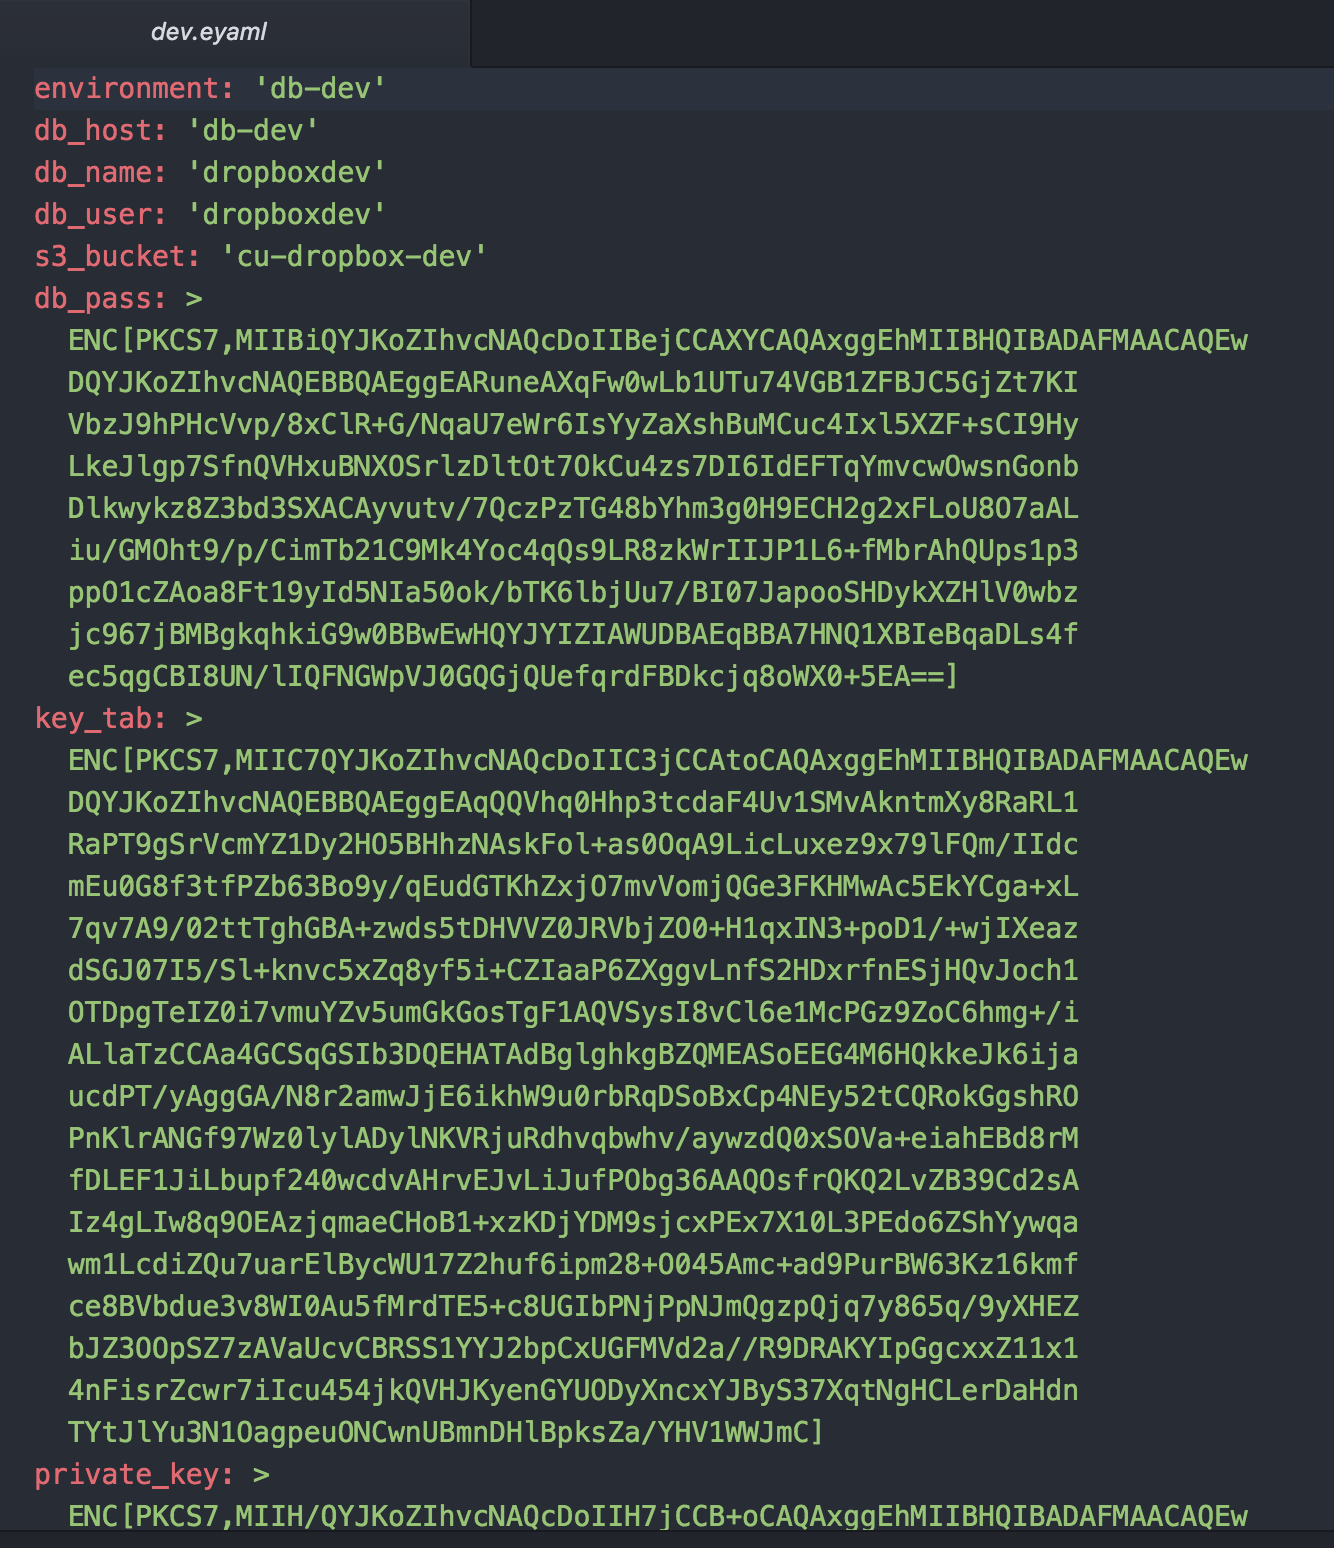
You can see that the file format is that of a typical yaml file with the exception of the fields we wish to keep secret.  These are encrypted by the hiera-eyaml plugin.  Early in the Rockerfile we mounted a “keys” folder wich contains the private key to decrypt these secrets when puppet runs.  In order for the hiera-eyaml to work correctly we have to adjust the hiera config, we store the following in our puppet project:

hiera_yaml1

The backends are the order in which to prefer files, in our case we want to give precedence to eyaml.  Under the eyaml config we have to specify where the data files live as well as where to find the encryption keys.  When we run the pupp apply we have to specify the path to this config file with the “–hiera_config” flag.

With this process we can use the same basic infrastructure to build out multiple environments for the dropbox application.  Using the hiera-eyaml plugin we can store the secrets in our puppet repository safely in github as they are encrypted.  Using Rocker we can keep our keys out of the image which limits the exposure of secrets if this image were to be compromised.  Now we can either build this image on the host it will run or push it to our private repository for later distribution.  Given that the images contains secrets like the database password you should give careful consideration on where the image is stored.

Using Cornell Shibboleth for Authentication in your Custom Application.

by Shawn Bower

Introduction

When working on your custom application at Cornell the primary option for integrating authentication with the Cornell central identity store is using Cornell’s Shibboleth Identity Provider (IDP).  Using Shibboleth can help reduce the complexity of your infrastructure and as an added bonus you can enable access to your site to users from other institutions that are members of the InCommon Federation.

How Shibboleth Login Works

Key Terms

  • Service Provider (SP) – requests and obtains an identity assertion from the identity provider. On the basis of this assertion, the service provider can make an access control decision – in other words it can decide whether to perform some service for the connected principal.
  • Identity Provider (IDP) – also known as Identity Assertion Provider, is responsible for (a) providing identifiers for users looking to interact with a system, and (b) asserting to such a system that such an identifier presented by a user is known to the provider, and (c) possibly providing other information about the user that is known to the provider.
  • Single Sign On (SSO) – is a property of access control of multiple related, but independent software systems.
  • Security Assertion Markup Language (SAML) – is an XML-based, open-standard data format for exchanging authentication and authorization data between parties, in particular, between an identity provider and a service provider.

samlsp

  1. A user request a resource from your application which is acting as a SP
  2. Your application constructs an authentication request to the Cornell IDP an redirects the user for login
  3. The user logins in using Cornell SSO
  4. A SAML assertion is sent back to your application
  5. Your application handles the authorization and redirects the user appropriately.

Shibboleth Authentication for Your Application

Your application will act as a service provider.  As an example I have put together a Sinatra application in ruby that can act as a service provider and will use the Cornell Test Shibboleth IDP.  The example source can be found here.  For this example I am using the ruby-saml library provided by One Login, there are other libraries that are compatible with Shibboleth such as omniauth.  Keep in mind that Shibboleth is SAML 2.0 compliant so any library that speaks SAML should work.  One reason I choose the ruby-saml library is that the folks at One Login provide similar libraries in various other languages, you can get more info here.  Let’s take a look at the code:

First it is important to configure the SAML environment as this data will be needed to send and receive information to the Cornell IDP.  We can auto configure the IDP settings by consuming the IDP metadata.  We then have to provide an endpoint for the Cornell IDP to send the SAML assertion to,  in this case I am using “https://shib.srb55.cs.cucloud.net/saml/consume.”  We also need to provide the IDP with an endpoint that allows it to consume our metadata.

We will need to create an endpoint that contains the metadata for our service provider.  With OneLogin::RubySaml this is super simple as it will create it based on the SAML settings we configured earlier.  We simply create “/saml/metadata” which will listen for get request and provided the auto generate metadata.

Next lets create an endpoint in our application that will redirect the user to the Cornell IDP.  We create “/saml/authentication_request” which will listen for get requests and then use the  OneLogin::RubySaml to create an authentication request.  This is done by reading the  SAML settings which include information on the IDP’s endpoints.

Then we need a call back hook that the IDP will send the SAML assertion to after the user has authenticated.  We create “/saml/consume” which will listen for a post from the IDP.  If we receive a valid response from the IDP then we will create a page that will display a success message along with the first name of the authenticate user.  You might be wondering where “urn:oid:2.5.4.42” comes from.  The information returned in the SAML assertion will contain attributes agreed upon by InCommon as well as some attributes provided by Cornell.  The full list is:

AttributeNameInEnterpriseDirectory
AttributeNameInSAMLAssertion
edupersonprimaryaffiliation urn:oid:1.3.6.1.4.1.5923.1.1.1.5
commonName urn:oid:2.5.4.3
eduPersonPrincipalName (netid@cornell.edu) urn:oid:1.3.6.1.4.1.5923.1.1.1.6
givenName (first name) urn:oid:2.5.4.42
surname(last name) urn:oid:2.5.4.4
displayName urn:oid:2.16.840.1.113730.3.1.241
uid (netid) urn:oid:0.9.2342.19200300.100.1.1
eduPersonOrgDN urn:oid:1.3.6.1.4.1.5923.1.1.1.3
mail urn:oid:0.9.2342.19200300.100.1.3
eduPersonAffiliation urn:oid:1.3.6.1.4.1.5923.1.1.1.1
eduPersonScopedAffiliation urn:oid:1.3.6.1.4.1.5923.1.1.1.9
eduPersonEntitlement urn:oid:1.3.6.1.4.1.5923.1.1.1.7

Conclusion

We covered the basic concepts of using Shibboleth and SAML creating a simple demo application.  Shibboleth is a great choice when looking at architecting your custom application in the cloud, as it drastically simplifies the authentication infrastructure while still using Cornell SSO.  An important note is that in this example we used the Cornell Test Shibboleth IDP which allows us to create an anonymous service provider.  When moving your application into production you will need to register your service provider from https://shibrequest.cit.cornell.edu.  For more information about Shibboleth at Cornell please take a look at IDM’s Confluence page.


This article was updated May 2021 to remove outdated information.

Benchmarking Network Speeds for Traffic between Cornell and “The Cloud”

by Paul Allen

As Cornell units consider moving various software and services to the cloud, one of the most common questions the Cloudification Services Team gets is “What is the network bandwidth between cloud infrastructure and campus?” Bandwidth to cloud platforms like Amazon Web Services and Microsoft Azure seems critical now, as units are transitioning operations. It’s during that transition that units will have hybrid operations–part on-premise and part in-cloud–and moving or syncing large chunks of data is common.

(more…)

Using Shibboleth for AWS API and CLI access

by Shawn Bower


Update 2019-11-06: We now recommend using awscli-login to obtaining temporary AWS credentials via SAML. See our wiki page Access Keys for AWS CLI Using Cornell Two-Step Login (Shibboleth)


This post is heavily based on “How to Implement Federated API and CLI Access Using SAML 2.0 and AD FS” by Quint Van Derman, I have used his blueprint to create a solution that works using Shibboleth at Cornell.

TL;DR

You can use Cornell Shibboleth login for both API and CLI access to AWS.  I built docker images that will be maintained by the Cloud Services team that can be used for this and it is as simple as running the following command:

docker run -it --rm -v ~/.aws:/root/.aws dtr.cucloud.net/cs/samlapi

After this command has been run it will prompt you for your netid and password.  This will be used to login you into Cornell Shibboleth. You will get a push from DUO.  Once you have confirmed the DUO notification, you will be prompted to select the role you wish to use for login, if you have only one role it will choose that automatically.  The credentials will be placed in the default credential file (~/.aws/credentials) and can be used as follows:

aws --profile saml s3 ls

NOTE: In order for the script to work you must have at least two roles, we can add you to a empty second role if need be.  Please contact cloud-support@cornell.edu if you need to be added to a role.

If there are any problems please open an issue here.

Digging Deeper

All Cornell AWS accounts that are setup by the Cloud Services team are setup to use Shibboleth for login to the AWS console. This same integration can be used for API and CLI access allowing folks to leverage AD groups and aws roles for users. Another advantage is this eliminates the need to monitor and rotate IAM access keys as the credentials provided through SAML will expire after one hour. It is worth noting the non human user ID will still have to be created for automating tasks where it is not possible to use ec2 instance roles.

When logging into the AWS management console the federation process looks likesaml-based-sso-to-console.diagram

  1. A user goes to the URL for the Cornell Shibboleth IDP
  2. That user is authenticated against Cornell AD
  3. The IDP returns a SAML assertion which includes your roles
  4. The data is posted to AWS which matches roles in the SAML assertion to IAM roles
  5.  AWS Security Token Services (STS) issues a temporary security credentials
  6. A redirect is sent to the browser
  7. The user is now in the AWS management console

In order to automate this process we will need to be able to interact with the Shibboleth endpoint as a browser would.  I decided to use Ruby for my implementation and typically I would use a lightweight framework like ruby mechanize to interact with webpages.  Unfortunately the DUO integration is done in an iframe using javascript, this makes things gross as it means we need a full browser. I decided to use selenium web driver to do the heavy lifting. I was able to script the login to Shibboleth as well as hitting the button for a DUO push notification:
duo-push

In development I was able to run this on mac just fine but I also realize it can be onerous to install the dependencies needed to run selenium web driver.  In order to make the distribution simple I decided to create a docker images that would have everything installed and could just be run.  This meant I needed a way to run selenium web driver and firefox inside a container.  To do this I used Xvfb to create a virtual frame buffer allowing firefox to run with out a graphics card.  As this may be useful to other projects I made this a separate image that you can find here.  Now I could create a Dockerfile with the dependencies necessary to run the login script:

saml-api-dockerfile

The helper script starts Xvfb and set the correct environment variable and then launches the main ruby script.  With these pieces I was able to get the SAML assertion from Shibboleth and the rest of the script mirrors what Quint Van Derman had done.  It parses the assertion looking for all the role attributes.  Then it presents the list of roles to the user where they can select which role they wish to assume.  Once the selection is done a call is made to the Simple Token Service (STS) to get the temporary credentials and then the credentials are stored in the default AWS credentials file.

Conclusion

Now you can manage your CLI and API access the same way you manage your console access. The code is available and is open source so please feel free to contribute, https://github.com/CU-CloudCollab/samlapi. Note I have not tested this on Windows but it should work if you change the volume mount to the default credential file on Windows. I can see the possibility to do future enhancements such as adding the ability to filter the role list before display it, so keep tuned for updates. As always if you have any questions with this or any other Cloud topics please email cloud-support@cornell.edu.