Spring is by far the busiest time for gardeners. Between selecting plants, starting seeds, and preparing beds, we often forget about what’s basic: the soil. Suddenly remembering, in April gardeners furiously submit handfuls of soil to our Horticulture Diagnostic Lab for testing, expecting immediate turnaround, and then realize, “What!? It takes how long for limestone to change the pH of my soil!?”
This is why autumn is the perfect time to start preparing your gardens for the growing season ahead. Submitting soil samples to us now allows you enough time to collect your samples properly, understand the test results, and if you need to make amendments to the soil, time for them to activate before next spring.

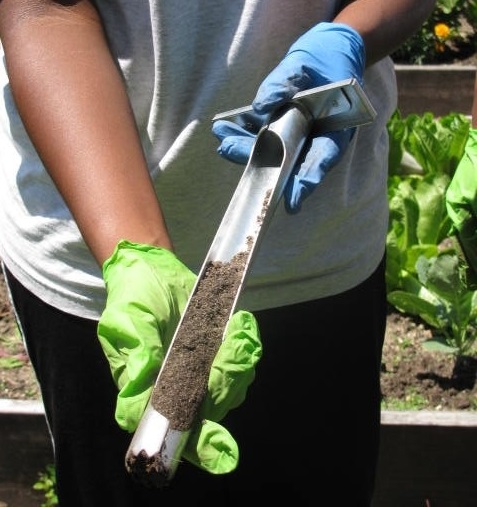
Using a soil auger, shown above, makes collecting samples easy, but a trowel will work just as well. Photo by Robin Simmen.
Maintaining the proper soil pH is just as important for maximum crop yields as fertilizing, watering, and pest control. The decision to add lime to raise the soil pH and the amount to apply must be based on a soil pH test and the crop species to be grown. Do not guess. Some plants, like rhododendrons, azaleas, and blueberries as well as other members of the Ericaceae family grow best in acid soil (pH 5.0). Most vegetable garden plants grow best in soil with a pH in the 6.2 range. The recommended range for a lawn is between 6.0 and 7.0.
Instructions for taking a soil sample
First determine how many samples to take. Different gardens/beds, lawns, areas with different soil types, places where such amendments as limestone were added, areas with plants having different pH requirements, and good/bad areas should be sampled separately as described below:
- In gardens or areas planned for new plantings where the soil will be turned under or rototilled, individual samples should be taken from the upper 6 to 8 inches of soil.
- In established plantings or lawns where the soil won’t be turned under, individual samples should be taken from the upper 3 inches of soil.
- Each soil sample should be comprised of 5 to 10 individual samples obtained by walking back and forth diagonally across the area to be sampled.
- Use a trowel to dig a small hole to the desired depth. Remove a slice of soil from the entire side of the hole and place this in a clean plastic container. Repeat this procedure at each of your 5 to 10 random spots, and place the soil from these spots in the same container, discarding any stones, grass, or other debris.
- Next, remove two 8-ounce cupfuls of the soil in this container and place them in a plastic bag. Secure the bag. This is your soil sample for that area. Mark the outside of the bag with an identification (i.e. #1, #2, or “A”, “B”, or “East”, “West”). Keep the identification simple.
- Repeat this entire procedure for each additional garden, landscape bed, and/or lawn area you wanted tested.
You can find soil testing submission forms to accompany your samples on our website at http://ccesuffolk.org/agriculture/horticulture-diagnostic-labs. The cost of a soil pH test is $5 per sample; if you submit five or more samples, they cost $3.50 each. Mail or drop off your samples at 423 Griffing Avenue, Riverhead, NY 11901. Our office hours are Monday through Friday 8:30 a.m. to 4:30 p.m.
Sandra Vultgaggio is Horticulture Consultant for CCE Suffolk. She can be reached by email at sib7@cornell.edu or by phone at 631-727-7850 x387.
